Author

Steven

Browsing

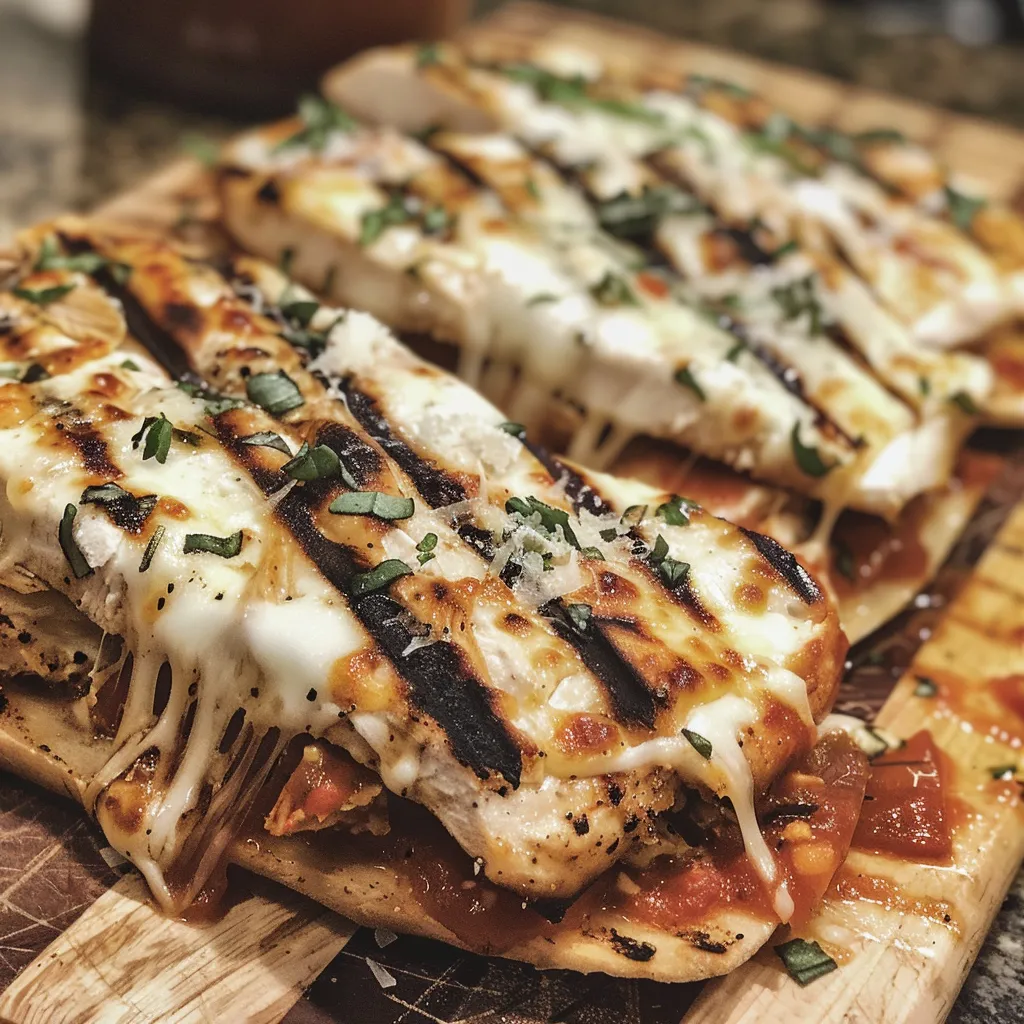
Welcome to your new favorite weeknight recipe! These Grilled Lemon Chicken Wraps are not just easy to make; they’re bursting with flavor and can transform your dinner routine into something exciting. With a delightful combination of zesty lemon, tender chicken, and a creamy garlic sauce, this recipe is perfect for busy evenings when you want something quick yet impressive. Let’s dive into why you’ll love this recipe and how to make it a staple in your kitchen.

Why You’ll Love This Recipe

  • Quick and Easy: This recipe comes together in about 30 minutes, making it ideal for those busy weeknights when time is precious.
  • Flavor Explosion: The marinade infuses the chicken with bright, zesty flavor, while the spicy garlic sauce adds a creamy kick that you won’t forget.
  • Versatile: Customize your wraps with your favorite toppings, adjust the spice level, or even switch up the flatbread.
  • Healthy Choice: Packed with lean protein and fresh veggies, these wraps are a nutritious option that doesn’t compromise on taste.
  • Meal Prep Friendly: Perfect for making ahead of time; just grill the chicken and assemble when you’re ready to eat!

Ingredients You’ll Need

Gather these ingredients for your delicious wraps:

  • 1 pound skinless, boneless chicken breasts: About 2 large breasts, cubed into bite-size pieces.
  • Olive oil: For marinating and grilling.
  • 2 cloves garlic: Pressed through a garlic press for maximum flavor.
  • Zest of 1 lemon: About 1 tablespoon adds freshness.
  • 1 tablespoon lemon juice: Brightens the marinade.
  • 1 teaspoon salt: For seasoning.
  • Pinch or two of black pepper: To taste.
  • 1/2 teaspoon dried oregano, ground cumin, coriander, and paprika: For a lovely depth of flavor.
  • 4 middle eastern-style flatbreads: You can use pita bread as well.
  • Arugula greens and sliced tomatoes: Fresh toppings to balance the flavors.

Making the Creamy Garlic Sauce

This sauce is what elevates your wraps to the next level. Here’s what you’ll need:

  • 1/2 cup mayonnaise: A creamy base for the sauce.
  • 1/2 cup sour cream or full-fat plain Greek yogurt: For tanginess and creaminess.
  • 3 cloves garlic: Pressed for flavor.
  • 1 tablespoon tahini: Adds a nutty undertone.
  • 2 to 3 teaspoons sriracha: Adjust according to your spice preference.
  • 1 teaspoon salt: To enhance the flavors.
  • Pinch black pepper and cayenne pepper: For an extra kick!
  • 1/2 teaspoon lemon juice: To tie it all together.

How to Make Grilled Lemon Chicken Wraps: Step-by-Step

Juicy lemon chicken wrapped in flatbread, topped with fresh greens and sliced tomatoes.

Let’s break down the steps for making these delicious wraps:

  1. Marinate the Chicken: Place the cubed chicken in a medium-sized bowl. Drizzle in about 2 tablespoons of olive oil. Add the garlic, lemon zest, lemon juice, salt, pepper, oregano, cumin, coriander, and paprika. Toss everything together using your hands, ensuring the chicken is well coated. Let it marinate for at least 20 minutes, or overnight for deeper flavor.
  2. Prepare the Garlic Sauce: In another bowl, combine the mayonnaise, sour cream or Greek yogurt, pressed garlic, tahini, sriracha, salt, black pepper, cayenne pepper, and lemon juice. Whisk until smooth. Store in the fridge until ready to use.
  3. Grill the Chicken: Heat a grill pan over medium-high heat (or use an outdoor grill). Drizzle a little olive oil in the pan. Once hot, add the marinated chicken, cooking for about 6-8 minutes. Turn occasionally until charred and cooked through. Remove from the grill and let it rest for 5-10 minutes.
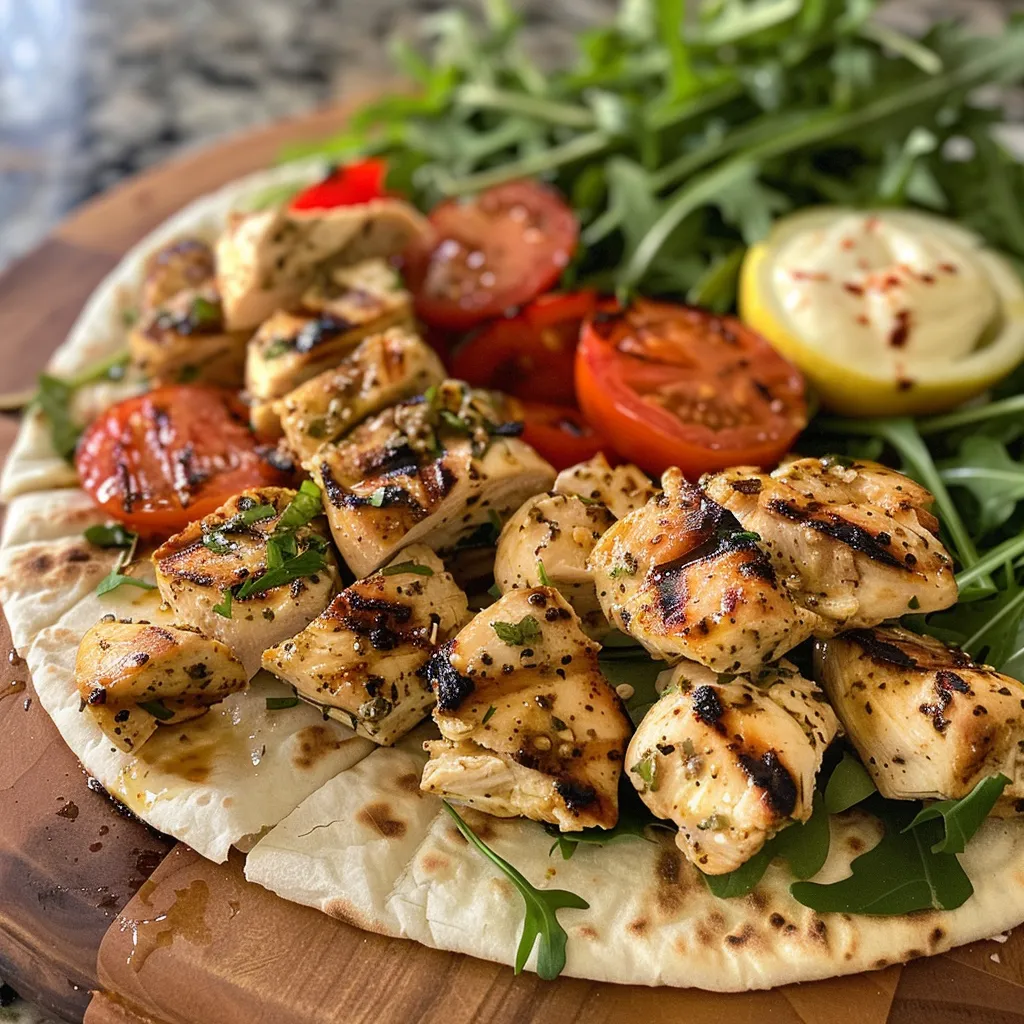
  4. Assemble Your Wrap: Start with a flatbread. Add a drizzle of the spicy garlic sauce, a handful of arugula, a couple of tomato slices, and a skewer’s worth of grilled chicken. Drizzle more sauce on top, then fold the sides towards the middle to create your wrap.
  5. Serve: Enjoy your delicious wraps immediately, or wrap them in parchment paper for easy eating on the go!

Pro Tips for the Best Grilled Lemon Chicken Wraps

  • Marinate Longer: If time allows, marinate the chicken overnight for a deeper flavor.
  • Use Fresh Ingredients: Fresh herbs and spices will elevate the taste significantly.
  • Don’t Overcook the Chicken: Aim for an internal temperature of 165°F to prevent dryness.
  • Experiment with Flatbreads: Try different types, like whole wheat or garlic naan, to switch things up.
  • Customize the Sauce: Feel free to adjust the spiciness by adding more or less sriracha.
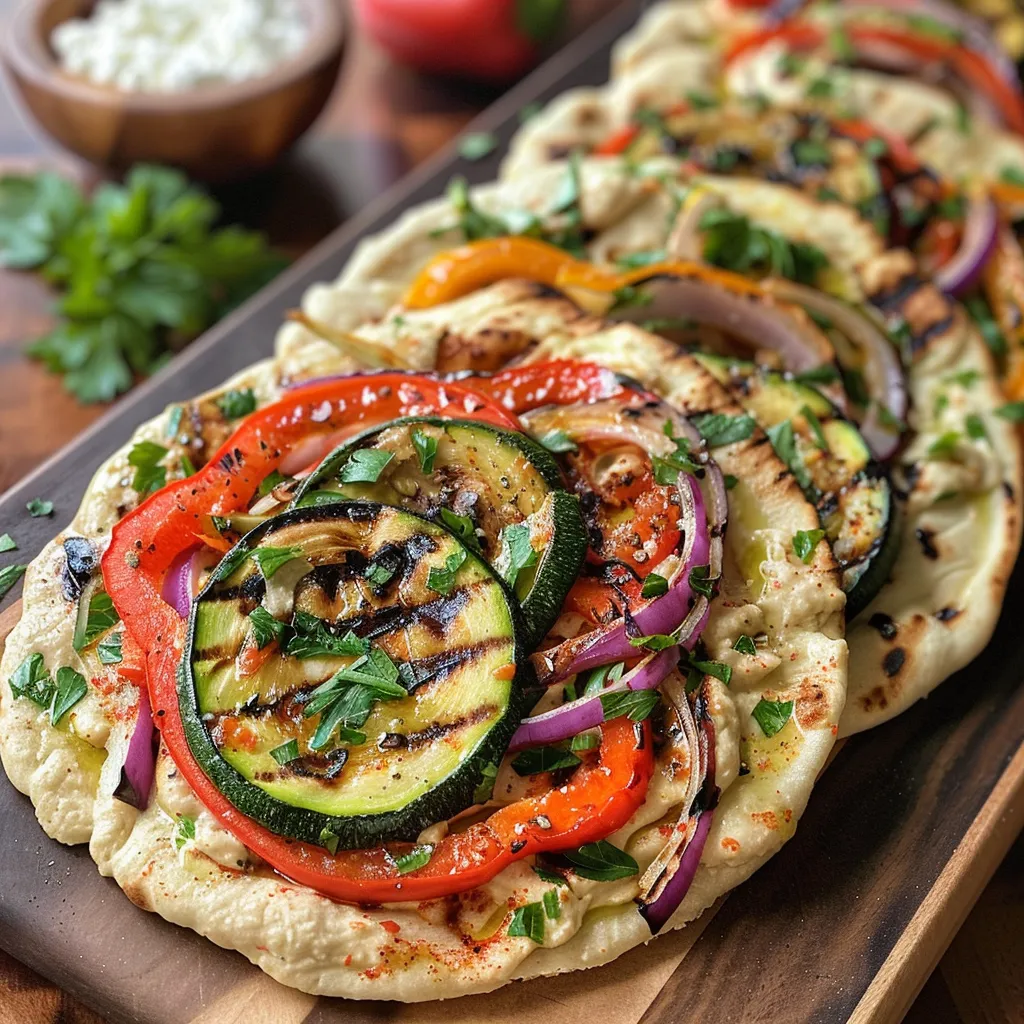
  • Grill Vegetables: Add grilled veggies like bell peppers or zucchini for extra nutrition.
  • Use a Meat Thermometer: This ensures perfectly cooked chicken every time.
  • Make Ahead: The chicken can be grilled in advance and stored for quick meals during the week.

Common Mistakes to Avoid

  • Not Marinating Long Enough: This can lead to bland chicken. Always aim for at least 20 minutes or longer.
  • Skipping the Sauce: The creamy garlic sauce is essential; don’t skip it!
  • Overcrowding the Grill: Give the chicken pieces space to ensure they cook evenly.
  • Using Dried Herbs Instead of Fresh: Fresh herbs provide a better flavor profile; consider growing your own!

Variations & Substitutions

Feel free to switch things up with these variations:

  • Spicy Chicken: Add more sriracha to the marinade for a spicier kick.
  • Vegetarian Option: Replace chicken with grilled tofu or tempeh, marinated the same way.
  • Different Sauces: Try a yogurt-based tzatziki or a balsamic glaze for a different flavor twist.
  • Fresh Herbs: Incorporate fresh parsley or cilantro into your wraps for brightness.

Storing and Make-Ahead Instructions

If you want to prepare ahead, here’s how:

  • Storing Grilled Chicken: Once cooked, store any leftover chicken in an airtight container in the fridge for up to 3 days.
  • Make Ahead Sauce: The garlic sauce can be made up to 3 days in advance. Just give it a stir before serving.
  • Freezing Chicken: You can freeze marinated chicken before grilling; just thaw it in the fridge overnight before cooking.

Frequently Asked Questions (FAQ)

  • Can I use frozen chicken? Yes, just make sure to thaw it completely before marinating and grilling.
  • What can I serve with these wraps? A fresh salad or crispy sweet potato fries complement these wraps perfectly.
  • Can I make these wraps gluten-free? Absolutely! Use gluten-free flatbreads or lettuce wraps instead.
  • How spicy is the sauce? The spice level is adjustable; feel free to add more or less sriracha based on your preference.
  • Can I grill the chicken indoors? Yes, a grill pan on your stovetop works great!
  • How long does grilled chicken last in the fridge? Properly stored, it will last for about 3 days.
  • What kind of flatbread do you recommend? Middle eastern-style flatbreads like pita or lavash are ideal, but feel free to experiment!
  • Can I use other proteins? Yes, this marinade works well with shrimp, pork, or even grilled vegetables!

Nutrition Tips and Dietary Adaptations

These wraps are not only delicious but also flexible in terms of dietary needs:

  • Low-Calorie Option: Use less mayo and sour cream by substituting with Greek yogurt.
  • High-Protein: Add legumes like chickpeas or lentils into your wraps for an extra protein boost.
  • Low-Carb: Opt for lettuce wraps instead of flatbreads.
  • Vegan Version: Substitute chicken with marinated tofu and use vegan mayo in the sauce.

Equipment Recommendations

Here’s what you’ll need to make this recipe:

  • Grill Pan or Outdoor Grill: For perfectly charred chicken.
  • Medium-Sized Bowls: For marinating and mixing sauces.
  • Whisk: To mix your garlic sauce smoothly.
  • Meat Thermometer: To ensure your chicken is cooked perfectly.
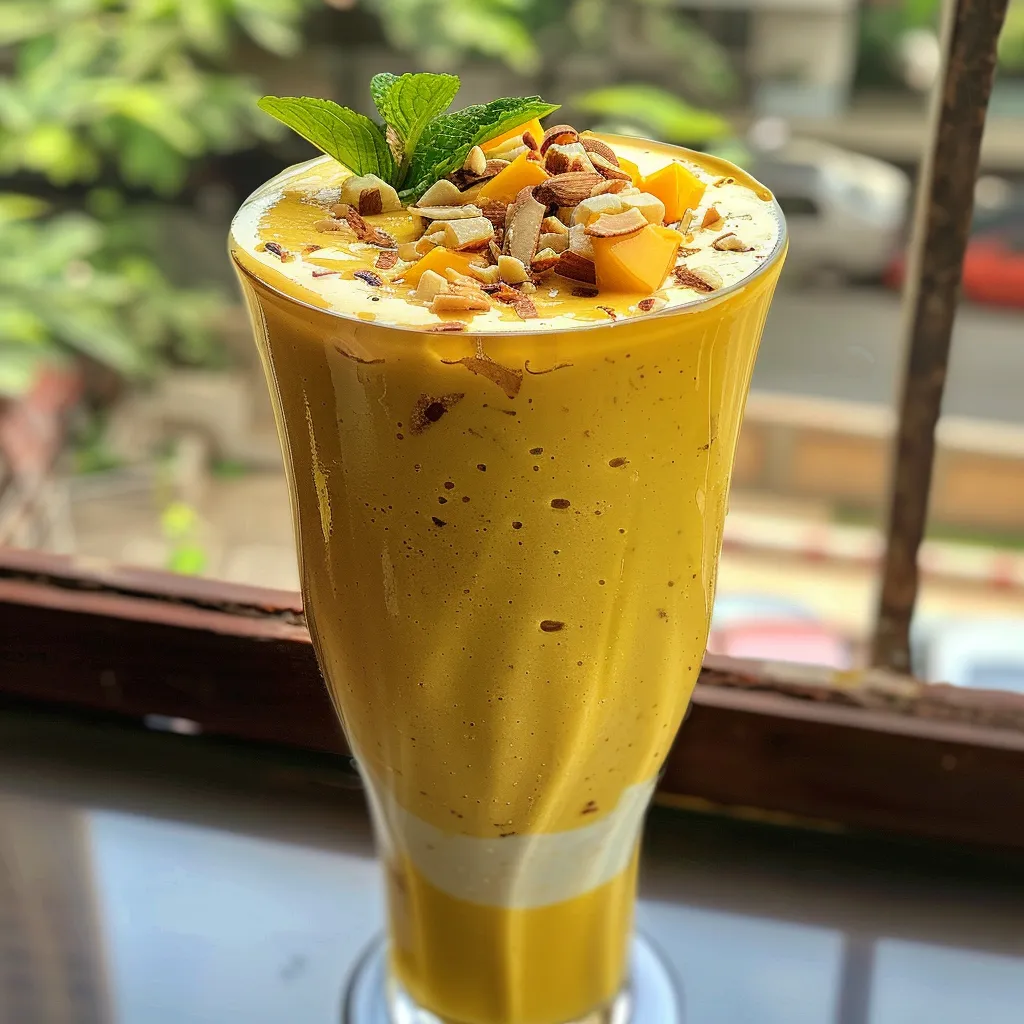
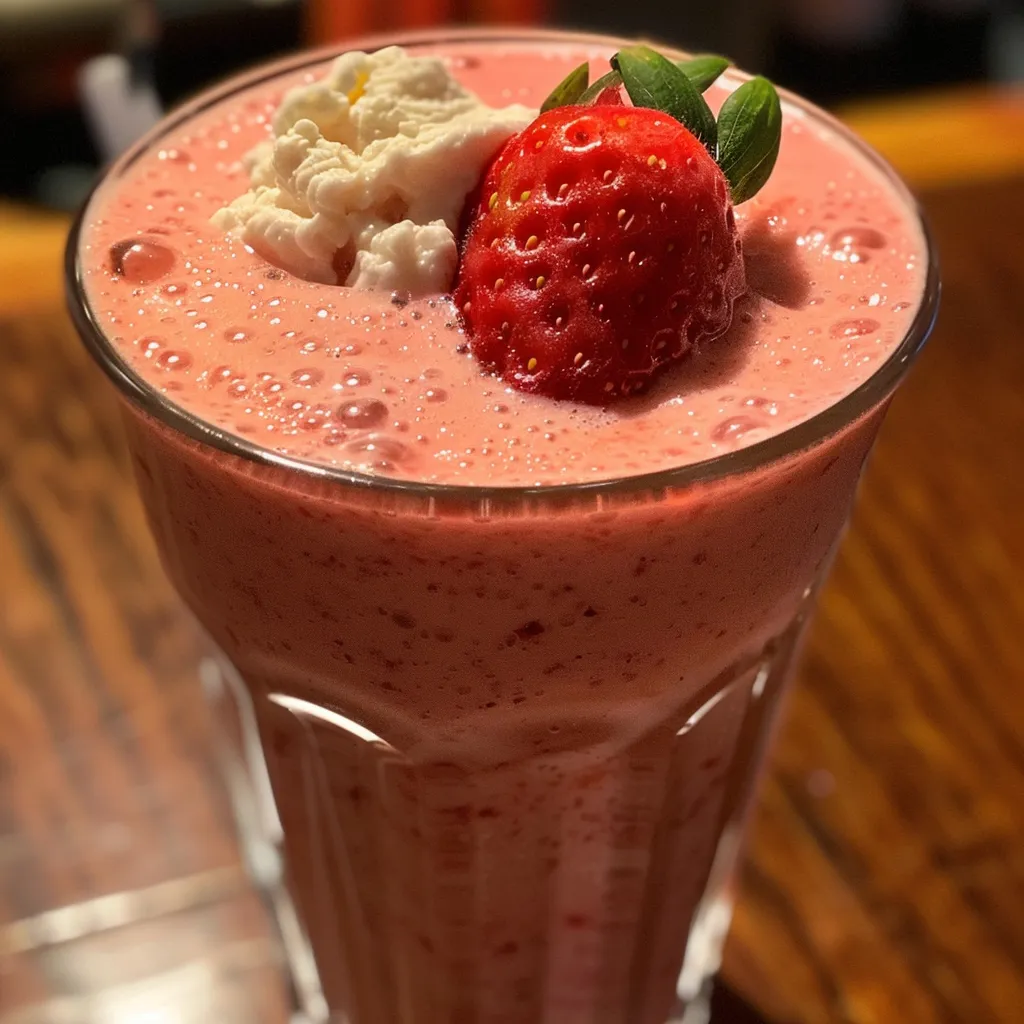
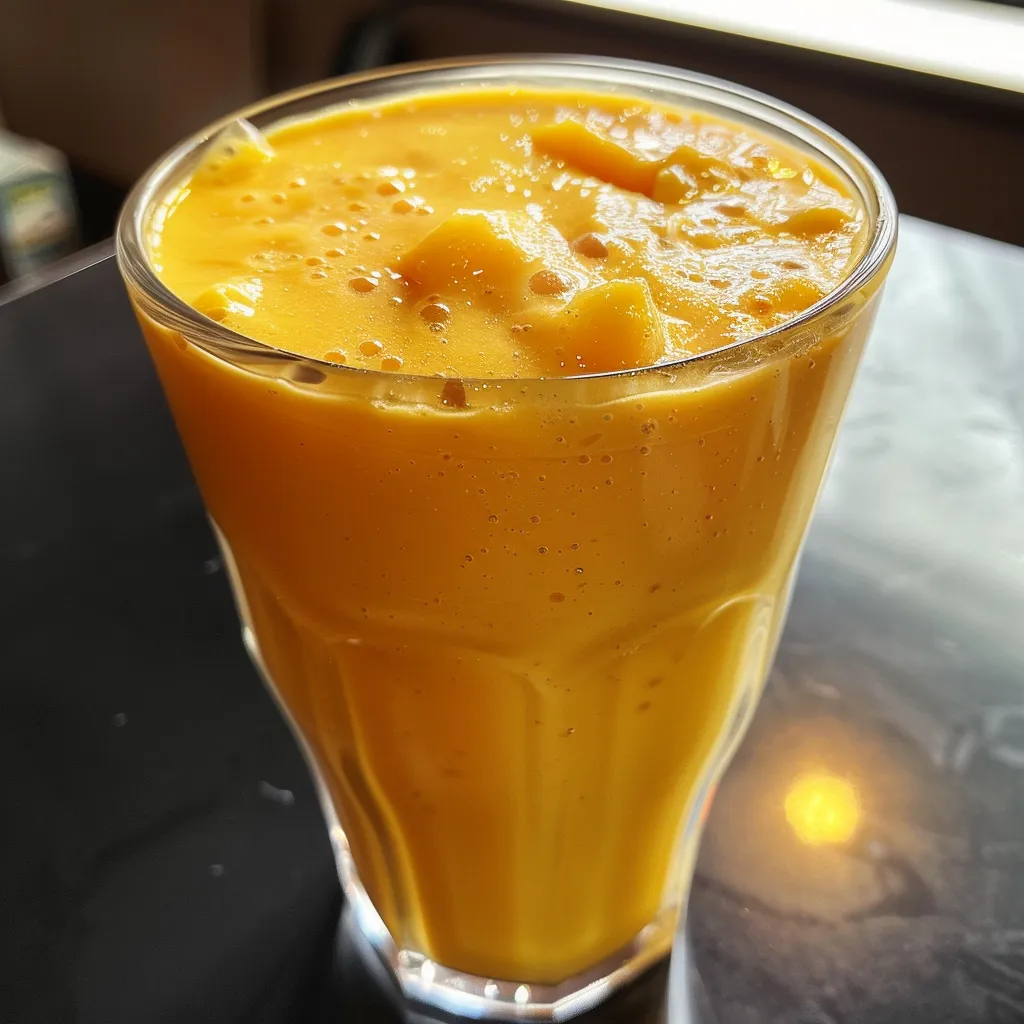
Serving Suggestions

Make your meal complete with these serving ideas:

  • Fresh Salad: A simple side salad with cucumbers and feta pairs beautifully.
  • Smoothie: A light, refreshing smoothie can be a great drink option.
  • Chips: Serve with baked tortilla chips and a salsa for a crunchy side.
  • Fruit: Fresh fruit salad can add a sweet touch to your meal.

Conclusion

These Deliciously Simple Grilled Lemon Chicken Wraps are a fantastic addition to your weeknight dinner lineup. With their vibrant flavors and ease of preparation, they’ll quickly become a family favorite. Remember, cooking is all about enjoying the process and experimenting with flavors, so don’t hesitate to make this recipe your own. Thank you for joining me in the kitchen today, and happy cooking!

Grilled Lemon Chicken Flatbread Wraps

Prep Time 20 minutes
Cook Time 10 minutes
Total Time 30 minutes
Servings 4 servings
Calories 550
Delicious grilled chicken wrapped in flatbread with fresh greens, tomatoes, and a spicy garlic sauce for a flavorful meal.

Ingredients

Chicken

  • 1 pound skinless, boneless chicken breasts (about 2 large breasts, cubed)
  • 2 cloves garlic (pressed)
  • 1 tablespoon lemon zest (about 1 tablespoon)
  • 1 tablespoon lemon juice
  • 1 teaspoon salt
  • a pinch black pepper
  • 0.5 teaspoon dried oregano
  • 0.5 teaspoon ground cumin
  • 0.25 teaspoon coriander
  • 0.25 teaspoon paprika

Flatbreads

  • 4 pieces Middle Eastern-style flatbreads (or pita bread)

Greens and Vegetables

  • to taste Arugula greens
  • to taste Sliced tomatoes

Spicy Garlic Sauce

  • 0.5 cup mayonnaise
  • 0.5 cup sour cream or Greek yogurt (full-fat, plain)
  • 3 cloves garlic (pressed)
  • 1 tablespoon tahini
  • 2 teaspoons sriracha (adjust to taste)
  • 1 teaspoon salt
  • a pinch black pepper
  • a pinch cayenne pepper (adjust to taste)
  • 0.5 teaspoon lemon juice

Instructions 

  • Marinate the chicken with olive oil, garlic, lemon zest, lemon juice, salt, pepper, oregano, cumin, coriander, and paprika for 20 minutes or overnight.
  • Whisk together all ingredients for the spicy garlic sauce until smooth; set aside.
  • Skewer the marinated chicken and grill over medium-high heat for 6-8 minutes, turning until charred and cooked through. Rest for 5-10 minutes, then remove from skewers.
  • Spread spicy garlic sauce on flatbreads, add greens, sliced tomatoes, and lemon chicken. Drizzle more sauce if desired, then fold into wraps.

Notes

Use water-soaked skewers to prevent burning and adjust spice levels to your preference.
Calories: 550kcal
Cost: $15
Course: Main Course
Cuisine: Middle Eastern
Keyword: Chicken, flatbread, Grilled

Welcome to Your New Favorite Recipe!

Are you ready to indulge in a delightful baking adventure? Today, we’re diving into the world of mini banana chocolate chip muffins. This easy-to-make recipe combines the natural sweetness of overripe bananas with the rich flavor of chocolate chips, creating a delightful treat that everyone will love. Whether you’re hosting a brunch, looking for a quick snack, or just want to enjoy a cozy baking session at home, these muffins are sure to satisfy your cravings!

Why You’ll Love This Recipe

Here are five irresistible reasons to get excited about this recipe:

  • Quick and Easy: You can whip up these muffins in less than 30 minutes, from mixing to baking!
  • Perfectly Portion-Controlled: Their mini size makes it easy to enjoy just one—or a few—without feeling guilty.
  • Great Use of Overripe Bananas: This recipe is a delicious solution for those brown bananas sitting on your counter.
  • Moist and Chocolatey: Each bite is packed with moisture and a burst of chocolate goodness, making them irresistible!
  • Versatile Treat: Enjoy these muffins for breakfast, as a snack, or even as a dessert!

Ingredients You’ll Need

Let’s gather our ingredients! Here’s what you need for these mini banana chocolate chip muffins:

  • 1/2 cup unsalted butter, melted
  • 1/2 cup golden or granulated sugar
  • 1 large egg
  • 1/2 teaspoon vanilla extract
  • 1 cup all-purpose flour
  • 1/2 teaspoon baking soda
  • 2 overripe bananas, mashed (about 3/4 cup)
  • 1/2 cup mini chocolate chips, plus more for garnishing

How to Make Mini Banana Chocolate Chip Muffins

Juicy mini banana muffins with chocolate chips, displayed in a soft focus with a warm glow.

Ready to bake? Here’s a step-by-step guide to creating these delicious muffins:

  1. Preheat your oven: Set it to 350°F (175°C). Prepare a mini muffin pan by spraying it generously with non-stick cooking spray.
  2. Mix the wet ingredients: In a large bowl, melt the butter and let it cool slightly. Whisk in the sugar, then add the egg and vanilla extract, mixing until well combined.
  3. Add the dry ingredients: Stir in the flour and baking soda until just combined.
  4. Fold in the bananas: Gently mix in the mashed bananas until incorporated, then fold in the mini chocolate chips.
  5. Fill the muffin cups: Spoon the batter into each muffin cup, filling them almost full. Garnish the tops with additional mini chocolate chips if desired.
  6. Bake: Place the muffin pan in the oven and bake for 12-15 minutes, or until they are golden brown and a toothpick inserted comes out clean.
  7. Cool: Allow the muffins to cool in the pan for 5 minutes before transferring them to a wire rack to cool completely.

Pro Tips for Perfect Muffins

Want to take your muffins to the next level? Here are some expert insights:

  • Use overripe bananas: The riper your bananas are, the sweeter and moister your muffins will be.
  • Don’t overmix: Mix just until ingredients are combined to keep the muffins light and fluffy.
  • Experiment with toppings: Add nuts or different types of chocolate chips for a unique twist!
  • Check for doneness: Ovens can vary, so start checking your muffins a couple of minutes before the timer goes off.
  • Let them cool: Allowing muffins to cool in the pan helps them set and makes them easier to remove.
  • Use a cookie scoop: For even muffin sizes, a cookie scoop is your best friend!
  • Store properly: Keep muffins in an airtight container to maintain freshness.
  • Make a double batch: These muffins freeze well, so consider making extra to enjoy later!

Common Mistakes and Troubleshooting

Even seasoned bakers can run into issues! Here are some common mistakes and how to avoid them:

  • Dense muffins: Overmixing the batter can lead to dense muffins. Mix just until combined.
  • Burnt tops: If your muffins are browning too quickly, cover them with aluminum foil for the last few minutes of baking.
  • Sticking muffins: Ensure you grease the muffin pan well or use paper liners to prevent sticking.
  • Uneven baking: If muffins are unevenly baked, rotate the muffin pan halfway through the baking time.

Variations to Try

Feeling adventurous? Here are some fun variations to switch things up:

  • Add nuts: Incorporate chopped walnuts or pecans for a crunchy texture.
  • Peanut butter twist: Swirl in some peanut butter for a delicious flavor combination.
  • Spice it up: Add a pinch of cinnamon or nutmeg for a warm, comforting flavor.
  • Fruit explosion: Mix in blueberries or chopped strawberries for a fruity surprise!

Storage and Make-Ahead Instructions

Want to enjoy these muffins later? Here’s how to store and prepare them:

  • Room temperature: Store muffins in an airtight container for up to 3 days.
  • Refrigeration: For longer freshness, refrigerate muffins for up to a week.
  • Freezing: Freeze muffins in a zip-top bag for up to 3 months. Thaw at room temperature or warm in the microwave.
  • Make-ahead: You can prepare the batter a day in advance, just store it in the fridge and bake when ready!

Frequently Asked Questions

Here are some common questions about mini banana chocolate chip muffins:

  • Can I use frozen bananas? Yes! Just thaw and mash them before using.
  • What if I don’t have mini chocolate chips? Regular chocolate chips work perfectly fine; just chop them into smaller pieces if needed.
  • Can I make these into regular-sized muffins? Absolutely! Just adjust the baking time to 18-20 minutes.
  • How do I know when my muffins are done? Insert a toothpick in the center; it should come out clean or with a few crumbs.
  • Can I add other fruits? Yes! Diced apples or berries can be delicious additions.
  • What’s the best way to reheat muffins? Microwave for 10-15 seconds or warm in the oven at 350°F for a few minutes.
  • Why are my muffins dry? Overbaking or using too much flour can result in dry muffins. Make sure to measure accurately!
  • Can I make these gluten-free? Yes! Substitute all-purpose flour for a 1:1 gluten-free blend.

Nutritional Tips and Dietary Adaptations

Here are some ways to make this recipe fit your dietary needs:

  • Low-sugar option: Reduce the sugar by half or use a sugar substitute.
  • Dairy-free: Substitute coconut oil for butter and use a flax egg instead of a regular egg.
  • High-protein: Add a scoop of protein powder to the batter for an extra boost.
  • Vegan: Use flaxseed meal as an egg substitute and coconut oil for butter.

Equipment Recommendations

Here’s a list of tools you’ll find handy for making these muffins:

  • Mini muffin pan: Essential for the perfect mini size.
  • Mixing bowls: Use a large bowl for wet ingredients and a medium bowl for dry ingredients.
  • Whisk: A good whisk helps to combine your ingredients smoothly.
  • Measuring cups and spoons: Accurate measurements are key to successful baking.
  • Spatula: A silicone spatula is great for folding in ingredients without overmixing.

Serving Suggestions

Here are a few fun ideas for serving your muffins:

  • With a cup of coffee: Enjoy these muffins with your morning brew for a delightful breakfast.
  • Spread with nut butter: Add almond or peanut butter for an extra layer of flavor.
  • With fresh fruit: Serve alongside some sliced strawberries or a fruit salad for a refreshing treat.
  • As a dessert: Top with a scoop of vanilla ice cream for a decadent dessert option!

Now that you have all the tools and tips, it’s time to get baking! Enjoy the process, embrace your creativity, and most importantly, have fun with it. Remember, great food doesn’t require perfection—just a willingness to try. Happy baking!

Mini Banana Chocolate Chip Muffins

Prep Time 10 minutes
Cook Time 15 minutes
Total Time 25 minutes
Servings 24 muffins
Calories 150
Enjoy these moist and flavorful mini muffins packed with ripe bananas and chocolate chips, perfect for a quick snack or breakfast.

Ingredients

Dairy & Baking

  • 0.5 cup unsalted butter, melted
  • 0.5 cup golden or granulated sugar
  • 1 large egg
  • 0.5 teaspoon vanilla extract
  • 1 cup all-purpose flour
  • 0.5 teaspoon baking soda
  • 2 overripe bananas mashed bananas (about 3/4 cup)
  • 0.5 cup mini chocolate chips (plus more for garnishing)

Instructions 

  • Preheat oven to 350°F (175°C). Spray a 24-cup mini muffin pan with non-stick spray.
  • Melt butter, let cool slightly. Whisk in sugar, then eggs and vanilla. Mix in flour and baking soda.
  • Fold in mashed bananas and chocolate chips. Fill muffin cups almost full and garnish with extra chips.
  • Bake for 12-15 minutes until golden and a toothpick comes out clean. Cool in pan 5 minutes, then transfer to wire rack.

Notes

Store muffins in an airtight container for up to 2 days or freeze for longer storage.
Calories: 150kcal
Cost: $10
Course: Breakfast, Snack
Keyword: Banana, chocolate chips

Discover the Magic of Mango Lassi

If you’re looking for a refreshing drink that captures the essence of summer, look no further than mango lassi. This creamy, delicious beverage combines the vibrant flavors of ripe mangoes with the tangy richness of yogurt, creating a drink that is both satisfying and invigorating. Perfect for hot days, as a dessert, or even as a snack, mango lassi is a delightful treat that’s easy to make at home.

Why You’ll Love This Recipe

  • Quick and Easy: With just a few ingredients, you can whip up this mango lassi in under 10 minutes, making it an ideal choice for a quick refreshment.
  • Customizable Flavors: Feel free to adjust the sweetness and spice levels according to your taste. You can experiment with different types of mangoes or add spices like cardamom.
  • Nutritious Ingredients: Packed with vitamins from mangoes and probiotics from yogurt, this lassi is not only delicious but also good for your gut health.
  • Great for Any Occasion: Whether it’s a summer barbecue, a family dinner, or just a relaxing afternoon at home, mango lassi is a crowd-pleaser.
  • Kid-Friendly: This sweet drink is usually a hit with kids, making it a great way to get them excited about healthy ingredients!

Ingredients Breakdown

To make the perfect mango lassi, you’ll need the following ingredients:

  • 2 cups chilled dahi yogurt: This provides the creamy base. You can substitute it with Greek yogurt for a thicker texture.
  • 2 cups mango pulp or fresh mangoes, chopped: If fresh mangoes are not available, canned mango pulp is a great alternative. Choose ripe mangoes for the best flavor.
  • 1/2 teaspoon cardamom powder (optional): This adds a lovely aromatic spice to the drink.
  • 1/4 cup cane sugar, honey, or agave nectar: Adjust this according to the sweetness of your mangoes.
  • Ice cubes (optional): For an extra refreshing chill.
  • 1/4 cup milk (or as needed): This helps adjust the consistency to your liking.
  • Mint leaves and slivered almonds (for garnish): Adds a touch of elegance and extra flavor.

How to Make Mango Lassi

Refreshing mango lassi in a glass, showcasing its creamy texture and golden color.

Follow these simple steps to create this delicious drink:

  1. In a blender, combine the yogurt, mango pulp (or fresh mangoes), cardamom powder, sweetener, ice cubes, and milk.
  2. Blend until smooth and frothy. Taste and adjust the sweetness if necessary.
  3. If the mixture is too thick, add a few more tablespoons of milk and blend again.
  4. Pour the mango lassi into tall glasses and garnish with slivered almonds, mint leaves, or a sprinkle of cardamom if desired.
  5. Serve chilled and enjoy!

Expert Tips for the Best Mango Lassi

  • Choose Perfect Mangoes: For the best flavor, opt for ripe, sweet mangoes like Alphonso or Haden. They have a rich sweetness that elevates the drink.
  • Experiment with Spices: Adding a pinch of cinnamon or nutmeg can give your lassi a unique twist.
  • Make it Vegan: Substitute regular yogurt with coconut yogurt and use maple syrup as a sweetener.
  • Chill Ingredients: Use chilled yogurt and mangoes for a refreshingly cold drink.
  • Blend Effectively: Ensure your blender is powerful enough to create a smooth, frothy texture.
  • Adjust Consistency: Depending on how thick you like your lassi, play around with the amount of milk added.
  • Store Properly: If you have leftovers, store them in the refrigerator and consume within 24 hours for the best flavor and freshness.
  • Garnish Creatively: Get creative with your garnishes! Try adding crushed pistachios or a drizzle of honey for extra flair.

Common Mistakes and Troubleshooting

Even the best of us can make mistakes in the kitchen. Here are some common issues and solutions:

  • Too Thick: If your lassi is too thick, simply blend in more milk gradually until you reach the desired consistency.
  • Not Sweet Enough: Taste your lassi before serving; if it needs more sweetness, add a little more honey or sugar and blend again.
  • Too Watery: If you accidentally add too much milk, consider adding more mango pulp to thicken it up.
  • Off Flavor: Ensure your mangoes are ripe. Unripe mangoes can impart a sour taste to your lassi.

Mango Lassi Variations

Don’t hesitate to switch things up! Here are some delightful variations of the classic mango lassi:

  • Mango Mint Lassi: Add a handful of fresh mint leaves for a refreshing twist.
  • Spicy Mango Lassi: Incorporate a pinch of chili powder for a spicy kick.
  • Mango Coconut Lassi: Use coconut yogurt and add shredded coconut for a tropical flavor.
  • Mango Protein Lassi: Blend in a scoop of your favorite protein powder for a post-workout treat.

Storage and Make-Ahead Instructions

Mango lassi is best enjoyed fresh, but you can prepare the ingredients ahead of time:

  • Refrigerate Ingredients: Store your mango pulp and yogurt in the refrigerator until you’re ready to blend.
  • Blend and Chill: After blending, if you need to store it for later, keep it in an airtight container in the fridge for a maximum of 24 hours.

Frequently Asked Questions

  • Can I use frozen mangoes? Yes! Frozen mangoes are an excellent alternative and can give a thicker, creamier texture.
  • Is mango lassi healthy? When made with fresh ingredients, mango lassi can be a healthy option, packed with nutrients and probiotics.
  • How can I make it dairy-free? Substitute yogurt with a plant-based yogurt and use a non-dairy milk alternative.
  • What if I don’t have cardamom? You can skip it altogether or use vanilla extract as a substitute for flavor.
  • Can I serve this drink warm? Mango lassi is traditionally served chilled, but you can warm it slightly if you prefer.
  • How long does lassi last in the fridge? It’s best consumed within 24 hours for optimal taste and freshness.
  • Can I add other fruits? Absolutely! Feel free to mix in other fruits like bananas or berries for a fruity twist.
  • What’s the best way to sweeten my lassi? The best sweetener depends on your taste—honey, sugar, or agave nectar work well!

Nutrition Tips and Dietary Adaptations

For those conscious about nutrition, here are some tips:

  • Low Sugar Option: Reduce the amount of sweetener or use a natural sugar substitute.
  • High Protein: Add Greek yogurt or a scoop of protein powder to increase protein content.
  • Vegan-Friendly: Ensure all ingredients are plant-based for a vegan version.

Equipment Recommendations

To make your mango lassi, you’ll need:

  • Blender: A high-speed blender will ensure a smooth consistency.
  • Measuring Cups: For accurate ingredient measurements.
  • Serving Glasses: Tall glasses are perfect for serving this refreshing drink.

Serving Suggestions

Mango lassi pairs wonderfully with a variety of dishes:

  • Indian Cuisine: Serve alongside spicy curries or tandoori dishes to cool the palate.
  • Grilled Meats: It complements grilled chicken or fish beautifully.
  • On Its Own: Enjoy it as a standalone snack or dessert!

Wrap-Up

Now that you know how to make a delicious, creamy mango lassi, it’s time to get blending! Whether you’re enjoying it on a sunny day or serving it at a family gathering, this drink is sure to impress. Don’t forget to experiment with flavors and make it your own. Happy cooking, and cheers to delicious, homemade mango lassi!

Mango Lassi Recipe Using Mango Pulp How To Make Mango Lassi

Prep Time 5 minutes
Total Time 5 minutes
Servings 2 glasses
Calories 150
A refreshing and creamy mango lassi made with mango pulp and yogurt, perfect for hot days or as a delightful beverage.

Ingredients

Main ingredients

  • 2 cups chilled dahi yogurt
  • 2 cups mango pulp or fresh mangoes, chopped
  • 1.5 tsp cardamom powder (optional)
  • 0.25 cup cane sugar honey agave nectar (adjust as per desired sweetness)
  • 0.25 cup milk (or as required to adjust consistency)
  • to taste Ice cubes (optional)
  • for garnish Mint leaves and slivered almonds (for garnish)

Instructions 

  • Add the first six ingredients to a blender and blend until smooth and frothy.
  • Check sweetness and add more sweetener if needed. If too thick, add a few more tablespoons of milk and blend again.
  • Serve chilled in tall glasses, garnished with slivered almonds, pistachios, more cardamom, and mint leaves.

Notes

You can refrigerate the mango lassi until ready to serve for a more refreshing experience.
Calories: 150kcal
Cost: $8
Course: Beverage
Cuisine: Indian
Keyword: Mango, Smoothie, Yogurt

Transform Your Weeknight Dinners with Grilled Chicken Parmesan Flatbread

If you’re looking to elevate your weeknight dinners, you’re in the right place! This Grilled Chicken Parmesan Flatbread is not just easy to make, but it’s also packed with flavor and satisfaction. In just a few simple steps, you’ll create a meal that combines juicy grilled chicken, melty cheese, and the rich taste of roasted tomato jam, all nestled in a delicious flatbread. Perfect for busy evenings, this recipe is sure to become a family favorite!

Why You’ll Love This Recipe

Here are just a few reasons why this Grilled Chicken Parmesan Flatbread will win your heart:

  • Quick and Easy: With minimal prep and cook time, you can whip up this dish in under 30 minutes.
  • Flavorful Components: The combination of grilled chicken, melted mozzarella, and roasted tomato jam creates an explosion of flavor.
  • Customizable: This recipe allows for easy substitutions and variations, catering to your personal taste.
  • Healthy Option: Packed with protein and fresh ingredients, this sandwich is a nutritious option for any meal.
  • Kid-Friendly: The delicious flavors and fun presentation make this a hit with kids and adults alike!

Ingredient Breakdown

Let’s dive deep into what you’ll need to create this mouthwatering Grilled Chicken Parmesan Flatbread. Here’s a detailed list with some possible substitutions:

  • 1 grilled chicken breast: You can use leftover rotisserie chicken or grilled tofu for a vegetarian option.
  • 1/3 cup grated mozzarella cheese: Feel free to substitute with provolone or a dairy-free cheese if needed.
  • 1 tbsp grated parmesan cheese: Nutritional yeast can be an excellent vegan alternative.
  • 2 sprigs of oregano leaves: Dried oregano works well if you don’t have fresh on hand. Use about 1 tsp.
  • 1/3 cup roasted tomato jam: If you can’t find roasted tomato jam, a mix of sun-dried tomatoes and a bit of olive oil can work beautifully.
  • 1 grilled flatbread: Pita or naan can be great substitutes if you prefer a different base.

Step-by-Step Instructions

Side profile of a juicy grilled chicken parmesan flatbread sandwich, highlighting melted mozzarella and fresh oregano.

Follow these simple steps to create your Grilled Chicken Parmesan Flatbread:

  1. Spread the roasted tomato jam evenly over the flatbread.
  2. Layer the sliced grilled chicken on one side of the flatbread.
  3. Top the chicken with fresh oregano leaves, followed by the mozzarella and parmesan cheese.
  4. Place the sandwich under the broiler for 1-2 minutes until the cheese is melted and bubbly. Keep an eye on it to avoid burning!
  5. Fold the sandwich together, slice it in half, and enjoy your creation!

Pro Tips for Perfect Flatbread Sandwiches

Want to take your sandwich to the next level? Here are some expert insights:

  • Preheat your broiler: Ensure your broiler is hot before placing the sandwich inside for the best melting results.
  • Keep ingredients fresh: Use the freshest ingredients possible for the best flavor.
  • Experiment with herbs: Fresh basil or thyme can add a delightful twist to your sandwich.
  • Don’t rush the broiling: Broil until the cheese starts to brown for maximum flavor.
  • Serve with sides: Pair with a light salad or sweet potato fries for a complete meal.
  • Adjust the heat: If you like a little kick, add some red pepper flakes to the cheese layer.
  • Make it a wrap: If you’re in a hurry, roll everything up in a tortilla instead of using flatbread.
  • Customize your jam: Try different flavored jams or spreads, such as pesto or garlic aioli, for unique flavors.

Common Mistakes and Troubleshooting

Even the best cooks can make mistakes. Here’s how to avoid common pitfalls:

  • Overcooking the chicken: Make sure not to overcook the chicken breast to keep it juicy.
  • Burning the cheese: Keep a close watch while broiling; it can go from perfect to burnt quickly!
  • Too much jam: Use a light hand with the roasted tomato jam to prevent sogginess.
  • Flatbread tearing: Handle the flatbread gently to avoid tearing when you fold it.

Delicious Variations

Mix things up with these fun variations of the Grilled Chicken Parmesan Flatbread:

  • Southwestern Style: Add sliced jalapeños and top with pepper jack cheese for a spicy kick.
  • Caprese Twist: Substitute chicken with fresh mozzarella, tomatoes, and basil for a lighter version.
  • Buffalo Chicken: Toss the grilled chicken in buffalo sauce before assembling for a tangy flavor.
  • Veggie Delight: Load up on grilled vegetables like bell peppers and zucchini instead of chicken.

Storage and Make-Ahead Instructions

Want to prep ahead? Here’s how to store and reheat your sandwiches:

  • Storing: Keep leftover sandwiches in an airtight container in the fridge for up to 2 days.
  • Reheating: Reheat in the oven or toaster oven to retain crispiness; microwaving can make it soggy.
  • Make-Ahead: You can prep the ingredients ahead and assemble right before cooking for a quick dinner option.

Frequently Asked Questions

Here are some common questions about this recipe:

  • Can I use frozen chicken? Yes, just ensure it’s fully thawed before cooking for best results.
  • What can I serve with this sandwich? It pairs wonderfully with a side salad, soup, or chips.
  • Is this sandwich gluten-free? Use gluten-free flatbread or tortillas to make it suitable for gluten-free diets.
  • Can I prepare this in advance? Yes, prepare the ingredients ahead, then assemble and cook when ready to serve.
  • How can I make this dish vegetarian? Substitute chicken with grilled vegetables or a plant-based protein.
  • What type of cheese works best? Mozzarella is ideal, but feel free to mix in other cheeses for added flavor.
  • Can I freeze leftovers? It’s best to eat them fresh, but you can freeze the components separately.
  • What if I don’t have roasted tomato jam? You can easily make your own or substitute with a mix of sun-dried tomatoes and olive oil.

Nutrition Tips and Dietary Adaptations

This Grilled Chicken Parmesan Flatbread can easily fit into various dietary needs:

  • Low-carb: Use lettuce wraps instead of flatbread for a low-carb option.
  • High-protein: Add extra chicken or cheese to boost the protein content.
  • Dairy-free: Use dairy-free cheese and yogurt flatbreads to cater to lactose intolerance.
  • Whole grain: Opt for whole grain flatbread for added fiber and nutrients.

Essential Equipment Recommendations

For best results, consider having these kitchen tools on hand:

  • Broiler-safe baking sheet: Ideal for achieving that perfect melted cheese.
  • Grill pan or outdoor grill: Perfect for grilling chicken evenly and adding flavor.
  • Sharp knife: For easy slicing of your flatbread and ingredients.
  • Cutting board: A sturdy board will keep your workspace tidy and safe.

Serving Suggestions

Elevate your meal with these serving ideas:

  • Fresh Side Salad: A light salad with vinaigrette pairs perfectly.
  • Sweet Potato Fries: Bake some sweet potato fries for a delightful crunch.
  • Homemade Pickles: Tangy pickles can add a fresh contrast to the sandwich.
  • Fruit Salad: A refreshing fruit salad can lighten up the meal.

In conclusion, this Grilled Chicken Parmesan Flatbread is a versatile and delicious recipe that’s perfect for any night of the week. With its rich flavors and easy preparation, you’ll not only satisfy your family’s taste buds but also enjoy the cooking process. Remember, cooking is all about confidence and creativity—so don’t be afraid to put your own twist on this dish. Happy cooking!

Grilled Chicken Parmesan Flatbread Sandwiches

Prep Time 10 minutes
Cook Time 5 minutes
Total Time 15 minutes
Servings 2 sandwiches
Calories 450
A delicious and easy-to-make flatbread sandwich featuring grilled chicken, melted cheese, and flavorful tomato jam.

Ingredients

Protein

  • 1 piece grilled chicken breast, sliced

Cheese

  • 0.75 cup grated mozzarella cheese
  • 1 tbsp grated parmesan cheese

Herbs

  • 2 sprigs oregano leaves

Condiments

  • 0.33 cup roasted tomato jam

Bread

  • 1 flatbread grilled flatbread

Instructions 

  • Spread roasted tomato jam over the flatbread.
  • Place sliced chicken on one side, then top with oregano, mozzarella, and parmesan.
  • Broil for 1-2 minutes until cheese melts.
  • Fold the sandwich, slice in half, and serve.

Notes

For best results, keep an eye on the broiler to prevent burning.
Calories: 450kcal
Cost: $12
Course: Main Course
Cuisine: Italian-American
Keyword: Cheese, Chicken, flatbread

Transform Your Weeknight Dinners with Grilled Lemon Chicken Flatbread Wraps

Are you looking to elevate your weeknight meals with a dish that’s both satisfying and bursting with flavor? Look no further! These Grilled Lemon Chicken Flatbread Wraps are the perfect solution for busy evenings. With a delightful combination of tender, marinated chicken and a creamy, spicy garlic sauce, this recipe promises to impress your family and friends while being easy to prepare. Let’s dive into the delicious details!

Why You’ll Love This Recipe

  • Quick and Easy: This recipe comes together in under 30 minutes, making it a perfect choice for those hectic weeknights when time is of the essence.
  • Flavor-Packed: The marinade infuses the chicken with zesty lemon and aromatic garlic, resulting in a flavor explosion that will have everyone coming back for seconds.
  • Versatile: Customize your wraps with your favorite toppings! Swap out the arugula for spinach, add avocado, or use a different type of flatbread to suit your taste.
  • Healthy Choice: Packed with lean protein and fresh vegetables, these wraps are a nutritious option that doesn’t compromise on flavor.
  • Meal Prep Friendly: Marinate the chicken ahead of time and have it ready to grill when you need it. These wraps also store well, making them great for lunch the next day.

Ingredient Breakdown

Before we get cooking, let’s take a closer look at the ingredients you’ll need for these wraps. Each component plays a crucial role in building the overall flavor.

  • Chicken: 1 pound of skinless, boneless chicken breasts (about 2 large breasts) cubed into bite-size pieces. You can also use thighs for a juicier option.
  • Olive Oil: Essential for marinating and grilling, providing moisture and flavor.
  • Garlic: 2 cloves, pressed through a garlic press. Fresh garlic adds a robust flavor that elevates the dish.
  • Lemon: Zest of 1 lemon (about 1 tablespoon) and 1 tablespoon of lemon juice to brighten the flavors.
  • Spices: 1 teaspoon salt, a pinch of black pepper, 1/2 teaspoon dried oregano, 1/2 teaspoon ground cumin, 1/4 teaspoon coriander, and 1/4 teaspoon paprika for a well-rounded seasoning.
  • Flatbread: 4 middle eastern-style flatbreads (pita works too) as the base for your wraps.
  • Fresh Vegetables: Arugula greens and sliced tomatoes add freshness and crunch.
  • Spicy Garlic Sauce: Made with 1/2 cup mayonnaise, 1/2 cup sour cream or full-fat plain Greek yogurt, 3 cloves garlic (pressed), 1 tablespoon tahini, 2-3 teaspoons sriracha, 1 teaspoon salt, a pinch of black pepper, a pinch of cayenne pepper, and 1/2 teaspoon lemon juice. This sauce ties everything together with creamy, spicy goodness.

Pro Tips for Perfect Wraps

Juicy grilled chicken flatbread wrap with fresh arugula and vibrant tomato slices.

To ensure your wraps turn out delicious every time, keep these expert tips in mind:

  • Marinate Longer: For even more flavor, marinate the chicken for up to 24 hours in the refrigerator. This allows the spices to penetrate the meat thoroughly.
  • Soak Skewers: If using bamboo skewers, soak them in water for at least 30 minutes before grilling to prevent burning.
  • Don’t Overcrowd the Grill: Give your chicken pieces enough space to cook evenly and achieve a nice char.
  • Let it Rest: After grilling, allow the chicken to rest for 5-10 minutes before removing it from the skewers. This helps retain the juices.
  • Customize the Sauce: Adjust the spiciness of your garlic sauce by adding more or less sriracha based on your preference.
  • Fresh Ingredients: Use the freshest ingredients possible for the best flavor. Farmer’s market produce can make a noticeable difference!
  • Experiment with Flatbreads: Try using different types of flatbreads like naan, whole wheat, or even gluten-free options to suit dietary needs.
  • Double the Recipe: Make extra chicken and sauce for meal prep. These can be used in salads, grain bowls, or as a sandwich filling.

Common Mistakes and Troubleshooting

Even the best cooks can encounter hiccups. Here are common mistakes to avoid and how to troubleshoot them:

  • Dry Chicken: Ensure you don’t overcook the chicken. Use a meat thermometer to check for doneness (165°F). Keeping an eye on cooking time is key!
  • Too Much Sauce: While the sauce is delicious, be cautious not to overpower the other flavors. Start with a little and add more as desired.
  • Flavorless Marinade: Always taste your marinade before adding it to the chicken. Adjust the seasoning to your liking for the best results.
  • Sticking to the Grill: Ensure your grill is properly oiled and preheated to prevent the chicken from sticking. A clean grill grate makes a world of difference!

Delicious Variations to Try

Feeling adventurous? Here are some variations you can try to keep things exciting:

  • Mediterranean Twist: Add feta cheese, olives, and cucumber slices to your wraps for a Mediterranean flair.
  • Buffalo Chicken Wraps: Substitute the lemon marinade with buffalo sauce for a spicy kick.
  • Vegetarian Option: Replace chicken with grilled eggplant or marinated tofu for a satisfying vegetarian wrap.
  • Asian-Inspired: Use hoisin sauce instead of garlic sauce and add shredded carrots and cilantro for an Asian twist.

Storage and Make-Ahead Instructions

Planning ahead? Here’s how to store your wraps and prepare them in advance:

  • Marinate Ahead: Marinate the chicken the night before for more intense flavors. Just store it in an airtight container in the fridge.
  • Cooked Chicken Storage: Store any leftover grilled chicken in an airtight container in the fridge for up to 3-4 days. Reheat gently to avoid drying out.
  • Assembled Wraps: It’s best to assemble the wraps just before serving. If you need to prepare them ahead of time, keep components separate to avoid sogginess.

Frequently Asked Questions (FAQ)

Here are some common questions about making Grilled Lemon Chicken Flatbread Wraps:

  • Can I use frozen chicken? Yes, but ensure it is completely thawed before marinating and grilling for even cooking.
  • What type of flatbread should I use? Any flatbread works well! Pita, naan, or tortillas are all great options.
  • How can I make this dish gluten-free? Use gluten-free flatbreads or lettuce wraps for a low-carb option.
  • Can I grill the chicken on a stovetop? Absolutely! A grill pan on medium-high heat works just as well for delicious results.
  • What can I serve with these wraps? Pair them with a fresh salad, roasted vegetables, or sweet potato fries for a complete meal.
  • How do I store leftovers? Store leftover chicken and sauce separately in airtight containers in the fridge.
  • Can I freeze the wraps? It’s best to freeze the chicken separately, as assembled wraps may become soggy upon thawing.
  • What’s the best way to reheat the chicken? Reheat in the oven at 350°F for about 10-15 minutes or until heated through.

Nutrition Tips and Dietary Adaptations

This recipe is not only delicious but can also be tailored to meet various dietary needs:

  • Low-Carb: Use lettuce wraps instead of flatbread and skip the sauce for a lighter option.
  • Dairy-Free: Substitute yogurt and mayonnaise in the sauce with avocado or a dairy-free mayo alternative.
  • Whole30 Approved: Ensure all ingredients are compliant with Whole30 standards, particularly in your sauce.
  • Protein Boost: Add chickpeas or black beans to your wraps for extra protein and fiber.

Essential Equipment Recommendations

To make your cooking experience smoother, here are some tools I recommend:

  • Grill Pan: A good-quality grill pan is essential for achieving perfect grill marks and flavor indoors.
  • Bamboo Skewers: Ideal for grilling, just remember to soak them first!
  • Garlic Press: A handy tool for quickly mincing garlic without the hassle.
  • Mixing Bowls: Having various sizes of mixing bowls makes marinating and mixing easier.

Serving Suggestions for Your Wraps

To make your meal even more delightful, consider these serving ideas:

  • Side Salad: A light, refreshing salad with a lemon vinaigrette pairs perfectly with the flavors of the wraps.
  • Chips and Salsa: Serve with tortilla chips and fresh salsa for a fun, casual meal.
  • Fruit Salad: A seasonal fruit salad adds a sweet contrast to the savory wraps.
  • Yogurt Dip: Serve with a side of tzatziki or another yogurt-based dip for a creamy addition.

In conclusion, these Grilled Lemon Chicken Flatbread Wraps are not just a meal; they are an experience. From the vibrant flavors to the ease of preparation, you’ll find yourself turning to this recipe time and again. Remember, cooking is about enjoying the process and sharing delicious food with those you care about. So, roll up your sleeves, gather your ingredients, and let’s make some magic in the kitchen! Happy cooking and bon appétit!

Grilled Lemon Chicken Flatbread Wraps

Prep Time 20 minutes
Cook Time 10 minutes
Total Time 30 minutes
Servings 4 servings
Calories 550
Delicious grilled chicken wrapped in flatbread with fresh greens, tomatoes, and a spicy garlic sauce for a flavorful meal.

Ingredients

Chicken

  • 1 pound skinless, boneless chicken breasts (about 2 large breasts, cubed)
  • 2 cloves garlic (pressed)
  • 1 tablespoon lemon zest (about 1 tablespoon)
  • 1 tablespoon lemon juice
  • 1 teaspoon salt
  • Pinch black pepper
  • 1/2 teaspoon dried oregano
  • 1/2 teaspoon ground cumin
  • 1/4 teaspoon coriander
  • 1/4 teaspoon paprika

Flatbreads

  • 4 pieces Middle Eastern-style flatbreads (or pita bread)

Greens

  • to taste Arugula greens
  • to taste Sliced tomatoes

Spicy Garlic Sauce

  • 1/2 cup mayonnaise
  • 1/2 cup sour cream or Greek yogurt (full-fat, plain)
  • 3 cloves garlic (pressed)
  • 1 tablespoon tahini
  • 2-3 teaspoons sriracha (adjust to spice preference)
  • 1 teaspoon salt
  • Pinch black pepper
  • Pinch cayenne pepper (adjust for spice level)
  • 1/2 teaspoon lemon juice

Instructions 

  • Marinate the chicken with olive oil, garlic, lemon zest, lemon juice, salt, pepper, oregano, cumin, coriander, and paprika for 20 minutes or overnight.
  • Whisk together all ingredients for the spicy garlic sauce until smooth; set aside.
  • Grill the marinated chicken skewers over medium-high heat for 6-8 minutes until charred and cooked through; rest for 5-10 minutes, then remove chicken from skewers.
  • Spread spicy garlic sauce on flatbreads, add greens, sliced tomatoes, and lemon chicken, then drizzle with more sauce.
  • Fold the flatbread into a wrap, secure with parchment or foil if desired, and serve.

Notes

Use water-soaked skewers to prevent burning and adjust spice levels to taste.
Calories: 550kcal
Cost: $15
Course: Main Course
Cuisine: Middle Eastern
Keyword: Chicken, flatbread, lemon

Whip Up Delightful Mini Donuts at Home

Welcome to the wonderful world of mini donuts! If you’re looking for a fun, bite-sized treat to impress your family and friends, you’ve come to the right place. This delightful mini donuts recipe is not only easy to follow but also allows you to unleash your creativity in the kitchen. Whether you want to whip them up for breakfast, a snack, or a special occasion, these fluffy little wonders are sure to become a favorite in your home. Let’s dive into the sweet details!

Why You’ll Love This Recipe

These mini donuts are more than just a tasty treat; they come with countless benefits that make them a must-try in your kitchen. Here are five reasons to love this recipe:

  • Quick and Easy: With simple steps and minimal prep time, you can have fresh mini donuts ready in under 30 minutes!
  • Customizable Flavors: From classic vanilla to rich chocolate or even fruity variations, the flavor possibilities are endless!
  • Perfect for Any Occasion: Whether it’s a birthday party, brunch, or just a cozy night in, these mini donuts fit right in.
  • Portion Control: Their bite-sized nature makes it easy to indulge without going overboard.
  • Family Fun: Get the kids involved in the kitchen! Making mini donuts can be a fun family activity.

Ingredient Breakdown

Understanding your ingredients is key to mastering the art of mini donuts. Here’s what you’ll need:

  • 1 cup all-purpose flour: The base of your donuts. You can substitute with whole wheat flour for a healthier option.
  • 1 3/4 cup granulated sugar: Sweetens your donuts. For a lower-calorie version, consider using a sugar substitute.
  • 1 tsp baking powder: Helps your donuts rise. Make sure it’s fresh for the best results!
  • 1/4 tsp baking soda: Works in tandem with baking powder for a fluffy texture.
  • 1/4 tsp salt: Enhances the overall flavor.
  • 1/2 cup buttermilk: Adds moisture and richness. If you don’t have buttermilk, mix milk with a teaspoon of vinegar as a substitute.
  • 1 egg: Binds the ingredients together.
  • 2 tbsp unsalted butter, melted: For that rich flavor, you can use coconut oil as a dairy-free alternative.
  • 1 tsp vanilla extract: Adds a lovely aroma and sweetness.
  • Cinnamon sugar, powdered sugar, chocolate glaze, or sprinkles (optional): For topping your donuts and adding flair!

Pro Tips for Perfect Mini Donuts

A side view of mini donuts, highlighting their fluffy interior and sugar coating.

To ensure your mini donuts turn out perfectly every time, keep these expert tips in mind:

  • Don’t Overmix: When combining wet and dry ingredients, mix just until incorporated to achieve fluffy donuts.
  • Use a Piping Bag: For neat filling of the donut pan, use a piping bag or a ziplock with the corner cut off.
  • Check for Doneness: Donuts should spring back when touched; avoid overbaking to keep them fluffy.
  • Experiment with Flavors: Try adding lemon zest or spices like nutmeg for a unique twist!
  • Cool Before Glazing: Let your donuts cool slightly before adding any glaze or toppings to prevent them from melting.
  • Store Properly: Keep leftover donuts in an airtight container to maintain freshness.
  • Use a Mini Donut Maker: If you have one, it can provide even cooking and a perfect shape!
  • Don’t Skip the Toppings: A simple dusting of powdered sugar or a drizzle of chocolate can elevate your donuts significantly!

Common Mistakes & Troubleshooting

Even the best of us make mistakes! Here’s how to avoid common pitfalls:

  • Dense Donuts: Overmixing the batter will lead to dense donuts—mix just until combined.
  • Sticking to the Pan: Ensure your mini donut pan is greased well, or use silicone molds for easy removal.
  • Burnt Edges: Keep an eye on the baking time and use an oven thermometer to ensure accurate temperature.
  • Too Sweet or Not Sweet Enough: Adjust sugar levels slightly according to your taste preferences.

Delicious Variations to Try

Once you’ve mastered the basic mini donuts, get creative! Here are four variations to tempt your taste buds:

  • Chocolate Mini Donuts: Add cocoa powder to the batter and top with chocolate glaze for a rich treat.
  • Maple Bacon Mini Donuts: Incorporate maple syrup in the batter and sprinkle crispy bacon bits on top.
  • Berry Blast Mini Donuts: Fold in fresh blueberries or raspberries for a fruity explosion in every bite.
  • Matcha Mini Donuts: Add matcha powder for a unique flavor and vibrant green color.

Storage & Make-Ahead Instructions

Want to enjoy your mini donuts later? Here’s how to store and prepare in advance:

  • Room Temperature: Store in an airtight container for up to 2 days at room temperature.
  • Refrigeration: For longer storage, keep in the fridge for up to a week.
  • Freezing: Freeze unglazed donuts for up to 3 months. Thaw and glaze when ready to enjoy.
  • Make-Ahead: Prepare the batter a day prior and store it in the fridge; bake fresh donuts the next morning!

Frequently Asked Questions

Here are some common questions about making mini donuts:

  • Can I use whole wheat flour? Yes, whole wheat flour can be substituted for all-purpose flour for a healthier version.
  • What if I don’t have a mini donut pan? You can use a muffin pan; simply adjust the baking time.
  • How do I make them gluten-free? Substitute all-purpose flour with a gluten-free blend.
  • Can I bake these in an air fryer? Absolutely! Adjust the temperature and time according to your air fryer’s settings.
  • What’s the best way to glaze my donuts? Dip the tops in glaze while the donuts are still warm for better adherence.
  • Can I add fillings to my mini donuts? Yes! Consider adding jams or creams for a delicious surprise.
  • How can I make these vegan? Replace the egg with a flax egg and use plant-based milk and butter.
  • What toppings work best? Sprinkles, nuts, or flavored glazes all add a wonderful touch!

Nutrition Tips & Dietary Adaptations

Making your mini donuts a bit healthier is easy! Here are some tips:

  • Reduce Sugar: Cut down the sugar by 1/4 cup or use a natural sweetener.
  • Whole Grains: Opt for whole wheat flour or oat flour for added fiber.
  • Low-Fat Options: Use low-fat buttermilk and omit butter for a lighter version.
  • Swap Toppings: Use fresh fruit or yogurt instead of sugary glazes to keep it healthier.

Equipment Recommendations

To make the best mini donuts, consider these handy tools:

  • Mini Donut Pan: Essential for achieving the perfect shape.
  • Piping Bag: For easy filling of your donut batter.
  • Mixing Bowls: A set of mixing bowls in various sizes is a kitchen must-have.
  • Whisk: A good whisk helps combine ingredients smoothly.

Serving Suggestions

How you serve your mini donuts can elevate the experience. Try these ideas:

  • Donut Bar: Set up a DIY donut bar with various toppings and glazes for guests to customize their treats!
  • Pair with Coffee: Serve alongside a hot cup of coffee or tea for a delightful morning treat.
  • Add Fresh Fruit: Serve with seasonal fruits for a lovely balance of flavors.
  • Gift Them: Package the mini donuts in a cute box as a thoughtful homemade gift!

In conclusion, making mini donuts at home is not just simple; it’s a joyous activity that brings family and friends together. With this comprehensive guide, you’re armed with everything you need to create these delightful treats. Remember, the key to great cooking is not perfection, but rather enjoying the process and celebrating the delicious results. So, roll up your sleeves, gather your ingredients, and let’s get baking! Happy cooking!

Mini Donuts

Prep Time 10 minutes
Cook Time 10 minutes
Total Time 20 minutes
Servings 12 pieces
Calories 150
Delight in these quick and easy mini donuts, perfect for a sweet snack or breakfast treat.

Ingredients

Dry Ingredients

  • 1 cup all-purpose flour
  • 1.5 cup granulated sugar
  • 1 tsp baking powder
  • 0.25 tsp baking soda
  • 0.25 tsp salt

Wet Ingredients

  • 0.5 cup buttermilk
  • 1 egg egg
  • 2 tbsp unsalted butter melted
  • 1 tsp vanilla extract

Instructions 

  • Preheat oven to 350°F (175°C). Grease mini donut pan.
  • Mix dry ingredients in a bowl. Whisk wet ingredients in another.
  • Combine wet and dry until just mixed. Fill pan 2/3 full.
  • Bake for 8-10 minutes. Cool slightly before removing.
  • Optional: Top with glaze, cinnamon sugar, powdered sugar, or sprinkles.

Notes

Use a piping bag for easier filling of the donut pan.
Calories: 150kcal
Cost: $8
Course: Dessert
Cuisine: American
Keyword: Donuts

Are you looking for a quick and delicious way to kickstart your day or replenish your energy after a workout? Look no further than this strawberry protein shake. Combining the sweet flavor of fresh strawberries with the creamy texture of cottage cheese, this shake is not only tasty but also packed with nutrients to keep you feeling your best. In just a few simple steps, you can create a satisfying drink that’s perfect for breakfast or as a refreshing snack. Let’s dive into the details of this fantastic recipe!

Why You’ll Love This Strawberry Protein Shake

This strawberry protein shake is more than just a drink; it’s a game-changer for your daily routine. Here are five reasons why you’ll absolutely love it:

  • Nutritious Boost: Packed with protein from the cottage cheese and protein powder, this shake provides a healthy dose of nutrients to fuel your day.
  • Quick and Easy: With minimal ingredients and a quick blending process, you can whip this up in under 5 minutes.
  • Customizable Flavor: Feel free to experiment with different fruits or protein powders to suit your taste preferences.
  • Perfect for Any Time: Enjoy it as a filling breakfast, a post-workout recovery drink, or a mid-afternoon snack.
  • Deliciously Satisfying: The combination of strawberries and creamy cottage cheese results in a shake that not only tastes great but also keeps you feeling full longer.

Ingredients for Your Strawberry Protein Shake

Let’s take a closer look at the ingredients you’ll need to create this delightful shake:

  • 12 oz almond milk (or any milk of your choice): This serves as the liquid base for your shake, ensuring a smooth texture.
  • 8 strawberries (stems removed): Fresh or frozen, strawberries provide the sweet flavor and vibrant color.
  • 1/4 cup cottage cheese: Adds creaminess and a protein boost, making the shake both satisfying and nutritious.
  • 1 scoop vanilla protein powder: Enhances the protein content and adds a touch of sweetness.
  • Whipped cream (optional): For a fun topping to make your shake even more indulgent.

How to Make a Strawberry Protein Shake

Follow these simple steps to blend your shake to perfection:

  1. Combine the almond milk, strawberries, cottage cheese, and protein powder in a blender.
  2. Blend until smooth and creamy, ensuring that all ingredients are well incorporated.
  3. Pour into a glass and top with whipped cream, if desired.
  4. Serve immediately and enjoy your refreshing strawberry protein shake!

Pro Tips for the Perfect Shake

A vibrant Strawberry Protein Shake displayed in a glass with a smooth texture and fresh strawberries beside it.

To elevate your shake-making skills, consider these expert tips:

  • Use Frozen Fruit: For a thicker, creamier texture, use frozen strawberries instead of fresh.
  • Layer Ingredients Wisely: Add the liquid first to prevent the ingredients from sticking to the bottom of the blender.
  • Choose Quality Protein Powder: Opt for a protein powder that is natural and free of additives for the best taste and health benefits.
  • Adjust Sweetness: If you prefer a sweeter shake, consider adding a splash of honey or a few dates.
  • Make it a Smoothie Bowl: Pour your shake into a bowl and top with granola, nuts, and extra fruit for a delicious breakfast bowl.
  • Test Different Milks: Almond milk is great, but feel free to experiment with oat, coconut, or regular dairy milk for different flavors.
  • Chill Your Glass: Chill your serving glass beforehand to keep your shake cold longer.
  • Blend in Greens: For an extra nutritional boost, consider adding a handful of spinach or kale—your shake will still taste amazing!

Common Mistakes and Troubleshooting

Even the best recipes can have hiccups. Here are common mistakes to avoid and how to troubleshoot them:

  • Too Thick? If your shake is too thick, simply add a little more almond milk to reach your desired consistency.
  • Not Sweet Enough? Adjust the sweetness by blending in a banana or a splash of maple syrup.
  • Texture Issues? Make sure to blend thoroughly, and consider using a high-powered blender for a smoother finish.
  • Flavor Not Strong Enough? Try adding a bit of vanilla extract or a pinch of salt to enhance the flavor.

Variations of Your Strawberry Protein Shake

Feel free to switch things up with these delicious variations:

  • Strawberry Banana Shake: Add half a banana for a sweeter taste and extra creaminess.
  • Chocolate Strawberry Shake: Replace vanilla protein powder with chocolate protein powder for a decadent twist.
  • Strawberry Coconut Shake: Add a tablespoon of shredded coconut for a tropical flair.
  • Berry Blast Shake: Mix in a handful of blueberries or raspberries for an antioxidant boost.

Storage and Make-Ahead Instructions

Planning ahead? Here’s how to store your shake:

  • Refrigeration: Store any leftovers in an airtight container in the fridge for up to 24 hours. Shake well before consuming.
  • Make-Ahead: You can pre-measure your ingredients and store them in the fridge, ready to blend in the morning.

Frequently Asked Questions (FAQ)

Here are some common questions about this strawberry protein shake:

  • Can I use fresh strawberries instead of frozen? Absolutely! Fresh strawberries are delicious, but using frozen ones will give you a thicker shake.
  • Is this shake suitable for weight loss? Yes, it’s low in calories and high in protein, making it a great option for weight management.
  • Can I make this shake dairy-free? Yes! Just use a dairy-free protein powder and substitute the cottage cheese with a dairy-free alternative like silken tofu.
  • How can I increase the fiber content? Consider adding a tablespoon of chia seeds or flaxseeds to boost fiber and omega-3 fatty acids.
  • Can I freeze this shake? While it’s best fresh, you can freeze it in ice cube trays and blend again when you’re ready to enjoy.
  • Is it okay to have protein shakes daily? Yes, as long as they fit into your overall diet and nutritional needs.
  • What’s the best time to consume a protein shake? It’s great as a breakfast option or post-workout recovery drink.
  • Can I add greens to this shake? Absolutely! Spinach or kale can be blended in for added nutrition without sacrificing flavor.

Nutrition Tips and Dietary Adaptations

To make this shake fit your dietary preferences:

  • Low-Carb Option: Use unsweetened almond milk and omit the fruit or use a low-carb fruit alternative.
  • Vegan Adaptation: Substitute the cottage cheese with silken tofu and use a plant-based protein powder.
  • High-Protein Boost: Add extra protein powder or Greek yogurt to up the protein content even further.
  • Low-Fat Adjustment: Opt for low-fat cottage cheese and use skim milk for a lighter shake.

Equipment Recommendations

To make your shake-making experience seamless, consider these tools:

  • High-Powered Blender: A good blender ensures a smooth consistency without chunks.
  • Measuring Cups: For accurate ingredient measurements, ensuring the right ratios for the best flavor.
  • Glass or Travel Mug: Perfect for serving or taking your shake on the go while keeping it fresh.

Serving Suggestions

Here’s how to enjoy your shake:

  • Garnish: Add sliced strawberries or a sprinkle of granola on top for added texture.
  • Pairing: Serve with whole-grain toast or a protein bar for a balanced meal.
  • Enjoy Cold: Serve your shake chilled for the best refreshing experience.

In conclusion, this strawberry protein shake is not only delicious but also a versatile addition to your diet. Whether you enjoy it post-workout or as a quick breakfast, it’s a simple way to boost your nutrition and satisfy your taste buds. So grab your ingredients, blend away, and enjoy a shake that’s as good for your body as it is for your palate!

Strawberry Protein Shake

Prep Time 5 minutes
Total Time 5 minutes
Servings 1 glass
Calories 250
A delicious and nutritious strawberry protein shake perfect for a quick breakfast or post-workout boost.

Ingredients

Liquid

  • 12 oz almond milk

Fruits

  • 8 stems strawberries (stems removed)

Dairy

  • 0.25 cup cottage cheese

Supplements

  • 1 scoop vanilla protein powder

Toppings

  • to taste whipped cream (optional)

Instructions 

  • Combine almond milk, strawberries, cottage cheese, and protein powder in a blender and blend until smooth.
  • Pour into a glass and top with whipped cream if desired.

Notes

For extra flavor, add a few ice cubes before blending.
Calories: 250kcal
Cost: $5
Course: Breakfast
Keyword: Protein, Strawberry

Discover the Joy of Flatbread with Hummus and Grilled Veggies

Welcome to a flavorful culinary adventure! If you’ve been searching for a simple yet delicious recipe that brings together the hearty satisfaction of flatbread, the creaminess of hummus, and the vibrant tastes of grilled veggies, you’re in the right place. This flatbread with hummus and grilled veggies is not only easy to make but also perfect for busy weeknights or casual gatherings with friends and family.

In this article, we will dive deep into the world of flatbread, exploring the wonderful ingredients, offering expert tips, and highlighting unique variations that will elevate your cooking game. By the end, you’ll feel empowered to whip up this delightful dish, impressing everyone with your culinary skills!

Why You’ll Love This Recipe

  • Quick and Easy Preparation: This recipe can be made in under 30 minutes, making it a perfect choice for weeknight dinners.
  • Customizable Ingredients: You can easily swap out the vegetables or hummus flavors to suit your taste preferences.
  • Healthy and Nutritious: Packed with fresh veggies and healthy fats from the olive oil, this dish is as good for you as it is delicious.
  • Vibrant Presentation: The colorful array of grilled veggies and fresh herbs makes for an eye-catching dish that’s great for sharing.
  • Versatile Serving Options: Serve it as a light dinner, a party appetizer, or a picnic treat—this recipe fits any occasion!

Ingredient Breakdown

Let’s take a closer look at the ingredients you’ll need to create this scrumptious flatbread, along with some helpful substitutions.

  • Large Flatbreads: You’ll need 2 large flatbreads. You can opt for store-bought or make your own for an extra special touch.
  • Hummus: 1 cup of your favorite hummus (store-bought or homemade). For a twist, try roasted garlic or spicy harissa hummus!
  • Zucchini: 1 zucchini, sliced lengthwise. This adds a lovely texture and flavor.
  • Red Bell Pepper: 1, sliced. Sweet and vibrant, it complements the earthiness of the hummus.
  • Red Onion: 1 small, sliced. Its sharpness balances the creaminess of the hummus.
  • Olive Oil: 2 tablespoons, for grilling. This enhances the flavors of the veggies.
  • Smoked Paprika: 1 teaspoon. Adds a smoky depth to the grilled vegetables.
  • Salt and Black Pepper: To taste.
  • Fresh Parsley and Mint: 1/4 cup of each, chopped. These herbs add freshness and brightness.
  • Lemon Juice: 1 tablespoon. A splash of acidity elevates all the flavors.

Pro Tips for Perfect Flatbread with Hummus and Grilled Veggies

Side view of a delicious flatbread with colorful grilled veggies and hummus.

Now that you have the ingredients, let’s talk about how to make this dish even better with some expert tips:

  • Prep Ahead: Slice your veggies and prepare the hummus in advance to save time on busy nights.
  • Marinate for Flavor: Consider marinating your veggies in olive oil and smoked paprika for at least 15 minutes before grilling.
  • Grill Tips: Ensure your grill or skillet is hot before adding the veggies. This helps achieve those beautiful char marks and enhances flavor.
  • Assemble with Care: Spread the hummus generously on the flatbread and layer the grilled veggies for a stunning presentation.
  • Garnish Wisely: Finish with a drizzle of olive oil and a sprinkle of fresh herbs to elevate the dish.
  • Experiment with Flavors: You can add feta cheese or olives for an extra Mediterranean touch!
  • Serve Warm: Flatbreads taste best when they’re warm, so serve right after assembling.
  • Pair with Drinks: This dish goes beautifully with a glass of chilled white wine or sparkling water with lemon.

Common Mistakes to Avoid

Even simple recipes can have pitfalls. Here are some common mistakes to steer clear of:

  • Overcooking Veggies: Keep an eye on your grilled veggies; they should be tender but still have a bit of crispness.
  • Skipping Seasoning: Don’t forget to season your veggies well before grilling. A little salt and pepper can go a long way!
  • Using Cold Ingredients: If your hummus is cold from the fridge, it may not spread well. Let it sit at room temperature for a few minutes.
  • Underestimating Herbs: Fresh herbs are a key component, so don’t skimp on them—use a generous amount!

Variations to Try

One of the best things about this recipe is its versatility. Here are some fun variations to consider:

  • Spicy Flatbread: Add sliced jalapeños or a drizzle of sriracha to the hummus for a kick.
  • Protein Boost: Top with grilled chicken or chickpeas for extra protein.
  • Gluten-Free Option: Use gluten-free flatbreads or lettuce wraps for a lighter version.
  • Different Hummus Flavors: Experiment with different hummus varieties like beet or avocado hummus for a unique taste.

Storage and Make-Ahead Instructions

If you want to prepare this dish ahead of time, here’s how to store it:

  • Storage: Keep leftover grilled veggies and hummus in separate airtight containers in the fridge for up to 3 days.
  • Make-Ahead: You can grill the veggies and prepare the hummus a day in advance. When ready to serve, simply assemble the flatbreads.
  • Reheating: Warm the veggies in a skillet or microwave before assembling to enjoy them at their best.

Frequently Asked Questions

Let’s address some common questions to help you on your cooking journey:

  • Can I use store-bought flatbread? Yes, store-bought flatbreads work great for this recipe!
  • What can I substitute for hummus? You can use tzatziki, baba ganoush, or even cream cheese as alternatives.
  • How do I make the flatbread crispy? Brush the flatbreads with olive oil before grilling or baking.
  • Can I use frozen vegetables? Yes, thaw and drain them well before grilling.
  • Is this recipe vegan? Yes, this flatbread with hummus and grilled veggies is entirely vegan-friendly.
  • How can I make it gluten-free? Use gluten-free flatbreads or lettuce wraps.
  • Can I prepare this dish in advance? Yes, you can prepare the veggies and hummus ahead of time, just assemble before serving.
  • What’s the best way to serve this dish? Serve warm with a drizzle of olive oil and a sprinkle of fresh herbs.

Nutritional Tips and Dietary Adaptations

This flatbread recipe is not only delicious but also nutritious. Here are some tips for those with dietary considerations:

  • Low-Carb Option: Substitute flatbreads with zucchini slices or lettuce wraps for a low-carb alternative.
  • High-Protein Version: Add grilled chicken or chickpeas for a protein boost, making it more filling.
  • Healthy Fats: The olive oil provides healthy monounsaturated fats, beneficial for heart health.

Equipment Recommendations

To make this recipe, you’ll need some basic kitchen tools:

  • Grill or Grill Pan: A good quality grill or grill pan is essential for achieving those beautiful char marks.
  • Cutting Board and Knife: For slicing your veggies with ease.
  • Spatula: To flip and serve your grilled veggies.
  • Mixing Bowl: For mixing the hummus or marinating veggies.

Serving Suggestions

To make your flatbread experience even more delightful, consider these serving suggestions:

  • Pair with a Salad: A light salad of mixed greens with a lemon vinaigrette complements the flatbread beautifully.
  • Offer Dips: Serve additional dips like tzatziki or spicy feta dip alongside the flatbread.
  • Make it a Platter: Create a colorful platter with assorted veggies, olives, and nuts for a Mediterranean feast!

Conclusion

Cooking should be an enjoyable adventure, and this flatbread with hummus and grilled veggies recipe is the perfect way to explore your culinary creativity. With its quick preparation, vibrant flavors, and endless customization options, you’ll be able to delight your family and friends with ease. So roll up your sleeves, gather your ingredients, and dive into this delicious experience. Happy cooking!

Flatbread with Hummus, Grilled Veggies, and Fresh Herbs

Prep Time 15 minutes
Cook Time 10 minutes
Total Time 25 minutes
Servings 4 people
Calories 350
A delicious and vibrant flatbread topped with creamy hummus, grilled vegetables, and fresh herbs for a flavorful meal.

Ingredients

Flatbreads

  • 2 large flatbreads

Hummus

  • 1 cup hummus

Vegetables

  • 1 zucchini zucchini, sliced lengthwise
  • 1 red bell pepper red bell pepper, sliced
  • 1 small red onion, sliced

Olive Oil and Spices

  • 2 tbsp olive oil
  • 1 tsp smoked paprika
  • to taste Salt and black pepper Salt and black pepper

Fresh Herbs

  • 0.25 cup fresh parsley, chopped
  • 0.25 cup fresh mint, chopped

Lemon Juice

  • 1 tbsp lemon juice

Instructions 

  • Grill the sliced vegetables with olive oil and smoked paprika until tender.
  • Spread hummus evenly over each flatbread.
  • Top the flatbreads with grilled vegetables, chopped herbs, and a squeeze of lemon juice.
  • Slice and serve immediately.

Notes

Feel free to add more herbs or spices for extra flavor.
Calories: 350kcal
Cost: $12
Course: Main Course
Cuisine: Mediterranean
Keyword: Vegetables

Unleashing the Magic of Mango Shake

Welcome to your new favorite way to enjoy the vibrant, tropical flavor of mangoes! This mango shake is not just a delicious drink; it’s a refreshing escape that you can whip up in minutes. Perfect for hot days or as a delightful snack, this recipe combines the sweetness of ripe mangoes with creamy milk, creating a beverage that is both satisfying and energizing. Let’s dive into the world of mango shakes and discover why this recipe will quickly become a staple in your kitchen!

Why You’ll Love This Recipe

This mango shake isn’t just tasty; it offers a plethora of benefits that will make you want to blend it up every day!

  • Quick and Easy: With just a few simple ingredients, you can create a delicious drink in under 10 minutes.
  • Healthy and Nutritious: Packed with vitamins A and C, mangoes are not only delicious but also good for your immune system.
  • Versatile Treat: Enjoy it as a snack, dessert, or even for breakfast! You can even dress it up with toppings or mix-ins.
  • Customizable: Easily adjust the sweetness and creaminess by changing the type of milk or adding other fruits.
  • Kid-Friendly: This shake is a great way to introduce kids to healthy fruits while satisfying their sweet tooth!

Ingredients Breakdown

Here’s what you’ll need to make this delightful mango shake:

  • 2 ripe mangoes: Look for mangoes that are slightly soft to the touch and fragrant. You can also use frozen mango chunks if fresh ones aren’t available.
  • 2 cups milk: Whole, skim, or any non-dairy alternatives like almond or coconut milk work perfectly.
  • 1 tablespoon sugar or maple syrup (optional): Adjust according to your sweetness preference; ripe mangoes often provide enough natural sweetness.
  • Small handful of ice: This is optional, especially if you’re using frozen mangoes, but it helps create a refreshing, slushy texture.

Step-by-Step Instructions to Make the Perfect Mango Shake

Side view of a frosty mango shake topped with mango pieces, captured in natural light.

Let’s get blending! Follow these simple steps to create a delicious mango shake.

  • Step 1: Peel the mangoes and chop them into chunks, avoiding the fibrous center. If you’re using frozen mango chunks, skip this step.
  • Step 2: Add all ingredients—mango chunks, milk, sugar or syrup (if using), and ice—into a blender.
  • Step 3: Blend on high until the mixture is smooth and creamy. You may need to stop and scrape down the sides of the blender to ensure everything is well mixed.
  • Step 4: Taste your shake! Adjust sweetness or add more milk if it’s too thick, then blend again briefly.
  • Step 5: Pour into glasses and enjoy immediately!

Pro Tips for the Best Mango Shake

To ensure your mango shake turns out perfectly every time, keep these expert tips in mind:

  • Choose the right mango: Alphonso mangoes are known for their sweetness and rich flavor, but any ripe variety will work.
  • Chill your ingredients: For an extra refreshing experience, chill your mangoes and milk beforehand.
  • Experiment with flavors: Consider adding a splash of vanilla extract or a pinch of cardamom for an aromatic twist.
  • Make it a meal: Add a scoop of protein powder or a banana for a more filling shake.
  • Blend in greens: Spinach or kale can be added for an extra nutrient boost without altering the flavor much.
  • Garnish creatively: Top with whipped cream, chopped nuts, or a sprinkle of cinnamon for added texture and flavor.
  • Storage tip: If you have leftovers, store in an airtight container in the fridge for up to 24 hours, but consume quickly for the best taste.
  • Don’t skip the ice: If you want a thicker shake, use the ice even if you’re using frozen mangoes—it adds a great texture!

Common Mistakes and Troubleshooting

Even the best of us have mishaps in the kitchen! Here are a few common mistakes to avoid when making your mango shake:

  • Using unripe mangoes: They can be hard and lack flavor. Choose ripe ones for the best taste.
  • Too thick or too thin: If your shake is too thick, add more milk; if it’s too thin, try blending in more fruit or ice.
  • Over-blending: Blend just until smooth; over-blending can warm up the shake and alter the texture.
  • Ignoring taste adjustments: Always taste before serving! You can easily adjust sweetness or creaminess to your liking.

Delicious Variations to Try

Ready to switch things up? Here are some exciting variations you can try with this mango shake recipe:

  • Mango Banana Shake: Add 1 ripe banana for a creamier, more filling shake.
  • Mango Lassi: Blend in a pinch of cardamom and use yogurt instead of milk for a traditional twist.
  • Tropical Mango Shake: Mix in pineapple chunks for an extra tropical flavor.
  • Mango Coconut Shake: Use coconut milk and add shredded coconut for a beachy feel.

Storage and Make-Ahead Instructions

If you want to prepare your mango shake ahead of time, here’s how to store it:

  • Refrigerate: Store in an airtight container in the fridge for up to 24 hours. Shake well before serving.
  • Freeze: For longer storage, pour into ice cube trays and freeze. Blend frozen cubes with milk for a quick smoothie later!

FAQs About Mango Shake

Here are some common questions about mango shakes that might help you:

  • Can I use frozen mango instead of fresh? Yes, frozen mango works wonderfully and can make your shake even creamier!
  • Is this recipe vegan? Absolutely! Just use non-dairy milk and skip the sugar if desired.
  • What can I add for extra nutrition? Consider adding chia seeds, flaxseeds, or even a scoop of protein powder.
  • How can I make it sugar-free? Ripe mangoes are naturally sweet. You can omit the added sugar or use a sugar substitute.
  • Can I make this shake ahead of time? Yes, but it’s best enjoyed fresh. If you must prepare it in advance, store it in the fridge and stir before serving.
  • What’s the best way to serve a mango shake? Serve chilled in a tall glass, garnished with fresh fruit or a sprig of mint for a beautiful presentation!
  • How long can I store leftovers? Consume leftovers within 24 hours for the best flavor and texture.
  • Can I blend in other fruits? Yes! Berries, peaches, or even greens can be blended in for added flavor and nutrients.

Nutritional Tips and Dietary Adaptations

This mango shake is naturally nutritious, but here are some tips to adjust it according to your dietary needs:

  • For Weight Watchers: Use unsweetened almond milk and omit added sugars to lower points.
  • For Keto: Substitute mango with avocado for a creamy texture without the carbs.
  • For Dairy-Free: Use coconut, almond, or oat milk to keep it deliciously creamy.
  • For Higher Protein: Add Greek yogurt or a protein powder of your choice.

Recommended Equipment

Here’s what you’ll need to create your mango shake:

  • High-Speed Blender: A good blender makes all the difference for a smooth consistency.
  • Measuring Cups: For accurate ingredient measurements to achieve the best results.
  • Cup or Glass: To serve your refreshing shake in style!

Serving Suggestions

Serve your mango shake in tall glasses with a colorful straw for a fun touch. You can also pair it with:

  • Granola: Sprinkle some granola on top for a crunchy texture.
  • Fresh Fruit: Garnish with slices of mango or strawberries for visual appeal.
  • Cookies: Enjoy alongside your favorite cookies for a sweet snack duo.

Your Mango Shake Adventure Awaits!

Now that you have the ultimate guide to making a delightful mango shake, it’s time to roll up your sleeves and get blending! Remember, cooking should be fun and stress-free. This mango shake is a perfect example of how simple ingredients can come together to create something truly special. Enjoy the vibrant flavors and the joy of creating something delicious in your kitchen!

Mango Shake

Prep Time 5 minutes
Total Time 5 minutes
Servings 2 cups
Calories 200
A refreshing and creamy mango shake perfect for a quick snack or breakfast.

Ingredients

Fruits

  • 2 pieces ripe mangoes (peeled and chopped)
  • 1.5 cups milk or dairy-free milk
  • 1 tbsp sugar or maple syrup (optional)
  • Small handful ice (omit if using frozen mango chunks)

Instructions 

  • Peel and chop the mangoes, avoiding the fibrous centre.
  • Add all ingredients to a blender and blend until smooth.
  • Pour into glasses and enjoy!

Notes

You can use frozen mango chunks to skip the ice.
Calories: 200kcal
Cost: $5
Course: Beverage
Keyword: Mango

Transform Your Weeknight Dinners with Street-Cart Chicken and Rice

Welcome, fellow food lovers! If you’re looking to elevate your weeknight meals, you’ve come to the right place. Today, we’re diving into a flavor-packed recipe for Street-Cart Chicken and Rice that will transport your taste buds straight to the vibrant streets filled with the aromas of delicious food. This dish is not just about satisfying hunger—it’s about creating a joyful cooking experience that brings your family together. With a few simple ingredients and easy steps, you’ll find that cooking can be fun and rewarding!

Why You’ll Love This Recipe

This recipe isn’t just another meal; it’s a culinary adventure! Here’s why you’ll fall head over heels for it:

  • Quick and Easy: This dish comes together in under an hour, making it perfect for busy weeknights.
  • Flavor Explosion: The combination of spices and toppings creates a mouthwatering experience that your palate will crave.
  • Customizable: You can easily adjust the spice levels or swap ingredients to suit your family’s preferences.
  • Meal Prep Friendly: Great for batch cooking—make extra and enjoy leftovers for lunch!
  • Family-Friendly: Kids and adults alike will love the delicious flavors and fun presentation!

Ingredient Breakdown

Let’s take a closer look at the ingredients that will bring this dish to life. Each ingredient plays a crucial role in the overall flavor:

  • Chicken Thighs: Tender and juicy, they absorb the marinade beautifully. Feel free to substitute with chicken breasts if preferred.
  • Olive Oil: Essential for cooking and adds richness. You can use avocado oil for a different flavor.
  • Spices: Smoked paprika, cumin, coriander, and turmeric create a warm, aromatic base.
  • Rice: Basmati is ideal for its fluffy texture, but jasmine rice works too.
  • Chicken Stock: Enhances the rice’s flavor; use low-sodium for a healthier option.
  • Salad Ingredients: Romaine lettuce, tomatoes, and onion add freshness and crunch.
  • White Sauce: A creamy yogurt-based sauce that complements the spices. Customize it with herbs!
  • Hot Sauce: Adds a kick! Adjust according to your spice tolerance.
  • Pita or Flatbread: Perfect for scooping up the chicken and rice.

Step-by-Step Cooking Instructions

Juicy chicken thighs served over basmati rice beside flatbread.

Now, let’s get cooking! Follow these steps for a delicious meal.

  • Marinate the Chicken: In a large zip-top bag, combine lemon juice, garlic, salt, smoked paprika, coriander, cumin, oregano, and 1 tablespoon of olive oil. Add the chicken, toss to coat, and let it sit in the fridge for at least 30 minutes or up to 2 days.
  • Cook the Chicken: Heat a large, deep pot over medium-high heat. Add a small amount of olive oil. Cook the chicken in a single layer until browned, about 8 minutes on the first side and 5 minutes on the second. Set aside.
  • Toast the Rice: In the same pot, wipe it out and add 1 tablespoon of olive oil. Once hot, add turmeric, cumin, and rice, toasting them for about a minute. Pour in the chicken stock and salt, bring to a boil, then reduce heat to low. Cover and cook for 15 minutes.
  • Prepare the Salad: While the rice cooks, toss the lettuce, onion, and tomatoes in a bowl. Season with salt and pepper and set aside.
  • Make the Sauces: In a small bowl, combine yogurt, mayonnaise, vinegar, sugar, and salt for the white sauce. In another bowl, mix hot sauce and harissa for the hot sauce.
  • Finish the Chicken: Chop the cooked chicken into bite-size pieces, return to the pot, and cook over medium-high heat for 3-5 minutes until heated through.
  • Serve: Scoop the rice onto a platter, pile the chicken on top, and dot with hot sauce, drizzle with white sauce, and garnish with cilantro. Serve warm with pita or flatbread.

Expert Tips for Perfection

To ensure your Street-Cart Chicken and Rice turns out fantastic, here are some valuable tips:

  • Don’t Rush the Marinade: Allow the chicken to marinate for at least 30 minutes—better flavor comes from patience!
  • High Heat for Browning: Ensure your pan is hot enough to achieve a good sear on the chicken.
  • Let the Rice Rest: After cooking, let the rice sit for 5 minutes off the heat to finish steaming.
  • Use Fresh Ingredients: Fresh herbs and vegetables make a big difference in flavor.
  • Adjust Spice Levels: If you prefer it milder, reduce the amount of hot sauce or paprika.
  • Save Some Marinade: Reserve a bit of the marinade to drizzle over the cooked chicken for extra flavor.
  • Cooking Time Matters: Monitor your chicken carefully to avoid overcooking it.
  • Garnish Generously: Don’t skimp on the cilantro or other fresh herbs—they really elevate the dish!

Common Mistakes and Troubleshooting

Even the best chefs can make mistakes! Here are some common pitfalls and how to avoid them:

  • Overcooked Chicken: Keep an eye on your chicken while it cooks, as overcooking can make it dry.
  • Undercooked Rice: If the rice isn’t cooked through, add a bit more chicken stock and cover it to steam further.
  • Too Much Spice: If it’s too spicy, serve it with more yogurt sauce to balance the heat.
  • Dry Salad: Ensure your salad is dressed just before serving to keep it fresh and crunchy.

Variations to Try

Feel free to get creative! Here are a few variations you can try:

  • Vegetarian Option: Substitute chicken with marinated tofu or chickpeas for a hearty plant-based meal.
  • Spicy Twist: Add diced jalapeños to the salad for an extra kick!
  • Herbed Rice: Mix in fresh herbs like parsley or dill for a fragrant rice dish.
  • Cheesy Delight: Top with crumbled feta or shredded cheese for a creamy finish.

Storage and Make-Ahead Instructions

Planning ahead? Here’s how to store and reheat your meal:

  • Refrigerate: Store leftovers in airtight containers for up to 3 days.
  • Freeze: The chicken and rice can be frozen separately for up to a month. Thaw overnight in the fridge before reheating.
  • Reheat: Warm in a pan over low heat, adding a splash of chicken stock for moisture if needed.
  • Make Ahead: Marinate the chicken a day in advance for even more flavor.

Frequently Asked Questions

Got questions? Here are some common ones:

  • Can I use brown rice instead of basmati? Yes, but adjust the cooking time as brown rice takes longer to cook.
  • Is this dish gluten-free? Yes, as long as you use gluten-free pita or flatbread.
  • What can I substitute for yogurt? You can use sour cream or a dairy-free yogurt alternative.
  • How can I make it spicier? Incorporate more hot sauce or add chili flakes to the marinade.
  • Can I use chicken breasts instead of thighs? Absolutely! Just be mindful not to overcook them.
  • What kind of toppings work best? Fresh herbs, diced cucumber, and sliced radishes add great texture and flavor!
  • Can this recipe be doubled? Yes, just ensure your cooking pot is large enough!
  • How do I make it dairy-free? Use a dairy-free yogurt alternative for the sauces.

Nutrition Tips and Dietary Adaptations

Want to keep it healthy? Here are some nutrition tips:

  • Lean Protein: Choose skinless chicken thighs for a lower fat option.
  • Whole Grains: Opt for brown basmati rice for added fiber.
  • Load Up on Veggies: Add extra vegetables to your salad for more nutrients and color.
  • Control Portions: Serve smaller portions of rice and load up on salad for a balanced meal.

Recommended Equipment

Having the right tools makes cooking a breeze! Here’s what I recommend:

  • Large Pot with Lid: Perfect for cooking the chicken and rice together.
  • Zip-Top Bags: Ideal for marinating the chicken without mess.
  • Cutting Board: Essential for prepping all your ingredients safely.
  • Mixing Bowls: Handy for combining salads and sauces.

Serving Suggestions

To make your meal even more delightful, consider these serving ideas:

  • Garnish Generously: Add fresh cilantro or parsley for a burst of flavor.
  • Serve with Extra Sauces: Offer additional white sauce and hot sauce on the side for those who like it spicy!
  • Pair with Drinks: A refreshing mint lemonade or iced tea complements the dish perfectly.
  • Use Warm Bread: Serve warm pita or flatbread for the ultimate experience.

In conclusion, cooking Street-Cart Chicken and Rice is not just about feeding your family; it’s about creating a joyful experience in the kitchen. With this comprehensive guide, you’re now equipped to make a delicious meal that everyone will love. Remember, cooking is all about confidence—trust yourself, follow these steps, and enjoy every moment. Happy cooking, and let the flavors take you on a journey!

Street-Cart Chicken and Rice Flatbread

Prep Time 20 minutes
Cook Time 30 minutes
Total Time 50 minutes
Servings 4 servings
Calories 650
A flavorful and vibrant dish featuring marinated chicken, fragrant rice, fresh salad, and spicy sauces, perfect for a quick street-style meal.

Ingredients

Marinade and Chicken

  • 1 each lemon, juiced
  • 2 cloves garlic, crushed
  • 1 tsp kosher salt
  • 1 tsp smoked paprika or sweet, or hot
  • 0.75 tsp ground coriander
  • 1.5 tsp ground cumin
  • 1 tbsp olive oil (plus extra for cooking)
  • 2 pounds boneless, skinless chicken thighs
  • 1 tbsp olive oil
  • 0.5 tsp ground turmeric
  • 0.75 tsp ground cumin
  • 2 cups basmati rice
  • 3.5 cups chicken stock
  • 1 tsp kosher salt

Salad

  • 1 head romaine lettuce, chopped
  • 2 medium tomatoes or cherry tomatoes, chopped
  • 0.5 small red onion, sliced

Dressing

  • 0.8 cups plain whole milk yogurt
  • 2 tbsp mayonnaise
  • 1 tbsp distilled white vinegar
  • 0.5 tsp sugar
  • 0.5 tsp kosher salt
  • 1 tbsp hot sauce
  • 1 tbsp harissa

Garnish and Serving

  • to taste fresh cilantro, chopped

Flatbread or Pita

Instructions 

  • Marinate chicken in lemon juice, garlic, salt, paprika, coriander, cumin, and olive oil for at least 30 minutes.
  • Cook chicken in a hot pan until browned and cooked through, then chop into bite-sized pieces.
  • Toast rice with turmeric and cumin, add chicken stock and salt, then simmer covered for 15 minutes. Rest for 5 minutes.
  • Prepare salad with lettuce, tomato, and onion; season with salt and pepper. Make white sauce and hot sauce mixture.
  • Combine cooked chicken with rice, then serve on flatbread or pita, topped with sauces, cilantro, and salad.

Notes

For extra flavor, marinate the chicken overnight and serve with warm flatbread.
Calories: 650kcal
Cost: $15
Course: Main Course
Cuisine: Middle Eastern
Keyword: Chicken, flatbread, rice