Author

Steven

Browsing

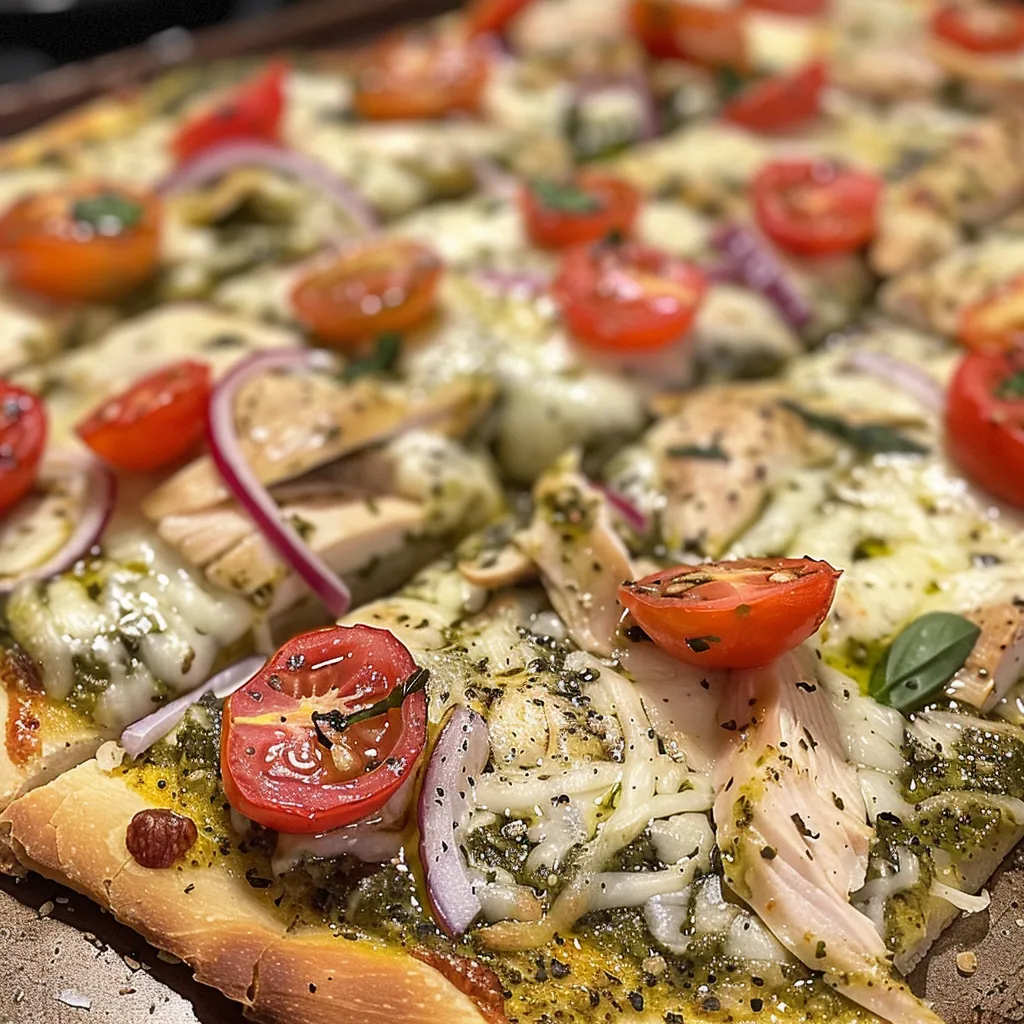
Unleash Your Inner Chef with BBQ Chicken Flatbread

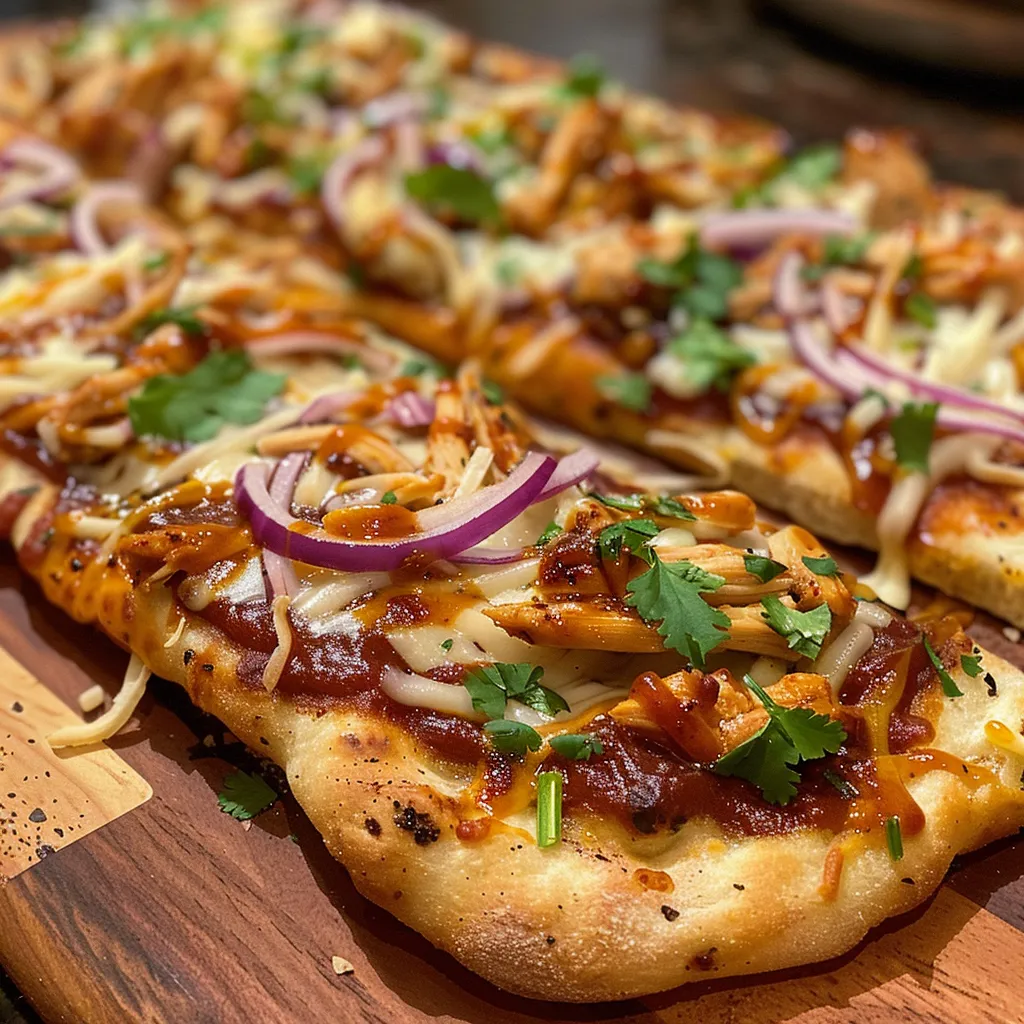
If you’re looking for a quick, satisfying meal that packs a punch of flavor, look no further than BBQ Chicken Flatbread. This delightful dish combines tender chicken, zesty barbecue sauce, and gooey mozzarella cheese atop a crispy flatbread base, making it perfect for busy weeknights when you want something delicious without spending hours in the kitchen.

In this comprehensive guide, I’ll walk you through everything you need to know about making the perfect BBQ Chicken Flatbread—from ingredients and cooking tips to delicious variations and storage options. Let’s dive into the world of BBQ Chicken Flatbread and discover why it’s a family favorite!

Why You’ll Love This Recipe

Here are just a few reasons why this BBQ Chicken Flatbread will become a staple in your home:

  • Quick and Easy: This recipe takes only 30 minutes from start to finish, making it ideal for hectic evenings.
  • Customizable: You can tailor the toppings and sauces to suit your family’s tastes, ensuring everyone is happy.
  • Minimal Cleanup: With just one baking sheet needed, cleanup is a breeze!
  • Great for Leftovers: If you have any leftovers (which is rare!), they reheat beautifully in the oven.
  • Kid-Friendly: The combination of flavors and textures is sure to please even the pickiest eaters.

Ingredients You’ll Need

Let’s break down the ingredients that make this BBQ Chicken Flatbread so irresistible:

  • Flatbreads or Naan: You can use store-bought flatbreads, naan, or pita bread. They’re all delicious options!
  • Cooked Chicken: For the best flavor and texture, use shredded or chopped cooked chicken breast. You can use rotisserie chicken for convenience.
  • BBQ Sauce: Your favorite brand of barbecue sauce will work perfectly. Just make sure it’s not too watery.
  • Shredded Mozzarella Cheese: This cheese melts beautifully and adds that gooey, cheesy goodness.
  • Red Onion: Thinly sliced for a bit of crunch and sweetness.
  • Fresh Cilantro: Adds a burst of freshness and color; feel free to substitute with parsley if you prefer.
  • Olive Oil: For brushing on the flatbreads to achieve that golden, crispy texture.
  • Black Pepper: Just a dash for some added warmth.

How to Make BBQ Chicken Flatbread Step-by-Step

Juicy BBQ Chicken Flatbread featuring shredded chicken and sliced red onion.

Ready to get cooking? Here’s how to make your BBQ Chicken Flatbread:

  1. Preheat your oven to 425°F (220°C) and line a baking sheet with parchment paper.
  2. Brush olive oil over both flatbreads and place them onto the prepared baking sheet.
  3. Toss the cooked chicken with 1/4 cup of the BBQ sauce until evenly coated.
  4. Spread the remaining BBQ sauce evenly onto the flatbreads.
  5. Top with mozzarella cheese, then the BBQ chicken and sliced red onion.
  6. Bake in the preheated oven for 12-15 minutes, until the cheese is melted and bubbly, and the edges are golden.
  7. Remove from the oven, sprinkle with chopped cilantro and black pepper. Slice and serve warm.

Pro Tips for the Best BBQ Chicken Flatbread

Want to elevate your BBQ Chicken Flatbread game? Here are some expert tips:

  • Use High-Quality BBQ Sauce: A good quality sauce makes all the difference. Don’t be afraid to experiment with different flavors.
  • Don’t Overload on Toppings: Keep it simple. Too many toppings can make the flatbread soggy.
  • Preheat Your Oven: Always ensure your oven is preheated to achieve that perfect crispy crust.
  • Cook the Chicken Properly: If cooking chicken from scratch, ensure it’s cooked through and seasoned well.
  • Broil for Extra Crispiness: If you like a crispy top, broil the flatbreads for the last minute of baking.
  • Use Fresh Ingredients: Fresh cilantro and red onion add vibrant flavor compared to dried or stale ingredients.
  • Try Different Cheeses: Experiment with other types of cheese like cheddar or pepper jack for a unique twist.
  • Make It Ahead: Prep the ingredients ahead of time and assemble when ready to bake.

Common Mistakes and Troubleshooting

Even the best chefs make mistakes! Here are some common issues and how to avoid them:

  • Soggy Flatbread: Ensure you don’t add too much sauce or toppings. Keep everything balanced!
  • Burnt Edges: If the edges of your flatbread are burning too quickly, lower the oven temperature slightly.
  • Uneven Cooking: If your flatbread is cooking unevenly, rotate it halfway through baking.

Delicious Variations to Try

Feeling adventurous? Here are some variations you can try to mix things up:

  • Buffalo Chicken Flatbread: Substitute BBQ sauce with buffalo sauce and top with blue cheese crumbles.
  • Vegetarian BBQ Flatbread: Skip the chicken and load up on grilled vegetables like zucchini, bell peppers, and mushrooms.
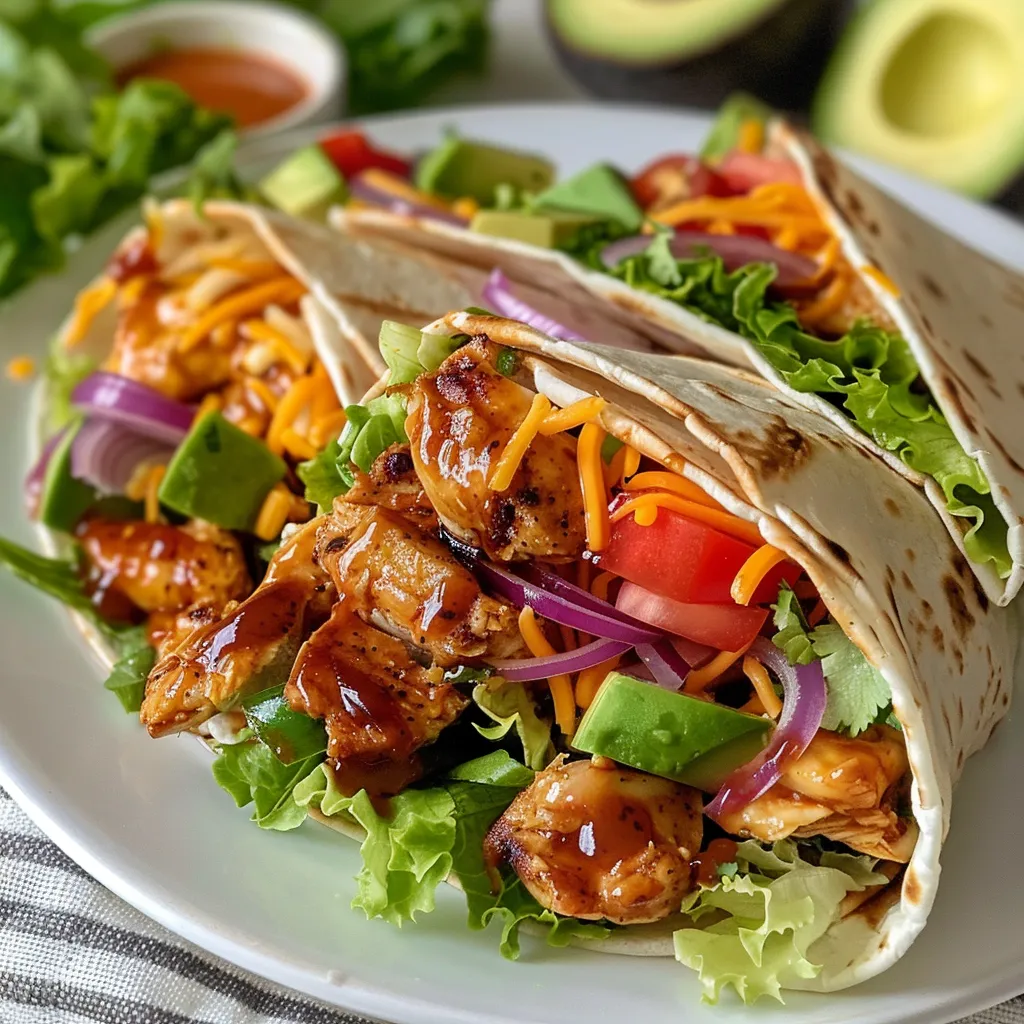
  • Mexican-Inspired Flatbread: Use salsa instead of BBQ sauce, add black beans, corn, and top with avocado.
  • Greek Flatbread: Use tzatziki sauce in place of BBQ sauce, and top with feta cheese, olives, and spinach.

Storage and Make-Ahead Instructions

If you want to make this meal ahead of time or store leftovers, here’s how:

  • Make Ahead: You can prep the chicken and toppings ahead of time. Assemble just before baking.
  • Storing Leftovers: Store any leftovers in an airtight container in the fridge for up to 3 days.
  • Reheating: Reheat in the oven at 350°F (175°C) for about 10 minutes until warmed through.

Nutrition Tips and Dietary Adaptations

This BBQ Chicken Flatbread can be a healthy choice with a few tweaks:

  • For a Healthier Base: Use whole grain or cauliflower flatbreads for extra nutrients.
  • Low-Calorie Option: Use less cheese or a reduced-fat version to cut calories.
  • Gluten-Free: Opt for gluten-free flatbreads or tortillas to accommodate dietary restrictions.

Essential Equipment Recommendations

Here’s what you’ll need to create your BBQ Chicken Flatbread:

  • Baking Sheet: A sturdy baking sheet is essential for even baking.
  • Parchment Paper: This prevents sticking and makes cleanup easier.
  • Mixing Bowl: For tossing chicken with sauce and combining ingredients.
  • Sharp Knife: For slicing your flatbread into perfect portions.

Serving Suggestions

Wondering what to serve with your BBQ Chicken Flatbread? Here are some ideas:

  • Salad: A fresh side salad with mixed greens and a light vinaigrette balances the richness of the flatbread.
  • Sweet Potato Fries: Crispy sweet potato fries are a fantastic complement.
  • Coleslaw: A tangy coleslaw adds a refreshing crunch.

Frequently Asked Questions (FAQs)

  • Can I use frozen flatbreads? Yes, just thaw them before using.
  • How do I make it spicier? Add jalapeños or use spicy BBQ sauce for a kick.
  • Can I use a different type of cheese? Absolutely! Cheddar, gouda, or pepper jack can be great alternatives.
  • What’s the best way to store leftovers? Keep them in an airtight container in the fridge for up to 3 days.
  • Can I make it vegetarian? Yes! Simply omit the chicken and add more veggies.
  • How do I reheat the flatbread? Reheat in the oven for the best crispy texture.
  • Can I use homemade BBQ sauce? Definitely! Homemade BBQ sauce can add a personal touch.
  • What other toppings can I use? Feel free to experiment with different toppings like olives, bell peppers, or even pineapple!

Now that you have all the tips and tricks, it’s time to gather your ingredients and get cooking! BBQ Chicken Flatbread is not just a meal; it’s an experience that will fill your kitchen with mouthwatering aromas and your family with joy. Enjoy the process, and remember, the best meals are made with love and a sprinkle of creativity!

BBQ Chicken Flatbread

Prep Time 10 minutes
Cook Time 15 minutes
Total Time 25 minutes
Servings 4 pieces
Calories 350
A delicious and easy-to-make flatbread topped with barbecue chicken, cheese, and fresh herbs, perfect for a quick meal or snack.

Ingredients

Flatbreads

  • 2 pieces flatbreads or naan
  • 1 cup cooked chicken breast, shredded or chopped
  • 0.5 cup barbecue sauce
  • 1 cup shredded mozzarella cheese
  • 0.25 cup red onion, thinly sliced
  • 2 tablespoons fresh cilantro, chopped
  • 1 tablespoon olive oil
  • 0.25 teaspoon black pepper

Instructions 

  • Preheat oven to 425°F (220°C) and line a baking sheet with parchment.
  • Brush flatbreads with olive oil and place on the baking sheet.
  • Toss cooked chicken with 1/4 cup barbecue sauce. Spread remaining sauce on flatbreads.
  • Top with cheese, BBQ chicken, and red onion. Bake for 12-15 minutes until cheese melts and edges are golden.
  • Remove from oven, sprinkle with cilantro and black pepper. Slice and serve warm.

Notes

For extra flavor, add a drizzle of honey or hot sauce before serving.
Calories: 350kcal
Cost: $15
Course: Main Course
Cuisine: American
Keyword: Barbecue, Chicken, flatbread

Unlock the Flavor: Your Guide to Easy Grilled Shrimp Scampi Flatbread Pizza

Welcome to a delicious journey where cooking meets simplicity! Imagine biting into a perfectly grilled shrimp scampi flatbread pizza, bursting with flavors and the comforting aroma of garlic and herbs. This recipe is designed for those busy weeknights when you crave something special without spending hours in the kitchen. In just a few easy steps, you can create a dish that not only delights your taste buds but also impresses your family and friends. Let’s dive into the details!

Why You’ll Love This Recipe

  • Quick and Easy: Prepare a flavorful meal in under 30 minutes, making it perfect for busy weeknights.
  • Flavor-Packed: The combination of juicy shrimp, garlic, and gooey mozzarella creates a taste explosion.
  • Versatile: Customize the toppings or swap out ingredients to fit your dietary preferences.
  • Minimal Cleanup: Using flatbread means less mess than traditional pizza dough.
  • Impressive Presentation: This dish looks as good as it tastes, making it ideal for entertaining.

Ingredients Breakdown & Substitutions

Here’s what you’ll need to make this scrumptious grilled shrimp scampi flatbread pizza:

  • Flatbread: Use any 8-inch flatbread, such as Joseph’s Lavash Flatbread. You can also use pita bread or naan for a different texture.
  • Shrimp: 8 to 10 large jumbo shrimp, peeled and deveined. If shrimp is not available, try using diced chicken or firm tofu for a vegetarian option.
  • Cheese: 1/4 cup of mozzarella cheese. Feel free to substitute with any melty cheese like provolone or cheddar.
  • Garlic: 2 to 3 teaspoons, chopped. If you love garlic, add more for an extra kick!
  • Butter and Olive Oil: 1 tsp each. You can substitute with coconut oil or another cooking oil if preferred.
  • Chicken Stock: 1/4 cup for flavor depth. Vegetable stock works great for a vegetarian version.
  • Parmesan Cheese: For garnish, adds a nutty flavor.
  • Crushed Red Pepper Flakes: For a spicy kick, adjust to your taste.
  • Parsley: Fresh parsley for garnish, enhancing the dish’s appearance.

Step-by-Step Instructions

Juicy jumbo shrimp on a crispy flatbread with garlic and cheese, presented at an angle.

Let’s get cooking! Follow these simple steps to create your grilled shrimp scampi flatbread pizza:

  • Prepare the Sauce: In a skillet, heat the butter and olive oil over medium heat. Once the butter is melted and bubbly, add the chopped garlic. Sauté until the garlic turns golden brown, about 1-2 minutes.
  • Add Stock: Pour in the chicken stock and cook until the mixture reduces by half, which concentrates the flavors.
  • Cook the Shrimp: Add the shrimp to the skillet. Cook each side until they turn pink, about 2-3 minutes per side. Ensure they are cooked through but not overdone.
  • Assemble the Pizza: Layer the mozzarella cheese on top of the flatbread. Evenly distribute the cooked shrimp and the garlic sauce over the cheese.
  • Grill: Preheat your grill to high heat. Place the flatbread on the grill and cook for 3-4 minutes or until the cheese has melted and the edges of the flatbread are crispy.

Pro Tips for Perfect Grilled Shrimp Scampi Pizza

  • Don’t Overcook the Shrimp: Cook shrimp until just pink to maintain their tender texture.
  • Preheat Your Grill: A hot grill ensures a crispy flatbread and perfectly melted cheese.
  • Experiment with Toppings: Add fresh spinach, sun-dried tomatoes, or even a drizzle of balsamic glaze for added flavor.
  • Use Fresh Ingredients: Fresh garlic and herbs will significantly enhance the dish’s flavor.
  • Make Ahead: Prepare the garlic sauce and shrimp in advance to save time during the week.

Common Mistakes & Troubleshooting

  • Shrimp is Chewy: This usually means they were overcooked; aim for just pink and firm.
  • Flatbread Burns: Keep an eye on the grill, as flatbreads cook quickly. Adjust the heat if necessary.
  • Lack of Flavor: Ensure you season the shrimp well and use fresh ingredients for the best taste.
  • Too Much Liquid: If the sauce is too runny, cook it longer to reduce it down before adding the shrimp.

Variations to Try

  • Spicy Shrimp Scampi: Add more crushed red pepper flakes or a drizzle of hot sauce.
  • Vegetarian Delight: Replace shrimp with grilled vegetables like zucchini, bell peppers, and mushrooms.
  • Italian Twist: Incorporate Italian herbs such as oregano and basil into the garlic sauce.
  • Cheesy Garlic Bread Version: Omit the shrimp and use extra cheese for a garlic bread twist.

Storage & Make-Ahead Instructions

This grilled shrimp scampi flatbread pizza is best enjoyed fresh, but you can store leftovers:

  • Refrigerate: Store in an airtight container for up to 3 days.
  • Reheat: Use an oven or grill to reheat for best results, maintaining crispy edges.
  • Make-Ahead Tip: Prepare the shrimp and sauce in advance. Assemble and grill when ready to serve.

Comprehensive FAQ

  • Can I use frozen shrimp? Yes! Just ensure they are thawed completely before cooking.
  • What if I don’t have garlic? You can substitute with garlic powder, though fresh is recommended for best flavor.
  • Can I make this gluten-free? Absolutely! Use gluten-free flatbread or corn tortillas as an alternative.
  • Is there a way to make this dairy-free? Substitute mozzarella with a dairy-free cheese alternative.
  • How can I add more veggies? Feel free to toss in spinach, cherry tomatoes, or bell peppers along with the shrimp.
  • What’s the best way to grill the pizza? Ensure your grill is preheated and oil the grates to prevent sticking.
  • Can I prepare this dish in the oven? Yes! Bake at 400°F for 10-12 minutes or until the cheese is melted and bubbly.
  • How can I enhance the flavor? Add fresh herbs like basil or parsley before serving for an extra flavor boost.

Nutritional Tips and Dietary Adaptations

This dish can be tailored to fit various dietary needs:

  • Low-Carb Option: Use a low-carb flatbread or even zucchini slices as a base.
  • Increase Protein: Add chickpeas or beans alongside the shrimp for an extra protein boost.
  • Reduce Sodium: Opt for low-sodium chicken stock and limit added salt for a healthier meal.

Essential Equipment for Success

  • Grill: A good grill is key to achieving that perfect char.
  • Skillet: For sautéing garlic and shrimp.
  • Spatula: To flip the flatbread easily on the grill.
  • Measuring Cups and Spoons: Ensure accurate ingredient portions for the best results.

Serving Suggestions

Pair your grilled shrimp scampi flatbread pizza with:

  • Side Salad: A fresh green salad with a light vinaigrette complements the richness of the pizza.
  • Garlic Bread: Enhance the garlic flavor with some toasted garlic bread on the side.
  • White Wine: A chilled glass of white wine brings out the flavors beautifully.

Final Thoughts

Cooking should be a joy, and this easy grilled shrimp scampi flatbread pizza is here to prove it! With its vibrant flavors and straightforward preparation, it invites you to experiment and make it your own. Remember, great meals don’t require perfection—just good ingredients and a willingness to try. So gather your ingredients and let’s get grilling! Happy cooking!

Grilled Shrimp Scampi Flat Bread Pizza

Prep Time 10 minutes
Cook Time 5 minutes
Total Time 15 minutes
Servings 2 pieces
Calories 350
A quick and flavorful flatbread pizza topped with succulent shrimp, garlic, and melted mozzarella, perfect for a delicious meal in minutes.

Ingredients

Flatbread

  • 1 piece 8 inch flatbread such as Joseph's Lavash Flatbread

Shrimp

  • 8 to 10 large jumbo shrimp, peeled and deveined

Cheese

  • 0.25 cup mozzarella cheese

Garlic

  • 2 to 3 teaspoons chopped garlic

Butter

  • 1 tsp butter

Olive Oil

  • 1 tsp olive oil

Chicken Stock

  • 0.25 cup chicken stock

Parmesan Cheese

  • Parmesan Cheese

Crushed Red Pepper Flakes

  • Crushed Red Pepper Flakes

Parsley

  • Parsley

Instructions 

  • Heat butter and olive oil in a skillet. Add garlic and cook until golden brown. Add chicken stock and reduce by half.
  • Cook shrimp on each side until pink. Remove from heat.
  • Layer mozzarella on flatbread, add cooked shrimp and sauce. Top with Parmesan, red pepper flakes, and parsley.
  • Grill on high for 3-4 minutes until cheese melts. Serve immediately.

Notes

Keep an eye on the grill to prevent overcooking the flatbread.
Calories: 350kcal
Cost: $15
Course: Main Course
Cuisine: American
Keyword: shrimp

How to Make Irresistibly Delicious Homemade Chocolate Cake Pops

Welcome, fellow baking enthusiasts! Today, we’re diving into a delightful world of homemade chocolate cake pops. These sweet bites are perfect for any occasion, whether you’re celebrating a birthday, having a family gathering, or just craving a sweet treat at home. This easy-to-follow recipe will guide you through every step, ensuring that your cake pops are not only delicious but also a joy to make. So let’s get started and unleash our inner bakers!

Why You’ll Love This Recipe

Here are a few irresistible reasons to try making chocolate cake pops:

  • Fun to Make: Rolling and decorating cake pops turns baking into a creative activity that everyone can enjoy.
  • Perfect for Any Occasion: These cake pops are versatile enough to fit any celebration, from birthdays to holidays.
  • Customizable Flavors: Change up the flavor profile by using different cake bases or coatings to suit your taste.
  • Great for Sharing: Cake pops are easy to package and share, making them perfect party favors.
  • Use Up Leftover Cake: If you have leftover cake, this is a fantastic way to repurpose it into something new and exciting!

Ingredient Breakdown

Understanding your ingredients is key to making the best chocolate cake pops. Here’s what you’ll need:

  • All-purpose flour (1 cup, 125 grams): This is the base of your cake. Make sure it’s spooned and leveled for accuracy.
  • Unsweetened cocoa powder (¼ cup + 2 tbsp, 30 grams): For that rich chocolate flavor. Natural cocoa powder is recommended.
  • Baking powder (¾ tsp) and Baking soda (½ tsp): These leavening agents help the cake rise.
  • Salt (½ tsp): Enhances the flavors of the other ingredients.
  • Light brown sugar (½ cup, 100 grams) and Granulated sugar (½ cup, 100 grams): A combination for sweetness and moisture.
  • Canola oil (⅓ cup, 80 ml): Keeps the cake moist.
  • Buttermilk (½ cup, 120 ml): Adds moisture and a slight tang. If you don’t have any, make your own by mixing milk with vinegar.
  • Large egg (1): Binds the ingredients together.
  • Pure vanilla extract (1 tsp): For flavor depth.
  • Boiling water (½ cup, 120 ml): Helps to bloom the cocoa powder for a more intense chocolate flavor.
  • Instant espresso powder (1 tsp, optional): Enhances the chocolate flavor.
  • Unsalted butter (¼ cup, 60 grams): For the frosting.
  • Powdered sugar (¾ cup, 90 grams): Sweetens and thickens the frosting.
  • Unsweetened cocoa powder (2 tbsp, sifted, 10 grams): Added to the frosting for flavor.
  • Milk (1 tbsp, 15 ml) and Vanilla extract (¼ tsp): For the frosting consistency and flavor.
  • Semi-sweet chocolate (16 ounces): For coating the cake pops.
  • Refined coconut oil (1 tbsp, 14 grams): Helps the chocolate coating set smoothly.
  • Optional sprinkles or chopped nuts: For decoration and added texture.

Pro Tips for Perfect Cake Pops

Side view of chocolate cake pops on a stick, drizzled with chocolate.

Here are some expert insights to ensure your cake pops turn out perfectly:

  • Use room temperature ingredients: This helps the batter mix together smoothly.
  • Don’t overmix the batter: Mix until just combined to avoid a dense cake.
  • Cool the cake completely: Always allow the cake to cool before crumbling; this prevents sogginess.
  • Check the consistency of the cake pop mixture: It should resemble cookie dough. If too dry, add a bit more frosting; if too wet, add more crumbled cake.
  • Freeze the cake balls: This step is crucial for preventing them from falling off the stick when dipped in chocolate.
  • Use a tall cup for dipping: This makes it easier to coat the cake pops evenly.
  • Work in small batches: Remove only a few cake balls from the freezer at a time to keep them firm.
  • Let the chocolate set at room temperature: This helps the coating to harden without cracking.
  • Experiment with toppings: Get creative with different sprinkles, nuts, or even drizzled chocolate.
  • Store properly: Keep your cake pops in an airtight container to maintain freshness.

Common Mistakes & Troubleshooting

Even seasoned bakers can run into issues. Here’s how to avoid common pitfalls:

  • Cake pops falling off the stick: Ensure the cake balls are frozen solid before dipping and the stick is dipped in chocolate before insertion.
  • Cracking chocolate coating: Allow your melted chocolate to cool slightly before dipping, and avoid over-melting.
  • Uneven coating: Use a swirling motion when dipping to ensure even coverage and tap off excess chocolate gently.
  • Too dry or crumbly cake balls: Adjust by adding more frosting until the mixture holds together.
  • Too moist cake balls: If the mixture is too wet, add more crumbled cake to achieve the right consistency.

Variations on Chocolate Cake Pops

Once you master the basic chocolate cake pop, why not try some variations? Here are a few ideas:

  • Red Velvet Cake Pops: Use red velvet cake instead of chocolate for a festive look.
  • Funfetti Cake Pops: Add sprinkles to the cake batter for a fun surprise!
  • Peanut Butter Chocolate Cake Pops: Mix in a bit of peanut butter into the frosting for a delicious twist.
  • Mint Chocolate Cake Pops: Add a few drops of peppermint extract to the chocolate coating for a refreshing flavor.

Storage & Make-Ahead Instructions

Planning ahead? Here’s how to store your cake pops:

  • Room Temperature: Store in an airtight container at room temperature for up to 3 days.
  • Refrigerator: For longer freshness, keep in the fridge for up to a week. Make sure they’re sealed well to prevent drying.
  • Freezer: Cake pops can be frozen for up to 3 months. Thaw them in the fridge before serving.

Comprehensive FAQ

Here are answers to some common questions about making chocolate cake pops:

  • Can I use a cake mix instead of homemade cake? Yes, using a cake mix is a quick and easy alternative!
  • How do I make sure my cake pops are moist? Ensure your cake is not overbaked and that you use enough frosting to bind the crumbs.
  • What kind of chocolate should I use for coating? Semi-sweet chocolate works best, but you can use milk or dark chocolate if you prefer.
  • Can I decorate them after they set? Yes! You can drizzle additional melted chocolate or sprinkle toppings after the initial coating hardens.
  • Why do my cake pops sweat? This can happen when they come from the fridge or freezer. Let them come to room temperature slowly.
  • How long will they last? Properly stored, they can last up to a week in the fridge and 3 months in the freezer.
  • Can I use alternative flours? Yes, gluten-free flour can work, but the texture may vary.
  • What’s the best way to package them for gifts? Place them in a box or use cellophane bags tied with ribbons for a lovely presentation.

Nutrition Tips & Dietary Adaptations

Here are some tips to make your cake pops a bit healthier:

  • Use whole wheat flour: This adds fiber and nutrients.
  • Replace sugars with natural sweeteners: Consider using honey or maple syrup for a healthier option.
  • Opt for dark chocolate: Dark chocolate has less sugar and more antioxidants.
  • Make it dairy-free: Use coconut milk and dairy-free chocolate to adapt for lactose intolerance.

Recommended Equipment

To make your cake pops, you’ll need a few tools:

  • Mixing bowls: Essential for combining ingredients.
  • Whisk: For mixing batter smoothly.
  • Stand or hand mixer: To beat the frosting quickly and evenly.
  • Cookie scoop: Helps to portion out uniform cake balls.
  • Styrofoam block: Ideal for holding the cake pops upright while they set.

Serving Suggestions

When it’s time to serve your cake pops, consider these fun ideas:

  • Display on a cake stand: Elevate your presentation and make them the centerpiece of your dessert table.
  • Pair with drinks: Serve alongside coffee, tea, or milk for a delightful pairing.
  • Gift them: Package them beautifully and share with friends and family for a sweet surprise!

In conclusion, making homemade chocolate cake pops is not just about baking; it’s about creating joyful moments and delicious memories. With this comprehensive guide, you now have all the tools and knowledge to create cake pops that are not only sweet but also filled with love. So gather your ingredients, get creative, and enjoy every bite of your delightful creations!

Homemade Chocolate Cake Pops

Prep Time 45 minutes
Cook Time 30 minutes
Total Time 1 hour 15 minutes
Servings 20 pieces
Calories 150
Delight in these rich and indulgent chocolate cake pops, perfect for parties or a sweet treat. Easy to make with a moist cake base and luscious chocolate coating.

Ingredients

Cake ingredients

  • 125 grams all-purpose flour (spooned leveled)
  • 30 grams unsweetened natural cocoa powder (¼ cup plus 2 tablespoons)
  • ¾ teaspoon baking powder
  • ½ teaspoon baking soda
  • ½ teaspoon salt
  • 100 grams light brown sugar (½ cup packed)
  • 100 grams granulated sugar (½ cup)
  • 80 ml canola or vegetable oil
  • 120 ml buttermilk
  • 1 large egg
  • 1 teaspoon pure vanilla extract
  • 120 ml boiling water
  • 1 teaspoon instant espresso powder (optional but recommended)
  • 60 grams unsalted butter (softened, ½ stick)
  • 90 grams powdered sugar
  • 10 grams unsweetened cocoa powder (sifted)
  • 15 ml milk (1 tablespoon)
  • ¼ teaspoon pure vanilla extract
  • 16 ounces semi-sweet chocolate (4 oz Ghirardelli bars)
  • 14 grams refined coconut oil (1 tablespoon)

Optional decoration

Instructions 

  • Preheat oven to 350°F (180°C). Grease a 9-inch round pan, line with parchment, and set aside.
  • Mix dry ingredients, then add wet ingredients and combine. Dissolve espresso powder in boiling water and add to batter. Pour into pan and bake 28-30 minutes.
  • Cool cake in pan for 30 minutes, then transfer to wire rack to cool completely.
  • Crumble cooled cake, mix with ½ cup frosting until cookie dough consistency. Form into 1-tablespoon balls, freeze 1 hour.
  • Melt chocolate and coconut oil in microwave, cool slightly. Dip sticks into chocolate, insert into cake balls, then dip entire ball into chocolate. Add sprinkles if desired, set in styrofoam.
  • Allow chocolate coating to set at room temperature for at least 30 minutes before serving.

Notes

Ensure to work quickly when dipping to prevent chocolate from setting prematurely.
Calories: 150kcal
Cost: $15
Course: Dessert
Cuisine: American
Keyword: chocolate

Welcome to your new favorite weeknight recipe! This Chicken Pesto Flatbread is not just quick to prepare; it’s a flavor-packed meal that combines tender chicken, vibrant veggies, and gooey cheese, all atop a crispy flatbread. Whether you’re rushing home after a long day or hosting a casual gathering, this dish is perfect for satisfying everyone’s cravings with minimal effort. Let’s dive into why you’ll love making this dish!

Why You’ll Love This Recipe

This Chicken Pesto Flatbread is a must-try for several reasons:

  • Time-Saving: With just a 10-12 minute bake time, you can have a delicious meal on the table in under 30 minutes!
  • Customizable: Feel free to throw on any toppings you have at home—this recipe is your blank canvas!
  • Healthy Ingredients: Packed with chicken, spinach, and tomatoes, it’s not only tasty but nutritious.
  • Family-Friendly: Even picky eaters will enjoy this dish thanks to its familiar flavors and cheesy goodness.
  • Perfect for Leftovers: Make a larger batch and enjoy the leftovers for lunch the next day.

Ingredient Breakdown

Let’s explore the ingredients you’ll need for this recipe, along with some excellent substitution options:

  • 2 cups cooked chicken: Use rotisserie chicken for convenience or any leftover chicken you have.
  • 1/2 cup pesto sauce: Store-bought is fine, but homemade adds a lovely touch! Use basil or sun-dried tomato pesto for a twist.
  • 4 pieces of flatbread or naan: Whole wheat or gluten-free options are available—choose what suits you best.
  • 1 cup cherry tomatoes: You can substitute with diced regular tomatoes or bell peppers for extra crunch.
  • 1 cup fresh spinach: Kale or arugula works well too and adds a peppery flavor.
  • 1 cup mozzarella cheese: Feel free to mix in cheddar or a dairy-free cheese alternative.
  • 1/4 cup grated Parmesan cheese: A sprinkle of feta can add a nice tang if you prefer.
  • Olive oil: Essential for brushing the flatbread for that golden crust.
  • Salt and pepper: Adjust these to your taste.

How to Make Chicken Pesto Flatbread

Ready to whip up your Chicken Pesto Flatbread? Follow these simple steps:

  1. Preheat your oven: Set it to 400°F (200°C).
  2. Prepare the flatbreads: Place them on a baking sheet and brush each with a little olive oil.
  3. Spread the pesto: Evenly distribute the pesto sauce over each flatbread.
  4. Add the toppings: Layer the cooked chicken, cherry tomatoes, and spinach on top of the pesto.
  5. Cheesy goodness: Sprinkle mozzarella and Parmesan cheeses generously over the top.
  6. Bake: Place in the oven for about 10-12 minutes, or until the cheese melts and the edges turn crispy.
  7. Serve: Remove from the oven, slice, and enjoy warm!

Pro Tips for Perfect Flatbread

Side perspective of a juicy Chicken Pesto Flatbread on a wooden board.

To elevate your Chicken Pesto Flatbread to the next level, check out these expert insights:

  • Use high-quality pesto: The flavor of your pesto will significantly impact the overall taste. Choose a brand or recipe you love!
  • Don’t overload the toppings: Too many toppings can make the flatbread soggy. Keep it balanced for the best texture.
  • Experiment with cheeses: Mixing different types of cheese can enhance the flavor—think about adding gouda or feta for something unique!
  • Preheat the baking sheet: For an even crispier base, preheat the baking sheet while the oven warms up.
  • Watch the bake time: Depending on your oven, it may bake faster—keep an eye on it to avoid burning.
  • Garnish with fresh herbs: A sprinkle of fresh basil or parsley after baking can brighten the dish.
  • Try it on a grill: For a smoky flavor, grill the flatbread instead of baking it.
  • Make it a meal: Serve with a side salad for a complete dinner experience!

Common Mistakes and Troubleshooting

Let’s address some common pitfalls to ensure your Chicken Pesto Flatbread turns out perfectly every time:

  • Soggy flatbread: Avoid this by not overloading with sauce and toppings.
  • Crispy edges, soggy center: Ensure the flatbread is pre-baked briefly before adding toppings to get an even bake.
  • Uneven cooking: Rotate the baking sheet halfway through baking for even heat distribution.
  • Burnt edges: If you notice the edges browning too quickly, cover them with foil while baking.

Delicious Variations

Feel free to mix things up! Here are a few creative variations on the Chicken Pesto Flatbread:

  • BBQ Chicken Flatbread: Replace pesto with BBQ sauce and add red onion and cilantro.
  • Mediterranean Flatbread: Use hummus instead of pesto, topped with olives, feta, and artichokes.
  • Buffalo Chicken Flatbread: Swap pesto for buffalo sauce, and add blue cheese and celery for a kick!
  • Veggie Delight: Skip the chicken entirely and load up with roasted vegetables like zucchini, bell peppers, and eggplant.

Storage and Make-Ahead Instructions

Want to prepare in advance? Here’s how to store and reheat your Chicken Pesto Flatbread:

  • Make-Ahead: Assemble the flatbreads a few hours in advance and cover them with plastic wrap until ready to bake.
  • Storing leftovers: Keep any leftover flatbread in an airtight container in the fridge for up to 3 days.
  • Reheating: Reheat in the oven at 350°F (175°C) for about 5-10 minutes to restore crispiness.

Frequently Asked Questions

Here are some common questions and answers about the Chicken Pesto Flatbread:

  • Can I use frozen flatbread? Yes, just thaw it before assembling your flatbread.
  • What if I don’t have pesto? You can use any sauce you like, such as marinara or hummus.
  • Is this recipe gluten-free? Yes, just choose gluten-free flatbread or naan.
  • Can I make it vegetarian? Absolutely! Substitute the chicken with roasted veggies or chickpeas.
  • How can I make this dairy-free? Use dairy-free cheese alternatives and skip the Parmesan.
  • How do I know when it’s done? The flatbread is done when the cheese is melted and bubbly, and the edges are golden.
  • Can I freeze the flatbread? Yes, wrap it tightly and freeze before baking. Just bake from frozen, adding a few extra minutes to the baking time.
  • What side dishes go well with this flatbread? A fresh garden salad or a side of roasted vegetables complements it perfectly!

Nutritional Tips and Dietary Adaptations

This recipe can be easily adapted to fit various dietary needs:

  • Low-Carb: Use a cauliflower crust instead of flatbread.
  • Higher Protein: Add more chicken or include chickpeas for plant-based protein.
  • Vegan: Substitute chicken with tofu and use vegan cheese options.
  • Low-Calorie: Use less cheese and opt for whole grain flatbread.

Equipment Recommendations

To make your flatbread, you’ll need:

  • Baking sheet: A sturdy baking sheet to hold your flatbreads.
  • Parchment paper: Optional, but helps with easy clean-up.
  • Brush: For applying olive oil evenly on the flatbreads.
  • Oven thermometer: Ensures your oven is at the correct temperature for baking.

Serving Suggestions

To elevate your meal, consider these serving ideas:

  • Pair with a salad: A fresh arugula salad dressed with lemon vinaigrette complements the flatbread beautifully.
  • Serve with dips: Offer marinara or extra pesto for drizzling or dipping.
  • Add a side of fruit: Fresh fruit like grapes or melon can provide a sweet contrast to the savory flatbread.
  • Garnish with herbs: Fresh basil or parsley sprinkled on top adds a pop of color and flavor.

In conclusion, this Chicken Pesto Flatbread is not only a delightful dish to prepare but also a fantastic way to bring the family together over a meal. With its ease of preparation and endless customization options, you’ll find yourself returning to this recipe time and time again. Enjoy your cooking journey, and remember, the most important ingredient is a dash of love!

Chicken Pesto Flatbread

Prep Time 10 minutes
Cook Time 12 minutes
Total Time 22 minutes
Servings 4 pieces
Calories 450
A delicious and easy-to-make flatbread topped with chicken, pesto, and fresh vegetables, perfect for a quick meal.

Ingredients

Main ingredients

  • 2 cups cooked chicken, sliced or shredded
  • 0.5 cup pesto sauce (store-bought or homemade)
  • 4 pieces flatbread or naan
  • 1 cup cherry tomatoes, halved
  • 1 cup fresh spinach
  • 1 cup mozzarella cheese, shredded
  • 0.25 cup grated Parmesan cheese
  • Olive oil for brushing
  • Salt and pepper to taste

Instructions 

  • Preheat oven to 400°F (200°C).
  • Place flatbreads on a baking sheet, brush with olive oil, and spread pesto evenly.
  • Top with chicken, cherry tomatoes, and spinach. Sprinkle cheeses on top.
  • Bake for 10-12 minutes until cheese melts and edges are crispy. Slice and serve warm.

Notes

Feel free to add extra herbs or spices for more flavor.
Calories: 450kcal
Cost: $15
Course: Main Course
Cuisine: American
Keyword: Chicken, flatbread, Pesto

Are you ready to elevate your lunch game? These Easy Juicy BBQ Chicken Wraps are here to transform your midday meals into something exciting and delicious! Packed with bold flavors and fresh ingredients, these wraps are not only simple to make but also leave you feeling satisfied and energized. Let’s whip up a delightful dish that will make your lunch routine something to look forward to!

Why You’ll Love This Recipe

Here are just a few reasons why these BBQ Chicken Wraps will become your new favorite:

  • Quick and Easy: This recipe comes together in under 30 minutes, perfect for a busy weekday lunch.
  • Flavor-Packed: The combination of BBQ sauce, smoked paprika, and garlic powder infuses the chicken with savory goodness.
  • Customizable: You can easily swap out ingredients to fit your dietary preferences or use up leftovers.
  • Family-Friendly: Even picky eaters will love these wraps, making them great for the whole family.
  • Meal Prep Friendly: Make a batch ahead of time and enjoy them throughout the week!

Ingredients Breakdown

Let’s dive into what you’ll need for these BBQ Chicken Wraps:

  • 2 pieces Chicken breast: Boneless and skinless for easy cooking.
  • 1/2 cup BBQ sauce: Choose your favorite flavor for the best taste.
  • 2 tablespoons Olive oil: Helps in cooking the chicken to perfection.
  • 1 teaspoon Smoked paprika: Adds a rich, smoky flavor to the chicken.
  • 1 teaspoon Garlic powder: For an extra kick of flavor.
  • 4 large Flour tortillas: Whole wheat tortillas can be a healthier alternative.
  • 2 cups Shredded lettuce: Provides a fresh crunch.
  • 1 cup Sliced tomatoes: Adds juiciness and color.
  • 1/2 cup Red onion rings: For a zesty bite.
  • 1 cup Cheddar cheese: Shredded for gooey deliciousness.
  • 1 medium Avocado: Sliced for creaminess.
  • 1/4 cup Fresh cilantro: Chopped for a burst of freshness.
  • 1/4 cup Ranch dressing: Optional for dipping or drizzling!

How to Make BBQ Chicken Wraps

Now, let’s bring these ingredients together in a few simple steps:

  1. Prepare the Chicken: In a bowl, mix the olive oil, BBQ sauce, smoked paprika, and garlic powder. Add the chicken breasts and coat them well with the marinade. Let them sit for at least 10 minutes.
  2. Cook the Chicken: Heat a skillet over medium heat. Add the marinated chicken and cook for about 5-7 minutes on each side until fully cooked. The internal temperature should reach 165°F (75°C). Remove from heat and let it rest for a few minutes before slicing.
  3. Assemble the Wraps: Lay a tortilla flat and layer it with shredded lettuce, sliced tomatoes, onion rings, and cheddar cheese. Add sliced chicken and avocado, then sprinkle with fresh cilantro. Drizzle ranch dressing if desired.
  4. Wrap It Up: Fold in the sides of the tortilla and roll it tightly from the bottom up. Cut in half if you like, and enjoy!

Pro Tips for Perfect BBQ Chicken Wraps

Delicious BBQ chicken wrap showcasing fresh ingredients, including avocado and lettuce.

To ensure your wraps are the best they can be, consider these expert insights:

  • Marinate Longer: For even more flavor, marinate the chicken for 30 minutes or longer, if time allows.
  • Use Rotisserie Chicken: Save time by using shredded rotisserie chicken as a shortcut.
  • Experiment with Sauces: Don’t be afraid to try different BBQ sauces or even other condiments like spicy mayo!
  • Fresh Ingredients Matter: Use the freshest veggies you can find for the best crunch and flavor.
  • Warm the Tortillas: Briefly warming the tortillas in a dry skillet makes them more pliable and easier to wrap.
  • Cutting Techniques: Use a sharp knife to slice the chicken for clean cuts and an appealing presentation.
  • Keep It Balanced: Don’t overload the wraps to avoid messy eating!
  • Store Properly: If you have leftovers, store them in an airtight container to keep them fresh.

Common Mistakes and Troubleshooting

Here are some common pitfalls to watch out for:

  • Overcooking the Chicken: Keep an eye on your chicken to prevent it from drying out. Use a meat thermometer for accuracy.
  • Skipping the Marinade: Don’t rush this step; it’s essential for flavor.
  • Ignoring Freshness: Using wilted veggies can affect the taste and texture of your wraps.
  • Not Wrapping Tightly: Ensure your wraps are snug to prevent fillings from falling out.

Variations on BBQ Chicken Wraps

Here are some creative twists to try:

  • Spicy BBQ Chicken Wrap: Add jalapeños or a spicy BBQ sauce for a kick.
  • Tropical BBQ Chicken Wrap: Incorporate pineapple chunks and swap BBQ sauce for teriyaki for a sweet twist.
  • Vegetarian BBQ Wrap: Substitute chicken with grilled vegetables or black beans for a meatless version.
  • Buffalo Chicken Wrap: Replace BBQ sauce with buffalo sauce for a tangy alternative.

Storage and Make-Ahead Instructions

If you want to prepare these wraps ahead of time:

  • Make-Ahead: You can marinate the chicken the night before and store it in the fridge.
  • Storage: Keep assembled wraps in an airtight container in the refrigerator for up to 3 days.
  • Freezing: If freezing, wrap each individual wrap in plastic wrap and store in an airtight container for up to 2 months. Thaw in the refrigerator before enjoying.

Frequently Asked Questions

Here are some common questions about BBQ Chicken Wraps:

  • Can I use frozen chicken? Yes! Just make sure to thaw it completely before marinating and cooking.
  • Can these wraps be made vegetarian? Absolutely! Swap the chicken for grilled veggies or beans.
  • What type of BBQ sauce should I use? Use any flavor you enjoy; sweet, tangy, or smoky all work well!
  • Are these wraps good for meal prep? Yes, they store well and are perfect for packing for lunches.
  • How can I make these wraps healthier? Use whole wheat tortillas and load up on veggies!
  • What should I serve with BBQ Chicken Wraps? They pair well with a side salad, fruit, or sweet potato fries.
  • How do I prevent the tortillas from tearing? Warm them briefly before wrapping!
  • Can I use a different type of tortilla? Yes! Corn tortillas or lettuce wraps can be great alternatives.

Nutritional Tips and Dietary Adaptations

For those mindful of dietary needs:

  • Low-Carb Option: Use lettuce leaves instead of tortillas for a keto-friendly wrap.
  • Dairy-Free: Omit the cheese or use a dairy-free alternative.
  • Gluten-Free: Choose gluten-free tortillas to make these wraps suitable for gluten sensitivities.

Equipment Recommendations

To make your cooking experience smoother:

  • Skillet: A non-stick skillet is ideal for cooking the chicken.
  • Meat Thermometer: Ensures your chicken is cooked perfectly every time.
  • Sharp Knife: For cleanly slicing chicken and veggies.
  • Cutting Board: A sturdy board for easy prep.

Serving Suggestions

When it comes to enjoying these wraps, consider these delicious ideas:

  • Pair with a Salad: Serve alongside a fresh garden salad for a complete meal.
  • Chips and Salsa: Add a crunchy side with tortilla chips and your favorite salsa.
  • Refreshing Drinks: A glass of iced tea or lemonade complements these wraps beautifully.

In conclusion, these Easy Juicy BBQ Chicken Wraps are a fantastic way to spice up your lunch routine! With simple ingredients and easy steps, anyone can master this recipe. Don’t forget to experiment with different flavors and ingredients to make them your own. Happy cooking, and enjoy your delicious wraps!

Easy Juicy BBQ Chicken Wraps That Will Transform Your Lunch!

Prep Time 10 minutes
Cook Time 15 minutes
Total Time 25 minutes
Servings 4 wraps
Calories 550
Enjoy these flavorful and juicy BBQ chicken wraps, perfect for a quick and satisfying lunch.

Ingredients

Protein

  • 2 pieces Chicken breast boneless, skinless
  • 0.5 cup BBQ sauce (your favorite flavor)
  • 2 tablespoons Olive oil
  • 1 teaspoon Smoked paprika
  • 1 teaspoon Garlic powder

Wraps

  • 4 large Flour tortillas

Vegetables

  • 2 cups Shredded lettuce
  • 1 cup Sliced tomatoes
  • 0.5 cup Red onion rings
  • 1 cup Cheddar cheese shredded
  • 1 medium Avocado sliced
  • 0.25 cup Fresh cilantro chopped
  • 0.25 cup Ranch dressing

Instructions 

  • Marinate chicken with BBQ sauce, smoked paprika, garlic powder, and olive oil.
  • Cook chicken until juicy and cooked through, then slice.
  • Warm tortillas and layer with lettuce, tomatoes, onions, cheese, avocado, cilantro, and sliced chicken.
  • Drizzle with ranch dressing, roll up, and serve.

Notes

For extra flavor, add a squeeze of lime before serving.
Calories: 550kcal
Cost: $12
Course: Lunch
Cuisine: American
Keyword: BBQ, Chicken, Wraps

Unleash Your Inner Baker with These Decadent Double Chocolate Muffins

Welcome to the ultimate guide for creating the most indulgent double chocolate muffins you’ve ever tasted! Packed with rich chocolate flavor and topped with extra chocolate chips, this recipe is sure to become a favorite in your household. If you’re looking for a way to elevate your baking game while making delightful treats, you’re in the right place. Not only are these muffins super moist and fluffy, but they also deliver an explosion of chocolate in every bite!

Why You’ll Love This Recipe

There are countless reasons to fall in love with these double chocolate muffins. Here are just a few:

  • Easy to Follow: This recipe breaks down the steps into simple, manageable tasks, making it perfect for bakers of all levels.
  • Rich Chocolate Flavor: With both cocoa powder and chocolate chips, these muffins are packed with chocolate goodness.
  • Perfect Texture: They come out super moist and fluffy, thanks to the combination of wet ingredients and proper baking techniques.
  • Customizable: Want to switch things up? This recipe allows for easy substitutions and variations.
  • Great for Any Occasion: Whether it’s breakfast, a snack, or a dessert, these muffins fit perfectly into any meal.

Key Ingredients for Double Chocolate Muffins

Let’s dive into the ingredients you’ll need for these delicious muffins. Each component plays a crucial role in achieving the perfect flavor and texture.

  • All-Purpose Flour: 1 3/4 cups (219 g), spooned and leveled. This flour provides the structure for the muffins.
  • Dutch Process Cocoa Powder: 1/2 cup (40 g). This type of cocoa powder adds a deep, rich flavor that enhances the chocolate experience.
  • Baking Powder: 2 1/2 tsp. This leavening agent ensures your muffins rise beautifully.
  • Baking Soda: 1/4 tsp. Helps add extra lift to the muffins.
  • Salt: 1/2 tsp. Enhances all the flavors in your muffins.
  • Unsalted Butter: 1/2 cup (112 g), melted. Adds richness and moisture.
  • Granulated Sugar: 1 cup (200 g). Sweetens the muffins perfectly.
  • Eggs: 2, at room temperature. Helps bind everything together and adds moisture.
  • Whole Milk: 1/2 cup (120 ml), at room temperature. Adds creaminess and moisture.
  • Sour Cream: 1/2 cup (122 g), at room temperature. This ingredient contributes to the muffins’ moist texture.
  • Vanilla Extract: 2 tsp. A must for flavor depth.
  • Mini Semi-Sweet Chocolate Chips: 1 cup (200 g) for the batter and 1/2 cup (100 g) for topping. These are the stars of the show!

Step-by-Step Instructions for the Best Chocolate Muffins

Delicious double chocolate muffins topped with semi-sweet chocolate chips.

Now that you have all your ingredients ready, let’s get baking!

  1. Preheat your oven: Preheat to 350°F (175°C) and line a muffin tin with paper liners or grease it.
  2. Mix dry ingredients: In a large bowl, whisk together the all-purpose flour, cocoa powder, baking powder, baking soda, and salt.
  3. Combine wet ingredients: In another bowl, whisk together the melted butter, sugar, eggs, milk, sour cream, and vanilla extract until well combined.
  4. Combine wet and dry: Pour the wet ingredients into the dry ingredients and gently fold until just combined. Be careful not to overmix!
  5. Add chocolate chips: Fold in 1 cup of mini chocolate chips, ensuring even distribution throughout the batter.
  6. Fill muffin cups: Divide the batter evenly among the muffin cups, filling them about 3/4 of the way full. Sprinkle the remaining chocolate chips on top.
  7. Bake: Bake for 18-22 minutes, or until a toothpick inserted into the center comes out clean.
  8. Cool: Allow the muffins to cool in the pan for 5 minutes before transferring them to a wire rack to cool completely.

Pro Tips for Perfect Double Chocolate Muffins

To ensure that your muffins are as delightful as possible, consider these expert tips:

  • Room Temperature Ingredients: Make sure your eggs, milk, and sour cream are at room temperature for better mixing and a fluffier texture.
  • Don’t Overmix: Gently fold the batter until just combined to avoid tough muffins.
  • Use Quality Ingredients: High-quality cocoa powder and chocolate chips make all the difference in flavor.
  • Check for Doneness: Use a toothpick to check for doneness; it should come out clean or with a few moist crumbs.
  • Store Properly: Once cooled, store muffins in an airtight container to keep them fresh.
  • Experiment with Flavors: Try adding nuts or substituting different types of chocolate for a unique twist.
  • Adjust Sugar as Needed: Depending on your preference for sweetness, feel free to adjust the sugar slightly.
  • Use a Cookie Scoop: For even muffin sizes, use a cookie scoop to fill the muffin cups.

Common Mistakes and Troubleshooting

Everyone makes mistakes in the kitchen, but here are some common pitfalls and how to avoid them:

  • Dry Muffins: If your muffins turn out dry, it could be due to overmixing or using too much flour. Ensure you spoon and level your flour.
  • Dense Texture: Overmixing the batter can lead to dense muffins. Mix until just combined.
  • Flat Muffins: If your muffins don’t rise, check that your baking powder and soda are fresh and active.
  • Uneven Baking: Make sure to rotate your muffin tin halfway through baking for even cooking.

Delicious Variations to Try

Looking to mix it up? Here are some fun variations to try with your double chocolate muffins:

  • White Chocolate Chips: Swap the semi-sweet chocolate for white chocolate chips for a different flavor.
  • Nutty Addition: Add chopped walnuts or pecans for a delightful crunch.
  • Minty Fresh: Incorporate a few drops of peppermint extract for a refreshing twist.
  • Fruit Fusion: Toss in some raspberries or cherries for a fruity chocolate experience.

Storage and Make-Ahead Instructions

Want to enjoy your muffins later? Here’s how to store and prepare them in advance:

  • Room Temperature: Store muffins in an airtight container at room temperature for up to 3 days.
  • Refrigerator: For longer storage, keep them in the fridge for up to a week.
  • Freezing: Muffins freeze well! Wrap them individually in plastic wrap and store in a freezer bag for up to 3 months.
  • Reheating: To enjoy frozen muffins, simply thaw at room temperature or microwave them for a few seconds.

Comprehensive FAQ

Got questions? We’ve got answers! Here are some frequently asked questions about making double chocolate muffins:

  • Can I use whole wheat flour? Yes, you can substitute part of the all-purpose flour with whole wheat flour for added nutrition.
  • What if I don’t have sour cream? Greek yogurt can be used as a substitute for sour cream.
  • Why are my muffins sinking? This can happen if the batter is overmixed or if the muffins are underbaked.
  • Can I use large chocolate chunks? Absolutely! Just adjust the baking time slightly if they’re larger than mini chips.
  • How do I prevent chocolate chips from sinking? Tossing them in a bit of flour before adding them to the batter can help keep them suspended.
  • Can I make these muffins gluten-free? Yes, use a gluten-free baking blend in place of all-purpose flour.
  • How can I make these muffins less sweet? Reduce the sugar by 1/4 cup and adjust according to your taste.
  • What’s the best way to serve these muffins? Enjoy them warm with a pat of butter or a drizzle of chocolate sauce!

Nutritional Tips and Dietary Adaptations

For those watching their diet or looking for healthier options, consider the following:

  • Reduce Sugar: You can cut back on sugar without sacrificing flavor by using natural sweeteners like honey or maple syrup.
  • Incorporate Protein: Add a scoop of protein powder to the batter for an extra protein boost.
  • Vegan Version: Replace eggs with flaxseed meal and use a plant-based milk and yogurt.
  • Low-Fat Option: Substitute unsweetened applesauce for butter to reduce fat content.

Essential Equipment Recommendations

Here are some kitchen tools that will make your muffin-making experience easier:

  • Muffin Tin: A standard 12-cup muffin tin is essential for baking the perfect muffins.
  • Mixing Bowls: Having a set of various sizes will help with the mixing process.
  • Whisk: A good whisk will help combine your dry and wet ingredients smoothly.
  • Rubber Spatula: For folding your batter without overmixing.
  • Cookie Scoop: Ensures even muffin sizes for uniform baking.

Serving Suggestions

How to enjoy your delightful muffins? Here are some serving ideas:

  • With Coffee: Pair your muffins with a hot cup of coffee or espresso for a perfect breakfast.
  • As a Dessert: Serve warm with a scoop of vanilla ice cream for an indulgent dessert.
  • Breakfast Treat: Add a side of fresh fruit for a balanced breakfast.
  • For Kids: Let your little ones enjoy them as an after-school snack!

Conclusion

Now that you have the ultimate guide to making the best double chocolate muffins, it’s time to get in the kitchen and start baking! Remember, cooking is all about having fun and experimenting, so don’t hesitate to add your personal touch to the recipe. Embrace the joy of creating something delicious that you and your loved ones can enjoy. Happy baking!

Double Chocolate Muffins

Prep Time 15 minutes
Cook Time 20 minutes
Total Time 35 minutes
Servings 12 muffins
Calories 350
Indulge in these rich and moist double chocolate muffins, perfect for chocolate lovers.

Ingredients

Flour and cocoa

  • 219 g all-purpose flour (spooned and leveled)
  • 40 g Dutch process cocoa powder
  • 4 tsp baking powder
  • 0.25 tsp baking soda
  • 0.5 tsp salt
  • 112 g unsalted butter (melted)
  • 200 g granulated white sugar
  • 2 eggs eggs (at room temperature)
  • 120 ml whole milk (at room temperature)
  • 122 g sour cream (at room temperature)
  • 2 tsp vanilla
  • 200 g mini semi-sweet chocolate chips
  • 100 g mini semi-sweet chocolate chips for sprinkling (for topping)

Instructions 

  • Preheat oven to 375°F (190°C). Line a muffin tin with paper liners.
  • Mix dry ingredients: flour, cocoa powder, baking powder, baking soda, salt.
  • In a separate bowl, combine melted butter, sugar, eggs, milk, sour cream, and vanilla.
  • Gradually add dry ingredients to wet, mixing until just combined. Fold in chocolate chips.
  • Divide batter among muffin cups, sprinkle with mini chocolate chips, and bake for 20 minutes.

Notes

Do not overmix the batter to keep muffins tender.
Calories: 350kcal
Cost: $12
Course: Dessert
Keyword: chocolate

Discover the Comfort of Cheesy Garlic Chicken Wraps

Welcome to your next favorite weeknight dinner! Cheesy Garlic Chicken Wraps are not just a meal; they’re an experience that brings warmth and satisfaction to your table. Perfect for busy evenings, these wraps combine succulent shredded chicken with gooey cheese and aromatic garlic. In just a few simple steps, you can create a dish that’s both comforting and exciting. Let’s dive into why these wraps are sure to become a staple in your home.

Why You’ll Love This Recipe

  • Quick Preparation: Ready in under 30 minutes, these wraps are perfect for those hectic weeknights.
  • Flavor Explosion: The combination of garlic, cheese, and seasoned chicken creates a mouthwatering flavor profile that’s hard to resist.
  • Customizable: Tailor the recipe to your taste by adding your favorite veggies or swapping out cheeses for endless variations.
  • Meal Prep Friendly: Make a batch ahead of time, and you’ll have a quick, satisfying meal ready in the fridge!
  • Family-Friendly: Even picky eaters will love these cheesy wraps, making them a hit for dinner with the whole family.

Ingredients Breakdown

Here’s what you’ll need to create these delicious cheesy garlic chicken wraps. Each ingredient plays a vital role in achieving the perfect balance of flavors.

  • 2 cups cooked chicken: Shredded or diced, this is your protein base. Leftover rotisserie chicken works great!
  • 1 ½ cups shredded mozzarella or cheddar cheese: Choose your favorite cheese for that melty goodness.
  • ¼ cup cream cheese: This adds creaminess and binds the filling together.
  • 2 tbsp butter: Used for sautéing the garlic, adding richness to the wraps.
  • 3 cloves garlic: Minced for an aromatic kick—garlic lovers rejoice!
  • ¼ cup sour cream: Adds tang and creaminess to the filling.
  • 1 tsp garlic powder: Enhances the garlic flavor throughout the dish.
  • 1 tsp Italian seasoning: A blend of herbs that complements the chicken beautifully.
  • 4 large tortillas: The vessel for your delicious filling—choose flour or whole grain.
  • Salt and pepper to taste: Essential for seasoning the chicken mixture.
  • Fresh parsley for garnish: Optional, but it adds a pop of color and freshness.

How to Make Cheesy Garlic Chicken Wraps

Side view of a juicy chicken wrap filled with cheese and garlic, ready to eat.

Ready to get cooking? Follow these simple steps to whip up your own cheesy garlic chicken wraps.

  • Step 1: In a skillet, melt the butter over medium heat. Add the minced garlic and sauté for 1-2 minutes until fragrant.
  • Step 2: Add the cooked chicken to the skillet. Season with garlic powder, Italian seasoning, salt, and pepper. Stir well and heat through.
  • Step 3: In a bowl, mix the softened cream cheese, sour cream, and half of the shredded cheese until smooth.
  • Step 4: Remove the chicken from heat and combine it with the cream cheese mixture until fully incorporated.
  • Step 5: Lay out the tortillas and divide the chicken mixture evenly in the center of each. Sprinkle the remaining cheese on top.
  • Step 6: Fold the sides of each tortilla over the filling and roll tightly into wraps.
  • Step 7: Heat a clean skillet or grill pan over medium heat. Cook the wraps for 2-3 minutes per side, until golden brown and the cheese is melted.
  • Step 8: Garnish with fresh parsley if desired, and serve warm.

Pro Tips for Perfect Wraps

  • Use the right tortillas: Flour tortillas are softer and easier to roll, while whole grain adds a nutty flavor.
  • Don’t skip the garlic: Fresh garlic provides the best flavor. Adjust the amount to your taste!
  • Experiment with cheeses: Try using a mix of mozzarella and cheddar for a flavorful blend.
  • Let the mixture cool slightly: This makes it easier to handle when assembling the wraps.
  • For extra crunch: Add chopped bell peppers or spinach to the filling for added texture.
  • Grill for flavor: For a smoky taste, grill the wraps instead of pan-frying.
  • Storage: If you have leftovers, store them in an airtight container in the fridge for up to 3 days.
  • Freeze for later: Wrap individually in foil and freeze for quick meals. Reheat directly from the freezer!

Common Mistakes and Troubleshooting

Even the best chefs can make mistakes! Here are some common pitfalls and how to avoid them:

  • Overfilling the wraps: Keep the filling amount moderate to prevent spills when rolling.
  • Skipping the seasoning: Don’t forget to season your chicken well! It’s crucial for flavor.
  • Cooking on too high heat: Medium heat is best for even cooking without burning the tortillas.

Creative Variations

Feel free to mix things up! Here are some fun variations to try:

  • Buffalo Chicken Wraps: Add buffalo sauce to the chicken mixture for a spicy kick.
  • Veggie Loaded Wraps: Incorporate sautéed bell peppers, onions, and spinach for a vegetarian option.
  • BBQ Chicken Wraps: Swap out the garlic for BBQ sauce for a tangy twist.
  • Cheesy Mexican Wraps: Add taco seasoning and black beans for a south-of-the-border flair.

Storage and Make-Ahead Instructions

These cheesy garlic chicken wraps are perfect for meal prep! Here’s how to store and reheat them:

  • Storing Leftovers: Place in an airtight container in the fridge for up to 3 days.
  • Freezing: Wrap individually in foil or plastic wrap, then place in a freezer bag for up to 3 months.
  • Reheating: Warm in a skillet over medium heat until heated through, or microwave for 1-2 minutes.

Nutrition Tips and Dietary Adaptations

Want to make your wraps a bit healthier? Here are some tips:

  • Low-Fat Options: Use low-fat cream cheese and reduced-fat cheese to cut calories.
  • Gluten-Free: Substitute regular tortillas for gluten-free wraps or lettuce leaves.
  • Protein Boost: Add black beans or chickpeas to the chicken mixture for extra protein.

Equipment Recommendations

Having the right tools makes cooking easier. Here’s what I recommend:

  • Non-Stick Skillet: Essential for sautéing and cooking the wraps without sticking.
  • Mixing Bowl: A large bowl for combining your filling ingredients.
  • Spatula: Use a spatula for flipping the wraps safely in the skillet.

Serving Suggestions

Serve your cheesy garlic chicken wraps with a side of:

  • Fresh Salad: A crisp green salad adds a refreshing contrast.
  • Chips and Salsa: Perfect for a crunchy side that complements the wraps.
  • Guacamole: Creamy guacamole pairs deliciously with cheesy wraps.

Frequently Asked Questions

Here are some common questions about these wraps:

  • Can I use rotisserie chicken? Absolutely! It’s a great time-saver and adds flavor.
  • How can I make this vegetarian? Substitute the chicken with sautéed mushrooms or tofu.
  • What can I add for extra flavor? Try adding diced jalapeños or fresh herbs like cilantro.
  • Can I make these ahead of time? Yes! Assemble the wraps and store them in the fridge until you’re ready to cook.
  • How do I keep them from getting soggy? Avoid overloading the filling and cook them until crispy.
  • What’s the best way to reheat leftovers? Reheat in a skillet for best results, or microwave for convenience.
  • Are they kid-friendly? Definitely! Kids love the cheesy flavor and fun wraps.
  • Can I freeze the wraps? Yes! Just wrap them individually and freeze for later use.

Now that you have everything you need to make these delicious cheesy garlic chicken wraps, it’s time to roll up your sleeves and get cooking! Remember, cooking is about confidence and creativity—don’t hesitate to make these wraps your own. Enjoy the process and the wonderful flavors that will fill your kitchen!

Cheesy Garlic Chicken Wraps A Deliciously Easy Meal

Prep Time 10 minutes
Cook Time 15 minutes
Total Time 25 minutes
Servings 4 servings
Calories 450
Enjoy these flavorful chicken wraps filled with cheesy garlic goodness, perfect for a quick and satisfying meal.

Ingredients

Chicken

  • 2 cups cooked chicken, shredded or diced
  • 1 1/2 cups shredded mozzarella or cheddar cheese
  • 1/4 cup cream cheese, softened
  • 2 tbsp butter, melted
  • 3 cloves garlic, minced
  • 1/4 cup sour cream
  • 1 tsp garlic powder
  • 1 tsp Italian seasoning
  • 4 large tortillas
  • to taste Salt and pepper

Garnish

  • optional Fresh parsley for garnish

Instructions 

  • In a skillet, melt butter and sauté garlic for 1-2 minutes.
  • Add cooked chicken, season with garlic powder, Italian seasoning, salt, and pepper. Heat through.
  • Mix cream cheese, sour cream, and half the cheese until smooth.
  • Combine chicken with the cream cheese mixture. Divide onto tortillas, sprinkle remaining cheese, roll into wraps.
  • Cook wraps in a skillet for 2-3 minutes per side until golden and cheese melts. Garnish with parsley if desired.

Notes

For extra flavor, add a dash of hot sauce or your favorite herbs.
Calories: 450kcal
Cost: $15
Course: Main Course
Cuisine: American
Keyword: Cheese, Chicken, Wraps

Welcome to a delightful journey of baking with these mini apple muffins! If you’re looking for a simple yet flavorful snack or breakfast option, you’ve hit the jackpot. Bursting with the sweetness of apples and a hint of cinnamon, these muffins are not only easy to whip up but also perfect for any occasion. Let’s dive into why you’ll love making these little bites of joy!

Why You’ll Love This Recipe

Here are five compelling reasons why these mini apple muffins should be your go-to recipe:

  • Quick to prepare: With just a few simple steps, you can have these muffins ready in under 30 minutes, making them ideal for busy mornings or last-minute snacks.
  • Healthy ingredients: Packed with fresh apples and wholesome ingredients, these muffins are a guilt-free treat you can feel good about serving to your family.
  • Kid-friendly: If you’re looking to introduce your little ones to baking, this recipe is perfect. Kids love the taste, and it’s a fun way to get them involved in the kitchen.
  • Customizable: Feel free to tweak the recipe according to your preferences. Add nuts, dried fruits, or even chocolate chips for a fun twist!
  • Freezer-friendly: Make a big batch and freeze them! These muffins hold up well in the freezer, allowing you to enjoy them any time without the hassle of baking from scratch.

Ingredients Breakdown

To create the perfect batch of mini apple muffins, gather the following ingredients:

  • 1 cup finely diced apples (like Fuji, Honey Crisp, or Pink Lady)
  • 1 tsp cinnamon (for that warm, comforting flavor)
  • ⅓ cup light brown sugar (adds moisture and a hint of caramel flavor)
  • ½ cup avocado oil (a healthy alternative to butter or vegetable oil)
  • 1 egg (binds the ingredients together)
  • ¼ cup unsweetened applesauce (for extra moisture and sweetness)
  • 1 tsp vanilla extract (for a hint of depth)
  • 1 cup all-purpose flour (the base of the muffins)
  • ½ tsp baking powder (for lift)
  • ¼ tsp baking soda (helps with leavening)
  • ¼ tsp salt (enhances the flavors)
  • Optional: Cinnamon sugar for topping

Making the Muffins

Ready to bake? Follow these simple steps:

  • Preheat your oven to 350°F (175°C) and prepare a mini muffin tin with non-stick spray or liners.
  • Prepare the apples: Peel and finely dice your apples, then set them aside.
  • Mix dry ingredients: In a bowl, whisk together the flour, baking powder, baking soda, salt, and cinnamon.
  • Combine wet ingredients: In another bowl, mix the avocado oil, brown sugar, applesauce, egg, and vanilla until well combined.
  • Combine wet and dry mixtures: Gradually add the dry ingredients to the wet ingredients, stirring until just combined. Be sure not to overmix!
  • Fold in the apples: Gently incorporate the diced apples into the batter.
  • Fill the muffin tin: Spoon the batter into each muffin cup, filling them about 2/3 full. If desired, sprinkle cinnamon sugar on top.
  • Bake for 12-15 minutes or until a toothpick inserted in the center comes out clean. Let them cool in the tin for a few minutes before transferring to a wire rack.

Pro Tips for Perfect Muffins

Juicy mini apple muffins arranged on a plate, showcasing their texture.

Want to elevate your baking game? Here are some expert insights:

  • Use fresh apples: The fresher the apples, the more flavor they will impart to your muffins.
  • Check your baking powder: Ensure it’s fresh for maximum rise. If it’s expired, your muffins may not rise as expected.
  • Don’t overmix: Mix until just combined to keep your muffins fluffy and tender.
  • Let them cool: Allowing the muffins to cool slightly before removing them helps prevent them from sticking to the pan.
  • Experiment with spices: Consider adding nutmeg or cardamom for extra flavor complexity.
  • Use a cookie scoop: For even muffin sizes, a cookie scoop works wonders.
  • Try different flours: Whole wheat or oat flour can be used for a healthier twist.
  • Store properly: Keep your muffins in an airtight container to maintain freshness.

Common Mistakes and Troubleshooting

Even the best bakers encounter hiccups. Here’s how to troubleshoot:

  • Muffins are too dry: This could be due to overbaking or too much flour. Make sure to measure accurately and check for doneness a couple of minutes early.
  • Muffins are too dense: This often happens if the batter is overmixed. Remember, less mixing means lighter muffins!
  • Apple pieces sink: Tossing the diced apples in a bit of flour before adding them to the batter can help them stay suspended.
  • Uneven baking: Ensure your oven is preheated and check for hot spots by rotating the muffin tin halfway through baking.

Delicious Variations

Feeling adventurous? Here are some fun variations to try:

  • Nutty crunch: Add ½ cup of chopped walnuts or pecans for a delightful crunch.
  • Fruit medley: Substitute half the apples with diced pears or berries for a twist.
  • Chocolate chip: Add ½ cup of mini chocolate chips for a sweet treat.
  • Spiced up: Incorporate 1/4 tsp of nutmeg or ginger for a spicier flavor profile.

Storage and Make-Ahead Instructions

Want to make your life easier? Here’s how to store and prepare ahead:

  • Room temperature: Store muffins in an airtight container at room temperature for up to 3 days.
  • Refrigerator: For longer storage, keep them in the fridge for up to a week.
  • Freezer: Freeze muffins in a single layer, then transfer to a freezer bag for up to 3 months. Thaw at room temperature or microwave for a quick snack.
  • Make-ahead: Prepare the batter the night before and store it in the fridge. Bake fresh muffins in the morning!

Comprehensive FAQ

Here are some frequently asked questions about these mini apple muffins:

  • Can I use different types of apples? Yes! Any firm, sweet apple will work well in this recipe.
  • Can I substitute the avocado oil? Absolutely! You can use melted coconut oil or any neutral oil.
  • Are these muffins healthy? They are a healthier option compared to store-bought muffins, especially with the addition of fresh fruit and healthy oils.
  • Can I make them gluten-free? Yes, substitute all-purpose flour with a gluten-free flour blend.
  • How can I make them vegan? Use flax eggs instead of a regular egg and a plant-based yogurt or applesauce for moisture.
  • What can I add for extra flavor? Try adding citrus zest or a splash of almond extract for a unique flavor twist.
  • How should I serve them? These muffins are great on their own, but they can also be served with a dollop of yogurt or a drizzle of honey.
  • What if I have leftovers? Store them in an airtight container, and reheat them in the microwave when you’re ready to enjoy!

Nutritional Tips and Dietary Adaptations

If you’re looking to adapt these muffins for specific nutritional needs:

  • Low-sugar: Reduce the sugar content by using a sugar substitute or omitting the brown sugar entirely.
  • High-fiber: Substitute half of the all-purpose flour with oat flour or whole wheat flour for added fiber.
  • Protein boost: Add a scoop of protein powder to the batter for a nutritious boost.
  • Paleo-friendly: Use almond flour and coconut sugar for a paleo-friendly version.

Essential Equipment Recommendations

To make the baking process smooth, here are some essential tools:

  • Mini muffin tin: The key to achieving those perfectly sized muffins.
  • Mixing bowls: A set of various sizes for the wet and dry ingredients.
  • Whisk: For combining ingredients efficiently.
  • Rubber spatula: Helps fold in the apples without damaging them.
  • Cooling rack: Allows muffins to cool evenly without getting soggy.

Delicious Serving Suggestions

Enjoy your mini apple muffins in various delightful ways:

  • With a spread: Serve with a smear of cream cheese or almond butter for added flavor and richness.
  • As a breakfast item: Pair with a smoothie or yogurt for a balanced breakfast.
  • In a lunchbox: These muffins make for a fantastic snack in lunchboxes for both kids and adults.
  • For brunch: Serve alongside a fruit salad or a savory quiche for a complete brunch spread.

In conclusion, these mini apple muffins are not just a recipe; they’re a canvas for creativity, a source of nourishment, and a way to bring joy into your kitchen. With their delightful flavor and easy preparation, they are sure to become a staple in your home. Happy baking, and remember, the joy of cooking comes from sharing delicious food with those you love!

Mini Apple Muffins

Prep Time 10 minutes
Cook Time 15 minutes
Total Time 25 minutes
Servings 12 muffins
Calories 150
Enjoy these moist and flavorful mini apple muffins, perfect for a quick breakfast or snack with fresh apple chunks and warm cinnamon.

Ingredients

Fruits

  • 1 cup finely diced apple (Fuji, Honeycrisp, Pink Lady, etc.)
  • 1 tsp cinnamon
  • 0.33 cup light brown sugar
  • 0.5 cup avocado oil
  • 1 egg egg
  • 0.25 cup unsweetened applesauce
  • 1 tsp vanilla
  • 1 cup all-purpose flour
  • 0.5 tsp baking powder
  • 0.25 tsp baking soda
  • 0.25 tsp salt

Optional topping

  • cinnamon sugar (for topping)

Instructions 

  • Preheat oven to 350°F (175°C). Line a muffin tin with paper liners.
  • Mix dry ingredients: flour, cinnamon, baking powder, baking soda, salt.
  • In a separate bowl, combine wet ingredients: eggs, applesauce, oil, vanilla, sugar, and diced apples.
  • Fold wet ingredients into dry until just combined. Divide batter among muffin cups.
  • Bake for 15 minutes or until a toothpick inserted comes out clean. Optional: sprinkle cinnamon sugar on top before baking.

Notes

Store in an airtight container for up to 2 days for best freshness.
Calories: 150kcal
Cost: $8
Course: Breakfast, Snack
Cuisine: American
Keyword: apple, muffin

Welcome to a culinary adventure that will transform your weeknight dinners and bring excitement back to your kitchen! If you’ve been searching for a quick, flavorful, and satisfying meal, look no further. This crispy hot honey chicken wrap combines tender chicken strips, a delightful sweet and spicy sauce, and fresh ingredients all wrapped up for a delicious experience. Let’s dive into the magic of this recipe!

Why You’ll Love This Recipe

  • Quick and Easy: Perfect for busy weeknights, this meal comes together in under 30 minutes, helping you avoid the stress of last-minute cooking.
  • Flavor Explosion: The balance of sweet and spicy flavors from the hot honey sauce will tantalize your taste buds and keep you coming back for more.
  • Customizable: Feel free to switch up the ingredients based on your preferences or what you have on hand—this recipe is incredibly versatile!
  • Family-Friendly: Kids and adults alike will love the crispy chicken and fun wrap format, making it a hit for family dinners.
  • Healthy Options: With fresh veggies and the option for whole wheat wraps, you can easily incorporate healthier choices into your meal.

Ingredient Breakdown

Before we get started, let’s take a closer look at the ingredients you’ll need for these crispy hot honey chicken wraps. Each component plays a crucial role in creating the perfect flavor and texture.

  • Chicken Breasts: 2 chicken breasts cut into strips. Opt for organic or free-range chicken for the best flavor.
  • Buttermilk: 1 cup for marinating. This not only tenderizes the chicken but also enhances the flavor.
  • Honey: 1/3 cup. Choose high-quality honey for a richer taste.
  • Hot Sauce: 1 tsp. Adjust the amount based on your heat preference.
  • Wraps: Tortillas of your choice, such as whole wheat or spinach, to add nutritional value.

Pro Tips for Perfect Wraps

To ensure your hot honey chicken wraps turn out perfectly, consider these expert insights:

  • Marinate for Flavor: Allow the chicken to marinate in buttermilk for at least 30 minutes, or overnight for deeper flavor absorption.
  • Double Coating: For extra crunch, double coat the chicken in seasoned flour before frying.
  • Temperature Check: Ensure the oil is hot enough by testing with a small piece of chicken—if it sizzles, you’re good to go!
  • Crispy Texture: Avoid overcrowding the pan when frying to maintain a crispy texture.
  • Warm Tortillas: Gently warm your tortillas before wrapping to prevent tearing.
  • Drizzle Generously: Don’t be shy with the hot honey drizzle; it’s the star of the show!
  • Fresh Ingredients: Use fresh produce for the best flavor and texture.
  • Experiment with Spices: Feel free to add spices like paprika or garlic powder to the flour for extra flavor.

Common Mistakes and Troubleshooting

Side view photograph of a delicious chicken wrap filled with crispy chicken and drizzled with honey.

We all make mistakes in the kitchen, but here are some common pitfalls to avoid when making your crispy hot honey chicken wraps:

  • Overcooking the Chicken: Keep an eye on the chicken while frying; overcooked chicken can become dry.
  • Skipping the Marination: This step is crucial for flavor and tenderness—don’t skip it!
  • Too Much Sauce: While hot honey is delicious, too much can make the wrap soggy—drizzle just enough for flavor.
  • Using Cold Tortillas: Cold tortillas can crack; warming them prevents this.

Flavor Variations

One of the best things about this recipe is its versatility. Here are some variations to try:

  • Spicy Garlic Sauce: Mix minced garlic into the hot honey for an additional flavor kick.
  • Buffalo Chicken Wrap: Substitute hot sauce with buffalo sauce for a classic twist.
  • Vegetarian Option: Replace chicken with crispy tofu or grilled vegetables.
  • Asian-Inspired: Use hoisin sauce and add shredded carrots and cucumbers for a fresh take.

Storage and Make-Ahead Instructions

If you want to prepare your crispy hot honey chicken wraps in advance, here’s how to store and reheat:

  • Refrigerate: Store cooked chicken and wrap components separately in airtight containers for up to 3 days.
  • Freeze: You can freeze cooked chicken strips for up to 3 months. Thaw before reheating.
  • Reheat: Reheat in an oven to maintain crispiness—avoid the microwave if possible!

Comprehensive FAQ

Here are some frequently asked questions to help you navigate your cooking journey:

  • Can I use frozen chicken? Yes, just make sure to thaw it completely before marinating.
  • What kind of hot sauce should I use? Any brand you love will work, but consider a balanced flavor that’s not too vinegary.
  • Can I make this recipe gluten-free? Absolutely! Use gluten-free flour and wraps.
  • How do I make the wraps spicier? Add more hot sauce to the honey or use a spicier variety.
  • Can I bake instead of fry the chicken? Yes, bake at 400°F for about 20 minutes, flipping halfway through.
  • What vegetables can I add? Lettuce, tomatoes, and avocados are great additions for freshness.
  • How do I ensure my chicken stays juicy? Marinating in buttermilk is key to juicy chicken.
  • Is this recipe kid-friendly? Yes, the sweet and spicy balance is usually a hit with kids!

Nutrition Tips and Dietary Adaptations

To make your crispy hot honey chicken wraps even healthier, consider these tips:

  • Whole Grains: Choose whole wheat or multigrain wraps for added fiber.
  • Lean Proteins: Opt for skinless chicken breasts to reduce fat content.
  • Load Up on Veggies: Add a variety of colorful vegetables to boost vitamins and minerals.
  • Reduce Sugar: Use less honey or opt for a natural sweetener to cut down on sugar.

Equipment Recommendations

Here’s a quick list of equipment that will make your cooking process smoother:

  • Heavy-Bottomed Pan: Ideal for frying chicken evenly.
  • Meat Thermometer: Ensures chicken is cooked to a safe temperature (165°F).
  • Mixing Bowls: For marinating and mixing ingredients.
  • Tongs: Perfect for flipping and removing chicken from hot oil.

Serving Suggestions

Your crispy hot honey chicken wraps can be served in various delightful ways:

  • Side Salads: Pair with a fresh garden salad to balance the richness of the wraps.
  • Fries or Chips: Serve with sweet potato fries or tortilla chips for added crunch.
  • Dipping Sauces: Offer a selection of sauces like ranch, blue cheese, or additional hot honey for dipping.

In conclusion, making your own crispy hot honey chicken wraps is not just about following a recipe; it’s about creating a memorable meal that brings joy and satisfaction to your dinner table. So gather your ingredients, roll up your sleeves, and let’s get cooking! Remember, the key to great food is not perfection, but the love and enjoyment you put into it. Happy cooking!

Crispy Hot Honey Chicken Wrap

Prep Time 15 minutes
Cook Time 10 minutes
Total Time 25 minutes
Servings 4 pieces
Calories 450
A flavorful and crispy chicken wrap drizzled with spicy honey, perfect for a quick and satisfying meal.

Ingredients

Protein

  • 2 pieces chicken breasts (cut into strips)
  • 1 cup buttermilk
  • 0.75 cup honey (3/4 cup)
  • 1 tsp hot sauce

Instructions 

  • Marinate chicken in buttermilk and hot sauce for 10 minutes.
  • Coat chicken strips and fry until crispy, about 5-7 minutes.
  • Assemble wraps with fried chicken and drizzle with hot honey.

Notes

For extra crunch, double coat the chicken before frying.
Calories: 450kcal
Cost: $12
Course: Main Course
Cuisine: American
Keyword: Chicken, honey, Wrap

Discover the Vibrant Veggie Rice Bowl: A Deliciously Quick Recipe

Are you ready to transform your weeknight meals into a culinary adventure? Introducing the Vibrant Veggie Rice Bowl, a quick and flavorful delight that’s perfect for busy schedules and picky eaters alike. This recipe is not just about filling your stomach; it’s about filling your plate with colorful, wholesome ingredients that make you feel good. You can whip up this veggie rice bowl in no time, making it an easy go-to for those hectic evenings when you need something satisfying and nutritious.

Let’s dive into why this recipe is a must-try!

Why You’ll Love This Recipe

  • Quick and Easy: With minimal prep time and a cooking duration of under 30 minutes, this recipe fits perfectly into your busy lifestyle.
  • Colorful and Nutritious: Packed with fresh vegetables like bell peppers, zucchini, and carrots, this dish is a feast for the eyes and the body.
  • Customizable: Feel free to swap in your favorite veggies or proteins; this rice bowl is all about personal preferences.
  • Meal Prep Friendly: Make a big batch on the weekend and enjoy delicious lunches throughout the week. You can store individual servings in the fridge for up to 5 days!
  • Flavors that Pop: The combination of soy sauce, sesame oil, and fresh ginger brings an explosion of flavor that will tantalize your taste buds.

Ingredients Breakdown

Let’s gather everything you need to make this delightful meal! Here’s what you’ll need:

  • 1 cup Bell Peppers (mixed colors): Adds color and sweetness.
  • 1 cup Zucchini: Provides a subtle flavor and soft texture.
  • 1 cup Carrots (shredded or thinly sliced): Offers crunch and vibrant color.
  • 1 cup Snap Peas: Adds a fresh, sweet flavor.
  • 2 stalks Green Onions (thinly sliced): For a mild onion flavor.
  • 1 cup Jasmine or Basmati Rice: The perfect base for your veggie rice bowl.
  • 1 cup Brown Rice: A great alternative for a heartier texture.
  • 3 tablespoons Soy Sauce or Tamari: For a splash of umami.
  • 1 tablespoon Fresh Ginger (grated): Adds warmth and zest.
  • 2 cloves Garlic (minced): For aromatic depth.
  • 1 tablespoon Sesame Oil: Enhances flavor and richness.
  • 2 tablespoons Toasted Sesame Seeds: For crunch and nutty flavor.
  • 1/4 cup Chopped Cilantro: Freshness to finish the dish.
  • 1 Sliced Avocado: Creaminess that complements the crunch.

Substitutions: Feel free to swap any of the vegetables or grains. Instead of snap peas, try broccoli. If you’re avoiding soy, coconut aminos work wonderfully as a substitute for soy sauce.

How to Make Your Quick Veggie Rice Bowl

Delicious veggie rice bowl featuring fresh snap peas, shredded carrots, and sliced avocado.

Ready to get cooking? Follow these simple steps to create your quick veggie rice bowl:

  • Cook the Rice: In a medium pot, combine the rice (white, brown, or a mix) with water. Bring to a boil, then reduce to a simmer and cook until tender, about 15-20 minutes. Fluff with a fork and set aside.
  • Sauté the Vegetables: In a large skillet, heat the sesame oil over medium heat. Add garlic and ginger, cooking until fragrant (about 30 seconds). Add bell peppers, zucchini, carrots, and snap peas. Sauté for 5-7 minutes until vegetables are tender but still vibrant.
  • Add Flavor: Stir in the soy sauce and toss to coat all the veggies. Cook for an additional 2 minutes.
  • Combine: In a large bowl, combine the cooked rice and sautéed vegetables. Toss to mix well.
  • Top It Off: Serve warm, garnished with green onions, cilantro, sesame seeds, and avocado slices.

Pro Tips for the Perfect Veggie Rice Bowl

Here are some expert insights to elevate your cooking:

  • Prep Ahead: Chop your vegetables ahead of time and store them in the fridge for quick assembly during busy evenings.
  • Layering Flavors: For a deeper flavor, consider marinating your veggies in soy sauce and sesame oil for 30 minutes before cooking.
  • Cooking Rice: For added flavor, cook rice in vegetable broth instead of water.
  • Experiment: Feel free to add proteins like tofu, tempeh, or cooked chicken for extra heartiness.
  • Serving Style: Serve in bowls for a family-style meal or prep individual servings for meal prep.
  • Garnish: Top with chili flakes or a drizzle of sriracha for an extra kick!
  • Texture Variation: Add some toasted nuts or seeds for crunch.
  • Fresh Herbs: Swap cilantro for basil or parsley for a different flavor profile.

Common Mistakes and Troubleshooting

Even the best cooks face challenges. Here’s how to avoid common pitfalls:

  • Overcooked Rice: Ensure you measure water accurately and let rice rest before fluffing.
  • Soggy Vegetables: Avoid overcrowding your pan; sauté in batches if needed.
  • Flavorless Dish: Taste as you go. Adjust soy sauce and seasoning to your preference.

Variations of the Veggie Rice Bowl

Here are some fun twists to keep your meals exciting:

  • Mexican-Inspired: Add black beans, corn, diced tomatoes, and avocado. Top with lime juice and cilantro.
  • Asian-Inspired: Incorporate bok choy, shiitake mushrooms, and a splash of teriyaki sauce.
  • Italian-Inspired: Use roasted cherry tomatoes, spinach, and a sprinkle of Parmesan cheese.
  • Indian-Inspired: Add chickpeas and seasoned cauliflower with a dash of curry powder.

Storage and Make-Ahead Instructions

This veggie rice bowl is perfect for preparing in advance. Here’s how to store it:

  • In the Fridge: Store in an airtight container for up to 5 days. Reheat in the microwave or on the stove.
  • Freezing: You can freeze individual portions for up to 3 months. Just let them cool completely before transferring to freezer-safe containers.
  • Make-Ahead Options: Cook the rice and veggies separately, then combine them just before serving for optimal freshness.

Frequently Asked Questions

Got questions? Here are some common inquiries about the Vibrant Veggie Rice Bowl:

  • Can I use frozen vegetables? Yes! Just add them to the pan straight from the freezer and cook until heated through.
  • Is this recipe gluten-free? Use tamari instead of soy sauce to make it gluten-free.
  • What can I serve with this rice bowl? Pair it with a simple salad or some spring rolls for a complete meal.
  • How can I make this recipe spicier? Add some fresh chopped chili or a drizzle of spicy sauce before serving.
  • Can I add nuts or seeds? Absolutely! Toasted almonds or sunflower seeds would add a nice crunch.
  • Is it suitable for meal prep? Yes! It holds up well in the fridge and is great for lunches.
  • Can I use other grains? Certainly! Quinoa, farro, or even cauliflower rice make excellent alternatives.
  • How do I store leftovers? Keep in an airtight container in the fridge for up to 5 days or freeze for longer storage.

Nutritional Tips and Dietary Adaptations

This quick veggie rice bowl is not only delicious but also nutritious. Here are ways to adapt it for various diets:

  • Vegan: The recipe is entirely plant-based as it stands. Just ensure your soy sauce is vegan-friendly.
  • Low-Carb: Substitute rice with cauliflower rice or spiralized zucchini for a lighter option.
  • High-Protein: Add edamame, chickpeas, or grilled chicken to boost the protein content.

Essential Equipment for Making the Veggie Rice Bowl

You don’t need much to make this recipe. Here’s what I recommend:

  • Medium Saucepan: For cooking the rice.
  • Large Skillet: For sautéing the vegetables.
  • Cutting Board: For chopping veggies easily.
  • Sharp Knife: Essential for quick and safe chopping.

Serving Suggestions

Get creative with how you present your veggie rice bowl:

  • Garnish generously with fresh herbs and seeds for visual appeal.
  • Serve in colorful bowls to enhance the dining experience.
  • Pair with a refreshing drink, like iced tea or sparkling water with lemon.

In conclusion, the Vibrant Veggie Rice Bowl is more than just a meal; it’s an experience that brings joy, health, and creativity into your kitchen. So gather your ingredients, roll up your sleeves, and let’s make cooking fun again!

Easy Quick Veggie Rice Bowl Packed with Bold, Fresh Flavors

Prep Time 10 minutes
Cook Time 15 minutes
Total Time 25 minutes
Servings 4 servings
Calories 450
This vibrant rice bowl combines colorful vegetables with bold flavors for a quick and satisfying meal.

Ingredients

Vegetables

  • 1 cup Bell Peppers mixed colors
  • 1 cup Zucchini
  • 1 cup Carrots shredded or thinly sliced
  • 1 cup Snap Peas
  • 2 stalks Green Onions thinly sliced
  • 1 cup Jasmine or Basmati Rice
  • 1 cup Brown Rice
  • 3 tablespoons Soy Sauce or Tamari
  • 1 tablespoon Fresh Ginger grated
  • 2 cloves Garlic minced
  • 1 tablespoon Sesame Oil
  • 2 tablespoons Toasted Sesame Seeds
  • 0.25 cup Chopped Cilantro
  • 1 each Sliced Avocado

Instructions 

  • Cook rice according to package instructions.
  • Stir-fry vegetables in sesame oil until tender.
  • Mix cooked rice with vegetables, soy sauce, ginger, and garlic.
  • Top with sliced avocado, cilantro, sesame seeds, and green onions.

Notes

Feel free to customize with your favorite vegetables or protein sources.
Calories: 450kcal
Cost: $12
Course: Main Course
Cuisine: Fusion
Keyword: Vegetables