Author

Steven

Browsing

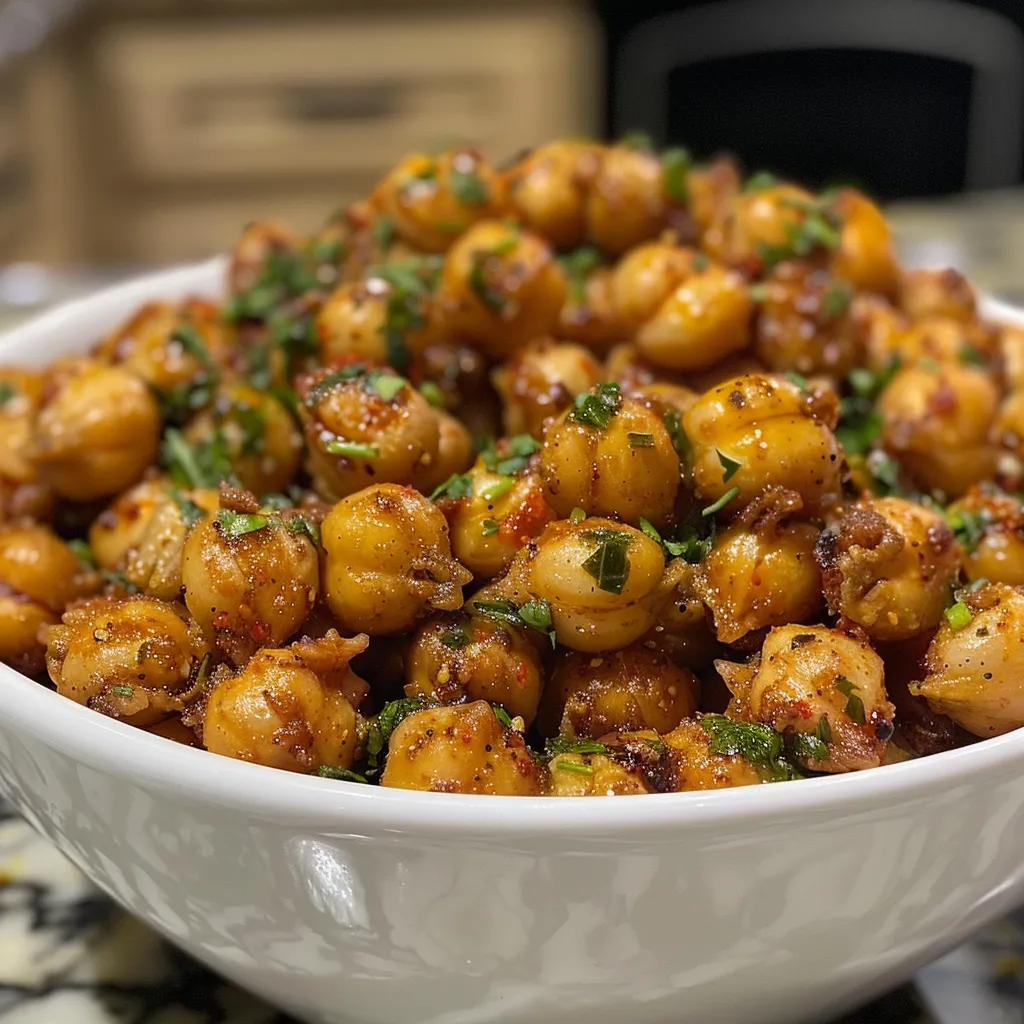
Discover the Joy of Crunch: Your Ultimate Guide to Addictive Ranch Crispy Chickpeas

Welcome to your next favorite snack! These Addictive Ranch Crispy Chickpeas are not just delicious; they’re a satisfying crunch you can enjoy at any time of the day. With minimal ingredients and quick preparation, you’ll learn how to transform ordinary chickpeas into a protein-packed treat that’s perfect for snacking, salads, or entertaining. Let’s dive into why you’re going to love this recipe and how to make it your own!

Why You’ll Love This Recipe

Here are some fabulous reasons to get excited about making these ranch crispy chickpeas:

  • Protein-Packed Snack: Chickpeas are loaded with protein and fiber, making them a healthy and filling snack option.
  • Easy to Make: With just a few simple steps, you can whip up a batch in no time!
  • Customizable Flavors: Switch up the seasonings to create different flavor profiles, from spicy to savory.
  • Perfect for Meal Prep: Make a big batch and store them for a delicious, crunchy snack throughout the week.
  • Kid-Friendly: These ranch crispy chickpeas are a hit with kids, making them a great addition to lunchboxes or after-school snacks.

Ingredient Breakdown with Substitutions

Let’s look at the ingredients you’ll need to make these crispy chickpeas, along with some smart substitutions:

  • Chickpeas: Use 3 (15 oz) cans of organic low sodium garbanzo beans, or substitute with cooked dried chickpeas (about 4.5 cups).
  • Olive Oil: 1-2 tablespoons provide the necessary fat for crisping. You can swap this for avocado oil or any neutral oil of your choice.
  • Maple Syrup: This adds a touch of sweetness; honey or agave syrup can work as alternatives.
  • Spices: The blend includes garlic powder, onion powder, dill, parsley, salt, chili powder, cumin, paprika, and cayenne pepper. Feel free to mix and match based on your flavor preferences.

Step-by-Step Instructions

Side view of spiced chickpeas ready to be served as a savory snack.

Follow these simple steps to create your ranch crispy chickpeas:

  1. Preheat your oven to 400°F (200°C) and line a large baking sheet with parchment paper for easier cleanup.
  2. Drain and rinse the chickpeas thoroughly in a colander under cold running water. Remove any loose skins that come off during rinsing.
  3. Spread the chickpeas on a clean kitchen towel or paper towels and gently pat dry. The drier the chickpeas, the crispier they’ll get in the oven.
  4. Transfer the dried chickpeas to a large bowl and drizzle with olive oil. Toss until all chickpeas are evenly coated.
  5. Divide the chickpeas into three separate bowls if making different flavors. Add corresponding seasonings to each bowl and toss until evenly coated.
  6. Spread the seasoned chickpeas in a single layer on the prepared baking sheet, ensuring they’re not overcrowded. Use multiple baking sheets if necessary.
  7. Bake for 25-30 minutes, stirring halfway through cooking time, until the chickpeas are golden brown and crispy. They should make a slight rattling sound when you shake the pan.
  8. Remove from the oven and let cool completely on the baking sheet. The chickpeas will continue to crisp up as they cool. Store in an airtight container at room temperature for up to 3 days.

Common Mistakes and Troubleshooting

Here are some tips to ensure your chickpeas turn out perfectly crispy:

  • Not Drying Chickpeas Thoroughly: Make sure to dry the chickpeas well after rinsing; damp chickpeas won’t crisp up.
  • Overcrowding the Baking Sheet: Ensure there’s enough space between chickpeas on the baking sheet for proper airflow.
  • Skipping the Cool Down: Allowing the chickpeas to cool completely on the baking sheet helps them achieve maximum crispiness.

Pro Tips for Perfect Ranch Crispy Chickpeas

Here are some expert insights to elevate your chickpea game:

  • Experiment with Seasonings: Don’t hesitate to try different spices and herbs to find your favorite combination.
  • Double the Batch: You can easily double the recipe if you’re planning on sharing (or if you’re really hungry!).
  • Serve Warm or Room Temperature: While delicious at any temperature, serving them warm enhances the flavor.
  • Use a Convection Oven: If you have one, it circulates hot air better, resulting in crispier chickpeas.
  • Try Different Oils: Each oil has a unique flavor; experiment to see which you prefer in your chickpeas.

Creative Seasoning Variations

Don’t just stop at ranch! Here are several exciting variations to try:

  • Spicy Cajun: Replace ranch seasoning with Cajun spice mix for a fiery kick.
  • Sweet Cinnamon: Omit the savory spices and add cinnamon and a bit of sugar for a sweet treat.
  • Italian Herb Blend: Use Italian seasoning, garlic powder, and Parmesan cheese for a Mediterranean twist.
  • Smoky BBQ: Add smoked paprika and a dash of BBQ sauce for a smoky flavor profile.

Storage and Make-Ahead Instructions

Want to prepare these chickpeas in advance? Here’s how:

  • Store in Airtight Container: After cooling, store your chickpeas in an airtight container to maintain their crunch.
  • Keep at Room Temperature: They stay fresh for up to 3 days at room temperature.
  • Make Ahead: You can prepare the chickpeas a day in advance; just ensure they reach room temperature before serving.

Frequently Asked Questions

Here are answers to common questions regarding crispy chickpeas:

  • Why Aren’t My Roasted Chickpeas Crispy? Ensure they are thoroughly dried and not overcrowded on the baking sheet.
  • How Can I Make Them Less Salty? Reduce the amount of added salt in your seasoning mix.
  • Can I Use Frozen Chickpeas? It’s best to use canned or cooked dried chickpeas for optimal texture.
  • What Can I Pair Them With? They make a great salad topping, snack on their own, or can be added to soups for crunch.
  • How Do I Revive Soggy Chickpeas? Re-bake them in the oven for a few minutes to restore their crunch.
  • Can I Freeze Them? While not recommended, you can freeze them. Just note that they may lose their crunch once thawed.
  • What’s the Best Way to Serve Them? Serve them warm or at room temperature for the best flavor and texture.
  • Are They Gluten-Free? Yes, chickpeas are naturally gluten-free!

Nutritional Tips and Dietary Adaptations

This recipe can easily fit into various dietary plans:

  • Vegan-Friendly: This snack is vegan as it contains no animal products.
  • Gluten-Free: Chickpeas are gluten-free, making this a safe snack for those with gluten intolerances.
  • Low-Calorie Option: Use less oil for a lower-calorie snack without compromising on flavor.

Equipment Recommendations

Here’s what you’ll need to make these crispy chickpeas:

  • Baking Sheet: A large, rimmed baking sheet allows for even cooking.
  • Parchment Paper: Helps prevent sticking and makes cleanup a breeze.
  • Colander: Ideal for rinsing and draining chickpeas efficiently.
  • Bowl for Mixing: A large bowl lets you easily coat your chickpeas with oil and seasoning.

Serving Suggestions

Looking for ways to enjoy your ranch crispy chickpeas? Here are a few ideas:

  • As a Standalone Snack: Enjoy them straight from the container for a quick, satisfying crunch.
  • Add to Salads: Use them as a crunchy topping for salads, adding both flavor and nutrition.
  • As a Garnish: Sprinkle over soups or stews for added texture and flavor.
  • On Charcuterie Boards: They make an excellent addition to any charcuterie or snack board.

Conclusion: Your New Favorite Snack Awaits!

There you have it! A step-by-step guide to creating your very own Addictive Ranch Crispy Chickpeas. This simple, flavorful snack is not only easy to make but also packed with nutrition. Don’t be afraid to get creative with flavors and enjoy them however you like! Happy cooking, and get ready to munch on these delicious chickpeas with confidence!

Addictive Ranch Crispy Chickpeas: Homemade Savory Snack

Prep Time 10 minutes
Cook Time 30 minutes
Total Time 40 minutes
Servings 4 servings
Calories 220
Enjoy these crunchy, flavorful roasted chickpeas seasoned with a savory ranch-inspired blend, perfect for a healthy snack.

Ingredients

Canned Goods

  • 3 cans organic low sodium garbanzo beans
  • 1-2 tbsp olive oil
  • 1 tbsp maple syrup
  • ½ tsp cinnamon
  • 1 tsp garlic powder
  • 1 tsp onion powder
  • ½ tsp dried dill
  • ½ tsp dried parsley
  • ½ tsp salt
  • ½ tsp chili powder
  • ½ tsp ground cumin
  • ½ tsp paprika
  • ½ tsp cayenne pepper
  • ¼ tsp garlic powder
  • ¼ tsp salt

Instructions 

  • Preheat oven to 400°F (200°C) and line a baking sheet with parchment paper.
  • Drain, rinse, and dry chickpeas thoroughly.
  • Toss chickpeas with olive oil and maple syrup.
  • Divide into bowls and add seasonings, tossing to coat.
  • Spread on baking sheet and bake for 25-30 minutes, stirring halfway.
  • Cool completely and store in an airtight container.

Notes

Ensure chickpeas are thoroughly dried for maximum crispiness.
Calories: 220kcal
Cost: $10
Course: Snack
Cuisine: American
Keyword: Chickpeas

Elevate Your Breakfast with Avocado Toast and Egg

Welcome to your new favorite breakfast! If you’re looking for a nutritious, satisfying, and flavorful start to your day, look no further than avocado toast with egg. This dish is not only simple to make but also packed with healthy fats, protein, and vitamins that will keep you energized throughout the morning. In this comprehensive guide, we will explore everything from the perfect ingredients to cooking techniques and variations that will make your breakfast exciting. Let’s dive in!

Why You’ll Love This Recipe

This avocado toast with egg recipe isn’t just delicious; it’s also incredibly versatile and packed with benefits. Here are five reasons why you’ll adore it:

  • Nutrient-Rich Ingredients: Avocado is loaded with healthy fats, fiber, and essential nutrients, making it a fantastic choice for a balanced breakfast.
  • Quick and Easy: With just a few simple ingredients and steps, you can whip up this meal in under 15 minutes!
  • Customizable: You can easily modify the toppings and types of eggs to suit your taste or dietary preferences.
  • Perfect for Meal Prep: Make a batch of avocado spread and keep it in the fridge for quick breakfasts all week.
  • Dazzling Presentation: This dish is not only tasty but also visually pleasing, perfect for impressing friends or family.

Ingredient Breakdown

Let’s take a closer look at the ingredients you’ll need to create this delightful dish, along with some substitutions if you’re missing an item.

  • Bread of Choice: Use 1-2 slices of whole grain or sourdough bread for a hearty base. Gluten-free options are available if needed.
  • Ripe Avocado: Choose a ripe avocado for the best flavor and creaminess. Hass avocados are typically preferred.
  • Eggs: This recipe calls for 2 eggs, but you can adjust this based on your hunger levels or preferences. Try fried, scrambled, or poached eggs!
  • Salt and Pepper: Essential for seasoning. Feel free to experiment with herbs or spices.
  • Butter or Olive Oil: Use either for cooking your eggs. Olive oil is a great choice for a healthier option.
  • Optional: Splash of Vinegar: This is especially useful for poaching eggs, helping to keep the whites together.

How to Make Avocado Toast with Eggs

Now, let’s get into the nitty-gritty of how to prepare this delicious breakfast. Follow these steps for perfect results.

Cooking the Toast

1. Toast the bread in a toaster or on a skillet until golden and crisp. This step is crucial for creating a solid base that won’t become soggy.

Preparing the Avocado

2. Slice or mash the ripe avocado in a bowl. Spread it generously onto your toast. Season with a pinch of salt and freshly cracked pepper for that extra flavor.

Cooking the Eggs

3. If you’re frying: Heat butter or oil in a pan over low heat. Crack in the egg and cook until the whites are set and the yolk remains runny.

4. If you’re scrambling: Whisk the eggs in a bowl, pour them into the pan with butter or oil, and cook gently, folding until soft and fluffy.

5. For boiled eggs: Boil water and gently add the eggs. Cook to your desired doneness, then cool in an ice bath, peel, and slice.

6. To poach: Bring water with a splash of vinegar to a boil. Swirl the water, gently slide in the egg, and poach until the white is set and the yolk is soft.

Assembling Your Toast

7. Place the cooked egg on top of the avocado toast and serve immediately for the best taste and texture.

Pro Tips for Perfect Avocado Toast

To elevate your avocado toast game, consider these expert insights:

  • Choose the Right Avocado: Ensure it’s ripe but not overripe to avoid a mushy texture.
  • Season Well: Don’t skip the salt and pepper; they enhance the flavors tremendously.
  • Experiment with Toppings: Add sliced tomatoes, radishes, or microgreens for a burst of freshness and color.
  • Use Fresh Ingredients: Fresh herbs or spices can bring a whole new dimension of flavor.
  • Toast to Perfection: Aim for a golden brown color for the best crunch.
  • Don’t Rush the Eggs: Cooking them on low heat ensures they remain tender and flavorful.
  • Variate Your Breads: Try different types of bread like rye, ciabatta, or even bagels!
  • Make It a Meal: Pair your avocado toast with a side of fruit or yogurt for a complete breakfast.

Common Mistakes and Troubleshooting

Even the best of us can run into issues while preparing our meals. Here are some common mistakes and how to avoid them:

  • Soggy Toast: Make sure your toast is adequately toasted and let it cool for a minute before adding avocado.
  • Brown Avocado: To prevent browning, add a splash of lemon or lime juice to the avocado after mashing.
  • Overcooked Eggs: Keep the heat low and stay attentive to your eggs to achieve the perfect doneness.
  • Unripe Avocado: If your avocado isn’t ripe, place it in a brown paper bag for a day or two.
  • Too Much Salt: Start with a small pinch of salt and adjust to your taste.

Variations to Try

Feeling adventurous? Here are some exciting variations of avocado toast with egg:

  • Spicy Avocado Toast: Add a sprinkle of red pepper flakes or a few slices of jalapeño for a kick.
  • Caprese Style: Top with fresh mozzarella and basil for an Italian twist.
  • Breakfast Burrito Style: Add black beans and salsa for a southwestern flair.
  • Smoked Salmon Addition: Layer on some smoked salmon for an elegant and flavorful touch.

Storage and Make-Ahead Instructions

If you want to prepare ahead of time, here’s how:

  • Avocado Preparation: Mash the avocado and store it in an airtight container with a little lemon juice to prevent browning, and consume within 1-2 days.
  • Eggs: Cook eggs fresh if possible. If you need to prepare in advance, consider hard-boiling them.
  • Bread: Toast the bread fresh for the best texture. You can pre-slice your bread for convenience.

Comprehensive FAQ

Here are answers to some common questions about avocado toast with egg:

  • Can I make this recipe vegan? Yes! Substitute the eggs with tofu scramble or chickpea salad.
  • What type of bread is best? Whole grain or sourdough works best for flavor and texture.
  • Is this a healthy breakfast? Absolutely! It’s rich in healthy fats and protein.
  • How can I keep my avocado from browning? Adding lemon juice helps maintain its vibrant green color.
  • Can I make this ahead of time? You can prepare the avocado spread in advance, but for best results, toast and assemble just before serving.
  • What can I pair with avocado toast? Fresh fruit, yogurt, or a smoothie make excellent accompaniments.
  • Can I use different types of eggs? Yes! Feel free to use boiled, scrambled, poached, or fried eggs.
  • How long does avocado toast last? It’s best eaten fresh, but the avocado can be stored for 1-2 days in the fridge.

Nutritional Tips and Dietary Adaptations

This avocado toast is already a well-rounded meal, but here are some ways to adjust it for specific dietary needs:

  • Low-Carb Option: Use a low-carb bread or lettuce wrap instead of traditional bread.
  • High-Protein Option: Add additional eggs or consider topping with cottage cheese or Greek yogurt.
  • Gluten-Free Option: Opt for gluten-free bread or rice cakes as the base.
  • Vegan Option: Substitute eggs with plant-based options like tofu or chickpea salad.

Equipment Recommendations

To make the most of your avocado toast journey, consider having these kitchen tools on hand:

  • Toaster or Toaster Oven: For perfectly toasted bread.
  • Non-Stick Skillet: Ideal for cooking eggs without sticking.
  • Mixing Bowl: For mashing the avocado.
  • Spatula: For flipping eggs and serving.
  • Knife and Cutting Board: Essential for slicing avocados and bread.

Serving Suggestions

To make your avocado toast even more appealing, consider these serving ideas:

  • Garnish with Fresh Herbs: A sprinkle of cilantro or parsley can elevate the dish.
  • Serve with a Side Salad: A light salad on the side can add freshness.
  • Enjoy with a Smoothie: Pair your toast with a refreshing smoothie for a complete breakfast.

In conclusion, avocado toast with egg is not just a breakfast; it’s a canvas for your culinary creativity. With the right ingredients, techniques, and a dash of imagination, you can create a dish that not only satisfies but also nourishes. So grab your ingredients, channel your inner chef, and enjoy the delightful flavors and textures of this amazing breakfast! Happy cooking!

Avocado Toast With Egg

Prep Time 5 minutes
Cook Time 10 minutes
Total Time 15 minutes
Servings 1 serving
Calories 350
A quick and nutritious breakfast featuring creamy avocado on crispy toast topped with a perfectly cooked egg.

Ingredients

Bread

  • 1 slice bread of choice (whole grain or sourdough recommended)

Avocado

  • 1 ripe avocado ripe avocado

Eggs

  • 2 eggs eggs

Salt and pepper

  • to taste Salt and pepper

Butter or olive oil

  • for frying or scrambling eggs Butter or olive oil

Vinegar (optional)

  • splash optional Splash of vinegar (for poaching eggs)

Instructions 

  • Toast the bread until golden and crisp.
  • Spread mashed or sliced avocado on toast; season with salt and pepper.
  • Cook eggs: fry, scramble, or poach as preferred, until whites are set and yolk is soft.
  • Place cooked egg on avocado toast and serve immediately.

Notes

For extra flavor, add a squeeze of lemon or hot sauce.
Calories: 350kcal
Cost: $10
Course: Breakfast
Cuisine: American
Keyword: Avocado, Egg, Toast

Wholesome Oatmeal Waffles: Your New Favorite Breakfast

If you’re looking for a delicious, nutritious, and quick breakfast option, look no further than these oatmeal waffles. Perfectly fluffy and incredibly satisfying, they are made entirely with rolled oats, which means they’re not only healthier but also help keep you full longer. This recipe is ideal for busy mornings or leisurely weekend breakfasts alike. Plus, you’ll find that they come together in just minutes! Let’s dive into why you’ll love this recipe.

Why You’ll Love This Recipe

  • Nutritious Ingredients: Made with whole rolled oats instead of refined flour, these oatmeal waffles pack a fiber punch, keeping you energized throughout the day.
  • Quick and Easy: The batter can be whipped up in a blender in just a few minutes, making cleanup a breeze.
  • Customizable: You can easily adapt the recipe to your dietary needs, whether you’re vegan, gluten-free, or looking for low-sugar alternatives.
  • Perfect Texture: The waffles are crispy on the outside and fluffy on the inside, giving you that ideal waffle experience.
  • Freezable: Cooked waffles can be frozen and reheated for a quick breakfast solution any day of the week!

Ingredients Breakdown

Here’s what you’ll need to make these delicious oatmeal waffles:

  • 2 cups Old Fashioned rolled oats: Provides the base for the batter, offering great taste and health benefits.
  • 2 large eggs (or flax eggs): Acts as a binder. For a vegan option, use 2 tablespoons of ground flaxseed mixed with 6 tablespoons of water.
  • 3/4 cup milk of choice: Any milk works well here, including oat milk, almond milk, or cow’s milk.
  • 2 tablespoons neutral oil or melted butter: This adds richness and helps the waffles crisp up.
  • 2 tablespoons brown sugar: For a hint of sweetness; you can substitute with maple syrup or a sugar alternative.
  • 2 teaspoons vanilla extract: Adds flavor and depth to the batter.
  • 2 teaspoons baking powder: Ensures that the waffles rise and are light and fluffy.
  • 1/2 teaspoon kosher salt: Balances out the sweetness and enhances flavor.
  • 1/4 teaspoon cinnamon: A warm spice that complements the oats beautifully.

Pro Tips for Perfect Waffles

Mouth-watering oatmeal waffles garnished with fresh fruit and a sprinkle of cinnamon.
  • Let the batter rest: After blending, allow it to sit for 5 minutes. This helps the oats absorb moisture and thickens the batter.
  • Brush the waffle iron: Lightly coat your waffle maker with oil before adding the batter to prevent sticking.
  • Cook in batches: Depending on your waffle maker, you may be able to make several at once. Keep them warm in a low oven until served.
  • Adjust for thickness: If the batter seems too thick, add a splash more milk to get the consistency just right.
  • Experiment with spices: Don’t hesitate to add a pinch of nutmeg or a dash of vanilla extract for a flavor twist.
  • Use a scale: For the most accurate measurements, consider weighing your ingredients.
  • Fresh toppings: Top with fresh fruit, yogurt, or a drizzle of maple syrup for a delightful finish.
  • Make it a meal: Serve with bacon or sausage for a heartier breakfast option.

Common Mistakes and Troubleshooting

Even the best of us can run into hiccups when cooking. Here are some common pitfalls and how to avoid them:

  • Waffles sticking to the iron: Ensure your waffle iron is properly oiled and preheated before adding the batter.
  • Dense waffles: If your waffles are too heavy, you might need to add more baking powder or ensure your batter isn’t overmixed.
  • Gummy texture: Letting the batter rest helps prevent this; also, avoid overcooking.
  • Uneven cooking: Make sure to spread the batter evenly in the center of the waffle iron.
  • Not enough sweetness: Adjust the sweetener to your preference—taste the batter before cooking!

Variations to Try

Feel like mixing things up? Here are some delicious variations:

  • Chocolate Chip Oatmeal Waffles: Add 1/2 cup of mini chocolate chips to the batter for a sweet treat.
  • Banana Oatmeal Waffles: Mash one ripe banana into the batter for a natural sweetness and extra moisture.
  • Apple Cinnamon Waffles: Incorporate 1 cup of finely chopped apples and an extra 1/2 teaspoon of cinnamon for a fall-inspired flavor.
  • Nutty Oatmeal Waffles: Stir in 1/4 cup of chopped nuts or seeds for added crunch and nutrition.

Storage and Make-Ahead Instructions

Want to prepare for a busy week? Here’s how to store and enjoy these oatmeal waffles later:

  • Freezing: Place cooked waffles in a single layer on a baking sheet before freezing. Once frozen, transfer them to a plastic bag, removing excess air before sealing.
  • Reheating: For the best results, toast frozen waffles in a toaster or toaster oven until heated through and crispy.
  • Make-ahead: Prepare the batter the night before and store it in the fridge. Just give it a quick stir before cooking!

Frequently Asked Questions

  • Can I make these waffles vegan?: Absolutely! Just use flax eggs and any non-dairy milk of your choice.
  • What can I substitute for the rolled oats?: Quick oats can be used, but the texture will differ slightly.
  • How long do these waffles last in the fridge?: They can be stored in an airtight container for up to 3 days.
  • Can I use this batter for pancakes?: Yes! Simply pour the batter onto a hot skillet instead of a waffle iron.
  • Are these waffles gluten-free?: If you use certified gluten-free oats, they will be gluten-free.
  • What toppings do you recommend?: Maple syrup, fresh fruit, yogurt, and nut butter work wonderfully!
  • Can I double this recipe?: Yes, just scale the ingredients accordingly; it works brilliantly for larger gatherings.
  • What’s the best way to serve these waffles?: Serve them warm with a drizzle of maple syrup and your favorite toppings!

Nutritional Tips and Dietary Adaptations

When it comes to making healthy choices, these oatmeal waffles can easily fit into many dietary plans:

  • High Fiber: Packed with rolled oats, they provide essential fiber for digestive health.
  • Low Sugar: Adjust the sugar levels to suit your preference; using ripe bananas can sweeten naturally.
  • Protein Boost: Consider adding protein powder or Greek yogurt to the batter for extra protein.
  • Rich in Whole Grains: This recipe focuses on whole ingredients, making it a better choice for heart health.

Equipment Recommendations

To make the best oatmeal waffles, here’s what you’ll need:

  • High-Speed Blender: Perfect for creating a smooth batter quickly.
  • Waffle Iron: Any style will do, but a Belgian waffle maker gives you that classic fluffy texture.
  • Measuring Cups and Spoons: Accurate measuring is key to consistent results.
  • Spatula: For pouring batter and serving your waffles with ease.

Serving Suggestions

These oatmeal waffles are versatile and can be paired with various toppings:

  • Classic Maple Syrup: A timeless choice that never disappoints.
  • Fresh Berries: Strawberries, blueberries, or raspberries add freshness and color.
  • Nut Butter: Almond or peanut butter for a protein kick.
  • Yogurt: A dollop of Greek yogurt for added creaminess and protein.

Conclusion

These wholesome oatmeal waffles are not just easy to make but also a delightful way to start your day. Packed with nutrition, flavor, and versatility, they’re bound to become a family favorite. So grab your ingredients, fire up that waffle iron, and enjoy a cozy breakfast that’ll keep you energized and satisfied!

Oatmeal Waffles

Prep Time 10 minutes
Cook Time 10 minutes
Total Time 20 minutes
Servings 4 servings
Calories 250
Enjoy fluffy, wholesome oatmeal waffles that are quick to make and perfect for a delicious breakfast or brunch.

Ingredients

Dry ingredients

  • 2 cups Old Fashioned rolled oats
  • 2 large eggs (or flax eggs)
  • 3/4 cup milk of choice
  • 2 tablespoons neutral oil or melted butter
  • 2 tablespoons brown sugar
  • 2 teaspoons vanilla extract
  • 2 teaspoons baking powder
  • 1/2 teaspoon kosher salt
  • 1/4 teaspoon cinnamon

Instructions 

  • Blend all ingredients until smooth, then let sit for 5 minutes.
  • Preheat waffle iron and lightly brush with oil.
  • Pour batter into waffle iron and cook until golden brown.
  • Remove waffles and keep warm. Serve with maple syrup.
  • Freeze leftovers in a plastic bag; reheat in toaster as needed.

Notes

For extra flavor, add fresh berries or nuts on top.
Calories: 250kcal
Cost: $15
Course: Breakfast
Cuisine: American
Keyword: Oats