Author

Steven

Browsing

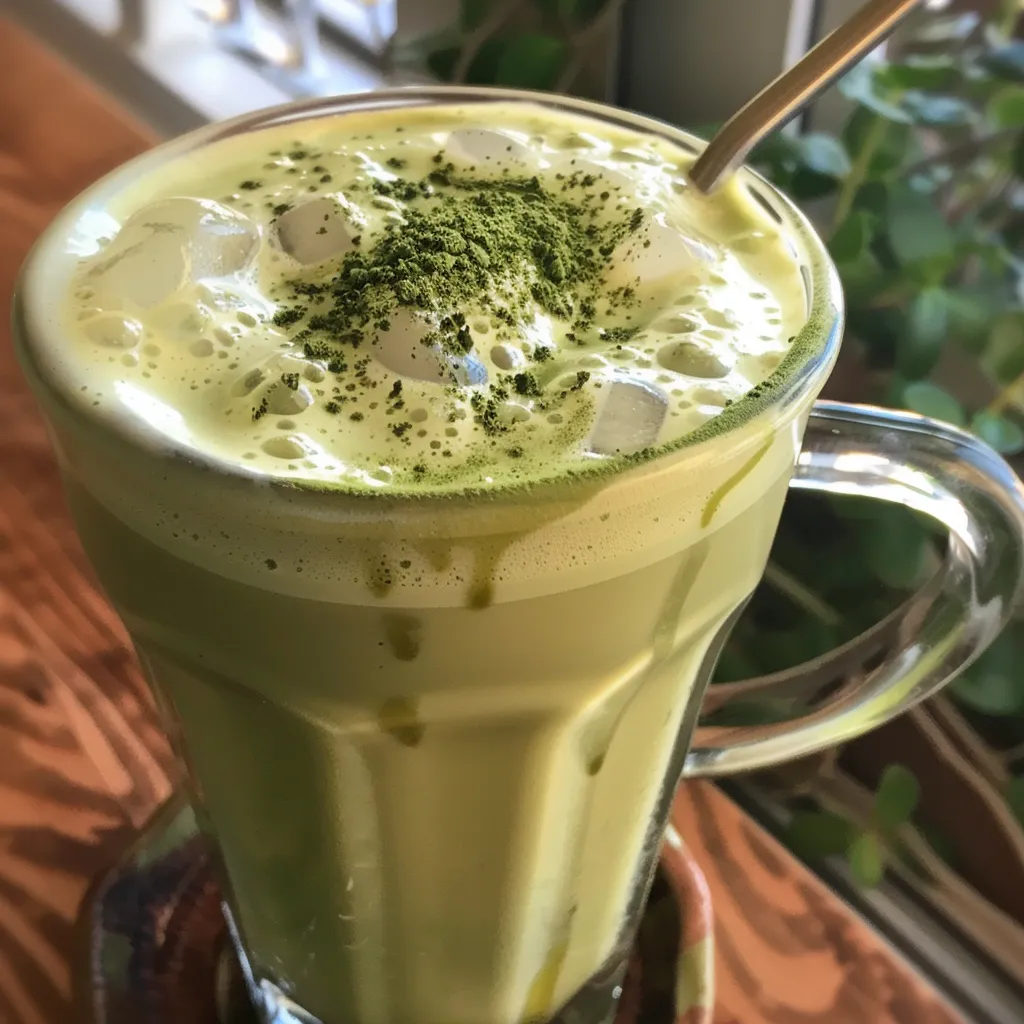
Your Morning Ritual: The Easy Matcha Latte

Welcome to your new favorite morning ritual! The Easy Matcha Latte is a delightful blend of ceremonial-grade matcha, creamy oat milk, and a hint of sweetness that will elevate your mornings. This simple yet satisfying recipe not only tantalizes your taste buds but also offers numerous health benefits. If you’re ready to explore how to make a matcha latte that’s both delicious and energizing, you’re in the right place!

Matcha, a finely ground powder made from specially grown green tea leaves, is packed with antioxidants and provides a gentle caffeine boost, making it a perfect choice for a morning drink. With this guide, you’ll discover everything you need to know about preparing the best matcha latte at home, from selecting quality matcha to creative variations that suit your taste!

Why You’ll Love This Recipe

  • Quick and Easy: This recipe can be made in under 10 minutes, making it perfect for busy mornings.
  • Versatile Ingredients: Customize your matcha latte with different milk options, sweeteners, and additional flavors.
  • Health Benefits: Matcha is rich in antioxidants, boosts metabolism, and enhances mood.
  • Eco-Friendly: Using matcha reduces waste compared to traditional brewed teas, as you consume the whole leaf.
  • Caffeine Control: Enjoy a gentle caffeine lift without the jitters, thanks to matcha’s slow-release energy.

Ingredients for Your Matcha Latte

To create the perfect matcha latte, you’ll need the following ingredients:

  • 1½ teaspoons ceremonial-grade matcha (approximately 3g): This high-quality matcha provides the best flavor and health benefits.
  • ¼ cup hot water (158-176°F or 70-80°C): Boil the water, then let it cool slightly to avoid burning the matcha.
  • ½ cup oat milk: Creamy and dairy-free, but feel free to use your favorite milk, like almond or soy.
  • 1-2 teaspoons maple syrup (optional): Adjust the sweetness to your liking; honey or agave syrup also work well.
  • Ice cubes (for an iced version): Chill your drink for hot summer days!

How to Make Your Matcha Latte

Close-up of a layered matcha latte featuring vibrant green matcha, oat milk, and ice cubes.

Follow these simple steps to create a delicious matcha latte:

  • Soak your bamboo whisk in hot water to soften the bristles, which aids in whisking the matcha.
  • In a small bowl, sift the matcha powder to remove clumps. This ensures a smoother drink.
  • Add the hot water to the sifted matcha and whisk vigorously in an M or W motion until smooth and frothy.
  • For an iced matcha latte, fill a glass with ice cubes, pour in the oat milk, then gently pour the whisked matcha over it. Stir in the sweetener if desired.
  • For a hot matcha latte, warm the milk in a saucepan or microwave before adding it to the mug with the whisked matcha.

Expert Tips for the Best Matcha Latte

  • Choose Quality Matcha: Look for ceremonial-grade matcha for the best flavor and health benefits; culinary-grade is fine for baking or cooking.
  • Water Temperature Matters: Using water that’s too hot can scorch the matcha, resulting in a bitter taste.
  • Whisk Technique: Use a bamboo whisk for the best froth; the unique design helps create a creamy texture.
  • Sift for Smoothness: Sifting the matcha is crucial; it prevents lumps and ensures a silky drink.
  • Experiment with Milk: Different types of milk can change the flavor profile; try coconut milk for a tropical twist!
  • Sweetener Variations: Adjust sweetness based on your preference; try adding vanilla extract or a sprinkle of cinnamon for extra flavor.
  • Adjust Matcha Strength: If you prefer a stronger matcha flavor, increase the amount of matcha powder gradually.
  • Serve Immediately: Matcha lattes are best enjoyed fresh to capture the optimal flavor and frothiness.

Common Mistakes and Troubleshooting

Even with the best intentions, you might run into a few hiccups while making your matcha latte. Here are some common mistakes and how to avoid them:

  • Grainy Texture: If your latte is gritty, you likely didn’t sift the matcha. Always sift before mixing!
  • Bitterness: Using water that’s too hot can make the matcha taste bitter. Stick to the recommended temperature.
  • Weak Flavor: If your latte lacks flavor, try adding more matcha or reducing the milk amount.
  • Too Sweet: If it’s overly sweet, balance it with more milk or simply reduce the sweetener next time.

Matcha Latte Variations

Once you master the basic matcha latte, consider trying these fun variations:

  • Chai Matcha Latte: Add a sprinkle of chai spices like cinnamon and ginger for a spiced twist.
  • Vanilla Matcha Latte: Mix in vanilla extract along with the sweetener for a fragrant flavor.
  • Matcha Mocha: Blend in a teaspoon of cocoa powder for a delicious chocolate matcha combination.
  • Mint Matcha Latte: Add fresh mint leaves or mint syrup for a refreshing minty version.

Storage and Make-Ahead Instructions

If you want to prepare your matcha latte in advance, here are some helpful tips:

  • Make the matcha mixture ahead of time and store it in the fridge for up to 24 hours. When ready to serve, just add your milk and ice.
  • To maintain freshness, keep matcha powder in an airtight container, away from light and moisture.

FAQs About Matcha Lattes

Still have questions? Here are some frequently asked questions about matcha lattes:

  • What is matcha? Matcha is a finely powdered green tea made from high-quality tea leaves, celebrated for its vibrant green color and health benefits.
  • Can I use regular green tea? While you can use green tea, matcha provides a richer flavor and more concentrated health benefits.
  • Is matcha latte vegan? Yes, if you use plant-based milk, your matcha latte can be completely vegan.
  • Can I sweeten my matcha latte? Absolutely! Use any sweetener you prefer, such as honey, maple syrup, or stevia.
  • How much caffeine is in a matcha latte? Matcha contains about 70 mg of caffeine per 8-ounce serving, providing a gentle energy boost.
  • Can I make a matcha latte without a whisk? While a bamboo whisk is ideal, you can use a frother or even a blender for mixing.
  • How do I know if my matcha is good quality? High-quality matcha is vibrant green in color and has a smooth, slightly sweet taste without any bitterness.
  • Can I use matcha in baking? Yes! Matcha can be used in various recipes, including cakes, cookies, and smoothies.

Nutrition Tips and Dietary Adaptations

Matcha lattes offer nutritional benefits, but you can also adapt them to meet specific dietary needs:

  • Low-Calorie Option: Use unsweetened almond or coconut milk to reduce calories while still enjoying a creamy texture.
  • Protein Boost: Add a scoop of protein powder to your latte for a nourishing post-workout drink.
  • Low-Sugar Version: Skip the sweetener or use a sugar substitute like erythritol to keep it low-sugar.

Equipment Recommendations

For the best results, here are some essential tools to have on hand:

  • Bamboo Whisk: A traditional tool that helps create the perfect froth.
  • Matcha Bowl: A shallow bowl is ideal for whisking matcha and prevents spills.
  • Sifter: To ensure your matcha powder is clump-free.
  • Milk Frother: Optional, but a frother can enhance the creaminess of your latte.
  • Glass or Mug: Choose a clear glass to showcase the beautiful green color of your matcha latte.

Serving Suggestions

To enjoy your matcha latte to the fullest, consider these serving suggestions:

  • Pair with Food: Enjoy with a light breakfast, like avocado toast or a smoothie bowl, to start your day right.
  • Garnish: Top with a sprinkle of matcha powder or cocoa nibs for a sophisticated touch.
  • Enjoy with Friends: Host a matcha latte tasting party and let everyone create their own variations!

With this comprehensive guide, you’re well on your way to mastering the art of the matcha latte. Remember, cooking—and in this case, whisking—is all about confidence, creativity, and a willingness to explore. So grab your matcha, and get ready to enjoy a delicious homemade matcha latte that will become your new favorite morning ritual!

Matcha Latte Easy Homemade Recipe

Prep Time 5 minutes
Cook Time 5 minutes
Total Time 10 minutes
Servings 1 cup
Calories 80
Enjoy a creamy, vibrant matcha latte made easily at home with simple ingredients and quick steps.

Ingredients

Matcha Powder

  • 1.5 teaspoon ceremonia-grade matcha (about 3g)
  • 0.25 cup hot water (158-176°F / 70-80°C) (boil water, then cool slightly)

Milk

  • 0.5 cup oat milk (or your preferred milk)
  • 1-2 teaspoons maple syrup (adjust to taste; granulated sugar or simple syrup also work)

Ice Cubes

Instructions 

  • Soak your bamboo whisk in hot water, about halfway up the bristles.
  • In a small bowl, sift matcha powder. Add hot water and whisk vigorously with a bamboo whisk until smooth and foamy, using M or W motion. Brush the surface with the tip of the whisk to break large bubbles.
  • For an iced latte, fill a glass with ice cubes, add milk, then pour the whisked matcha over it. Stir in sweetener if desired and mix well.
  • For a hot latte, warm or steam the milk before adding to a mug, then pour the matcha over it and stir.

Notes

Adjust sweetener to taste and enjoy your homemade matcha latte!
Calories: 80kcal
Cost: $8
Course: Beverage
Cuisine: Japanese
Keyword: homemade, latte, matcha

Discover the Joy of a Mango Banana Smoothie Bowl

Welcome to your next favorite recipe—a Mango Banana Smoothie Bowl! If you’re looking for a quick, delicious, and refreshing meal that’s perfect for breakfast or a snack, you’ve come to the right place. This smoothie bowl is not only packed with flavor but is also incredibly versatile. You can customize it with your favorite toppings and make it your own. Let’s dive into this vibrant recipe that’s sure to brighten your day!

Why You’ll Love This Recipe

  • Quick and Easy: This smoothie bowl takes less than 10 minutes to prepare, making it perfect for busy mornings.
  • Nutrient-Dense: Packed with vitamins and minerals, the combination of mango and banana provides a healthy boost to your day.
  • Customizable: You can easily swap ingredients or add your favorite toppings to make it uniquely yours.
  • Refreshing and Satisfying: The creamy texture and sweet flavors make this bowl a delightful treat that keeps you full.
  • Fun for All Ages: Kids and adults alike will love the vibrant colors and delicious taste, making it a great family-friendly option!

Ingredients You’ll Need

Let’s gather our ingredients! Here’s what you’ll need for this scrumptious Mango Banana Smoothie Bowl:

  • 4 cups of frozen mango: Choose high-quality frozen mango for the best flavor.
  • 2 large bananas: Use ripe bananas, frozen in chunks or slices for added sweetness.
  • 1/2 cup coconut milk: This adds creaminess; feel free to adjust based on your preferred thickness.
  • Optional toppings: Get creative with granola, sliced bananas, fresh mango, nuts, seeds, coconut flakes, and berries.

How to Make Your Mango Banana Smoothie Bowl

Close-up of a creamy Mango Banana Smoothie Bowl with slices of banana and mango on top.

Now, let’s get blending! Follow these simple steps to create your smoothie bowl:

  1. Add all the ingredients to a high-speed blender. If you have a Vitamix or similar, that’s perfect!
  2. Start blending on the lowest speed to combine, then quickly increase to the highest speed.
  3. Blend for about 1-2 minutes until everything is smooth and creamy. Use a tamper if necessary to push frozen fruit towards the blades.
  4. Pour the blended mixture into bowls and add your favorite toppings. I recommend a sprinkle of granola, fresh slices of banana, diced mango, and coconut flakes for that tropical vibe!

Pro Tips for the Perfect Smoothie Bowl

  • Frozen Fruit: Always use frozen fruit for that thick, creamy texture. If you’re out of frozen mango, frozen peaches can be a great substitute!
  • Adjust Thickness: If your smoothie is too thick, add more coconut milk gradually until you reach your desired consistency.
  • Layering Toppings: For a beautiful presentation, layer your toppings in a rainbow pattern or create a fun design.
  • Tropical Twist: Add a splash of pineapple juice for a tropical flair!
  • Protein Boost: Add a scoop of your favorite protein powder for an extra nutritional kick.
  • Nut Butters: Swirl in a tablespoon of almond or peanut butter for added richness and flavor.
  • Chill Your Bowl: For an extra cold treat, chill your serving bowls in the freezer for a few minutes before serving.
  • Experiment! Don’t be afraid to try different fruits or toppings based on what you have on hand!

Common Mistakes and Troubleshooting

Even the best of us can make a misstep in the kitchen. Here are some common mistakes and how to avoid them:

  • Too Thick: If your smoothie bowl is too thick to blend, add a little more coconut milk or water and blend again.
  • Too Sweet: If you find your smoothie too sweet, balance it out with a squeeze of lemon juice or add a handful of greens like spinach.
  • Not Smooth Enough: Ensure your blender is powerful enough to handle frozen fruit. If not, let the fruit sit out for a few minutes to soften before blending.
  • Ingredients Not Blending: If ingredients are stuck, stop the blender and use a tamper or spoon to push them down towards the blades.

Variations to Try

Feel free to mix things up! Here are some delicious variations to explore:

  • Green Goddess: Add a handful of spinach or kale for a nutrient boost.
  • Berry Bliss: Swap mango for mixed berries for a different flavor profile.
  • Peanut Butter Banana: Blend in a tablespoon of peanut butter for added protein and a nutty taste.
  • Coconut Cream Dream: Use coconut yogurt instead of coconut milk for extra creaminess and flavor.

Storage and Make-Ahead Instructions

This smoothie bowl is best enjoyed fresh, but you can prepare some components ahead of time:

  • Prep Ahead: You can pre-chop your bananas and mango and store them in the freezer for quick blending later.
  • Storage: If you have leftovers, store them in an airtight container in the refrigerator for up to 24 hours. It may thicken, so add a splash of coconut milk before serving.

Frequently Asked Questions

Let’s address some common questions about the Mango Banana Smoothie Bowl:

  • Can I use fresh fruit instead of frozen? Yes, but your smoothie may be thinner. Consider adding ice to achieve a similar consistency.
  • What can I use instead of coconut milk? Any plant-based milk, such as almond or oat milk, works well!
  • How do I make it vegan? This recipe is already vegan-friendly. Just ensure your toppings follow suit!
  • Can I make this smoothie bowl in advance? Yes, you can prep the fruit ahead of time, but it’s best to blend and serve fresh.
  • What toppings do you recommend? Get creative! Granola, seeds, nuts, coconut flakes, and fresh fruit are all great options.
  • Can I add protein powder? Absolutely! Add a scoop of your favorite protein powder to boost the nutrition.
  • Is this recipe gluten-free? Yes, all ingredients are naturally gluten-free, making it suitable for a gluten-free diet.
  • How can I make my smoothie bowl more filling? Add nut butters, seeds, or oats for extra fiber and protein.

Nutritional Tips and Dietary Adaptations

This Mango Banana Smoothie Bowl is not only delicious but also offers numerous health benefits:

  • Rich in Vitamins: Mangoes and bananas are excellent sources of vitamin C and potassium.
  • High in Fiber: The fruits and toppings can help promote digestive health.
  • Low in Calories: This recipe is light yet filling, making it suitable for weight management.
  • Dairy-Free Option: By using coconut milk or other plant-based alternatives, this recipe is suitable for those with lactose intolerance.

Equipment Recommendations

Having the right tools can make a big difference in your cooking experience:

  • High-Speed Blender: A powerful blender like Vitamix or Ninja will give you the smoothest results.
  • Measuring Cups: Accurate measurements ensure your ingredients are perfectly balanced.
  • Spoon or Tamper: A tamper can help push down frozen ingredients for better blending.

Serving Suggestions

Want to elevate your smoothie bowl experience? Here are some fun serving ideas:

  • Garnish: Top with edible flowers or a sprinkle of chia seeds for an eye-catching finish.
  • Pair with: Serve alongside whole-grain toast or a breakfast bar for a complete meal.
  • Family Style: Make a large batch and let everyone customize their toppings for a fun brunch!

Conclusion

There you have it! Your ultimate guide to making a delightful Mango Banana Smoothie Bowl. This recipe is all about enjoying fresh flavors, easy preparation, and endless customization. So grab your ingredients, invite some friends over, and make this delicious bowl together. Remember, cooking is about having fun and experimenting—so don’t hesitate to make this bowl your own. Happy blending!

Mango Banana Smoothie Bowl

Prep Time 5 minutes
Total Time 5 minutes
Servings 2 bowls
Calories 250
A vibrant and nutritious smoothie bowl made with frozen mango and bananas, topped with your favorite goodies for a delicious breakfast or snack.

Ingredients

Fruits

  • 4 cups frozen mango
  • 2 large bananas (frozen, in chunks or slices)

Liquid

  • 0.5 cup coconut milk (or more as needed)

Toppings

  • granola
  • banana (sliced for topping)
  • mango (sliced for topping)
  • nuts, seeds, coconut flakes, berries (optional toppings)

Instructions 

  • Add all ingredients to a high-speed blender and blend on low to high speed for 1-2 minutes until smooth.
  • Pour the blended mixture into bowls and add your favorite toppings like granola, sliced banana, mango, nuts, seeds, or berries.

Notes

Use frozen fruit for a thicker, colder smoothie bowl.
Calories: 250kcal
Cost: $10
Course: Breakfast
Keyword: Banana, Mango, Smoothie

Beat the Heat with Homemade Nectarine Frozen Yogurt

Are you looking for a refreshing treat that will cool you down on warm days? This homemade nectarine frozen yogurt is not only delicious but also easy to make! Combining ripe nectarines, creamy Greek yogurt, and just a hint of sweetness from honey or maple syrup, this recipe is perfect for a quick dessert or a healthy snack. In less than an hour, you can whip up this delightful summer dessert that’s sure to impress family and friends.

Why You’ll Love This Recipe

  • Simple Ingredients: With just a few fresh ingredients, this recipe is a breeze to prepare.
  • Healthy Option: Unlike many store-bought frozen desserts, this yogurt is made with wholesome Greek yogurt, providing protein and probiotics.
  • Customizable Flavor: Adjust the sweetness to your liking and experiment with various toppings for a unique twist each time.
  • Quick Preparation: From prep to freeze, you can have this treat ready in under an hour (plus freezing time).
  • Perfect for Any Occasion: Great for summer gatherings, movie nights, or as a sweet post-dinner treat!

Ingredients Breakdown

To create your delicious nectarine frozen yogurt, gather the following ingredients:

  • 4 ripe nectarines: Peeled, pitted, and sliced. Choose the ripest fruit for maximum sweetness.
  • 1 ½ cups plain Greek yogurt: This provides creaminess and a protein boost. You can use low-fat or full-fat depending on your preference.
  • 3-4 tablespoons honey or maple syrup: Adjust based on the sweetness of your nectarines—start with less and add as needed.
  • 1 teaspoon lemon juice (optional): This adds brightness and enhances the overall flavor.

How to Make Nectarine Frozen Yogurt

Side view of vibrant orange nectarine frozen yogurt topped with fresh fruit.

Creating this frozen yogurt is straightforward. Follow these simple steps:

  • Prepare the nectarines: Peel, pit, and slice the nectarines, then spread them in a single layer on a baking sheet. Freeze for at least 3 hours until firm.
  • Blend the mixture: In a blender or food processor, combine the frozen nectarines, Greek yogurt, honey, and lemon juice. Blend until smooth and creamy. You may need to stop and scrape down the sides a few times.
  • Taste and adjust: Taste the mixture and adjust sweetness if needed by adding more honey or syrup, blending again to incorporate.
  • Freeze again (optional): For a soft-serve texture, serve immediately. For a firmer texture, transfer to a freezer-safe container, cover, and freeze for 1-2 hours.
  • Serve and enjoy: Scoop into bowls and add your favorite toppings if desired.

Pro Tips for Perfect Nectarine Frozen Yogurt

  • Use ripe nectarines: The riper the nectarines, the sweeter your frozen yogurt will taste.
  • Chill your blender: If you have a high-speed blender, chill it beforehand for better blending.
  • Adjust sweetness: Start with less sweetener, and add more after tasting. Remember, flavors become muted when frozen.
  • Add texture: Mix in small pieces of fresh or frozen nectarines or a sprinkle of granola before serving for added crunch.
  • Experiment with flavors: Try adding a splash of vanilla extract or swapping nectarines for peaches or mangoes for a different fruity twist.
  • Use quality yogurt: Opt for Greek yogurt for its creaminess; it makes a significant difference in texture.
  • Don’t skip the freeze: If you want a firmer texture, ensure to freeze the yogurt mixture adequately.
  • Store properly: Keep leftovers in an airtight container to maintain freshness and prevent ice crystals.

Common Mistakes and Troubleshooting

Even the simplest recipes can have hiccups. Here’s how to avoid common pitfalls:

  • Not freezing enough: Ensure your nectarines are fully frozen. They should be solid before blending.
  • Over-blending: Blend just until smooth. Over-blending can make the yogurt too soft.
  • Too sweet or not sweet enough: Adjust sweetness after blending. Remember that freezing can mute flavors.
  • Not serving promptly: This yogurt is best enjoyed right after blending or shortly after freezing.

Flavor Variations

Make this recipe your own with these fun variations:

  • Peach Frozen Yogurt: Swap nectarines for ripe peaches for a delightful twist.
  • Mango Frozen Yogurt: Use ripe mangoes for a tropical flavor; add a hint of coconut milk for richness.
  • Citrus Zest: Add the zest of an orange or lemon for a refreshing zing.
  • Berry Delight: Incorporate mixed berries for a colorful and antioxidant-rich version.

Storage and Make-Ahead Instructions

If you’re planning ahead, here’s how to store your frozen yogurt:

  • Freezing: Store in an airtight container in the freezer for up to 2 weeks for best quality.
  • Thawing: Let it sit at room temperature for 5-10 minutes before scooping if it becomes too hard.
  • Make-ahead: Prepare the mixture and freeze it a day in advance for convenience.

Nutrition Tips and Dietary Adaptations

This recipe is versatile and can be adjusted to fit various dietary needs:

  • Low-sugar option: Substitute honey with a sugar-free syrup or stevia for a lower-calorie option.
  • Dairy-free alternative: Use a non-dairy yogurt made from coconut or almond milk for a vegan version.
  • Protein boost: Add a scoop of protein powder to the mixture for an extra kick.

Equipment Recommendations

Here are some kitchen tools you will need:

  • High-speed blender or food processor: Essential for achieving a smooth consistency.
  • Baking sheet: Use this for freezing the nectarines.
  • Measuring cups and spoons: Accurate measurements ensure the best results.
  • Freezer-safe container: Store your frozen yogurt in a container that seals tightly.

Serving Suggestions

Make your homemade nectarine frozen yogurt even more delightful with these serving ideas:

  • Garnish with fresh fruit: Top with slices of fresh nectarines, berries, or kiwi for added color and flavor.
  • Add a drizzle: A drizzle of honey or melted chocolate can elevate the presentation and taste.
  • Serve in waffle cones: For a fun twist, scoop the yogurt into waffle cones for easy eating.

Frequently Asked Questions

  • Can I use frozen nectarines? Yes, you can use frozen nectarines; just skip the freezing step.
  • How long does it last in the freezer? It can last up to 2 weeks in the freezer but is best consumed fresh.
  • Can I make this yogurt without a blender? It’s best to use a blender for the smoothest texture, but you can mash the ingredients manually for a chunkier version.
  • Is this recipe suitable for kids? Absolutely! It’s a healthy and fun treat for children.
  • What’s the best way to store leftovers? Store in an airtight container to prevent freezer burn.
  • Can I make this recipe vegan? Yes, substitute Greek yogurt with a plant-based yogurt.
  • What can I serve with this frozen yogurt? Pair it with granola, nuts, or a fruit salad for a balanced dessert.
  • Can I use other fruits? Yes! This recipe is adaptable to other fruits like peaches, mangos, or berries.

Conclusion

Now that you have a step-by-step guide to making the most refreshing homemade nectarine frozen yogurt, it’s time to get cooking! With its vibrant flavor and creamy texture, this dessert is sure to become a favorite in your household. Remember, cooking is about experimenting and having fun, so don’t hesitate to make this recipe your own. Enjoy your delicious creation and share it with loved ones on sunny days for a truly delightful experience!

Homemade Nectarine Frozen Yogurt

Prep Time 10 minutes
Cook Time 3 minutes
Total Time 13 minutes
Servings 4 servings
Calories 180
A refreshing and healthy frozen treat made with ripe nectarines and Greek yogurt, perfect for a hot day.

Ingredients

Fruits

  • 4 pieces ripe nectarines peeled, pitted, and sliced
  • 1.5 cups plain Greek yogurt
  • 3.4 tablespoons honey or maple syrup
  • 1 teaspoon lemon juice (optional) (for brightness)

Instructions 

  • Peel, pit, and slice the nectarines; freeze for at least 3 hours.
  • Add frozen nectarines, yogurt, honey, and lemon juice to a blender; blend until smooth.
  • Taste and add more honey if needed; blend again.
  • Serve immediately for soft-serve or freeze for 1-2 hours for a firmer texture.

Notes

For a creamier texture, blend thoroughly and serve immediately or freeze longer.
Calories: 180kcal
Cost: $10
Course: Dessert
Cuisine: American
Keyword: nectarines

Indulge in the Ultimate Chocolate Experience

Welcome, fellow chocolate lovers! If you’re on the hunt for a delightful treat that combines richness and moistness in every bite, you’re in for a real treat with these Double Chocolate Muffins. Perfect for breakfast, a midday snack, or even dessert, this recipe is designed to satisfy every chocolate craving. With simple ingredients and straightforward steps, you can whip up a batch of these tempting muffins in no time. Let’s dive into the details of what makes this recipe so special!

Why You’ll Love This Recipe

These double chocolate muffins are not only easy to make, but they also offer a variety of benefits that will have you baking them over and over again:

  • Decadent flavor: Each muffin is bursting with rich chocolate flavor, thanks to both cocoa powder and chocolate chips.
  • Moist and tender texture: The addition of buttermilk and oil ensures these muffins are incredibly moist.
  • Quick and simple: This recipe can be prepared in less than 30 minutes, making it perfect for busy mornings.
  • Freezer-friendly: Store these muffins in the freezer for up to three months for a quick chocolate fix anytime.
  • Customizable: Feel free to add your favorite mix-ins or toppings to make these muffins uniquely yours.

Ingredients Breakdown

Let’s take a closer look at the ingredients you’ll need for these scrumptious muffins.

  • All-purpose flour (1¾ cups, 220g): This forms the base of the muffins. You can substitute with whole wheat flour for added fiber.
  • Unsweetened cocoa powder (½ cup, 45g): Adds rich chocolate flavor. Opt for Dutch-processed cocoa for a smoother taste.
  • Granulated sugar (1 cup, 200g): Sweetens the muffins. Brown sugar can also be used for a deeper flavor.
  • Baking soda (½ teaspoon): Essential for leavening, helping the muffins rise.
  • Baking powder (¼ teaspoon): Works in conjunction with baking soda for a fluffy texture.
  • Salt (½ teaspoon): Enhances the overall flavor of the muffins.
  • Eggs (2 large, at room temperature): Binds the ingredients together and provides moisture.
  • Buttermilk (1 cup, 240ml, at room temperature): Contributes to the moistness and adds a slight tang.
  • Vegetable oil (½ cup, 120ml): Keeps the muffins moist. You can substitute with melted butter for a richer flavor.
  • Vanilla extract (1 teaspoon): Adds warmth and enhances the chocolate flavor.
  • Semi-sweet chocolate chips (1 cup, 175g): The star ingredient! Feel free to use dark chocolate chips for a richer taste.

Step-by-Step Instructions

Close-up of rich, moist double chocolate muffins showcasing melting chocolate chips.

Now that you have your ingredients ready, let’s get started on making these delicious double chocolate muffins.

  1. Preheat your oven: Set your oven to 375°F (190°C) and prepare a muffin tin with paper liners or lightly grease it.
  2. Mix the dry ingredients: In a large bowl, whisk together the flour, cocoa powder, sugar, baking soda, baking powder, and salt until well combined.
  3. Combine the wet ingredients: In another bowl, whisk the eggs, buttermilk, vegetable oil, and vanilla extract until smooth.
  4. Combine wet and dry: Pour the wet mixture into the dry ingredients, gently folding until just combined. Be cautious not to overmix!
  5. Add chocolate chips: Fold in the chocolate chips, reserving a few for topping.
  6. Fill muffin cups: Divide the batter evenly among the muffin cups, filling each about ¾ full.
  7. Top with chocolate chips: Sprinkle the reserved chocolate chips on top of the batter in each cup.
  8. Bake: Place the muffin tin in the oven and bake for 18-20 minutes, or until a toothpick inserted into the center comes out clean.
  9. Cool: Allow the muffins to cool in the pan for a few minutes, then transfer them to a wire rack to cool completely.

Pro Tips for Perfect Muffins

To ensure your double chocolate muffins turn out perfectly every time, keep these expert tips in mind:

  • Room temperature ingredients: Ensure ingredients like eggs and buttermilk are at room temperature for better mixing.
  • Don’t overmix: Overmixing can lead to dense muffins. Mix until just combined for a light texture.
  • Use an ice cream scoop: For even muffin sizes, an ice cream scoop works wonders.
  • Check for doneness: Every oven is different; check muffins a few minutes early to avoid overbaking.
  • Keep them fresh: Store muffins in an airtight container at room temperature for up to 3 days, or freeze for longer storage.
  • Experiment with flavors: Don’t hesitate to add nuts, dried fruits, or even spices like cinnamon for a unique twist.
  • Cool completely: Let muffins cool completely on a rack before storing to prevent sogginess.
  • Use quality chocolate: The better the chocolate, the better the flavor of your muffins.

Common Mistakes and Troubleshooting

If you encounter issues while making your muffins, here are common mistakes and how to fix them:

  • Dry muffins: This can happen if you overbake or use too much flour. Always spoon and level flour for accuracy.
  • Flat muffins: Ensure your baking powder and soda are fresh and active. Old leavening agents can result in flat muffins.
  • Dense muffins: Overmixing the batter can lead to dense muffins. Mix just until combined.

Delicious Variations to Try

These double chocolate muffins are versatile! Here are some variations to consider:

  • Mint chocolate: Add ½ teaspoon of mint extract to the batter for a refreshing twist.
  • Peanut butter swirl: Drop spoonfuls of peanut butter into the batter before baking for a delicious swirl.
  • Chocolate orange: Add the zest of one orange to the batter for a citrusy flavor boost.
  • Nutty chocolate: Stir in ½ cup of chopped walnuts or pecans for added texture and flavor.

Storage and Make-Ahead Instructions

If you want to prepare these muffins ahead of time, here’s how to store and freeze them:

  • At room temperature: Store cooled muffins in an airtight container for up to 3 days.
  • In the fridge: For longer freshness, keep them in the fridge for up to a week.
  • Freezing: Wrap muffins tightly in plastic wrap, then place in a freezer-safe bag. They can be frozen for up to 3 months.
  • Reheating: For a quick treat, microwave frozen muffins for 30-60 seconds or bake them at 350°F (175°C) for 10 minutes to warm up.

Frequently Asked Questions

Here are some common questions about these double chocolate muffins:

  • Can I use whole wheat flour? Yes, but the texture may be denser. A blend of all-purpose and whole wheat flour works well.
  • What can I substitute for buttermilk? You can substitute with regular milk mixed with 1 tablespoon of vinegar or lemon juice.
  • How do I know when the muffins are done? Insert a toothpick into the center. If it comes out clean or with a few crumbs, they’re done.
  • Can I use different types of chocolate chips? Absolutely! Dark chocolate, white chocolate, or even milk chocolate can be great alternatives.
  • Why are my muffins sinking in the middle? This can happen due to underbaking or too much leavening agent. Ensure ingredients are measured correctly.
  • Can I make mini muffins? Yes! Just reduce the baking time to about 10-12 minutes.
  • How can I make these muffins healthier? Substitute half the sugar with applesauce or use whole grain flour for added nutrition.
  • What’s the best way to serve these muffins? Pair with a smear of butter, a sprinkle of powdered sugar, or enjoy them plain with a cup of coffee!

Nutritional Tips and Dietary Adaptations

For those watching their diet, here are some tips:

  • Lower sugar: Reduce the sugar by ¼ cup without significantly affecting the taste.
  • Gluten-free option: Use a gluten-free all-purpose flour blend to make these muffins gluten-free.
  • Vegan alternative: Substitute eggs with flax eggs and use plant-based milk and oil for a vegan option.

Essential Equipment

To make these double chocolate muffins efficiently, here’s what you’ll need:

  • Muffin tin: A standard muffin tin or a silicone muffin tray works well.
  • Mixing bowls: Use at least two bowls—one for dry ingredients and another for wet ingredients.
  • Whisk: A good whisk is essential for blending ingredients smoothly.
  • Measuring cups and spoons: To ensure precision in your measurements.
  • Cooling rack: This allows muffins to cool evenly without becoming soggy.

Serving Suggestions

These muffins are delicious on their own, but here are some fun serving ideas:

  • With a scoop of ice cream: Serve warm muffins with a scoop of vanilla or chocolate ice cream for a decadent dessert.
  • Breakfast sandwich: Slice a muffin in half and fill it with cream cheese or nut butter for a tasty breakfast.
  • As a dessert platter: Arrange muffins with fruit and whipped cream for an elegant dessert display.

Conclusion

Now that you have the ultimate guide to making Double Chocolate Muffins, it’s time to get baking! With their rich flavor and moist texture, these muffins are sure to become a favorite. Remember, cooking is all about enjoying the process and making it your own. So grab your ingredients and let your chocolate-loving heart lead the way. Happy baking!

Double Chocolate Muffins

Prep Time 10 minutes
Cook Time 20 minutes
Total Time 30 minutes
Servings 12 muffins
Calories 250
Enjoy rich, moist muffins packed with chocolate flavor, perfect for a quick treat or breakfast.

Ingredients

Dry Ingredients

  • 1.75 cups all-purpose flour
  • 0.5 cup unsweetened cocoa powder
  • 1 cup granulated sugar
  • 0.5 teaspoon baking soda
  • 0.25 teaspoon baking powder
  • 0.5 teaspoon salt

Wet Ingredients

  • 2 large eggs (at room temperature)
  • 1 cup buttermilk (at room temperature)
  • 0.5 cup vegetable oil
  • 1 teaspoon vanilla extract

Add-ins

  • 1 cup semi-sweet chocolate chips

Instructions 

  • Preheat oven to 375°F (190°C) and prepare muffin tin.
  • Mix dry ingredients in a large bowl.
  • Whisk eggs, buttermilk, oil, and vanilla in a separate bowl.
  • Combine wet and dry ingredients; fold in chocolate chips.
  • Divide batter into muffin cups, top with reserved chips, and bake 18-20 mins.
  • Cool muffins before serving.

Notes

Do not overmix the batter for tender muffins.
Calories: 250kcal
Cost: $12
Course: Breakfast, Snack
Cuisine: American
Keyword: chocolate, muffins

Unleash Your Kitchen Creativity with These High Protein Prepper Bars

Welcome to your go-to guide for making the ultimate High Protein Prepper Bars! Whether you’re gearing up for a busy day or looking for a nutritious snack, this recipe is perfect for you. In just a few simple steps, you can whip up a batch of these delicious bars that are packed with protein and flavor. Not only will you love how easy they are to make, but you’ll also appreciate the flexibility of the ingredients. Let’s dive into why this recipe will quickly become a staple in your kitchen!

Why You’ll Love This Recipe

  • Quick and Easy: Perfect for busy individuals, this recipe requires minimal prep time, making it ideal for those on the go.
  • Nutritious Ingredients: Packed with protein and fiber, these bars provide sustained energy to keep you fueled throughout the day.
  • Customizable: Feel free to swap in your favorite nut butter or add different mix-ins to create your perfect bar!
  • Make-Ahead Friendly: Store them in the fridge for up to two weeks, ensuring you always have a healthy snack on hand.
  • Great for Any Occasion: Whether you need a post-workout snack, a mid-afternoon boost, or a quick breakfast, these bars have you covered.

Ingredients You’ll Need

Gather these simple ingredients to get started:

  • 2 cups rolled oats: The base of your bars, providing whole grains and fiber.
  • 1.5 cups whey protein powder: A powerful protein source to help build and repair muscles.
  • 1/2 cup natural peanut butter: Adds creaminess and healthy fats; feel free to use almond or cashew butter instead!
  • 1/3 cup honey or maple syrup: Natural sweetener to bind the mixture and enhance flavor.
  • 1/4 cup water or unsweetened almond milk: Adjusts the texture of the mixture for easy mixing.
  • 1/2 teaspoon salt: Balances the sweetness and enhances the overall flavor.
  • 1/4 cup mini dark chocolate chips: Optional, but they add a delicious touch to your bars!

Step-by-Step Instructions

Juicy and delicious high protein prepper bars stacked, showcasing their texture.

Let’s bring your bars to life with these straightforward steps:

  1. Line an 8×8 inch square baking pan with parchment paper, leaving an overhang on two sides for easy removal.
  2. In a large mixing bowl, whisk together the rolled oats, protein powder, and salt until well combined.
  3. Add the peanut butter and honey or maple syrup to the dry ingredients. Use a heavy spoon to stir until the mixture becomes crumbly.
  4. Gradually add the water or almond milk, one tablespoon at a time, mixing thoroughly between additions until the dough holds together when pressed.
  5. Fold in the mini dark chocolate chips until evenly distributed throughout the mixture.
  6. Transfer the mixture to the prepared pan and press down firmly with a spatula or the bottom of a measuring cup to create an even layer.
  7. Place the pan in the refrigerator for at least 60 minutes to allow the oats to hydrate and the bars to firm up.
  8. Once set, lift the parchment paper to remove the block from the pan and slice into 10 equal rectangular bars.
  9. Store in an airtight container in the refrigerator for up to two weeks and enjoy!

Pro Tips for Best Results

To ensure your High Protein Prepper Bars turn out perfectly, consider these expert insights:

  • Mix Thoroughly: Ensure all dry and wet ingredients are well combined to avoid dry spots in your bars.
  • Don’t Overmix: Once you add the liquid, mix just until the dough holds together; overmixing can lead to tough bars.
  • Choose Quality Ingredients: Using high-quality protein powder and natural nut butters can greatly enhance the flavor.
  • Experiment with Flavors: Consider adding spices like cinnamon or nutmeg for added warmth and depth.
  • Chill for Longer: If you prefer a firmer texture, let the mixture chill in the fridge for a few hours longer.
  • Cut with a Sharp Knife: To achieve clean edges, use a sharp knife when slicing your bars.
  • Store Properly: Keeping these bars in an airtight container in the fridge ensures they remain fresh for up to two weeks.
  • Label and Date: If you make multiple batches, label and date them to keep track of freshness.

Common Mistakes and Troubleshooting

Here are some common pitfalls to avoid when making these protein bars:

  • Bars Crumbling: If your bars fall apart, it might be due to insufficient moisture. Make sure to add enough liquid until the mixture holds together.
  • Too Sticky: If the mixture is overly sticky, try adding an extra scoop of protein powder or oats to balance it out.
  • Flavor Imbalance: If the bars taste too sweet or bland, adjust the honey and salt levels to suit your preference.
  • Uneven Texture: Ensure you mix the ingredients thoroughly for an even consistency throughout the bars.

Variations to Try

Looking to switch things up? Here are some fun variations to consider:

  • Chocolate Banana: Add 1 ripe mashed banana and 1/4 cup cocoa powder for a chocolatey twist.
  • Nutty Trail Mix: Incorporate 1/2 cup of your favorite nuts and seeds for added crunch and nutrition.
  • Fruit and Nut: Mix in 1/2 cup dried fruits like cranberries, apricots, or figs for a chewy texture.
  • Spiced Pumpkin: Substitute 1/2 cup pumpkin puree and add 1 teaspoon pumpkin spice for a seasonal flavor.

Storage and Make-Ahead Instructions

To keep your High Protein Prepper Bars fresh:

  • Refrigeration: Store in an airtight container in the fridge for up to two weeks. You can also wrap individual bars in plastic for easy on-the-go snacking.
  • Freezing: For longer storage, freeze the bars. Wrap them individually and place in a freezer-safe bag for up to 3 months.

Frequently Asked Questions

Here are answers to some common questions about these bars:

  • Can I use plant-based protein powder? Absolutely! Just be aware that texture and flavor may vary slightly.
  • Are these bars gluten-free? Yes, as long as you use gluten-free oats, these bars are naturally gluten-free!
  • What can I use instead of peanut butter? Almond butter, sunflower seed butter, or any nut/seed butter works well as a substitute.
  • How can I make these bars vegan? Substitute honey with maple syrup and ensure your protein powder is plant-based.
  • Can I add fresh fruit? Fresh fruit may add moisture, so it’s best to stick with dried fruits or use fruit puree.
  • How do I know when they are ready? The bars should feel firm to the touch and hold together nicely when pressed.
  • What if I don’t have a baking pan? You can use any flat dish, but ensure it has at least 1-inch sides for proper shaping.
  • How do I cut the bars cleanly? Use a sharp knife and wipe it clean between cuts to achieve neat edges.

Nutritional Tips and Dietary Adaptations

These High Protein Prepper Bars offer a nutritious boost, but you can further customize them to suit your dietary needs:

  • Low-Carb Option: Use a low-carb protein powder and reduce the honey or opt for sugar-free alternatives.
  • Keto-Friendly: Substitute oats with flaxseed meal or almond flour and adjust sweeteners accordingly.
  • Added Fiber: Mix in chia seeds or hemp seeds for extra fiber and omega-3 fatty acids.

Essential Equipment Recommendations

Here’s what you’ll need to make these bars:

  • Mixing Bowls: A large bowl for combining ingredients and a smaller bowl for wet ingredients.
  • Baking Pan: An 8×8 inch square pan works best, but any shallow dish will do.
  • Spatula: A sturdy spatula is essential for pressing the mixture into the pan.
  • Measuring Cups and Spoons: Accurate measurements are key to a successful recipe.

Serving Suggestions

Enjoy your High Protein Prepper Bars in various ways:

  • As a Snack: Perfect for a quick pick-me-up during the day.
  • Breakfast Boost: Pair with a smoothie or yogurt for a complete breakfast.
  • Post-Workout Fuel: Ideal for replenishing energy after a workout.

In conclusion, making these High Protein Prepper Bars is a rewarding experience that allows you to embrace creativity in the kitchen. With simple ingredients and straightforward steps, you’ll find that cooking can be fun and fulfilling. Try them out and enjoy the countless ways to customize and savor these delicious bars—your taste buds will thank you!

High Protein Prepper Bars

Prep Time 15 minutes
Total Time 1 hour 15 minutes
Servings 10 bars
Calories 350
A nutritious and easy-to-make snack packed with protein, perfect for on-the-go energy boosts.

Ingredients

Dry Ingredients

  • 2 cups rolled oats
  • 1.5 cups whey protein powder
  • 1/2 teaspoon salt

Wet Ingredients

  • 1/2 cup natural peanut butter
  • 1/3 cup honey or maple syrup
  • 1/4 cup water or unsweetened almond milk

Add-ins

  • 1/4 cup mini dark chocolate chips

Instructions 

  • Line an 8x8 inch pan with parchment paper.
  • Mix oats, protein powder, and salt in a bowl.
  • Add peanut butter and honey; stir until crumbly.
  • Gradually add water, mixing until dough holds together.
  • Fold in chocolate chips, press mixture into pan, and chill for 60 minutes.
  • Remove from pan, slice into 10 bars, and store in refrigerator.

Notes

Press firmly when shaping the bars for best texture.
Calories: 350kcal
Cost: $15
Course: Snack
Keyword: High-Protein

Are you ready to dive into the world of delicious, easy-to-make frozen treats? Look no further than these delightful Frozen Chocolate Covered Bananas. Perfect for warm days, snack time, or even as a healthy dessert option, this recipe combines the sweetness of ripe bananas with the richness of chocolate, making it a crowd-pleaser for kids and adults alike. Let’s explore why you’ll love this recipe, what you need, and how to create your own frozen banana pops that will have everyone coming back for more!

Why You’ll Love This Recipe

  • Simple Ingredients: With just a few pantry staples, you can whip up a delightful treat that feels indulgent but is easy to make.
  • Healthy Option: This recipe uses bananas, a nutritious fruit, making it a great alternative to store-bought frozen desserts.
  • Customizable: You can easily customize your banana pops with various toppings, allowing for endless flavor combinations.
  • Fun Activity: Making these with kids is a fantastic way to engage them in the kitchen, creating lasting memories.
  • Make-Ahead Friendly: These frozen treats can be prepared in advance and stored in the freezer, perfect for busy days!

What You’ll Need

Before you get started, let’s gather our ingredients and equipment:

Ingredients

  • 4 Bananas: The riper, the better for sweetness and flavor.
  • 12 Ounces Chocolate Chips: Choose semi-sweet or milk chocolate based on your preference.
  • 2 Tablespoons Coconut Oil: This helps the chocolate melt smoothly and gives a glossy finish.
  • 1/4 Cup Sprinkles: For a fun, colorful touch.
  • 1/4 Cup Peanuts: Chopped, for added crunch and flavor.

Equipment

  • Baking Sheet: Line it with parchment paper to prevent sticking.
  • Popsicle Sticks: For easy handling and fun presentation.
  • Microwave-Safe Bowl: For melting the chocolate.
  • Zip-Top Bags: To store your finished banana pops in the freezer.

How to Make Frozen Chocolate Covered Bananas

Now that we have everything ready, let’s dive into the steps to make your frozen chocolate covered bananas:

  1. Remove the peel from the bananas and cut them in half crosswise.
  2. Push a popsicle stick into the cut end of each banana half.
  3. Place the bananas on the prepared baking sheet lined with parchment paper.
  4. Freeze for at least three hours until solid.
  5. While the bananas are freezing, combine the chocolate chips and coconut oil in a microwave-safe bowl.
  6. Melt the chocolate mixture in the microwave at half power for 2-3 minutes, stirring every 30-60 seconds until fully melted.
  7. Once melted, pour the chocolate into a tall glass (like a mason jar) for easy dipping.
  8. Dip each frozen banana half into the melted chocolate, ensuring it’s fully covered.
  9. Immediately sprinkle with nuts or sprinkles, then place it back on the parchment paper.
  10. Repeat until all banana halves are coated, then return them to the freezer to set.
  11. Store any leftovers in a zip-top bag in the freezer for up to one month.

Pro Tips for Perfect Results

Side view of juicy frozen chocolate-covered bananas with chopped peanuts on top.
  • Chill Your Tools: Ensure your baking sheet and popsicle sticks are chilled; this helps the chocolate set faster.
  • Don’t Rush the Freezing: Make sure the bananas are completely frozen before dipping for the best results.
  • Experiment with Chocolate: Try dark chocolate or white chocolate for different flavor profiles.
  • Keep it Dry: Ensure all equipment and bananas are dry before dipping; moisture can cause the chocolate to seize.
  • Sprinkle Quickly: Add toppings immediately after dipping to ensure they stick.
  • Use Quality Chocolate: Choose high-quality chocolate for a richer flavor.
  • Go for Fun Shapes: Cut the bananas into different shapes for added fun and creativity!
  • Layer Flavors: Consider adding a layer of peanut butter or Nutella before dipping for added richness.

Common Mistakes and Troubleshooting

Even the best cooks can encounter issues. Here are a few common mistakes and how to avoid them:

  • Chocolate Seizing: If this happens, try adding a little more coconut oil and stirring well.
  • Bananas Not Freezing: Ensure your freezer is set to a cold enough temperature; bananas need to freeze solid.
  • Toppings Falling Off: Make sure to sprinkle them on right after dipping, while the chocolate is still wet.
  • Too Soft Chocolate: If your chocolate is too thick, remelt it with a splash of coconut oil for a smoother consistency.

Creative Variations to Try

If you’re looking to mix things up, here are some fun variations to explore:

  • Nut Butter Dipped: Before dipping in chocolate, spread a thin layer of almond or peanut butter on the bananas.
  • Coconut Flakes: Roll the chocolate-covered bananas in shredded coconut for a tropical twist.
  • Granola Coating: For added crunch and nutrition, coat the chocolate in granola.
  • Fruit and Nut Combinations: Add diced strawberries or crushed hazelnuts as toppings for extra flavor.

Storage and Make-Ahead Magic

These frozen treats can be made ahead of time! Here’s how to store them:

  • Freezer Storage: Once fully set, place banana pops in a zip-top bag or airtight container. They can last up to one month in the freezer.
  • Thawing Tips: Let them sit at room temperature for a few minutes before eating for the best texture.

Frequently Asked Questions

  • Can I use other fruits?: Absolutely! Try strawberries, apples, or even pineapple.
  • What if I don’t have coconut oil?: You can use any neutral oil, but coconut oil gives a lovely flavor.
  • Can I make them vegan?: Yes, use dairy-free chocolate chips for a vegan-friendly option.
  • How long do these last?: They can last in the freezer for up to one month.
  • Can I dip them in yogurt instead?: Yes! Yogurt-covered bananas are a delicious alternative.
  • Will the bananas turn brown?: They may brown slightly, but the chocolate coating prevents significant discoloration.
  • How do I make them healthier?: Use dark chocolate or skip the toppings to reduce sugar content.
  • Can I use frozen bananas?: Yes, but fresh ones yield a better texture after dipping.

Nutrition Tips and Dietary Adaptations

These chocolate covered bananas are not just tasty; they can be adapted to fit various dietary needs:

  • Gluten-Free: Naturally gluten-free, making them safe for those with gluten sensitivities.
  • Dairy-Free: Choose dairy-free chocolate chips for a completely dairy-free treat.
  • Low-Sugar Option: Use unsweetened chocolate or reduce the amount of chocolate used.

Serving Suggestions

Serve these frozen chocolate covered bananas as a delightful dessert, a fun snack for parties, or a healthy treat during movie nights. Pair them with a scoop of vanilla ice cream or a dollop of whipped cream for an extra indulgent experience!

Now that you have this comprehensive guide to making Frozen Chocolate Covered Bananas, it’s time to get in the kitchen and create your own delicious treats! Remember, cooking is all about having fun and experimenting, so don’t hesitate to try new variations and toppings. Enjoy your culinary adventure!

Frozen Chocolate Covered Bananas

Prep Time 10 minutes
Cook Time 3 minutes
Total Time 13 minutes
Servings 4 pieces
Calories 150
Enjoy these delicious frozen bananas dipped in chocolate and topped with sprinkles and nuts for a sweet treat.

Ingredients

Fruits

  • 4 pieces Bananas (The more ripe the bananas, the better!)
  • 12 ounces Chocolate Chips (semi sweet or milk chocolate)
  • 2 tablespoons Coconut Oil
  • 0.25 cup Sprinkles
  • 0.25 cup Peanuts (chopped)

Instructions 

  • Peel and cut bananas in half lengthwise, then insert a popsicle stick into each.
  • Place bananas on parchment-lined baking sheet and freeze for 3 hours.
  • Microwave chocolate and coconut oil on half power for 2-3 minutes, stirring every 30 seconds until melted.
  • Dip frozen bananas into melted chocolate, then immediately sprinkle with nuts or sprinkles.
  • Place dipped bananas on parchment to cool, then serve. Store leftovers in freezer up to one month.

Notes

For easier dipping, work quickly after melting the chocolate.
Calories: 150kcal
Cost: $10
Course: Dessert
Keyword: Banana, chocolate, frozen

Why You’ll Fall in Love with This Chicken Caesar Pasta Salad

If you’re seeking a meal that’s both effortless and delicious, our Chicken Caesar Pasta Salad is the answer. This dish embodies the classic flavors of a Caesar salad, but with the added heartiness of pasta and chicken, making it perfect for busy weeknights. In just under 30 minutes, you can create a dish that not only satisfies your hunger but also delights your taste buds. Here’s why this recipe stands out:

  • Quick Preparation: With minimal prep and cooking time, this salad is ideal for those hectic evenings when you want something wholesome without spending hours in the kitchen.
  • Versatile Ingredients: Use whatever pasta or protein you have on hand. Chicken, shrimp, or even chickpeas work beautifully in this recipe, allowing you to customize it to your preferences.
  • Rich Flavor Profile: The creamy Caesar dressing combined with the savory chicken and fresh veggies creates a harmonious blend of flavors that will keep you coming back for more.
  • Healthy Components: Packed with protein from the chicken and nutrients from the vegetables, this pasta salad is a nutritious choice that doesn’t compromise on taste.
  • Perfect for Meal Prep: This dish holds up well in the fridge, making it a fantastic option for meal prep. Enjoy leftovers for lunch or dinner throughout the week!

Key Ingredients in Chicken Caesar Pasta Salad

To make this delightful Chicken Caesar Pasta Salad, you’ll need the following ingredients:

  • 2 cups cooked chicken breast: Diced or shredded, this is the protein base of your salad. You can use grilled, roasted, or even leftover chicken for convenience.
  • 8 ounces rotini or penne pasta: These pasta shapes are excellent at holding onto the creamy dressing, ensuring that every bite is full of flavor.
  • 3 cups Romaine lettuce, chopped: Provides a crisp, fresh crunch that balances the richness of the dressing.
  • 1 cup cherry tomatoes, halved: Adds a burst of sweetness and color to your dish.
  • 1/2 cup Parmesan cheese, grated: A classic addition that brings a salty depth to the salad.
  • 1/2 cup Caesar dressing: The star of the show! Choose your favorite brand or make your own for added freshness.
  • 1/4 cup croutons: For an extra crunch, top your salad with croutons just before serving.
  • 2 tablespoons olive oil: Used to cook the chicken if you’re starting with raw.
  • Salt and pepper to taste: Essential for seasoning the chicken and enhancing the overall flavor of the salad.

Step-by-Step Instructions to Make Chicken Caesar Pasta Salad

Follow these simple steps to bring your Chicken Caesar Pasta Salad to life:

  1. Begin by boiling a pot of water with a pinch of salt. Add the pasta and cook according to package instructions until al dente. Drain and rinse under cold water to stop the cooking process. Set aside.
  2. While the pasta cooks, prepare the chicken. If using raw chicken, heat olive oil in a pan over medium heat. Season the chicken with salt and pepper, then cook until golden brown and cooked through, about 7-10 minutes. If using pre-cooked chicken, simply dice or shred and set aside.
  3. In a large mixing bowl, combine the cooked pasta, chopped Romaine lettuce, halved cherry tomatoes, and cooled chicken pieces.
  4. Pour the Caesar dressing over the salad mixture and toss gently to coat everything evenly. Feel free to add more dressing if desired.
  5. Sprinkle the grated Parmesan cheese over the salad and toss lightly to combine.
  6. Transfer the salad to a serving dish or individual plates. Top with croutons for added crunch.
  7. Serve immediately, garnishing with additional Parmesan cheese or cracked black pepper if preferred.

Pro Tips for the Perfect Chicken Caesar Pasta Salad

Side view of a colorful Chicken Caesar Pasta Salad with cherry tomatoes and croutons.

Want to elevate your Chicken Caesar Pasta Salad even further? Here are some expert tips:

  • Chill the Ingredients: If you have time, chill the pasta and chicken in the fridge for an hour before mixing. This helps the flavors meld beautifully.
  • Homemade Dressing: Try making your own Caesar dressing for a fresher taste. Combine mayonnaise, garlic, lemon juice, Dijon mustard, and Worcestershire sauce for a quick version.
  • Experiment with Pastas: Whole wheat or gluten-free pasta can be used as substitutes for a healthier option without sacrificing flavor.
  • Mix Up the Greens: Add spinach or kale for an extra nutritional boost and to vary the texture.
  • Protein Variations: Swap the chicken for grilled shrimp, diced turkey, or even roasted chickpeas for a vegetarian option.
  • Add Extra Veggies: Feel free to toss in some bell peppers, cucumbers, or avocado for more color and crunch.
  • Make It Spicy: A sprinkle of red pepper flakes or a dash of hot sauce can add a fun kick to the dressing.
  • Limit Dressing Until Serving: If you’re preparing this salad in advance, add the dressing just before serving to keep the greens crisp.

Common Mistakes and Troubleshooting

To ensure your Chicken Caesar Pasta Salad turns out perfectly every time, here are some common mistakes to avoid:

  • Overcooking the Pasta: Always follow package instructions for al dente pasta. Overcooked pasta will become mushy and affect the texture of your salad.
  • Using Low-Quality Ingredients: Since the dressing is a key component, using high-quality Caesar dressing can significantly enhance the flavor of the salad.
  • Skipping the Rinsing Step: Rinsing the pasta under cold water after cooking stops the cooking process and prevents it from becoming sticky.
  • Not Seasoning Properly: Don’t forget to season your chicken well. A little salt and pepper can go a long way in elevating the dish.

Variations on the Classic Chicken Caesar Pasta Salad

Looking to mix things up? Here are some delicious variations of the Chicken Caesar Pasta Salad:

  • Grilled Chicken Caesar Pasta Salad: Grill the chicken for added smokiness and flavor.
  • Caesar Pasta Salad with Bacon: Add crispy bacon bits for a salty crunch that complements the creamy dressing.
  • Vegetarian Caesar Pasta Salad: Substitute chicken with chickpeas or roasted vegetables for a filling vegetarian option.
  • Asian-Inspired Caesar Pasta Salad: Incorporate sesame oil in the dressing and add edamame and sliced cucumbers for a unique twist.

How to Store and Make-Ahead Instructions

This Chicken Caesar Pasta Salad is perfect for leftovers! Here’s how to store it:

  • Refrigeration: Store in an airtight container in the refrigerator for up to 3 days.
  • Make-Ahead: Prepare the salad components (pasta, chicken, veggies) separately and assemble just before serving to maintain freshness.

Frequently Asked Questions

Here are some common questions about Chicken Caesar Pasta Salad:

  • Can I use rotisserie chicken? Yes! Rotisserie chicken is a great shortcut for this recipe.
  • Is this salad gluten-free? You can easily make this salad gluten-free by using gluten-free pasta.
  • Can I freeze the salad? It’s not recommended to freeze this salad, as the texture of the lettuce will suffer once thawed.
  • How can I make it vegan? Use plant-based chicken alternatives and a vegan Caesar dressing for a delicious vegan version.
  • What other dressings can I use? Feel free to experiment with ranch or Italian dressings for a different flavor profile.
  • Can I add nuts or seeds? Absolutely! Adding toasted nuts or seeds can provide an extra crunch and flavor.
  • How do I prevent the salad from getting soggy? Keep the dressing separate until serving time to maintain the crispness of the greens.
  • What’s the best way to reheat the chicken? If you’re using leftover cooked chicken, simply microwave it until warmed through before adding it to the salad.

Nutritional Information and Dietary Adaptations

This Chicken Caesar Pasta Salad can be tailored to fit various dietary needs:

  • Low-Carb Option: Substitute pasta with zucchini noodles or cauliflower rice.
  • High-Protein Variation: Increase the amount of chicken or add hard-boiled eggs for additional protein.
  • Dairy-Free Adaptation: Use a dairy-free Caesar dressing and omit the Parmesan cheese for a dairy-free option.
  • Caloric Consideration: This salad can be calorie-controlled by adjusting the amount of dressing and cheese used.

Essential Equipment for Your Kitchen

To make this Chicken Caesar Pasta Salad, make sure you have the following kitchen tools on hand:

  • Large Pot: For boiling pasta.
  • Colander: To drain and rinse the pasta.
  • Sauté Pan: For cooking chicken if using raw.
  • Mixing Bowl: A large bowl for combining all ingredients.
  • Measuring Cups and Spoons: Essential for accurate ingredient measurements.
  • Chef’s Knife: For chopping vegetables and chicken.

Serving Suggestions for Chicken Caesar Pasta Salad

To enhance your dining experience, consider these serving suggestions:

  • Pair with Garlic Bread: Serve with warm garlic bread for a comforting meal.
  • Complement with Wine: A crisp white wine like Sauvignon Blanc pairs beautifully with the creamy dressing.
  • Top with Extra Greens: Add more greens like arugula or spinach on the side for a refreshing contrast.
  • Garnish with Fresh Herbs: Fresh basil or parsley can add a fragrant touch to the presentation.

Wrap Up and Enjoy Your Meal!

Now that you have the ultimate guide to making a Chicken Caesar Pasta Salad, it’s time to gather your ingredients and get cooking! Remember, the joy of cooking comes from experimenting and making the recipe your own. Whether you’re serving it for a family dinner or meal prepping for the week, this recipe is sure to become a go-to favorite. Happy cooking!

Chicken Caesar Pasta Salad

Prep Time 10 minutes
Cook Time 15 minutes
Total Time 25 minutes
Servings 4 servings
Calories 550
A quick and delicious salad combining pasta, chicken, fresh vegetables, and a creamy Caesar dressing for a satisfying meal.

Ingredients

Protein

  • 2 cups cooked chicken breast, diced or shredded
  • 8 ounces rotini or penne pasta

Vegetables

  • 3 cups Romaine lettuce, chopped
  • 1 cup cherry tomatoes, halved

Cheese & Dressing

  • 1/2 cup Parmesan cheese, grated
  • 1/2 cup Caesar dressing
  • 1/4 cup croutons

Other

  • 2 tablespoons olive oil
  • Salt and pepper to taste

Instructions 

  • Cook pasta in boiling salted water until al dente, then drain and rinse with cold water.
  • If using raw chicken, cook with olive oil, salt, and pepper until golden and cooked through; otherwise, shred pre-cooked chicken.
  • Combine pasta, lettuce, tomatoes, and chicken in a large bowl.
  • Pour Caesar dressing over the mixture and toss gently to coat evenly.
  • Sprinkle Parmesan cheese, toss lightly, top with croutons, and serve immediately.

Notes

For extra flavor, add freshly cracked black pepper or additional Parmesan cheese before serving.
Calories: 550kcal
Cost: $15
Course: Salad
Cuisine: American
Keyword: Caesar, Chicken, Pasta

Kickstart Your Day with a Delicious Berry and Banana Smoothie

Are you looking for a quick, nutritious, and utterly delicious way to start your day? Look no further! This Berry and Banana Smoothie is not only packed with flavor but is also incredibly easy to make, making it the perfect breakfast option or refreshing snack. In just a few minutes, you can whip up a smoothie that will energize you and keep you satisfied, whether you’re rushing out the door or enjoying a leisurely weekend brunch.

With a blend of vibrant berries and a creamy banana base, this smoothie is not just tasty—it’s a powerhouse of nutrients. Let’s dive into why you’ll love this recipe!

Why You’ll Love This Recipe

  • Quick and Convenient: This smoothie comes together in just 5 minutes, making it an ideal choice for busy mornings.
  • Nutritious Boost: Packed with antioxidants from the berries and fiber from the banana, it’s a healthful way to start your day.
  • Customizable: The recipe allows for various substitutions and additions, so you can tailor it to your taste and dietary needs.
  • Kid-Friendly: With its sweet flavor and fun color, kids will love this smoothie, making it a great way to sneak in some extra fruits.
  • Deliciously Satisfying: The creamy texture and fruity flavor make it feel indulgent, yet it’s completely guilt-free!

Ingredients You’ll Need

Here’s what you’ll need to make this Berry and Banana Smoothie:

  • 4 Ice cubes
  • 1 Banana, peeled
  • 1 cup Strawberries (fresh or frozen)
  • 1 cup Blueberries (fresh or frozen)
  • 1 cup Raspberries (fresh or frozen)
  • ½ cup Orange juice
  • ¾ cup Strawberry Greek yogurt (fat-free)
  • ½ teaspoon Agave nectar or honey (optional)
  • 1 Tablespoon Ground flax seed (optional)
  • 1 Tablespoon Wheat germ (optional)

Ingredient Breakdown and Substitutions

Refreshing Berry and Banana Smoothie filled with ice cubes, presented in a clear glass with a variety of fresh berries on top.

Let’s take a closer look at the star players in this smoothie and their potential substitutions:

  • Ice Cubes: Essential for a cold and refreshing smoothie. If you prefer a thicker texture, use frozen fruit instead.
  • Banana: A natural sweetener that adds creaminess. You can substitute it with avocado for a different flavor and healthy fats.
  • Berries: Any combination of strawberries, blueberries, and raspberries works well. You can also substitute with blackberries or cherries if you prefer.
  • Orange Juice: Provides a citrusy zing. Feel free to swap with almond milk or coconut water for a different twist.
  • Greek Yogurt: For creaminess and protein. Non-dairy yogurt can be used for a vegan option.
  • Agave Nectar or Honey: Optional sweeteners that can be adjusted based on your taste. Maple syrup is a great alternative!
  • Flax Seed and Wheat Germ: Both are optional but add extra nutrients! You can also use chia seeds or omit them if you prefer.

How to Make Your Smoothie

Ready to blend? Let’s get started with these simple steps:

  1. In a blender, crush the ice cubes until finely crushed.
  2. Add the banana, strawberries, blueberries, raspberries, orange juice, Greek yogurt, and optional sweeteners or seeds.
  3. Puree until smooth and creamy. If it’s too thick, add a splash more orange juice or water.
  4. Serve immediately in your favorite glass and enjoy! For added flair, garnish with a few whole berries on top.

Pro Tips for the Perfect Smoothie

To ensure your smoothie turns out beautifully every time, consider these expert tips:

  • Use Frozen Fruit: For a thicker, colder smoothie, use frozen berries or bananas instead of fresh.
  • Adjust Sweetness: Taste your smoothie before serving and adjust sweetness with more agave or honey if needed.
  • Blend in Stages: Start with ice and liquids first to create a smoother blend, then add the softer ingredients.
  • Experiment with Greens: Add a handful of spinach or kale for an extra nutrient boost without altering the taste.
  • Chill Your Glass: For an extra refreshing experience, chill your glass in the freezer before pouring your smoothie.
  • Don’t Overblend: Blend just until smooth to preserve the nutrients in your fruits.
  • Make it a Meal: Add a scoop of protein powder or nut butter to turn this smoothie into a meal replacement.
  • Use a High-Powered Blender: For the best texture, a high-powered blender can make a big difference in achieving that creamy consistency.

Common Mistakes and Troubleshooting

Even smoothies can go wrong sometimes! Here are some common pitfalls and how to avoid them:

  • Too Thick: If your smoothie is too thick, simply add a bit more liquid and blend again.
  • Too Sweet: If it’s too sweet, balance with a bit more yogurt or a squeeze of lemon juice.
  • Too Thin: For a thinner smoothie, add more fruit or yogurt to thicken it up.
  • Not Blending Enough: Ensure all ingredients are well-blended for a smooth consistency—no one wants chunky smoothies!

Variations to Try

Once you’ve mastered the basic recipe, why not switch things up? Here are some tasty variations:

  • Chocolate Berry Smoothie: Add a tablespoon of cocoa powder for a chocolatey twist.
  • Peanut Butter Banana Smoothie: Mix in a tablespoon of peanut butter for added creaminess and flavor.
  • Tropical Berry Smoothie: Substitute orange juice with pineapple juice and add coconut for a tropical feel.
  • Protein-Packed Smoothie: Add a scoop of your favorite protein powder to boost your smoothie’s nutritional value.

Storage and Make-Ahead Instructions

Want to prepare your smoothie in advance? Here’s how:

  • Make-Ahead: Prepare the fruit the night before, place it in a freezer bag, and freeze. In the morning, just blend with yogurt and juice.
  • Storage: While smoothies are best fresh, you can store leftovers in the fridge for up to 24 hours in an airtight container. However, it’s best enjoyed immediately to retain its nutrients.

Frequently Asked Questions

Here are some common questions about making this Berry and Banana Smoothie:

  • Can I use frozen fruit? Yes! Frozen fruit works beautifully and gives your smoothie a thicker texture.
  • Is it okay to add greens? Absolutely! Spinach or kale can be blended in for added nutrition without altering the taste.
  • Can I make this vegan? Yes! Substitute Greek yogurt with a non-dairy yogurt and use a plant-based milk instead of orange juice.
  • How can I make it sweeter? Add more agave nectar or honey to taste, or include a splash of vanilla extract for flavor.
  • What’s the best way to clean my blender? Fill it with warm water and a drop of dish soap, then blend on high for a minute. Rinse and dry!
  • How can I add protein? Mix in protein powder, Greek yogurt, or nut butter to increase the protein content.
  • Can I store leftovers? Yes, but consume them within 24 hours for the best flavor and nutrient retention.
  • What can I do with leftover smoothie? Pour leftovers into popsicle molds for a delicious frozen treat!

Nutritional Benefits and Dietary Adaptations

This Berry and Banana Smoothie is not just delicious; it’s also brimming with nutritional benefits:

  • Rich in Antioxidants: Berries are known for their high antioxidant content, which can help fight inflammation.
  • High in Fiber: The banana and flaxseed provide dietary fiber, promoting digestive health.
  • Good Source of Protein: Greek yogurt adds protein, which is essential for muscle repair and growth.

Equipment Recommendations

To make the best Berry and Banana Smoothie, you’ll need a few key tools:

  • High-Powered Blender: A good blender is essential for achieving a smooth and creamy texture.
  • Measuring Cups: Accurate measurements ensure the right balance of flavors and nutrients.
  • Spatula: Useful for scraping down the sides of the blender to ensure all ingredients are well mixed.

Serving Suggestions

Serve your Berry and Banana Smoothie in a tall glass, and consider these fun serving ideas:

  • Garnish with Fresh Berries: Top with a few whole berries for a beautiful presentation.
  • Drizzle of Honey: A light drizzle of honey can enhance sweetness and add a lovely touch.
  • Serve with Granola: Pair your smoothie with a side of granola or a slice of whole-grain toast for a balanced meal.

Conclusion

There you have it—your ultimate guide to creating a deliciously easy Berry and Banana Smoothie! Packed with nutrients and bursting with flavor, this recipe is a fantastic way to kickstart your day or enjoy a refreshing snack. Remember, cooking should be fun and stress-free, so don’t be afraid to experiment with flavors and ingredients. Now grab your blender and get ready to enjoy a smoothie that’s not only tasty but also makes you feel great. Happy blending!

Berry And Banana Smoothie

Prep Time 5 minutes
Total Time 5 minutes
Servings 2 cups
Calories 250
A delicious and nutritious smoothie combining fresh berries, banana, and yogurt for a refreshing treat.

Ingredients

Ice Cubes

  • 4 pieces Ice cubes

Fruits

  • 1 piece Banana peeled
  • 1 cup Strawberries
  • 1 cup Blueberries
  • 1 cup Raspberries

Liquid

  • ½ cup Orange juice

Dairy

  • ¾ cup Strawberry Greek yogurt fat free

Sweetener

  • ½ teaspoon Agave nectar or honey

Optional Add-ins

  • 1 tablespoon Ground flax seed (optional)
  • 1 tablespoon Wheat germ (optional)

Instructions 

  • In a blender, crush ice cubes.
  • Add remaining ingredients and puree until smooth.
  • Serve immediately.

Notes

For a creamier texture, add a splash of milk or more yogurt.
Calories: 250kcal
Cost: $8
Course: Breakfast, Snack
Cuisine: American
Keyword: Banana, Berries, Smoothie

Unlock the Comfort of Creamy Garlic Chicken Rice Bowls

Welcome to a culinary adventure that will elevate your weeknight dinners to new heights! Today, we’re diving into the world of creamy garlic chicken rice bowls—a dish that’s not just about filling your belly but also about warming your heart. Perfect for busy evenings, this recipe combines tender chicken, a rich garlic sauce, and fluffy rice, all topped with vibrant broccoli florets. Let’s embark on this delicious journey together!

Why You’ll Love This Recipe

There are countless reasons to adore this creamy garlic chicken rice bowl. Here are just a few:

  • Quick and Easy: With a total cook time of under 30 minutes, you can whip this up even on the busiest nights.
  • Comfort Food Bliss: The rich, creamy garlic sauce envelops the chicken and rice, turning each bite into a hug for your taste buds.
  • Perfect for Meal Prep: This recipe is ideal for making ahead; just store the components separately and enjoy throughout the week.
  • Customizable: Adapt this dish to suit your taste—whether you want it spicy, loaded with veggies, or with a different protein, the possibilities are endless!
  • Family-Friendly: Picky eaters? Not a problem! This dish’s flavors appeal to all ages, making it a hit at the dinner table.

Ingredients Breakdown

Let’s gather what we need for our creamy garlic chicken rice bowls. Here’s the complete list:

  • 2 tablespoons olive oil: For sautéing the chicken, imparting a delicious flavor and helping achieve that golden-brown finish.
  • 1 pound boneless, skinless chicken breasts: Cut into bite-sized pieces for quick cooking and maximum flavor absorption.
  • Salt and pepper to taste: Essential seasonings to enhance the natural flavors of the chicken.
  • 4 cloves garlic, minced: The star of our dish, bringing a robust flavor that complements the cream perfectly.
  • 1 cup chicken broth: Adds depth and moisture to our sauce.
  • 1 cup heavy cream: Provides that luxurious creaminess we’re after.
  • ½ cup grated Parmesan cheese: For a cheesy touch that enriches the sauce.
  • 1 teaspoon Italian seasoning: A blend of herbs that elevates the dish with aromatic flavors.
  • 2 cups cooked rice: The base of our bowl, fluffy and ready to soak up all the creamy goodness.
  • 1 cup broccoli florets, steamed: Adds color, nutrition, and a bit of crunch to our dish.
  • 1 tablespoon chopped fresh parsley: For garnish, adding a fresh note and a pop of color.

How to Make Creamy Garlic Chicken Rice Bowls

Juicy chicken pieces in a creamy sauce served over rice with broccoli.

Now that we have our ingredients prepped, let’s get cooking! Follow these simple steps for a meal that’s sure to impress.

Step 1: Cook the Chicken

In a large skillet, heat 1 tablespoon of olive oil over medium-high heat. Season the chicken pieces with salt and pepper, then add them to the skillet. Cook the chicken for 6-8 minutes, stirring occasionally, until it’s fully cooked and golden brown. Remove the chicken from the skillet and set aside.

Step 2: Make the Garlic Sauce

In the same skillet, add the remaining tablespoon of olive oil. Add the minced garlic and sauté for about 1 minute, until fragrant. Pour in the chicken broth, scraping up any browned bits from the bottom of the skillet. Bring it to a simmer and let it reduce slightly for about 2-3 minutes.

Step 3: Create the Creamy Base

Stir in the heavy cream and grated Parmesan cheese. Continue to cook, stirring frequently, until the sauce begins to thicken, about 3-4 minutes. Add the Italian seasoning, and return the cooked chicken to the skillet, stirring to coat the chicken in the creamy garlic sauce. Cook for an additional 2-3 minutes until the chicken is heated through.

Step 4: Assemble Your Bowls

Divide the cooked rice into bowls, top with the creamy garlic chicken, and add steamed broccoli florets. Garnish with chopped fresh parsley before serving.

Pro Tips for Perfecting Your Dish

Before you dive in, here are some expert insights to enhance your cooking experience:

  • Choose Quality Ingredients: Fresh, high-quality chicken and ingredients will make a noticeable difference in flavor.
  • Don’t Rush the Sauce: Allow the sauce to simmer until it thickens to achieve that perfect creamy consistency.
  • Adjust the Garlic: If you’re a garlic lover, feel free to add more garlic for an extra punch of flavor!
  • Try Different Cheeses: Swap Parmesan for Pecorino Romano or Gruyère for a twist on the classic flavor.
  • Spice It Up: Add crushed red pepper flakes or a dash of hot sauce for those who enjoy a little heat.
  • Experiment with Herbs: Fresh basil or thyme can add a delightful aroma and taste to the dish.
  • Use Leftover Chicken: Rotisserie chicken can save time and turn this dish into a quick meal.
  • Double the Recipe: Making extra means you’ll have a quick lunch option ready for the next day!

Common Mistakes and Troubleshooting

Even the best cooks can have hiccups! Here are some common mistakes and how to avoid them:

  • Overcooking the Chicken: Keep an eye on your chicken to prevent it from becoming dry. It should be cooked just until it’s no longer pink inside.
  • Too Much Liquid in Sauce: If your sauce is too thin, let it simmer longer to reduce and thicken.
  • Not Enough Flavor: Always taste and adjust seasoning throughout the cooking process; a pinch of salt or more garlic can elevate the dish.

Delicious Variations to Try

Feeling adventurous? Here are some delightful variations of this recipe:

  • Asian-Inspired: Substitute the chicken broth with low-sodium soy sauce or teriyaki sauce, and add snap peas or bell peppers.
  • Vegetarian Delight: Replace chicken with sautéed mushrooms and tofu for a hearty vegetarian option.
  • Spicy Kick: Add jalapeños or sriracha to the sauce for a spicy twist on the classic.
  • Cheesy Broccoli: Mix steamed broccoli with shredded cheddar before serving for an extra cheesy experience.

Storage and Make-Ahead Instructions

This creamy garlic chicken rice bowl is perfect for meal prep! Here’s how to store and reheat:

  • Refrigeration: Store leftovers in airtight containers in the fridge for up to 3 days.
  • Freezing: You can freeze the chicken and sauce separately. Thaw overnight in the refrigerator before reheating.
  • Reheating: Gently reheat on the stove over low heat, adding a splash of chicken broth or cream to loosen the sauce if needed.

Comprehensive FAQ

Here are some common questions about creamy garlic chicken rice bowls:

  • Can I make this recipe dairy-free? Yes! Substitute heavy cream with coconut cream and omit the cheese or use a dairy-free alternative.
  • What type of rice works best? Jasmine or basmati rice is recommended for its fluffy texture, but you can use any preferred rice.
  • Can I add more vegetables? Absolutely! Feel free to incorporate bell peppers, spinach, or carrots for added nutrition.
  • How do I make it gluten-free? Ensure your chicken broth and any sauces used are labeled gluten-free.
  • What can I serve as a side? A simple green salad or garlic bread pairs beautifully with this dish.
  • Can I use chicken thighs instead? Yes! Chicken thighs are a great alternative for added flavor and moisture.
  • Is this recipe kid-friendly? Definitely! The creamy garlic flavor is generally a hit with kids.
  • How can I spice it up? Consider adding cayenne pepper or a splash of hot sauce to the sauce for a zesty kick.

Nutritional Tips and Dietary Adaptations

This dish can be adjusted for various dietary needs. Here are some ideas:

  • For a Low-Carb Option: Use cauliflower rice instead of traditional rice for a lighter meal.
  • Paleo-Friendly: Substitute the cream with coconut milk and use compliant broth.
  • For a Vegan Version: Swap chicken for chickpeas or jackfruit, and use plant-based cream alternatives.

Essential Equipment Recommendations

To make this recipe a breeze, here’s what you’ll need:

  • Large Skillet: A good-quality non-stick skillet ensures even cooking and easy cleanup.
  • Measuring Cups and Spoons: For precise ingredient measurements that lead to consistent results.
  • Cutting Board and Knife: Essential tools for prepping ingredients quickly and safely.

Serving Suggestions

To elevate your creamy garlic chicken rice bowls, consider these serving ideas:

  • Garnish with Extra Herbs: Fresh basil or cilantro can brighten the dish.
  • Serve with a Side Salad: A crunchy salad adds freshness and balances the creaminess of the bowl.
  • Offer Hot Sauce: A side of hot sauce can allow guests to customize their spice level.

In Conclusion: Your Path to Culinary Confidence

Now that you’ve got the scoop on how to make these delicious creamy garlic chicken rice bowls, it’s time to roll up your sleeves and start cooking! Remember, cooking is all about experimentation and enjoyment. Don’t hesitate to make this recipe your own, and most importantly, have fun in the kitchen! Happy cooking!

Creamy Garlic Chicken Rice Bowls

Prep Time 10 minutes
Cook Time 20 minutes
Total Time 30 minutes
Servings 4 servings
Calories 650
A delicious and comforting dish featuring tender chicken in a creamy garlic sauce served over rice with broccoli and fresh parsley.

Ingredients

Main Ingredients

  • 2 tablespoons olive oil
  • 1 pound boneless, skinless chicken breasts (cut into bite-sized pieces)
  • Salt and pepper to taste
  • 4 cloves garlic (minced)
  • 1 cup chicken broth
  • 1 cup heavy cream
  • ½ cup grated Parmesan cheese
  • 1 teaspoon Italian seasoning
  • 2 cups cooked rice
  • 1 cup broccoli florets (steamed)
  • 1 tablespoon chopped fresh parsley (for garnish)

Instructions 

  • Heat 1 tablespoon of olive oil in a skillet. Season chicken with salt and pepper, cook for 6-8 minutes until golden. Remove and set aside.
  • Add remaining olive oil, sauté garlic for 1 minute. Pour in chicken broth, simmer 2-3 minutes.
  • Stir in heavy cream and Parmesan, cook until thickened (3-4 minutes). Add Italian seasoning and cooked chicken, heat through 2-3 minutes.
  • Divide rice into bowls, top with chicken and sauce, add steamed broccoli, and garnish with parsley.

Notes

For a lighter version, use half-and-half instead of heavy cream.
Calories: 650kcal
Cost: $15
Course: Main Course
Cuisine: American
Keyword: Chicken, Creamy, Garlic

Why BBQ Chicken Salad is Your Next Go-To Meal

If you’re looking for a meal that’s both quick to prepare and bursting with flavor, look no further than BBQ chicken salad. This delightful dish combines tender, shredded BBQ chicken with crisp vegetables and a savory dressing, making it a perfect choice for busy weeknights or casual gatherings. It’s not just a salad; it’s a wholesome meal that packs a punch! In this guide, I’ll walk you through everything you need to know to make the best BBQ chicken salad, from ingredients to variations and tips to store it for later.

Why You’ll Love This Recipe

This BBQ chicken salad is not only delicious but also offers numerous benefits that make it a fantastic meal choice:

  • Quick and Easy: With minimal prep time, you can whip this salad up in 30 minutes or less, making it ideal for busy weekdays.
  • Flavor-Packed: The combination of smoky BBQ chicken, fresh veggies, and your choice of dressing creates a satisfying and flavorful dish.
  • Customizable: You can easily modify this salad to suit your taste preferences or dietary needs.
  • Meal Prep Friendly: Make a large batch and enjoy leftovers throughout the week; just store in an airtight container.
  • Healthy and Nutritious: Packed with protein and fresh produce, this salad is a great way to get your daily nutrients.

Ingredients for BBQ Chicken Salad

Here’s what you’ll need to create this mouthwatering BBQ chicken salad, along with some substitution suggestions:

  • 2 cups Shredded BBQ Chicken: Rotisserie chicken is a great time-saver, but you can also grill your chicken for a fresh option.
  • 4 cups Crisp Lettuce: Any salad mix works, but I recommend romaine or spring mix for the best crunch.
  • 1 cup Juicy Tomatoes: Opt for cherry or grape varieties for added sweetness; diced larger tomatoes work too.
  • 1 cup Corn: You can substitute with grilled corn for a smoky flavor or use canned corn for convenience.
  • 1 can Black Beans: Rinsed canned beans will add healthy protein and fiber.
  • 1 cup Cheese: Cheddar or mozzarella are excellent choices, but feel free to use your favorite cheese.
  • 1/2 cup Ranch or BBQ Dressing: Choose your preferred dressing to complement the flavors of the salad.

How to Make BBQ Chicken Salad

Side view of a colorful BBQ chicken salad in a bowl.

Follow these simple steps to create your BBQ chicken salad:

  1. In a large bowl, combine the shredded BBQ chicken and your choice of dressing. Mix well to coat the chicken evenly.
  2. Add the crisp lettuce, tomatoes, corn, black beans, and cheese to the bowl.
  3. Toss everything together gently until all ingredients are well mixed.
  4. Serve immediately or chill in the refrigerator for 15-20 minutes for enhanced flavor.

Expert Tips for the Best BBQ Chicken Salad

Here are some pro tips to elevate your BBQ chicken salad:

  • Use Quality Ingredients: Fresh veggies and high-quality BBQ sauce will significantly enhance the flavor of your salad.
  • Experiment with Dressings: Try different dressings like honey mustard or a vinaigrette to switch up the flavors.
  • Make it a Meal: Add avocado or grilled corn for extra heartiness, making it satisfying enough for a main course.
  • Chill Before Serving: Letting the salad sit for a bit allows the flavors to meld beautifully.
  • Garnish Wisely: Add fresh herbs like cilantro or green onions for an extra layer of flavor.
  • Perfect for Leftovers: Store any leftovers in an airtight container for up to 3 days.
  • Adjust for Spice: If you like some heat, add sliced jalapeños or a spicy BBQ sauce.
  • Mind the Balance: Keep a good ratio of protein to veggies to ensure a satisfying bite.

Variations of BBQ Chicken Salad

Here are some fun variations to try:

  • Southwestern BBQ Chicken Salad: Add avocado, black olives, and a spicy ranch dressing for a southwestern twist.
  • Asian-Inspired BBQ Chicken Salad: Use sesame dressing, add mandarin oranges, and top with sesame seeds.
  • Greek BBQ Chicken Salad: Incorporate feta cheese, olives, and a lemon-herb dressing for a Mediterranean flair.
  • Buffalo BBQ Chicken Salad: Substitute BBQ sauce with buffalo sauce for a spicy kick.

Storage and Make-Ahead Instructions

To ensure your BBQ chicken salad stays fresh, follow these storage tips:

  • Store in an Airtight Container: Keep leftovers in an airtight container for up to 3 days.
  • Keep Dressings Separate: If preparing ahead, store the dressing separately to prevent sogginess.
  • Freeze Chicken: You can freeze prepared BBQ chicken for up to 3 months; just thaw before using in the salad.

Common Mistakes and Troubleshooting

Here are some common pitfalls and how to avoid them:

  • Overdressing: Too much dressing can make the salad soggy. Start with a small amount and add more as needed.
  • Using Wilted Greens: Always use fresh, crisp greens for the best texture and flavor.
  • Skipping Seasoning: Don’t forget to season your chicken well; it makes a big difference in taste.
  • Not Mixing Properly: Ensure all ingredients are well mixed for balanced flavor in every bite.

BBQ Chicken Salad FAQs

Here are some frequently asked questions about BBQ chicken salad:

  • Can I use grilled chicken instead of shredded BBQ chicken? Absolutely! Grilled chicken adds a wonderful flavor.
  • Is this salad gluten-free? Yes, as long as you use gluten-free dressing and avoid cross-contamination.
  • How can I make this salad vegan? Substitute the chicken with chickpeas and use vegan cheese and dressing.
  • What other veggies can I add? Feel free to include cucumbers, bell peppers, or even shredded carrots for extra crunch.
  • Can I make this salad ahead of time? Yes, but store the dressing separately to keep the greens crisp.
  • What dressing pairs best with this salad? Ranch, BBQ, or a vinaigrette all work well.
  • How long does the salad last in the fridge? It lasts about 3 days when stored properly in an airtight container.
  • Can I serve this salad warm? Yes, it’s delicious warm or cold!

Nutrition Tips and Dietary Adaptations

This BBQ chicken salad can easily fit into various dietary needs:

  • High-Protein: With shredded chicken and black beans, this salad is great for boosting protein intake.
  • Low-Carb: Skip the corn and beans for a low-carb option that’s still satisfying.
  • Dairy-Free: Use dairy-free cheese or skip it completely for a lighter salad.

Equipment Recommendations

Here’s what you’ll need for making BBQ chicken salad:

  • Large Mixing Bowl: A spacious bowl is essential for mixing all the ingredients thoroughly.
  • Cutting Board and Knife: For chopping veggies and preparing your chicken.
  • Measuring Cups: Accurate measurements ensure the right balance of flavors.
  • Serving Utensils: Tongs or a large spoon work best for serving this salad.

Serving Suggestions

This BBQ chicken salad can be enjoyed on its own or paired with:

  • Crusty Bread: A slice of your favorite bread makes for a satisfying meal.
  • Fruit Salad: A light fruit salad complements the savory flavors of the salad.
  • Chips: Serve with tortilla chips for a fun crunch.

In conclusion, BBQ chicken salad is not just another salad; it’s a versatile and satisfying meal that you can whip up in no time. Whether you’re cooking for yourself or hosting friends, this recipe is sure to impress. So, roll up your sleeves and dive into the joy of cooking this delightful dish. Happy cooking!

BBQ Chicken Salad Your New Favorite Healthy Meal Treat

Prep Time 10 minutes
Total Time 10 minutes
Servings 4 servings
Calories 450
Enjoy a delicious and healthy BBQ Chicken Salad that's quick to prepare and packed with flavor. Perfect for a satisfying lunch or dinner.

Ingredients

Protein

  • 2 cups Shredded BBQ Chicken (Use rotisserie chicken to save time.)
  • 4 cups Crisp Lettuce (Any salad mix can be substituted.)
  • 1 cup Juicy Tomatoes (Use cherry or grape varieties for sweetness.)
  • 1 cup Corn (Can substitute with grilled corn for a smoky taste.)
  • 1 can Black Beans (Rinsed canned beans provide protein.)
  • 1 cup Cheese (Any cheese like cheddar or mozzarella works well.)
  • 0.5 cup Ranch or BBQ Dressing (Choose your favorite for added flavor.)

Instructions 

  • Combine shredded BBQ chicken, lettuce, tomatoes, corn, black beans, and cheese in a large bowl.
  • Drizzle with ranch or BBQ dressing and toss to combine.
  • Serve immediately or chill for 30 minutes for extra flavor.

Notes

This salad is versatile and can be customized with your favorite toppings or dressings.
Calories: 450kcal
Cost: $15
Course: Salad
Keyword: BBQ Chicken