Author

Steven

Browsing

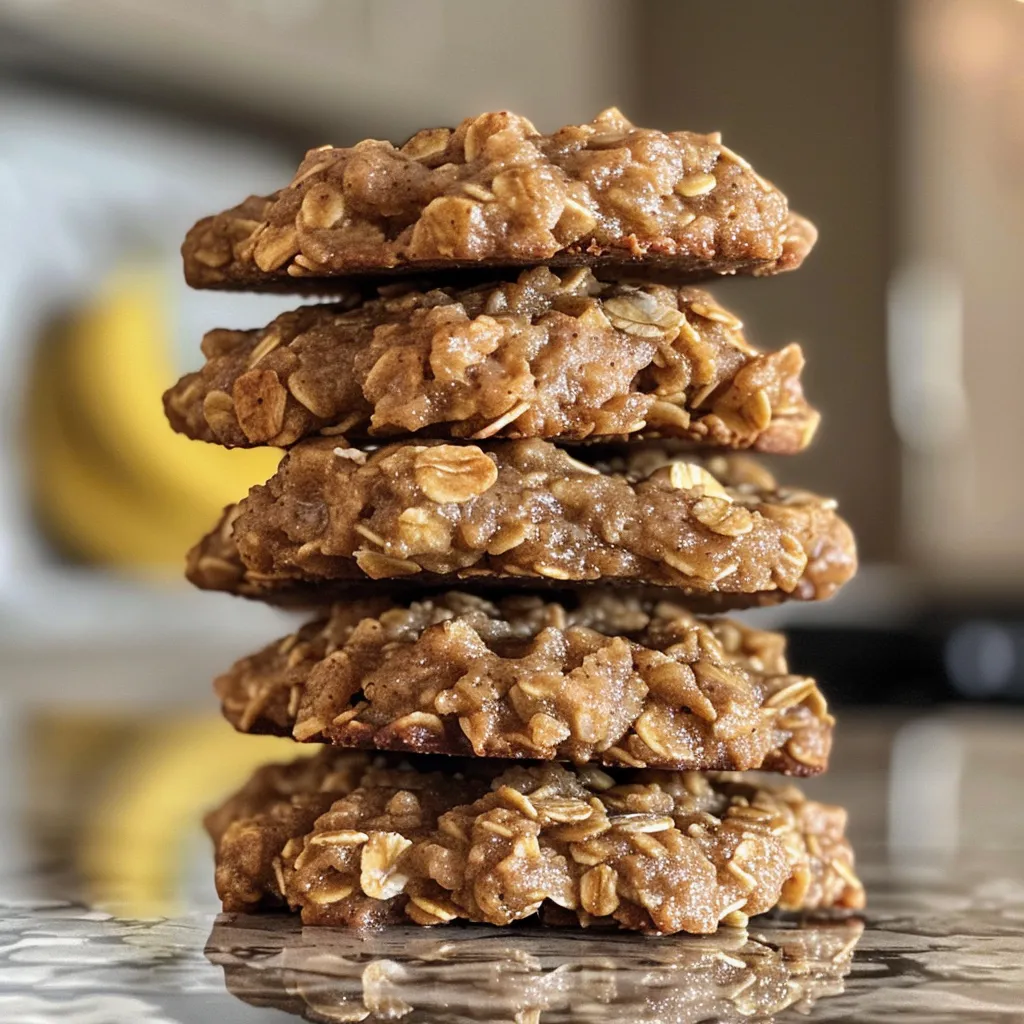
Are you ready to whip up a batch of delicious, chewy cookies that require just three simple ingredients? These Banana Oatmeal Cookies are not only easy to make but also a fantastic way to use up those ripe bananas sitting on your counter. With no eggs or flour required, these cookies are perfect for anyone looking for a quick and healthy treat. Let’s dive into why you’ll love this recipe!

Why You’ll Love This Recipe

  • Quick to prepare: With just a few minutes of prep time and a short baking period, you’ll have cookies ready in no time.
  • Healthy ingredients: Made with mashed bananas and oats, these cookies are naturally sweet and nutritious.
  • Versatile base: This recipe can easily be adapted with add-ins like chocolate chips, nuts, or dried fruit.
  • Kid-friendly: A great way to involve your kids in the kitchen, these cookies are fun to make and even more fun to eat!
  • Perfect for busy days: Whether as a quick breakfast or an after-school snack, these cookies fit seamlessly into your day.

Ingredient Breakdown

Let’s take a closer look at the key ingredients for these delightful cookies and some possible substitutions:

  • Bananas: You’ll need 2 ripe and spotty bananas (approximately 200g). If you have frozen bananas, simply thaw them before mashing.
  • Rolled oats: 1 cup of rolled oats (old fashioned or quick cooking) works best for texture. If you’re gluten-free, be sure to choose certified gluten-free oats.
  • Cinnamon: 1 teaspoon for a warm, inviting flavor. Feel free to experiment with nutmeg or pumpkin spice for a twist!

Pro Tips for Perfect Cookies

To ensure your cookies turn out just right, here are some expert insights:

  • Mash thoroughly: Make sure to mash the bananas well to avoid chunky bits that may alter the texture.
  • Let oats soak: Allow the oats to rest for a few minutes after mixing to ensure they absorb moisture and bind well.
  • Use parchment paper: Line your baking tray to prevent sticking and make cleanup a breeze.
  • Shape cookies before baking: Since these cookies don’t spread, shape them into your desired size before they go in the oven.
  • Bake in batches: If you have a larger batch, consider baking them in smaller batches for even cooking.
  • Cool slightly: Let your cookies cool for a few minutes after baking for the perfect chewy texture.
  • Store properly: Keep leftover cookies in an airtight container to maintain freshness.
  • Try different toppings: Add chocolate chips, dried cranberries, or nuts for extra flavor and texture.

Common Mistakes and Troubleshooting

Close-up of a single banana oatmeal cookie, highlighting its soft and moist surface.

Even the best bakers make mistakes! Here’s how to avoid common pitfalls:

  • Too dry? If your cookie batter feels dry, add a tablespoon of water or milk to adjust the consistency.
  • Too wet? If your cookies spread too much, try adding a bit more oats to thicken the mixture.
  • Uneven baking? Make sure your oven is preheated properly and check cookies towards the end of the baking time for doneness.

Delicious Variations

Feeling adventurous? Here are some fun variations to try:

  • Peanut Butter Banana Oatmeal Cookies: Add 2 tablespoons of peanut butter to the mixture for a nutty flavor.
  • Chocolate Chip Cookies: Mix in 1/2 cup of chocolate chips for a sweet twist.
  • Dried Fruit Cookies: Incorporate 1/4 cup of raisins or dried cranberries for a chewy texture.
  • Nuts and Seeds: Add 1/4 cup of chopped nuts or seeds for extra crunch and nutrition.

Storage and Make-Ahead Instructions

These cookies can be made ahead and stored for later enjoyment:

  • Room Temperature: Store in an airtight container at room temperature for up to 3 days.
  • Refrigeration: For longer storage, keep cookies in the fridge for up to a week.
  • Freezing: Freeze cookies in a single layer, then transfer to an airtight container for up to 3 months. Thaw at room temperature before enjoying.

Frequently Asked Questions

Here are answers to some common questions about this recipe:

  • Can I use frozen bananas? Yes! Thaw them and mash as usual.
  • How can I make these cookies gluten-free? Use certified gluten-free oats.
  • What if I don’t have cinnamon? Feel free to skip it or substitute with nutmeg or vanilla extract.
  • Can I add protein powder? Yes! Just adjust the oat quantity to ensure the right texture.
  • Why are my cookies flat? This can happen if the batter is too wet; try adding more oats.
  • How can I make these cookies sweeter? You can add a bit of honey or maple syrup if desired.
  • What’s the best way to shape the cookies? Shape them with your fingers before baking since they won’t spread.
  • Can I double the recipe? Absolutely! Just ensure you have enough baking trays.

Nutritional Tips and Dietary Adaptations

This recipe is not only delicious but also can be tailored to fit various dietary needs:

  • Vegan: This recipe is already vegan-friendly as it contains no eggs or dairy.
  • Low-Sugar Option: Reduce the number of bananas for a less sweet cookie.
  • Protein Boost: Add a scoop of protein powder for a nutritious snack.

Essential Equipment Recommendations

Here’s what you’ll need to make these cookies:

  • Mixing Bowl: A standard mixing bowl for combining ingredients.
  • Potato Masher or Fork: For mashing bananas smoothly.
  • Baking Tray: A sturdy baking tray lined with parchment or a silicone mat.
  • Measuring Cups: For accurate ingredient measurements.

Serving Suggestions

Serve these cookies in various delightful ways:

  • With Milk: Enjoy with a glass of milk or your favorite plant-based alternative.
  • As a Breakfast Treat: Pair with yogurt and fresh fruit for a balanced breakfast.
  • After School Snack: Perfect for kids coming home from school, maybe with a side of fruit.

Now that you have all the insights and tips to make these Effortless Banana Oatmeal Cookies, it’s time to roll up your sleeves and get baking! Remember, cooking is about having fun and being creative, so don’t stress if everything isn’t perfect. Enjoy the process, and most importantly, enjoy your delicious cookies!

3 Ingredient Banana Oatmeal Cookies (no egg, no flour)

Prep Time 10 minutes
Cook Time 17 minutes
Total Time 27 minutes
Servings 8 cookies
Calories 150
These simple, healthy cookies require just three ingredients and no baking fuss. Perfect for a quick snack or breakfast treat.

Ingredients

Main

  • 2 pieces bananas (ripe and spotty, mashed) (about 200g)
  • 1 cup rolled oats (old fashioned or quick cooking)
  • 1 teaspoon ground cinnamon

Instructions 

  • Preheat oven to 350°F (175°C). Mash bananas in a bowl until smooth.
  • Mix in oats and cinnamon; let sit for a few minutes.
  • Line a baking tray with parchment paper. Drop spoonfuls of batter and shape into cookies.
  • Bake for 17 minutes, then cool slightly before serving.

Notes

For firmer cookies, bake a bit longer or shape thicker.
Calories: 150kcal
Cost: $5
Course: Dessert
Cuisine: Healthy
Keyword: Banana

Kickstart Your Morning with a High Protein Breakfast Burrito

Welcome to a delightful way to fuel your day! If you’re searching for a **quick high protein breakfast** that’s both satisfying and delicious, then this recipe is for you. Packed with wholesome ingredients like eggs, black beans, and chicken, these burritos are perfect for busy mornings or a leisurely brunch. Let’s dive into how you can whip up these scrumptious burritos in no time, ensuring you feel energized and ready to tackle your day.

Why You’ll Love This Recipe

  • Nutritious Fuel: Each burrito is loaded with protein, providing a healthy start to your day that keeps you full for hours.
  • Quick and Easy: In just **15 minutes**, you can prepare a delicious breakfast that’s perfect for busy mornings.
  • Customizable: Feel free to tweak ingredients based on your preferences or what you have on hand—this recipe is all about making it yours!
  • Meal Prep Friendly: Prepare a batch of these burritos ahead of time and freeze them for a quick breakfast option throughout the week.
  • Flavorful Combinations: With spices and fresh ingredients, each bite is bursting with flavor that will make your taste buds dance!

Ingredients Breakdown

Let’s take a closer look at what you’ll need to create these delightful breakfast burritos:

  • 4 large eggs: The protein powerhouse that forms the base of your burrito.
  • 1/2 cup black beans (drained and rinsed): Adds fiber and a hearty texture.
  • 1/2 cup cooked chicken breast (shredded or turkey for leaner option): Provides additional protein; you can also use tofu for a vegetarian version.
  • 1/4 cup diced bell peppers: For a sweet crunch; feel free to swap with any color you like.
  • 1/4 cup diced onions: Adds depth of flavor; red onions can give a milder taste.
  • 1/4 cup shredded cheddar cheese: Melts beautifully and enhances the flavor; consider sharp cheddar for a bolder taste.
  • 1/2 teaspoon garlic powder: Elevates the flavor profile.
  • 1/2 teaspoon smoked paprika: Adds a smoky depth to your burrito.
  • Salt and pepper (to taste): Essential seasoning for balance.
  • 2 large whole wheat tortillas: The perfect vehicle for your filling; try spinach or herb-infused tortillas for a twist!
  • 2 tablespoons salsa (optional): For a zesty kick.
  • 1/4 avocado (sliced, optional): Creamy and delicious topping.
  • Fresh cilantro (for garnish): Brightens the dish and adds freshness.

Step-by-Step Instructions

An appetizing high protein breakfast burrito with visible toppings like avocado and salsa.

Now that you have your ingredients ready, let’s put it all together!

  • Step 1: Prep Your Ingredients: Gather everything you’ll need—chop veggies, shred chicken, and whisk the eggs.
  • Step 2: Cook the Veggies: In a medium skillet over medium heat, add a splash of oil and sauté the onions and bell peppers until tender, about 3-4 minutes.
  • Step 3: Scramble the Eggs: Push the veggies to the side, add the whisked eggs to the pan, and scramble until just set. Season with garlic powder, smoked paprika, salt, and pepper.
  • Step 4: Combine the Filling: Add the black beans and chicken to the egg mixture, stirring gently to combine everything evenly.
  • Step 5: Assemble the Burrito: Spoon the filling onto the center of each tortilla, sprinkle with cheese, salsa, and avocado if desired. Fold in the sides and roll it up tightly.
  • Step 6: Toast the Burrito: In the skillet, place the burrito seam side down and toast for 2-3 minutes on each side until golden brown and crispy.

Pro Tips for Perfect Burritos

  • Don’t Overfill: Less is more when it comes to burrito filling. Ensure you can roll them up easily.
  • Temperature Matters: Make sure your tortillas are warm for easier rolling; you can microwave them for a few seconds.
  • Experiment with Spices: Feel free to add your favorite spices or hot sauce to the mix for an extra kick!
  • Fresh Ingredients: Use the freshest ingredients you can find for the best flavor.
  • Storage Tip: Wrap burritos tightly in foil or plastic wrap to ensure they stay fresh.
  • Freezing: Wrap them individually in foil and store in a freezer-safe bag for up to three months.
  • Reheating: To reheat, microwave for a few minutes or bake in the oven until heated through.
  • Kids Love Them: Offer a variety of fillings and let kids create their own burritos for a fun family meal!

Common Mistakes and Troubleshooting

Even the best cooks make mistakes! Here are a few common issues and how to avoid them:

  • Dry Burritos: Ensure not to overcook the eggs. They should be fluffy and slightly creamy.
  • Soggy Tortillas: If your fillings are too wet, the burrito will become soggy. Drain beans well and avoid excess liquid.
  • Filling Falls Out: Make sure to fold the tortilla tightly and seal the edges well.

Variations to Try

Get creative with your breakfast burrito by trying out these variations:

  • Veggie Burrito: Skip the meat and load up on extra veggies like mushrooms, spinach, and zucchini.
  • Spicy Chorizo: Swap the chicken for spicy chorizo for a zesty flavor.
  • Breakfast Bowl: Turn this into a burrito bowl by serving the filling over brown rice or quinoa.
  • Cheesy Veggie Burrito: Use a mix of different cheeses and add more vegetables like diced tomatoes and corn.

Storage and Make-Ahead Instructions

Meal prep is a great way to save time during busy weekdays! Here’s how you can store your burritos:

  • Refrigerate: Store cooked burritos in an airtight container in the fridge for up to 4 days.
  • Freeze: Wrap each burrito in foil and place them in a freezer-safe bag. They can last for up to 3 months.

Frequently Asked Questions

Here are some common questions about making high protein breakfast burritos:

  • Can I use egg whites instead of whole eggs? Yes! Egg whites can make this dish lower in fat while still providing protein.
  • What can I use instead of tortillas? You can use lettuce wraps for a low-carb option or whole-grain wraps for a healthier choice.
  • Can I make these burritos vegetarian? Absolutely! Just omit the chicken and consider adding more beans or tofu.
  • How can I spice up the flavor? Try adding jalapeños, hot sauce, or your favorite spices to kick it up a notch!
  • What’s the best way to reheat frozen burritos? The best way is to bake them in the oven. Wrap them in foil and bake at 350°F for about 30 minutes.
  • Can I add other toppings? Yes! Sour cream, guacamole, or fresh salsa are great additions.
  • Are these burritos good for meal prep? Definitely! They’re perfect for batch cooking and freezing.
  • How do I know when the eggs are done? The eggs should be set but still moist and fluffy, not dry.

Nutrition Tips and Dietary Adaptations

For a healthier burrito, consider these tips:

  • Whole Wheat Tortillas: Opt for whole wheat or high-fiber tortillas to boost nutritional value.
  • Low-Fat Cheese: Use low-fat cheese to reduce calorie content.
  • Load Up on Veggies: The more vegetables you add, the more nutrients you’ll get!
  • Control Portions: If you’re watching your caloric intake, keep an eye on the amount of cheese and avocado you use.

Equipment Recommendations

Here’s what you’ll need to make these burritos:

  • Non-Stick Skillet: For easy cooking and cleanup.
  • Spatula: To scramble the eggs and flip the burritos.
  • Mixing Bowl: For whisking the eggs and mixing ingredients.
  • Measuring Cups and Spoons: For accurate ingredient measurements.

Serving Suggestions

To elevate your breakfast experience, consider serving your burritos with:

  • Fresh Salsa: A zesty addition that complements the flavors beautifully.
  • Greek Yogurt: A healthier alternative to sour cream.
  • Fruit Salad: A refreshing side that adds sweetness and brightness to your meal.
  • Green Smoothie: Pair with a nutrient-packed smoothie for an extra boost.

With these tips and tricks, you’re all set to enjoy a delightful high protein breakfast burrito that not only tastes great but also nourishes your body. Cooking can be a joyful experience, and I hope this recipe inspires you to get creative in the kitchen. Remember, it’s about enjoying the process and sharing delicious meals with loved ones. Happy cooking!

High Protein Breakfast Burrito

Prep Time 10 minutes
Cook Time 10 minutes
Total Time 20 minutes
Servings 2 burritos
Calories 550
A delicious and protein-packed breakfast burrito that is quick to prepare and perfect for a healthy start to your day.

Ingredients

Eggs

  • 4 large eggs

Beans

  • 0.5 cup black beans (drained and rinsed)

Chicken

  • 0.5 cup cooked chicken breast (shredded) (or turkey for leaner option)

Vegetables

  • 0.25 cup diced bell peppers
  • 0.25 cup diced onions

Cheese

  • 0.25 cup shredded cheddar cheese

Spices

  • 0.5 teaspoon garlic powder
  • 0.5 teaspoon smoked paprika

Salt and Pepper

  • to taste Salt and pepper

Tortillas

  • 2 large whole wheat tortillas

Salsa

  • 2 tablespoons salsa (optional)

Avocado

  • 0.25 avocado sliced (optional)

Garnish

  • Fresh cilantro (for garnish)

Instructions 

  • Scramble the eggs in a bowl.
  • Cook the eggs in a skillet until set, then add beans, chicken, peppers, onions, and spices. Warm through.
  • Divide the filling between the tortillas, top with cheese, salsa, and avocado if desired.
  • Roll up the tortillas to form burritos.
  • Garnish with cilantro and serve.

Notes

For extra flavor, add hot sauce or additional spices as desired.
Calories: 550kcal
Cost: $15
Course: Breakfast
Cuisine: American
Keyword: High-Protein

Are you ready to start your day with a warm hug in a bowl? This recipe for Apple Pie Overnight Oats combines the sweetness of apples with the comforting spices of cinnamon, transforming your breakfast into a delightful experience. Perfect for busy mornings, these overnight oats are not only easy to prepare but also rich in flavor and nutrition. With just a few simple steps and ingredients, you can enjoy a delicious and healthy breakfast that will keep you satisfied all morning long.

Why You’ll Love This Recipe

  • Quick and Easy: This recipe is perfect for busy mornings. Prepare it the night before and wake up to a ready-to-eat breakfast.
  • Customizable: Adjust the ingredients based on your taste preferences or dietary needs. Whether you prefer almond milk or yogurt, this recipe adapts beautifully.
  • Healthy and Nutritious: Packed with fiber from oats and apples, along with protein from yogurt, these overnight oats are a wholesome breakfast choice.
  • Deliciously Satisfying: The combination of sweet apples, creamy yogurt, and aromatic spices creates a flavor explosion that will make this your go-to breakfast.
  • Great for Meal Prep: Make a batch for the week ahead, allowing for a variety of flavors and toppings to keep breakfast exciting.

Ingredients You’ll Need

Here’s what you’ll need to create these delicious Apple Pie Overnight Oats:

  • ½ cup chopped apple (about ½ of a large apple): Choose a sweet variety like Honeycrisp for the best flavor.
  • 1 teaspoon maple syrup: Adds natural sweetness. You can adjust the amount to your taste.
  • Pinch of cinnamon: Enhances the apple pie flavor.
  • ½ cup old-fashioned oats: Rolled oats work best for a creamy texture.
  • ½–¾ cup unsweetened almond milk: Use your favorite dairy-free milk for a creamy base.
  • ¼ cup plain Greek yogurt or coconut yogurt: Adds creaminess and protein.
  • 2 teaspoons maple syrup or honey: Optional for extra sweetness.
  • ½ teaspoon alcohol-free vanilla flavor: For added depth of flavor.
  • ½ teaspoon cinnamon or apple pie spice: To reinforce the apple pie theme.
  • Toppings: cinnamon apples, nut butter, chopped nuts, chia or hemp seeds.

Step-by-Step Instructions

Follow these simple steps to create your Apple Pie Overnight Oats:

  1. In a small microwave-safe bowl, combine chopped apples, maple syrup, and a pinch of cinnamon. Stir to coat the apples evenly.
  2. Microwave for 30–60 seconds until the apples soften and resemble baked apples. Set aside and reserve about ¼ cup for topping.
  3. In a mason jar or container with a lid, add oats, almond milk, yogurt, maple syrup, vanilla flavor, and cinnamon. Stir to mix.
  4. Add ¼ cup of the prepared cinnamon apples into the oat mixture and stir again.
  5. Cover the jar with a lid and refrigerate overnight (or at least 30–60 minutes if preparing the same day).
  6. In the morning, stir the oats. If they are too thick, add a splash of almond milk or yogurt.
  7. Top with the reserved apples, nut butter, chopped nuts, chia, or hemp seeds before serving.

Pro Tips for Making the Best Overnight Oats

Here are some expert insights to elevate your overnight oats:

  • Choose the Right Oats: Rolled oats are ideal for overnight oats. Quick oats can become mushy, while steel-cut oats will remain too hard.
  • Adjust Sweetness Naturally: Use natural sweeteners like maple syrup or honey to control the sweetness according to your preference.
  • Layer for Texture: Alternate layers of oats and toppings to create a visually appealing and texturally interesting breakfast.
  • Experiment with Flavors: Don’t hesitate to try different spices like nutmeg or cardamom for a unique twist.
  • Make It Dairy-Free or Vegan: Substitute Greek yogurt with coconut yogurt and use plant-based milk to make this recipe vegan.
  • Prep in Batches: Make multiple jars at once to save time during the week.
  • Use Different Containers: Mason jars are great, but any airtight container will work for storing your overnight oats.
  • Top Creatively: Use fruits, seeds, or nut butters to switch up the toppings each day.

Common Mistakes and Troubleshooting

Here are some common pitfalls to avoid when making overnight oats:

  • Using Quick Oats: They can become too mushy. Stick with rolled oats for the best texture.
  • Not Adding Enough Liquid: Ensure there’s enough almond milk or yogurt to fully hydrate the oats.
  • Forgetting to Stir: Stir well before refrigerating to ensure all ingredients are evenly mixed.
  • Skipping the Overnight Rest: Allow the oats to soak overnight for the best flavor and texture.

Variations to Try

Mix it up with these delightful variations:

  • Banana Bread Overnight Oats: Replace apples with mashed bananas and add walnuts and a dash of vanilla.
  • Berry Bliss Overnight Oats: Swap out apples for mixed berries and top with a dollop of Greek yogurt.
  • Chocolate Peanut Butter Overnight Oats: Add cocoa powder and peanut butter for a decadent twist.
  • Pumpkin Spice Overnight Oats: Mix in pumpkin puree and pumpkin pie spice for a fall-inspired breakfast.

Storage and Make-Ahead Instructions

These oats are perfect for meal prep! Here’s how to store them:

  • Refrigeration: Store in the fridge for up to 5 days in a sealed container.
  • Freezing: You can freeze the oat mixture for up to 3 months; just thaw overnight in the fridge before serving.
  • Make-Ahead: Prepare several jars at once to grab-and-go during busy mornings.

Nutrition Tips and Dietary Adaptations

To keep your Apple Pie Overnight Oats nutritious:

  • Add Protein: Boost protein content by including protein powder or additional yogurt.
  • Use Whole Ingredients: Opt for whole oats and natural sweeteners for a wholesome meal.
  • Watch Portion Sizes: Adjust portion sizes based on your dietary needs and activity level.

Equipment Recommendations

For preparing your overnight oats, consider the following:

  • Mason Jars: Ideal for storing and serving your oats.
  • Microwave-Safe Bowls: For softening apples quickly.
  • Measuring Cups and Spoons: Essential for accurate ingredient measurements.
  • Spatula or Spoon: For mixing ingredients thoroughly.

Serving Suggestions

Enjoy your Apple Pie Overnight Oats with these serving ideas:

  • Garnish with Fresh Fruits: Add slices of fresh apples or berries for a pop of color and flavor.
  • Drizzle with Nut Butter: A drizzle of almond or peanut butter adds richness and protein.
  • Sprinkle with Nuts or Seeds: Chopped walnuts or chia seeds provide a satisfying crunch.

FAQs About Apple Pie Overnight Oats

Here are some common questions about this recipe:

  • Can I use other fruits? Yes! Feel free to experiment with berries, bananas, or peaches.
  • How long do they last? They can be stored in the fridge for up to 5 days.
  • Can I make this vegan? Absolutely! Just use coconut yogurt and plant-based milk.
  • What if I don’t have yogurt? You can omit it or substitute with extra almond milk for a creamier texture.
  • Are overnight oats healthy? Yes! They are packed with fiber and nutrients, making them a great breakfast choice.
  • Can I heat them up? Yes! You can warm them in the microwave for a cozy breakfast option.
  • Can I use steel-cut oats? It’s recommended to use rolled oats instead, as steel-cut oats require a longer soaking time.
  • What toppings do you recommend? Try nut butter, fresh fruits, or seeds for added texture and flavor.

With this comprehensive guide to Apple Pie Overnight Oats, you’re equipped to whip up a delicious breakfast that’s not only easy and quick but also packed with flavor and nutrition. So grab your ingredients, and let’s get cooking! Remember, cooking is about enjoying the process, so have fun with it and make this recipe your own!

Apple Pie Overnight Oats

Prep Time 10 minutes
Cook Time 1 minute
Total Time 11 minutes
Servings 2 servings
Calories 250
A delicious and easy overnight oats recipe infused with apple pie flavors, perfect for a quick breakfast.

Ingredients

Fruit and Spices

  • 0.5 cup chopped apple (about ½ of a large apple)
  • 1 teaspoon maple syrup
  • Pinch cinnamon

Oats and Liquids

  • 0.5 cup old-fashioned oats
  • 0.75 cup unsweetened almond milk
  • 0.25 cup plain Greek yogurt (or coconut yogurt)
  • 2 teaspoons maple syrup or honey
  • 0.5 teaspoon alcohol-free vanilla flavor
  • 0.5 teaspoon cinnamon or apple pie spice

Toppings

  • cinnamon apples, nut butter, chopped nuts, chia or hemp seeds

Instructions 

  • Combine chopped apples, maple syrup, and cinnamon. Microwave until softened, then set aside.
  • In a jar, mix oats, almond milk, yogurt, maple syrup, vanilla, and cinnamon.
  • Add cooked apples to the oat mixture and stir.
  • Cover and refrigerate overnight or at least 30 minutes.
  • Stir the oats in the morning, add more almond milk if needed, and top with reserved apples and toppings.

Notes

Prepare the night before for a quick and tasty breakfast.
Calories: 250kcal
Cost: $4
Course: Breakfast
Cuisine: American
Keyword: apple, Oats

Start Your Day Right with a Delicious Strawberry Smoothie Bowl

Imagine waking up to a vibrant, refreshing strawberry smoothie bowl that not only pleases your taste buds but also fuels your body. This delightful recipe, made with just a handful of simple ingredients, is the perfect way to kick off your morning or enjoy as a midday snack. Whether you’re a busy professional or a stay-at-home parent, this smoothie bowl is quick to prepare and packed with nutrition. Plus, it’s a fun canvas for creativity with toppings!

Why You’ll Love This Recipe

  • Quick and Easy: This strawberry smoothie bowl can be whipped up in under 10 minutes, making it ideal for busy mornings.
  • Nutrient-Rich: Packed with vitamins and antioxidants from strawberries and bananas, it’s a delicious way to boost your energy levels.
  • Customizable: Tailor the toppings and ingredients to your taste preferences or dietary needs.
  • Great for Meal Prep: Prepare multiple servings ahead of time and store them in the fridge for quick grab-and-go breakfasts.
  • Kid-Friendly: Kids love the colorful presentation and fun toppings, making it an easy way to get them to eat healthy.

Ingredients Needed

Gather these simple ingredients to create your own strawberry smoothie bowl:

  • 1 ½ cups frozen strawberries
  • 1 large frozen banana, chopped
  • ⅔ cup plain nonfat Greek yogurt
  • ⅓ – ½ cup almond or oat milk

Ingredient Substitutions

  • Greek Yogurt: Use any yogurt you prefer, including dairy-free options like coconut or almond yogurt.
  • Milk Choices: Substitute almond milk with oat milk, coconut milk, or even dairy milk.
  • Fruit Variations: Swap strawberries for other frozen fruits like blueberries, mangoes, or mixed berries for a different flavor.

How to Make Your Strawberry Smoothie Bowl

Detailed image of a strawberry smoothie bowl featuring a smooth texture and appealing toppings.

Follow these simple steps to create a perfectly creamy smoothie bowl:

  • Blend Ingredients: Add all ingredients to a high-speed blender. Start with ⅓ cup of your chosen milk to achieve a creamy texture.
  • Adjust Consistency: Blend until smooth and creamy. If you prefer a thinner consistency, add more milk. For a thicker smoothie bowl, incorporate more frozen banana or 1-3 ice cubes.
  • Serve: Pour the smoothie into a bowl and top with your favorite toppings. Enjoy immediately!

Pro Tips for the Perfect Smoothie Bowl

  • Use Frozen Fruit: Frozen fruit not only makes your smoothie bowl thicker but also keeps it colder longer.
  • Layer Your Toppings: Create visual appeal by layering toppings in a rainbow pattern.
  • Chill Your Bowl: For an extra refreshing experience, chill your bowl in the freezer for 10-15 minutes before serving.
  • Experiment with Nut Butters: Adding a spoonful of peanut or almond butter can enhance the flavor and add healthy fats.
  • Don’t Skimp on Toppings: Go wild with toppings! Nuts, seeds, granola, and fresh fruit add texture and nutritional value.
  • Blend in Superfoods: Consider adding chia seeds, flaxseeds, or a scoop of protein powder for an extra nutritional boost.
  • Adjust Sweetness: If you like your smoothie bowl sweeter, consider adding a drizzle of honey or maple syrup.
  • Mix in Greens: Sneak in a handful of spinach or kale for added nutrients without altering the flavor much.

Common Mistakes and Troubleshooting

Here are some common mistakes to avoid and solutions to ensure your smoothie bowl turns out perfectly:

  • Too Thick: If your smoothie bowl is too thick, add a splash more milk and blend again.
  • Too Runny: If it’s too runny, add more frozen fruit or ice cubes to thicken it up.
  • Flavor Imbalance: Taste as you blend. If it’s not sweet enough, add a bit of honey or another banana.

Delicious Variations to Try

Feeling adventurous? Here are some tasty variations to switch things up:

  • Chocolate Strawberry: Add 1 tablespoon of cocoa powder for a chocolatey twist.
  • Berry Blast: Use a mix of frozen strawberries, blueberries, and raspberries for a berry medley.
  • Tropical Vibes: Incorporate frozen pineapple and coconut milk for a tropical smoothie bowl.
  • Peanut Butter Banana: Mix in a tablespoon of peanut butter for a protein-packed breakfast.

Storing Your Smoothie Bowl

If you make extra, here’s how to store your smoothie bowl:

  • Refrigeration: Store any leftovers in an airtight container in the fridge for up to 24 hours. Stir before serving.
  • Freezing: For longer storage, freeze individual portions in freezer-safe containers. They can last for up to a month. Simply thaw in the fridge overnight before enjoying.

Frequently Asked Questions

  • Can I use fresh strawberries instead of frozen?
    Yes, but your smoothie bowl may not be as thick. Add some ice cubes to compensate.
  • How do I make it dairy-free?
    Use dairy-free yogurt and plant-based milk alternatives.
  • Can I add protein powder?
    Absolutely! Add a scoop of your favorite protein powder for an extra boost.
  • How can I make this more filling?
    Incorporate oats or granola into the mix for added fiber and staying power.
  • Is this recipe suitable for kids?
    Yes! Kids love the colorful toppings and fun texture.
  • How can I make it lower in sugar?
    Opt for unsweetened yogurt and reduce or omit any added sweeteners.
  • Can I prepare this in advance?
    Yes! You can prep the ingredients the night before and blend them in the morning.
  • What are some topping ideas?
    Fresh fruit, granola, nuts, seeds, and shredded coconut are all great options!

Nutritional Benefits and Dietary Adaptations

This strawberry smoothie bowl is not only delicious but also provides several nutritional benefits:

  • High in Vitamins: Strawberries are an excellent source of vitamin C, while bananas provide potassium.
  • Protein Boost: The Greek yogurt adds a significant protein content, which aids in muscle repair and keeps you feeling full.
  • Fiber-Rich: Adding fruits and seeds increases the fiber content, promoting healthy digestion.
  • Low in Calories: This recipe can be adapted to be low in calories, especially when using low-fat yogurt and reducing sweeteners.

Essential Equipment for Your Smoothie Bowl

To make this recipe, you’ll need:

  • High-Speed Blender: A good blender is essential for achieving a smooth, creamy texture.
  • Measuring Cups: Accurate measurements ensure the best results.
  • Bowl and Spoon: For serving and enjoying your delicious creation!

Serving Suggestions

To enhance your smoothie bowl experience:

  • Pair with Whole Grains: Serve with a slice of whole-grain toast for a balanced breakfast.
  • Enjoy with a Side of Protein: Consider pairing it with a boiled egg or a small handful of nuts for added protein.

With this comprehensive guide, you’re all set to create a delightful strawberry smoothie bowl that brightens your day! Remember, cooking is about having fun and experimenting, so don’t hesitate to make this recipe your own. Happy blending!

Strawberry Smoothie Bowl

Prep Time 5 minutes
Total Time 5 minutes
Servings 2 bowl
Calories 250
A delicious and healthy breakfast option packed with fresh fruit and creamy yogurt.

Ingredients

Fruits

  • 1 ½ cups frozen strawberries
  • 1 large frozen banana, chopped
  • cup plain nonfat Greek yogurt
  • ⅓ - ½ cup almond or oat milk (start with ⅓ cup, add more if needed)

Instructions 

  • Add all ingredients to a high-speed blender. Blend until smooth.
  • Pour into a bowl and top with your favorite toppings. Enjoy!

Notes

Adjust the amount of milk for desired consistency.
Calories: 250kcal
Cost: $8
Course: Breakfast
Cuisine: American
Keyword: Strawberry

Start Your Day Right with Healthy Blueberry Muffins

There’s nothing quite like the smell of freshly baked muffins wafting through your home. These healthy blueberry muffins are not only easy to make but are also packed with wholesome ingredients that will brighten your mornings! Using ingredients like whole wheat flour and oats, these muffins are naturally sweetened and make for a nutritious start to your day. Let’s dive into why you’ll love this recipe, how to make it, and all the tips and tricks to get it just right!

Why You’ll Love This Recipe

These muffins are more than just a sweet treat. Here are five reasons to whip up a batch:

  • Wholesome Ingredients: Made with white whole wheat flour and oats, these muffins offer a nutritious twist without sacrificing flavor.
  • Easy to Customize: Feel free to mix in your favorite nuts or spices to fit your taste preferences.
  • Great for Meal Prep: These muffins stay fresh for days, making them perfect for quick breakfasts or snacks.
  • Kid-Friendly: With their sweet flavor and fluffy texture, kids will love these muffins as much as adults!
  • Guilt-Free Indulgence: Enjoy the sweetness without the guilt, thanks to natural sweeteners like honey or maple syrup.

Ingredient Breakdown

Let’s take a closer look at what you’ll need to make these delightful muffins:

  • 1.5 cups white whole wheat flour: A healthier alternative to all-purpose flour, adding fiber and nutrients.
  • 0.75 cup old-fashioned rolled oats: Adds texture and heartiness to the muffins.
  • 0.5 cup light brown sugar: For a hint of sweetness that doesn’t overpower.
  • 1 tablespoon baking powder: Essential for that perfect rise.
  • 0.5 teaspoon ground cinnamon: Adds warmth and flavor.
  • 0.5 teaspoon kosher salt: Enhances all the flavors in the muffins.
  • 1 cup nonfat milk: Keeps the muffins moist.
  • 0.33 cup unsalted butter: Provides richness; make sure it’s melted and cooled.
  • 2 large eggs: Binds everything together and adds protein.
  • 2 teaspoons pure vanilla extract: For a touch of sweetness and aroma.
  • 1 cup blueberries: The star of the show, providing burst after burst of juicy flavor!

Pro Tips for Perfect Muffins

Delicious blueberry muffins with a crispy top and moist interior.

To ensure your muffins turn out perfectly every time, keep these expert tips in mind:

  • Don’t overmix: Gently fold the ingredients together to avoid tough muffins.
  • Use fresh blueberries: If using frozen, do not thaw to prevent sogginess.
  • Room temperature ingredients: Ensure your eggs and milk are at room temperature for the best texture.
  • Check for doneness: A toothpick should come out clean when inserted into the center of a muffin.
  • Cool before serving: Let the muffins cool in the pan for a few minutes before transferring to a wire rack.
  • Experiment with spices: Consider adding nutmeg, ginger, or lemon zest for a flavor twist!
  • Portion control: Use an ice cream scoop for uniform muffin sizes.
  • Store properly: Keep in an airtight container to maintain freshness.

Common Mistakes and Troubleshooting

Even seasoned bakers can run into issues. Here are some common problems and how to avoid them:

  • Muffins too dense: This often results from overmixing the batter. Mix just until combined!
  • Uneven baking: Make sure your oven is preheated and consider rotating the muffin tin halfway through baking.
  • Blueberries sunk to the bottom: Tossing them in a little flour before adding to the batter can help prevent this.
  • Dry muffins: Avoid overbaking; check for doneness a few minutes early.

Delicious Variations to Try

One of the best things about this recipe is how adaptable it is! Here are some fun variations to consider:

  • Banana Blueberry Muffins: Mash 1 ripe banana into the batter for added moisture and flavor.
  • Nutty Crunch: Add 1/2 cup of chopped walnuts or pecans for a delightful crunch.
  • Chocolate Chip Twist: Stir in 1/2 cup of dark chocolate chips for a sweet surprise.
  • Vegan Option: Substitute eggs with flax eggs and use almond milk instead of dairy.

Storage and Make-Ahead Instructions

Planning ahead? Here’s how to store your muffins:

  • Room Temperature: Store in an airtight container for up to 3 days.
  • Refrigerator: Keeps well for up to a week, but may dry out slightly.
  • Freezer: Freeze muffins in a single layer, then transfer to a freezer bag for up to 3 months.

Frequently Asked Questions

Got questions? I’ve got answers! Here are some common queries about these healthy blueberry muffins:

  • Can I use frozen blueberries? Yes, just don’t thaw them before adding to the batter.
  • Can I substitute whole wheat flour? Absolutely! You can use all-purpose flour, but it will alter the nutritional content.
  • How can I make them gluten-free? Use a gluten-free flour blend instead of wheat flour.
  • What can I use instead of eggs? Flax eggs or unsweetened applesauce work well as substitutes.
  • How can I make these muffins less sweet? Reduce the sugar to your taste; the muffins will still taste great!
  • What toppings can I add? Consider sprinkling oats or a crumb topping before baking.
  • Can I add yogurt? Yes! Greek yogurt can replace some of the milk for added creaminess.
  • What’s the best way to reheat? Microwave for 15-20 seconds or warm in the oven at 350°F for a few minutes.

Nutritional Tips and Dietary Adaptations

These muffins are already a healthy choice, but here are some tips to adapt them further:

  • Reduce sugar: Use honey or maple syrup for a more natural sweetness.
  • Increase fiber: Add a tablespoon of chia seeds or flaxseeds to the batter.
  • Enhance protein: Mix in a scoop of protein powder for an energy boost.
  • Nut-free option: Omit nuts altogether to make them safe for school lunches.

Recommended Equipment

To make these muffins, you’ll need a few essentials:

  • Muffin tin: A standard 12-cup muffin tin works well.
  • Parchment liners: For easy removal and cleanup.
  • Mixing bowls: A large bowl for dry ingredients and a medium bowl for wet ingredients.
  • Whisk: To ensure your batter is well combined.

Serving Suggestions

These muffins are fantastic on their own, but you can elevate your experience with:

  • Yogurt or cottage cheese: A dollop on the side adds creaminess.
  • Fresh fruit: Serve with sliced bananas or strawberries for extra color and flavor.
  • Nut butter: Spread a little almond or peanut butter for added richness.
  • Tea or coffee: Pair your muffin with a warm beverage for the perfect breakfast.

In conclusion, these healthy blueberry muffins are a delicious and nutritious way to start your day. With their flexible ingredients and straightforward steps, you’ll find joy in making them again and again. So grab your apron, and let’s get baking! Remember, cooking is about having fun and feeling capable in the kitchen. Happy baking!

Healthy Blueberry Muffins

Prep Time 10 minutes
Cook Time 20 minutes
Total Time 30 minutes
Servings 12 muffins
Calories 180
Enjoy these wholesome blueberry muffins packed with fiber and antioxidants, perfect for a nutritious breakfast or snack.

Ingredients

Dry ingredients

  • 1.5 cups white whole wheat flour (plus 1 tablespoon, divided)
  • 0.75 cup old-fashioned rolled oats
  • 0.5 cup light brown sugar (lightly packed)
  • 1 tablespoon baking powder (preferably aluminum-free)
  • 0.5 teaspoon ground cinnamon
  • 0.5 teaspoon kosher salt

Wet ingredients

  • 1 cup nonfat milk (plus 2 tablespoons)
  • 0.33 cup unsalted butter (melted and cooled)
  • 2 large eggs (at room temperature)
  • 2 teaspoons pure vanilla extract
  • 1 cup blueberries (fresh or frozen, do not thaw if frozen)

Instructions 

  • Preheat oven to 375°F (190°C). Line a muffin tin with paper liners.
  • Mix dry ingredients in a bowl. In a separate bowl, whisk wet ingredients.
  • Combine wet and dry ingredients until just mixed. Fold in blueberries.
  • Divide batter evenly into muffin cups. Bake for 20 minutes or until golden.
  • Allow muffins to cool before serving. Enjoy!

Notes

For extra flavor, add a sprinkle of oats on top before baking.
Calories: 180kcal
Cost: $12
Course: Breakfast
Cuisine: American
Keyword: Blueberry

Welcome to the delicious world of wholesome blueberry muffins! If you’ve ever craved a treat that combines indulgence with nutritious ingredients, you’re in the right place. This healthy blueberry muffin recipe is packed with wholesome ingredients, making it perfect for breakfast, a snack, or even a quick dessert. In this comprehensive guide, I’ll walk you through how to make these muffins, ensuring you feel confident every step of the way.

With a balance of whole grains and natural sweeteners, these muffins are not just tasty—they’re also good for you. Let’s dive into the wonderful benefits of this recipe and why you’ll love making it in your own kitchen!

Why You’ll Love This Recipe

  • Quick and easy: These healthy blueberry muffins come together in under 30 minutes, making them a fantastic choice for busy mornings.
  • Wholesome ingredients: Made with whole wheat flour and natural sweeteners like honey or maple syrup, these muffins are kinder to your body.
  • Versatile snack: Great for breakfast, a midday pick-me-up, or an after-school treat for the kids—everyone will love them!
  • Freezer-friendly: Bake a batch and store them in the freezer for a quick snack whenever you need it.
  • Customizable: Feel free to mix in your favorite fruits or nuts for a personal touch!

Detailed Ingredient Breakdown

Let’s explore the ingredients that make these muffins so special, along with some great substitutions if you need them.

  • Whole Wheat Flour: 1 ½ cups of whole wheat flour adds fiber and nutrients. If you prefer, you can use all-purpose flour or a gluten-free blend.
  • Baking Powder: 1 teaspoon for optimal rising. Ensure it’s fresh for the best results.
  • Baking Soda: ½ teaspoon to help the muffins rise and achieve that lovely texture.
  • Salt: ¼ teaspoon enhances the flavors.
  • Cinnamon: ½ teaspoon for a warm, inviting flavor. You can also try nutmeg for a different spice profile.
  • Eggs: 2 large eggs provide structure and moisture. For a vegan option, substitute with flax eggs or applesauce.
  • Honey or Maple Syrup: ⅓ cup adds natural sweetness. Feel free to use agave syrup for a vegan alternative.
  • Melted Coconut Oil or Olive Oil: ⅓ cup keeps the muffins moist. You can use melted butter if you prefer.
  • Greek Yogurt or Unsweetened Applesauce: ½ cup adds moisture and reduces fat. This can be substituted with dairy-free yogurt.
  • Vanilla Extract: 1 teaspoon for a delightful aroma and flavor.
  • Blueberries: 1 cup of fresh or frozen blueberries adds natural sweetness and antioxidants.

How to Make Healthy Blueberry Muffins

Now that we have our ingredients ready, let’s go through the simple steps to whip up these delicious muffins!

  • Preheat the oven to 180°C (350°F) and line or grease a muffin tin.
  • In a large bowl, mix together the flour, baking powder, baking soda, salt, and cinnamon.
  • In another bowl, whisk the eggs, honey (or maple syrup), oil, yogurt, and vanilla extract until well combined.
  • Pour the wet ingredients into the dry ingredients and stir just until blended—don’t overmix!
  • Gently fold in the blueberries to keep them intact.
  • Fill the muffin cups about ¾ full with the batter.
  • Bake for 18–20 minutes, or until golden brown and a toothpick inserted into the center comes out clean.
  • Cool slightly, then enjoy warm or at room temperature.

Pro Tips for Perfect Blueberry Muffins

Delicious healthy blueberry muffins displayed on a wooden background.
  • Don’t overmix: Stir just until combined to avoid tough muffins.
  • Use fresh blueberries: They provide the best flavor and texture, but if you use frozen, don’t thaw them before adding.
  • Adjust sweetness: Taste your batter before baking and adjust the sweetness if needed; remember, the blueberries add natural sweetness too!
  • Check for doneness: Each oven is different, so start checking at 18 minutes.
  • Let them cool: Allow muffins to cool in the pan for a few minutes before transferring them to a wire rack.
  • Experiment with flavors: Add lemon zest or almond extract for a delightful twist.
  • Make mini muffins: Adjust the baking time to about 12-15 minutes for bite-sized muffins.
  • Rotate the pan: Halfway through baking, rotate your muffin tin for even cooking.

Common Mistakes and Troubleshooting

Here are some common mistakes to avoid when making blueberry muffins, along with troubleshooting tips:

  • Dense muffins: This usually happens due to overmixing. Remember to mix gently!
  • Muffins not rising: Check your baking powder and baking soda’s expiration dates; they need to be fresh to work effectively.
  • Blueberries sinking: Toss them in a bit of flour before adding to the batter to help them stay suspended.

Variations to Try

Feeling adventurous? Here are some tasty variations to switch things up:

  • Chocolate Chip Blueberry Muffins: Add ½ cup of dark chocolate chips for a decadent twist.
  • Banana Blueberry Muffins: Mash in one ripe banana for extra moisture and flavor.
  • Nutty Muffins: Stir in ½ cup of chopped walnuts or almonds for a delightful crunch.
  • Berry Medley: Swap out blueberries for raspberries or chopped strawberries for a mixed berry muffin.

Storage and Make-Ahead Instructions

To keep your blueberry muffins fresh and delicious, follow these storage tips:

  • At Room Temperature: Store in an airtight container for up to 3 days.
  • In the Fridge: They can last up to a week when refrigerated in an airtight container.
  • Freezing: Wrap each muffin in plastic wrap and then place them in a freezer bag for up to 3 months. Thaw at room temperature when you’re ready to enjoy!

Comprehensive FAQ

  • Can I substitute the eggs? Yes, use 1/4 cup of unsweetened applesauce or 1 flax egg as an alternative.
  • What if I don’t have whole wheat flour? You can use all-purpose flour or a gluten-free flour blend instead.
  • Can I use frozen blueberries? Absolutely! Just don’t thaw them before adding to the batter.
  • How do I know when the muffins are done? Insert a toothpick in the center; it should come out clean when they’re done.
  • Can I add more sugar? Yes, if you prefer sweeter muffins, feel free to add more honey or maple syrup.
  • What are the best ways to enjoy these muffins? They’re fantastic on their own, but you can also serve them with a dollop of yogurt or a smear of nut butter!
  • How do I make them dairy-free? Use dairy-free yogurt instead of Greek yogurt and choose plant-based milk.
  • Are these muffins suitable for kids? Definitely! They’re a great way to introduce healthy ingredients to children.

Nutrition Tips and Dietary Adaptations

These healthy blueberry muffins are not just delicious; they can be adapted to fit various dietary needs:

  • Gluten-Free: Substitute whole wheat flour with a gluten-free flour blend.
  • Lower Sugar: Reduce the honey or maple syrup for a less sweet muffin.
  • Protein Boost: Add a scoop of protein powder to the dry ingredients for extra nutrition.

Equipment Recommendations

To make the best blueberry muffins, here are some essential tools:

  • Muffin Tin: A standard-sized muffin tin works perfectly for this recipe.
  • Mixing Bowls: Use at least two mixing bowls—one for dry ingredients and one for wet.
  • Whisk: A whisk is great for blending wet ingredients smoothly.
  • Rubber Spatula: Useful for folding in blueberries and scraping the bowl clean.
  • Cooling Rack: Helps cool muffins evenly after baking.

Serving Suggestions

These muffins are delightful on their own, but here are a few serving ideas to enhance your experience:

  • With Yogurt: Serve with a side of Greek yogurt for added protein.
  • Nut Butter: Spread almond or peanut butter on top for a deliciously nutty flavor.
  • Fresh Fruit: Pair with sliced bananas or strawberries for a refreshing side.

As we wrap up this journey into the world of wholesome blueberry muffins, I hope you feel empowered to whip up a batch in your own kitchen. Remember, cooking is all about experimenting and enjoying the process. So gather your ingredients and get ready to treat yourself and your loved ones to these delightful muffins. Happy baking!

Healthy Blueberry Muffins

Prep Time 10 minutes
Cook Time 20 minutes
Total Time 30 minutes
Servings 12 muffins
Calories 180
Enjoy these wholesome blueberry muffins that are perfect for a nutritious breakfast or snack.

Ingredients

Dry ingredients

  • 1.5 cups whole wheat flour
  • 1 teaspoon baking powder
  • 0.5 teaspoon baking soda
  • 0.25 teaspoon salt
  • 0.5 teaspoon cinnamon

Wet ingredients

  • 2 large eggs
  • 0.33 cup honey or maple syrup
  • 0.33 cup melted coconut oil or olive oil
  • 0.5 cup Greek yogurt or unsweetened applesauce
  • 1 teaspoon vanilla extract

Blueberries

  • 1 cup fresh or frozen blueberries

Instructions 

  • Preheat oven to 180°C (350°F) and prepare muffin tin.
  • Mix dry ingredients in a bowl; whisk wet ingredients separately.
  • Combine wet and dry, then fold in blueberries.
  • Fill muffin cups ¾ full and bake for 18–20 minutes.
  • Cool slightly and enjoy warm or at room temperature.

Notes

Use ripe blueberries for the best flavor.
Calories: 180kcal
Cost: $12
Course: Breakfast
Cuisine: American
Keyword: Blueberry

Start Your Day Right with a Wholesome Spinach and Feta Omelet

If you’re looking for a delicious and nutritious way to kickstart your mornings, you’ve come to the right place! This Spinach and Feta Omelet recipe is not only simple to make but also bursting with fresh flavors and wholesome ingredients. With just a few key components, you can create an omelet that’s fluffy, savory, and satisfying. Let’s dive into why this recipe is a must-try and how you can master it in your own kitchen.

Why You’ll Love This Recipe

This Spinach and Feta Omelet isn’t just another breakfast option; it’s a delightful way to elevate your mornings. Here are some specific benefits:

  • Quick and Easy: With minimal prep and cook time, you can whip up this omelet in under 15 minutes, making it perfect for busy mornings.
  • Nutritious Ingredients: Packed with fresh spinach and feta, this dish is rich in vitamins, minerals, and protein, ensuring you start your day on a healthy note.
  • Customizable: You can easily modify the ingredients based on your preferences or what you have on hand, making it a versatile option.
  • Flavorful Profile: The combination of sautéed spinach and tangy feta creates a delicious balance that will keep your taste buds excited.
  • Impressive Presentation: With its beautiful colors and fluffy texture, this omelet is sure to impress anyone you serve it to.

Essential Ingredients for Your Spinach and Feta Omelet

Before we get started, let’s gather our ingredients. Here’s what you’ll need:

  • 1 tsp olive oil: This helps to sauté the spinach without sticking.
  • 1 to 3 eggs: The base of your omelet; feel free to adjust the quantity based on your hunger level.
  • 1 Tbsp unsalted butter: Adds creaminess and richness to the omelet.
  • 1 cup fresh spinach, chopped: A nutritious green that wilts beautifully.
  • Salt and pepper: Essential for seasoning the eggs and spinach.
  • 2 tsp minced fresh chives (optional): A lovely garnish that adds a mild onion flavor.

Step-by-Step Instructions to Craft the Perfect Omelet

A beautifully presented spinach and feta omelet, with fresh spinach visible inside and a sprinkle of chives on top.

Now that we have our ingredients ready, let’s walk through the steps to create your Spinach and Feta Omelet:

Step 1: Prepare Your Eggs

Start by cracking the eggs into a bowl. Add a pinch of salt and pepper, then whisk them thoroughly until the mixture is uniform. This ensures a fluffy texture every time!

Step 2: Sauté the Spinach

Heat an 8-inch non-stick skillet over medium-high heat. Add the olive oil and swirl it around to coat the pan evenly. Toss in the chopped spinach, seasoning lightly with salt and pepper, and sauté for about 1 minute until it wilts.

Step 3: Add the Eggs

Pour the beaten eggs evenly over the sautéed spinach. Tilt the pan gently to spread the eggs across the surface.

Step 4: Cook and Cover

Cover the pan briefly to help the top cook through, which is crucial for achieving that perfect omelet consistency.

Step 5: Fold and Serve

Once the eggs are set, use a spatula to carefully fold the omelet in half. Slide it onto a plate and garnish with fresh chives for a vibrant finish.

Pro Tips for Omelet Success

Mastering the art of the omelet comes with practice, but here are some expert insights to help you along the way:

  • Use Fresh Ingredients: Fresh spinach and quality feta cheese make a significant difference in flavor.
  • Don’t Overcook: Keep an eye on the eggs; overcooking can lead to dry, rubbery texture.
  • Experiment with Seasonings: Feel free to personalize your omelet with herbs like dill or basil for an extra flavor boost.
  • Use the Right Pan: A good quality non-stick skillet is essential for easy flipping and folding.
  • Be Gentle: When folding the omelet, do it gently to avoid tearing.
  • Let It Rest: Allow your omelet to sit for a minute after cooking; this helps retain moisture.
  • Try Different Cheeses: While feta is fantastic, experimenting with cheeses like goat cheese or cheddar can yield delightful results.
  • Practice Makes Perfect: The more you make omelets, the better you’ll get at achieving that ideal fluffiness.

Common Mistakes and Troubleshooting

Even the best cooks can hit a snag. Here are some common pitfalls and how to avoid them:

  • Too Much Filling: Overloading your omelet can make it difficult to fold. Stick to a moderate amount of spinach and feta.
  • Soggy Omelet: Ensure you sauté the spinach well to avoid excess moisture in the eggs.
  • Burned Eggs: Keep the heat at medium; high heat can quickly burn the eggs before they’re fully cooked.
  • Uneven Cooking: If you notice uneven cooking, consider investing in a good quality non-stick skillet.

Delicious Variations to Try

While this Spinach and Feta Omelet is a delight on its own, here are some variations to mix things up:

  • Mediterranean Style: Add diced tomatoes and olives for a Mediterranean twist.
  • Herbed Omelet: Incorporate fresh herbs like dill or parsley for added flavor.
  • Mushroom Spinach Omelet: Sauté mushrooms along with spinach for an earthy touch.
  • Cheesy Delight: Mix in different cheeses like goat cheese or mozzarella for a creamy texture.

Storage and Make-Ahead Instructions

If you want to prepare your omelet ahead of time, here’s how to do it:

  • Refrigeration: Cooked omelets can be stored in the fridge for up to 2 days. Ensure they are in an airtight container.
  • Make-Ahead Ingredients: You can wash and chop the spinach the night before to save time in the morning.
  • Reheating: To reheat, place the omelet in a skillet over low heat until warmed through.

Comprehensive FAQ

Let’s address some common questions about making a Spinach and Feta Omelet:

  • Can I use frozen spinach? Yes, frozen spinach can be used. Just ensure to thaw and drain it well to remove excess moisture.
  • How do I make a fluffier omelet? Be sure to whisk the eggs thoroughly and avoid overcooking them.
  • What other fillings work well? Bell peppers, onions, and cooked meats like ham or bacon can enhance your omelet.
  • Is this recipe suitable for meal prep? Yes, you can prepare the ingredients ahead of time for quick assembly in the morning.
  • How can I make this recipe dairy-free? Substitute feta with a dairy-free cheese or omit it altogether.
  • Can I add spices? Absolutely! A dash of paprika or cayenne can add a lovely kick.
  • What’s the best way to serve it? Serve your omelet with a side of whole-grain toast or a fresh salad for a complete meal.
  • How do I know when it’s done? The omelet is done when the edges are set, and the center is slightly soft but not runny.

Nutritional Tips and Dietary Adaptations

This Spinach and Feta Omelet is inherently nutritious, but here are some tips to make it even healthier:

  • Add More Veggies: Feel free to add more vegetables such as bell peppers or mushrooms for additional nutrients.
  • Go Whole Grain: Pair your omelet with whole-grain bread for added fiber.
  • Reduce Fat: You can use cooking spray instead of oil and butter for a lighter version.
  • Protein Boost: Add some diced chicken or turkey for an extra protein punch.

Equipment Recommendations

To create the perfect omelet, having the right tools can make all the difference:

  • Non-Stick Skillet: A good quality non-stick skillet is essential for easy flipping.
  • Whisk: A sturdy whisk helps achieve a light and fluffy egg mixture.
  • Spatula: A flexible spatula is ideal for folding and serving the omelet.
  • Measuring Spoons: Ensure accurate ingredient measurements for consistency.

Serving Suggestions

Once you’ve perfected your omelet, here are some delightful ways to serve it:

  • Fresh Greens: Serve alongside a simple green salad with a light vinaigrette.
  • Avocado Slices: Add sliced avocado on top for creaminess and healthy fats.
  • Salsa: A spoonful of fresh salsa can provide a zesty contrast to the omelet.

Wrap-Up: Embrace Your Culinary Adventure!

Cooking should be a joyful experience, and making this Spinach and Feta Omelet is a fantastic way to embrace that spirit! With its simple ingredients and straightforward steps, you’ll feel confident tackling this recipe. Remember, practice makes perfect, so don’t hesitate to experiment with variations and flavors. Enjoy your cooking journey, and happy omelet-making!

Spinach And Feta Omelet

Prep Time 5 minutes
Cook Time 5 minutes
Total Time 10 minutes
Servings 1 serving
Calories 250
A quick and nutritious omelet packed with fresh spinach and feta cheese, perfect for a healthy breakfast.

Ingredients

olive oil

  • 1 tsp olive oil

eggs

  • 1 to 3 eggs eggs

butter

  • 1 Tbsp (≈14 g) g unsalted butter

fresh spinach

  • 1 cup cup fresh spinach, chopped

salt and pepper

  • to taste Salt and pepper

chives

  • 2 tsp tsp minced fresh chives (optional, for garnish)

Instructions 

  • Crack eggs into a bowl, add salt and pepper, and whisk until uniform.
  • Heat a non-stick skillet over medium-high heat, add olive oil, and sauté spinach for 1 minute.
  • Pour beaten eggs over spinach, tilt pan to spread evenly, then cook until set.
  • Fold omelet in half with a spatula, then slide onto a plate.
  • Garnish with chopped chives if desired and serve.

Notes

Using fresh spinach enhances flavor; adjust seasoning to taste.
Calories: 250kcal
Cost: $8
Course: Breakfast
Cuisine: International
Keyword: Omelet

Unleash Your Inner Mixologist with the Ocean Love Colada

Dive into the refreshing world of the Ocean Love Colada! This easy recipe combines creamy coconut milk, sweet pineapple juice, and a hint of vanilla for a delightful tropical drink. Perfect for any occasion, whether you’re celebrating a sunny day or simply unwinding after a long week. The Ocean Love Colada is not just a drink; it’s a mini-vacation in a glass that will transport you straight to the beach.

Why You’ll Love This Recipe

Here are some compelling reasons to whip up this delightful Ocean Love Colada:

  • Refreshing Flavor: The combination of sweet pineapple juice and creamy coconut milk creates a tropical paradise in your mouth.
  • Quick to Prepare: With just a few ingredients and a blender, you can have this cocktail ready in minutes.
  • Versatile Drink: Enjoy it as a cocktail or adapt it into a non-alcoholic version for everyone to savor.
  • Perfect for Any Occasion: Whether it’s a summer BBQ or a cozy movie night, this drink fits right in.
  • Customizable: Easy to adjust ingredients based on your taste preferences or dietary needs.

Ingredient Breakdown & Their Roles

Understanding each ingredient’s role can enhance your experience when making the Ocean Love Colada. Here’s what you need:

  • 1 cup Coconut Milk: Adds a rich, creamy texture and tropical flavor. You can use light coconut milk for a lighter option or even coconut cream for a more indulgent drink.
  • 1 cup Pineapple Juice: Provides natural sweetness and a refreshing zing. Freshly squeezed juice will elevate the flavor even further.
  • 1 piece Banana: Adds natural sweetness and a smooth consistency, making the drink luxurious and creamy.
  • 1 cup Ice Cubes: Chills the drink and makes it extra refreshing, perfect for hot days.
  • Splash of Vanilla Extract: For extra depth of flavor, enhancing the overall taste.

Step-by-Step Recipe Instructions

Ready to create your Ocean Love Colada? Follow these simple steps:

  1. Gather Your Ingredients: Ensure you have all your ingredients ready to go.
  2. Blend the Ingredients: In a blender, add the coconut milk, pineapple juice, banana, and vanilla extract.
  3. Add Ice Cubes: Toss in the ice cubes and blend until you achieve a smooth, creamy texture.
  4. Taste and Adjust: Sample your drink and adjust sweetness if necessary, adding more pineapple juice or a splash of honey if desired.
  5. Serve and Garnish: Pour into your favorite glass and garnish with a slice of pineapple or a cherry for a fun touch.

Pro Tips for the Perfect Ocean Love Colada

Here are some expert insights to elevate your colada-making game:

  • Chill Your Ingredients: For an ultra-refreshing drink, chill your coconut milk and pineapple juice beforehand.
  • Garnish Creatively: Use fresh fruit or edible flowers for a beautiful presentation that impresses guests.
  • Blend in Stages: If your blender struggles, blend in stages to ensure everything mixes well without clumps.
  • Experiment with Flavors: Try adding other fruits like mango or strawberries for a unique twist on the classic recipe.
  • Consider Alcohol: For an adult version, add rum or vodka for a spirited kick; just adjust the ice accordingly.

Common Mistakes and Troubleshooting

Let’s avoid some common pitfalls when making your Ocean Love Colada:

  • Too Watery? If your drink is too watery, reduce the amount of ice or blend less. You want a creamy texture, not a slushy one.
  • Overly Sweet? Balance out sweetness by adding a splash of lime juice for acidity, which brightens the flavors.
  • Not Blending Well? If your blender isn’t smoothening the mixture, add a splash of coconut milk or juice to help it blend better.

Variations to Try

Here are some fun and delicious variations of the Ocean Love Colada to keep things exciting:

  • Mango Love Colada: Substitute half the pineapple juice with mango puree for a tropical twist.
  • Berry Colada: Add mixed berries (like strawberries or blueberries) for a fruity flavor explosion.
  • Pineapple Coconut Smoothie: Omit the banana and add spinach for a healthy smoothie option.
  • Non-Alcoholic Splash: Replace any alcohol with sparkling water or soda for a refreshing mocktail experience.

Storage and Make-Ahead Instructions

Want to prepare ahead of time? Here’s how to store your Ocean Love Colada:

  • Refrigerate Ingredients: You can pre-mix the coconut milk and pineapple juice a day ahead, but blend fresh with ice just before serving.
  • Freezing: Freeze leftovers in ice cube trays to use in smoothies later—perfect for quick snacks!

Comprehensive FAQ

Here are some frequently asked questions about the Ocean Love Colada:

  • Can I use fresh pineapple instead of juice? Absolutely! Fresh pineapple adds a vibrant flavor.
  • What type of coconut milk is best? Use full-fat coconut milk for creaminess, or light coconut milk for a lower-calorie option.
  • How can I make it vegan? This recipe is already vegan as it doesn’t contain dairy.
  • Can I make this drink ahead of time? Yes, prep the mix beforehand, but blend with ice just before serving for the best texture.
  • What’s the best way to garnish? Use fresh fruit slices or mint sprigs for a beautiful presentation.
  • Is this drink suitable for kids? Yes! Simply omit any alcohol for a delicious mocktail.
  • How long does it last in the fridge? It’s best enjoyed fresh, but you can store it for up to 24 hours in the fridge.
  • Can I freeze the colada? Yes, pour it into ice cube trays to enjoy later in smoothies!

Nutrition Tips and Dietary Adaptations

For those mindful of their dietary choices, here are some tips:

  • Low-Sugar Option: Use unsweetened coconut milk and reduce the amount of pineapple juice.
  • Protein Boost: Add a scoop of protein powder or Greek yogurt for a nutritious enhancement.
  • Gluten-Free: This recipe is naturally gluten-free, making it suitable for everyone!

Equipment Recommendations

To make your Ocean Love Colada, you’ll need:

  • High-Speed Blender: Ensures a smooth texture without lumps.
  • Measuring Cups: For accurate ingredient measurements to achieve the best flavor.
  • Fun Glassware: Serve in colorful or themed glasses to enhance the tropical vibe.

Serving Suggestions

For the best experience, consider these serving ideas:

  • Chill Your Glasses: Serve in chilled glasses to keep your drink cool longer.
  • Pair with Snacks: Enjoy with light snacks like veggie chips or fresh fruit skewers for a delightful treat.
  • Host a Tasting Party: Create a DIY cocktail station with different mixers for guests to customize their coladas.

There you have it! A fun, flavorful recipe for the Ocean Love Colada that’s sure to impress your friends and family. Remember, cooking is about enjoying the process, so relax, have fun, and sip into paradise with this delightful drink!

Ocean Love Colada

Prep Time 5 minutes
Total Time 5 minutes
Servings 2 cups
Calories 180
A tropical blend that combines creamy coconut, sweet pineapple, and ripe banana for a refreshing and indulgent drink.

Ingredients

Liquid

  • 1 cup Coconut Milk (Adds a rich, creamy texture and tropical flavor.)
  • 1 cup Pineapple Juice (Provides natural sweetness and a refreshing zing.)
  • 1 piece Banana (Adds natural sweetness and a smooth consistency.)
  • 1 cup Ice Cubes (Chills the drink and makes it extra refreshing.)
  • splash splash Vanilla Extract (For extra flavor.)

Instructions 

  • Add all ingredients to a blender.
  • Blend until smooth and creamy.
  • Pour into glasses and serve immediately.

Notes

For a colder drink, add more ice or chill the ingredients beforehand.
Calories: 180kcal
Cost: $8
Course: Beverage
Cuisine: Tropical
Keyword: Banana, Coconut, Pineapple

Start Your Day Right with Easy Apple Cinnamon Overnight Oats

Are you tired of the morning rush leaving you with little time for breakfast? Say goodbye to soggy toast and bland cereal! With these delicious Apple Cinnamon Overnight Oats, you can enjoy a nutritious meal that’s ready when you are. Packed with flavor and nutrients, this recipe is perfect for busy mornings. In just a few simple steps, you’ll whip up a creamy, satisfying breakfast that will keep you energized throughout the day!

Why You’ll Love This Recipe

  • Quick and Easy: With just a few ingredients and minimal prep time, you can make these oats in under 10 minutes.
  • Healthy Breakfast: Packed with fiber and protein from oats and Greek yogurt, these overnight oats make for a filling and nutritious start to your day.
  • Customizable: You can easily swap ingredients to suit your taste or dietary needs, making it versatile for everyone.
  • Meal Prep Friendly: Perfect for batch cooking! Make several servings at once and enjoy them throughout the week.
  • Deliciously Satisfying: The combination of sweet apples and warm cinnamon creates a delightful flavor that you’ll look forward to every morning.

Ingredients You’ll Need

Here’s what you’ll need to create your Apple Cinnamon Overnight Oats:

  • 1 cup Rolled Oats (or Quick Oats): Rolled oats provide a chewy texture and hold up well when soaked overnight.
  • 2 tablespoons Chia Seeds: These tiny seeds add fiber and help thicken the oats.
  • ½ cup Greek Yogurt (or dairy-free yogurt): For a creamy texture and extra protein; you can substitute with any yogurt of choice.
  • 1 cup Non-Dairy Milk of Choice: Almond, oat, or coconut milk work wonderfully here.
  • 2 tablespoons Pure Maple Syrup: Adds natural sweetness, or use honey if not vegan.
  • 1 teaspoon Vanilla Extract (optional): For additional flavor.
  • 1 teaspoon Ground Cinnamon (or nutmeg/ginger): A must for that cozy, warm flavor.
  • 1 medium Diced Apple: Honeycrisp or Cosmic Crisp are great for sweetness and crunch.

Ingredient Substitutions

A deliciously prepared bowl of apple cinnamon overnight oats, showcasing layers of oats, yogurt, and fresh apple pieces.
  • Oats: Use steel-cut oats for a heartier texture, but note that they will require longer soaking time.
  • Chia Seeds: Flaxseeds can be used as an alternative for similar health benefits.
  • Yogurt: Substitute with coconut cream for a dairy-free option or increase the milk slightly for a lighter version.
  • Maple Syrup: Agave syrup or stevia can be used for a lower-calorie sweetener.
  • Apples: Pears or even diced bananas can add a different flavor profile.

How to Prepare Your Overnight Oats

Making these Apple Cinnamon Overnight Oats is incredibly straightforward:

  1. Combine all the ingredients: In a medium-sized bowl or jar, mix together the oats, chia seeds, yogurt, non-dairy milk, maple syrup, vanilla extract, cinnamon, and diced apple.
  2. Seal and store: Transfer the mixture into an airtight container or portion into jars, then seal tightly.
  3. Chill: Refrigerate overnight (or at least 4 hours) to let the oats absorb the liquid and flavor.
  4. Enjoy: In the morning, stir the oats and enjoy them cold, or warm them up in the microwave for a cozy breakfast.

Pro Tips for Perfect Overnight Oats

  • Choose the right oats: Always opt for rolled oats over instant oats for the best texture and flavor.
  • Let them sit: The longer the oats soak, the creamier they’ll become. Overnight soaking is ideal.
  • Mix-ins: Feel free to add nuts, seeds, or dried fruits for extra crunch and flavor.
  • Adjust sweetness: Taste the mixture before sealing; adjust the sweetness with more maple syrup if desired.
  • Consistency: If the oats are too thick in the morning, add a splash more milk to reach your desired consistency.
  • Layering: For a fun twist, layer your oats with yogurt and fruit in a jar for a parfait-style breakfast.
  • Meal prep: Make several jars at once to have a week’s worth of breakfast ready to go!
  • Garnish: Top with additional apple slices, nuts, or a sprinkle of cinnamon before serving for a delightful presentation.

Common Mistakes and Troubleshooting

  • Too thick or too runny: If your oats are too thick, add more milk; if they’re too runny, add a bit more oats or chia seeds next time.
  • Flavorless oats: Don’t skip the spices! A good amount of cinnamon or nutmeg enhances the dish.
  • Using instant oats: They can become mushy; stick with rolled oats for the best texture.

Variations to Try

  • Peanut Butter Banana: Stir in 2 tablespoons of peanut butter and substitute the apple with sliced bananas.
  • Berry Delight: Replace the apple with mixed berries for a refreshing twist.
  • Chocolate Chip: Add dark chocolate chips for a dessert-like breakfast experience.
  • Maple Pecan: Mix in chopped pecans and substitute maple syrup with brown sugar for a richer flavor.

How to Store Your Overnight Oats

Store your Apple Cinnamon Overnight Oats in the refrigerator for up to 5 days. Make sure they are in an airtight container to keep them fresh and flavorful. You can enjoy them cold straight from the fridge or heat them up in the microwave for a cozy breakfast option.

FAQs About Apple Cinnamon Overnight Oats

  • How long do overnight oats last? They can last in the fridge for up to 5 days, making them perfect for meal prep.
  • Can I freeze overnight oats? Yes, but the texture may change. It’s best to freeze without any fruit or yogurt mixed in.
  • Do I need to cook the oats? No, the oats soften perfectly as they soak in the milk overnight.
  • What types of oats are best for overnight oats? Rolled oats work best, but steel-cut oats can be used with a longer soaking time.
  • Can I use flavored yogurt? Absolutely! Flavored yogurt can add an extra layer of taste to your overnight oats.
  • Can I eat overnight oats warm? Yes, warm them up in the microwave before serving for a comforting breakfast.
  • Does the chia seed need to be ground? No, whole chia seeds work perfectly and add a nice texture.
  • Can I make it vegan? Yes, simply use dairy-free yogurt and maple syrup instead of honey.

Nutritional Tips and Dietary Adaptations

This recipe is not only delicious but also packed with nutrients. The combination of oats and chia seeds provides a significant amount of fiber, helping you feel full longer. Greek yogurt adds protein, which is essential for muscle repair and growth. For those watching their sugar intake, consider reducing the maple syrup or using a sugar substitute. If you’re gluten-free, ensure that your oats are certified gluten-free.

Essential Equipment

  • Mixing Bowl: A medium-sized bowl for combining ingredients.
  • Airtight Containers: For storing your prepared overnight oats in the fridge.
  • Measuring Cups and Spoons: For accurate ingredient measurements.
  • Spoon or Spatula: For mixing everything together.

Serving Suggestions

Serve your Apple Cinnamon Overnight Oats chilled or warmed in a bowl. Top with additional diced apples, a drizzle of maple syrup, or a sprinkle of nuts for added crunch. Enjoy alongside a cup of coffee or tea for a perfect morning ritual!

With these Easy Apple Cinnamon Overnight Oats, you can transform your breakfast routine into something exciting and nourishing. Enjoy experimenting with flavors and making this recipe your own. Remember, cooking should be fun and stress-free, so don’t be afraid to get creative in the kitchen!

Cozy Apple Cinnamon Overnight Oats for Your Busy Mornings

Prep Time 5 minutes
Total Time 5 minutes
Servings 2 servings
Calories 350
Start your day with a delicious and nutritious overnight oats recipe infused with apple and cinnamon, perfect for busy mornings.

Ingredients

Oats

  • 1 cup Rolled Oats (or Quick Oats)

Chia Seeds

  • 2 tablespoons Chia Seeds

Yogurt

  • ½ cup Greek Yogurt (or dairy-free yogurt)

Non-Dairy Milk

  • 1 cup Non-Dairy Milk of Choice (such as almond, oat, or coconut)

Sweetener

  • 2 tablespoons Pure Maple Syrup (or honey if not vegan)

Flavoring

  • 1 teaspoon Vanilla Extract (optional)

Spices

  • 1 teaspoon Ground Cinnamon (or nutmeg/ginger)

Apple

  • 1 medium Diced Apple (preferably Honeycrisp or Cosmic Crisp)

Instructions 

  • Combine oats, chia seeds, cinnamon, and vanilla in a jar or bowl.
  • Add Greek yogurt, non-dairy milk, maple syrup, and diced apple; stir well.
  • Cover and refrigerate overnight or at least 4 hours.
  • In the morning, stir the oats and enjoy cold or warmed.

Notes

Feel free to top with nuts or additional fruit for extra flavor and texture.
Calories: 350kcal
Cost: $10
Course: Breakfast
Cuisine: American
Keyword: apple, Cinnamon, Oats

Are you ready to elevate your breakfast game? These Flourless Banana Oat Waffles are not just easy to make; they’re a wholesome, gluten-free option that brings a delightful twist to your morning routine. Made with just a handful of simple ingredients, these waffles are perfect for busy mornings or a cozy weekend brunch. Let’s get started on transforming those ripe bananas into a delicious breakfast treat!

Why You’ll Love This Recipe

There are countless reasons to adore these flourless banana oat waffles, but here are the top five:

  • Nutritious and Wholesome: Packed with rolled oats and bananas, these waffles are a source of fiber and essential nutrients, making them a healthier alternative to traditional waffles.
  • Gluten-Free Goodness: Using certified gluten-free oats ensures that these waffles can be enjoyed by everyone, including those with gluten sensitivities.
  • Quick and Easy: With just a blender and a waffle iron, you can whip up these waffles in less than 30 minutes, perfect for those hectic mornings.
  • Customizable: The base recipe can be modified with various toppings or flavor additions, allowing you to get creative with each batch.
  • Kid-Friendly: Children love the natural sweetness of bananas in these waffles, making them a great breakfast option for the whole family.

Ingredients Breakdown

Understanding your ingredients is key to mastering this recipe. Here’s what you need:

  • 1 ¾ cups old fashion rolled oats: The heart of this recipe, replacing traditional flour and providing a wholesome, nutty flavor. Ensure they’re gluten-free certified if necessary.
  • 2 medium spotty bananas: These are not just for sweetness—they also act as a natural binding agent in the batter.
  • 2 eggs: Essential for structure, eggs lend a fluffy texture to the waffles.
  • ⅔ cup unsweetened almond milk: You can substitute this with 2% milk, whole milk, or any plant-based milk of your choice.
  • 1 tsp vanilla extract: Adds a lovely aroma and flavor depth.
  • 1 ½ tsp cinnamon: This warm spice complements the bananas perfectly.
  • 1 ½ tsp baking powder: Ensures your waffles rise and become fluffy.

How to Make Flourless Banana Oat Waffles

Ready to get cooking? Follow these simple steps:

  • Blend the Batter: Start by adding all the ingredients into a high-speed blender. Blend for 30 to 45 seconds until you achieve a smooth batter.
  • Let the Batter Sit: Allow the batter to sit for 4 to 6 minutes; this will help thicken it up before cooking.
  • Preheat Your Waffle Iron: Heat your waffle iron according to the manufacturer’s instructions and lightly grease it with non-stick spray or butter.
  • Cook the Waffles: Pour the batter into the hot waffle iron. Cook until golden brown and ensure the center is cooked through. Cooking time may vary based on your waffle maker.
  • Serve and Enjoy: Once cooked, let the waffles sit for 1-2 minutes before serving warm. Top them with your favorite fruits, syrup, or yogurt!

Pro Tips for Perfect Waffles

Want to elevate your waffle-making skills? Here are some expert insights:

  • Use Overripe Bananas: Ripe bananas are sweeter and will enhance the flavor of your waffles significantly.
  • Experiment with Spices: Add nutmeg or vanilla bean for extra flavor complexity.
  • Adjust Consistency: If your batter seems too thick, a splash more milk can help reach the desired pourable consistency.
  • Don’t Overcook: Keep an eye on your waffles as they cook; overcooking can lead to dryness.
  • Let Them Rest: Allowing the waffles to sit for a minute after cooking helps them firm up, making them easier to handle.
  • Make a Big Batch: These waffles freeze beautifully! Make extra and store them for quick breakfasts later.
  • Pair with Nut Butters: Almond or peanut butter adds protein and creaminess, making your breakfast more satisfying.
  • Use a Non-Stick Waffle Iron: This will make removing the waffles easier and prevent sticking.

Common Mistakes and Troubleshooting

Even the best cooks can run into a few bumps. Here’s how to troubleshoot common issues:

  • Waffles Stick to Iron: Ensure you properly grease your waffle iron. You can also check if your iron is hot enough before adding the batter.
  • Waffles Are Too Dense: This could be due to over-blending or not letting the batter rest. Allowing it to thicken helps!
  • Uneven Cooking: Make sure you’re not overloading the waffle iron; stick to the recommended amount of batter for best results.
  • Flavor Lacking: If the waffles taste bland, try adding more spices or even a pinch of salt to enhance flavors.

Variations to Try

Feel free to mix things up with these variations:

  • Chocolate Chip Banana Oat Waffles: Stir in some dark chocolate chips to the batter for a decadent twist.
  • Blueberry Banana Oat Waffles: Fold in fresh or frozen blueberries for a burst of fruity goodness.
  • Cinnamon Roll Waffles: Swirl in a mixture of brown sugar and cinnamon for a sweet, cinnamon roll-inspired waffle.
  • Nutty Banana Oat Waffles: Add chopped nuts like walnuts or pecans for added crunch and nutrition.

Storage and Make-Ahead Instructions

Want to prepare these delicious waffles in advance? Here’s how:

  • Storing Leftovers: Store any leftover waffles in an airtight container in the refrigerator for up to 3 days.
  • Freezing Waffles: To freeze, place cooked waffles in a single layer on a baking sheet until frozen solid, then transfer to a freezer bag for up to 3 months.
  • Reheating: Reheat frozen waffles in a toaster or toaster oven for a quick and easy breakfast.

FAQ: Your Questions Answered

Here are some frequently asked questions about these delightful waffles:

  • Can I make these waffles vegan? Yes! Substitute the eggs with flax eggs (2 tablespoons flaxseed meal mixed with 6 tablespoons water).
  • What can I use instead of bananas? Applesauce or pumpkin puree can be used as a binding agent, but they will alter the flavor.
  • Can I use quick oats instead of rolled oats? Quick oats will work, but the texture may be different.
  • How do I make the batter sweeter? Add a tablespoon of maple syrup or honey to enhance the sweetness.
  • What toppings go well with these waffles? Fresh fruits, yogurt, nut butter, and syrup are all excellent choices!
  • How can I ensure my waffles are fluffy? Make sure not to overmix the batter, and allow it to rest before cooking.
  • Can I make a double batch? Absolutely! Just adjust the ingredient quantities accordingly and enjoy for multiple breakfasts.
  • Are these waffles gluten-free? Yes, as long as you use certified gluten-free oats, these waffles are gluten-free!

Nutrition Tips and Dietary Adaptations

These waffles are naturally nutritious, but here are some tips to make them even healthier:

  • Use Whole Grain Oats: Opt for whole grain oats to increase fiber content.
  • Limit Added Sugar: Rely on the natural sweetness of bananas instead of adding sugar.
  • Incorporate Protein: Serve with Greek yogurt or nut butter to boost protein intake.

Equipment Recommendations

To get the best results, here’s what you’ll need:

  • High-Speed Blender: Essential for creating a smooth batter.
  • Waffle Iron: A non-stick waffle iron will yield the best results for easy release.
  • Measuring Cups: Accurate measurements are crucial for baking!

Serving Suggestions

Now that your waffles are ready, here are some fun serving ideas:

  • Top with Fresh Fruits: Strawberries, blueberries, or banana slices add color and flavor.
  • Drizzle with Maple Syrup: A classic pairing that enhances the sweetness.
  • Add Yogurt: A dollop of Greek yogurt can make for a creamy, delicious contrast.
  • Sprinkle with Nuts: Chopped nuts add a satisfying crunch and extra nutrition.

Cooking is about experimenting and finding joy in the process. With these Flourless Banana Oat Waffles, you’ll not only satisfy your taste buds but also create a nourishing meal that fuels your day. So, grab those ripe bananas and get cooking! Enjoy the journey of creating something delicious that you and your loved ones will savor. Happy cooking!

Flourless Banana Oat Waffles

Prep Time 10 minutes
Cook Time 10 minutes
Total Time 20 minutes
Servings 4 servings
Calories 210
Enjoy these healthy, gluten-free banana oat waffles that are quick to make and perfect for a nutritious breakfast.

Ingredients

Dry ingredients

  • 1 ¾ cups old fashion rolled oats (gluten-free if necessary)
  • 2 medium spotty bananas
  • 2 eggs eggs
  • cup unsweetened almond milk (or other milk options)
  • 1 tsp vanilla extract
  • 1 ½ tsp cinnamon
  • 1 ½ tsp baking powder

Instructions 

  • Add all ingredients to a high-speed blender and blend until smooth. Let sit for 4-6 minutes.
  • Preheat waffle iron and lightly grease. Pour batter and cook until golden brown.
  • Repeat with remaining batter.
  • Serve warm with your favorite toppings.

Notes

For best results, follow the waffle maker's recommended cooking time.
Calories: 210kcal
Cost: $10
Course: Breakfast
Cuisine: American
Keyword: Banana, Gluten-Free, Oats