Author

Steven

Browsing

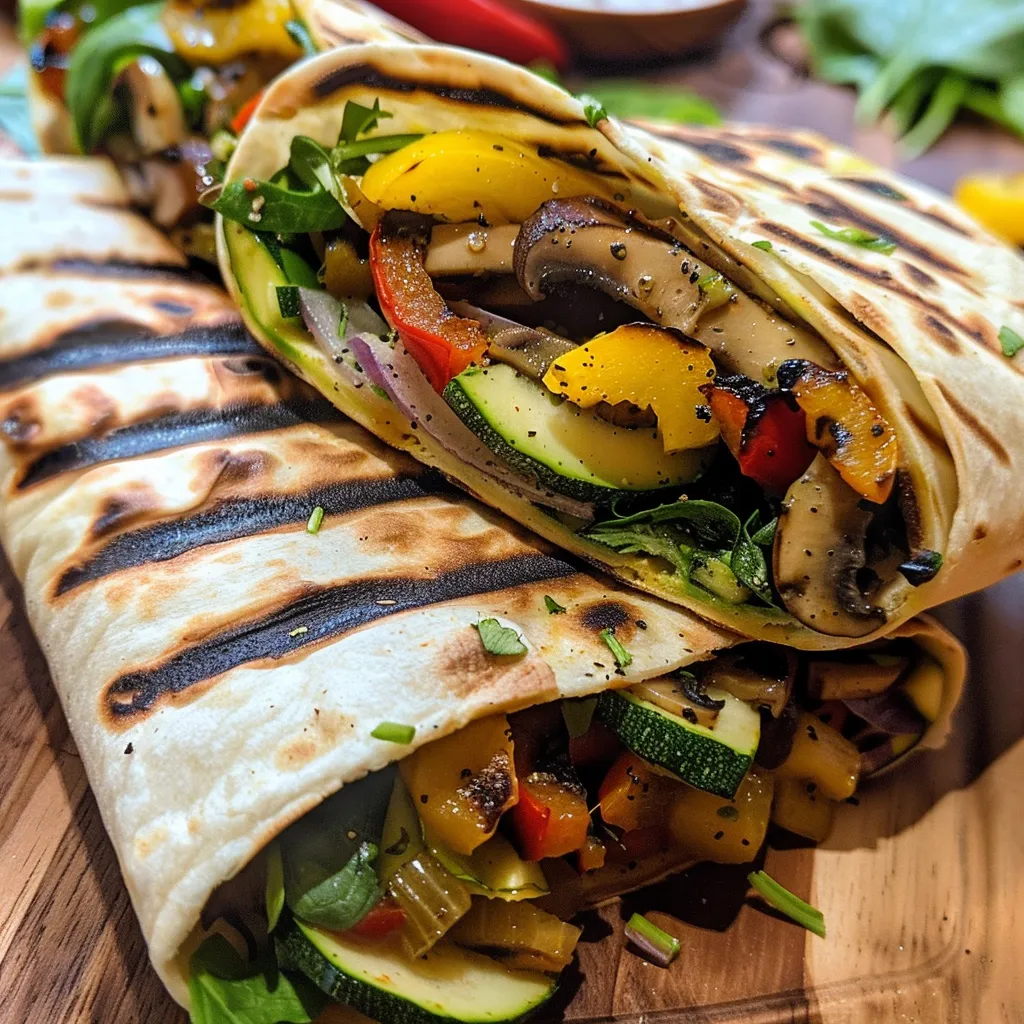
Welcome to your new favorite weeknight meal! These Deliciously Simple Veggie Grilled Wraps are perfect for those evenings when you’re short on time but still want a satisfying, flavorful dish. Packed with colorful veggies and bursting with taste, these wraps are a breeze to make and can be easily customized to suit your preferences. Let’s dive into the world of grilled veggie wraps that will transform your dinner routine!

Why You’ll Love This Recipe

Here are just a few reasons why these veggie wraps will quickly become a staple in your kitchen:

  • Quick to prepare: With only 15 minutes of prep and 15 minutes of grilling, you can enjoy a delicious meal in under 30 minutes!
  • Versatile ingredients: Use whatever vegetables you have on hand to create your perfect wrap. From bell peppers to zucchini, the possibilities are endless!
  • Healthy and satisfying: These wraps are loaded with nutrients and fiber, making them a guilt-free option for lunch or dinner.
  • Customizable for dietary needs: Easily adapt the recipe for vegan, gluten-free, or low-carb diets by switching out ingredients as needed.
  • Meal prep friendly: Make a large batch to enjoy throughout the week or freeze for later use.

Ingredients Breakdown

Here’s what you’ll need to whip up these delightful wraps:

  • 2 assorted bell peppers: Sliced. Any color will do! Red, yellow, and green all add great flavor and nutrition.
  • 1/2 cup onion: Sliced. Sweet onions work wonderfully, but feel free to use red or yellow onions.
  • 1 zucchini: Diced. This adds a soft texture and mild flavor that pairs well with the other vegetables.
  • 2 stalks celery: Chopped. For that satisfying crunch!
  • 1 cup mushrooms: Sliced. Use your favorite type, such as button or portobello.
  • 1 cup spinach: Adds a burst of color and nutrition.
  • 1/2 tsp garlic powder: To taste. This enhances the overall flavor of the veggies.
  • 2 tbsp oil: Olive oil or avocado oil works best for grilling.
  • 1 tsp salt: To taste. Season your vegetables for maximum flavor.
  • 1/4 tsp black pepper: To taste. A dash of pepper adds a little kick!
  • 6 tortillas: Choose whole wheat or gluten-free wraps, depending on your dietary needs.
  • 1 tbsp butter: For coating tortillas. This gives them a delicious golden brown color when grilled.

Pro Tips for Perfect Veggie Wraps

Follow these expert insights to ensure your wraps are always a hit:

  • Grill at the right temperature: Medium-high heat is ideal for grilling vegetables. It helps to achieve a nice char without overcooking.
  • Don’t overcrowd the grill: Give your veggies space to cook evenly. Grilling in batches ensures they get that perfect sear.
  • Marinate for flavor: If you have extra time, marinate your vegetables in the oil and spices for at least 30 minutes before grilling.
  • Experiment with spices: Try adding cumin, paprika, or Italian seasoning for an extra flavor boost.
  • Use a panini press: For an even easier cooking method, a panini press can be used to grill the wraps to perfection.
  • Watch the cooking time: Most veggies take about 5-7 minutes to grill. Keep an eye on them to avoid burning.
  • Wrap it right: For easier eating, fold in the sides of the tortilla before rolling it up to secure the filling.
  • Let the wraps rest: Allowing the wrapped veggies to sit for a couple of minutes helps the flavors meld and makes them easier to slice.

Common Mistakes and Troubleshooting

A side view of a delicious veggie grilled wrap filled with fresh vegetables and herbs.

Here are some common pitfalls to avoid when making your grilled veggie wraps:

  • Overcooking the vegetables: Keep an eye on your veggies while grilling. They should be tender yet still crisp.
  • Using stale tortillas: Fresh tortillas are key for a delicious wrap. If they’re stale, they might crack when you roll them.
  • Skipping the seasoning: Don’t forget to season your veggies! A little salt and pepper can make a huge difference in flavor.
  • Not allowing time for marinating: If you’re looking for maximum flavor, don’t skip marinating your veggies.

Delicious Variations to Try

Feeling adventurous? Here are some tasty variations to consider:

  • Mexican Street Style: Add corn, black beans, and jalapeños. Top with avocado crema for a zesty twist.
  • Italian-Inspired: Include roasted red peppers, artichokes, and fresh basil. Drizzle with balsamic reduction for added flavor.
  • Asian Fusion: Use bok choy, carrots, and red cabbage. Toss with sesame oil and serve with soy sauce.
  • Breakfast Wrap: Add scrambled eggs or tofu, along with bell peppers and spinach, for a hearty morning option.

Storage and Make-Ahead Instructions

Want to save time? Here are some tips for storing and prepping your wraps:

  • Refrigeration: Store any leftover grilled veggies in an airtight container in the refrigerator for up to 3 days.
  • Freezing: Grilled veggies can be frozen for up to 3 months. Thaw before using in wraps.
  • Make-ahead wraps: Assemble wraps in advance and store them wrapped tightly in foil or plastic wrap in the fridge. Enjoy within 2 days for best quality.

Comprehensive FAQ

Have questions? Here are answers to some common queries:

  • Can I use frozen vegetables? Yes, frozen vegetables can be used, but make sure to thaw and drain them before grilling.
  • How do I make these wraps gluten-free? Simply use gluten-free tortillas and ensure your sauces and seasonings are gluten-free.
  • Can I make these wraps vegan? Absolutely! Omit the butter or use a plant-based alternative.
  • What dipping sauces pair well with these wraps? A cilantro lime sauce or a spicy hummus are great options!
  • How can I add protein to the wraps? Consider adding grilled chicken, tofu, or chickpeas for an extra protein boost.
  • What if I don’t have a grill? You can sauté the veggies in a pan or use an air fryer for a similar result.
  • How do I prevent soggy wraps? Be sure to drain any excess moisture from the grilled veggies before assembling your wraps.
  • How do I serve these wraps? Cut them in half and serve with a side salad or chips for a complete meal.

Nutrition Tips and Dietary Adaptations

Keep your wraps healthy with these tips:

  • Add healthy fats: Include avocado or a sprinkle of seeds for added nutrition.
  • Increase fiber: Choose whole grain tortillas and load up on veggies for extra fiber.
  • Watch the sauces: Opt for light dressings or homemade sauces to control added sugars and calories.

Essential Equipment Recommendations

Here’s what you’ll need to make your wraps a success:

  • Grill or grill pan: Essential for getting those beautiful grill marks and smoky flavor.
  • Sharp knife: For slicing vegetables easily and safely.
  • Cutting board: A sturdy board will make prep work a breeze.
  • Non-stick spatula: Great for flipping veggies without sticking.

Serving Suggestions

Ready to enjoy your wraps? Here are some serving ideas:

  • Pair with a fresh salad: A light side salad can complement the wraps nicely.
  • Serve with a side of chips: Crispy tortilla chips or sweet potato fries make for a great side.
  • Garnish with fresh herbs: A sprinkle of fresh cilantro or parsley can elevate the dish.

Conclusion

These Deliciously Simple Veggie Grilled Wraps are not just a meal—they’re an experience! With their vibrant colors, delightful flavors, and the ability to customize, they make for a fantastic dinner option any night of the week. Remember, cooking is about enjoying the process, so gather your ingredients, get creative, and savor every bite. Happy cooking, and enjoy your delicious wraps!

Veggie Grilled Wraps

Prep Time 10 minutes
Cook Time 10 minutes
Total Time 20 minutes
Servings 6 wraps
Calories 250
Enjoy these colorful and healthy veggie wraps, perfect for a quick lunch or dinner.

Ingredients

Vegetables

  • 2 count Bell pepper assorted, sliced
  • 0.5 cup Onion sliced
  • 1 count Zucchini diced
  • 2 stalks Celery
  • 1 cup Mushrooms sliced
  • 1 cup Spinach
  • 0.5 tsp Garlic powder to taste
  • 2 tbsp Oil
  • 1 tsp Salt
  • 0.25 tsp Black Pepper to taste
  • 6 count Tortillas
  • 1 tbsp Butter for coating tortillas

Instructions 

  • Sauté the sliced vegetables in oil with garlic powder and salt until tender.
  • Warm the tortillas and coat each with a little butter.
  • Divide the cooked vegetables among the tortillas and roll up.
  • Optional: Grill the wraps for a few minutes until golden.

Notes

Feel free to add cheese or your favorite sauce for extra flavor.
Calories: 250kcal
Cost: $12
Course: Main Course
Cuisine: American
Keyword: Vegetables

If you’re looking for a quick, delicious meal that won’t leave you stressed in the kitchen, then you’re in for a treat! These BBQ Chicken Coleslaw Wraps combine the smoky flavor of grilled chicken with the refreshing crunch of coleslaw, all wrapped up in a soft tortilla. This recipe is not only simple to make, but it also offers a fusion of flavors that will tantalize your taste buds. Let’s dive into why this recipe is a must-try!

Why You’ll Love This Recipe

  • Quick Preparation: With a total time of just 30 minutes, these wraps are perfect for busy weeknights when you need a meal on the table fast.
  • Versatile Ingredients: Use leftovers or customize with your favorite veggies and sauces. This recipe allows for endless variations to suit your taste!
  • Health Benefits: Packed with protein from the chicken and vitamins from the fresh coleslaw, these wraps are a nutritious option for any meal.
  • Kid-Friendly: The sweet and tangy BBQ sauce makes this dish appealing to kids, ensuring everyone at the table is happy.
  • Meal Prep Friendly: Make the chicken and coleslaw ahead of time for an easy grab-and-go lunch or dinner option.

Ingredients Breakdown

Here’s what you’ll need to whip up these flavorful wraps:

  • 2 chicken breasts: Grilled and shredded for maximum flavor.
  • 1 cup BBQ sauce: Choose your favorite brand or make your own for a personalized touch.
  • 1/2 small red cabbage: Adds a vibrant color and crunch.
  • 1/2 small green cabbage: Offers a milder flavor that complements the red cabbage.
  • 1 carrot: Grated for an extra layer of sweetness and texture.
  • 1/4 cup green onions: Sliced for a fresh, zesty kick.
  • 1/4 cup mayonnaise: Provides creaminess to the coleslaw.
  • 2 tbsp apple cider vinegar: Adds tanginess to the dressing.
  • Salt and pepper to taste: Essential for seasoning.
  • 4 large tortillas: Use whole wheat or gluten-free if preferred.
  • Fresh cilantro: For garnish, adding a burst of freshness.

How to Make BBQ Chicken Coleslaw Wraps

Follow these easy steps to create your wraps:

  1. Grill the chicken breasts over medium heat until cooked through, about 6-7 minutes per side. Once cooked, shred the chicken using two forks.
  2. In a medium bowl, toss the shredded chicken with BBQ sauce until well-coated. Set aside.
  3. In another bowl, mix the shredded red cabbage, green cabbage, and grated carrot until combined.
  4. In a small bowl, whisk together the mayonnaise, apple cider vinegar, and a pinch of salt and pepper. Pour this dressing over the cabbage mixture and toss until evenly coated.
  5. Lay out the tortillas on a flat surface and place a generous portion of BBQ chicken in the center of each tortilla.
  6. Add a layer of coleslaw on top of the BBQ chicken.
  7. Fold the sides of the tortillas over the filling, then roll them up tightly to form wraps.
  8. Slice each wrap in half and garnish with fresh cilantro before serving.

Expert Tips for Perfect Wraps

Close-up of BBQ Chicken Coleslaw Wraps garnished with cilantro.
  • Choose the Right Chicken: Shredded rotisserie chicken works wonders for flavor and convenience.
  • Fresh Ingredients Matter: Always opt for fresh cabbage and veggies to maintain that satisfying crunch.
  • Don’t Overfill: Less is more! Overfilling can lead to messy wraps. Aim for a balanced amount of chicken and coleslaw.
  • Adjust the Sauce: Feel free to add more BBQ sauce if you like it saucier, but be careful not to make it soggy.
  • Make it Ahead: Prep the chicken and coleslaw in advance, storing them separately until you’re ready to assemble.
  • Add Heat: If you enjoy a little spice, consider adding a dash of hot sauce to the chicken or coleslaw.
  • Experiment with Tortillas: Try different types of tortillas, such as spinach or garlic, for varied flavors.
  • Store Wisely: Keep wraps in an airtight container if you have leftovers to maintain freshness.

Common Mistakes and Troubleshooting

Even with the best intentions, cooking can sometimes go awry. Here are some common mistakes to avoid:

  • Overcooking the Chicken: Keep an eye on your chicken to prevent it from becoming dry. Use a meat thermometer for precision.
  • Letting the Coleslaw Sit Too Long: If you let the coleslaw sit too long before serving, it can become soggy. Mix it just before assembling the wraps.
  • Using Stale Tortillas: Always check your tortillas for freshness to avoid a disappointing wrap experience.

Delicious Variations to Try

Want to put a twist on your BBQ Chicken Coleslaw Wraps? Here are some fun variations:

  • Southwestern Style: Add black beans and corn to the coleslaw for a hearty twist.
  • Spicy BBQ Chicken: Mix in diced jalapeños with the chicken for an extra kick.
  • Asian Fusion: Use sesame oil in the coleslaw dressing and add sliced almonds for crunch.
  • Vegan Option: Swap chicken for grilled portobello mushrooms and use a vegan mayo in the coleslaw.

Storage and Make-Ahead Instructions

Planning ahead? Here’s how to store and prep for later:

  • Refrigerate: Store leftovers in an airtight container in the fridge for up to 3 days.
  • Separate Storage: Keep the chicken, coleslaw, and tortillas stored separately to maintain freshness.
  • Freezing: You can freeze the grilled chicken for up to 3 months. Just thaw it before use.

Frequently Asked Questions

  • Can I use other proteins? Absolutely! You can substitute chicken with turkey, beef, or even tofu for a vegetarian option.
  • Is this recipe gluten-free? Yes, as long as you use gluten-free tortillas and sauces.
  • How can I make the coleslaw healthier? You can reduce the amount of mayo or substitute with Greek yogurt for a lighter option.
  • What can I serve with these wraps? Pair them with sweet potato fries, a fresh salad, or baked beans for a complete meal.
  • Can I make this recipe in advance? Yes! Just prepare the chicken and coleslaw ahead of time and assemble the wraps just before serving.
  • How long do leftovers last? Leftovers can be stored in the fridge for up to 3 days.
  • Can I grill the chicken ahead of time? Definitely! Grilled chicken can be made a day ahead and stored in the refrigerator.
  • What type of BBQ sauce should I use? Use your favorite BBQ sauce or make a homemade version for a personal touch.

Nutrition Tips and Dietary Adaptations

For those watching their diet, here are some tips:

  • Low-Calorie Options: Choose low-calorie tortillas to reduce overall calories without sacrificing taste.
  • Protein Boost: Add chickpeas or beans to the coleslaw for added protein and fiber.
  • Reduce Sodium: Opt for low-sodium BBQ sauce to keep the dish heart-healthy.

Equipment Recommendations

Here’s what you’ll need to get started:

  • Grill or Grill Pan: For perfectly grilled chicken.
  • Mixing Bowls: To combine your ingredients easily.
  • Whisk: For mixing the coleslaw dressing smoothly.
  • Sharp Knife: To shred chicken and cut the tortillas.

Serving Suggestions

To elevate your meal experience, consider these serving ideas:

  • Side Dishes: Serve with crispy potato wedges or a light cucumber salad for a refreshing contrast.
  • Dip Options: Offer extra BBQ sauce or ranch dressing for dipping.
  • Garnishes: Sprinkle with additional cilantro or lime wedges for extra flavor.

In conclusion, these BBQ Chicken Coleslaw Wraps are more than just a meal; they’re a delightful experience that brings friends and family together. With their vibrant flavors, quick prep time, and endless customization options, you’ll find yourself making them again and again. So grab your ingredients, unleash your inner chef, and enjoy the deliciousness that awaits!

BBQ Chicken Coleslaw Wraps

Prep Time 15 minutes
Cook Time 15 minutes
Total Time 30 minutes
Servings 4 servings
Calories 450
Delicious and easy-to-make wraps combining smoky BBQ chicken with crunchy coleslaw, perfect for a quick lunch or dinner.

Ingredients

Protein

  • 2 pieces chicken breasts (grilled and shredded)
  • 1 cup BBQ sauce

Vegetables

  • 1/2 small red cabbage (shredded)
  • 1/2 small green cabbage (shredded)
  • 1 carrot carrot (grated)
  • 1/4 cup green onions (sliced)

Dressing

  • 1/4 cup mayonnaise
  • 2 tbsp apple cider vinegar
  • to taste Salt and pepper

Wraps

  • 4 large tortillas

Garnish

  • as needed Fresh cilantro (for garnish)

Instructions 

  • Grill chicken breasts until cooked through, then shred and toss with BBQ sauce.
  • Mix shredded cabbages and grated carrot in a bowl.
  • Whisk mayonnaise, apple cider vinegar, salt, and pepper; pour over vegetables and toss.
  • Lay tortillas flat, add BBQ chicken and coleslaw, then roll up tightly.
  • Slice wraps in half, garnish with cilantro, and serve.

Notes

For extra flavor, add a squeeze of lime or hot sauce.
Calories: 450kcal
Cost: $15
Course: Main Course
Cuisine: American
Keyword: BBQ, Chicken, Wraps

Uncover the Joy of Making Korean Banana Milk

Welcome to your next favorite indulgence! Korean Banana Milk, or Leite de Banana Coreano, is not just a beverage; it’s a delightful fusion of flavor and nostalgia that can elevate your everyday snacks. With its creamy texture and sweet banana flavor, this drink is perfect for any time of day. You might be wondering if making this creamy delight from scratch is complicated, but I’m here to reassure you—it’s incredibly simple! In this guide, I’ll walk you through everything you need to know about Korean Banana Milk, including its benefits, variations, and tips for perfecting your recipe.

Why You’ll Love This Recipe

This isn’t just another drink recipe; this is a celebration of flavors that you’ll love for several reasons:

  • Quick and Easy: With just five ingredients and one blender, you can whip up this delicious drink in minutes!
  • Nutritious Boost: Packed with potassium from bananas, this drink supports heart health and can help maintain energy levels.
  • Customizable: You can easily adjust sweetness and creaminess to your liking, making it perfect for everyone in the family.
  • Refreshing Taste: The creamy blend of banana and milk is not just satisfying; it’s a refreshing treat on hot days.
  • Fun for Everyone: This drink is not just for kids; adults will love it too, making it a versatile option for gatherings!

Ingredients You’ll Need

Let’s gather our ingredients! This recipe is straightforward, so you won’t need a long shopping list. Here’s what you’ll need:

  • 1 ripe banana: The star of the show! Choose a ripe banana for natural sweetness and smooth blending.
  • ½ cup whole milk: This adds creamy richness and helps achieve that classic silky texture.
  • ½ cup cold water: Lightens the milk to keep the drink refreshingly frothy without heaviness.
  • 1 tablespoon maple syrup: Sweetens the drink naturally; adjust to your preference!
  • 1 drop of pure vanilla extract: Adds a lovely depth of flavor and aroma.

Steps to Prepare Your Korean Banana Milk

Side view of a refreshing Korean banana milk in a clear glass, showcasing its smooth texture.

Ready to blend? Here’s how to make your Korean Banana Milk:

  1. Gather all your ingredients and place them in a blender.
  2. Blend until smooth and creamy, resembling milk.
  3. Pour into a glass and enjoy immediately!

Pro Tips for the Perfect Banana Milk

Want to elevate your banana milk game? Here are some expert insights:

  • Choose the Right Banana: The riper the banana, the sweeter your milk will be. Aim for bananas with brown spots for maximum sweetness.
  • Experiment with Milk Types: While whole milk is traditional, feel free to try almond, oat, or coconut milk for a different flavor profile.
  • Chill Your Ingredients: For an extra refreshing drink, use chilled milk and water.
  • Add Ice: If you prefer a cold drink, add ice cubes to the blender for a frosty texture.
  • Mix in Other Fruits: Consider adding strawberries or mango for a fruity twist!
  • Sweetness Control: Taste before pouring; adjust the sweetness with more maple syrup if needed.
  • Blend Longer for Creaminess: If you like it super smooth, blend for a few extra seconds.
  • Use a High-Powered Blender: This ensures a silky texture without any lumps.

Common Mistakes and Troubleshooting

Even the best can make mistakes! Here are some common pitfalls and how to avoid them:

  • Banana Too Green: If your banana isn’t ripe enough, it won’t blend well and may taste starchy. Always choose a ripe banana.
  • Too Sweet: If you find your banana milk overly sweet, balance it out with a splash of milk or water.
  • Not Blending Long Enough: Ensure you blend long enough for a smooth texture; lumps can ruin the experience.
  • Skipping Vanilla: Don’t skip the vanilla extract! It enhances the overall flavor profile significantly.

Variations to Try

Feel like mixing it up? Here are some fun variations to consider:

  • Chocolate Banana Milk: Add 1-2 tablespoons of cocoa powder for a chocolatey twist.
  • Peanut Butter Banana Milk: Blend in 1 tablespoon of peanut butter for a rich and nutty flavor.
  • Matcha Banana Milk: Incorporate 1 teaspoon of matcha powder for a vibrant green drink with health benefits.
  • Spiced Banana Milk: Add a pinch of cinnamon or nutmeg for a warm, comforting flavor.

Storage and Make-Ahead Instructions

Want to prepare this drink in advance? Here’s how to store it:

  • Refrigeration: Store any leftover banana milk in an airtight container in the fridge for up to 2 days. Shake before serving.
  • Freezing: You can freeze banana milk in ice-cube trays for a frosty treat later. Just blend again after thawing.
  • Make-Ahead: Prepare the ingredients (excluding the milk) and store them in the fridge for quick blending later.

Comprehensive FAQ

Got questions? Let’s tackle some common queries!

  • Can I use unripe bananas for this recipe? Unripe bananas can be starchy and not as sweet; they’re not recommended.
  • Is this drink suitable for kids? Absolutely! It’s a healthy and tasty option for kids.
  • Can I use non-dairy milk? Yes! Almond, soy, or oat milk work beautifully in this recipe.
  • How can I make it vegan? Just use plant-based milk and maple syrup instead of honey.
  • What if I don’t have a blender? A hand mixer can work, but it may not achieve the same smooth texture.
  • Can I add protein powder? Yes! Stir in your favorite protein powder for a post-workout drink.
  • What’s the best way to serve this drink? Serve it chilled in a tall glass with a straw for a refreshing experience.
  • Can I make a larger batch? Definitely! Just double or triple the ingredients and blend in batches.

Nutritional Tips and Dietary Adaptations

This drink is not only delicious but also nutritious! Here are some tips to make it fit your dietary needs:

  • Protein Boost: Add protein powder for a post-workout snack.
  • Low-Calorie Option: Use skim milk or a plant-based alternative to reduce calories.
  • Low-Sugar Version: Skip the maple syrup or use less to lower sugar content.
  • High-Energy Snack: Pair it with nuts or seeds for a balanced snack.

Equipment Recommendations

Having the right tools can make all the difference. Here’s what I recommend:

  • High-Powered Blender: A good blender is essential for achieving a smooth consistency.
  • Measuring Cups and Spoons: Accurate measurements help maintain consistency in flavor.
  • Airtight Containers: For storing any leftovers, ensuring freshness.

Serving Suggestions

Ready to serve? Here are some fun ideas:

  • Garnish with Slices: Top with banana slices for an appealing presentation.
  • Serve with Snacks: Pair your banana milk with cookies, granola bars, or fruit.
  • Presentation: Use a tall glass or mason jar for that Instagram-worthy look!

In conclusion, making your own Korean Banana Milk is not just a fun kitchen project; it’s a chance to explore flavors and create something delicious that you can enjoy any time. So gather your ingredients, grab your blender, and let’s get started on this creamy adventure. Remember, cooking is meant to be enjoyable, and with this simple recipe, you’ll be sipping on homemade banana milk in no time. Cheers to tasty creations!

Receita Leite de Banana Coreano

Prep Time 5 minutes
Total Time 5 minutes
Servings 1 glass
Calories 150
Enjoy a creamy and delicious Korean-style banana milk made with ripe bananas and natural ingredients.

Ingredients

Fruits

  • 1 piece Banana madura
  • 0.5 cup leite
  • 0.5 cup água
  • 1 colher de sopa xarope de bordo
  • 1 gota extrato de baunilha puro

Instructions 

  • Coloque todos os ingredientes no liquidificador.
  • Bata até obter uma mistura homogênea, semelhante ao leite.
  • Sirva imediatamente.

Notes

Use bananas maduras para melhor sabor e doçura.
Calories: 150kcal
Cost: $3
Course: Beverage
Cuisine: Korean
Keyword: Banana

Discover Your New Favorite Smoothie Recipe

Welcome to a delightful world of flavors with our Mango Strawberry Blueberry Smoothie! This refreshing blend combines the tropical sweetness of mango, the juiciness of strawberries, and the tartness of blueberries in a simple, nutritious recipe. Whether you’re looking for a quick breakfast, a post-workout boost, or a tasty treat, this smoothie is sure to become a staple in your kitchen. Packed with vitamins and minerals, it’s a delicious way to enjoy your daily dose of fruit. Let’s dive into why you’ll love this recipe!

Why You’ll Love This Recipe

  • Nutritious Boost: This smoothie is loaded with antioxidants, vitamins, and minerals from fresh fruits, making it a great way to start your day or recharge in the afternoon.
  • Quick and Easy: In just 10 minutes, you can whip up this smoothie with minimal ingredients and effort—perfect for busy mornings!
  • Customizable: Feel free to adjust the ingredients based on what you have on hand or your personal preferences; add spinach for extra nutrients or swap almond milk for coconut milk.
  • Family-Friendly: Kids and adults alike will love the vibrant colors and sweet flavors, making this smoothie a great choice for the whole family.
  • Refined Sugar-Free: Naturally sweetened by the fruits, this smoothie avoids added sugars, making it a healthier option for those watching their sugar intake.

Ingredients Breakdown

Let’s take a closer look at the ingredients that make this smoothie not only delicious but also nutritious:

  • 1 Banana: Adds creaminess and natural sweetness.
  • ¾ Cup Frozen Mango: A tropical fruit that is naturally sweet and rich in vitamins A and C.
  • 1 Cup Frozen Strawberries: Provides a vibrant color and a good source of fiber and antioxidants.
  • ¾ Cup Frozen Blueberries: Packed with antioxidants, these berries add a lovely tartness to balance the sweetness.
  • ⅓ Cup Unsweetened Greek Yogurt: This adds protein and creaminess, making the smoothie more filling.
  • ⅔ Cup Unsweetened Almond Milk: A dairy-free liquid base that keeps the smoothie light and creamy.
  • ½ Lime Juiced: A splash of lime juice enhances the flavors and adds a refreshing zing.

Pro Tips for the Perfect Smoothie

A close-up side view of a vibrant mango strawberry blueberry smoothie with fresh fruits.

Here are some expert tips to ensure your smoothie turns out perfectly every time:

  • Use Frozen Fruit: Frozen fruits create a thick, creamy texture without the need for ice, which can dilute the flavor.
  • High-Speed Blender: Invest in a good quality blender for a smooth consistency; high-speed blenders are particularly effective for blending frozen ingredients.
  • Adjust Thickness: If your smoothie is too thick, simply add a splash more of almond milk until you reach your desired consistency.
  • Prep Ahead: For busy mornings, pre-portion your ingredients in freezer bags and blend in the morning for a quick meal.
  • Experiment with Greens: Add a handful of spinach or kale for a nutrient boost without altering the taste significantly.
  • Taste as You Go: Adjust sweetness or tartness by adding honey or a bit more lime juice to fit your taste preference.
  • Store Properly: If you have leftovers, store them in an airtight container in the fridge for up to 24 hours, but give it a good shake before drinking.
  • Garnish Creatively: Top your smoothie with chia seeds, nuts, or fresh fruit slices for added texture and visual appeal.

Common Mistakes and Troubleshooting

Even experienced cooks can run into issues. Here’s how to troubleshoot common smoothie mishaps:

  • Too Thick: Add more almond milk or a splash of juice and blend again until smooth.
  • Too Sweet: If you accidentally added too much fruit, balance it with a bit more Greek yogurt or lime juice.
  • Uneven Blending: Stop the blender and stir the mixture if it’s not blending evenly; sometimes, you need to help it along.
  • Oxidation: Smoothies can brown due to oxidation. If you plan to store them, add a bit of lemon juice to slow this process.

Variations to Try

Mix it up! Here are some delicious variations on the classic mango berry smoothie:

  • Green Mango Berry Smoothie: Add a handful of spinach or kale for extra nutrients without altering the flavor.
  • Protein-Packed Smoothie: Include a scoop of your favorite protein powder or nut butter for a satisfying post-workout option.
  • Creamy Coconut Smoothie: Swap almond milk for coconut milk and add shredded coconut for a tropical twist.
  • Berry Blast Smoothie: Use a mix of different berries like raspberries and blackberries for a tangy flavor.

Storage and Make-Ahead Instructions

If you want to enjoy this smoothie later, consider these storage tips:

  • Freezing Ingredients: Prepare and freeze individual smoothie packs containing all your ingredients (except for the liquid) so you can blend them on busy mornings.
  • Refrigeration: Store leftover smoothies in an airtight container in the fridge for up to 24 hours. Stir well before serving.
  • Pre-Mixing: If you prefer a make-ahead option, blend all ingredients except for the almond milk and store in the fridge. Add the liquid when ready to serve.

Frequently Asked Questions

Here are some common questions and answers that might help you:

  • Can I use fresh fruit instead of frozen? Yes, but your smoothie will be less thick. You may need to add ice to achieve the desired texture.
  • Is this smoothie vegan? Yes, if you use a plant-based yogurt and almond milk.
  • How can I make this smoothie lower in calories? You can reduce the amount of yogurt or use a lower-calorie sweetener if desired.
  • Can I add other fruits? Absolutely! Feel free to mix in other fruits like peaches, kiwi, or even avocado for creaminess.
  • What if I’m allergic to almonds? Substitute almond milk with oat milk, coconut milk, or any other non-dairy alternative that you prefer.
  • How long does it take to make this smoothie? It takes about 10 minutes from start to finish!
  • Can I prepare this smoothie the night before? Yes, but for the best taste and texture, blend it fresh if possible. If prepped, store it in the fridge for no more than 24 hours.
  • What’s the best way to sweeten my smoothie? Ripe bananas and sweet fruits usually provide enough sweetness. If needed, add a dash of honey or maple syrup.

Nutrition Tips and Dietary Adaptations

This smoothie not only tastes great but can also fit various dietary needs. Here are some tips:

  • Protein Boost: Add protein powder or nut butter to keep you fuller for longer.
  • Dairy-Free Option: Ensure all ingredients, especially yogurt, are dairy-free if needed.
  • Low-Sugar Alternative: Use unsweetened yogurt and almond milk to keep sugar levels in check.
  • Fiber-Rich: Adding chia seeds or flaxseeds can enhance the fiber content of your smoothie.

Equipment Recommendations

To get the best results, here’s what you’ll need:

  • High-Speed Blender: Essential for smooth blending of frozen fruits.
  • Measuring Cups and Spoons: For precise ingredient measurements.
  • Spatula: Helpful for scraping down the sides of the blender.
  • Storage Containers: Airtight jars for storing leftovers or prepped ingredients.

Serving Suggestions

Serve this vibrant smoothie in tall glasses and consider these fun serving ideas:

  • Garnish with Fresh Fruit: Top with sliced strawberries or a few blueberries for a visually appealing touch.
  • Serve with a Straw: Use fun, colorful straws to make drinking even more enjoyable.
  • Pair with a Snack: Complement your smoothie with a handful of nuts or a slice of whole-grain toast for a balanced meal.

With this Mango Strawberry Blueberry Smoothie, you’re not just making a drink—you’re creating a moment of joy in your day. So grab your blender, and let’s get mixing! Remember, cooking should be fun and stress-free, so don’t worry about perfection. Just enjoy the process and the delicious results!

Mango Strawberry Blueberry Smoothie

Prep Time 5 minutes
Total Time 5 minutes
Servings 2 glasses
Calories 250
A refreshing and nutritious smoothie combining tropical mango, sweet strawberries, and blueberries for a delicious treat.

Ingredients

Fruits

  • 1 piece banana peeled
  • 0.75 cup frozen mango
  • 1 cup frozen strawberries
  • 0.75 cup frozen blueberries
  • 0.33 cup unsweetened Greek yogurt
  • 0.67 cup unsweetened almond milk
  • 0.5 lime juiced

Instructions 

  • Combine all ingredients in a high-speed blender.
  • Blend until thick, creamy, and smooth.
  • If too thick, add more almond milk and blend again.
  • Pour into glasses and enjoy!

Notes

For a colder smoothie, use frozen fruit and serve immediately.
Calories: 250kcal
Cost: $8
Course: Breakfast, Snack
Cuisine: Fusion
Keyword: Fruits, Smoothie

Discover the Joy of Cooking with Hot Honey Chicken Flatbread

Are you ready to elevate your weeknight meals with something both delicious and easy to prepare? This Hot Honey Chicken Flatbread Pizza is the perfect recipe for busy nights, combining tender chicken, gooey mozzarella, and a delightful drizzle of sweet heat. In just about 15 minutes, you can create a dish that’s not only satisfying but also bursting with flavor. Let’s dive into why you’ll love this recipe and how to make it a staple in your home!

Why You’ll Love This Recipe

This Hot Honey Chicken Flatbread is more than just a meal; it’s an experience. Here are a few reasons to get excited:

  • Quick and Easy: Ready in under 15 minutes, this recipe is perfect for those hectic weeknights when you want something delicious without spending hours in the kitchen.
  • Flavor Explosion: The combination of sweet and spicy hot honey paired with savory chicken and melted cheese creates a flavor profile that is simply irresistible.
  • Customizable: You can easily swap out ingredients to suit your tastes or dietary needs, making this a versatile dish for everyone.
  • Nutrient-Packed: With protein-rich chicken and fresh vegetables like red onion and arugula, you’re not just feeding your belly; you’re nourishing your body.
  • Perfect for Sharing: It’s an easy dish to make for gatherings or a cozy dinner with the family, encouraging everyone to dig in and enjoy together.

Ingredient Breakdown and Substitutions

Before we get into the cooking, let’s take a closer look at the ingredients you’ll need and some delicious substitutions you can make:

  • Cooked Chicken Breast: You can use shredded rotisserie chicken for convenience or grill your own for a fresh touch.
  • Lavash Flatbread: For a thinner and crispier base, consider using pita bread or a homemade pizza dough.
  • Shredded Mozzarella: Feel free to substitute with your favorite cheese, such as cheddar or feta, for a different flavor.
  • Red Onion: If you prefer a milder taste, substitute with green onions or omit them entirely.
  • Hot Honey: If you don’t have hot honey, mix regular honey with a dash of chili flakes for that sweet and spicy kick.

Cooking Instructions

Side shot of a delicious Hot Honey Chicken Flatbread Pizza on a wooden surface.

Now that you have everything ready, let’s walk through the steps to create your Hot Honey Chicken Flatbread:

  1. Preheat your oven to 425°F (220°C) and line a sheet pan with parchment paper.
  2. Place the lavash flatbread on the sheet pan and lightly brush with olive oil or spray with avocado oil.
  3. Chop the cooked chicken into small pieces and slice the red onion.
  4. Sprinkle the shredded mozzarella evenly over the flatbread.
  5. Add the chicken and red onion on top of the cheese.
  6. Drizzle hot honey evenly over everything, making sure to cover the chicken and cheese for maximum flavor.
  7. Bake for 6 to 8 minutes, or until the flatbread is crispy and the cheese is bubbly and melted.
  8. Remove from the oven and top with chopped green onions, arugula, and an extra drizzle of hot honey if desired.
  9. Slice, serve, and enjoy your delightful creation!

Pro Tips for Best Results

To ensure you’re getting the most out of your Hot Honey Chicken Flatbread, consider these expert tips:

  • Don’t Overload: While it’s tempting to add more toppings, too many can make the flatbread soggy. Keep it simple for the best texture.
  • Watch the Baking Time: Ovens vary, so keep an eye on your flatbread to avoid burning. You want crispy edges and melted cheese.
  • Experiment with Flavors: Try adding roasted vegetables like bell peppers or zucchini for extra nutrition and flavor.
  • Use Fresh Ingredients: Fresh herbs and quality cheese greatly enhance the taste, so splurge a little on the good stuff!
  • Let It Rest: Allow your flatbread to cool for a minute after baking to help the cheese set slightly before slicing.
  • Adjust the Spice: If you prefer less heat, adjust the amount of hot honey or opt for a milder honey drizzle.
  • Make It a Meal: Serve with a side salad or soup to round out your dinner and make it feel more substantial.
  • Save Time: Pre-chop your ingredients ahead of time and store them in the fridge for a quicker meal prep during the week.

Common Mistakes and Troubleshooting

Cooking can sometimes lead to unexpected results. Here are common pitfalls and how to avoid them:

  • Flatbread Soggy: If your flatbread becomes soggy, ensure you’re not overloading it with toppings and that the oven is properly preheated.
  • Cheese Not Melting: If the cheese isn’t melting well, consider using a higher moisture cheese or adjusting your oven’s temperature.
  • Too Spicy: If you’ve accidentally made it too spicy, balance it out with a dollop of sour cream or yogurt on top.

Delicious Variations to Try

Looking to mix things up? Here are some tasty variations you can try:

  • BBQ Chicken Flatbread: Substitute hot honey with BBQ sauce and use shredded BBQ chicken for a smoky twist.
  • Veggie Delight: Load up on your favorite vegetables like spinach, mushrooms, and bell peppers for a veggie-packed version.
  • Buffalo Chicken Flatbread: Replace hot honey with buffalo sauce for a spicy kick, and top with blue cheese crumbles.
  • Caprese Style: Use fresh mozzarella, tomatoes, and basil, drizzling with balsamic glaze for a refreshing summer flatbread.

Storage and Make-Ahead Instructions

Want to prepare in advance? Here’s how to store and reheat your hot honey chicken flatbread:

  • Refrigeration: Store leftovers in an airtight container in the fridge for up to 3 days.
  • Freezing: You can freeze the assembled flatbread (without baking) for up to 2 months. Bake directly from the freezer, adding a few extra minutes to the cooking time.
  • Reheating: Reheat in the oven at 350°F (175°C) for about 10 minutes for the best texture, or microwave for 1-2 minutes if you’re in a hurry.

Nutritional Tips and Dietary Adaptations

This recipe can be easily adapted to meet various dietary needs:

  • Gluten-Free: Use a gluten-free flatbread or cauliflower crust for a gluten-free option.
  • Dairy-Free: Substitute cheese with a dairy-free alternative or skip it entirely for a lighter dish.
  • Low-Carb: Opt for a low-carb flatbread or use vegetables as a base to create a keto-friendly version.

Equipment Recommendations

For the best results, here are some kitchen tools you might find helpful:

  • Parchment Paper: This helps prevent sticking and makes cleanup a breeze.
  • Sharp Knife: For slicing ingredients and cutting your flatbread into perfect pieces.
  • Sheet Pan: A sturdy sheet pan is essential for evenly baking your flatbread.
  • Mixing Bowl: For tossing your ingredients together if you decide to add extras.

Serving Suggestions

This Hot Honey Chicken Flatbread is not only delicious on its own but can also be paired with various sides:

  • Fresh Salad: A simple arugula salad with lemon vinaigrette complements the rich flavors of the flatbread.
  • Soup: Serve with a light tomato or butternut squash soup for a cozy meal.
  • Chips and Dip: Pair with tortilla chips and your favorite salsa or guacamole for a fun appetizer.

Frequently Asked Questions (FAQs)

Here are some common questions about making Hot Honey Chicken Flatbread:

  • Can I use raw chicken? Yes, just ensure it’s cooked thoroughly before adding it to the flatbread.
  • What if I don’t have hot honey? Mix regular honey with chili flakes or sriracha for a homemade version!
  • How can I make it spicier? Add more hot honey or sprinkle red pepper flakes on top before serving.
  • Can I use a different type of bread? Absolutely! Pita, naan, or even homemade pizza dough work well.
  • Is this recipe kid-friendly? Yes! The balance of sweet and savory flavors is appealing to kids.
  • How can I make it healthier? Add more veggies or use whole grain flatbread for added fiber.
  • How long does it take to prepare? From prep to bake, it takes about 15 minutes!
  • Can I make it vegetarian? Yes! Skip the chicken and load it up with your favorite vegetables.

Conclusion

In just a few simple steps, you can create a mouthwatering Hot Honey Chicken Flatbread Pizza that will impress your family and friends. With its sweet and spicy flavor profile and endless customization options, it’s sure to become a favorite in your household. Remember, cooking is all about having fun and enjoying the process, so don’t be afraid to get creative. Happy cooking, and enjoy every delicious bite!

Easy Hot Honey Chicken Flatbread Pizza

Prep Time 10 minutes
Cook Time 8 minutes
Total Time 18 minutes
Servings 2 servings
Calories 450
A quick and flavorful flatbread pizza topped with spicy honey, chicken, and fresh greens for a delicious meal.

Ingredients

Main

  • 3 oz cooked chicken breast
  • 1 4 red onion red onion, sliced
  • 1.5 cups light shredded mozzarella
  • 2 tablespoons hot honey plus more for drizzling
  • Green for garnish green onions
  • Baby for garnish arugula
  • 1 tablespoon olive oil brushed or avocado oil spray
  • 1 lavash flatbread lavash flatbread

Instructions 

  • Preheat oven to 425°F (220°C). Line a sheet pan with parchment paper.
  • Brush the flatbread with olive or avocado oil. Top with mozzarella, chicken, and red onion.
  • Drizzle hot honey over the toppings. Bake for 6-8 minutes until crispy and cheese melts.
  • Remove from oven, garnish with green onions and arugula, and drizzle with extra hot honey if desired.

Notes

Use fresh greens for best flavor and texture.
Calories: 450kcal
Cost: $15
Course: Main Course
Cuisine: American
Keyword: Chicken, honey, Pizza

Discover the Joy of Cooking with Cottage Cheese Flatbread Wraps

Welcome to a world where healthy eating meets culinary creativity! If you’re on the lookout for a delicious, nutritious, and quick meal idea, your search ends here. These High-Protein Crispy Cottage Cheese Flatbread Wraps not only deliver on flavor but also pack a protein punch that will keep you satisfied. Perfect for weeknight dinners or meal prep, these wraps are versatile, fun to make, and sure to impress.

In this guide, we’ll explore the ins and outs of creating your own cottage cheese flatbread wraps, including key ingredients, expert tips, and even some tasty variations. Let’s dive in!

Why You’ll Love These Cottage Cheese Flatbread Wraps

  • Quick Preparation: Ready in just 30 minutes, making them perfect for busy weeknights.
  • Nutrient-Dense: Loaded with protein from cottage cheese and chicken, ideal for muscle maintenance and overall health.
  • Endless Versatility: Enjoy them as wraps, dips, or even chips—perfect for any occasion!
  • Family-Friendly: Kids will love their flavor and fun texture, making mealtime enjoyable for everyone.
  • Easy to Customize: Adapt the fillings and spices to suit your taste preferences or dietary needs.

Ingredient Breakdown for Cottage Cheese Flatbread Wraps

Let’s break down the ingredients you’ll need to make these delightful flatbread wraps:

  • Cottage Cheese: 1 cup, full-fat or low-fat—this is the star of the show, providing creaminess and protein.
  • Large Eggs: 2—these help bind the flatbread together for a perfect texture.
  • Oat Flour: 1/2 cup—gives the flatbread its body and a subtle nutty flavor. If unavailable, you can substitute with whole wheat flour.
  • Garlic Powder: 1 teaspoon—adds a flavorful kick that enhances the overall taste.
  • Baking Powder: 1/2 teaspoon—ensures the flatbread rises and remains fluffy.
  • Salt: 1/2 teaspoon—essential for flavor enhancement.
  • Olive Oil: 1 tablespoon—adds moisture and richness to the flatbread.
  • Chicken Breasts: 2 medium, about 1 lb—seasoned to perfection, they provide a hearty protein source.
  • Spices: Paprika, cumin, chili powder, and black pepper (each 1/2 teaspoon)—these create a robust flavor profile for the chicken.
  • Greek Yogurt: 1/2 cup—used in the sauce for creaminess and tang.
  • Lemon Juice: 1 tablespoon—adds brightness to the yogurt sauce.
  • Fresh Vegetables: Shredded romaine lettuce, cherry tomatoes, red onion, and parsley or cilantro—these add freshness and crunch to your wraps.

How to Make Cottage Cheese Flatbread Wraps: Step-by-Step Instructions

Side view of a juicy chicken wrap made with cottage cheese flatbread and vibrant vegetables.

Making these wraps is as easy as 1-2-3! Follow these simple steps:

  1. Preheat: Preheat your oven to 400°F (200°C) and line a baking sheet with parchment paper.
  2. Blend the Batter: In a blender, combine cottage cheese, eggs, oat flour, garlic powder, baking powder, salt, and olive oil. Blend until smooth.
  3. Spread & Bake: Pour the mixture onto the prepared baking sheet, spreading it into a 1/4-inch thick rectangle. Bake for 18-22 minutes until golden and set. Broil for an additional 1-2 minutes for extra crispiness, then allow to rest for 5-7 minutes.
  4. Prepare the Chicken: Pat the chicken dry, then mix paprika, cumin, chili powder, black pepper, and salt. Rub this spice mix over the chicken. Cook the chicken in a skillet over medium-high heat for 5-6 minutes per side until the internal temperature reaches 165°F (74°C). Let it rest for 5 minutes before slicing.
  5. Make the Sauce: In a bowl, mix Greek yogurt, lemon juice, and a pinch of salt to create a creamy sauce.
  6. Assemble the Wraps: Slice the flatbread into rectangles. Layer with yogurt sauce, sliced chicken, lettuce, tomatoes, onions, and herbs. Fold tightly into wraps. For extra crispness, sear in a dry skillet for 1-2 minutes per side.

Expert Tips for Perfect Cottage Cheese Flatbread Wraps

  • Consistent Blending: Ensure the batter is well-blended for a smooth flatbread texture—no lumps!
  • Don’t Skip the Rest: Allowing the flatbread to rest after baking enhances its texture.
  • Check Chicken Temperature: Always use a meat thermometer to ensure your chicken is fully cooked.
  • Experiment with Fillings: Try different proteins like turkey or tofu, or add additional veggies for extra nutrition.
  • Storage Precautions: Store leftovers in an airtight container with parchment paper between layers to maintain freshness.
  • Prep Ahead: Make the flatbread and chicken in advance for quick meals throughout the week.
  • Use Fresh Herbs: Fresh parsley or cilantro not only adds flavor but also a refreshing touch.
  • Adjust Seasoning: Feel free to adjust the spices according to your taste preferences—add more heat or a different seasoning blend!

Common Mistakes and Troubleshooting

Don’t let minor hiccups ruin your cooking experience! Here are common mistakes and how to avoid them:

  • Flatbread Too Thick: Keep the spread to 1/4 inch for even baking.
  • Overcooked Chicken: Always monitor cooking time and internal temperature to prevent dryness.
  • Wraps Falling Apart: Ensure the flatbread is fully cooled before assembly to help with structure.
  • Flavorless Filling: Don’t skimp on seasoning the chicken and sauce—flavor is key!

Delicious Variations of Cottage Cheese Flatbread Wraps

Get creative with these variations:

  • Mediterranean Twist: Use feta cheese, olives, and roasted red peppers in place of the chicken for a vegetarian option.
  • Mexican Style: Add black beans, corn, avocado, and a chipotle sauce for a zesty flair.
  • Breakfast Wrap: Fill with scrambled eggs, spinach, and salsa for a delightful breakfast treat.
  • Sweet Version: Spread with nut butter and sliced bananas for a quick, healthy snack.

Storage and Make-Ahead Instructions

These wraps are perfect for meal prep! Store the components separately:

  • Flatbread: Keep in an airtight container in the fridge for up to 3 days or freeze for up to 2 months.
  • Cooked Chicken: Refrigerate for up to 4 days or freeze for later use.
  • Yogurt Sauce: Store in the fridge for up to 5 days; it’s great on salads too!

Frequently Asked Questions (FAQs)

Here are some common queries about cottage cheese flatbread wraps:

  • Can I use other types of cheese? Yes! Feel free to experiment with ricotta or cream cheese for different flavors.
  • Is this recipe gluten-free? Yes, if you use gluten-free oat flour or a gluten-free flour blend.
  • How can I make these wraps vegan? Substitute eggs with flaxseed meal and use plant-based yogurt for the sauce.
  • Can I bake the flatbread instead of pan-frying? Absolutely! Baking gives it a lovely crisp texture.
  • What can I serve with these wraps? Serve with fresh salad, roasted veggies, or a side of your favorite dipping sauce.
  • Can I freeze the assembled wraps? Yes, but they are best enjoyed fresh. If freezing, wrap tightly and reheat in the oven.
  • How do I reheat the flatbread? Reheat in the oven at 350°F (175°C) for about 10 minutes for best results.
  • What makes these wraps high-protein? The cottage cheese and chicken combined provide a substantial amount of protein, making these wraps nutritious and filling.

Nutrition Tips and Dietary Adaptations

These wraps can easily fit into various dietary needs:

  • High-Protein Diet: The combination of chicken and cottage cheese makes these a protein powerhouse.
  • Low-Carb Option: Omit the flatbread and use lettuce leaves as wraps for a low-carb version.
  • Heart-Healthy: Use skinless chicken and low-fat cottage cheese for a heart-friendly meal.

Equipment Recommendations

For best results, here’s what you’ll need:

  • Blender: Essential for creating a smooth flatbread batter.
  • Baking Sheet: A good quality sheet lined with parchment for easy cleanup.
  • Skillet: A non-stick skillet works best for cooking the chicken and searing the wraps.

Serving Suggestions

Enjoy your wraps with a variety of accompaniments:

  • Fresh Salad: A light salad of mixed greens with a lemon vinaigrette makes a perfect side.
  • Dip Options: Serve with hummus, salsa, or guacamole for added flavor.
  • Herb Garnish: A sprinkle of fresh herbs on top before serving adds a pop of color and freshness.

Cooking is all about creativity and confidence, and these Crispy Cottage Cheese Flatbread Wraps are your canvas! With simple ingredients and straightforward steps, you can whip up a dish that not only satisfies your hunger but also excites your taste buds. Remember, great food doesn’t require perfection—just a willingness to try. So gather your ingredients, roll up your sleeves, and enjoy the delicious journey of cooking!

High-Protein Crispy Cottage Cheese Flatbread Chicken Wraps

Prep Time 10 minutes
Cook Time 20 minutes
Total Time 30 minutes
Servings 4 servings
Calories 450
Enjoy these protein-packed, crispy flatbread wraps filled with flavorful chicken and fresh vegetables for a healthy and satisfying meal.

Ingredients

Dough

  • 1 cup cottage cheese (full-fat or low-fat)
  • 2 large eggs
  • 0.5 cup oat flour
  • 1 teaspoon garlic powder
  • 0.5 teaspoon baking powder
  • 0.5 teaspoon salt
  • 1 tablespoon olive oil

Chicken

  • 2 medium boneless skinless chicken breasts (about 1 lb)
  • 1 teaspoon paprika
  • 0.5 teaspoon cumin
  • 0.5 teaspoon chili powder
  • 0.5 teaspoon black pepper

Sauce

  • 0.25 cup Greek yogurt
  • 1 tablespoon fresh lemon juice

Vegetables & Herbs

  • 1 cup shredded romaine lettuce
  • 0.5 cup cherry tomatoes, halved
  • 0.25 cup thinly sliced red onion
  • 2 tablespoons chopped fresh parsley or cilantro

Instructions 

  • Preheat oven to 400°F (200°C) and line a baking sheet with parchment paper.
  • Blend cottage cheese, eggs, oat flour, garlic powder, baking powder, salt, and olive oil until smooth. Spread into a ¼-inch thick rectangle and bake for 18-22 minutes until golden. Broil 1 minute for crispiness, then rest 5 minutes.
  • Pat chicken dry, mix spices, rub over chicken, and cook in a skillet over medium-high heat for 5-6 minutes per side until cooked through. Rest 5 minutes, then slice.
  • Mix Greek yogurt and lemon juice to make the sauce. Slice flatbread, layer with sauce, chicken, lettuce, tomatoes, onion, and herbs, then fold into wraps. Optionally sear in a skillet for 1-2 minutes per side for extra crispness.

Notes

For extra crispiness, broil the flatbread briefly and sear the wraps in a skillet if desired.
Calories: 450kcal
Cost: $12
Course: Main Course
Cuisine: International
Keyword: Chicken, flatbread, Healthy

Indulge in Bakery-Style Strawberry Chocolate Muffins

Are you ready to delight your taste buds with a scrumptious treat? These Bakery-Style Strawberry Chocolate Muffins are a perfect blend of sweet, fruity goodness and rich chocolate. They’re moist, fluffy, and bursting with fresh strawberries and chocolate chips, making them an ideal choice for breakfast, snacks, or even dessert. Get ready to elevate your baking game and create something truly special in your kitchen!

Why You’ll Love This Recipe

This isn’t just any muffin recipe; it’s a celebration of flavors and textures! Here are some reasons why you’ll adore these muffins:

  • Easy to Make: Simple ingredients and straightforward steps ensure that anyone can whip these up, even after a long day.
  • Flavor Explosion: The combination of fresh strawberries and semi-sweet chocolate creates a delightful balance of sweetness.
  • Perfectly Moist: These muffins have a fluffy texture that keeps them moist and tender, thanks to the butter and milk.
  • Versatile Treat: Enjoy them warm from the oven, as a midday snack, or packed in lunchboxes for a sweet surprise!
  • Customizable: With a few easy variations, you can tailor these muffins to suit your taste or dietary needs.

Ingredients Breakdown

Let’s dive into what you’ll need to create these delicious Bakery-Style Strawberry Chocolate Muffins. Here’s a detailed breakdown of the ingredients, including some substitutions for added flexibility:

  • All-Purpose Flour: 1 1/2 cups – provides structure. You can substitute with whole wheat flour for added nutrition.
  • Baking Powder: 1 tsp – acts as a leavening agent for a fluffy texture.
  • Salt: 1/2 tsp – enhances flavor; don’t skip it!
  • Unsalted Butter: 1/3 cup, softened – adds richness. Can be replaced with coconut oil for a dairy-free version.
  • Granulated Sugar: 3/4 cup – sweetens the muffins. For a healthier option, consider using coconut sugar.
  • Large Eggs: 2 – binds the ingredients. You can replace each egg with 1/4 cup applesauce or a flax egg for a vegan alternative.
  • Vanilla Extract: 1 tsp – adds depth of flavor.
  • Milk: 1/4 cup – helps achieve the right batter consistency. Almond or oat milk works well for dairy-free.
  • Fresh Strawberries: 3/4 cup, diced – the star ingredient that brings freshness and juiciness.
  • Semi-Sweet Chocolate Chips: 1/2 cup – for that irresistible chocolatey goodness.
  • Cinnamon Sugar Topping: Mix 2 tbsp sugar with 1/4 tsp cinnamon for a sweet finish (optional).

How to Make Bakery-Style Strawberry Chocolate Muffins

Juicy bakery-style muffins with chunks of strawberries and chocolate chips, served on a plate.

Now that we have our ingredients ready, let’s break down the steps to baking these delicious muffins:

Step 1: Preheat Oven and Prepare Pan

Preheat your oven to 375°F (190°C). Line a muffin tin with paper liners or grease with butter or non-stick spray to prevent sticking.

Step 2: Mix Dry Ingredients

In a medium bowl, whisk together the all-purpose flour, baking powder, and salt. Setting these aside allows the leavening agents to activate later.

Step 3: Cream Butter and Sugar

In a large bowl, cream the softened butter and granulated sugar using an electric mixer until light and fluffy. This should take about 2-3 minutes.

Step 4: Add Eggs and Vanilla

Beat in the eggs one at a time, ensuring each is fully incorporated before adding the next. Then stir in the vanilla extract for an aromatic boost.

Step 5: Combine with Dry Ingredients

Gradually add the dry ingredients to the wet mixture, alternating with the milk. Start and end with the flour mixture. Mix until just combined—be careful not to overmix!

Step 6: Fold in Strawberries and Chocolate Chips

Gently fold the diced strawberries and chocolate chips into the batter, ensuring an even distribution without crushing the strawberries.

Step 7: Prepare Muffin Tins

Spoon the batter into the prepared muffin tin, filling each cup about 2/3 full. This gives them room to rise beautifully.

Step 8: Add Optional Topping

If you’re using the cinnamon sugar topping, mix it together and sprinkle over the muffin batter before baking for a delightful crunchy finish.

Step 9: Bake

Bake for 20-25 minutes, or until the muffins are golden on top and a toothpick inserted into the center comes out clean.

Step 10: Cool and Serve

Allow the muffins to cool in the pan for about 5 minutes before transferring them to a wire rack to cool completely. Enjoy them warm or at room temperature!

Pro Tips for Perfect Muffins

To help you achieve the best results, here are some expert tips:

  • Room Temperature Ingredients: Ensure that your butter, eggs, and milk are at room temperature for better mixing and a lighter texture.
  • Don’t Overmix: Mix the batter just until combined to avoid tough muffins.
  • Use Fresh Strawberries: The fresher the fruit, the better the flavor. If using frozen, make sure to thaw and drain them well.
  • Check Doneness: Every oven is different; check muffins a couple of minutes early to avoid overbaking.
  • Cool Completely: Allow muffins to cool fully on a wire rack for the best texture and flavor.
  • Experiment with Mix-Ins: Try adding nuts or different fruits to customize your muffins.
  • Store Properly: Store muffins in an airtight container to maintain freshness.
  • Make Ahead: You can prepare the batter a day ahead and bake fresh muffins in the morning!

Common Mistakes and Troubleshooting

Even the best bakers can encounter hiccups. Here’s how to avoid common errors:

  • Muffins are Dense: This often results from overmixing. Mix until just combined!
  • Too Dry: If your muffins turn out dry, check your oven temperature and ensure accurate measurements.
  • Burnt Tops: If the tops are browning too quickly, cover with foil for the last few minutes of baking.
  • Sticking to the Pan: Always grease your muffin tin or use liners to help with easy removal.

Delicious Variations

Want to switch things up? Here are some fun variations to try:

  • Blueberry Muffins: Substitute strawberries with blueberries for a fruity twist.
  • Nutty Chocolate Chip Muffins: Add chopped nuts like walnuts or pecans for added crunch.
  • Vegan Muffins: Replace eggs with flax eggs and use plant-based milk and butter.
  • Chocolate Swirl Muffins: Add a swirl of chocolate ganache into the batter for a decadent treat.

Storage and Make-Ahead Instructions

To keep your muffins fresh and delicious:

  • Storage: Store in an airtight container at room temperature for up to 3 days or refrigerate for up to a week.
  • Freezing: These muffins freeze well! Place them in a freezer-safe bag for up to 3 months. Thaw at room temperature before serving.
  • Make Ahead: Prepare the batter a day in advance and bake fresh muffins in the morning for a delightful breakfast treat.

Frequently Asked Questions (FAQs)

Here are some common questions about these Bakery-Style Strawberry Chocolate Muffins:

  • Can I use frozen strawberries? Yes, but make sure to thaw and drain them well to avoid excess moisture in the batter.
  • What can I substitute for eggs? Use 1/4 cup of applesauce or a flax egg (1 tbsp flaxseed meal + 2.5 tbsp water).
  • How do I prevent the muffins from sticking to the liners? Greasing the liners lightly can help, or use parchment paper liners.
  • Can I add other fruits? Definitely! Feel free to experiment with your favorite fruits.
  • What should I do if my muffins are too dry? Ensure you’re measuring the flour correctly and not overbaking them.
  • How can I make these muffins healthier? Substitute half the all-purpose flour with whole wheat flour and reduce sugar slightly.
  • Can I make mini muffins? Yes, just reduce baking time to about 10-15 minutes.
  • What’s the best way to serve these muffins? They’re delightful warm with a pat of butter or a drizzle of honey!

Nutrition Tips and Dietary Adaptations

For those mindful of nutrition, here are some tips:

  • Substitutions: Use whole wheat flour for added fiber and nutrients.
  • Lower Sugar: Reduce sugar by using ripe bananas or applesauce in the batter.
  • Protein Boost: Add Greek yogurt to the batter for extra protein.
  • Dairy-Free: Use plant-based butter and milk to cater to lactose intolerance.

Essential Equipment Recommended

To create these muffins, here’s what you’ll need:

  • Muffin Tin: A good quality non-stick muffin tin is essential for perfect muffins.
  • Mixing Bowls: Use a set of mixing bowls for easy preparation and mixing.
  • Electric Mixer: For creaming butter and sugar quickly and efficiently.
  • Whisk: A whisk is handy for mixing dry ingredients thoroughly.
  • Rubber Spatula: Great for folding in delicate ingredients like strawberries and chocolate chips.

Serving Suggestions

Pair your muffins with:

  • Fresh Fruit: A side of fresh fruit adds a refreshing touch.
  • Coffee or Tea: Perfect for a cozy breakfast or afternoon snack.
  • Yogurt: A dollop of yogurt complements the sweetness and adds creaminess.

In conclusion, these Bakery-Style Strawberry Chocolate Muffins are not only delicious but also versatile and easy to make. With the tips and variations provided, you can customize them to fit your taste. Happy baking, and remember, cooking is all about enjoying the process. You’ve got this!

Bakery-Style Strawberry Chocolate Muffins Moist Sweet Strawberry Muffin Recipe

Prep Time 15 minutes
Cook Time 25 minutes
Total Time 40 minutes
Servings 12 muffins
Calories 250
Enjoy these moist and sweet strawberry chocolate muffins, perfect for a delightful breakfast or snack.

Ingredients

Dry Ingredients

  • 2 cups all-purpose flour
  • 1 tsp baking powder
  • 1/2 tsp salt

Wet Ingredients

  • 1/3 cup unsalted butter, softened
  • 3/4 cup granulated sugar
  • 2 large eggs
  • 1 tsp vanilla extract
  • 1/4 cup milk

Add-ins

  • 3/4 cup fresh strawberries, diced
  • 1/2 cup semi-sweet chocolate chips
  • 2 tbsp granulated sugar
  • 1/4 tsp ground cinnamon

Instructions 

  • Preheat oven to 375°F (190°C). Line a muffin tin with paper liners or grease.
  • Whisk together flour, baking powder, and salt in a bowl. Cream butter and sugar until light and fluffy. Beat in eggs one at a time, then add vanilla.
  • Alternately add dry ingredients and milk to wet mixture, starting and ending with dry. Gently fold in strawberries and chocolate chips.
  • Spoon batter into muffin cups about 2/3 full. Mix sugar and cinnamon, sprinkle over tops.
  • Bake for 20-25 minutes until golden and a toothpick comes out clean. Cool in pan 5 minutes, then transfer to wire rack.

Notes

For extra flavor, add a sprinkle of cinnamon on top before baking.
Calories: 250kcal
Cost: $15
Course: Breakfast, Snack
Cuisine: American
Keyword: chocolate, muffins, Strawberry

Unleash the Power of Berries with This Almond Milk Berry Smoothie

Are you ready to elevate your smoothie game? This Almond Milk Berry Smoothie is not just a drink—it’s a burst of flavor and nutrition that can brighten your day! Whether you’re looking for a refreshing breakfast or a midday pick-me-up, this smoothie is your answer. Packed with antioxidants, vitamins, and minerals, it’s as healthy as it is delicious.

In this guide, we’ll dive into the benefits of berries, the ingredients you’ll need, and expert tips to make the perfect smoothie every time. Let’s get blending!

Why You’ll Love This Recipe

This smoothie is more than just a tasty treat. Here are five compelling reasons to whip it up:

  • Rich in Antioxidants: Berries are loaded with antioxidants, helping to fight inflammation and boost your immune system.
  • Perfect for Any Time of Day: This versatile smoothie can be enjoyed for breakfast, as a snack, or even dessert!
  • Energizing Ingredients: With ingredients like bananas and almond milk, this smoothie provides a great energy boost without the crash.
  • Customizable: You can easily swap ingredients based on your preferences or dietary needs.
  • Quick and Easy: This recipe takes just minutes to prepare, making it perfect for busy lifestyles.

Ingredients You’ll Need

Let’s gather our ingredients for this delicious almond milk berry smoothie. Here’s what you’ll need:

  • 1 cup blueberries: Fresh or frozen, these little gems are packed with nutrients.
  • 1 cup mixed berries: Use your favorites—strawberries, raspberries, or blackberries work great!
  • 1 large ripe banana: Frozen bananas add creaminess and natural sweetness.
  • 1 medium ripe pear: Adds a subtle sweetness and pairs wonderfully with berries.
  • ½ cup almond milk: Opt for organic, unsweetened varieties for a healthier choice.
  • ½ cup water: Adjust the consistency to your liking.
  • 10 ice cubes: Only if using fresh fruits for a cold, refreshing smoothie.
  • 2 tablespoons date paste or 2 medjool dates: For natural sweetness without added sugars.
  • 2 tablespoons vegan vanilla protein powder: A great addition for an extra protein boost.
  • 2 teaspoons maca powder: Known for its stress-relief properties, this is an optional but beneficial ingredient.

Expert Tips for the Perfect Smoothie

Brightly colored smoothie featuring blueberries, strawberries, and a banana.

Creating a delicious smoothie is all about balance and technique. Here are some pro tips to ensure yours is a hit:

  • Blend Order Matters: Always add the liquid first (almond milk and water) to ensure a smoother blend.
  • Adjust Sweetness: Taste your smoothie before serving; add more banana or dates if you prefer a sweeter flavor.
  • Texture Control: For a thicker smoothie, add more frozen fruits; for a thinner consistency, increase the almond milk or water.
  • Boost Nutritional Value: Consider adding a handful of spinach or kale for an extra nutrient kick without altering the taste much.
  • Keep It Cold: If using fresh fruit, don’t forget those ice cubes to keep your smoothie refreshing!
  • Experiment with Flavors: Don’t hesitate to mix in different fruits or nut butters to find your perfect flavor combination.
  • Clean Your Blender Right Away: To make cleanup easier, rinse your blender immediately after use.
  • Batch Prep: Make smoothie packs by pre-portioning ingredients in freezer bags for quick blending on busy mornings.

Common Mistakes and Troubleshooting

Even the best cooks can make mistakes! Here are some common pitfalls to avoid and how to fix them:

  • Too Thick? Add more almond milk or water slowly until you reach your desired consistency.
  • Too Sweet? Balance it out with a splash of lemon juice or add a handful of spinach.
  • Not Blending Well? Make sure to add enough liquid and start blending at a lower speed to avoid lumps.
  • Bland Flavor? Spice it up with a pinch of cinnamon or a splash of vanilla extract.

Variations to Try

Feeling adventurous? Here are four delicious twists you can try with this smoothie recipe:

  • Tropical Twist: Add ½ cup of frozen mango or pineapple for a refreshing tropical flavor.
  • Chocolate Delight: Mix in 1 tablespoon of cocoa powder for a chocolatey treat.
  • Nutty Banana: Add 2 tablespoons of almond butter for added creaminess and healthy fats.
  • Green Machine: Toss in a handful of spinach or kale for a nutrient-packed green smoothie.

Storage and Make-Ahead Instructions

This smoothie is best enjoyed fresh, but if you need to prepare it in advance, follow these tips:

  • Refrigerate Leftovers: Store in an airtight container in the fridge and consume within 24 hours for the best quality.
  • Make-ahead Smoothie Packs: Pre-portion ingredients (minus the liquid) into freezer bags. When you’re ready, just add to the blender with your almond milk and water.

Frequently Asked Questions

Here are some common questions about this almond milk berry smoothie:

  • Can I use different fruits? Absolutely! Feel free to substitute any of your favorite fruits.
  • Is this smoothie vegan? Yes! All ingredients are plant-based.
  • Can I add protein powder? Yes, adding protein powder is a great way to increase the nutritional value.
  • How can I make this smoothie lower in sugar? Use less banana or opt for a lower-sugar alternative sweetener.
  • What can I use instead of almond milk? Any plant-based milk like oat or coconut milk works great!
  • How long will this smoothie keep? It’s best consumed fresh, but can be stored in the refrigerator for up to 24 hours.
  • Can I add greens to my smoothie? Yes, adding spinach or kale is a great way to boost nutrition without affecting flavor.
  • What’s the best way to freeze bananas? Slice them before freezing to make blending easier!

Nutritional Tips and Dietary Adaptations

This almond milk berry smoothie is not only delicious but also adaptable to various dietary needs:

  • Gluten-Free: All the ingredients are naturally gluten-free.
  • Nut-Free: Substitute almond milk with oat milk or coconut milk for a nut-free option.
  • Low-Carb: Use fewer fruits and add more leafy greens for a low-carb variation.

Essential Equipment for Smoothie Success

To make your smoothie, here’s what you’ll need:

  • High-Powered Blender: A good blender is key for achieving that creamy texture.
  • Measuring Cups: For precise ingredient measurements.
  • Storage Containers: Airtight containers for leftovers or smoothie packs.

Serving Suggestions

For a delightful presentation, consider these serving ideas:

  • Garnish with Fresh Berries: Top your smoothie with a few whole berries for a pop of color.
  • Serve in a Fun Glass: Use colorful glasses or mason jars for a cheerful touch.
  • Pair with a Snack: Enjoy your smoothie with a handful of nuts or a slice of whole-grain toast for a balanced meal.

Conclusion

This Almond Milk Berry Smoothie is a fantastic way to enjoy a delicious, nutritious drink that’s easy to make and full of flavor. With the tips and variations provided, you can tailor it to your taste and dietary needs. So what are you waiting for? Grab your blender and let’s make something amazing together! Remember, cooking should be fun and stress-free, just like this smoothie. Cheers to your health and happiness!

Almond Milk Berry Smoothie

Prep Time 5 minutes
Total Time 5 minutes
Servings 2 cups
Calories 250
A delicious and nutritious berry smoothie made with fresh or frozen fruits, almond milk, and plant-based protein for a perfect healthy treat.

Ingredients

Fruits

  • 1 cup blueberries frozen or fresh
  • 1 cup mixed berries frozen or fresh
  • 1 large banana (ripe, sliced and frozen)
  • 1 medium pear (ripe, cored)
  • 0.5 cup almond milk organic unsweetened
  • 0.5 cup water
  • 10 ice cubes ice cubes (if using fresh products)
  • 2 tablespoons date paste or medjool dates
  • 2 tablespoons vegan vanilla protein powder
  • 2 teaspoons maca powder (for stress support)

Instructions 

  • Add all ingredients to a blender.
  • Blend until creamy and smooth, adding more liquid or ice as needed.
  • Adjust thickness with more pear, banana, or liquid; taste and add more sweetener if desired.

Notes

For a thicker smoothie, add more frozen banana or pear; for a thinner one, add more plant milk or water.
Calories: 250kcal
Cost: $10
Course: Breakfast, Snack
Keyword: Berry, Smoothie, Vegan

Delight in Every Bite: The Ultimate Chicken Fajitas Wrap Recipe

Are you ready to transform your weeknight dinners into something truly special? With this Quick and Flavorful Chicken Fajitas Wrap recipe, you can whip up a delightful meal in no time! Featuring tender chicken, vibrant peppers, and zesty seasoning, all wrapped in warm tortillas, this dish is perfect for busy weeknights when you crave something satisfying yet simple. Let’s dive into the details and explore why this recipe is a must-try!

Why You’ll Love This Recipe

This recipe isn’t just about taste; it’s about making your cooking experience enjoyable and stress-free. Here are five reasons why you’ll adore these chicken fajitas wraps:

  • Quick Preparation: With all steps combined, you can have this delicious meal ready in under 30 minutes, making it ideal for those hectic weeknights.
  • Flavor Explosion: The combination of fajita seasoning, juicy chicken, and fresh vegetables delivers a mouthwatering experience that will leave your taste buds dancing.
  • Customizable: You can easily adjust the ingredients based on your preferences—add more veggies, or spice it up with jalapeños for an extra kick!
  • Perfect for Meal Prep: These wraps are not only great for dinner but also make for excellent lunches. Prepare them ahead of time and enjoy all week!
  • Family-Friendly: Whether you’re cooking for kids or adults, everyone will love the vibrant colors and flavors of these wraps!

Ingredients Breakdown

Let’s take a closer look at what you’ll need for this recipe:

  • 2 Tablespoons Cooking Oil: For sautéing the chicken and veggies. Olive oil or vegetable oil works well.
  • 1 Pound Boneless Skinless Chicken Breast: Cut into strips. You can substitute with turkey or tofu for a healthier option.
  • 2 Peppers: Cut into strips. Bell peppers are great, but feel free to mix in other colors for a fun twist!
  • 1 Small Onion: Sliced into strips. Red onion adds a nice sweetness, but yellow or white onions are also great.
  • 1 Packet Fajita Seasoning: About 1.12 ounces. You can make your own seasoning blend if you prefer.
  • ¼ Cup Water: To help the seasoning coat the chicken and veggies evenly.
  • 8.5 Ounce Package of Prepared Rice: Cilantro and lime flavor complements the fajitas beautifully.
  • ⅓ Cup Sour Cream: Adds creaminess to the wraps. You can use Greek yogurt for a healthier option.
  • 1 ½ Cups Monterey Jack Cheese: Shredded, for that melty goodness.
  • 7-8 Large Tortillas: Flour or whole wheat tortillas work well; consider using corn tortillas for a gluten-free option.

How to Make Chicken Fajitas Wrap

Delicious Chicken Fajitas Wrap showing layers of grilled chicken, peppers, and cheese.

Now that we’ve gathered our ingredients, let’s get cooking! Follow these simple steps:

  • Step 1: Heat the oil in a skillet over medium-high heat.
  • Step 2: Add the chicken strips and cook for about 3 minutes until no longer pink.
  • Step 3: Stir in the sliced peppers and onions, cooking for another 3 to 5 minutes until they’re tender.
  • Step 4: Pour in the water and fajita seasoning, mixing until everything is well coated. Let it simmer for a couple of minutes.
  • Step 5: Prepare the rice according to package directions, then combine it with the sour cream in a bowl.
  • Step 6: On a tortilla, layer the rice mixture, chicken mixture, and shredded cheese.
  • Step 7: Roll up the tortilla tightly, tucking in the sides first.
  • Step 8: Optional: Toast each wrap in a pan until golden brown for a crispy exterior.

Pro Tips for Perfect Fajitas

Here are some expert insights to elevate your chicken fajitas wraps:

  • Marinate the Chicken: For added flavor, consider marinating the chicken in fajita seasoning and lime juice for a few hours before cooking.
  • Use Fresh Ingredients: Fresh, vibrant vegetables not only taste better but also add a beautiful color contrast to your wraps.
  • Don’t Overcrowd the Pan: Cook in batches if necessary to avoid steaming the chicken and veggies; you want them nicely seared!
  • Experiment with Seasonings: Feel free to add spices like paprika, cayenne, or garlic powder to personalize the flavor.
  • Warm Tortillas: Warming the tortillas before assembling helps make them more pliable and enhances their flavor.
  • Serve with Fresh Garnishes: A sprinkle of fresh cilantro or a squeeze of lime juice adds a zesty finish to your wraps.
  • Use a Good Quality Cheese: Opt for freshly shredded cheese instead of pre-packaged for better melting and flavor.
  • Make it a Family Affair: Get the whole family involved in assembling their own wraps for a fun dinner experience!

Common Mistakes and Troubleshooting

Even the best recipes can have hiccups. Here are some common mistakes to avoid:

  • Overcooking the Chicken: Make sure to cook the chicken just until it’s no longer pink to keep it juicy.
  • Skipping the Seasoning: Don’t forget to season your chicken and veggies; it’s essential for flavor!
  • Not Preparing the Rice in Advance: Prepare your rice ahead of time to streamline the cooking process.
  • Using Cold Tortillas: Cold tortillas can break; always warm them up before wrapping.

Variations to Try

Feeling adventurous? Here are some fun variations you can try:

  • Vegetarian Fajitas: Substitute chicken with grilled mushrooms, zucchini, and bell peppers for a hearty vegetarian option.
  • Spicy Chicken Fajitas: Add more heat with sliced jalapeños or a splash of hot sauce to your chicken mixture.
  • BBQ Chicken Fajitas: Use BBQ sauce instead of fajita seasoning for a sweet and tangy twist.
  • Southwestern Fajitas: Incorporate black beans and corn into your mixture for added texture and flavor.

Storage and Make-Ahead Instructions

Want to prepare these wraps ahead of time? Here’s how to store them:

  • Store Cooked Filling: Keep the chicken and veggie mixture in an airtight container in the fridge for up to 3 days.
  • Wraps Assembly: It’s best to assemble the wraps fresh. However, you can pre-cook all components and wrap them when ready to eat.
  • Freeze for Later: You can freeze the filling in portions. Reheat in the microwave or stovetop before assembling your wraps.

Frequently Asked Questions

Got questions? We have answers! Here are some common queries:

  • Can I use frozen chicken? Yes! Just ensure it’s fully thawed before cooking for even cooking.
  • What can I serve with chicken fajitas wraps? Serve with guacamole, salsa, or a fresh salad for a complete meal.
  • Can I use whole wheat tortillas? Absolutely! Whole wheat tortillas add fiber and nutrients.
  • How do I make this gluten-free? Use corn tortillas and ensure your seasoning is gluten-free.
  • Can I add other vegetables? Yes, feel free to include any of your favorites like zucchini, mushrooms, or spinach.
  • How do I store leftovers? Keep in an airtight container in the fridge for up to 3 days.
  • Can I make these wraps spicy? Definitely! Add more spices or fresh jalapeños for heat.
  • What’s the best way to reheat these wraps? Use a skillet over medium heat to warm them gently, or microwave them for a quick option.

Nutritional Tips and Dietary Adaptations

Looking to make this meal a bit healthier? Here are some suggestions:

  • Lean Proteins: Choose lean chicken breast or turkey to reduce fat content.
  • Low-Fat Dairy: Use low-fat sour cream or cheese alternatives to cut calories.
  • Whole Grains: Opt for whole wheat or corn tortillas to increase fiber intake.
  • Add More Veggies: Loading up on bell peppers, onions, and even leafy greens will boost nutrients without adding many calories.

Equipment Recommendations

To make your cooking experience smoother, here are some handy tools:

  • Non-stick Skillet: Ideal for cooking your chicken and veggies without sticking.
  • Sharp Knife: A good knife makes chopping vegetables much easier and safer.
  • Cutting Board: Essential for prepping your ingredients efficiently.
  • Measuring Cups: For accurate ingredient measurements, especially with spices and liquids.
  • Mixing Bowls: Great for combining your rice and sour cream or for marinating chicken.

Serving Suggestions

To elevate your meal, consider these serving suggestions:

  • Garnish: Top your wraps with fresh cilantro, avocado slices, or a squeeze of lime.
  • Dips: Serve with sides of guacamole, salsa, or sour cream for added flavor.
  • Salad: Pair with a light salad for a refreshing contrast to the warm wraps.
  • Drinks: Enjoy with a chilled glass of iced tea or a light beer to complement the flavors.

Now that you have everything you need, it’s time to roll up your sleeves and get cooking! Enjoy the process and don’t forget, the best meals come from the heart. Happy cooking!

Chicken Fajitas Wrap

Prep Time 10 minutes
Cook Time 15 minutes
Total Time 25 minutes
Servings 4 servings
Calories 650
Enjoy flavorful chicken fajitas wrapped in tortillas, perfect for a quick and satisfying meal.

Ingredients

Cooking Oil

  • 2 tablespoons Cooking Oil

Boneless Skinless Chicken Breast

  • 1 pound Boneless Skinless Chicken Breast (Cut into strips)

Peppers

  • 2 peppers Peppers (Cut into strips)

Small Onion

  • 1 small onion Small Onion (Sliced into strips)

Fajita Seasoning

  • 1.12 ounces Fajita Seasoning

Water

  • 0.25 cup Water

Prepared Rice Cilantro and Lime Flavor

  • 8.5 ounce Prepared Rice Cilantro and Lime Flavor (Prepared according to package)

Sour Cream

  • 1/3 cup Sour Cream

Monterey Jack Cheese

  • 1.5 cups Shredded Monterey Jack Cheese

Large Tortillas

  • 7-8 large Tortillas (For wrapping)

Instructions 

  • Heat oil in a skillet over medium-high heat.
  • Add chicken strips and cook for about 3 minutes until no longer pink. Stir in sliced peppers and onions, cook for another 3-5 minutes.
  • Pour in water and fajita seasoning, stir to coat. Prepare rice as per package, then mix with sour cream.
  • Layer rice mixture, chicken, and cheese on a tortilla. Roll up tightly, tucking sides in. Optional: toast in a pan until golden.

Notes

For extra flavor, add fresh cilantro or a squeeze of lime before serving.
Calories: 650kcal
Cost: $12
Course: Main Course
Cuisine: Mexican
Keyword: Chicken, Fajitas

Looking for a quick and delicious dinner idea that will impress your family or guests? This Hot Honey Chicken Flatbread is the answer! Not only is it simple to prepare, but it also offers a lovely balance of flavors—savory chicken, melty mozzarella, and a spicy-sweet honey drizzle that will have everyone reaching for seconds. Let’s dive into the world of flavors and textures that this recipe brings to your table, making it a perfect addition to your weeknight meals!

Why You’ll Love This Recipe

This recipe is more than just a meal; it’s an experience. Here’s why you’ll fall in love with this Hot Honey Chicken Flatbread:

  • Quick to Prepare: With just a few simple steps and minimal prep time, you can have this dish on the table in less than 30 minutes.
  • Balanced Flavors: The combination of spicy and sweet creates a mouthwatering flavor profile that tantalizes your taste buds.
  • Customizable: Make this dish yours! Add your favorite toppings or adjust the spice level to suit your palate.
  • Perfect for Any Occasion: Whether it’s a casual weeknight dinner or a gathering with friends, this flatbread fits right in.
  • Family-Friendly: Kids and adults alike will enjoy this tasty treat, making it a hit for the whole family.

Ingredients You Will Need

To make this scrumptious Hot Honey Chicken Flatbread, gather the following ingredients:

  • Flatbread: 1 flatbread (store-bought or homemade)
  • Spinach: 1 3/4 cup whole leaves, not chopped
  • Cooked Chicken: 3/4-1 cup, cubed or shredded (use rotisserie chicken for convenience!)
  • Shredded Mozzarella Cheese: 1 1/2 cups
  • Olive Oil: 2 tablespoons (plus 1/2 teaspoon for the sauce)
  • Smoked Paprika: 1/2 teaspoon
  • Cayenne Pepper: A dash, to taste
  • Garlic Powder: 1/2 teaspoon
  • Hot Honey Sauce: 1 1/2-2 tablespoons honey, 1 teaspoon chili flakes, 1/8 teaspoon garlic powder, and 1/2 dashes of cayenne pepper

How to Make Hot Honey Chicken Flatbread

Follow these simple steps to create your own Hot Honey Chicken Flatbread:

Step 1: Preheat the Oven

Preheat your oven to 425°F (220°C). This step is crucial for achieving that crispy flatbread base.

Step 2: Prepare the Flavor Base

In a small bowl, mix together olive oil, garlic powder, cayenne pepper, and smoked paprika. Lightly brush this mixture over the flatbread, ensuring the edges are covered too.

Step 3: Layer on the Goodness

Evenly scatter the cooked chicken across the flatbread. Next, sprinkle the spinach leaves and top it all off with a generous amount of shredded mozzarella. The melting cheese will hold all the flavors together!

Step 4: Bake to Perfection

Place the flatbread directly on the oven rack or use a baking sheet for easy handling. Bake for 8-10 minutes until the cheese is melted and golden, and the edges of the flatbread are crisp.

Step 5: Prepare the Hot Honey Drizzle

While the flatbread is baking, combine the honey, olive oil, chili flakes, garlic powder, and cayenne pepper in a microwave-safe bowl. Heat in the microwave for 15-20 seconds and stir well to blend the flavors.

Step 6: Serve and Enjoy!

After baking, slice the flatbread into pieces and drizzle the warm hot honey sauce generously over the top. For an extra touch, prepare additional sauce for dipping!

Pro Tips for Perfecting Your Flatbread

Side angle shot of a delicious Hot Honey Chicken Flatbread, showcasing its layered toppings.

Want to elevate your Hot Honey Chicken Flatbread even more? Here are some expert insights:

  • Use Fresh Ingredients: Fresh spinach and quality chicken make a noticeable difference in flavor.
  • Experiment with Cheese: While mozzarella is classic, feel free to mix in cheddar or pepper jack for an extra kick.
  • Adjust Spice Levels: Modify the amount of cayenne and chili flakes based on your heat preference.
  • Make Your Own Flatbread: If you have time, try making homemade flatbread for a fresher taste.
  • Prepare Ahead: Assemble the flatbread ahead of time and store it in the fridge. Bake it fresh when you’re ready to eat!
  • Garnish Wisely: Top with fresh herbs like cilantro or parsley after baking for added freshness.
  • Keep an Eye on the Oven: Ovens can vary, so check your flatbread a minute or two before the recommended baking time.
  • Serve with a Side Salad: Balance the richness of the flatbread with a light, refreshing salad.

Common Mistakes and Troubleshooting

Even the best home cooks can make mistakes, but don’t worry! Here are some common pitfalls and how to avoid them:

  • Overbaking: Keep an eye on the flatbread to avoid burning the edges.
  • Too Much Topping: While it’s tempting to load it up, too many toppings can make the flatbread soggy.
  • Skipping the Flavor Base: The oil and spices are essential for flavor, so don’t skip this step!
  • Underbaking the Chicken: Make sure your chicken is fully cooked and heated through before serving.

Variations to Try

Get creative with your Hot Honey Chicken Flatbread! Here are some variations to inspire you:

  • BBQ Chicken Flatbread: Swap out the hot honey sauce for BBQ sauce for a smoky twist.
  • Veggie Delight: Omit the chicken and load up on fresh veggies like bell peppers, mushrooms, and zucchini.
  • Spicy Sausage Flatbread: Use cooked spicy sausage instead of chicken for a different flavor profile.
  • Buffalo Chicken Flatbread: Toss your chicken in buffalo sauce for a spicy kick!

Storage and Make-Ahead Instructions

If you have leftovers (which is rare!), store them in an airtight container in the refrigerator for up to 3 days. To maintain crispness, reheat in the oven rather than the microwave.

You can also prepare the flatbread ahead of time. Assemble it, cover it with plastic wrap, and store it in the fridge for up to 24 hours. Bake it fresh when you’re ready to enjoy!

Comprehensive FAQ

Here are some frequently asked questions about making Hot Honey Chicken Flatbread:

  • Can I use store-bought flatbread? Yes! Store-bought flatbread saves time and works perfectly for this recipe.
  • How can I make it gluten-free? Use a gluten-free flatbread or pizza crust to accommodate dietary needs.
  • Can I freeze the flatbread? Yes! Assemble the flatbread, wrap it tightly, and freeze for up to 2 months. Bake straight from frozen, adding a few extra minutes to the cooking time.
  • What can I use instead of honey? Maple syrup or agave can be used for a different sweetness.
  • How spicy is this recipe? Adjust the cayenne and chili flakes to fit your spice tolerance; it can be mild or fiery!
  • Can I add more cheese? Absolutely! Feel free to add as much cheese as you like.
  • What sides pair well with this flatbread? A fresh green salad, coleslaw, or roasted vegetables complement this dish well.
  • How long will it take to make? This recipe takes about 25-30 minutes from start to finish.

Nutritional Tips and Dietary Adaptations

For those watching their nutrition, consider these tips:

  • Low-Calorie Option: Use reduced-fat cheese and less oil.
  • Protein Boost: Add more chicken or include beans for extra protein without much additional fat.
  • Vegetarian Version: Skip the chicken and load up on vegetables for a hearty vegetarian meal.

Equipment Recommendations

To make your cooking experience smoother, here are a few essential tools:

  • Baking Sheet: A sturdy baking sheet is essential for evenly baking the flatbread.
  • Mixing Bowls: Use different sizes for mixing the oil and spices, and for the hot honey sauce.
  • Microwave-Safe Bowl: For heating the hot honey sauce quickly.

Serving Suggestions

When serving, consider pairing your Hot Honey Chicken Flatbread with:

  • Fresh Salad: A simple green salad with a light vinaigrette complements the richness of the flatbread.
  • Homemade Dips: Serve with ranch or blue cheese dressing for a flavorful dip option.
  • Refreshing Beverage: A chilled iced tea or lemonade enhances the meal beautifully.

Conclusion

Now that you’re armed with the knowledge to create a delicious Hot Honey Chicken Flatbread, it’s time to get cooking! Remember, cooking is about enjoying the process and the flavors you create. So, gather your ingredients, get your oven preheated, and let this recipe bring some excitement to your dinner table. Happy cooking!

Hot Honey Chicken Flatbread Recipe

Prep Time 10 minutes
Cook Time 10 minutes
Total Time 20 minutes
Servings 4 pieces
Calories 650
A delicious flatbread topped with seasoned chicken, spinach, mozzarella, and drizzled with sweet and spicy hot honey sauce for a quick and flavorful meal.

Ingredients

Flatbread

  • 1 piece flatbread
  • 1/4 cup spinach whole leaves (not chopped)
  • 3/4 cup cooked chicken cubed or shredded
  • 1 1/2 cups shredded mozzarella cheese
  • 2 tablespoons olive oil
  • 1/2 teaspoon smoked paprika
  • a dash dash cayenne pepper
  • 1/2 teaspoon garlic powder

Hot Honey Sauce

  • 2 tablespoons honey
  • 1/2 teaspoon olive oil
  • 1 teaspoon chili flakes
  • 1/8 teaspoon garlic powder
  • 2 dashes cayenne pepper

Instructions 

  • Preheat oven to 425°F (220°C). Mix olive oil, garlic powder, cayenne, and smoked paprika; brush over flatbread edges.
  • Spread cooked chicken evenly on flatbread, then add spinach leaves and shredded mozzarella.
  • Place flatbread on oven rack or baking sheet; bake for 8-10 minutes until cheese melts and edges are crisp.
  • While baking, combine honey, olive oil, chili flakes, garlic powder, and cayenne; microwave 15-20 seconds and stir.
  • Slice baked flatbread, drizzle with hot honey sauce, and serve immediately.

Notes

For extra flavor, add a drizzle of hot honey sauce before serving.
Calories: 650kcal
Cost: $12
Course: Main Course
Cuisine: American
Keyword: flatbread