Author

Steven

Browsing

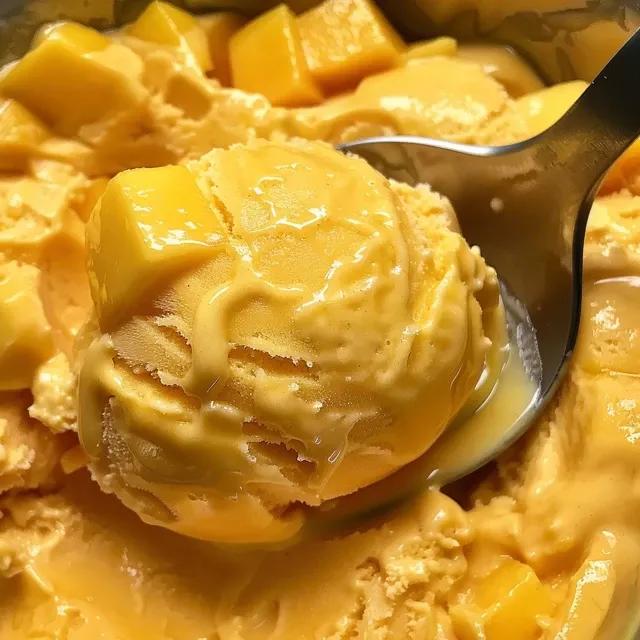
Experience the Joy of Homemade No-Churn Mango Ice Cream

Welcome to the tropical paradise of flavor! If you’ve ever craved a refreshing, creamy dessert that feels indulgent yet is easy to make, you’re in the right place. This no-churn mango ice cream recipe is your ticket to a delightful treat that requires only three simple ingredients. Perfect for hot days or any occasion, this homemade mango ice cream is not just easy to whip up, but it also bursts with the luscious flavor of ripe mangoes. Let’s dive into the recipe that guarantees to impress your friends and family!

Why You’ll Love This Recipe

  • Effortless Preparation: With just three ingredients, you can create a delicious dessert without any complicated steps.
  • Creamy Texture: The combination of whipped cream and mango purée results in a smooth, luscious ice cream that’s easy to scoop.
  • Customizable Flavors: Feel free to add your favorite mix-ins or toppings to create a unique treat every time.
  • Perfect for Any Occasion: Whether it’s a summer BBQ or a cozy family dinner, this ice cream fits right in.
  • Healthier Option: Made with fresh mangoes and minimal sugar, it’s a more wholesome choice compared to store-bought ice creams.

Ingredients Breakdown

Before we get started, let’s take a closer look at the ingredients you’ll need for this mango ice cream recipe:

  • Ripe Mangoes (600 g): Choose sweet, fully ripe mangoes for the best flavor. You can also use frozen mango chunks for convenience.
  • Double Cream or Whipping Cream (200 ml): This contributes to the creamy texture. If you prefer a lighter option, use whipping cream.
  • Caster Sugar (50-65 g): Adjust the sweetness based on your taste and the ripeness of the mangoes.

How to Make Homemade Mango Ice Cream

Creamy mango ice cream with a smooth texture, displayed in a rustic dish on a wooden table.

Ready to make your own no-churn mango ice cream? Follow these simple steps:

  1. Prepare the Mango: Peel and dice the mango flesh, discarding the stone. Blend until completely smooth. Taste and adjust sweetness with caster sugar if necessary.
  2. Whip the Cream: In a mixing bowl, whip the double cream until soft peaks form. Be careful not to overwhip, as this can create a grainy texture.
  3. Combine: Gently fold the mango purée into the whipped cream until fully combined and smooth. Avoid vigorous stirring to keep the mixture airy.
  4. Freeze: Transfer the mixture to a freezer-safe container, cover, and freeze for 5-6 hours. Stir every 1-2 hours during the first few hours to reduce ice crystals.
  5. Serve: Remove from the freezer and allow to soften for 5 minutes before scooping and serving. Enjoy your homemade treat!

Pro Tips for Perfect Ice Cream

  • Choosing the Right Mango: Use varieties like Alphonso or Haden for their sweet and aromatic flavor.
  • Chill Your Equipment: For optimal results, chill your mixing bowl and beaters before whipping the cream.
  • Adjust Sweetness: Taste the mango purée before adding sugar to ensure it’s sweet enough.
  • Mix-in Options: Consider adding shredded coconut, chocolate chips, or crushed nuts for added texture and flavor.
  • Serving Suggestion: Serve with fresh fruit or a drizzle of honey for an elegant touch.

Avoiding Common Mistakes

  • Overwhipping the Cream: Stop whipping when you see soft peaks to avoid a grainy texture.
  • Not Stirring Enough: Stirring during the freezing process helps to create a smoother texture.
  • Using Unripe Mangoes: Unripe mangoes can result in a less flavorful ice cream. Always choose ripe ones.

Delicious Variations

Want to switch things up? Here are some fun variations you can try:

  • Mango Coconut Ice Cream: Add ½ cup of coconut milk for a tropical twist.
  • Mango Strawberry Swirl: Fold in fresh strawberry purée for a fruity combination.
  • Spicy Mango Ice Cream: Mix in a pinch of cayenne pepper or chili powder for a surprising kick.
  • Mango Lime Sorbet: Substitute lime juice for some of the sugar to create a refreshing sorbet.

Storage and Make-Ahead Instructions

This homemade mango ice cream can be stored in the freezer for up to a month. Just make sure to:

  • Keep it in an airtight container to prevent freezer burn.
  • Allow it to sit at room temperature for a few minutes before scooping for easier serving.

Frequently Asked Questions (FAQs)

  • Can I make mango ice cream without an ice cream maker? Yes! This recipe is designed to be made without any special equipment.
  • Can I use canned or frozen mango? Absolutely! Just ensure the mango is ripe and sweet for the best flavor.
  • How do I make it dairy-free? Substitute the cream with coconut cream or a dairy-free whipped topping.
  • Can I add alcohol to my ice cream? Yes, adding a tablespoon of rum or vodka can enhance flavors and prevent ice crystals.
  • What can I use instead of caster sugar? You can use powdered sugar or honey as alternative sweeteners.
  • How long does it take to freeze? It typically takes 5-6 hours to freeze, but stirring initially helps speed up the process.
  • Why is my ice cream icy? This could be due to not stirring enough during the freezing process or using overly ripe mangoes.
  • Can I make this recipe in advance? Yes! It’s perfect for preparing ahead of time for parties or gatherings.

Nutritional Tips and Dietary Adaptations

This mango ice cream can easily be adapted to fit various dietary needs:

  • Low Sugar: Reduce the amount of sugar or use a sugar substitute.
  • Dairy-Free: As mentioned, use coconut cream or a non-dairy alternative.
  • Vegan Option: Replace the cream with a plant-based whipped cream.

Essential Equipment for Making Ice Cream

While this recipe doesn’t require fancy gadgets, having these kitchen tools can make the process smoother:

  • Blender or Food Processor: For puréeing the mangoes.
  • Mixing Bowls: A set of bowls for mixing and whipping.
  • Spatula: For gently folding ingredients together.
  • Freezer-Safe Container: To store your ice cream while it sets.

Serving Suggestions

When it’s time to serve your homemade mango ice cream, consider these ideas to elevate your dish:

  • Top with fresh mint leaves for a pop of color and freshness.
  • Drizzle with chocolate or caramel sauce for an indulgent touch.
  • Serve alongside a slice of cake or pie for a delightful dessert combo.

Conclusion

Enjoying homemade ice cream doesn’t have to be a complicated affair. With this easy no-churn mango ice cream recipe, you can create a delicious and creamy dessert that is sure to impress. Remember, cooking is about enjoying the process, experimenting, and finding joy in the flavors. So, gather your ingredients, and let’s bring a tropical delight to your table!

Homemade Tropical Mango Ice Cream No-Churn

Prep Time 10 minutes
Cook Time 6 hours
Total Time 6 hours 10 minutes
Servings 4 servings
Calories 250
Enjoy a refreshing, creamy mango ice cream made effortlessly at home without an ice cream maker.

Ingredients

Fruits

  • 600 g ripe mango, peeled, diced and puréed
  • 200 ml double cream or whipping cream
  • 50 g caster sugar (to taste)

Instructions 

  • Peel, dice, and purée the mango, then taste and add sugar if needed.
  • Whip the cream until soft peaks form.
  • Gently fold the mango purée into the whipped cream until smooth.
  • Transfer to a freezer-safe container, cover, and freeze for 5-6 hours, stirring every 1-2 hours initially.
  • Allow to soften for 5 minutes before scooping and serving.

Notes

For best texture, stir the ice cream during freezing to prevent large ice crystals.
Calories: 250kcal
Cost: $15
Course: Dessert
Cuisine: Tropical
Keyword: Mango

Start Your Day with a Burst of Flavor

Kickstart your morning with a vibrant and nutritious Raspberry Peach Smoothie Bowl that not only tantalizes your taste buds but also fuels your day with essential nutrients. This delightful bowl combines frozen fruits with creamy yogurt, creating a refreshing and satisfying breakfast option. Let’s dive into the details of this recipe and why it’s the perfect choice for anyone looking to enjoy a healthy meal without the hassle of cooking.

Why You’ll Love This Recipe

This Raspberry Peach Smoothie Bowl is more than just a pretty dish. Here are five reasons you’ll love making it:

  • Quick and Easy: With just a few minutes of prep, this recipe is perfect for busy mornings.
  • Customizable Ingredients: You can easily swap or add ingredients based on your preferences or dietary needs.
  • Nutrient-Rich: Packed with vitamins, fiber, and protein, this bowl supports your overall health.
  • Perfect for Meal Prep: Make a batch ahead of time for a grab-and-go breakfast throughout the week.
  • Visually Appealing: Its colorful presentation makes it a feast for the eyes as well as the stomach.

Ingredient Breakdown

Let’s take a closer look at the ingredients that make this smoothie bowl shine, along with some helpful substitutions.

  • Frozen Peach Slices (1/2 cup): Essential for a thick and creamy texture. If you don’t have frozen peaches, you can use fresh slices, but keep in mind that they may make the smoothie less dense.
  • Frozen Raspberries (1/2 cup): These add a wonderful tartness and vibrant color. Fresh raspberries can be reserved for topping, as they won’t provide the same texture in the base.
  • Vanilla Greek Yogurt (1/2 cup): This adds creaminess and a protein boost. If you’re looking for a dairy-free option, use coconut or almond-based yogurt.
  • Almond Milk (1/4 cup): This helps to blend the ingredients smoothly. You can substitute with any plant-based milk or even regular milk if preferred.
  • Sweetener (to taste, optional): Depending on your taste preference, feel free to add a drizzle of honey, agave syrup, or maple syrup.
  • Fresh Raspberries (1/4 cup): For topping and added texture.
  • Diced Fresh Peaches (1 tablespoon): A touch of freshness for garnish.
  • Granola (1 tablespoon): Adds crunch and makes your smoothie bowl more filling.

Pro Tips for the Perfect Smoothie Bowl

Close-up view of a Raspberry Peach Smoothie Bowl showcasing its creamy texture and colorful toppings.

To ensure your Raspberry Peach Smoothie Bowl turns out perfectly every time, consider these expert tips:

  • Use Frozen Fruit: Always opt for frozen peaches and raspberries as they create a thicker base due to their frozen state, which is key to achieving the desired texture.
  • Blend Strategically: Start with the liquid in the blender first, then add the frozen fruit. This helps the blades move smoothly, avoiding clogs.
  • Adjust Liquid Ratio: If your smoothie is too thick, gradually add more almond milk until you reach your desired consistency.
  • Don’t Over-Blend: Blend just until smooth. Over-blending can warm up the smoothie, making it less refreshing.
  • Layer Your Toppings: For an Instagram-worthy bowl, layer the fresh fruits and granola artistically on top.
  • Experiment with Flavors: Add a pinch of cinnamon or a splash of vanilla extract for an extra flavor boost.
  • Pre-Freeze Ingredients: If you’re preparing ahead, freeze your yogurt in ice cube trays for a thicker base.
  • Use Quality Ingredients: The flavor of your smoothie bowl will greatly depend on the quality of your ingredients, especially the fruits and yogurt.

Avoid Common Mistakes

Here are some common pitfalls to avoid when making your smoothie bowl:

  • Using Fresh Fruits: Fresh peaches and raspberries may result in a watery smoothie base; stick to frozen for the best texture.
  • Ignoring the Blender’s Capacity: Don’t overload your blender; it can lead to uneven blending. Blend in batches if necessary.
  • Too Much Liquid: Adding too much almond milk can make your smoothie bowl too runny. Start with a little and add more as needed.
  • Skipping Toppings: Toppings add not just flavor but also texture. Don’t skip them!
  • Not Tasting Before Serving: Always taste your smoothie before serving; adjust sweetness or flavors as needed.

Delicious Variations to Try

Get creative with your smoothie bowl by trying these exciting variations:

  • Berry Blast: Swap peaches for strawberries or blueberries for a different berry flavor.
  • Tropical Twist: Add pineapple and coconut for a refreshing tropical vibe.
  • Nutty Delight: Incorporate a tablespoon of peanut butter or almond butter for added richness and protein.
  • Green Boost: Blend in a handful of spinach or kale for a nutritious green smoothie bowl.

Storage and Make-Ahead Tips

If you’re looking to prepare your smoothie bowl in advance, here are some helpful tips:

  • Make-Ahead Smoothie Packs: Pre-portion the frozen fruits and yogurt into freezer bags. In the morning, just add almond milk and blend.
  • Refrigeration: If you have leftovers, store the smoothie base in an airtight container in the fridge for up to 24 hours. Stir or shake before serving.
  • Revitalize with Fresh Toppings: Always add fresh toppings right before serving to maintain their texture and flavor.

Frequently Asked Questions

Here are some common questions and answers about the Raspberry Peach Smoothie Bowl:

  • Can I use fresh peaches and raspberries instead of frozen? Fresh fruit can be used, but the texture will not be as thick.
  • What if I don’t have vanilla Greek yogurt? You can substitute plain yogurt or any other flavor you enjoy.
  • Can I add protein powder? Absolutely! This is a great way to increase the protein content of your breakfast.
  • How can I make it dairy-free? Use dairy-free yogurt and almond milk to make it completely dairy-free.
  • What can I use instead of granola? Try using nuts, seeds, or even homemade crunchy cereal for a different texture.
  • Is this recipe kid-friendly? Yes! It’s a fun and tasty way to get kids to eat fruits.
  • How many servings does this recipe make? This recipe serves one but can easily be doubled or tripled for more servings.
  • Can I freeze the smoothie bowl? While you can freeze it, the texture may change. It’s best enjoyed fresh!

Nutritional Insights and Dietary Adaptations

This smoothie bowl is not only delicious but also a powerhouse of nutrition. Here’s a breakdown of what you get:

  • High in Fiber: The fruits and yogurt provide essential fiber for digestive health.
  • Rich in Vitamins: Raspberries and peaches are packed with vitamins A and C, supporting your immune system.
  • Protein Boost: Greek yogurt adds protein, essential for muscle repair and growth.
  • Low in Calories: This bowl is a guilt-free breakfast option, keeping you satisfied without excess calories.

Essential Equipment for Success

To make your smoothie bowl, you’ll need the following equipment:

  • High-Powered Blender: A good blender is essential for achieving a smooth consistency.
  • Measuring Cups: Accurate measurements help in maintaining the right balance of flavors.
  • Bowl and Spoon: For serving and enjoying your creation!

Serving Suggestions

Once you’ve created your Raspberry Peach Smoothie Bowl, consider these serving ideas:

  • Garnish Creatively: Top with additional fresh fruit, nuts, or seeds for added flair.
  • Pair with a Beverage: A refreshing herbal tea or a glass of water with lemon complements the smoothie bowl beautifully.
  • Make it a Full Meal: Serve alongside a slice of whole-grain toast or a small serving of oatmeal for a balanced breakfast.

Final Thoughts

Making a Raspberry Peach Smoothie Bowl is not only simple but also incredibly rewarding. With vibrant flavors and a healthy profile, it’s a perfect way to start any day. Remember, cooking should be fun and stress-free—embrace your creativity and enjoy the process! So grab your blender, pick your favorite ingredients, and whip up this delicious bowl today!

Raspberry Peach Smoothie Bowl

Prep Time 5 minutes
Total Time 5 minutes
Servings 2 servings
Calories 250
A vibrant and refreshing smoothie bowl combining the sweetness of peaches and raspberries, perfect for a healthy breakfast or snack.

Ingredients

Fruits

  • 0.5 cup frozen peach slices
  • 0.5 cup frozen raspberries
  • 0.25 cup vanilla Greek yogurt or dairy free yogurt
  • 0.25 cup almond milk
  • to taste sweetener (optional)
  • 0.25 cup fresh raspberries
  • 1 tablespoon diced fresh peaches
  • 1 tablespoon granola

Instructions 

  • Add peaches, raspberries, yogurt, almond milk, and sweetener into a blender and blend until smooth.
  • Transfer the blended mixture to a bowl.
  • Top with fresh raspberries, diced peaches, and granola.

Notes

Feel free to adjust sweetness with more or less sweetener.
Calories: 250kcal
Cost: $10
Course: Breakfast
Cuisine: American
Keyword: Fruit, Healthy, Smoothie

If you’re looking for a meal that combines nutrition and flavor, look no further than this Grilled Salmon Salad with Kale, Corn, and Parmesan. It’s a delightful dish that can easily become a staple in your weeknight dinner rotation. With its vibrant colors and fresh ingredients, this recipe not only pleases the palate but also offers a wealth of health benefits. So, roll up your sleeves and let’s dive into a cooking experience that’s both enjoyable and rewarding!

Why You’ll Love This Recipe

This recipe is designed not just for taste, but for ease and versatility. Here are some reasons to get excited about this grilled salmon salad:

  • Quick & Easy: Ready in under 30 minutes, making it perfect for busy weeknights.
  • Nutritious: Packed with omega-3 fatty acids from salmon, vitamins from fresh veggies, and protein from Parmesan.
  • Customizable: Easily adjust ingredients to suit your taste or dietary needs.
  • Family-Friendly: A hit with both adults and kids, ensuring everyone at the table enjoys dinner.
  • Deliciously Satisfying: The combination of grilled salmon, fresh greens, and a tangy dressing creates a delightful explosion of flavors.

Ingredients You’ll Need

Gather the following ingredients to prepare this mouthwatering salad:

  • 10 oz salmon fillets, skin off
  • Olive oil spray
  • ⅓ teaspoon salt
  • ¼ teaspoon black pepper
  • 2 teaspoons maple syrup
  • 2 teaspoons lemon juice
  • 2 cups chopped kale leaves
  • 2 cups chopped lettuce (e.g., Cos or Gem)
  • ½ cup diced red pepper
  • 1 small cucumber, diced
  • 1 small carrot, grated
  • 2 green onions, chopped
  • ½ apple, diced
  • ½ cup sweet corn
  • ½ cup grated Parmesan cheese
  • 1 tablespoon lemon juice for dressing

Ingredient Substitutions

If you’re missing any ingredient or want to make a twist, consider these substitutions:

  • Salmon: Substitute with grilled chicken or tofu for a vegetarian option.
  • Maple Syrup: Honey or agave nectar can serve as sweeteners.
  • Kale: Spinach or arugula can be used for a different green base.
  • Parmesan: Feta or goat cheese can provide a tangy flavor.

How to Make Grilled Salmon Salad

Close-up of a delicious grilled salmon salad with colorful vegetables.

Follow these simple steps to prepare your grilled salmon salad:

Step 1: Marinate the Salmon

Start by spraying the salmon fillets with olive oil. Season them with salt, black pepper, maple syrup, and lemon juice. Allow the salmon to marinate for 15 minutes to enhance the flavors.

Step 2: Preheat the Grill

While the salmon is marinating, preheat your grill to medium-high heat, preparing it for perfectly grilled salmon.

Step 3: Grill the Salmon

Once the grill is ready, place the salmon on it and grill for 4-5 minutes on each side, or until it’s cooked through and flakes easily with a fork.

Step 4: Prepare the Salad

In a large bowl, combine the chopped kale, lettuce, diced red pepper, cucumber, grated carrot, chopped green onions, diced apple, sweet corn, and grated Parmesan cheese.

Step 5: Dress the Salad

Whisk together the lemon juice and drizzle it over the salad mixture. Toss everything gently to combine.

Step 6: Assemble and Serve

Top the salad with the grilled salmon and serve it immediately, allowing the flavors to shine.

Pro Tips for Perfect Grilled Salmon Salad

Here are some expert insights to enhance your cooking experience:

  • Grilling Temperature: Ensure your grill is well-preheated to achieve a nice sear on the salmon.
  • Fresh Ingredients: Using fresh vegetables will elevate the taste and nutritional value of your salad.
  • Don’t Overcook: Watch the salmon carefully; overcooking can lead to dryness. Aim for a medium rare finish.
  • Balance the Flavors: Adjust the sweetness of the dressing with more lemon juice or maple syrup, depending on your preference.
  • Cool Ingredients: Allow grilled salmon to rest for a few minutes before slicing to keep it juicy.
  • Chill the Salad: For a refreshing twist, chill the salad ingredients before serving.
  • Experiment with Dressings: Try different dressings like balsamic vinaigrette or a creamy ranch to mix things up.
  • Plate Presentation: Take a moment to arrange the salad beautifully; it makes for a more inviting meal!

Common Mistakes and Troubleshooting

If you’re new to grilling salmon or preparing salads, here are some common pitfalls to avoid:

  • Skipping the Marination: Don’t skip marinating the salmon; it adds essential flavor.
  • Not Preheating the Grill: A hot grill is crucial for a good sear and to prevent sticking.
  • Overcrowding the Grill: Grill salmon in batches if necessary to ensure even cooking.
  • Ignoring Freshness: Always choose fresh ingredients for the best flavor and nutrition.

Variations to Try

Here are some creative ideas to vary this grilled salmon salad:

  • Mediterranean Twist: Add kalamata olives, cherry tomatoes, and feta cheese for a Mediterranean flair.
  • Asian Inspiration: Incorporate shredded cabbage, mandarin oranges, and a sesame dressing for an Asian-inspired dish.
  • Southwestern Style: Mix in black beans, corn, and avocado for a hearty southwestern salad.
  • Fruit Fusion: Experiment with seasonal fruits like peaches or mango for added sweetness.

Storage and Make-Ahead Instructions

This salad can be prepped ahead of time, making it a convenient option for meal planning:

  • Make-Ahead: Prepare the salad ingredients a day in advance, but add the dressing and grilled salmon just before serving to keep everything fresh.
  • Storage: Store leftover salad in an airtight container in the fridge for up to 2 days. Note that the texture may soften over time.

Frequently Asked Questions

Here are some common questions about this grilled salmon salad:

  • Can I use frozen salmon? Yes, just ensure it’s fully thawed before grilling.
  • What can I substitute for kale? Spinach or mixed greens are great alternatives.
  • How can I make this salad vegan? Substitute salmon with grilled tofu and skip the cheese.
  • What dressing works best? A lemon vinaigrette or a creamy dressing pairs beautifully with the salmon.
  • Can I grill salmon on a stovetop? Absolutely! Use a grill pan for great results indoors.
  • Is this salad gluten-free? Yes, all ingredients are naturally gluten-free.
  • How do I know when the salmon is done? The salmon should flake easily with a fork when fully cooked.
  • Can leftovers be reheated? It’s best enjoyed cold, but you can reheat the salmon lightly in the microwave.

Nutrition Tips and Dietary Adaptations

This grilled salmon salad is not only delicious but also nutritious. Here are some tips to maximize its health benefits:

  • Protein Power: Salmon is rich in protein and omega-3 fatty acids, essential for heart health.
  • Veggie Boost: Feel free to add even more colorful vegetables to increase fiber and nutrients.
  • Low-Calorie Dressing: Opt for a lighter dressing made with yogurt instead of mayonnaise for a healthier option.
  • Balanced Meal: Pair the salad with a whole grain like quinoa or brown rice for a more filling meal.

Equipment Recommendations

To prepare this grilled salmon salad, you’ll need:

  • Grill: A charcoal or gas grill works perfectly for grilling salmon.
  • Grill Pan: An alternative for indoor cooking; it gives the salmon those lovely grill marks.
  • Mixing Bowl: A large bowl for tossing your salad ingredients together.
  • Whisk: For mixing the dressing ingredients smoothly.

Serving Suggestions

This grilled salmon salad is versatile and pairs well with various sides. Here are some ideas:

  • Whole Grains: Serve alongside quinoa or couscous for added texture and heartiness.
  • Crusty Bread: A slice of whole grain bread or a baguette complements the meal beautifully.
  • Wine Pairing: A chilled white wine like Sauvignon Blanc enhances the dining experience.
  • Light Dessert: Consider a fresh fruit salad or sorbet to conclude your meal on a refreshing note.

Cooking should be a joyful experience, and this Grilled Salmon Salad brings just that. With its delightful mix of flavors, textures, and vibrant ingredients, it’s sure to become a favorite in your kitchen. So gather your ingredients, fire up the grill, and enjoy a meal that’s as rewarding to make as it is to eat!

Grilled Salmon Salad With Kale Corn Parmesan

Prep Time 15 minutes
Cook Time 10 minutes
Total Time 25 minutes
Servings 4 servings
Calories 450
A fresh and healthy salad featuring grilled salmon, crisp greens, and a tangy lemon dressing, perfect for a nutritious meal.

Ingredients

Protein

  • 10 oz salmon fillets, skin off

Oil & Seasonings

  • 1 spray Olive oil spray
  • 0.33 teaspoon salt
  • 0.25 teaspoon black pepper
  • 2 teaspoons maple syrup
  • 2 teaspoons lemon juice

Salad Base

  • 2 cups chopped kale leaves
  • 2 cups chopped lettuce e.g., Cos or Gem
  • 0.5 cup diced red pepper
  • 1 small cucumber, diced
  • 1 small carrot, grated
  • 2 green onions chopped
  • 0.5 apple diced
  • 0.5 cup sweet corn
  • 0.5 cup grated Parmesan cheese
  • 1 tablespoon lemon juice

Instructions 

  • Spray salmon with olive oil, season with salt, pepper, maple syrup, and lemon juice. Marinate for 15 minutes.
  • Preheat grill to medium-high heat. Grill salmon for 4-5 minutes on each side until cooked through.
  • In a large bowl, combine kale, lettuce, red pepper, cucumber, carrot, green onions, apple, corn, and Parmesan.
  • Whisk together lemon juice and drizzle over salad. Toss to combine.
  • Serve salad topped with grilled salmon.

Notes

For extra flavor, add fresh herbs or a drizzle of olive oil before serving.
Calories: 450kcal
Cost: $15
Course: Salad
Cuisine: American
Keyword: Salmon

Burrata toast is more than just a meal; it’s an experience that combines creamy, dreamy cheese with fresh, vibrant toppings. This burrata toast recipe is perfect for gatherings or simply enjoying as a quick snack. In this article, we’ll dive into how to make the perfect burrata toast with fresh peaches, arugula, and a drizzle of balsamic glaze. With a few simple steps, you can create a dish that looks gourmet but feels approachable. Let’s get started!

Why You’ll Love This Recipe

  • Quick and Easy: This burrata toast can be prepared in under 15 minutes, making it ideal for busy weeknights or impromptu gatherings.
  • Versatile Toppings: The beauty of burrata toast is its adaptability. You can experiment with seasonal fruits, herbs, and other toppings to keep it exciting!
  • Delicious Flavor Profile: The combination of creamy burrata, sweet peaches, and tangy balsamic glaze creates a well-balanced dish that tantalizes your taste buds.
  • Perfect for Any Occasion: Whether it’s a brunch with friends, a light dinner, or a fancy appetizer, this burrata toast fits right in.
  • Great for Sharing: Serve it as an appetizer or a snack to impress your guests with minimal effort!

Ingredients for Burrata Toast

To create your delightful burrata toast, you’ll need the following ingredients:

  • ½ ciabatta roll: A hearty bread like ciabatta holds up well to toppings.
  • 100 g burrata cheese: This creamy cheese is the star of the dish.
  • 1 peach, sliced: Fresh peaches add sweetness and a juicy texture.
  • 1-2 tbsp extra-virgin olive oil: Good quality olive oil enhances flavor.
  • 1 tbsp balsamic glaze: This adds a tangy sweetness that brings everything together.
  • Handful of arugula rocket leaves: Arugula provides a peppery contrast.
  • Salt to taste: Enhances the flavors of the ingredients.

Substitutions & Variations

If you’re missing some ingredients or want to mix things up, here are a few suggestions:

  • Cheese alternatives: Try using goat cheese or ricotta for a different flavor.
  • Fruits: Substitute peaches with strawberries, figs, or even roasted cherry tomatoes for a savory twist.
  • Herbs: Fresh basil or mint can add a refreshing note.
  • Breads: Switch ciabatta for sourdough or whole-grain bread for added flavor and texture.

Step-by-Step Instructions

Close-up of a burrata toast featuring fresh peaches, drizzled with balsamic glaze and olive oil.

Here’s how to make your burrata toast:

  1. Slice the ciabatta roll in half and toast it until golden brown. You can use a toaster or pan-fry it with a teaspoon of olive oil for added flavor.
  2. Once toasted, add a handful of arugula leaves on each half and drizzle lightly with olive oil and sprinkle with flaky salt.
  3. Carefully cut the creamy burrata cheese in half and place it on top of the arugula, allowing it to ooze slightly.
  4. Top with the peach slices and finish with a drizzle of balsamic glaze. Feel free to add red pepper flakes for a spicy kick!
  5. Serve immediately and enjoy your delightful burrata toast!

Pro Tips for the Best Burrata Toast

  • Room Temperature Cheese: For the best flavor, let the burrata sit at room temperature for about 30 minutes before serving.
  • Quality Ingredients: Always use high-quality olive oil and balsamic glaze to elevate the dish.
  • Don’t Overdo the Toppings: Keep toppings balanced to allow the burrata to shine.
  • Experiment with Textures: Add crispy prosciutto or toasted nuts for an interesting crunch.
  • Make it Personal: Customize your burrata toast by adding your favorite ingredients or seasonal produce.
  • Toast Options: Experiment with different types of bread for varying flavors and textures.
  • Flavor Infusions: Try infusing your olive oil with herbs like rosemary or garlic for an extra flavor boost.
  • Presentation Counts: Arrange your toppings artfully for a stunning presentation!

Common Mistakes and Troubleshooting

Here are a few pitfalls to avoid while making your burrata toast:

  • Using Cold Cheese: Burrata served cold won’t have the same rich flavor; always let it warm up a bit.
  • Overtoasting the Bread: Keep an eye on your toast to ensure it doesn’t become too hard or burnt.
  • Skipping the Salt: A little salt enhances all the flavors, so don’t skip it!
  • Overloading on Toppings: More isn’t always better; keep it simple to let the burrata shine.

Storage and Make-Ahead Instructions

If you want to prepare some elements in advance:

  • Prep Ahead: You can slice the peaches and prepare the arugula salad a few hours before serving.
  • Storage: Store any leftover burrata in an airtight container in the refrigerator for up to 2 days.
  • Reheat Toast: If making the toast ahead of time, reheat lightly in a toaster oven to maintain crispness.

Frequently Asked Questions

Here are some common questions related to burrata toast:

  • Can I make burrata toast vegan? Absolutely! Substitute burrata with a plant-based cheese alternative.
  • What is burrata cheese? Burrata is a fresh Italian cheese made from mozzarella and cream, known for its soft, creamy interior.
  • How do I know when the burrata is fresh? Fresh burrata should feel soft and slightly bouncy, with minimal odor.
  • Can I use frozen bread? Yes, but ensure to toast it well to achieve the right texture.
  • What drinks pair well with burrata toast? Light wines, such as a crisp Sauvignon Blanc or a refreshing Prosecco, complement it beautifully.
  • Is burrata gluten-free? Yes, burrata itself is gluten-free, but ensure your bread is as well.
  • Can I use other fruits? Yes! Try figs, cherries, or even grilled fruits for a unique flavor.
  • How do I serve burrata toast? Serve it as an appetizer, brunch item, or snack; it’s versatile!

Nutrition Tips and Dietary Adaptations

If you’re looking to adapt this recipe to meet specific dietary needs:

  • Low-Carb Option: Use grilled zucchini slices instead of bread for a low-carb version.
  • Gluten-Free: Opt for gluten-free bread or serve on cucumber slices for a refreshing twist.
  • High-Protein: Add a poached egg on top to boost protein content.
  • Vegan Alternative: Use a vegan cream cheese or cashew cheese for a plant-based option.

Equipment Recommendations

To make your burrata toast, you’ll need:

  • Toaster or Pan: For toasting the ciabatta to perfection.
  • Sharp Knife: To slice the burrata and fruits with ease.
  • Cutting Board: A sturdy board for preparing your ingredients.
  • Serving Platter: To present your beautifully arranged toast!

Serving Suggestions

To make your meal even more enjoyable:

  • Pair with a Salad: A light arugula salad complements the toast perfectly.
  • Offer a Variety: Create a toast bar with different toppings for guests to customize their own.
  • Include Dips: Serve with a side of pesto or hummus for added flavor.
  • Accompany with Drinks: A nice white wine or sparkling water with lemon elevates the dining experience.

In conclusion, burrata toast is a delightful dish that brings joy to both the cook and the eater. With its creamy texture, fresh toppings, and endless variations, it’s a recipe you’ll want to keep handy. So gather your ingredients, invite some friends, and enjoy the magic of burrata toast!

Burrata Toast

Prep Time 10 minutes
Cook Time 5 minutes
Total Time 15 minutes
Servings 2 servings
Calories 350
A delicious and fresh toast featuring creamy burrata, sweet peaches, and peppery arugula, perfect for a quick snack or light meal.

Ingredients

Bread

  • 0.5 roll ciabatta roll
  • 100 g burrata cheese
  • 1 piece peach (sliced)
  • 1-2 tbsp extra-virgin olive oil
  • 1 tbsp balsamic glaze
  • a handful arugula rocket leaves
  • to taste salt

Instructions 

  • Slice the ciabatta roll in half and toast one half in a toaster or pan with a teaspoon of olive oil.
  • Arrange arugula leaves on the toasted bread with a light drizzle of olive oil and a pinch of flaky salt.
  • Cut the burrata cheese and place it on top of the arugula, then drizzle with olive oil.
  • Top with peach slices and a drizzle of balsamic glaze.
  • Enjoy immediately. Optionally, add red pepper flakes for spice.

Notes

Use ripe peaches for the best flavor and fresh burrata for creaminess.
Calories: 350kcal
Cost: $12
Course: Appetizer, Snack
Cuisine: Italian
Keyword: Burrata, Peach, Toast

Unleash Your Culinary Creativity with Chicken Fajitas Wrap

Welcome to a delightful culinary adventure where we transform a classic dish into a weeknight hero! This Chicken Fajitas Wrap recipe is not just quick to prepare; it’s packed with vibrant flavors and nourishing ingredients that will make your taste buds dance. Whether you’re cooking for family or friends, this dish is perfect for any occasion, bringing joy and satisfaction to your dining table. Get ready to uncover the secrets of making the perfect chicken fajitas wraps right in your kitchen!

Why You’ll Love This Recipe

  • Quick to Prepare: This recipe takes only about 30 minutes from start to finish, making it an ideal choice for busy weeknights.
  • Flavor-Packed: The combination of tender chicken, sautéed peppers, and zesty seasoning creates a mouthwatering experience that will have everyone asking for seconds.
  • Customizable: You can easily adjust the ingredients and spices to suit your personal preferences, whether you enjoy a spicy kick or prefer something milder.
  • Meal Prep Friendly: These wraps are perfect for meal prep! Make a batch ahead of time for quick lunches or dinners throughout the week.
  • Family-Friendly: Kids and adults alike will love these wraps, making them a fantastic option for family dinners or gatherings.

Ingredient Breakdown: What You’ll Need

Before diving into the cooking process, let’s gather our ingredients. Here’s everything you need to create your delicious chicken fajitas wrap:

  • 2 Tablespoons Cooking Oil: Essential for sautéing the chicken and vegetables.
  • 1 Pound Boneless Skinless Chicken Breast: Cut into strips for quick cooking.
  • 2 Peppers: Any combination of bell peppers works great; choose your favorites for color and flavor.
  • 1 Small Onion: Sliced into strips for added sweetness and texture.
  • 1 Packet of Fajita Seasoning (1.12 ounces): This adds the authentic fajita flavor.
  • ¼ Cup Water: Helps to create a flavorful sauce.
  • 8.5 Ounce Package of Prepared Rice (Cilantro and Lime Flavor): Adds a zesty touch to your wraps.
  • ⅓ Cup Sour Cream: For a creamy finish in your wraps.
  • 1 ½ Cups Monterey Jack Cheese (Shredded): Melts beautifully and adds richness.
  • 7-8 Large Tortillas: The perfect vessel for all your delicious fillings.

Feel free to experiment with substitutions. For instance, you can use leftover rotisserie chicken to save time or swap out the rice for quinoa or a low-carb option.

How to Make Your Chicken Fajitas Wrap

Side view of a juicy Chicken Fajitas Wrap filled with chicken and veggies.

Let’s break down the process into simple steps:

  • Step 1: Heat the Oil: In a skillet over medium-high heat, add the cooking oil and let it warm up.
  • Step 2: Cook the Chicken: Add the chicken strips to the skillet and cook for about 3 minutes until they are no longer pink.
  • Step 3: Add Vegetables: Stir in the sliced peppers and onion, cooking for another 3-5 minutes until they are tender.
  • Step 4: Season: Pour in the water and fajita seasoning, mixing until the chicken and veggies are well-coated and flavorful.
  • Step 5: Prepare Rice Mixture: Cook the rice according to the package directions, then mix it with sour cream for extra creaminess.
  • Step 6: Assemble Wraps: On each tortilla, layer the rice mixture, the chicken and vegetable mix, and sprinkle with shredded cheese.
  • Step 7: Roll It Up: Tightly roll the tortilla, tucking in the sides as you go.
  • Step 8: Optional Toast: For a crispy exterior, toast each wrap in a pan until golden brown.

Pro Tips for Perfect Chicken Fajitas Wrap

Here are some expert insights to elevate your chicken fajitas wraps:

  • Use Fresh Ingredients: Fresh vegetables and quality chicken make all the difference in flavor and texture.
  • Don’t Overcrowd the Pan: Cook in batches if necessary to ensure even cooking and browning.
  • Experiment with Spices: Feel free to add extra spices or herbs to your fajita seasoning for a personalized touch.
  • Let It Rest: Allow the cooked chicken to rest for a few minutes before slicing to retain moisture.
  • Keep Tortillas Warm: Wrap tortillas in a kitchen towel to keep them warm before assembling.
  • Try Different Cheeses: Switch it up with pepper jack for a spicy kick or a vegan cheese for a plant-based option.
  • Make-Ahead: Prep all ingredients in advance for a quick assembly during busy weeknights.
  • Serve with Sides: Pair with salsa, guacamole, or a fresh salad for a complete meal.

Common Mistakes and Troubleshooting

Here are some common pitfalls to avoid while making your chicken fajitas wraps:

  • Underseasoning: Always taste as you go! If your wraps lack flavor, add a pinch of salt or more seasoning.
  • Overcooking Vegetables: Keep an eye on your cooking time for peppers and onions to maintain their crunch.
  • Using Cold Tortillas: Warm your tortillas before wrapping to prevent tearing and to improve flavor.
  • Too Much Filling: Avoid overstuffing your wraps, or they might burst when rolled.
  • Skipping the Resting Period: Allowing the chicken to rest keeps it juicy; don’t skip this step!

Delicious Variations to Try

Mix things up with these exciting variations of chicken fajitas wraps:

  • Vegetarian Fajitas Wrap: Swap chicken for grilled vegetables like zucchini, mushrooms, and eggplant.
  • Spicy Chipotle Chicken Fajitas: Add chipotle peppers in adobo sauce to the chicken for a smoky flavor.
  • BBQ Chicken Fajitas Wrap: Use BBQ sauce instead of fajita seasoning for a tangy, sweet twist.
  • Breakfast Fajitas Wrap: Scramble eggs with fajita veggies for a hearty breakfast option.

Storage and Make-Ahead Instructions

Want to prepare in advance? Here’s how to store your chicken fajitas wraps:

  • Refrigerate: Store cooked ingredients in an airtight container for up to 4 days.
  • Freeze: Wrap individual fajitas in plastic wrap and freeze for up to 3 months. Thaw in the fridge before reheating.
  • Reheat: Warm in a skillet on low heat or microwave until heated through.

Frequently Asked Questions

Here are some common questions about chicken fajitas wraps:

  • Can I use other proteins?: Absolutely! Shrimp, beef, or tofu can make delicious alternatives.
  • What kind of tortillas should I use?: Flour tortillas are traditional, but corn tortillas are a great gluten-free option.
  • How can I make this dish gluten-free?: Use gluten-free tortillas and ensure your seasoning is gluten-free.
  • Can I make these wraps spicy?: Yes! Add jalapeños or use a spicier fajita seasoning for extra heat.
  • What sides pair well with fajitas?: Consider serving with chips and salsa, guacamole, or a fresh green salad.
  • How do I know when the chicken is cooked?: The internal temperature should reach 165°F (75°C) for safe consumption.
  • Can I make these in advance?: Yes! Prep ingredients ahead of time and cook them just before serving for the freshest taste.
  • What can I do with leftovers?: Use leftover chicken and veggies in salads, quesadillas, or as a topping for nachos!

Nutritional Insights and Dietary Adaptations

This chicken fajitas wrap is not only delicious but also offers several nutritional benefits:

  • Protein-Rich: Chicken provides a great source of lean protein, essential for muscle repair and overall health.
  • Colorful Veggies: Bell peppers and onions are loaded with vitamins, minerals, and antioxidants that support your immune system.
  • Customizable for Dietary Needs: Easily adapt this recipe for gluten-free, dairy-free, or vegetarian diets.

Equipment Recommendations

To make your cooking experience even smoother, here are some recommended tools:

  • Non-Stick Skillet: Perfect for even cooking and easy cleanup when preparing your chicken and veggies.
  • Wooden Spoon or Spatula: Ideal for stirring and mixing ingredients without damaging your cookware.
  • Tortilla Warmer: Keeps your tortillas warm and pliable while you prepare the filling.

Serving Suggestions

Serve your chicken fajitas wraps with a variety of toppings and sides to enhance the meal:

  • Fresh Salsa: A zesty salsa can brighten up the flavors of the wraps.
  • Guacamole: Creamy and rich, guacamole is a perfect pairing for these fajitas.
  • Shredded Lettuce: Add some crunch with fresh lettuce for a nice texture contrast.

With this comprehensive guide, you’re well-equipped to make the best chicken fajitas wraps of your life! Remember, cooking is all about having fun and experimenting. Enjoy the process, and don’t hesitate to make this recipe your own. Happy cooking!

Chicken Fajitas Wrap

Prep Time 10 minutes
Cook Time 15 minutes
Total Time 25 minutes
Servings 4 servings
Calories 650
Enjoy flavorful chicken fajitas wrapped in tortillas, perfect for a quick and satisfying meal.

Ingredients

Cooking Oil

  • 2 tablespoons Cooking Oil

Chicken Breast

  • 1 pound Boneless Skinless Chicken Breast (cut into strips)

Peppers

  • 2 peppers Peppers (cut into strips)

Onion

  • 1 small Small Onion (sliced into strips)

Fajita Seasoning

  • 1.12 ounces Fajita Seasoning (packet)

Water

  • 0.25 cup Water

Prepared Rice

  • 8.5 ounces Prepared Rice Cilantro and Lime Flavor (package)

Sour Cream

  • 1/3 cup Sour Cream

Shredded Cheese

  • 1.5 cups Monterey Jack Cheese (shredded)

Tortillas

  • 7-8 large Large Tortillas

Instructions 

  • Heat oil in a skillet over medium-high heat.
  • Add chicken strips and cook for about 3 minutes until no longer pink. Stir in sliced peppers and onions; cook for another 3-5 minutes.
  • Pour in water and fajita seasoning; stir until well coated. Prepare rice as per package instructions and mix with sour cream.
  • Layer rice mixture, chicken mixture, and cheese on a tortilla. Roll up tightly, tucking in sides. Optional: toast in a pan until golden brown.

Notes

For extra flavor, add fresh cilantro or a squeeze of lime before serving.
Calories: 650kcal
Cost: $15
Course: Main Course
Cuisine: Mexican
Keyword: Chicken

Deliciously Decadent Strawberry Yoghurt Bites: A Guilt-Free Indulgence

Are you ready to indulge in a guilt-free treat that satisfies your sweet cravings while keeping things healthy? These Chocolate-Covered Strawberry Yoghurt Bites are not just a treat; they’re a delightful blend of flavors and textures that you can whip up with just a few simple ingredients. Perfect for a snack, dessert, or even a party platter, this recipe will show you how to make strawberry yogurt bites that are sure to impress. Let’s dive into the delicious world of homemade treats!

Why You’ll Love This Recipe

There are countless reasons to fall in love with these strawberry yoghurt bites. Here are just a few:

  • Healthier alternative: These bites are made with fresh strawberries and yogurt, making them a nutritious choice compared to traditional desserts.
  • Easy to make: With just a handful of ingredients and straightforward steps, you’ll have a delicious treat in no time!
  • Customizable: You can easily swap ingredients to suit your taste or dietary needs, such as using dairy-free yogurt or different types of chocolate.
  • Perfect for sharing: These bite-sized treats are great for parties, gatherings, or simply enjoying with family.
  • Great for meal prep: You can make a batch ahead of time and store them, so you always have a sweet, healthy snack on hand.

Ingredients You’ll Need

Here’s what you’ll need to create your very own strawberry yogurt chocolate bites:

  • 250g strawberries: Fresh, washed, and dried, diced into small pieces for easy mixing.
  • 200g plain or Greek yogurt: You can use dairy-free or vegan yogurt if preferred.
  • 300g gluten-free chocolate buttons: Dark chocolate is recommended for a rich flavor; feel free to use dairy-free options as well.
  • 1 teaspoon vanilla extract: This is optional, but it adds a lovely flavor depth.
  • 1 tablespoon coconut oil: Use this if you’re working with milk or white chocolate to help achieve a smoother melt.

Pro Tips for Perfect Strawberry Yoghurt Bites

Side view of delicious strawberry yoghurt bites dipped in dark chocolate, showcasing their texture.

To ensure your frozen yogurt bites turn out perfectly every time, keep these expert tips in mind:

  • Choose ripe strawberries: Make sure to select juicy, ripe strawberries for the best flavor and sweetness.
  • Consistency matters: Use creamy yogurt; Greek yogurt works well as it’s thicker and holds its shape better.
  • Melting chocolate: Be patient while melting chocolate; do it slowly to avoid scorching, and allow it to cool slightly before dipping.
  • Freezing time: Ensure the yogurt bites freeze completely before coating them in chocolate for easier handling.
  • Experiment with flavors: Try adding a splash of orange or almond extract to the yogurt for a unique twist.
  • Use a cookie scoop: This helps form uniform bites, making your treats look more professional.
  • Layer flavors: Consider adding crushed nuts or granola on top of the chocolate for added crunch.
  • Store wisely: Keep your bites in an airtight container in the freezer to maintain their freshness.

Common Mistakes and Troubleshooting

Even the best cooks run into hiccups sometimes. Here are some common issues and how to avoid them:

  • Chocolate seizing: If your chocolate gets grainy or hard, it’s likely been overheated. Always melt on low heat.
  • Yogurt melting: If your yogurt mixture starts to melt while handling, work quickly and return it to the freezer for a few minutes.
  • Too sweet: If the mixture is too sweet for your taste, reduce the amount of chocolate or use unsweetened yogurt.
  • Sticky bites: If the bites are too sticky, they may not have frozen long enough before coating with chocolate. Make sure to freeze them for the full 1.5 to 2 hours.

Variations to Try

Want to switch things up? Here are some delicious variations to try:

  • Coconut flakes: Roll the bites in unsweetened coconut flakes before freezing for a tropical twist.
  • Nut butters: Swirl in almond or peanut butter for added richness and flavor.
  • Different fruits: Experiment with other fruits like banana or mango for unique flavor profiles.
  • Spiced chocolate: Add a pinch of cinnamon or cayenne to your melted chocolate for a spicy kick.

Storage and Make-Ahead Instructions

These strawberry yogurt chocolate bites are perfect for meal prep!

  • Freezing: Store in an airtight container in the freezer for up to 2 months.
  • Thawing: If you want to enjoy them immediately, let them sit at room temperature for a few minutes or microwave for a few seconds until slightly softened.
  • Batch-making: Feel free to double or triple the recipe to have plenty on hand for snacking!

Frequently Asked Questions

Here are some common questions about making these delightful bites:

  • Can I use frozen strawberries? It’s best to use fresh strawberries for the best texture and flavor, but if you must use frozen, thaw and pat dry well.
  • Is this recipe vegan-friendly? Yes, simply use dairy-free yogurt and chocolate for a vegan version.
  • How can I make these bites lower in sugar? Use unsweetened yogurt and dark chocolate, which generally has less sugar than milk chocolate.
  • Can I add other flavors to the yogurt? Absolutely! Try adding your favorite extracts or spices to customize the flavor.
  • What is the best way to melt chocolate? Melting in a double boiler or in the microwave in short bursts works best to avoid scorching.
  • How long do these last in the freezer? They can last up to 2 months in an airtight container.
  • Can I use other types of chocolate? Yes, you can use white or milk chocolate; just remember to adjust the coconut oil accordingly if needed.
  • Can I add nuts or seeds? Definitely! Chopped nuts or seeds can enhance the texture and flavor of your yogurt bites.

Nutritional Tips and Dietary Adaptations

These chocolate-covered strawberry bites are not just delicious but can also be a part of a balanced diet. Consider these tips:

  • Protein boost: Use Greek yogurt for extra protein.
  • Dairy-free option: Use coconut yogurt or almond yogurt for a dairy-free treat.
  • Lower fat: Choose low-fat yogurt and dark chocolate to reduce overall fat content.

Equipment Recommendations

Here are a few tools that will make the process easier:

  • Baking tray: A flat tray lined with baking paper for freezing the bites.
  • Cookie scoop: For forming uniform bites.
  • Double boiler or microwave-safe bowl: For melting the chocolate smoothly.

Serving Suggestions

These delightful treats can be served in a variety of ways:

  • Party platter: Arrange them on a platter with fresh fruit for a beautiful display.
  • With coffee: Enjoy these bites alongside a cup of coffee or tea for a sweet afternoon treat.
  • As dessert: Serve them on a dessert plate drizzled with extra melted chocolate or a sprinkle of sea salt.

In conclusion, making your own strawberry yoghurt bites is not only simple but also a fun way to enjoy a healthy treat. With the flexibility to customize and experiment, you’ll find endless ways to enjoy these delicious bites. So grab your ingredients, unleash your creativity, and enjoy these guilt-free indulgences!

Chocolate-covered Strawberry Yoghurt Bites

Prep Time 10 minutes
Cook Time 20 minutes
Total Time 30 minutes
Servings 8 pieces
Calories 150
Delight in these frozen treats combining fresh strawberries, creamy yoghurt, and rich chocolate for a perfect summer snack.

Ingredients

Fruits and Dairy

  • 250 g strawberries, washed and dried
  • 200 g plain or Greek yoghurt, dairy-free or vegan optional
  • 300 g gluten-free chocolate buttons, preferably dark chocolate, dairy-free or vegan optional
  • 1 tsp vanilla extract optional
  • 1 tbsp coconut oil if using milk or white chocolate

Instructions 

  • Wash, dry, and dice strawberries into small pieces.
  • Mix strawberries, yoghurt, and vanilla extract in a bowl.
  • Spoon dollops onto a lined tray and freeze for 1.5-2 hours.
  • Melt chocolate and coconut oil if using milk or white chocolate, then dip frozen bites into the chocolate.
  • Place coated bites back on tray and freeze for 30 minutes before serving.

Notes

Ensure to freeze the bites thoroughly for best texture.
Calories: 150kcal
Cost: $10
Course: Dessert
Keyword: chocolate, Strawberry, yoghurt

Discover the Joy of Cooking with This Tangy Balsamic Chicken Pasta Salad

If you’re looking to brighten up your table with a dish that’s both vibrant and satisfying, you’ve come to the right place! This Tangy Balsamic Chicken Pasta Salad combines fresh ingredients and a zesty balsamic dressing, making it perfect for busy weeknights or any gathering where you want to impress. In this comprehensive guide, we’ll explore every aspect of this delightful recipe, ensuring you’re equipped with all the knowledge and skills to create it effortlessly.

With a generous serving of protein, fiber, and colorful veggies, this pasta salad not only looks good but also tastes fantastic. Let’s dive in and discover why you’ll love making this dish.

Why You’ll Love This Recipe

  • Quick and Easy: With just a few simple steps, you can whip up this delicious salad in under 30 minutes, making it ideal for those hectic evenings.
  • Fresh Ingredients: The combination of cucumbers, tomatoes, and fresh basil brings vibrant flavors and textures, ensuring each bite is a taste sensation.
  • Meal Prep Friendly: This salad holds up well in the refrigerator, making it perfect for meal prep or leftovers that taste even better the next day.
  • Customizable: Feel free to swap in your favorite ingredients or use what you have on hand, making this recipe versatile and adaptable.
  • Health-Conscious: Packed with lean protein from the chicken and fiber from the vegetables, this salad is as nutritious as it is delicious.

Ingredients You’ll Need

To create the perfect Balsamic Chicken Pasta Salad, gather the following ingredients:

  • 1 lb pasta: I recommend using Barilla rotini for its ideal texture, but feel free to substitute with your favorite pasta shape.
  • 2 cups cooked chicken: Cut into ½-inch cubes. Use rotisserie chicken for a quick option or leftover grilled chicken for extra flavor.
  • 1 cup cucumber: Seeded and chopped into ½-inch pieces to add a refreshing crunch.
  • 1 pint grape tomatoes: Halved for a burst of juicy sweetness.
  • ½ cup red onion: Finely diced into ¼-inch pieces for a mild, tangy flavor.
  • ½ cup red bell pepper: Chopped to add a sweet, crunchy element.
  • ½ cup celery: Diced for additional texture and freshness.
  • ⅓ cup parmesan cheese: Grated for a savory, cheesy finish.
  • ¼ cup fresh basil leaves: Chiffonade for an aromatic herbal note.
  • ¾ cup Greek yogurt: I prefer Fage 2 for a richer consistency, but any plain yogurt will work.
  • 5 tbsp balsamic vinegar: Adds a tangy depth to the dressing.
  • 1.5 tbsp olive oil: For healthy fats and flavor.
  • 1.25 tsp salt: To taste.
  • ¼ tsp pepper: Freshly ground for a hint of spice.
  • ½ tsp dried oregano: Adds a warm, herbal flavor.

How to Make Tangy Balsamic Chicken Pasta Salad

A delectable serving of chicken pasta salad featuring rotini, diced chicken, and fresh veggies.

Ready to get cooking? Follow these simple steps to create your salad:

Step 1: Cook the Pasta

Bring a large pot of salted water to a boil. Add the pasta and cook according to package instructions until al dente. Drain the pasta and rinse it under cold water to stop the cooking process. This also prevents the pasta from sticking together.

Step 2: Prepare the Dressing

In a large mixing bowl, whisk together the Greek yogurt, balsamic vinegar, olive oil, salt, pepper, and dried oregano until smooth. This creamy dressing will coat the salad beautifully and add a tangy flavor.

Step 3: Chop and Combine the Salad Ingredients

In the same bowl, add the cooked pasta, chicken, cucumber, grape tomatoes, red onion, red bell pepper, celery, parmesan, and fresh basil. Gently toss everything together until evenly coated with the dressing.

Step 4: Chill and Serve

Cover the salad and refrigerate for at least 30 minutes to allow the flavors to meld. Serve chilled, and enjoy the delightful combination of textures and tastes!

Pro Tips for the Perfect Pasta Salad

  • Chill the Salad: Allowing the salad to chill for at least 30 minutes enhances the flavor as the ingredients meld together.
  • Use Seasonal Produce: Incorporating seasonal vegetables ensures freshness and enhances flavor. Look for ripe tomatoes and crisp cucumbers.
  • Don’t Overcook the Pasta: To achieve the perfect texture, aim for al dente. It should have a slight bite to it when you bite down.
  • Make It a Meal: Add additional proteins like chickpeas or cubed tofu for a vegetarian-friendly version.
  • Experiment with Dressings: Try different dressings such as a honey mustard or a vinaigrette if you’re looking for a flavor change.
  • Store It Right: Keep any leftovers in an airtight container in the fridge for up to 3 days.
  • Garnish for Presentation: A sprinkle of extra parmesan and fresh basil just before serving can make the dish look even more inviting.
  • Mix Up the Pasta: Feel free to experiment with whole wheat or gluten-free pasta options to cater to dietary preferences.

Common Mistakes and Troubleshooting

  • Overcooked Pasta: If you accidentally overcook the pasta, try rinsing it thoroughly and tossing it into a cold salad to cool it down.
  • Dry Salad: If the salad seems too dry, add a splash of balsamic vinegar or a bit more yogurt to enhance moisture.
  • Flavorless Dressing: If the dressing lacks punch, consider adding a squeeze of lemon juice for acidity or more seasoning.
  • Wilted Greens: If your fresh basil wilts too quickly, add it just before serving for maximum freshness.

Variations on This Pasta Salad

Feel free to make this salad your own with these tasty variations:

  • Italian Twist: Add chopped salami or pepperoni and substitute Italian herbs for oregano.
  • Greek Delight: Incorporate feta cheese, Kalamata olives, and artichoke hearts for a Mediterranean spin.
  • Veggie-Packed: Include additional veggies like spinach, bell peppers, or zucchini to increase the nutrition.
  • Spicy Kick: Add sliced jalapeños or crushed red pepper flakes for some heat!

Storage and Make-Ahead Instructions

This pasta salad is perfect for meal prep! Here’s how to store it:

  • Keep the salad in an airtight container in the refrigerator for up to 3 days.
  • If making ahead, consider storing the dressing separately to prevent the salad from becoming soggy.
  • To refresh leftovers, add a splash of balsamic vinegar or a bit more yogurt before serving.

Frequently Asked Questions

  • Can I use a different type of pasta? Yes! Feel free to substitute with your favorite pasta shape.
  • Is this salad gluten-free? You can make it gluten-free by using gluten-free pasta.
  • How long does this salad last in the fridge? It lasts for up to 3 days when stored properly in an airtight container.
  • Can I make this salad vegan? Absolutely! Substitute the chicken with chickpeas or tofu and use a vegan yogurt alternative.
  • What can I serve with this salad? It pairs well with grilled vegetables, crusty bread, or a light soup.
  • Can I add nuts or seeds? Yes! Adding toasted pine nuts or sunflower seeds can provide a nice crunch.
  • How spicy is this salad? It’s mild, but you can adjust the spice level by adding jalapeños or red pepper flakes.
  • Is it possible to freeze this salad? It’s best enjoyed fresh, but you can freeze the cooked pasta separately and mix it after thawing.

Nutrition Tips and Dietary Adaptations

This salad is not just tasty; it’s also packed with nutrients:

  • Lean Protein: Chicken provides a source of lean protein essential for muscle growth and repair.
  • Healthy Fats: Olive oil offers heart-healthy monounsaturated fats, while Greek yogurt adds creaminess with less fat than traditional dressings.
  • Vitamins and Minerals: Fresh vegetables contribute vitamins A, C, and K, along with essential minerals.
  • High Fiber: The combination of veggies and whole grain pasta promotes digestive health.

Equipment Recommendations

Here’s what you’ll need to make this salad:

  • Large Pot: For boiling the pasta.
  • Colander: To drain the pasta.
  • Mixing Bowl: A large bowl for combining all the ingredients.
  • Whisk: For mixing the dressing smoothly.
  • Sharp Knife: For chopping vegetables and chicken.

Serving Suggestions

This salad is versatile and pairs beautifully with various dishes:

  • Grilled Meats: Serve alongside grilled chicken, steak, or fish for a complete meal.
  • Light Soups: Complement with a refreshing gazpacho or a light vegetable soup.
  • Crusty Bread: A slice of crusty bread or garlic bread makes for a satisfying addition.

In conclusion, this Tangy Balsamic Chicken Pasta Salad is not just a dish; it’s a celebration of fresh ingredients and delightful flavors. Whether you’re preparing it for a family dinner or a potluck, it’s sure to be a hit. Don’t be afraid to get creative and make it your own! Happy cooking, and remember, the kitchen is a place for experimentation and joy.

Tangy Balsamic Chicken Pasta Salad - cookingwithricky

Prep Time 15 minutes
Cook Time 10 minutes
Total Time 25 minutes
Servings 4 servings
Calories 520
A vibrant and flavorful pasta salad combining tender chicken, fresh vegetables, and a tangy balsamic dressing for a satisfying meal.

Ingredients

pasta

  • 1 lb pasta (rotini) (preferably Barilla)

chicken

  • 2 cups chicken, cubed (cut into 1/2-inch pieces)

vegetables

  • 1 cup cucumber, chopped (seeded, into 1/2-inch pieces)
  • 1 pint grape tomatoes
  • 0.25 cup red onion, diced (finely diced into 1/4-inch pieces)
  • 0.5 cup red pepper
  • 0.5 cup celery

cheese

  • 0.25 cup parmesan

herbs

  • 0.25 cup fresh basil leaves, chiffonade

dairy

  • 0.75 cup Greek yogurt (preferably Fage 2%)

dressing

  • 5 tbsp balsamic vinegar
  • 1.5 tbsp olive oil
  • 1.25 tsp salt
  • 0.25 tsp pepper
  • 0.5 tsp dried oregano

Instructions 

  • Cook the pasta according to package instructions, then drain and set aside.
  • In a large bowl, combine cooked pasta, chicken, and chopped vegetables.
  • In a small bowl, whisk together Greek yogurt, balsamic vinegar, olive oil, salt, pepper, and oregano to make the dressing.
  • Pour the dressing over the pasta mixture and toss to combine.
  • Garnish with Parmesan cheese and fresh basil before serving.

Notes

Chill the salad for at least 30 minutes before serving for best flavor.
Calories: 520kcal
Cost: $15
Course: Salad
Cuisine: American
Keyword: Balsamic, Chicken, Pasta

Discover a Refreshing Twist on Dinner

Welcome to your next favorite weeknight meal! Our Cold Noodles with Shredded Chicken recipe is not only easy to prepare but also incredibly satisfying. Perfect for those busy evenings when you crave something delicious without the hassle, this dish brings together a medley of flavors and textures that will delight your palate. Packed with nutrients and bursting with flavor, you’ll find it hard to believe how simple it is to make. Let’s dive in!

Why You’ll Love This Recipe

This recipe is a game-changer for your dinner routine. Here are just a few reasons why you’ll adore it:

  • Quick and Easy: Ready in under 30 minutes, perfect for weeknights.
  • Flavor-Packed: The combination of sesame oil, garlic, and chili oil creates a rich, savory flavor.
  • Versatile Ingredients: Substitute ingredients according to your pantry and taste preferences.
  • Great for Meal Prep: Make it ahead of time and enjoy leftovers for lunch or dinner.
  • Healthy and Satisfying: A balanced dish full of protein, fiber, and healthy fats.

Ingredients Breakdown

Let’s take a closer look at what you’ll need to whip up this delightful dish:

  • Chicken Breast: 1 chicken breast, left at room temperature for 1-2 hours so it’s not cold from the fridge. You can also use leftover rotisserie chicken.
  • Ginger: 2 slices for a warm, spicy kick.
  • Scallions: Cut into 3-inch lengths. They add a mild onion flavor.
  • Noodles: 2 servings of your choice (egg noodles, rice noodles, or any long pasta work well).
  • Cucumber: 1/2 seedless cucumber, julienned for crunch.
  • Bean Sprouts: 1 1/2 cups, raw or blanched for added texture.
  • Peanuts: 1/3 – 1/2 cup of dry roasted peanuts for crunch and nuttiness.
  • Cilantro: A small handful for freshness.
  • Sugar: 2 teaspoons to balance the flavors.
  • Sesame Oil: 1 tablespoon for a rich, nutty flavor.
  • Garlic: 4 cloves, finely minced to enhance the taste.
  • Rice Vinegar: 4 tablespoons for acidity.
  • Soy Sauce: 3 tablespoons, preferably light, for a savory depth.
  • Chili Oil: 2-3 teaspoons, omit if you prefer a milder dish.
  • Salt: To taste.

Step-by-Step Instructions

Side view of a bowl of cold noodles garnished with bean sprouts and herbs.

Follow these easy steps to create your delicious meal:

  1. Poach the Chicken: Fill a small pot with enough water to submerge the chicken breast. Add the ginger and scallion. When the water comes to a boil, add the chicken and bring to a boil again. Cover the pot, shut off the heat, and let the chicken sit in the water for 22-25 minutes.
  2. Prepare the Sauce: In a bowl, combine all the sauce ingredients: sugar, sesame oil, minced garlic, rice vinegar, soy sauce, and chili oil. Mix well and set aside.
  3. Cook the Noodles: Prepare your noodles according to package instructions. Drain and rinse thoroughly under cold water. If you’re not serving immediately, mix in 1-2 teaspoons of oil to prevent sticking.
  4. Assemble the Dish: In a large mixing bowl, combine the cooked noodles, shredded chicken, julienned cucumber, bean sprouts, chopped peanuts, scallions, and cilantro. Pour the sauce over everything and toss well to combine.
  5. Serve: Enjoy your Cold Noodles with Shredded Chicken chilled or at room temperature!

Pro Tips for Perfection

Here are some expert insights to elevate your dish:

  • Chicken Texture: For the best texture, let the chicken rest after poaching. This keeps it juicy and tender.
  • Fresh Ingredients: Use fresh veggies and herbs for vibrant flavors and textures.
  • Adjust the Heat: Feel free to modify the amount of chili oil based on your heat preference.
  • Noodle Cooking: Avoid overcooking the noodles by tasting them a minute before the package time is up.
  • Chill the Dish: For an even more refreshing meal, chill the assembled noodles in the fridge for about 30 minutes before serving.
  • Peanut Allergy Alternative: Substitute with sunflower seeds or omit nuts if allergies are a concern.
  • Make It Vegetarian: Replace chicken with tofu or tempeh for a plant-based version.
  • Flavor Boost: Add a splash of sesame paste for extra richness in the sauce.

Common Mistakes and Troubleshooting

Here’s how to avoid common pitfalls:

  • Overcooked Noodles: Keep a close eye on the cooking time to ensure they stay firm and don’t turn mushy.
  • Too Salty: If the dish ends up too salty, add a squeeze of lime or lemon juice to balance it out.
  • Dry Chicken: If your chicken is dry, ensure not to over-poach and let it rest properly.
  • Unbalanced Sauce: Taste the sauce before mixing it in; adjust the sugar or vinegar as needed for balance.

Variations to Try

Get creative with these variations:

  • Spicy Sesame Noodles: Increase the chili oil or add sliced jalapeños for extra heat.
  • Crunchy Veggie Noodles: Add bell peppers, carrots, or snap peas for a colorful crunch.
  • Peanut Sauce Twist: Substitute the sauce with a peanut butter-based dressing for a richer flavor.
  • Asian Citrus Noodles: Incorporate citrus segments like mandarin oranges for a refreshing twist.

Storage and Make-Ahead Instructions

This dish is perfect for meal prep! Here’s how to store it:

  • Refrigeration: Store in an airtight container in the fridge for up to 3 days.
  • Freezing: Not recommended due to the texture of the noodles and vegetables.
  • Make Ahead: You can prepare the chicken and sauce one day in advance. Assemble everything just before serving for best results.

Comprehensive FAQ

Here are answers to your burning questions:

  • Can I use gluten-free noodles? Yes, feel free to use gluten-free noodles or zucchini noodles for a healthier option.
  • How do I make this dish vegan? Substitute the chicken with tofu or tempeh and use soy sauce instead of regular sauces.
  • What can I serve with these noodles? A light cucumber salad or egg rolls make excellent accompaniments.
  • Can I make this dish spicy? Absolutely! Increase the chili oil or add some red pepper flakes to the sauce.
  • Is this dish suitable for kids? Yes! You can adjust the spice level to make it kid-friendly.
  • What’s the best way to reheat leftovers? If needed, reheat gently in the microwave, but it’s best enjoyed cold.
  • Can I use other meats? Yes, shredded pork or beef can also be delicious substitutes.
  • How long do leftovers last? Leftovers will stay fresh in the refrigerator for up to 3 days.

Nutrition Tips and Dietary Adaptations

This dish is naturally healthy, but here are a few tips to enhance its nutritional profile:

  • Increase Fiber: Add more veggies like broccoli or edamame to boost fiber content.
  • Reduce Sodium: Use low-sodium soy sauce to keep the dish heart-healthy.
  • Healthy Fats: Incorporate avocado slices for added creaminess and healthy fats.

Equipment Recommendations

To make this recipe a breeze, here are some kitchen essentials:

  • Medium Pot: For poaching the chicken.
  • Mixing Bowls: For combining ingredients and assembling the dish.
  • Cutting Board and Knife: For chopping veggies and preparing the chicken.
  • Colander: For draining and rinsing the noodles.

Serving Suggestions

Present your Cold Noodles with Shredded Chicken beautifully:

  • Garnish: Top with extra peanuts, scallions, or sesame seeds for visual appeal.
  • Side Dishes: Pair with a light Asian slaw or spring rolls for a complete meal.
  • Drink Pairing: Serve with a chilled jasmine tea or your favorite sparkling drink.

Enjoy Cooking Again!

There you have it—the ultimate guide to making Cold Noodles with Shredded Chicken. This dish is not only a breeze to prepare but also a delightful way to enjoy a variety of flavors and textures. Remember, cooking should be fun and stress-free, so don’t hesitate to make this recipe your own! Happy cooking, and enjoy your delicious meal!

Cold Noodles with Shredded Chicken

Prep Time 15 minutes
Cook Time 25 minutes
Total Time 40 minutes
Servings 2 servings
Calories 450
A refreshing cold noodle dish topped with shredded chicken, fresh vegetables, and a flavorful sauce, perfect for a quick and satisfying meal.

Ingredients

Protein

  • 1 piece chicken breast (left at room temperature for 1-2 hours)
  • 2 slices ginger
  • 1 piece scallion (cut into 3-inch lengths)

Noodles

  • 2 servings noodles (almost any noodle or pasta)
  • 1 piece seedless cucumber (julienned)
  • 0.5 cup bean sprouts (raw or blanched)
  • 1.5 cup dry roasted peanuts
  • 1 scallion finely chopped scallion
  • a small handful chopped cilantro
  • 2 teaspoons sugar
  • 1 tablespoon sesame oil
  • 4 cloves garlic (finely minced)
  • 4 tablespoons rice vinegar
  • 3 tablespoons light soy sauce
  • 2-3 teaspoons chili oil (omit if you don’t like heat)
  • to taste salt salt

Instructions 

  • Poach the chicken breast in boiling water with ginger and scallion for 22-25 minutes, then shred.
  • Mix all sauce ingredients in a bowl to prepare the sauce.
  • Cook noodles according to package instructions, rinse under cold water, and toss with 1-2 teaspoons oil if not serving immediately.
  • Combine noodles, shredded chicken, cucumber, bean sprouts, peanuts, scallion, and cilantro. Pour sauce over and toss to combine.

Notes

Adjust chili oil to taste for heat, and serve immediately for best texture.
Calories: 450kcal
Cost: $12
Course: Main Course
Cuisine: Asian
Keyword: Chicken, Cold Dish, Noodles

Discover the Vibrant World of Lentil Tabbouleh

Lentil tabbouleh is a refreshing twist on the classic Middle Eastern dish. This flavorful salad combines the nutty taste of green lentils with bright ingredients like lemon juice, olive oil, and a medley of fresh herbs and vegetables. Not only is it packed with nutrients, but it also makes for a satisfying side dish or a filling meal on its own. In this article, we’ll explore everything you need to know to create the perfect lentil tabbouleh salad that brightens any meal.

Why You’ll Love This Recipe

This lentil tabbouleh recipe is not just another salad. Here’s why it stands out:

  • Nutritious Powerhouse: Lentils are rich in protein, fiber, and essential vitamins, making this salad a healthy addition to your diet.
  • Quick and Easy: With just a few simple steps, you can whip up this delicious salad in under 30 minutes.
  • Versatile Flavor: The combination of fresh herbs, tomatoes, and cucumbers brings a burst of flavor that can complement any meal.
  • Meal Prep Friendly: This salad keeps well in the fridge, making it a perfect option for meal prep.
  • Customizable: You can easily swap ingredients based on your preferences or what you have on hand.

Ingredient Breakdown

Let’s dive deeper into the ingredients that make this lentil tabbouleh salad special:

  • Green Lentils: The base of the salad, green lentils hold their shape well and provide a hearty texture. You can substitute them with canned lentils if you’re short on time.
  • Fresh Parsley: This herb adds a vibrant flavor and a beautiful green color. Flat-leaf parsley is preferred for its robust flavor.
  • Fresh Mint: Adds a refreshing taste that complements the other ingredients. If you don’t have mint, you can use basil as a substitute.
  • Lemon Juice: Brightens the dish and balances the flavors. Freshly squeezed lemon juice is recommended for the best taste.
  • Olive Oil: A high-quality extra virgin olive oil enhances the overall richness of the salad.
  • Sea Salt and Black Pepper: Essential for seasoning and enhancing the flavors of the ingredients.
  • Red Onion: Adds a sharp, tangy flavor that complements the freshness of the vegetables.
  • English Cucumber: Provides a crunchy texture, adding a refreshing element to the salad.
  • Cherry Tomatoes: Sweet and juicy, they add brightness and color to the dish.

How to Prepare Lentil Tabbouleh

Close-up view of a fresh Lentil Tabbouleh Salad with ingredients like lentils, mint, and cherry tomatoes.

Now, let’s go through the steps to prepare this delicious lentil tabbouleh salad.

Step 1: Cooking the Lentils

If you’re using dried lentils, start by rinsing them under cold water. In a medium-sized pot, combine 1 cup of green lentils with a few cups of water. Bring the water to a boil, then reduce the heat to medium and simmer the lentils for about 20 to 25 minutes, or until they are tender but not mushy. Drain any excess water and let them cool.

Step 2: Mixing the Ingredients

In a large mixing bowl, combine the cooled lentils with:

  • 1 cup of finely chopped Italian parsley
  • ¼ cup of finely chopped fresh mint
  • 1 cup of finely chopped red onion
  • 1 cup of finely chopped English cucumber
  • ½ cup of halved cherry tomatoes

Step 3: Preparing the Dressing

In a separate small bowl, whisk together:

  • ¼ cup of fresh lemon juice
  • ¼ cup of extra virgin olive oil
  • 2 teaspoons of sea salt
  • 1 teaspoon of black pepper

Step 4: Combining Everything

Pour the dressing over the lentil mixture and toss gently to combine. Allow the flavors to meld together by letting the salad sit for at least 15 minutes before serving.

Pro Tips for Perfect Lentil Tabbouleh

To help you make the best lentil tabbouleh, here are some expert insights:

  • Don’t Overcook the Lentils: Keep an eye on the cooking time to ensure they maintain their shape and texture.
  • Let the Salad Rest: Allowing the salad to sit helps the flavors develop and intensify.
  • Adjust the Seasoning: Taste the salad before serving and adjust the seasoning as needed. More salt or lemon juice can elevate the flavors.
  • Experiment with Herbs: Feel free to mix in other herbs like dill or cilantro for a different flavor profile.
  • Make It Colorful: Add diced bell peppers or radishes for extra color and crunch.

Common Mistakes and Troubleshooting

Here are some common pitfalls and how to avoid them:

  • Watery Salad: Ensure lentils are well-drained after cooking and avoid adding too much dressing at once.
  • Flat Flavor: Use fresh herbs and adjust seasoning to prevent a bland dish.
  • Overcooked Lentils: Keep a close watch while cooking. They should be tender but still firm.

Variations to Try

Want to switch it up? Here are some variations you can try:

  • Quinoa Tabbouleh: Replace lentils with cooked quinoa for a gluten-free option.
  • Spicy Tabbouleh: Add diced jalapeños or a dash of cayenne pepper for some heat.
  • Roasted Vegetable Tabbouleh: Mix in roasted bell peppers, zucchini, or eggplant for a smoky flavor.
  • Feta Cheese Tabbouleh: Crumble feta cheese over the salad for a creamy, salty addition.

Storage and Make-Ahead Instructions

This lentil tabbouleh salad is perfect for meal prep! Store it in an airtight container in the refrigerator, where it will last for up to 3 days. The flavors will continue to develop as it sits. To make ahead, simply prepare the salad and dressing separately, combining them just before serving.

Frequently Asked Questions

Here are some common questions about lentil tabbouleh:

  • Can I use canned lentils? Yes, canned lentils can be a convenient option. Just rinse and drain them before use.
  • Is lentil tabbouleh gluten-free? Absolutely! This recipe is naturally gluten-free, making it a great choice for those with dietary restrictions.
  • How can I make this salad vegan? This recipe is already vegan, so you can enjoy it without any modifications!
  • Can I freeze lentil tabbouleh? While you can freeze it, the texture may change once thawed. It’s best enjoyed fresh.
  • What can I serve with lentil tabbouleh? This salad pairs well with grilled meats, wraps, or as a standalone light meal.
  • How long does this salad last? It can be stored in the fridge for up to 3 days.
  • Can I add nuts or seeds? Yes! Adding toasted nuts like almonds or walnuts can provide a delightful crunch.
  • What’s the best way to serve it? Serve chilled or at room temperature for the best flavor.

Nutrition Tips and Dietary Adaptations

This lentil tabbouleh is nutritious and can be adapted to meet various dietary needs:

  • High-Protein Option: Add chickpeas for extra protein and fiber.
  • Low-Carb Version: Use cauliflower rice instead of lentils for a lower-carb alternative.
  • Omega-3 Boost: Toss in some chia seeds or flaxseeds for added nutrition.

Essential Equipment for Making Lentil Tabbouleh

Before you start cooking, gather the necessary tools:

  • Medium Pot: For cooking lentils.
  • Mixing Bowls: One large and one small for combining ingredients and dressing.
  • Whisk: For mixing the dressing.
  • Knife and Cutting Board: For chopping fresh herbs and vegetables.

Serving Suggestions

Lentil tabbouleh is incredibly versatile and can be served in various ways:

  • As a Side Dish: Perfect alongside grilled meats or fish.
  • In a Wrap: Use as a filling for pita bread or lettuce wraps.
  • On a Bed of Greens: Serve over a bed of mixed greens for a hearty salad.
  • Garnished with Feta: Top with crumbled feta or goat cheese for added creaminess.

With this comprehensive guide, you’re well on your way to mastering the art of lentil tabbouleh. Enjoy the vibrant flavors and the confidence that comes with creating a dish that’s not only delicious but also nourishing. Happy cooking!

Lentil Tabbouleh Salad Recipe

Prep Time 10 minutes
Cook Time 25 minutes
Total Time 35 minutes
Servings 4 servings
Calories 250
A fresh and hearty salad combining cooked lentils with herbs and vegetables, dressed in lemon and olive oil for a vibrant flavor.

Ingredients

Lentils

  • 1 cup green lentils

Herbs and Vegetables

  • 1 cup Italian parsley (flat-leaf parsley)
  • 0.25 cup fresh mint leaves
  • 1 cup finely chopped Red onion
  • 1 cup finely chopped English cucumber
  • 0.5 cups cherry tomatoes

Dressing

  • 0.25 cup lemon juice
  • 0.25 cup extra virgin olive oil
  • 2 teaspoons sea salt
  • 1 teaspoon black pepper

Instructions 

  • Cook the lentils in boiling water for 20-25 minutes until tender, then drain and let cool.
  • In a large bowl, combine cooked lentils, herbs, and chopped vegetables.
  • Whisk together lemon juice, olive oil, salt, and pepper in a small bowl.
  • Pour dressing over the lentil mixture and toss gently to combine.
  • Let the salad sit for at least 15 minutes to meld flavors before serving.

Notes

This salad is best enjoyed fresh and can be stored in the refrigerator for up to 2 days.
Calories: 250kcal
Cost: $12
Course: Salad
Cuisine: Middle Eastern
Keyword: Lentils

Welcome to your new favorite recipe for mini chocolate cupcakes! These delightful, bite-sized treats are perfect for any celebration or simply to satisfy your sweet tooth. Whether you’re planning a birthday party, a baby shower, or just a cozy night in, these cupcakes are sure to impress. With a rich chocolate flavor and a creamy chocolate cream cheese frosting, you’ll find that they are not just easy to make, but also incredibly delicious. Let’s dive into how you can make these mini chocolate cupcakes that will leave everyone wanting more!

Why You’ll Love This Recipe

This recipe is designed with you in mind, making it simple to create delicious treats without the stress. Here’s why you’ll love making these mini chocolate cupcakes:

  • Quick and Easy: With just a few simple steps, you can whip up a batch of these delightful cupcakes in no time.
  • Moist and Flavorful: Thanks to ingredients like sour cream and espresso powder, each cupcake is incredibly moist with a rich chocolate flavor.
  • Perfectly Portion-Controlled: Each mini cupcake is just the right size for a sweet indulgence without the guilt.
  • Versatile Toppings: You can customize these cupcakes with a variety of frostings or toppings, making them perfect for any occasion.
  • Kid-Friendly: These mini treats are ideal for kids’ parties or as a fun weekend baking project with your family.

Ingredients You’ll Need

Before we start baking, let’s gather our ingredients. Here’s what you’ll need:

  • 1 cup all-purpose flour: This forms the base of your cupcakes.
  • 1 cup sugar: Adds sweetness to balance the cocoa flavor.
  • ½ cup cocoa powder (Dutch processed): For that rich chocolate taste.
  • ½ teaspoon baking powder: Helps the cupcakes rise perfectly.
  • ½ teaspoon baking soda: Works with the acidity of sour cream to create a light texture.
  • ½ teaspoon kosher salt: Enhances the overall flavors.
  • 2 large eggs (room temperature): Binds the ingredients together and adds moisture.
  • ½ cup vegetable oil: Keeps the cupcakes moist.
  • 1 teaspoon vanilla extract: Adds a lovely aroma and flavor.
  • ½ cup sour cream (room temperature): Ensures a tender crumb and moisture.
  • 1 teaspoon espresso powder: Boosts the chocolate flavor without tasting like coffee.
  • ½ cup hot water: Activates the cocoa powder and creates a rich batter.

For the Frosting

You’ll also need these ingredients for the creamy chocolate cream cheese frosting:

  • 6 tablespoons unsalted butter (room temperature): Adds richness to the frosting.
  • 2 cups confectioners’ sugar: Sweetens the frosting to perfection.
  • ½ teaspoon vanilla extract: For added flavor.
  • ¼ teaspoon kosher salt: Balances the sweetness.
  • 2 oz cream cheese (cold): Gives the frosting its creamy texture.
  • ¼ cup Dutch processed cocoa powder: Intensifies the chocolate flavor in the frosting.
  • ½ tablespoon heavy cream (optional): Makes the frosting extra smooth.

Step-by-Step Instructions

Side view of delectable mini chocolate cupcakes topped with glossy chocolate frosting.

Now that we have our ingredients ready, let’s get baking! Follow these simple steps to create your mini chocolate cupcakes:

1. Preheat Your Oven

Preheat your oven to 350°F (175°C) and line a mini muffin tin with cupcake liners.

2. Mix the Dry Ingredients

In a large mixing bowl, whisk together the flour, sugar, cocoa powder, baking powder, baking soda, and salt until well combined.

3. Combine the Wet Ingredients

In another bowl, mix the eggs, vegetable oil, vanilla extract, sour cream, and espresso powder. Stir until smooth.

4. Combine Both Mixtures

Gradually add the wet ingredients to the dry ingredients, mixing gently. Pour in the hot water and stir until just combined. Do not overmix.

5. Bake the Cupcakes

Fill each mini muffin cup about 2/3 full with batter. Bake for 12-15 minutes or until a toothpick inserted into the center comes out clean. Allow to cool in the pan for 5 minutes before transferring to a wire rack.

6. Make the Frosting

In a mixing bowl, cream the unsalted butter and cream cheese until smooth. Gradually add the confectioners’ sugar, cocoa powder, vanilla, and salt. Beat until fluffy. If the frosting is too thick, add heavy cream, one tablespoon at a time until desired consistency is reached.

7. Frost the Cupcakes

Once the cupcakes are completely cool, use a piping bag or a knife to frost each cupcake generously with the chocolate cream cheese frosting.

Pro Tips for Success

To ensure your mini chocolate cupcakes turn out perfectly, here are some expert tips:

  • Room Temperature Ingredients: Using eggs and sour cream at room temperature helps with better mixing and a smoother batter.
  • Don’t Overmix: Mix until ingredients are just combined to keep your cupcakes light and fluffy.
  • Check for Doneness: Cupcakes can bake quickly, so start checking at the 12-minute mark.
  • Cool Completely: Ensure cupcakes are fully cooled before frosting to prevent melting.
  • Use a Piping Bag: For a professional look, use a piping bag fitted with a star tip to frost your cupcakes.
  • Experiment with Flavors: Add chocolate chips or nuts to the batter for added texture.
  • Make-Ahead Option: You can bake the cupcakes a day in advance and frost them just before serving.
  • Keep Frosting Cool: If your kitchen is warm, refrigerate the frosting for a few minutes before applying it to the cupcakes.

Common Mistakes and Troubleshooting

If you encounter any issues, here are some common mistakes and how to avoid them:

  • Dry Cupcakes: Ensure you’re measuring your flour correctly. Use a kitchen scale or spoon and level method instead of scooping directly from the bag.
  • Flat Cupcakes: Make sure your baking powder and baking soda are fresh. Expired leavening agents can lead to flat cupcakes.
  • Overbaked Cupcakes: Keep an eye on the time and use the toothpick test to check for doneness.

Variations to Try

Add some creativity to your mini chocolate cupcakes with these fun variations:

  • Peanut Butter Swirl: Add dollops of peanut butter to the cupcake batter before baking for a delightful twist.
  • Mint Chocolate: Mix in peppermint extract for a refreshing minty flavor.
  • Chocolate Chip: Fold in mini chocolate chips for extra chocolatey goodness.
  • Coconut Frosting: Replace the chocolate frosting with a coconut cream frosting for a tropical flair.

Storage and Make-Ahead Instructions

These mini chocolate cupcakes can be stored for up to 3 days at room temperature in an airtight container. To freeze, place them in a single layer in a freezer-safe container or bag. They can be frozen for up to 3 months. Just thaw at room temperature before frosting and serving.

Frequently Asked Questions (FAQs)

Here are some common questions about making mini chocolate cupcakes:

  • Can I use whole wheat flour? Yes, you can substitute half or all the all-purpose flour with whole wheat flour for a healthier option.
  • Can I make these cupcakes gluten-free? Absolutely! Use a gluten-free all-purpose flour blend.
  • How do I make the cupcakes vegan? Substitute eggs with flaxseed meal or applesauce, and use non-dairy milk and butter alternatives.
  • What can I use instead of sour cream? Greek yogurt or buttermilk can be great substitutes for sour cream in this recipe.
  • How do I know when the cupcakes are done? A toothpick inserted in the center should come out clean or with a few moist crumbs.
  • Can I double the recipe? Yes, feel free to double the ingredients for a larger batch.
  • How can I make the frosting more chocolatey? Simply add more cocoa powder to the frosting mixture.
  • Can I use store-bought frosting? Yes, if you’re short on time, store-bought frosting works perfectly.

Nutrition Tips and Dietary Adaptations

For those watching their nutrition, consider these tips:

  • Reduce Sugar: You can cut down the sugar by 25% without sacrificing flavor.
  • Use Healthy Fats: Substitute vegetable oil with applesauce for a lower fat option.
  • Portion Control: Stick to the mini size to keep portions manageable.

Equipment Recommendations

To make your baking experience smooth, here are a few essential tools:

  • Mini Muffin Tin: A non-stick mini muffin tin is perfect for uniform baking.
  • Baking Liners: Use colorful cupcake liners to add flair to your treats.
  • Mixing Bowls: Invest in a set of mixing bowls for easy ingredient prep.
  • Whisk: A good whisk helps to mix your batter smoothly.
  • Piping Bag: For frosting, a piping bag with a star tip is ideal for a professional finish.

Serving Suggestions

These mini chocolate cupcakes are perfect as is, but here are a few serving suggestions:

  • On a Dessert Table: Arrange them on a tiered stand for an eye-catching display.
  • With a Scoop of Ice Cream: Serve alongside vanilla or mint chocolate chip ice cream for a decadent dessert.
  • Garnished with Berries: Add fresh berries on top for a burst of color and flavor.

Conclusion

There you have it—your ultimate guide to making decadent mini chocolate cupcakes! These delightful treats are not only easy to make, but they also offer endless possibilities for customization. Perfect for any occasion or simply as a sweet treat to enjoy at home, you’ll find that these mini cupcakes are bound to become a favorite. So, roll up your sleeves, gather your ingredients, and start baking! Remember, cooking is about having fun, being creative, and enjoying the process. Happy baking!

Mini Chocolate Cupcakes with Chocolate Cream Cheese Frosting

Prep Time 20 minutes
Cook Time 15 minutes
Total Time 35 minutes
Servings 24 cupcakes
Calories 150
Delight in these rich and moist mini chocolate cupcakes topped with creamy chocolate cream cheese frosting, perfect for any celebration.

Ingredients

Batter

  • 1 cup all purpose flour
  • 1 cup sugar
  • ½ cup cocoa powder dutch processed
  • ½ teaspoon baking powder
  • ½ teaspoon baking soda
  • ½ teaspoon kosher salt
  • 2 large eggs (room temperature)
  • ½ cup vegetable oil
  • 1 teaspoon vanilla extract
  • ½ cup sour cream (room temperature)
  • 1 teaspoon espresso powder
  • ½ cup hot water

Chocolate Frosting

  • 6 tablespoons unsalted butter (room temperature)
  • 2 cups confectioners sugar
  • ½ teaspoon vanilla extract
  • ¼ teaspoon kosher salt
  • 2 oz cream cheese (cold)
  • ¼ cup dutch processed cocoa powder
  • ½ tablespoon heavy cream (optional)

Instructions 

  • Preheat oven to 350°F (175°C) and line mini muffin tins with paper liners.
  • Mix dry ingredients, then add eggs, oil, vanilla, sour cream, espresso, and hot water; combine until smooth.
  • Fill muffin tins with batter and bake for 15 minutes; cool completely.
  • Beat butter, confectioners sugar, vanilla, salt, and cream cheese until fluffy; add cocoa powder and heavy cream, mix well.
  • Frost cooled cupcakes with chocolate cream cheese frosting and serve.

Notes

Use high-quality cocoa for best flavor and consider chilling the frosting for easier piping.
Calories: 150kcal
Cost: $12
Course: Dessert
Keyword: chocolate