Author

Steven

Browsing

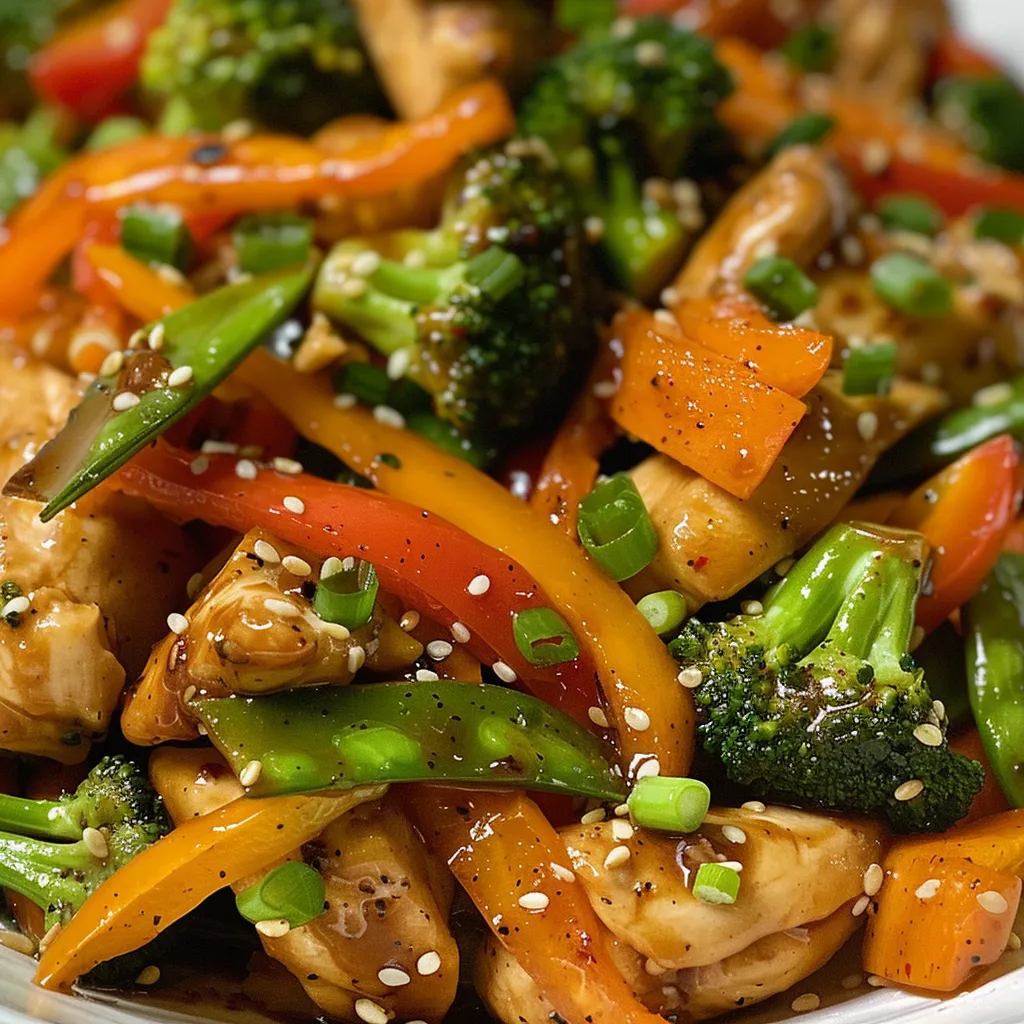
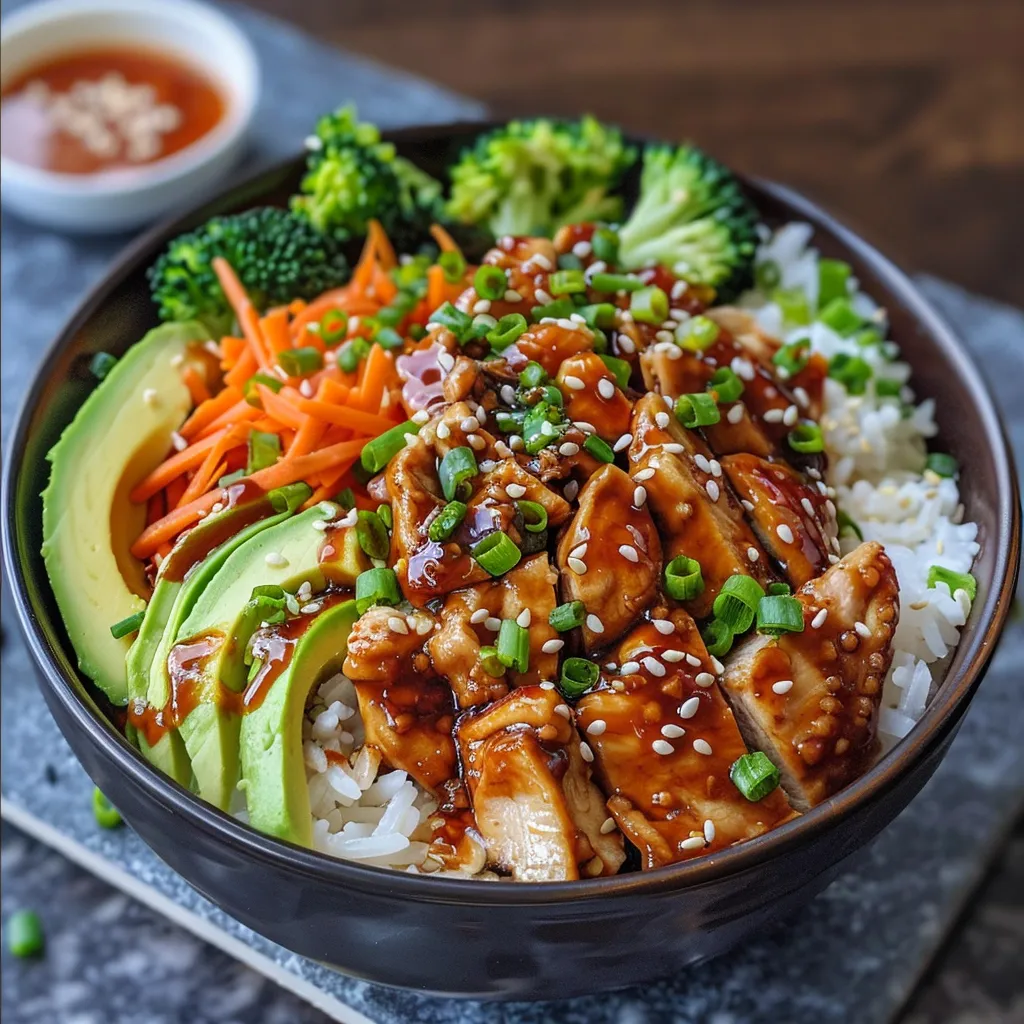
Whip Up a Delectable Teriyaki Chicken Bowl in Just 15 Minutes!

Are you ready to transform your weeknight dinners with a quick and delicious teriyaki chicken bowl? This recipe is not only simple but also packed with flavor, making it the perfect solution for busy nights when you want something satisfying without spending hours in the kitchen. With tender chicken, vibrant broccoli, and fluffy rice, this dish is sure to become a staple in your home.

In this guide, we’ll dive deep into everything you need to know to make the ultimate teriyaki chicken bowl. From ingredient breakdowns to expert tips, we’ve got you covered. Let’s get started!

🍽 Looking for More Recipes to Cook Every Day?

Get my full cookbook with 50 Recipes You’ll Want to Cook Again and Again perfect for busy days and family dinners.

🍗 Download Your Cookbook Now

Instant download • 50 tested recipes

Why You’ll Love This Teriyaki Chicken Bowl Recipe

  • Quick and Easy: This teriyaki chicken bowl can be made in just 15 minutes, perfect for busy weeknights.
  • Flavor Explosion: The homemade teriyaki sauce delivers a sweet and savory flavor that elevates the dish.
  • Customizable: You can easily swap in your favorite vegetables or proteins, making it versatile for everyone’s taste.
  • Healthy Option: Packed with lean protein and fresh veggies, this bowl is a nutritious choice.
  • Meal Prep Friendly: Prepare extra portions for quick lunches throughout the week!

Ingredient Breakdown for Your Teriyaki Chicken Bowl

Main Ingredients

  • 1 pound chicken breast: Cut into bite-sized pieces for quick cooking.
  • 0.5 cup teriyaki sauce: Use store-bought or homemade for the best flavor.
  • 2 cups cooked rice: White, brown, or jasmine rice works perfectly.
  • 1 cup broccoli: Fresh or frozen, add it for vibrant color and nutrients.
  • 1 tablespoon oil: Use vegetable or sesame oil for cooking.
  • 1 tablespoon sesame seeds: For garnish, adding a nice crunch.
  • 2 green onions: Chopped, for a fresh garnish.

Substitutions and Variations

  • Protein Options: Substitute chicken with tofu, shrimp, or beef for different flavors.
  • Vegetable Choices: Feel free to use bell peppers, snap peas, or carrots to mix it up.
  • Rice Alternatives: Quinoa or cauliflower rice can be a low-carb substitute.
  • Gluten-Free: Use gluten-free soy sauce or tamari in the teriyaki sauce.

Step-by-Step Instructions for Making Your Teriyaki Chicken Bowl

Captivating image of a Teriyaki chicken bowl showing vibrant ingredients and textures.

Ready to cook? Follow these simple steps to create your teriyaki chicken bowl:

  1. Heat the oil: Begin by heating oil in a large skillet over medium-high heat.
  2. Add chicken: Once the oil is hot, add the chicken pieces and cook until they are golden brown, about 5-7 minutes.
  3. Pour the sauce: Add the teriyaki sauce over the chicken and let it simmer for 3 minutes until it thickens.
  4. Prepare the bowls: Place cooked rice in serving bowls, followed by the teriyaki chicken and broccoli.
  5. Garnish: Top with sesame seeds and chopped green onions. Serve warm and enjoy!

Pro Tips for the Best Teriyaki Chicken Bowl

  • High Heat Cooking: Cooking on high heat caramelizes the chicken, enhancing its flavor.
  • Resting Time: Let the chicken rest for a few minutes before adding it to the rice; this helps retain its juices.
  • Thickening the Sauce: If the sauce isn’t thick enough, mix a little cornstarch with water and add it to the pan.
  • Meal Prep: Cook extra chicken and rice for quick meals throughout the week.
  • Keep Ingredients Fresh: Use fresh vegetables for the best taste and texture.
  • Cooking in Batches: If you have a lot of chicken, cook in batches to prevent steaming.
  • Flavor Boost: Marinate the chicken in teriyaki sauce for an hour before cooking for enhanced flavor.
  • Experiment: Don’t hesitate to play around with different vegetables and sauces!

Common Mistakes and Troubleshooting

Even the best cooks make mistakes! Here are some common pitfalls and how to avoid them:

  • Overcooking Chicken: Cook just until golden; overcooked chicken can become dry.
  • Too Much Sauce: Start with less sauce; you can always add more if needed!
  • Not Enough Veggies: Ensure a colorful mix for added nutrients and flavor.
  • Sticky Rice: Rinse rice before cooking to remove excess starch for fluffier grains.

Storage and Make-Ahead Instructions

Planning ahead? Here’s how to store your teriyaki chicken bowl:

  • Refrigeration: Store leftovers in an airtight container in the fridge for up to 3 days.
  • Freezing: Freeze cooked chicken and rice separately for up to 2 months. Reheat before serving.
  • Make-Ahead: Prepare the sauce in advance and store it in the fridge for quick assembly later.

Frequently Asked Questions

  • Can I use frozen vegetables? Absolutely! Just add them to the pan as the chicken cooks.
  • Is this recipe gluten-free? Use gluten-free soy sauce or tamari for a gluten-free option.
  • Can I meal prep this dish? Yes, it’s perfect for meal prepping! Just store components separately.
  • How long does it take to cook? The entire recipe takes about 15 minutes from start to finish.
  • Can I use chicken thighs instead of breasts? Yes, chicken thighs are a great alternative for a juicier option.
  • What can I substitute for teriyaki sauce? You can use a mix of soy sauce and brown sugar as a quick substitute.
  • Is this dish spicy? No, it’s sweet and savory, but you can add chili flakes for heat!
  • What’s the best way to serve this dish? Serve warm in bowls, garnished with green onions and sesame seeds.

Nutritional Tips and Dietary Adaptations

This teriyaki chicken bowl is not only delicious but nutritious as well:

  • Protein-Packed: Each serving contains lean protein from chicken, essential for muscle health.
  • Fiber-Rich: Adding broccoli boosts fiber content, aiding digestion.
  • Low-Calorie Option: Use cauliflower rice instead of regular rice for a low-calorie adaptation.
  • Balanced Meal: With proteins, carbs, and veggies, it’s a well-rounded meal.

Equipment Recommendations

To make your cooking experience smoother, here are some recommended tools:

  • Non-Stick Skillet: A must-have for easy cooking and cleanup.
  • Rice Cooker: Perfect for cooking rice perfectly every time.
  • Measuring Cups and Spoons: Essential for accurate ingredient measurements.
  • Sharp Knife: For efficiently cutting chicken and vegetables.

Serving Suggestions for Your Teriyaki Chicken Bowl

Finally, how you serve your dish can elevate the experience:

  • Pair with Edamame: A side of steamed edamame adds protein and fiber.
  • Serve with a Salad: A light cucumber and carrot salad complements the bowl.
  • Enjoy with Sushi: Add sushi rolls for a complete Japanese-inspired meal.
  • Garnish Well: Don’t skimp on garnishes; they add flavor and visual appeal!

Now that you have the ultimate guide to creating a delicious teriyaki chicken bowl, it’s time to get cooking! You’ll enjoy the simplicity of this recipe, the joy of cooking, and the satisfaction of a meal well done. Bon appétit!

🍽 Looking for More Recipes to Cook Every Day?

Get my full cookbook with 50 Recipes You’ll Want to Cook Again and Again perfect for busy days and family dinners.

🍗 Download Your Cookbook Now

Instant download • 50 tested recipes

Teriyaki chicken bowl: 15 minute divine bliss

Prep Time 5 minutes
Cook Time 10 minutes
Total Time 15 minutes
Servings 2 servings
Calories 550
A quick and delicious meal combining tender chicken, flavorful teriyaki sauce, and fresh vegetables in a satisfying bowl.

Ingredients

Protein

  • 1 pound chicken breast
  • 0.5 cup teriyaki sauce

Carbohydrates

  • 2 cups cooked rice

Vegetables

  • 1 cup broccoli

Fats

  • 1 tablespoon oil

Garnishes

  • 1 tablespoon sesame seeds
  • 2 green onions green onions

Instructions 

  • Heat oil in a pan and cook chicken until browned.
  • Add teriyaki sauce and simmer for 3 minutes.
  • Place rice in bowls, top with chicken, broccoli, seeds, and chopped green onions.

Notes

Use fresh broccoli for best flavor and texture.
Calories: 550kcal
Cost: $15
Course: Main Course
Cuisine: Asian
Keyword: Chicken

Your New Favorite Breakfast Recipe: Flourless Banana Protein Pancakes

Are you on the hunt for a quick, nutritious breakfast that fuels your day without complicating your morning routine? Look no further! These flourless banana protein pancakes are not just easy to make but also packed with flavor and nutrients. With just a few simple ingredients, you can whip up a batch that keeps you satisfied and energized. Let’s dive into why this recipe deserves a spot in your breakfast rotation!

Why You’ll Love This Recipe

  • Quick and Easy: This recipe requires minimal prep time and can be made in under 15 minutes, perfect for busy mornings.
  • High in Protein: Each serving is packed with protein, thanks to the protein powder and eggs, making it a filling meal.
  • Gluten-Free: With no flour needed, these pancakes are a great choice for those with gluten sensitivities.
  • Customizable: Feel free to add your favorite mix-ins or toppings for a personalized touch.
  • Kid-Friendly: These pancakes are not only healthy but also delicious, making them appealing to children and adults alike.

Ingredients You’ll Need

To make these delightful flourless banana protein pancakes, gather the following ingredients:

  • 3 Tbsp pea or whey protein powder: Adjust the amount to reach your desired batter consistency.
  • 1 ripe yellow banana: The riper, the better! A ripe banana adds natural sweetness and helps bind the pancakes.
  • 2 eggs: These contribute to the fluffiness and texture of the pancakes.
  • Optional: A splash of water or milk to adjust the batter consistency as needed.

How to Make Flourless Banana Protein Pancakes

Deliciously plated flourless pancakes made with banana and protein powder, ready to be served.

Step 1: Prepare Your Ingredients

Start by gathering all your ingredients. Make sure the banana is ripe for the best flavor.

Step 2: Blend the Batter

In a blender or mixing bowl, combine the ripe banana, eggs, and protein powder. Blend until you achieve a thick, pourable batter. If the batter is too thick, add a splash of water or milk.

Step 3: Heat Your Pan

Heat a non-stick fry pan over medium-low heat and grease it with a little oil or butter. This will prevent the pancakes from sticking.

Step 4: Cook the Pancakes

Pour the pancake batter into the pan, using about a 1/4 cup for each pancake. Cook until bubbles form on the surface and the edges look set, then flip and cook for another minute or two until golden brown.

Step 5: Serve and Enjoy!

Transfer the pancakes to a plate and serve them warm. Top with your favorite toppings such as fresh fruit, maple syrup, or nut butter.

Pro Tips for Perfect Pancakes

  • Monitor Heat Levels: Cooking on medium-low heat ensures even cooking and prevents burning.
  • Don’t Overmix: Blend just until combined to keep the pancakes fluffy.
  • Experiment with Add-Ins: Consider adding chocolate chips, nuts, or berries to the batter for extra flavor.
  • Use a Milk Jug: Pouring the batter from a milk jug makes it easy to control the size of your pancakes.
  • Make Ahead: Prepare the batter the night before and store it in the fridge for a quick morning meal.
  • Flipping Tips: Use a thin spatula to flip the pancakes for the best results.
  • Storage: Leftover pancakes can be stored in the fridge for up to 3 days or frozen for later use.
  • Thicker Pancakes: For thicker pancakes, add more protein powder or use less liquid.

Common Mistakes and Troubleshooting

Even the best cooks make mistakes! Here are some common issues and how to fix them:

  • Pancakes fall apart: Ensure the banana is fully mashed and the eggs are well combined. Adding a bit more protein powder can help with binding.
  • Pancakes are too dense: Adjust the amount of liquid in the batter. A thicker batter will yield denser pancakes.
  • Inconsistent cooking: Make sure your pan is evenly heated before adding the batter.
  • Too much sweetness: If you find the pancakes too sweet, use less ripe bananas or add a pinch of salt to balance the flavors.

Variations to Try

Feel free to get creative with these pancakes! Here are a few variations:

  • Chocolate Banana Pancakes: Add 2 tablespoons of cocoa powder to the batter for a chocolatey treat.
  • Peanut Butter Banana Pancakes: Stir in 2 tablespoons of peanut butter for added flavor and creaminess.
  • Berry Bliss Pancakes: Fold in fresh or frozen berries for a fruity twist.
  • Spiced Banana Pancakes: Add a pinch of cinnamon or nutmeg to the batter for a warm spice flavor.

Storage and Make-Ahead Instructions

These pancakes are perfect for meal prep! Here’s how to store and reheat:

  • Refrigeration: Store leftover pancakes in an airtight container in the fridge for up to 3 days.
  • Freezing: Freeze pancakes in a single layer on a baking sheet, then transfer to a zip-top bag. They’ll keep for up to 2 months.
  • Reheating: Reheat in the microwave for 30-60 seconds or in a toaster for a crispy finish.

Frequently Asked Questions

  • Can I use any kind of protein powder? Yes! Whey, pea, or any other protein powder works well.
  • Are these pancakes suitable for meal prep? Absolutely! They keep well in the fridge or freezer.
  • Can I make these pancakes vegan? Substitute the eggs with flax eggs or applesauce and use plant-based protein powder.
  • What toppings go well with these pancakes? Fresh fruit, nut butter, or yogurt are all excellent choices!
  • How can I make these pancakes fluffier? Ensure you don’t overmix the batter and cook them on low heat.
  • Can I add flour to the recipe? While it’s a flourless recipe, a small amount of oat flour can be added for a different texture.
  • How many servings does this recipe make? This recipe yields about 2-3 servings, depending on the size of your pancakes.
  • Can I substitute the banana? Yes! You can use unsweetened applesauce or pumpkin puree for a different flavor.

Nutrition Tips and Dietary Adaptations

These pancakes are inherently nutritious, but here are some tips to enhance their health benefits:

  • Increase Fiber: Mix in a tablespoon of chia seeds or flaxseeds to boost fiber content.
  • Lower Sugar: Use less ripe bananas or add unsweetened cocoa powder to reduce natural sugar levels.
  • Protein Boost: Add a bit more protein powder or Greek yogurt as a topping for extra protein.
  • Vegan Options: Use plant-based protein powder and substitute eggs with flaxseed or chia seeds.

Equipment Recommendations

For this recipe, you’ll need:

  • Blender or Whisk: For mixing the batter thoroughly.
  • Non-stick Fry Pan: To ensure pancakes cook evenly without sticking.
  • Spatula: A thin spatula is best for flipping the pancakes.
  • Measuring Cups and Spoons: For precise ingredient measurements.

Serving Suggestions

These pancakes shine on their own, but consider pairing them with:

  • Maple Syrup: A classic choice that adds sweetness.
  • Fresh Fruit: Sliced strawberries, blueberries, or banana make a delicious topping.
  • Yogurt: A dollop of Greek yogurt adds creaminess and protein.
  • Nut Butter: Almond or peanut butter provides healthy fats and extra flavor.

In conclusion, these flourless banana protein pancakes are a delightful way to start your day with a boost of energy and nutrition. They’re simple to make and can be customized to fit your taste. So gather your ingredients, follow the steps, and enjoy a stress-free breakfast that will leave you feeling fantastic!

Flourless Banana & Protein Powder Pancakes

Prep Time 5 minutes
Cook Time 10 minutes
Total Time 15 minutes
Servings 2 pancakes
Calories 250
Enjoy these quick, protein-packed pancakes made with ripe bananas and your choice of pea or whey protein powder. Perfect for a healthy breakfast or snack.

Ingredients

Protein Powder

  • 3 Tbsp pea or whey protein powder (or more to reach thick, pourable consistency)
  • 1 piece ripe yellow banana (or approx. 1/3 cup mashed)
  • 2 eggs eggs
  • Optional Splash water or milk (to adjust batter consistency)

Instructions 

  • Heat a fry-pan over medium-low heat and grease well.
  • Blend banana, eggs, and protein powder until a thick, pourable batter forms. Adjust with water or protein powder as needed.
  • Pour batter into a jug for easy pouring, then into the pan.
  • Cook until golden and easily flipped, then flip and cook the other side.

Notes

Use a non-stick pan to reduce the need for added oil or butter.
Calories: 250kcal
Cost: $8
Course: Breakfast
Cuisine: American
Keyword: Banana, Protein

Welcome to Your New Favorite Chicken Stir-Fry Recipe

If you’re looking for a quick and colorful meal that bursts with flavor, you’ve landed in the right place! This Easy Chicken and Vegetable Stir-Fry is not just a recipe; it’s a vibrant feast that can transform your weeknight dinners into something special. In just 30 minutes, you can whip up a delicious dish filled with tender chicken and fresh vegetables, all coated in a savory sauce that will leave your taste buds dancing.

Let’s dive in and explore why this stir-fry will become a staple in your kitchen!

Why You’ll Love This Recipe

  • Quick and Easy: With only 30 minutes from start to finish, this recipe is perfect for busy weeknights.
  • Healthy Ingredients: Packed with colorful veggies and lean protein, it’s a meal you can feel good about.
  • Customizable: Feel free to swap in your favorite vegetables or proteins to suit your taste.
  • Flavor Forward: The combination of soy sauce, ginger, and honey creates a savory and sweet balance that enhances every bite.
  • One-Pan Wonder: Minimal cleanup is required, as everything cooks in one pan—perfect for those who prefer convenience!

Chicken and Vegetable Stir-Fry Ingredients

Here’s what you’ll need to make this delicious stir-fry:

  • 1 lb Chicken breast: Thinly sliced for quick cooking.
  • 2 cups Bell peppers: A mix of colors for sweetness and crunch.
  • 2 cups Broccoli florets: Small pieces keep a satisfying snap.
  • 1 cup Carrots: Julienned for easy cooking and added sweetness.
  • 1 cup Snow peas: Fresh and crisp for a delightful texture.
  • 3 tbsp Soy sauce: For that umami flavor.
  • 2 cloves Garlic: Minced for aromatic depth.
  • 1 tbsp Ginger: Freshly grated to elevate the dish.
  • 1 tbsp Honey: To balance the savory flavors.
  • 1 tbsp Sesame oil: A drizzle for added richness.
  • 2 tbsp Green onions: Sliced thin for garnish.
  • 1 tbsp Sesame seeds: Toasted, for a final crunchy touch.

How to Make Chicken Stir-Fry with Vegetables

Brightly colored stir-fry showcasing chicken and a variety of vegetables.

Let’s break down the steps to create this delightful dish:

  1. Prep Your Ingredients: Have everything sliced and ready to go. This makes the cooking process swift and ensures you don’t overcook anything.
  2. Heat Your Pan: In a large skillet or wok, heat a tablespoon of sesame oil over medium-high heat.
  3. Add the Chicken: Once the oil is hot, add the chicken slices. Cook for about 5-7 minutes until golden brown and cooked through. Remove from the pan and set aside.
  4. Sauté the Aromatics: In the same pan, add a bit more sesame oil if needed, then add minced garlic and grated ginger. Sauté for about 30 seconds until fragrant.
  5. Cook the Vegetables: Add bell peppers, broccoli, carrots, and snow peas. Stir-fry for about 4-5 minutes until vegetables are tender but still crisp.
  6. Combine: Return the cooked chicken to the pan. Pour in soy sauce and honey, stirring to combine everything well.
  7. Finish and Serve: Cook for an additional 2 minutes, then remove from heat. Garnish with sliced green onions and toasted sesame seeds before serving.

Expert Tips for Perfect Stir-Fry

  • Cut Evenly: Ensure chicken and vegetables are cut into similar sizes for even cooking.
  • High Heat: Always stir-fry on high heat to achieve that delightful sear and keep veggies crisp.
  • Don’t Crowd the Pan: If you have a lot of ingredients, consider cooking in batches to prevent steaming.
  • Prep Ahead: Chop your veggies and marinate your chicken ahead of time to save on prep.
  • Use Fresh Ingredients: Fresh vegetables not only taste better but also have a better texture.
  • Experiment with Sauces: Feel free to add chili paste for heat or swap soy sauce for teriyaki for a different flavor profile.
  • Use a Wok: If you have one, a wok is excellent for high-heat cooking and gives that authentic stir-fry taste.
  • Let It Rest: Allow your stir-fry to rest a few minutes before serving to let the flavors meld.

Common Mistakes and Troubleshooting

Don’t let a few missteps ruin your stir-fry experience! Here are some common mistakes and how to fix them:

  • Overcooked Chicken: If your chicken is dry, try slicing it thinner next time or cooking it for a shorter time.
  • Soggy Vegetables: To avoid this, make sure your pan is hot enough before adding the veggies, and don’t cook them for too long.
  • Lack of Flavor: Ensure you use fresh garlic and ginger, and don’t skip the soy sauce or honey.
  • Clumpy Sauce: If your sauce is too thick, add a splash of chicken broth or water to loosen it up.

Variations to Try

Feel free to get creative! Here are some delicious variations you can try:

  • Beef Stir-Fry: Swap the chicken for thinly sliced beef for a different protein option.
  • Vegetable-Only Stir-Fry: Skip the meat entirely and load up on more vegetables for a hearty vegetarian dish.
  • Spicy Stir-Fry: Add red pepper flakes or a dash of sriracha to the sauce for a spicy kick.
  • Rice Noodle Stir-Fry: Toss in some pre-cooked rice noodles for a more filling meal.

Storage and Make-Ahead Instructions

This stir-fry is great for meal prep! Here’s how to store and reheat:

  • Refrigerate: Store leftovers in an airtight container in the fridge for up to 3 days.
  • Freeze: You can freeze the stir-fry for up to 3 months. Thaw in the fridge before reheating.
  • Reheat: Warm on the stove over medium heat, adding a splash of water or broth to keep it moist.

Frequently Asked Questions

  • Can I use frozen vegetables? Yes, frozen vegetables can be used, but make sure to thaw and drain them well to avoid excess moisture.
  • What can I serve with stir-fry? Serve your stir-fry over rice, quinoa, or noodles for a satisfying meal.
  • Can I add other sauces? Absolutely! Experiment with teriyaki, oyster sauce, or even a homemade peanut sauce.
  • Is this recipe gluten-free? Use tamari instead of soy sauce to make it gluten-free.
  • Can I use chicken thighs instead? Yes, boneless, skinless chicken thighs work beautifully in this recipe.
  • How do I know when the chicken is done? The chicken is fully cooked when it reaches an internal temperature of 165°F.
  • Can I make this vegetarian? Yes! Simply omit the chicken and increase the amount of vegetables or add tofu.
  • What’s the best way to cut chicken for stir-fry? Slice the chicken against the grain into thin strips for tender bites.

Nutritional Benefits and Dietary Adaptations

This stir-fry not only pleases the palate but also supports a healthy lifestyle:

  • Lean Protein: Chicken breast provides a good source of protein, essential for muscle repair and growth.
  • Vitamins and Minerals: Packed with vegetables, this dish delivers vitamins A, C, and K, along with essential minerals.
  • Low in Calories: A healthy option that can be tailored to fit a variety of dietary needs, including low-carb or low-calorie diets.

Essential Equipment for Your Stir-Fry

To make this stir-fry successfully, here’s what you’ll need:

  • Wok or Large Skillet: Ideal for even cooking and high heat.
  • Sharp Knife: For easy and precise cutting of ingredients.
  • Cutting Board: A sturdy board to prep your veggies and chicken.
  • Spatula or Wooden Spoon: For stirring and tossing the ingredients.

Serving Suggestions

This stir-fry is versatile and pairs well with a variety of sides:

  • Steamed Rice: White, brown, or jasmine rice can soak up the delicious sauce.
  • Noodles: Serve with rice noodles or soba for a different texture.
  • Salad: A light cucumber or Asian slaw complements the stir-fry nicely.

So there you have it! Your complete guide to making a delicious, colorful chicken stir-fry that’s sure to impress. Remember, cooking is all about trying new things and having fun! With this recipe in your back pocket, you’ll be ready to whip up a flavorful meal in no time. Happy cooking!

Easy Chicken and Vegetable Stir-Fry That Bursts with Flavor

Prep Time 10 minutes
Cook Time 15 minutes
Total Time 25 minutes
Servings 4 servings
Calories 350
This vibrant stir-fry combines tender chicken with colorful vegetables, all coated in a savory sauce for a quick and delicious meal.

Ingredients

Protein

  • 1 lb Chicken breast (thinly sliced)

Vegetables

  • 2 cups Bell peppers (a mix of colors)
  • 2 cups Broccoli florets (small pieces)
  • 1 cup Carrots (julienned)
  • 1 cup Snow peas (fresh)

Sauces and seasonings

  • 3 tbsp Soy sauce
  • 2 cloves Garlic (minced)
  • 1 tbsp Ginger (freshly grated)
  • 1 tbsp Honey
  • 1 tbsp Sesame oil (to drizzle)
  • 2 tbsp Green onions (sliced thin)
  • 1 tbsp Sesame seeds (toasted)

Instructions 

  • Heat a wok or large skillet over medium-high heat and add sesame oil.
  • Add sliced chicken and cook until browned, about 5 minutes.
  • Stir in garlic, ginger, and vegetables; cook for another 5-7 minutes until tender-crisp.
  • Mix soy sauce, honey, and a splash of water; pour over the stir-fry and toss to coat.
  • Garnish with sliced green onions and toasted sesame seeds before serving.

Notes

For extra flavor, add a splash of rice vinegar or chili flakes.
Calories: 350kcal
Cost: $15
Course: Main Course
Cuisine: Asian
Keyword: Chicken, Vegetables

Indulge in the Delight of a Yogurt Cake with Lemon Apricot Glaze

If you’re looking for a dessert that combines simplicity with a burst of flavor, then this yogurt cake with a lemon and apricot jam glaze is your answer! This cake is not only easy to make but also incredibly delicious, offering a moist texture paired with the zesty brightness of lemon and the sweetness of apricot. In this comprehensive guide, we’ll walk you through everything you need to know to create this delightful cake, from ingredients to expert tips, ensuring that even novice bakers can achieve fantastic results.

Why You’ll Love This Recipe

  • Quick and Easy: This easy yogurt cake can be whipped up in under an hour, making it perfect for last-minute gatherings or a midweek treat.
  • Moist and Flavorful: The yogurt keeps the cake incredibly moist, while the lemon zest adds a refreshing zing that elevates the flavor.
  • Customizable: Feel free to experiment with different jams or add spices to create a unique twist on this classic recipe.
  • Perfect for Any Occasion: Whether it’s a casual family dinner or a festive celebration, this cake fits seamlessly into any setting.
  • Healthier Option: With yogurt as a base, this cake offers a lighter alternative to traditional desserts without sacrificing taste.

Ingredients You’ll Need

To create this luscious yogurt cake, gather the following ingredients:

  • 2 leveled cups (250g) all-purpose flour or light spelt flour (can be mixed)
  • 2 tsp baking powder
  • 1 pinch salt
  • 1 cup (250g) plain yogurt (not very cold)
  • 1/2 cup (100g) white or unrefined cane sugar
  • 2 eggs, at room temperature
  • 1/2 scant cup (approx 80g) vegetable oil (canola oil recommended)
  • 1/2 tsp vanilla essence
  • Zest of 1-2 lemons
  • 3 Tbsp apricot or orange jam

Ingredient Substitutions & Tips

  • Flour Options: Substitute all-purpose flour with whole wheat flour for a nuttier flavor or almond flour for a gluten-free option.
  • Sweetness Level: Adjust the sugar based on your preference; substitute honey or maple syrup for a natural sweetener.
  • Yogurt Type: Use flavored yogurt for added depth or Greek yogurt for a thicker batter.
  • Jam Alternatives: Try using raspberry or blueberry jam for a different fruity glaze.

How to Make Easy Yogurt Cake with Lemon and Apricot Jam Glaze

The side view of a delicious Easy Yogurt Cake, showcasing its fluffy texture and bright jam topping.

Now that you have your ingredients, let’s dive into the steps to create your yogurt cake!

Step 1: Preheat Your Oven

Preheat your oven to 350°F (180°C) and position the rack in the middle of the oven for even baking.

Step 2: Prepare Your Pan

Grease a 9x5x2.5 inch loaf pan with butter or cooking spray, or line it with parchment paper to prevent sticking without needing to grease.

Step 3: Mix the Wet Ingredients

In a large bowl, whisk together the eggs and sugar until combined. Add the vegetable oil, lemon zest, and vanilla essence and mix well. Then stir in the yogurt (room temperature) until the batter is smooth and homogeneous.

Step 4: Combine the Dry Ingredients

In a separate bowl, sift or whisk the flour, baking powder, and salt together to ensure even distribution.

Step 5: Fold the Mixtures Together

Gradually add the dry ingredients into the wet mixture and fold gently until just combined, being careful not to overmix to keep the cake tender.

Step 6: Bake to Golden Perfection

Pour the batter into the prepared loaf pan and smooth the top with a spatula or the back of a spoon for an even surface. Bake in the preheated oven for about 35-40 minutes. Check doneness by inserting a skewer into the center—if it comes out clean, the cake is ready.

Step 7: Cool and Glaze

Remove the cake from the oven and place it on a wire rack to cool completely in the pan, which helps prevent cracking. For added shine and flavor, warm the apricot or orange jam slightly and brush it over the top of the cooled cake before serving.

Pro Tips for Perfect Results

  • Room Temperature Ingredients: Always use eggs and yogurt at room temperature for a smoother batter and improved rise.
  • Don’t Overmix: Gently fold the batter to keep it light and airy; overmixing can lead to a dense cake.
  • Check Your Oven: Ovens can vary, so keep an eye on your cake as it bakes for the best results.
  • Cooling Time: Allow the cake to cool completely in the pan to avoid breaking during removal.
  • Glaze Timing: Brush the glaze on while the cake is still slightly warm for better absorption.
  • Use Fresh Ingredients: Always opt for fresh lemons and quality yogurt for optimal flavor.
  • Experiment: Don’t hesitate to add spices like cinnamon or nutmeg to the batter for extra warmth.
  • Store Properly: Keep the cake in an airtight container to maintain moisture and freshness.

Common Mistakes and Troubleshooting

Even the best bakers can run into a few hiccups. Here are some common mistakes and how to avoid them:

  • Dense Cake: This often happens due to overmixing the batter. Remember to fold gently!
  • Dry Cake: Make sure not to overbake; check for doneness a few minutes early.
  • Sticky Glaze: If your glaze is too sticky, warm it slightly before brushing it on the cake.
  • Flavorless Cake: Always ensure you’re using fresh ingredients, especially when it comes to fruits and spices.

Variations to Try

Feel free to mix things up with these delicious variations:

  • Citrus Twist: Add zest from oranges or limes for a zesty flavor profile.
  • Berry Bliss: Fold in fresh berries like blueberries or raspberries into the batter for a fruity surprise.
  • Nutty Delight: Incorporate chopped nuts like walnuts or almonds for added crunch.
  • Chocolate Chip: Add chocolate chips to the batter for a sweet indulgence.

Storage and Make-Ahead Instructions

This yogurt cake is simple to store and can be made ahead of time:

  • Room Temperature: Keep the cake in an airtight container at room temperature for up to 3 days.
  • Refrigeration: For longer storage, refrigerate the cake for up to a week.
  • Freezing: Wrap the cooled cake tightly in plastic wrap and foil to freeze for up to 3 months. Thaw at room temperature before serving.

Comprehensive FAQ

  • Can I use Greek yogurt for this recipe? Yes, Greek yogurt will work well and add a slight tang.
  • What if I can’t find apricot jam? Feel free to substitute with any fruit jam you prefer!
  • Is it okay to leave out the eggs? You can use flax eggs as a substitute for a vegan option.
  • Can I make this cake gluten-free? Absolutely! Use a gluten-free flour blend in place of all-purpose flour.
  • How do I know when the cake is done baking? Insert a toothpick into the center; it should come out clean when the cake is done.
  • Can I add more lemon zest? Yes! Adjust to your taste for a more pronounced lemon flavor.
  • What should I serve with this cake? Pair it with fresh fruit or a scoop of whipped cream for a lovely dessert.
  • How can I prevent the cake from sticking? Ensure the pan is well-greased or lined with parchment for easy removal.

Nutritional Tips and Dietary Adaptations

This cake can easily cater to various dietary needs:

  • Lower Sugar Option: Reduce sugar by half or use a sugar substitute to reduce calories.
  • Dairy-Free Version: Substitute yogurt with plant-based yogurt alternatives.
  • Whole Grain: Use whole wheat flour for added fiber and nutrients.

Equipment Recommendations

Having the right tools can make a big difference:

  • Mixing Bowls: A set of mixing bowls in various sizes will help in managing your ingredients efficiently.
  • Whisk: A sturdy whisk is essential for combining wet and dry ingredients smoothly.
  • Loaf Pan: A quality non-stick loaf pan is crucial for easy cake release.
  • Cooling Rack: This will help cool your cake evenly and prevent sogginess.

Serving Suggestions

Make your yogurt cake even more delightful with these serving ideas:

  • With a Dusting of Powdered Sugar: Add a light sprinkle for an elegant touch.
  • Fresh Berries: Serve with a side of mixed berries for a colorful presentation.
  • Whipped Cream: Top with freshly whipped cream for added indulgence.
  • Ice Cream: A scoop of vanilla or lemon sorbet pairs beautifully with the cake.

Conclusion

There you have it! A beautifully moist and flavorful yogurt cake with a lemon apricot glaze that’s sure to become a staple in your dessert repertoire. With its simple ingredients and easy-to-follow steps, cooking at home can feel like a breeze. I hope you enjoy baking this cake as much as I enjoyed creating this recipe for you. Happy baking, and remember, cooking is all about enjoying the process and expressing your creativity in the kitchen!

Easy Yogurt Cake with Lemon and Apricot Jam Glaze Recipe

Prep Time 15 minutes
Cook Time 40 minutes
Total Time 55 minutes
Servings 8 pieces
Calories 250
A simple and flavorful yogurt cake infused with lemon zest and topped with a sweet apricot glaze, perfect for a quick dessert or snack.

Ingredients

Dry ingredients

  • 250 g all-purpose flour or light spelt flour (can be mixed)
  • 2 tsp baking powder
  • 1 pinch salt

Wet ingredients

  • 250 g plain yogurt (not very cold)
  • 100 g white or unrefined cane sugar
  • 2 eggs eggs (at room temperature)
  • 80 g vegetable oil (canola oil recommended)
  • 0.5 tsp vanilla essence
  • 1-2 lemons lemon zest (zest of 1-2 lemons)
  • 3 Tbsp apricot or orange jam

Instructions 

  • Preheat oven to 350°F (180°C) and prepare a loaf pan.
  • Whisk eggs and sugar, then add oil, lemon zest, and vanilla; mix well. Stir in yogurt until smooth.
  • Sift or whisk flour, baking powder, and salt; fold into wet mixture until just combined.
  • Pour batter into pan, smooth surface, and bake for 35-40 minutes. Cool completely.
  • Warm jam slightly and brush over cooled cake for a shiny glaze before serving.

Notes

For best results, use room temperature ingredients and do not overmix the batter.
Calories: 250kcal
Cost: $12
Course: Dessert
Cuisine: European
Keyword: apricot jam, lemon, Yogurt

Unlock the Joy of Cooking with Homemade Spinach Tortillas

If you’re looking to elevate your meals with a healthy and delicious twist, you’ve landed in the right place! These homemade spinach tortillas are not just a feast for the eyes; they’re also packed with nutrients and flavor. Made from wholesome ingredients like chickpea flour and fresh spinach, this recipe is a game-changer for anyone wanting to explore new culinary horizons. Plus, it’s completely gluten-free, making it a great option for those with dietary restrictions. Let’s dive into why you’ll love this recipe!

Why You’ll Love This Recipe

  • Healthy Ingredients: Featuring chickpea flour and fresh spinach, these tortillas are loaded with protein, vitamins, and minerals.
  • Quick and Easy: With just a few simple steps, you can whip up a batch in under 30 minutes.
  • Versatile Usage: Use them for wraps, tacos, or as a side with your favorite dishes.
  • Customizable: Easily adapt the recipe by adding spices or swapping ingredients for personal preferences.
  • Kid-Friendly: Get the little ones involved! They’ll love the vibrant color and fun shapes.

Ingredient Breakdown and Substitutions

To create these delightful spinach tortillas, you’ll need the following ingredients:

  • 1 cup chickpea flour (also called garbanzo bean flour): This is the star ingredient, providing a nutty flavor and rich protein content.
  • 1/2 cup tapioca flour/starch: This ingredient gives the tortillas their chewy texture. You can substitute with arrowroot flour if necessary.
  • 2 oz fresh baby spinach leaves: Fresh spinach adds color and nutrients. If unavailable, you can use frozen spinach (thawed and drained).
  • 1 – 1 1/8 cup water: Adjust the amount of water depending on the thickness you prefer for your tortillas.
  • 1/3 tsp salt: Enhances the overall flavor of the tortillas.

How to Make Spinach Tortillas

Freshly cooked spinach tortillas in a rustic setting, emphasizing their organic appearance.

Now, let’s get cooking! Follow these simple steps to make your own homemade spinach tortillas:

  • Blend the Ingredients: In a food processor or blender, combine the chickpea flour, tapioca flour, spinach, salt, and water. Blend until the batter is smooth.
  • Adjust the Consistency: Use 1 cup of water for thicker tortillas (great for tacos) and 1 1/8 cups for thinner ones (perfect for burritos).
  • Cook the Tortillas: Heat a non-stick skillet over medium heat. Pour about 1/3 cup of batter into the skillet and cook for 2 minutes on one side. Flip and cook for an additional minute.
  • Enjoy!: Remove from the skillet and enjoy your fresh, healthy spinach tortillas!

Pro Tips for Perfect Spinach Tortillas

Here are some expert insights to ensure your tortillas turn out perfectly every time:

  • Resting the Batter: Allow the batter to rest for at least 20-30 minutes before cooking for a better texture.
  • Use a Non-Stick Skillet: This helps prevent sticking and makes flipping easier.
  • Experiment with Herbs: Add fresh herbs like basil or oregano to the batter for extra flavor.
  • Temperature Control: Keep the heat on low-medium to avoid burning the tortillas.
  • Try Different Flours: Experiment with other gluten-free flours like almond flour or brown rice flour for variety.
  • Store Properly: Keep cooked tortillas in an airtight container to retain freshness.
  • Make Ahead: Prepare the batter a day in advance and store it in the fridge for quick meals.
  • Use Fresh Ingredients: Always opt for fresh spinach and high-quality flours for the best taste and nutrition.

Common Mistakes and Troubleshooting

Even the best of us can make mistakes in the kitchen! Here’s how to troubleshoot:

  • Too Sticky?: If your batter is too sticky, gradually add more tapioca flour until you achieve the desired consistency.
  • Not Flipping Well?: If the tortillas are breaking, they may need a little more cooking time on the first side.
  • Flavor Too Mild?: Enhance the flavor by adding garlic powder, onion powder, or your favorite spices to the batter.
  • Burning?: Lower the heat and cook longer; each stove is different, and you want a gentle, even heat.

Variations & Substitutions

Want to switch things up? Here are some creative variations for your spinach tortillas:

  • Spicy Spinach Tortillas: Add cayenne pepper or chili flakes to the batter for a kick.
  • Herb-Infused Tortillas: Mix in dried herbs like thyme or rosemary for a fragrant twist.
  • Cheese Lover’s Tortillas: Stir in some nutritional yeast or grated dairy cheese for a rich flavor.
  • Sweet Spinach Tortillas: Add a touch of honey or maple syrup and cinnamon for a sweeter option, perfect for breakfast wraps.

Storage and Make-Ahead Instructions

Proper storage is key to enjoying your homemade tortillas for days! Here’s how:

  • Refrigerate: Store cooked tortillas in an airtight container in the fridge for up to 5 days.
  • Freeze: For longer storage, freeze the tortillas with parchment paper in between to prevent sticking. They can last up to 3 months.
  • Reheat: Warm tortillas in a skillet or microwave before serving to retain their softness.

Comprehensive FAQ

Got questions? Here are some frequently asked questions about homemade spinach tortillas:

  • Can I use other types of flour? Yes! You can substitute chickpea flour with lentil flour or even regular flour if gluten is not a concern.
  • Are these tortillas vegan? Absolutely! This recipe is 100% vegan and gluten-free.
  • What can I serve with spinach tortillas? They pair wonderfully with grilled vegetables, hummus, or as a wrap for your favorite protein.
  • How do I know when the tortillas are cooked? Look for a light golden color and a slight puffing; they should be firm but still soft.
  • Can I make these tortillas ahead of time? Yes, you can prepare the batter a day in advance or cook and store them for quick meals.
  • Is there a way to make these tortillas more nutritious? Consider adding seeds like chia or flaxseed for added health benefits.
  • What’s the best way to store leftover tortillas? Store them in an airtight container in the fridge or freezer, as mentioned above.
  • Can I reheat them? Yes! Simply place them in a skillet or microwave until warm.

Nutrition Tips and Dietary Adaptations

These spinach tortillas are already a healthy choice, but here are some tips to enhance their nutritional value:

  • Add Protein: Pair your tortillas with protein-rich fillings like beans, lentils, or grilled chicken.
  • Include Fiber: Add more vegetables to your wraps for added fiber and nutrients.
  • Watch Portions: While healthy, be mindful of portion sizes to maintain balanced meals.
  • Hydration: Drink plenty of water, especially if you’re adding spices, to stay hydrated and aid digestion.

Equipment Recommendations

To make this recipe, you’ll need a few essential kitchen tools:

  • Food Processor or Blender: For blending the batter smoothly.
  • Non-Stick Skillet: Essential for cooking your tortillas without sticking.
  • Spatula: For flipping the tortillas with ease.
  • Measuring Cups: Accurate measurements are key to a successful recipe.

Serving Suggestions

Here are some delicious ways to enjoy your homemade spinach tortillas:

  • Wrap It Up: Fill them with grilled chicken and veggies for a hearty lunch.
  • Taco Night: Use them as taco shells filled with your favorite toppings.
  • Breakfast Burrito: Fill with scrambled eggs, cheese, and salsa for a nutritious breakfast.
  • Snack Time: Serve with hummus or a yogurt dip for a healthy snack.

Conclusion: Your Culinary Adventure Awaits!

There you have it! A comprehensive guide to making your own healthy spinach tortillas. Not only are they easy to prepare, but they also offer a canvas for endless culinary creativity. So go ahead, give this recipe a try, and embrace the joy of cooking. Remember, it’s all about confidence and having fun in the kitchen. Thank you for joining me on this delicious adventure. I can’t wait to hear how your spinach tortillas turn out—happy cooking!

Healthy Spinach Tortillas

Prep Time 10 minutes
Cook Time 4 minutes
Total Time 14 minutes
Servings 4 pieces
Calories 150
Enjoy these nutritious and easy-to-make spinach tortillas, perfect for wraps and tacos.

Ingredients

Dough

  • 1 cup chickpea flour (garbanzo bean flour)
  • 0.5 cup tapioca flour/starch
  • 2 oz fresh baby spinach leaves
  • 1.125 cup water (for thinner tortillas)
  • 1/3 tsp salt

Instructions 

  • Blend all ingredients until smooth, adjusting water for desired tortilla thickness.
  • Pour about 1/3 cup of batter into a non-stick skillet.
  • Cook for 2 minutes on low-medium heat, flip, then cook for 1 minute.
  • Repeat with remaining batter and enjoy.

Notes

Use a non-stick skillet for best results and minimal oil.
Calories: 150kcal
Cost: $5
Course: Main Course
Cuisine: Healthy
Keyword: Spinach

Delight in the Vibrance of Pasta Primavera

Pasta Primavera is a celebration of fresh, seasonal vegetables that transform a simple pasta dish into a colorful and nutritious meal. This delightful recipe is not just easy to prepare; it’s also incredibly versatile, allowing you to tailor it to your preferences and what you have on hand. Whether you’re looking for a quick weeknight dinner or an impressive dish for guests, Pasta Primavera has got you covered!

Why You’ll Love This Recipe

  • Quick and Easy: With a preparation time of just 15 minutes, Pasta Primavera is perfect for busy weeknights when you want something delicious without spending hours in the kitchen.
  • Packed with Nutrients: This recipe is loaded with fresh vegetables, making it a wholesome choice that boosts your daily intake of vitamins and minerals.
  • Customizable: Feel free to mix and match your favorite vegetables or use whatever is in season. This flexibility makes it easy to adapt based on your preferences.
  • Deliciously Light: The combination of olive oil, garlic, and fresh veggies creates a light yet satisfying dish that doesn’t weigh you down.
  • Family-Friendly: With its bright colors and appealing flavors, this dish is a hit with both kids and adults. It’s a great way to encourage your family to eat more vegetables!

Ingredients for Pasta Primavera

Here’s what you’ll need to create this vibrant dish:

  • 12 ounces pasta: Choose from penne, fettuccine, or spaghetti based on your preference.
  • 2 tablespoons olive oil: This adds richness and flavor; extra virgin is best for a fruity taste.
  • 3 cloves garlic, minced: Fresh garlic brings aromatic depth to the dish.
  • 1 red bell pepper, sliced: Adds sweetness and color.
  • 1 yellow bell pepper, sliced: Complementing the red peppers for a beautiful presentation.
  • 1 zucchini, sliced: A classic choice that adds a nice crunch.
  • 1 cup cherry tomatoes, halved: Their juicy sweetness brightens up the dish.
  • 1 cup broccoli florets: For a splash of green and added nutrition.
  • 1/2 cup carrots, thinly sliced: Adds color and a bit of sweetness.
  • 1/2 cup vegetable broth: Enhances flavor and moisture.
  • 1/4 cup heavy cream (optional): For a creamy finish, omit for a lighter dish.
  • 1/2 cup grated Parmesan cheese: A finishing touch that adds a nutty flavor.
  • Salt and black pepper to taste: Essential for flavor balance.
  • 2 tablespoons fresh basil or parsley, chopped: For garnish and freshness.

Step-by-Step Instructions to Make Pasta Primavera

Juicy Pasta Primavera highlighting various vegetables in a creamy sauce.
  1. Cook the pasta until al dente in a large pot of salted boiling water, reserving a splash of pasta water before draining.
  2. In a large skillet, heat olive oil over medium heat. Add minced garlic and sauté until fragrant, about 1 minute.
  3. Add the sliced bell peppers, zucchini, broccoli, and carrots to the skillet. Sauté for 5-7 minutes until the vegetables are tender but still crisp.
  4. Stir in the halved cherry tomatoes and vegetable broth, cooking briefly until the tomatoes soften, about 2-3 minutes.
  5. If using, stir in the heavy cream and mix well. Let it simmer for another minute.
  6. Add the drained pasta to the skillet, tossing everything together. If the mixture seems dry, add a splash of reserved pasta water.
  7. Stir in the grated Parmesan cheese and season with salt and black pepper to taste.
  8. Garnish with fresh herbs and serve warm.

Pro Tips for Perfect Pasta Primavera

  • Choose Fresh Seasonal Vegetables: Opt for vegetables that are in season for the best flavor and nutrition. Think asparagus in spring or butternut squash in fall.
  • Don’t Overcook Your Veggies: Aim for a tender-crisp texture to maintain nutrients and color.
  • Experiment with Pasta Shapes: While long pasta is traditional, short shapes like fusilli or farfalle work great too!
  • Add a Splash of Lemon Juice: For brightness, a squeeze of lemon juice just before serving can elevate the flavors.
  • Make it Vegan: Skip the cream and cheese, and use nutritional yeast for a cheesy flavor without dairy.
  • Meal Prep Friendly: Prep your vegetables ahead of time and store them in the fridge for quick assembly later.
  • Enhance with Protein: For added protein, consider adding grilled chicken, shrimp, or chickpeas.
  • Use Quality Olive Oil: A good quality olive oil can make a significant difference in taste.

Common Mistakes and Troubleshooting

Even the best recipes can lead to mishaps. Here are some common mistakes to avoid:

  • Overcooking Pasta: Always cook pasta until al dente, as it will continue to cook when combined with the sauce.
  • Not Reserving Pasta Water: This starchy water is perfect for adjusting the sauce’s consistency.
  • Skipping the Seasoning: Don’t forget to taste and adjust salt and pepper before serving.
  • Using Frozen Vegetables: Fresh vegetables yield the best texture and flavor, so opt for fresh whenever possible.

Variations to Try

Get creative with your Pasta Primavera by trying these variations:

  • Creamy Alfredo Version: Add a creamy Alfredo sauce instead of the broth for a richer dish.
  • Spicy Arrabbiata Style: Incorporate red pepper flakes for a spicy kick.
  • Italian Sausage Addition: For meat lovers, add crumbled Italian sausage for a savory twist.
  • Pesto Primavera: Toss the finished dish with pesto instead of olive oil for a herby flavor explosion.

Storage and Make-Ahead Instructions

This Pasta Primavera is great for meal prep! Here’s how to store it:

  • Refrigeration: Store leftovers in an airtight container for up to 3 days.
  • Freezing: You can freeze the dish for up to 3 months, but note that the texture of the vegetables may change.
  • Reheating: Reheat in a skillet over medium heat, adding a splash of water or broth to loosen the sauce.

Frequently Asked Questions

Here are some common questions about Pasta Primavera:

  • Can I use whole grain pasta? Absolutely! Whole grain pasta adds fiber and a nutty flavor.
  • What can I substitute for heavy cream? You can use coconut milk or a dairy-free cream for a lighter option.
  • Can I add other vegetables? Yes! Feel free to include any vegetables you enjoy or have on hand.
  • How can I make this gluten-free? Use gluten-free pasta and ensure your other ingredients are also gluten-free.
  • Is this dish good for meal prep? Yes! It holds up well in the fridge for a few days.
  • Can I serve this dish cold? Yes! Pasta Primavera can also be enjoyed as a cold pasta salad.
  • How spicy is this dish? It’s not spicy unless you add red pepper flakes or hot sauce.
  • What goes well with Pasta Primavera? A side salad or garlic bread pairs beautifully with this dish!

Nutrition Tips and Dietary Adaptations

Pasta Primavera is naturally nutritious. Here are some tips to boost its health benefits:

  • Incorporate Whole Foods: Use whole grain pasta and plenty of colorful vegetables for maximum nutrients.
  • Watch the Cheese: Use a smaller amount of cheese or opt for nutritional yeast to reduce calories.
  • Increase Fiber: Add beans or lentils to enhance the fiber content.
  • Control Portions: This dish is satisfying, so be mindful of your portion sizes.

Essential Equipment

To prepare Pasta Primavera, you’ll need:

  • Large Pot: For boiling pasta.
  • Skillet: A large skillet helps with sautéing the vegetables evenly.
  • Colander: For draining the pasta.
  • Cheese Grater: Freshly grated Parmesan is always better than pre-packaged.

Serving Suggestions

To elevate your dining experience, consider these serving ideas:

  • Garnish with Fresh Herbs: A sprinkle of fresh basil or parsley enhances flavors and adds color.
  • Accompany with a Salad: Serve with a light salad for a refreshing contrast.
  • Pair with a White Wine: A chilled glass of Sauvignon Blanc pairs wonderfully with the dish.
  • Use a Unique Serving Bowl: Presenting your pasta in a rustic bowl can make the meal feel special.

Conclusion

Cooking should be a joyous experience, and Pasta Primavera embodies that spirit with its vibrant colors, fresh flavors, and simple preparation. Remember, the key to a fantastic dish lies in quality ingredients and a little creativity. So gather your favorite vegetables, cook with love, and enjoy the confidence that comes with creating a beautiful meal at home. Happy cooking!

Pasta Primavera You’ll Love for Fresh Weeknight Dinners

Prep Time 10 minutes
Cook Time 15 minutes
Total Time 25 minutes
Servings 4 servings
Calories 450
A vibrant and easy-to-make pasta dish packed with fresh vegetables, perfect for quick weeknight dinners.

Ingredients

Pasta

  • 12 ounces pasta (penne, fettuccine, or spaghetti)
  • 2 tablespoons olive oil
  • 3 cloves garlic, minced
  • 1 red bell pepper red bell pepper, sliced
  • 1 yellow bell pepper yellow bell pepper, sliced
  • 1 zucchini zucchini, sliced
  • 1 cup cherry tomatoes, halved
  • 1 cup broccoli florets
  • 1/2 cup carrots, thinly sliced
  • 1/2 cup vegetable broth
  • 1/4 cup heavy cream (optional)
  • 1/2 cup grated Parmesan cheese
  • to taste Salt and black pepper
  • 2 tablespoons fresh basil or parsley, chopped

Instructions 

  • Cook pasta until al dente and reserve some pasta water.
  • Sauté garlic and vegetables in olive oil.
  • Add tomatoes and broth; cook briefly.
  • Stir in cream if using, then add pasta and toss.
  • Stir in Parmesan and seasonings, garnish, and serve.

Notes

Use fresh herbs for best flavor and adjust seasoning to taste.
Calories: 450kcal
Cost: $15
Course: Main Course
Cuisine: Italian
Keyword: Pasta

Blend Your Way to Bliss with the Ultimate Banana Berry Smoothie Recipe

Are you ready to elevate your smoothie game? This banana berry bliss smoothie is not just a drink; it’s a flavorful experience that combines the natural sweetness of ripe bananas with the vibrant tartness of mixed berries. In just a few minutes, you can have a nutrient-packed smoothie that’s perfect for busy mornings or as a refreshing snack. Let’s dive into the art of creating this delicious drink, ensuring you can whip it up with confidence and ease!

Why You’ll Love This Recipe

This smoothie is more than just a tasty treat; it offers a plethora of benefits that make it a fantastic addition to your daily routine. Here are some reasons why you’ll want to blend this smoothie:

  • Quick preparation: Ready in under 10 minutes, making it the perfect on-the-go breakfast or snack.
  • Nutrient-dense: Packed with vitamins and antioxidants from mixed berries and bananas, supporting your immune system.
  • Customizable: Easily adjust ingredients to meet your dietary needs or preferences.
  • Deliciously satisfying: The creamy texture and sweet flavors will satisfy your cravings without guilt.
  • Great for all ages: A hit with kids and adults alike, making family meals easier and healthier.

Ingredients You’ll Need

The foundation of any great smoothie is quality ingredients. Here’s what you’ll need to create your banana berry bliss:

  • 1 large ripe banana, peeled: Adds natural sweetness and a smooth, creamy texture.
  • 1 cup mixed berries (fresh or frozen): Options include blueberries, raspberries, or blackberries for a burst of flavor and color.
  • 1 cup unsweetened almond milk or milk of choice: Provides a smooth base; feel free to use oat or soy milk for extra creaminess.
  • ½ cup plain Greek yogurt or dairy-free yogurt: Offers probiotics and creaminess; opt for a dairy-free version to meet dietary needs.
  • 1 tablespoon chia seeds (optional): Boosts fiber content and adds omega-3 fatty acids.
  • 1 teaspoon pure vanilla extract (optional): Enhances flavor depth and sweetness.

Step-by-Step Instructions

Colorful smoothie showcasing ripe banana and rich berry hues in a glass.

Now that you have your ingredients ready, let’s walk through the simple steps to create this delightful smoothie:

  1. Place the banana, mixed berries, almond milk, and Greek yogurt into a blender.
  2. Add chia seeds and vanilla extract if you’re using them.
  3. Blend on high until the mixture is smooth and creamy, with no lumps remaining.
  4. Taste the smoothie and add a little honey or maple syrup if more sweetness is desired. Blend again briefly to combine.
  5. Pour into glasses and serve immediately for the best flavor and texture.

Pro Tips for the Perfect Smoothie

To ensure your banana berry bliss smoothie turns out perfectly every time, keep these expert tips in mind:

  • Use frozen fruits: They provide a thicker texture and a chill factor, making your smoothie extra refreshing.
  • Experiment with greens: Add a handful of spinach or kale for an extra nutrient boost without altering the taste.
  • Don’t skimp on blending: Blend until completely smooth to avoid any grainy texture.
  • Adjust thickness: If your smoothie is too thick, add more almond milk a little at a time until you reach your desired consistency.
  • Try different sweeteners: Maple syrup, agave nectar, or even dates can add natural sweetness without refined ingredients.
  • Pack for later: If you’re on the go, pour the smoothie into a mason jar for a quick, nutritious drink anytime.
  • Garnish creatively: Top with a sprinkle of granola or a few whole berries for added texture and presentation.
  • Chill your glass: For an extra cold smoothie, chill your serving glass in the freezer for 10 minutes before pouring.

Common Mistakes and Troubleshooting

Even the best cooks can encounter hiccups. Here are some common mistakes and how to avoid them:

  • Using overly ripe bananas: While ripe bananas add sweetness, overripe ones can make the smoothie too mushy. Aim for a balance.
  • Not blending long enough: Failing to blend thoroughly can leave chunks. Blend until you achieve a silky consistency.
  • Too much liquid: Adding too much milk can dilute flavors. Start with less and adjust as needed.
  • Skipping the taste test: Always taste before serving; you may want to adjust sweetness or thickness.

Variations to Try

Feel free to get creative with your banana berry bliss smoothie! Here are some delightful variations to consider:

  • Green Machine Smoothie: Add a handful of spinach or kale for a nutrient-packed green smoothie.
  • Peanut Butter Bliss: Mix in 1-2 tablespoons of peanut or almond butter for extra protein and a satisfying nutty flavor.
  • Chocolate Berry Delight: Add a tablespoon of cocoa powder for a chocolatey twist that pairs beautifully with berries.
  • Protein Power Smoothie: Blend in a scoop of your favorite protein powder for an energizing post-workout drink.

Storage and Make-Ahead Instructions

If you want to prepare in advance, here’s how to store your smoothie for optimal freshness:

  • Make-ahead option: Prepare the ingredients the night before. Store them in the blender container and refrigerate overnight. Blend in the morning!
  • Freezing leftovers: If you have leftover smoothie, pour it into an ice cube tray. Freeze and blend the cubes into future smoothies for a quick treat.
  • Storage duration: Fresh smoothies are best consumed within 24 hours for the best flavor and nutrient retention.

Comprehensive FAQ

Got questions? We’ve got answers! Here are some frequently asked questions about the banana berry bliss smoothie:

  • Can I use frozen fruit instead of fresh? Absolutely! Frozen fruits work great and can enhance the texture of your smoothie.
  • Is this smoothie suitable for kids? Yes! It’s a nutritious and delicious option that kids will love.
  • Can I make this smoothie vegan? Yes! Simply use a dairy-free yogurt and plant-based milk.
  • What can I add for extra protein? Consider adding Greek yogurt, protein powder, or nut butter for a protein boost.
  • How can I reduce the sugar content? Opt for unsweetened yogurt, skip added sweeteners, and use less ripe bananas.
  • Can I add vegetables to this smoothie? Yes! Spinach or kale are excellent additions that won’t compromise the taste.
  • How do I make it thicker? Use frozen fruits and reduce the amount of liquid added.
  • Is this smoothie good for meal prep? Yes! It’s a convenient option that can be prepared ahead of time.

Nutrition Tips and Dietary Adaptations

When preparing your banana berry bliss smoothie, consider these nutrition tips to cater to various dietary needs:

  • Low-carb option: Swap out the banana for avocado for healthy fats and lower carbs.
  • High-fiber boost: Include flaxseeds or oats for an extra fiber punch.
  • Protein-packed version: Add Greek yogurt or a protein shake to keep you fuller longer.
  • Allergy-friendly alternative: Substitute almond milk with coconut milk or oat milk for those with nut allergies.

Equipment Recommendations

To create the perfect banana berry bliss smoothie, here’s the kitchen equipment you’ll need:

  • High-speed blender: A good-quality blender will ensure your smoothie is perfectly smooth.
  • Measuring cups and spoons: Accurate measurements are key to great flavor.
  • Spatula: Use a spatula to scrape down the sides of the blender for an even blend.

Serving Suggestions

Once your smoothie is ready, how can you serve it in style? Here are some ideas:

  • Chill in fancy glasses: Use clear glasses to showcase the vibrant colors of your smoothie.
  • Top with toppings: Garnish with fresh berries, granola, or shredded coconut for added texture.
  • Pair with a healthy snack: Serve alongside a slice of whole-grain toast or a handful of nuts for a complete meal.

Now that you’re equipped with the ultimate banana berry bliss smoothie recipe, you’re ready to blend your way to a healthier, happier you. Enjoy every sip, and remember, cooking is about confidence and creativity—so let your kitchen adventures begin!

Banana Berry Bliss Smoothie

Prep Time 5 minutes
Total Time 5 minutes
Servings 2 cups
Calories 250
A delicious and nutritious smoothie combining ripe bananas and mixed berries for a refreshing treat.

Ingredients

Fruits

  • 1 large ripe banana (peeled)
  • 1 cup mixed berries (fresh or frozen)
  • 1 cup unsweetened almond milk (or milk of choice)
  • ½ cup plain Greek yogurt (or dairy-free yogurt)
  • 1 tablespoon chia seeds (optional)
  • 1 teaspoon vanilla extract (optional)

Instructions 

  • Place the banana, berries, almond milk, and yogurt into a blender.
  • Add chia seeds and vanilla extract if using.
  • Blend until smooth and creamy.
  • Taste and add honey or maple syrup if desired, then blend briefly.
  • Pour into glasses and serve immediately.

Notes

For extra sweetness, add a drizzle of honey or maple syrup.
Calories: 250kcal
Cost: $8
Course: Breakfast, Snack
Cuisine: American
Keyword: Fruit, Smoothie

Discover the Joy of Making Strawberry Oatmeal Bars

Welcome to a delightful journey of flavor and nutrition! In this article, we will explore how to create scrumptious Healthy Strawberry Oatmeal Bars that are perfect for snacking or breakfast. With simple ingredients and straightforward steps, these bars are not only easy to make but also packed with flavor and health benefits. So, roll up your sleeves and let’s dive into this exciting recipe that transforms fresh strawberries into a delicious treat!

Why You’ll Love This Recipe

These strawberry oatmeal bars are a perfect blend of taste and health. Here are a few reasons why you’ll adore making them:

  • Quick and Easy: This recipe can be prepared in just under an hour, making it a perfect choice for busy days.
  • Nutritious Ingredients: Packed with whole grains and fresh strawberries, these bars are a guilt-free snack or breakfast option.
  • Customizable: You can easily modify the recipe to suit your dietary needs and preferences, such as using gluten-free flour.
  • Kid-Friendly: These bars are a hit with kids, making them a fantastic treat for lunchboxes or after-school snacks.
  • Perfect for Meal Prep: They store well, making them an excellent option for preparing snacks in advance.

Ingredients Breakdown

To create these delicious strawberry oatmeal bars, you will need the following ingredients. Each ingredient plays a crucial role in achieving the perfect flavor and texture:

  • 1 cup old-fashioned rolled oats: Provides a chewy texture and is a great source of fiber.
  • 3/4 cup white whole wheat flour: Adds a nutty flavor while keeping the bars light and wholesome.
  • 1/3 cup light brown sugar: Infuses the bars with natural sweetness and a hint of caramel flavor.
  • 1/4 teaspoon ground ginger: Adds a subtle warmth and complexity to the flavor profile.
  • 1/4 teaspoon kosher salt: Enhances the sweetness and balances the flavors.
  • 6 tablespoons unsalted butter (or melted coconut oil): Provides richness and moisture to the bars.
  • 2 cups small-diced strawberries (about 10 ounces, divided): The star ingredient, offering fresh flavor and natural sweetness.
  • 1 teaspoon cornstarch: Helps to thicken the strawberry filling, ensuring it doesn’t make the bars soggy.
  • 1 tablespoon freshly squeezed lemon juice: Brightens the flavors and enhances the strawberries.
  • 1 tablespoon granulated sugar, divided: Used to sweeten the strawberries and for topping.
  • 1/2 cup powdered sugar, sifted: For drizzling over the bars to add a sweet finishing touch.
  • 1/2 teaspoon pure vanilla extract: Adds a lovely aroma and flavor.
  • 1 tablespoon milk (any kind you like): To achieve the desired consistency for the glaze.

Step-by-Step Instructions

Delicious healthy strawberry oatmeal bars arranged on a plate, with a hint of powdered sugar on top.

Let’s get started with making these delightful oatmeal bars! Follow these simple steps to ensure your bars turn out perfectly:

  1. Preheat your oven to 375°F (190°C) and position a rack in the center. Line an 8×8-inch baking pan with parchment paper, allowing the paper to overhang on two sides for easy lifting later.
  2. In a medium bowl, combine the oats, flour, brown sugar, ground ginger, and kosher salt. Pour in the melted butter (or coconut oil) and mix until clumps form, ensuring the dry ingredients are evenly moistened. Set aside 1/2 cup of this mixture to use later.
  3. Press the remaining crumble mixture firmly into the bottom of the prepared pan using the back of a measuring cup, creating an even layer.
  4. Spread half of the diced strawberries over the crust. Sprinkle cornstarch over the strawberries, then drizzle lemon juice and half of the granulated sugar (1/2 tablespoon) on top. Add the remaining strawberries and sprinkle the other 1/2 tablespoon of granulated sugar evenly over them.
  5. Top the strawberries with the reserved crumble mixture, ensuring some fruit remains visible.
  6. Bake for 35 to 40 minutes, or until the filling is bubbly and the topping is golden brown. Remove from the oven and let cool on a wire rack. To speed up the cooling process, you can refrigerate the bars.
  7. While the bars cool, whisk together powdered sugar, vanilla extract, and milk in a medium bowl until smooth. Adjust the milk quantity if you prefer a thinner glaze.
  8. Once cool, lift the bars out of the pan using the parchment paper handles, drizzle with glaze, slice into 16 bars, and serve.

Pro Tips for Perfect Bars

Achieving the perfect strawberry oatmeal bars is easy with these expert tips:

  • Use Fresh Strawberries: Opt for ripe, fresh strawberries for the best flavor. Frozen strawberries can be used but may make the filling watery.
  • Don’t Overmix: When combining the crumble ingredients, be careful not to overmix to keep the texture light and crumbly.
  • Cool Completely: Allow the bars to cool completely before slicing. This helps them hold their shape.
  • Adjust Sweetness: Feel free to adjust the sugar according to your taste preferences. Maple syrup can also be used for a different flavor.
  • Check for Doneness: Use a toothpick to check if the bars are set. The toothpick should come out clean when the bars are done.
  • Experiment with Spices: Adding cinnamon or nutmeg can enhance the flavor profile, giving these bars a cozy twist.
  • Storage: Store bars in an airtight container at room temperature for up to 3 days or refrigerate for a week. They can also be frozen for up to 3 months.
  • Make Ahead: These bars are perfect for meal prep. Make a batch on the weekend to enjoy throughout the week.

Variations to Try

Feel free to get creative with your oatmeal bars! Here are some variations to try:

  • Berry Medley: Substitute strawberries with a mix of raspberries, blueberries, and blackberries for a berry explosion.
  • Chocolate Chip: Add 1/2 cup of dark chocolate chips to the crumble mixture for a sweet twist.
  • Nutty Addition: Incorporate 1/2 cup of chopped nuts, like almonds or walnuts, to add crunch and flavor.
  • Vegan Delight: Use coconut oil and a flax egg (1 tablespoon flaxseed meal + 2.5 tablespoons water) to make these bars completely vegan.

Common Mistakes and Troubleshooting

To ensure your strawberry oatmeal bars turn out perfectly, avoid these common pitfalls:

  • Underbaking: If the bars are underbaked, they will be too soft and fall apart. Make sure the filling is bubbly and the topping is golden brown.
  • Skipping the Cooling Step: Cutting into warm bars can lead to a messy result. Always let them cool first.
  • Not Using Parchment Paper: Skipping this step can make it difficult to remove the bars from the pan. Always line the pan for easy lifting.

Storage and Make-Ahead Instructions

These delicious healthy strawberry oatmeal bars can be easily stored and made ahead:

  • Room Temperature: Store in an airtight container at room temperature for up to 3 days.
  • Refrigerator: For longer freshness, refrigerate for up to a week.
  • Freezer: Freeze bars in a single layer, then transfer to a freezer bag for up to 3 months. Thaw before serving.
  • Meal Prep: Make a batch on the weekend and enjoy them throughout the week for a quick snack or breakfast.

Frequently Asked Questions

Here are some common questions about making strawberry oatmeal bars:

  • Can I use other fruits? Yes! Other berries or even diced apples can be used as substitutes.
  • Are these bars gluten-free? You can make them gluten-free by using certified gluten-free oats and a gluten-free flour blend.
  • How do I know when the bars are done? The filling should be bubbly, and the topping should be golden brown.
  • Can I make these bars vegan? Yes! Substitute the butter with coconut oil and use a flax egg.
  • How do I store leftover bars? Keep them in an airtight container at room temperature or in the refrigerator for longer freshness.
  • Can I freeze these bars? Absolutely! They freeze well for up to 3 months.
  • What can I serve with these bars? They pair wonderfully with yogurt or can be enjoyed with a drizzle of nut butter.
  • How long do they take to bake? They typically take 35-40 minutes to bake.

Nutrition Tips and Dietary Adaptations

These bars not only satisfy your sweet tooth but also provide essential nutrients!

  • Fiber Boost: Oats and strawberries are high in fiber, which is great for digestion.
  • Lower Sugar Option: Reduce the sugar or use natural sweeteners like honey or maple syrup for a healthier alternative.
  • Protein Addition: Add a scoop of protein powder to the crumble mixture for an energizing boost.

Equipment Recommendations

To make the process smooth and enjoyable, consider having the following tools handy:

  • 8×8-inch baking pan: Ideal for baking the bars evenly.
  • Parchment paper: Makes lifting the bars out of the pan a breeze.
  • Mixing bowls: Necessary for combining your ingredients.
  • Whisk: Useful for mixing the glaze smoothly.

Serving Suggestions

Once your strawberry oatmeal bars are ready, consider these serving ideas:

  • With Yogurt: Serve with a dollop of Greek yogurt for added creaminess and protein.
  • Fresh Fruit: Pair with extra fresh strawberries or a fruit salad for a refreshing complement.
  • Nut Butter Drizzle: A drizzle of almond or peanut butter adds a tasty twist and extra nutrition.

Conclusion

Now that you have all the tools and tips to create these delightful Healthy Strawberry Oatmeal Bars, it’s time to get cooking! Enjoy the process and the delicious results. With this easy recipe, you’ll be able to whip up a batch any time you need a nutritious snack or breakfast option. Happy baking, and remember—great food doesn’t require perfection, just a willingness to try!

Healthy Strawberry Oatmeal Bars Recipe

Prep Time 15 minutes
Cook Time 40 minutes
Total Time 55 minutes
Servings 16 bars
Calories 180
Enjoy these wholesome, fruity oatmeal bars that are perfect for a quick snack or breakfast. They combine fresh strawberries with a crunchy oat topping for a delicious treat.

Ingredients

Crumb mixture

  • 1 cup old-fashioned rolled oats
  • 3/4 cup white whole wheat flour
  • 1/3 cup light brown sugar
  • 1/4 teaspoon ground ginger
  • 1/4 teaspoon kosher salt
  • 6 tablespoons unsalted butter, melted (or melted coconut oil for vegan/dairy free)

Filling strawberries

  • 2 cups small-diced strawberries (about 10 ounces, divided)
  • 1 teaspoon cornstarch
  • 1 tablespoon freshly squeezed lemon juice (from about 1/2 small lemon)
  • 1 tablespoon granulated sugar (divided)
  • 1/2 cup powdered sugar (sifted)
  • 1/2 teaspoon pure vanilla extract
  • 1 tablespoon milk (any kind you like)

Instructions 

  • Preheat oven to 375°F (190°C) and line an 8x8-inch pan with parchment paper.
  • Mix oats, flour, brown sugar, ginger, and salt. Add melted butter and combine. Reserve 1/2 cup of crumble, press remaining into pan.
  • Spread half of strawberries over crust, sprinkle cornstarch, lemon juice, and half of sugar. Add remaining strawberries and sugar, then top with reserved crumble.
  • Bake for 35-40 minutes until bubbly and golden. Cool completely on wire rack.
  • Mix powdered sugar, vanilla, and milk to make glaze. Drizzle over cooled bars, slice into 16 pieces, and serve.

Notes

For a vegan version, substitute melted coconut oil for butter.
Calories: 180kcal
Cost: $15
Course: Dessert
Keyword: strawberries

Are you ready to transform your lunch into something spectacular? This Crispy Grilled Chicken Caesar Wrap recipe is here to help you do just that! Packed with bold flavors and made with simple, fresh ingredients, these wraps are perfect for busy weeknights, picnics, or a quick meal on the go. Whether you’re a seasoned cook or just starting out in the kitchen, you’ll find this recipe straightforward and enjoyable.

In this article, we’ll take a deep dive into the components that make this wrap not only delicious but also a hit with family and friends. You’ll learn about the ingredients, preparation methods, variations, and even some common pitfalls to avoid. Plus, we’ll share tips that will make you feel confident in your cooking skills. Let’s get started!

Why You’ll Love This Recipe

  • Quick to Prepare: This recipe comes together in under 30 minutes, making it ideal for busy day lunches or last-minute dinners.
  • Simple Ingredients: You likely have most of these ingredients in your kitchen already, so no need for a fancy grocery trip!
  • Customizable: Personalize your wraps with various ingredients, ensuring everyone gets their favorite flavor without hassle.
  • Perfect for Leftovers: Make extra chicken and store it for quick meals throughout the week—no more dull lunches!
  • Great for Meal Prep: Prepare the components in advance and assemble when you’re ready to eat, saving you time and effort.

What Ingredients You Will Need

Let’s break down the ingredients for the Crispy Grilled Chicken Caesar Wraps. Each component plays a vital role in creating the scrumptious flavors and textures.

  • 2 boneless, skinless chicken breasts (about 1 lb / 450 g): Pounded to an even thickness for consistent cooking.
  • 2 tablespoons olive oil: This helps in marinating the chicken and adds richness.
  • 1 teaspoon garlic powder: For a subtle yet impactful garlic flavor.
  • 1 teaspoon smoked paprika: Adds a smoky depth that elevates the chicken.
  • Salt and freshly cracked black pepper: Essential for seasoning to taste.
  • ½ cup mayonnaise (or Greek yogurt for a lighter option): Forms the base of your creamy Caesar dressing.
  • 2 tablespoons grated Parmesan cheese: Enhances the flavor of the dressing.
  • 1 tablespoon fresh lemon juice: Brightens the dressing and adds freshness.
  • 1 teaspoon Dijon mustard: Provides a slight tang that balances the creaminess.
  • 1 small garlic clove, minced: Fresh garlic intensifies the dressing’s flavor.
  • 4 large flour tortillas (10-inch / 25 cm): The wrap that holds everything delicious together.
  • 2 cups fresh romaine lettuce, chopped: Adds crunch and freshness.
  • ½ cup shredded Parmesan cheese: For extra cheesy goodness inside the wrap.
  • Optional: Sliced cherry tomatoes or cucumbers for added crunch and flavor.

Equipment Needed

For this recipe, you’ll need a few essential tools to make the process smooth:

  • Grill pan or outdoor grill: For achieving those beautiful grill marks on the chicken.
  • Meat mallet or rolling pin: To pound the chicken breasts to an even thickness.
  • Whisk: For mixing the dressing until smooth.
  • Cutting board and knife: For slicing your chicken and veggies.

Preparation Method

Detailed close-up of a wrapped Caesar salad featuring grilled chicken, fresh greens, and dressing.

Now that we have everything ready, let’s walk through the preparation steps to create your wraps:

  • Pat the chicken breasts dry and pound to an even thickness of about ½ inch (1.3 cm). Brush both sides with olive oil and season evenly with garlic powder, smoked paprika, salt, and pepper.
  • Preheat your grill pan or outdoor grill over medium-high heat until it’s smoking hot, about 5 minutes.
  • Grill the chicken breasts for 5-6 minutes per side (about 12-15 minutes total) until grill marks form and the internal temperature reaches 165°F (74°C).
  • Transfer the chicken to a plate and let it rest for 5 minutes to keep it juicy.
  • While the chicken is resting, whisk together the mayonnaise, Parmesan, lemon juice, Dijon mustard, minced garlic, salt, and pepper in a bowl until smooth and creamy. Adjust seasoning as desired.
  • Wash and dry the romaine lettuce thoroughly, then chop it into bite-sized pieces.
  • Slice the rested chicken into thin strips or bite-sized pieces.
  • Lay your warm tortillas flat and spread a generous spoonful of Caesar dressing down the center of each.
  • Top each tortilla with chopped romaine, sliced chicken, shredded Parmesan, and optional veggies like cherry tomatoes or cucumbers.
  • Fold the sides of the tortilla in and roll tightly from the bottom up. Slice diagonally and serve immediately.
  • For an added crunch, you can toast the wrap in a dry skillet for 1-2 minutes per side.

Pro Tips for Perfect Wraps

To help you nail this recipe every time, here are some expert tips:

  • Marinate the chicken: If you have time, marinate your chicken in olive oil, garlic powder, and smoked paprika for 30 minutes to enhance the flavor.
  • Use a meat thermometer: To ensure your chicken is perfectly cooked, use a meat thermometer to check for an internal temperature of 165°F (74°C).
  • Don’t skip the resting: Letting the chicken rest after grilling allows the juices to redistribute, keeping it tender.
  • Warm your tortillas: A warm tortilla is more pliable and less likely to tear when rolling.
  • Experiment with dressings: Feel free to swap out the Caesar dressing for ranch or blue cheese if you prefer.
  • Adding crunch: For added texture, consider adding sliced radishes or bell peppers for a refreshing crunch.
  • Meal prep: Cook the chicken in bulk and store it in the fridge for quick assembly later in the week.
  • Keep it fresh: Use fresh ingredients for the best taste—especially the romaine lettuce!

Common Mistakes and Troubleshooting

Even the best cooks can face challenges. Here are some common mistakes to avoid:

  • Overcooking the chicken: This can lead to dry meat. Stick to the cooking times and use a thermometer for accuracy.
  • Too much dressing: While it’s tempting to slather on the dressing, too much can make the wrap soggy. Use just enough to coat the ingredients.
  • Not drying the lettuce: Wet lettuce can lead to a soggy wrap. Make sure to wash and dry it thoroughly.
  • Skipping the resting time: Cutting into the chicken immediately can release juices and make it dry. Always let it rest first.

Variations & Adaptations

There’s no limit to how you can customize these wraps! Here are some delicious variations to try:

  • Spicy Chicken Caesar Wrap: Add red pepper flakes or hot sauce to the dressing for a spicy kick.
  • Mediterranean Twist: Use grilled chicken, feta cheese, olives, and tzatziki sauce instead of Caesar dressing.
  • Vegetarian Option: Substitute grilled veggies like zucchini, bell peppers, and mushrooms for the chicken, adding a protein-rich spread like hummus.
  • Gluten-Free Version: Use gluten-free tortillas to make this recipe friendly for those with gluten sensitivities.

Serving Suggestions

These wraps are fantastic on their own, but here are some ideas for sides that complement them beautifully:

  • Chips or Fries: Serve with homemade sweet potato fries or crispy tortilla chips for a satisfying crunch.
  • Fresh Salad: A light side salad with mixed greens, cherry tomatoes, and a simple vinaigrette pairs perfectly.
  • Fruit Salad: For a refreshing contrast, serve a bowl of mixed fruit or a fruit salad on the side.

Storage and Make-Ahead Instructions

If you want to make these wraps in advance, here are some storage tips:

  • Store chicken separately: Keep cooked chicken in an airtight container in the fridge for up to 4 days.
  • Assemble before serving: To prevent sogginess, assemble the wraps just before serving.
  • Freezing: You can freeze cooked chicken for later use—just thaw and reheat before adding to wraps.

Nutritional Information & Benefits

Each wrap is not only delicious but offers a good balance of protein, healthy fats, and fresh veggies. Here’s a breakdown of what you can expect:

  • Protein-Packed: Grilled chicken provides lean protein that helps keep you fuller for longer.
  • Healthy Fats: Olive oil and Parmesan cheese offer healthy fats that are essential for a balanced diet.
  • Load up on Veggies: Romaine lettuce and optional veggies add fiber and vital nutrients to your meal.

FAQs About Crispy Grilled Chicken Caesar Wraps

Here are some frequently asked questions to help you out:

  • Can I make the Caesar dressing ahead of time? Yes, you can prepare the dressing a day in advance and store it in the fridge.
  • Can I use a different type of meat? Absolutely! This recipe works well with turkey or even shrimp.
  • How do I prevent my wrap from getting soggy? Keep the dressing separate until you’re ready to eat and use fresh ingredients.
  • Can I grill the chicken in advance? Yes, grilled chicken can be made ahead of time and stored in the fridge for easy assembly later.
  • Are these wraps healthy? They can be a healthy option when made with lean chicken, lots of veggies, and a lighter dressing.
  • What can I use instead of tortillas? You can use lettuce leaves for a low-carb version or whole grain wraps for added fiber.
  • How long does it take to grill the chicken? Grill the chicken for about 5-6 minutes per side, depending on thickness.
  • Can I make these wraps vegetarian? Yes! Substitute chicken with grilled vegetables or chickpeas for a vegetarian option.

With the information, tips, and variations provided, you’re now ready to create your own crispy grilled chicken Caesar wraps that will impress everyone at the table. Remember, cooking is about enjoying the process and experimenting with flavors. So, roll up your sleeves and get ready to indulge in a delicious meal that you’ve made with love. Happy cooking!

Crispy Grilled Chicken Caesar Wraps

Prep Time 15 minutes
Cook Time 15 minutes
Total Time 30 minutes
Servings 4 servings
Calories 650
Enjoy these flavorful wraps featuring tender grilled chicken, crisp romaine, and creamy Caesar dressing, all wrapped in warm tortillas for a satisfying meal.

Ingredients

Chicken

  • 2 pieces boneless, skinless chicken breasts (about 1 lb / 450 g, pounded to even thickness)
  • 2 tablespoons olive oil
  • 1 teaspoon garlic powder
  • 1 teaspoon smoked paprika
  • Salt and freshly cracked black pepper to taste Salt and pepper
  • ½ cup mayonnaise (or Greek yogurt for a lighter option)
  • 2 tablespoons grated Parmesan cheese
  • 1 tablespoon fresh lemon juice
  • 1 teaspoon Dijon mustard
  • 1 small garlic clove (minced)
  • 4 large flour tortillas (10-inch / 25 cm, warmed)
  • 2 cups fresh romaine lettuce (chopped)
  • ½ cup shredded Parmesan cheese
  • Optional sliced cherry tomatoes or cucumbers (for extra crunch)

Instructions 

  • Pound chicken to ½ inch thickness, brush with olive oil, and season with garlic powder, paprika, salt, and pepper.
  • Grill chicken over medium-high heat for 5-6 minutes per side until cooked through. Rest for 5 minutes, then slice.
  • Mix mayonnaise, Parmesan, lemon juice, Dijon, minced garlic, salt, and pepper to make Caesar dressing.
  • Spread dressing on warm tortillas, add chopped lettuce, sliced chicken, Parmesan, and optional veggies. Roll up tightly and slice.
  • Optional: Toast wraps in a skillet for 1-2 minutes per side for extra crispness.

Notes

For a lighter option, substitute Greek yogurt for mayonnaise.
Calories: 650kcal
Cost: $15
Course: Main Course
Cuisine: American
Keyword: Chicken, Wraps

Unlock the Secrets of High Protein Chocolate Chia Pudding

If you’re looking for a delicious and nutritious way to satisfy your sweet tooth, you’ve landed in the right place! Our High Protein Chocolate Chia Pudding is not only a delightful treat but also a powerhouse of nutrients, making it perfect for breakfast, snacks, or even dessert. With just a handful of ingredients and a few simple steps, you can whip up this creamy pudding that’s rich in flavor and packed with protein. Ready to dive in? Let’s get started!

Why You’ll Love This High Protein Chocolate Chia Pudding

This recipe is truly a game-changer in the world of healthy desserts. Here’s why you’ll adore it:

  • Quick and Easy Preparation: In just five minutes, you can have your pudding mixture ready to chill and enjoy later.
  • High Protein Content: Each serving is loaded with protein, thanks to the addition of plant-based protein powder, keeping you full and energized.
  • Rich Chocolate Flavor: The combination of cocoa powder and sweeteners creates a delectable chocolatey experience that satisfies cravings.
  • Customizable Options: Whether you want to add toppings or mix in extra flavors, this recipe adapts beautifully to your preferences.
  • Meal Prep Friendly: Make a batch ahead of time, and you’ll have a nutritious snack or breakfast ready for busy mornings.

Ingredients Breakdown

Let’s take a closer look at the ingredients that make this pudding so special, along with some tasty substitutions:

  • Chia Seeds: The star of the show! These tiny seeds swell up and create a lovely pudding texture. You can substitute with flaxseeds if needed, but the texture will differ slightly.
  • Cocoa Powder (Unsweetened): For that rich chocolate flavor without the added sugar. You can use Dutch-processed cocoa for a milder taste.
  • Plant-Based Protein Powder: We recommend chocolate or vanilla for the best flavor. Feel free to use any protein powder that suits your dietary needs.
  • Plant-Based Milk: Almond, soy, or oat milk all work well. Choose your favorite or what you have on hand.
  • Maple Syrup or Agave: Sweeteners that add a touch of natural sweetness. Honey or stevia can also be used as alternatives.
  • Vanilla Extract (Optional): A splash enhances the overall flavor profile, making it even more delectable.
  • Sea Salt: Just a pinch to elevate the flavors. You can omit this if you prefer.

Pro Tips for Perfecting Your Pudding

An aesthetically arranged chocolate chia pudding in a clear container, highlighting its rich color.

Want to take your chia pudding to the next level? Here are some expert tips:

  • Whisk Thoroughly: Make sure to whisk the milk and dry ingredients together until there are no lumps before adding the chia seeds.
  • Stir After Five Minutes: To avoid clumping, stir the mixture again after it has sat for five minutes.
  • Chill Overnight: For the best texture, let it sit overnight in the refrigerator. This allows the chia seeds to absorb the liquid fully.
  • Add Texture: Top your pudding with fresh berries, granola, or nuts for added crunch and flavor.
  • Experiment with Flavors: Try adding a tablespoon of peanut butter or almond butter for a nutty twist!
  • Adjust Sweetness: Taste your mixture before chilling and adjust the sweetness according to your preference.
  • Batch Preparation: Make several jars at once for an easy grab-and-go breakfast option.
  • Store in Airtight Containers: Ensure your pudding stays fresh by storing it in airtight jars or containers.

Avoiding Common Mistakes

Cooking can sometimes be tricky, so here are some common pitfalls to watch out for:

  • Skipping the Stirring: Failing to stir after five minutes can lead to clumping. Always give it a good mix!
  • Using Too Much Liquid: Stick to the recommended measurements for the right pudding consistency.
  • Not Refrigerating Long Enough: Allow enough time in the fridge for the best flavor and texture development.
  • Ignoring the Salt: A pinch of salt can make a big difference in flavor—don’t skip it!

Flavor Variations to Try

Looking to shake things up? Here are some fun variations on the classic recipe:

  • Berry Bliss: Stir in fresh or frozen berries for a fruity twist.
  • Peanut Butter Chocolate: Add a tablespoon of peanut butter to the mixture for a nutty flavor.
  • Coconut Delight: Use coconut milk and top with shredded coconut for a tropical vibe.
  • Mint Chocolate: Add a few drops of peppermint extract for a refreshing chocolate mint pudding.

Storage and Make-Ahead Instructions

This pudding is perfect for meal prep! Here’s how to store it:

  • Refrigeration: Store your pudding in the fridge for up to five days. Just remember to give it a good stir before serving as separation may occur.
  • Freezing: You can freeze the pudding in portions, but the texture may change slightly upon thawing.
  • Jar Prep: Use mason jars for easy portioning and storage; they’re also great for on-the-go meals!

Frequently Asked Questions

Here are some common questions about our High Protein Chocolate Chia Pudding:

  • How do I keep my chia pudding from getting clumpy?
    Ensure you stir well after adding the chia seeds and stir again after five minutes.
  • Is chocolate chia pudding healthy?
    Yes! It’s packed with protein, fiber, and healthy fats, making it a nutritious choice.
  • Can I make this with almond milk?
    Absolutely! Almond milk is a great base for this recipe.
  • How long does chia pudding last?
    Stored properly in the fridge, it can last up to five days.
  • Can I heat up overnight chia pudding?
    It’s best enjoyed cold, but you can warm it slightly if preferred.
  • What toppings work well with chia pudding?
    Fresh fruits, nuts, seeds, or a drizzle of nut butter all make wonderful toppings!
  • Can I use regular milk instead of plant-based?
    Yes, regular milk can be used, though it may alter the nutritional profile.
  • Does it have to sit overnight?
    While overnight is best, it can set in as little as 2 hours if you’re in a hurry.

Nutrition Tips and Dietary Adaptations

Want to make this pudding fit your dietary needs? Here are some tips:

  • Low Sugar Option: Use stevia or erythritol as a sweetener to keep sugar levels down.
  • Vegan Friendly: This recipe is naturally vegan as all ingredients are plant-based.
  • Gluten-Free: Chia seeds and cocoa powder are both gluten-free, making this recipe suitable for gluten-sensitive individuals.
  • Add Superfoods: Boost the nutritional profile by integrating superfoods like spirulina or acai powder into the mix.

Essential Equipment for Making Chia Pudding

While the recipe is simple, having the right tools can make the process smoother:

  • Whisk or Fork: For mixing your ingredients thoroughly.
  • Bowl or Jar: A container for mixing and storing your pudding.
  • Measuring Cups and Spoons: To ensure accurate ingredient amounts.
  • Refrigerator: For chilling and firming the pudding.

Serving Suggestions

How you serve your pudding can elevate the experience:

  • Chia Parfaits: Layer the pudding with yogurt and fruits for a beautiful parfait.
  • On-the-Go Snacks: Pack into portable containers for quick snacks throughout the week.
  • As a Topping: Use it as a topping for pancakes or waffles for a protein boost.

Conclusion

Your journey into the world of High Protein Chocolate Chia Pudding starts here! With its delicious taste, superb nutritional profile, and ease of preparation, this pudding is set to become a favorite in your kitchen. Remember, cooking should be fun and stress-free, and I’m here to guide you every step of the way. So grab those ingredients, and let’s create something wonderful together. Happy cooking!

High Protein Chocolate Chia Pudding

Prep Time 10 minutes
Total Time 10 minutes
Servings 2 servings
Calories 250
A delicious and nutritious chia pudding packed with protein and rich chocolate flavor, perfect for a quick breakfast or snack.

Ingredients

Dried ingredients

  • 2 tbsp chia seeds
  • 2 tbsp cocoa powder (unsweetened)
  • 1 scoop plant-based protein powder (chocolate or vanilla)
  • 1 cup plant-based milk (almond, soy, or oat milk)
  • 3 tbsp maple syrup (or agave)
  • 1 tsp vanilla extract (optional)
  • 1 pinch sea salt

Instructions 

  • Whisk together plant-based milk, protein powder, cocoa powder, vanilla, maple syrup, and salt until smooth.
  • Stir in chia seeds until evenly combined.
  • Let sit for 5 minutes, then stir again to prevent clumping.
  • Cover and refrigerate for at least 2 hours or overnight.
  • Stir before serving and add toppings like berries or cacao nibs.

Notes

Use your favorite plant-based milk and toppings for variety.
Calories: 250kcal
Cost: $10
Course: Breakfast, Dessert
Cuisine: Healthy
Keyword: Chia, chocolate, Protein