Author

Steven

Browsing

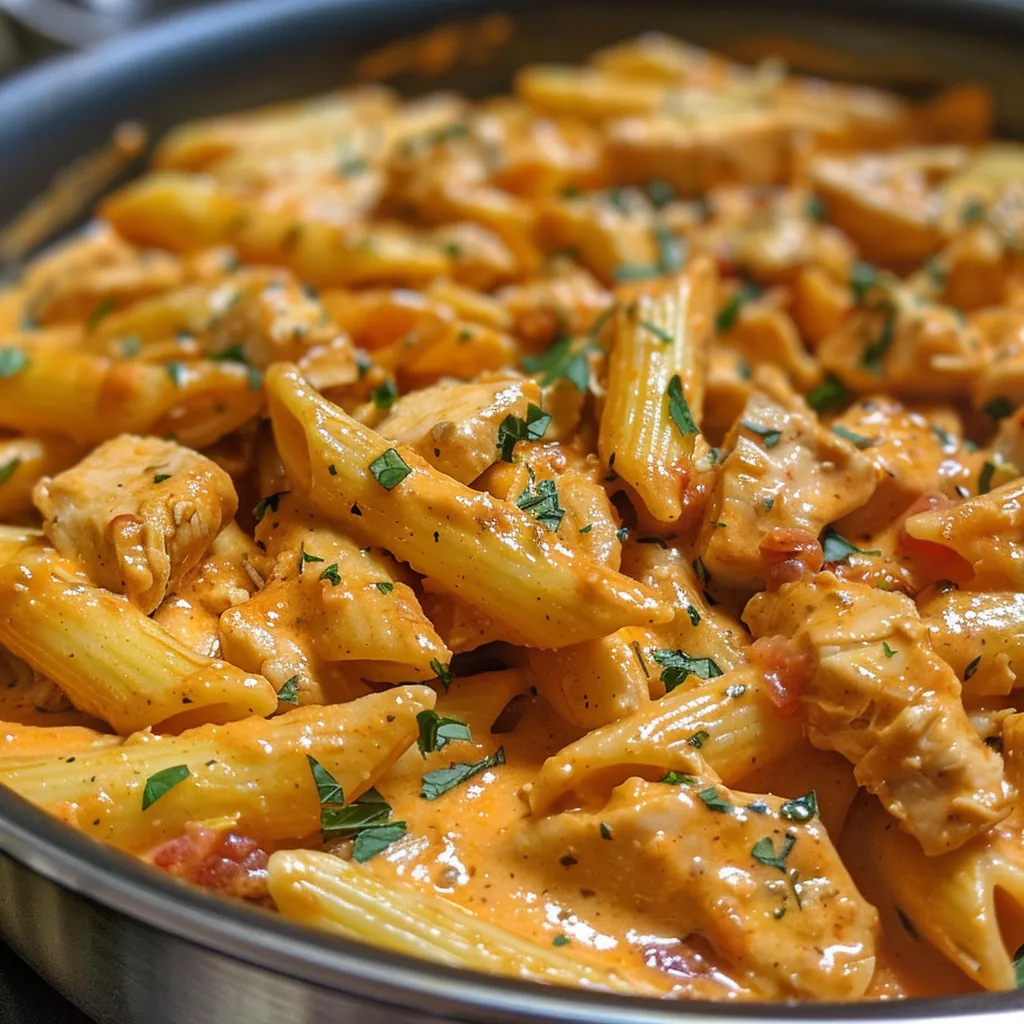
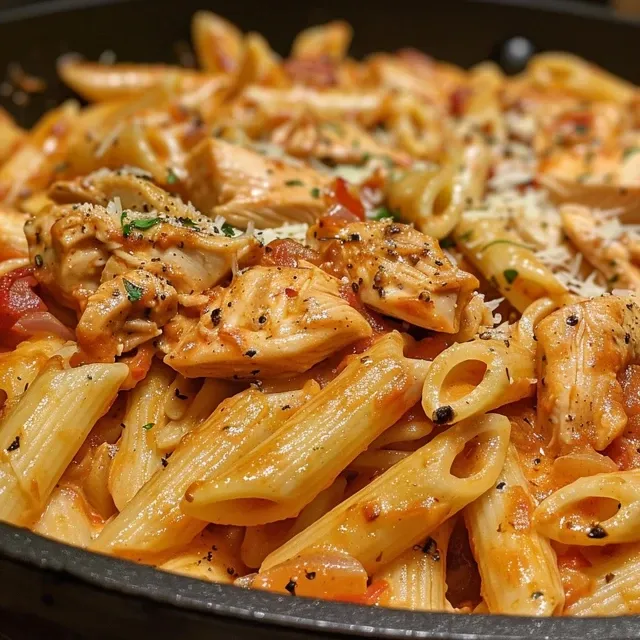
Cook Up Comfort with Creamy Chicken Penne Arrabbiata

Welcome to your new culinary adventure! If you’re looking for a dish that perfectly balances creamy richness with a spicy kick, then you’ve found it with this Creamy Chicken Penne Arrabbiata. This comforting pasta dish is not only quick to prepare, but it also bursts with flavor, making it an ideal choice for busy weeknights or relaxed weekend gatherings. Ready to dive in? Let’s explore this delicious recipe that promises to become a household favorite!

Why You’ll Love This Recipe

This recipe isn’t just about great taste; it’s about creating joyful experiences in the kitchen! Here are five compelling reasons to love this dish:

  • Quick Cooking Time: Ready in just 35 minutes, making it perfect for busy evenings.
  • Flavor-Packed: The combination of spices and creamy sauce creates a symphony of flavors that will impress everyone.
  • Customizable Ingredients: Easily swap ingredients to suit your preferences or pantry availability.
  • One-Pot Wonder: Less clean-up means more time enjoying your meal and less time in the kitchen.
  • Kid-Friendly: A creamy pasta dish that appeals to both kids and adults alike!

Ingredient Breakdown

To make this Creamy Chicken Penne Arrabbiata, you’ll need the following ingredients:

  • 2 boneless, skinless chicken breasts: Diced for quick cooking and maximum flavor absorption.
  • 12 ounces penne pasta: Perfectly shaped to catch every drop of that creamy sauce.
  • 2 tablespoons olive oil: For sautĂ©ing the chicken and adding richness.
  • 2 tablespoons butter: Adds a luscious finish to the sauce.
  • Salt and black pepper: Essential for seasoning your dish to perfection.
  • 4 cloves garlic: Minced for an aromatic base.
  • 1 small onion: Finely chopped for sweetness.
  • 1 teaspoon red pepper flakes: Adjust to taste for your preferred level of heat.
  • 1 teaspoon dried oregano: Adds a touch of herby flavor.
  • 1 can (28 ounces) crushed tomatoes: The heart of the sauce.
  • 2 tablespoons tomato paste: Enhances the tomato flavor and thickens the sauce.
  • ½ cup chicken broth: For depth of flavor.
  • Âľ cup heavy cream or cream cheese: For that creamy finish you’ll love.
  • ½ cup freshly grated Parmesan cheese: Adds a savory touch.
  • Fresh basil or parsley: For garnish and a pop of color.

How to Make Creamy Chicken Penne Arrabbiata

Side view of a delicious bowl of creamy chicken penne pasta with tomato sauce.

Let’s break this down into simple, doable steps. You will be amazed at how easy this dish is to prepare!

Step 1: Bring Water to a Boil

Start by filling a large pot with water, adding a generous pinch of salt, and bringing it to a rolling boil.

Step 2: Cook the Penne

Add the penne pasta to the boiling water. Cook according to package instructions until al dente, usually about 10-12 minutes. Drain and set aside, reserving a cup of pasta water.

Step 3: Sear the Chicken

In a large skillet, heat the olive oil over medium-high heat. Add the diced chicken to the skillet, seasoning with salt and pepper. Sauté until the chicken is golden brown and cooked through, about 6-8 minutes. Remove the chicken and set aside.

Step 4: Create the Flavor Base

In the same skillet, add butter and let it melt. Sauté the onions until translucent, about 3 minutes, then add minced garlic and red pepper flakes. Sauté for an additional 1-2 minutes, until fragrant.

Step 5: Build the Sauce

Add in the crushed tomatoes, tomato paste, and chicken broth. Stir well and let it simmer for about 5-7 minutes, allowing the flavors to meld.

Step 6: Make It Creamy

Reduce the heat to low and slowly stir in the heavy cream or cream cheese until well combined. If the sauce is too thick, gradually add some reserved pasta water until you reach your desired consistency.

Step 7: Toss and Taste

Add the cooked chicken back into the sauce along with the cooked penne. Toss everything together gently, ensuring that the pasta is well coated with the creamy sauce. Taste and adjust seasoning if necessary.

Step 8: Serve It Up!

Plate your creamy chicken penne arrabbiata and sprinkle with freshly grated Parmesan and chopped herbs for garnish. Enjoy your flavorful creation!

Pro Tips for the Best Creamy Chicken Penne Arrabbiata

To elevate your dish even further, consider these expert tips:

  • Perfect Texture: Ensure your pasta is cooked al dente to hold up against the rich sauce.
  • Flavor Adjustment: Feel free to adjust the level of red pepper flakes according to your spice tolerance.
  • Ingredient Swaps: You can substitute chicken with shrimp or even tofu for a vegetarian version.
  • Fresh Herbs: Fresh basil or parsley not only adds color but also enhances the flavor profile.
  • Extra Creaminess: For an even richer sauce, consider adding cream cheese along with the heavy cream.
  • Leftover Chicken: This recipe is a great way to use leftover rotisserie chicken!
  • Cheese Varieties: Experiment with different types of cheese, like mozzarella or pecorino, for a unique twist.
  • Garnish Smartly: A sprinkle of lemon zest can brighten the dish beautifully.

Common Mistakes and Troubleshooting

Even seasoned cooks can face challenges. Here are some common pitfalls and how to avoid them:

  • Overcooking Pasta: Always keep an eye on your pasta; it should be al dente, so it retains some bite.
  • Too Much Spice: If you accidentally overdo the red pepper flakes, add a splash of cream to balance the heat.
  • Thick Sauce: If your sauce becomes too thick, gently stir in reserved pasta water until it loosens up.
  • Underseasoned Chicken: Always season your chicken liberally before cooking to ensure it’s flavorful.

Variations to Try

Want to switch things up? Here are a few variations to consider:

  • Vegetarian Delight: Replace chicken with sautĂ©ed mushrooms or zucchini for a veggie-packed version.
  • Spicy Sausage: Use Italian sausage instead of chicken for a hearty twist.
  • Seafood Twist: Add shrimp or scallops for a seafood-inspired creamy penne.
  • Cheesy Broccoli: Toss in some steamed broccoli florets for extra nutrition and crunch.

Storage and Make-Ahead Instructions

This dish is perfect for meal prep! Here’s how to store it:

  • Refrigeration: Store in an airtight container for up to 3 days.
  • Freezing: You can freeze this dish for up to 2 months. Reheat on the stove with a splash of broth or cream to restore creaminess.
  • Make-Ahead: Prepare the sauce a day in advance and just cook the pasta when you’re ready to serve.

FAQ

Got questions? Here are some of the most frequently asked:

  • Can I use whole wheat pasta? Yes, whole wheat penne works great and adds extra fiber!
  • Is this dish spicy? The level of spice depends on how much red pepper flakes you use. Adjust to your preference!
  • Can I add vegetables? Absolutely! Spinach, bell peppers, or peas make wonderful additions.
  • What can I substitute for heavy cream? You can use half-and-half or even a non-dairy cream for a lighter option.
  • How can I make this dairy-free? Substitute the cream with coconut cream and nutritional yeast for a cheesy flavor.
  • Is it possible to make this dish gluten-free? Yes, simply use gluten-free penne pasta.
  • How do I reheat leftovers? Reheat gently on the stove, adding a bit of broth or cream to loosen the sauce.
  • What cheese can I use besides Parmesan? Pecorino or a sharp cheddar can also work beautifully!

Nutritional Tips and Dietary Adaptations

This Creamy Chicken Penne Arrabbiata can easily be adapted for various dietary needs:

  • Low-Carb Option: Substitute pasta with zucchini noodles or spaghetti squash.
  • High-Protein Version: Add more chicken or incorporate chickpeas for an extra protein boost.
  • Lower-Calorie Option: Use low-fat cream and reduce the amount of cheese.

Equipment Recommendations

Gather these essential tools to make your cooking experience smooth and enjoyable:

  • Large Pot: For boiling the pasta.
  • Skillet: A large skillet for cooking the chicken and sauce.
  • Cooking Spoon: A sturdy spoon for stirring and mixing.
  • Measuring Cups and Spoons: Accurate measurements lead to perfect results!

Serving Suggestions

To elevate your dining experience, consider these serving ideas:

  • Accompany with Garlic Bread: A great way to soak up any leftover sauce.
  • Side Salad: A fresh green salad provides a nice contrast to the creamy pasta.
  • Wine Pairing: Serve with a light red wine like Pinot Noir for a delightful complement.

Conclusion

And there you have it—a Creamy Chicken Penne Arrabbiata that’s not just a meal, but an experience! With its comforting flavors and simple preparation, this dish is sure to become a staple in your home. Remember, cooking should be enjoyable and stress-free, so embrace your inner chef and have fun! Bon appétit!

Creamy Chicken Penne Arrabbiata 35-Minutes

Prep Time 10 minutes
Cook Time 25 minutes
Total Time 35 minutes
Servings 4 servings
Calories 650
This flavorful pasta combines tender chicken, spicy arrabbiata sauce, and creamy richness for a satisfying meal ready in just 35 minutes.

Ingredients

Protein

  • 2 pieces boneless, skinless chicken breasts diced

Pasta

  • 12 ounces penne pasta

Oils & Fats

  • 2 tablespoons olive oil
  • 2 tablespoons butter

Seasonings

  • Salt and black pepper to season Salt and black pepper (to taste)
  • 4 cloves garlic minced
  • 1 small onion finely chopped
  • 1 teaspoon red pepper flakes (adjust to taste)
  • 1 teaspoon dried oregano

Canned Goods

  • 1 can 28 ounces crushed tomatoes
  • 2 tablespoons tomato paste

Broth & Liquids

  • ½ cup chicken broth
  • ½ teaspoon salt (adjust to taste)

Dairy

  • Âľ cup heavy cream or cream cheese (for extra richness)
  • ½ cup freshly grated Parmesan cheese

Garnish

  • as needed Fresh basil or parsley (for garnish)

Instructions 

  • Cook penne pasta according to package instructions; drain and set aside.
  • SautĂ© diced chicken in olive oil until cooked through; remove and set aside.
  • In the same pan, sautĂ© garlic, onion, red pepper flakes, and oregano until fragrant.
  • Add crushed tomatoes, tomato paste, chicken broth, and salt; simmer for 10 minutes.
  • Stir in heavy cream and Parmesan cheese; add cooked chicken and pasta, then toss to combine.

Notes

For a spicier kick, increase red pepper flakes or add a dash of hot sauce.
Calories: 650kcal
Cost: $15
Course: Main Course
Cuisine: Italian
Keyword: arrabbiata, Chicken, Pasta

Discover the Joy of Cooking with Teriyaki Salmon Rice Bowls

Are you looking for a quick and delicious meal that’s packed with flavor? Look no further than these Teriyaki Salmon Rice Bowls! This dish combines tender salmon, fluffy jasmine rice, and vibrant veggies in a sweet and savory teriyaki glaze that will elevate your weeknight dinners. Whether you’re a seasoned chef or just starting out, this recipe is designed to inspire confidence in the kitchen. Let’s dive into why you’ll love this recipe and how you can whip it up in no time!

Why You’ll Love This Recipe

This dish isn’t just tasty; it’s also practical and versatile. Here are some specific benefits of making Teriyaki Salmon Rice Bowls:

  • Quick to Prepare: In just 35 minutes, you can have a delicious meal on the table, making it perfect for busy weeknights.
  • Nutritious Ingredients: Packed with protein from the salmon and fiber from the veggies, this meal is both satisfying and healthy.
  • Customizable: Feel free to swap out vegetables or use different proteins to suit your tastes.
  • Meal Prep Friendly: Make a double batch for easy lunches throughout the week!
  • Flavorful and Fun: The combination of savory teriyaki sauce and fresh veggies creates a delightful taste experience that everyone will enjoy.

Ingredients You’ll Need

Gather the following ingredients to make your Teriyaki Salmon Rice Bowls. Feel free to make substitutions as needed!

  • 4 salmon fillets (5-6 oz each) – Fresh or frozen will work.
  • 1 cup jasmine rice – You can substitute with brown rice for a healthier option.
  • 2 cups water – For cooking the rice.
  • 1 tablespoon olive oil – To cook the salmon.
  • 1/2 cup teriyaki sauce – Use store-bought or make your own for a personal touch.
  • 1 cup broccoli florets – Fresh or frozen, steamed until bright green.
  • 1/2 cup shredded carrots – For added crunch and sweetness.
  • 2 green onions – Thinly sliced for garnish.
  • 1 tablespoon sesame seeds – For garnish and added flavor.
  • Salt and pepper – To taste, enhancing the flavors of the salmon.

How to Make Teriyaki Salmon Rice Bowls

Juicy Teriyaki Salmon served over jasmine rice with broccoli and carrots in a bowl.

Let’s break down the steps to prepare your delicious Teriyaki Salmon Rice Bowls:

  1. Rinse the jasmine rice under cold water until the water runs clear. In a medium saucepan, combine the rice and water. Bring to a boil, then reduce the heat to low, cover, and simmer for 15-20 minutes, or until the rice is tender and the water is absorbed. Remove from heat and let it sit, covered, for 5 minutes. Fluff with a fork before serving.
  2. While the rice cooks, heat olive oil in a large skillet over medium heat. Season the salmon fillets with salt and pepper. Place the salmon skin-side down in the skillet and cook for 4-5 minutes, until the skin is crispy. Flip the salmon and cook for an additional 3-4 minutes, or until the salmon is cooked through.
  3. Pour the teriyaki sauce over the salmon fillets in the skillet. Let it simmer for 2-3 minutes, spooning the sauce over the salmon to glaze it evenly.
  4. While the salmon cooks, steam the broccoli florets until bright green and tender, about 4-5 minutes. In the last minute of steaming, add the shredded carrots to the steamer basket to soften them slightly.
  5. Divide the cooked rice evenly among four bowls. Top each with a salmon fillet, steamed broccoli, and carrots. Drizzle with the remaining teriyaki sauce from the skillet. Garnish with sliced green onions and sesame seeds.

Pro Tips for Perfect Teriyaki Salmon Rice Bowls

Follow these expert tips to elevate your dish:

  • Choose Fresh Ingredients: Fresh salmon and seasonal veggies enhance flavor and texture.
  • Don’t Overcook the Salmon: Watch your cooking time closely to avoid dry salmon; it should flake easily with a fork.
  • Customize Your Veggies: Feel free to add bell peppers, snap peas, or any veggies you love!
  • Adjust the Sauce: If you prefer a sweeter teriyaki, add a touch of honey or brown sugar to your sauce.
  • Garnish Generously: Fresh herbs, green onions, and sesame seeds make for a beautiful presentation.
  • Make Your Own Teriyaki Sauce: Combine soy sauce, honey, garlic, and ginger for a homemade glaze.
  • Use a Non-Stick Skillet: This will prevent the salmon from sticking and make cleanup easier.
  • Serve Immediately: Teriyaki salmon is best enjoyed fresh and hot!

Common Mistakes and Troubleshooting

Here are some common mistakes to avoid when making Teriyaki Salmon Rice Bowls:

  • Overcooking the Rice: Keep an eye on the water level and cooking time to ensure fluffy rice.
  • Skipping the Rinse: Rinsing your rice helps remove excess starch, preventing it from becoming gummy.
  • Using Too Much Sauce: A little goes a long way; start with a small amount and add as needed.
  • Not Prepping Veggies: Make sure your vegetables are prepped and ready before you start cooking to streamline the process.

Variations on Your Teriyaki Salmon Rice Bowls

Here are some delicious variations to try:

  • Spicy Teriyaki: Add sriracha or your favorite hot sauce to the teriyaki sauce for a kick.
  • Teriyaki Tofu Bowls: Swap salmon for tofu for a plant-based option that’s just as satisfying.
  • Quinoa Bowls: Replace jasmine rice with quinoa for a protein-packed twist.
  • Asian Noodle Bowls: Serve the teriyaki salmon over cooked soba or udon noodles instead of rice.

Storage and Make-Ahead Instructions

If you want to make these Teriyaki Salmon Rice Bowls ahead of time, here’s how to store them:

  • Refrigerate: Store leftovers in an airtight container in the fridge for up to 3 days.
  • Freeze: You can freeze the salmon and rice for up to a month. Just make sure to let them cool before freezing.
  • Reheat Gently: When reheating, do so in the microwave or on the stovetop over low heat to avoid drying out the salmon.

Frequently Asked Questions

Here are some common questions about Teriyaki Salmon Rice Bowls:

  • Can I use frozen salmon? Yes, just ensure it’s fully thawed before cooking.
  • What can I substitute for teriyaki sauce? Soy sauce mixed with honey or brown sugar can work in a pinch.
  • Is this recipe gluten-free? Use gluten-free soy sauce or tamari for a gluten-free option.
  • Can I make this dish ahead of time? Yes, it’s great for meal prep! Just store components separately until ready to eat.
  • What sides go well with teriyaki salmon? Steamed veggies, a fresh salad, or miso soup are all excellent choices!
  • How do I keep salmon from drying out? Monitor the cooking time and don’t overcook; salmon should be flaky and moist.
  • Can I add more vegetables? Absolutely! Feel free to customize based on your preferences.
  • What’s the best way to reheat leftovers? Reheat gently in the microwave or on the stovetop with a splash of water.

Nutritional Tips and Dietary Adaptations

For a healthier twist, consider these tips:

  • Whole Grain Rice: Swap jasmine rice for brown rice or farro for added fiber.
  • Low-Sodium Teriyaki: Use low-sodium teriyaki sauce to control salt intake.
  • Vegetable Variety: Incorporate a variety of colorful vegetables to increase nutrient diversity.
  • Lean Proteins: Consider using grilled chicken or shrimp for different protein options.

Equipment Recommendations

Here are a few kitchen tools that will make the cooking process easier:

  • Non-Stick Skillet: Perfect for cooking salmon without sticking.
  • Rice Cooker: Makes cooking rice a breeze and ensures perfect results every time.
  • Steamer Basket: Great for steaming vegetables to retain their nutrients and crunch.
  • Sharp Knife: For slicing the salmon and veggies with ease.

Serving Suggestions

To make your Teriyaki Salmon Rice Bowls extra special, consider the following serving suggestions:

  • Top with Fresh Herbs: Chopped cilantro or basil adds a fresh flavor.
  • Include Pickled Vegetables: Add a tangy element with pickled ginger or radishes.
  • Serve with a Side Salad: A simple cucumber salad complements the richness of the salmon.
  • Drizzle with Extra Sauce: A little extra teriyaki sauce on top can enhance the flavor.

Cooking doesn’t have to be stressful, and with these Teriyaki Salmon Rice Bowls, you can enjoy a delicious meal that’s easy to prepare. Remember, the joy of cooking comes from experimenting and enjoying the process. So roll up your sleeves, grab your ingredients, and let’s make something amazing together!

Teriyaki Salmon Rice Bowls

Prep Time 10 minutes
Cook Time 25 minutes
Total Time 35 minutes
Servings 4 bowls
Calories 550
Enjoy a delicious and healthy bowl of tender salmon glazed with teriyaki sauce, served over jasmine rice with steamed vegetables.

Ingredients

Salmon

  • 4 fillets salmon fillets (5-6 oz each)
  • 1 cup jasmine rice
  • 2 cups water
  • 1 tablespoon olive oil
  • 0.5 cup teriyaki sauce (store-bought or homemade)
  • 1 cup broccoli florets
  • 0.5 cup shredded carrots
  • 2 green onions green onions (thinly sliced)
  • 1 tablespoon sesame seeds
  • to taste salt and pepper

Instructions 

  • Rinse rice, then cook with water for 15-20 minutes. Let sit covered for 5 minutes, then fluff.
  • Heat olive oil in a skillet, season salmon with salt and pepper, cook skin-side down for 4-5 minutes, then flip and cook 3-4 minutes.
  • Add teriyaki sauce to the skillet, simmer for 2-3 minutes, spooning over salmon.
  • Steam broccoli until tender, add shredded carrots in the last minute.
  • Divide rice into bowls, top with salmon, vegetables, drizzle with sauce, garnish with green onions and sesame seeds.

Notes

For extra flavor, marinate the salmon in some teriyaki sauce before cooking.
Calories: 550kcal
Cost: $15
Course: Main Course
Cuisine: Japanese
Keyword: Salmon

Welcome to your next culinary adventure! Today, we’re diving into a vibrant and refreshing dish that combines the creamy delight of avocados with the classic flavors of a Caprese salad. This Stuffed Avocado Caprese salad is not only beautiful to look at but also bursting with flavor, making it the perfect appetizer or light meal for any occasion. Let’s explore why this recipe deserves a spot in your regular rotation and how easy it is to make!

Why You’ll Love This Recipe

  • Quick to Prepare: In just 15 minutes, you can have a stunning dish ready to impress your family or guests.
  • Healthful Ingredients: This salad is loaded with nutritious ingredients like avocados, fresh mozzarella, and tomatoes, providing healthy fats and proteins.
  • Flavor Fusion: The combination of creamy avocados, juicy tomatoes, and aromatic basil creates a delightful explosion of flavors in every bite.
  • Versatile Serving Options: Perfect as a light lunch, elegant appetizer, or side dish, this recipe can be adapted for various occasions.
  • Make Ahead Friendly: Prep the filling in advance and stuff the avocados just before serving to keep them fresh and vibrant.

Ingredients Breakdown

Let’s gather our ingredients! Here’s what you’ll need to create this delicious Stuffed Avocado Caprese salad:

  • 4 large avocados: Choose ripe avocados that yield slightly to pressure for the best texture.
  • 1 cup cherry tomatoes: Halved for easy mixing and a burst of sweetness.
  • 1 cup mozzarella pearls: These bite-sized pieces are perfect for stuffing.
  • 3 tablespoons fresh basil leaves: Chopped for a fragrant touch.
  • 2 tablespoons balsamic vinegar: Adds a tangy sweetness to the salad.
  • 1 tablespoon olive oil: Enhances the richness of the dish.
  • Salt and pepper to taste: Essential for balancing flavors.
  • Fresh basil leaves for garnish: Optional, but highly recommended for presentation.

Substitutions

  • Cheese Options: Use feta or goat cheese if you prefer a stronger flavor.
  • Vegan Version: Replace mozzarella with marinated tofu for a plant-based option.
  • Herb Variations: Experiment with fresh parsley or cilantro instead of basil for a different flavor profile.
  • Topping Ideas: Drizzle with balsamic glaze for added sweetness and a gourmet touch.

Step-by-Step Instructions

Let’s get cooking! Follow these simple steps to create your Stuffed Avocado Caprese salad:

  1. Start by preparing your avocados: Cut each avocado in half lengthwise and gently remove the pits. You can scoop out a bit more flesh from the center to create larger “boats” if desired. Set the avocado halves on a serving plate.
  2. In a large bowl, combine the halved cherry tomatoes and mozzarella pearls. Toss gently to distribute evenly.
  3. In a separate small bowl, whisk together the chopped fresh basil, balsamic vinegar, olive oil, salt, and freshly ground black pepper to create a flavorful dressing.
  4. Pour the dressing over the tomato and mozzarella mixture, tossing until everything is well coated and the flavors meld together beautifully.
  5. Generously fill each avocado half with the caprese mixture, allowing it to mound slightly above the avocado rim.
  6. If desired, drizzle with balsamic glaze and garnish with additional basil leaves. Finish with a sprinkle of salt and pepper to taste.

Pro Tips for Perfect Stuffed Avocado Caprese

Side view of a stuffed avocado showcasing vibrant tomatoes and basil.
  • Choosing Avocados: Look for avocados that yield slightly when gently squeezed; they should not be overly soft or hard.
  • Fresh Ingredients: Use only the freshest tomatoes and basil for the best flavor.
  • Coat Before Stuffing: Toss the filling in the dressing before stuffing to ensure every bite is flavorful.
  • Presentation Matters: Arrange the stuffed avocados on a beautiful platter for an inviting display.
  • Balsamic Glaze Boost: A drizzle of balsamic glaze enhances both flavor and appearance.
  • Chill Before Serving: Let the stuffed avocados sit in the fridge for about 10 minutes to meld the flavors.
  • Adjusting Seasoning: Always taste and adjust the seasoning before serving to ensure bright, balanced flavors.
  • Experiment with Textures: Add toasted pine nuts or sunflower seeds for an interesting crunch.

Common Mistakes and Troubleshooting

  • Overripe Avocados: If they are too soft, they won’t hold their shape when stuffed. Aim for just ripe.
  • Too Much Dressing: Don’t overdo it; a little goes a long way. Start with less and add more if needed.
  • Not Enough Seasoning: Always taste as you go! Adjust salt and pepper to enhance the flavors.

Variations to Try

Feel free to get creative with your Stuffed Avocado Caprese! Here are some delicious variations:

  • Spicy Kick: Add diced jalapeños or a sprinkle of red pepper flakes for heat.
  • Protein-Packed: Include cooked chicken, shrimp, or chickpeas for a heartier dish.
  • Caprese Pasta Salad: Mix the filling ingredients with cooked pasta for a filling meal.
  • Grilled Version: Grill the avocado halves for a smoky flavor before stuffing.

Storage and Make-Ahead Instructions

Your Stuffed Avocado Caprese can be prepped in advance, making it a fantastic option for entertaining. Here’s how to store and make it ahead of time:

  • Make Ahead: Prepare the filling a day in advance and store it in an airtight container in the fridge. Stuff the avocados just before serving.
  • Storage: Leftover stuffed avocados can be stored in an airtight container for up to 24 hours, but the avocados may brown slightly.
  • Refreshing Tip: To keep avocados from browning, brush the exposed flesh with lemon juice before storing.

Comprehensive FAQ

  • Can I use frozen avocados?: While fresh is best, you can use frozen avocados if thawed and drained well.
  • What can I substitute for mozzarella?: Feta or vegan cheese works well if you’re looking for alternatives.
  • Is this recipe gluten-free?: Yes! All ingredients are naturally gluten-free.
  • How do I ripen avocados quickly?: Place them in a paper bag with a banana to speed up the ripening process.
  • Can I make this salad vegan?: Absolutely! Just replace the mozzarella with a plant-based alternative.
  • What dressing can I use instead of balsamic?: A simple olive oil and lemon juice dressing works beautifully.
  • How long do stuffed avocados last in the fridge?: They are best consumed within 24 hours for optimal freshness.
  • Can I add other vegetables?: Yes! Feel free to include diced cucumbers, bell peppers, or olives for added crunch and flavor.

Nutrition Tips and Dietary Adaptations

This recipe can be adapted to fit various dietary needs:

  • Low-Carb: Enjoy as is for a low-carb meal.
  • Paleo-Friendly: This recipe fits well within a paleo diet as it focuses on whole foods.
  • High-Protein: Add grilled chicken or chickpeas to increase protein content.

Equipment Recommendations

To make this recipe, you’ll need some basic kitchen tools:

  • Sharp Knife: For slicing avocados and tomatoes.
  • Mixing Bowls: To combine ingredients.
  • Whisk: For mixing the dressing.
  • Serving Platter: To display your beautiful stuffed avocados.

Serving Suggestions

Pair your Stuffed Avocado Caprese salad with:

  • Grilled Chicken: For a complete meal.
  • Crusty Bread: Perfect for soaking up any leftover dressing.
  • Wine Pairing: A crisp white wine complements the freshness of the salad.

Conclusion

Now that you have the ultimate guide to making the best Stuffed Avocado Caprese salad, it’s time to roll up your sleeves and get cooking! Remember, cooking is about enjoying the process and having fun in the kitchen. You’ve got this! Don’t forget to experiment with flavors, and make this dish your own. Happy cooking!

Stuffed Avocado Caprese Salad

Prep Time 10 minutes
Total Time 10 minutes
Servings 4 servings
Calories 350
A fresh and colorful salad featuring creamy avocados filled with a classic caprese mixture of tomatoes, mozzarella, and basil, drizzled with balsamic vinegar.

Ingredients

Avocados

  • 4 large avocados (halved and pitted)
  • 1 cup cherry tomatoes (sliced in half)
  • 1 cup mozzarella pearls
  • 3 tablespoons fresh basil leaves (chopped)
  • 2 tablespoons balsamic vinegar
  • 1 tablespoon olive oil
  • to taste Salt and pepper (for seasoning)

Garnish

  • optional Fresh basil leaves (for garnish)

Instructions 

  • Cut avocados in half, remove pits, and arrange on a plate. Scoop out some flesh if desired.
  • Mix cherry tomatoes and mozzarella pearls in a bowl.
  • Whisk basil, balsamic vinegar, olive oil, salt, and pepper to make dressing.
  • Pour dressing over tomato and mozzarella, toss gently, then fill avocado halves with the mixture.
  • Garnish with basil leaves and drizzle with balsamic glaze if desired. Season with salt and pepper to taste.

Notes

For extra flavor, add a drizzle of balsamic glaze before serving.
Calories: 350kcal
Cost: $12
Course: Salad
Cuisine: Italian-American
Keyword: Avocado, Caprese

Elevate Your Weeknight Dinners with This Chicken Pasta in Creamy Tomato Sauce

If you’re looking for a quick and satisfying meal that brings comfort and flavor to your table, you’ve landed in the right place! This Chicken Pasta in Creamy Tomato Sauce is not just any pasta dish; it’s a delightful combination of tender chicken, rich tomato sauce, and creamy goodness that is sure to impress your family and friends. With just a few simple ingredients and easy steps, you can create a meal that feels like a gourmet experience without the fuss. Let’s dive into why this recipe is a must-try!

Why You’ll Love This Recipe

  • Quick to Prepare: In just 30 minutes, you can have a delicious dinner ready, making it perfect for busy weeknights.
  • Simple Ingredients: You only need a handful of ingredients that are likely already in your pantry, making this recipe accessible and budget-friendly.
  • Rich Flavor Profile: The combination of creamy tomato sauce, garlic, and Italian seasoning creates a mouthwatering flavor that will have everyone asking for seconds.
  • Customizable: This dish allows for plenty of variations and substitutions, so you can adapt it to your taste or dietary needs.
  • Leftover Friendly: This pasta reheats beautifully, making it a great option for meal prep or leftovers.

Ingredients for Chicken Pasta in Creamy Tomato Sauce

Gathering the right ingredients is key to making this dish a success. Here’s what you’ll need:

  • 3-4 boneless, skinless chicken breasts: Cut into bite-sized pieces.
  • Pasta of your choice: Penne or fettuccine works beautifully.
  • 2 cloves fresh garlic: Minced for a burst of flavor.
  • 1 can diced tomatoes (14.5 oz): Provides the base of our sauce.
  • 1 cup heavy cream: For that luscious, creamy texture.
  • 1 teaspoon Italian seasoning: Adds depth of flavor.
  • Olive oil, salt, and pepper: Essential for cooking and seasoning.

Feel free to experiment with substitutions! For a lighter version, you can use half-and-half instead of heavy cream or replace the chicken with shrimp or vegetables for a vegetarian option.

How to Make Chicken Pasta in Creamy Tomato Sauce

Side angle of a colorful plate of chicken pasta in creamy tomato sauce with herbs and spices.

Follow these simple steps to whip up your creamy chicken pasta:

  1. Prepare ingredients: Chop chicken into bite-sized pieces and mince garlic. Cook pasta according to package instructions until al dente.
  2. Cook chicken: In a skillet over medium heat, add olive oil and cook the chicken until golden brown, about 5-7 minutes.
  3. Add garlic and tomatoes: Sauté minced garlic for one minute, then stir in the canned diced tomatoes with their juices.
  4. Create sauce: Pour in the heavy cream and sprinkle with Italian seasoning. Let simmer for 5 minutes until slightly thickened.
  5. Combine pasta and sauce: Add the cooked pasta to the skillet and toss gently to coat.
  6. Serve hot: Plate the dish and drizzle with extra sauce if desired.

Expert Tips for Success

  • Avoid overcooking the pasta: Cook until al dente to ensure the pasta maintains a nice bite.
  • Marinate your chicken: For added flavor, consider marinating the chicken in Italian dressing before cooking.
  • Adjust seasoning: Taste as you go and adjust salt, pepper, and Italian seasoning to your preference.
  • Use high-quality ingredients: Good quality canned tomatoes and fresh garlic can elevate the dish.
  • Don’t rush the sauce: Allow the sauce to simmer to enhance its flavors.
  • Garnish with fresh herbs: A sprinkle of fresh basil or parsley adds a lovely touch.
  • Serve with sides: Complement this dish with a simple salad or garlic bread for a complete meal.
  • Store properly: To maintain quality, cool the pasta before storing it in an airtight container.

Common Mistakes and Troubleshooting

Even the best recipes can have hiccups! Here are some common mistakes and how to avoid them:

  • Overcooking the chicken: Keep an eye on your chicken while cooking to prevent it from becoming dry.
  • Thick sauce: If your sauce is too thick, add a splash of pasta water to loosen it up.
  • Insufficient seasoning: Don’t forget to taste your sauce before serving; adjusting seasoning can make all the difference.
  • Sticking pasta: If your pasta is sticking together, toss it with a bit of olive oil after draining.
  • Not enough sauce: Feel free to double the sauce ingredients if you love a saucier pasta.

Variations on the Classic Recipe

Want to switch things up? Here are some delicious variations to try:

  • Vegetarian option: Substitute chicken with sautĂ©ed mushrooms, zucchini, or spinach for a veggie-packed dish.
  • Spicy kick: Add red pepper flakes or diced jalapeños to the sauce for some heat.
  • Pesto twist: Mix in some basil pesto for an herby flavor boost.
  • Cheesy goodness: Stir in some parmesan or mozzarella cheese for a creamy, cheesy sauce.

Storage and Make-Ahead Instructions

This Chicken Pasta in Creamy Tomato Sauce is perfect for meal prep! Here’s how to store and reheat:

  • Refrigerate: Store in an airtight container for up to 3 days. Reheat in a skillet over low heat, adding a splash of cream or broth to bring back the sauce’s consistency.
  • Freeze: You can freeze the dish for up to 2 months. Thaw in the fridge overnight before reheating.
  • Make-ahead: Prepare the chicken and sauce the day before and simply cook the pasta and combine on the day of serving.

FAQs

  • Can I use frozen chicken? Yes, just ensure it’s fully thawed before cooking.
  • What type of pasta works best? Penne, fettuccine, or even spaghetti are great choices!
  • How can I make this dish dairy-free? Use coconut cream or a dairy-free cream substitute for a similar texture.
  • Can I add vegetables? Absolutely! Spinach, bell peppers, or broccoli are great additions.
  • How do I know the chicken is cooked? Ensure the internal temperature reaches 165°F (75°C).
  • What can I serve with this pasta? A simple tossed salad or garlic bread pairs wonderfully.
  • Can this recipe be halved? Yes, simply reduce the ingredient amounts accordingly.
  • Is this dish kid-friendly? Yes! The creamy sauce and pasta are typically a hit with children.

Nutrition Tips and Dietary Adaptations

This dish can be easily adapted to fit various dietary needs:

  • Low-carb option: Substitute pasta with zucchini noodles or spaghetti squash.
  • Gluten-free option: Use gluten-free pasta for a delicious alternative.
  • Lower calorie version: Use chicken breast, non-fat milk, and skip heavy cream.

Equipment Recommendations

To make this recipe, you’ll need:

  • Large skillet: For cooking the chicken and sauce.
  • Pot for pasta: A large pot to cook the pasta until al dente.
  • Wooden spoon: For stirring and mixing ingredients.
  • Measuring cups and spoons: To ensure accurate ingredient amounts.

Serving Suggestions

This creamy chicken pasta can be served in many delightful ways:

  • Garnish: Top with fresh basil or parsley for a pop of color.
  • Pair with wine: A light white wine, such as Pinot Grigio or Chardonnay, complements the dish beautifully.
  • Side dishes: Serve with a fresh garden salad and garlic bread for a complete meal experience.

Conclusion

There you have it! A comforting, creamy Chicken Pasta in Tomato Sauce that’s perfect for busy evenings or any occasion where you want to impress. With its incredible flavor and simple preparation, this dish is sure to become a staple in your home. So gather your ingredients, unleash your inner chef, and enjoy a delightful meal that will satisfy everyone at the table. Happy cooking!

🍽 Looking for More Recipes to Cook Every Day?

Get my full cookbook with 50 Recipes You’ll Want to Cook Again and Again perfect for busy days and family dinners.

🍗 Download Your Cookbook Now

Instant download • 50 tested recipes

Chicken Pasta in Creamy Tomato Sauce

Prep Time 10 minutes
Cook Time 20 minutes
Total Time 30 minutes
Servings 4 servings
Calories 650
A delicious and creamy chicken pasta dish with a rich tomato sauce, perfect for a comforting meal.

Ingredients

Protein

  • 3-4 pieces boneless, skinless chicken breasts

Pasta

  • 200 grams pasta of your choice (penne or fettuccine)

Aromatics

  • 2 cloves fresh garlic (minced)

Canned Goods

  • 1 can diced tomatoes 14.5 oz

Dairy

  • 1 cup heavy cream

Spices & Oils

  • 1 teaspoon Italian seasoning
  • Olive oil, salt, and pepper (for cooking and seasoning)

Instructions 

  • Chop chicken into bite-sized pieces and mince garlic. Cook pasta until al dente.
  • Cook chicken in olive oil over medium heat until golden, about 5-7 minutes.
  • SautĂ© garlic for 1 minute, then stir in diced tomatoes.
  • Pour in heavy cream, add Italian seasoning, and simmer for 5 minutes.
  • Add cooked pasta to the sauce and toss to coat. Serve hot.

Notes

For extra flavor, sprinkle with grated Parmesan cheese before serving.
Calories: 650kcal
Cost: $15
Course: Main Course
Cuisine: Italian
Keyword: Chicken, Creamy Tomato, Pasta

Discover the Joy of Cooking Fast Garlic Butter Fish

Cooking doesn’t have to be complicated or stressful, and this Easy Fast Garlic Butter Fish Recipe proves just that! Bursting with flavor and ready in mere minutes, it’s the perfect solution for a weeknight dinner. With tender fish, rich garlic butter, and fresh herbs, you can elevate your meals without breaking a sweat. Let’s dive into this delightful recipe!

Why You’ll Love This Recipe

  • Quick & Easy: Ready in under 20 minutes, making it a perfect weeknight meal choice.
  • Flavor-Packed: The combination of garlic butter and fresh herbs enhances the fish, ensuring every bite is bursting with flavor.
  • Versatile: Works well with a variety of flaky white fish like cod or tilapia, and pairs beautifully with different sides.
  • Healthy & Nutritious: Packed with protein and healthy fats, this dish supports your diet without sacrificing taste.
  • Family-Friendly: Even picky eaters will enjoy this dish, making it great for family dinners.

Ingredients for Fast Garlic Butter Fish

Here’s what you’ll need to whip up this delightful dish:

  • 2 fillets White fish: Opt for flaky varieties like cod or tilapia for a tender bite.
  • Salt & Pepper: Season simply to highlight the natural flavor of the fish.
  • 4 tablespoons Unsalted butter: Fresh butter adds a rich, creamy base.
  • 3 cloves Fresh garlic: Minced finely to release bold flavor.
  • 1 tablespoon Lemon juice: Adds a bright, tangy balance to the dish.
  • 2 tablespoons Fresh parsley: Chopped and sprinkled at the end for a fresh finish.
  • 1 cup Steamed vegetables: Light and healthy companions to the fish.
  • 1 cup Cooked rice or quinoa: Perfect for soaking up the delicious garlic butter sauce.

How to Make Fast Garlic Butter Fish

Deliciously cooked garlic butter fish fillets on a plate, accompanied by steamed vegetables and a portion of quinoa.
  1. In a large skillet, melt the unsalted butter over medium heat.
  2. Add the minced garlic and sauté for about 1 minute until fragrant.
  3. Season the fish fillets with salt and pepper, then place them in the skillet.
  4. Cook for 3-4 minutes on each side, or until the fish flakes easily with a fork.
  5. Drizzle with lemon juice and sprinkle with parsley before serving.

Pro Tips for Perfect Garlic Butter Fish

  • Pat the fish dry: This helps achieve a beautiful golden crust.
  • Use fresh herbs: Fresh parsley or even dill can elevate the flavor.
  • Don’t overcrowd the skillet: Cook in batches if necessary for even cooking.
  • Experiment with spices: Add a pinch of chili flakes for a spicy kick!
  • Use a non-stick skillet: Ensures easy flipping and cleanup.
  • Check for doneness: The fish should be opaque and flake easily when done.
  • Add a splash of white wine: Deglazing the pan adds another layer of flavor.
  • Save leftover sauce: Drizzle it over steamed veggies or pasta for extra flavor.

Common Mistakes and Troubleshooting

  • Overcooking the fish: Keep an eye on cooking time; fish cooks quickly.
  • Using cold fish: Let the fish sit at room temperature for 15 minutes before cooking for even cooking.
  • Not seasoning enough: Don’t skimp on salt and pepper; they enhance the fish’s natural flavors.

Variations of Fast Garlic Butter Fish

This recipe is versatile! Here are some fun twists to try:

  • Spicy Garlic Butter Fish: Add red pepper flakes for a spicy kick!
  • Lemon Butter Fish: Swap lemon juice for lime juice for a zesty twist.
  • Herb Garlic Butter Fish: Experiment with other herbs like thyme or basil.
  • Coconut Garlic Butter Fish: Use coconut oil instead of butter for a tropical vibe.

Storage & Make-Ahead Instructions

This dish is best enjoyed fresh, but you can store leftovers:

  • Refrigeration: Store in an airtight container for up to 2 days.
  • Reheating: Gently reheat in a skillet over low heat to prevent overcooking.
  • Make Ahead: Prep the garlic butter sauce and store separately; cook fish fresh when ready to serve.

Frequently Asked Questions

  • Can I use frozen fish? Yes! Just ensure it’s fully thawed before cooking.
  • What other fish can I use? Any firm white fish like haddock or snapper works well.
  • How do I know the fish is cooked? It should be opaque and flake easily with a fork.
  • Can I make this dairy-free? Substitute butter with olive oil or dairy-free butter.
  • What should I serve with garlic butter fish? It pairs excellently with rice, quinoa, or a fresh salad.
  • Can I use garlic powder instead of fresh garlic? Yes, but fresh garlic provides a stronger flavor.
  • Is this recipe gluten-free? Yes, all ingredients used are gluten-free.
  • How do I make it more flavorful? Consider marinating the fish in lemon juice and herbs before cooking.

Nutrition Tips and Dietary Adaptations

This recipe is not only delicious but also nutritious:

  • Healthy Fats: The butter provides a good source of healthy fats, essential for a balanced diet.
  • Protein-Rich: The fish is a great source of lean protein, perfect for muscle repair and growth.
  • Low Carb Option: Serve with non-starchy vegetables instead of rice for a low-carb alternative.

Essential Equipment

Here are a few kitchen essentials to make this recipe a breeze:

  • Non-stick skillet: Ideal for cooking fish without sticking.
  • Spatula: A wide spatula helps flip the fish without breaking it apart.
  • Measuring spoons: For measuring out butter and other ingredients accurately.

Serving Suggestions

Pair your Fast Garlic Butter Fish with:

  • Steamed vegetables: Broccoli, asparagus, or green beans are excellent choices.
  • Grain sides: Serve alongside fluffy quinoa or brown rice to soak up the garlic butter sauce.
  • Fresh salad: A light green salad with lemon vinaigrette complements the dish well.

Conclusion

Cooking should be a joyful experience, and this Easy Fast Garlic Butter Fish Recipe embodies that spirit! With just a few ingredients and simple steps, you can create a meal that’s not only delicious but also nourishing. So roll up your sleeves, embrace your inner chef, and enjoy the satisfaction of a homemade fish dinner that’s sure to impress!

Easy Fast Garlic Butter Fish Recipe That s Bursting with Flavor

Prep Time 10 minutes
Cook Time 10 minutes
Total Time 20 minutes
Servings 2 servings
Calories 350
This quick and flavorful fish recipe combines garlic, butter, and fresh herbs for a delicious meal in minutes.

Ingredients

Main ingredients

  • 2 fillets White fish fillets (Choose flaky varieties like cod or tilapia for a tender bite.)
  • to taste Salt (Season simply to highlight the natural fish flavor.)
  • to taste Black pepper (Season simply to highlight the natural fish flavor.)
  • 4 tablespoons Unsalted butter (Use fresh butter for a rich, creamy base.)
  • 3 cloves Fresh garlic cloves (Mince finely to release bold flavor.)
  • 1 tablespoon Lemon juice (Adds a bright, tangy balance.)
  • 2 tablespoons Fresh parsley (Chop and sprinkle at the end.)
  • 1 cup Steamed vegetables (Light and healthy companions.)
  • 1 cup Cooked rice or quinoa (Great for soaking up the sauce.)

Instructions 

  • Season fish fillets with salt and black pepper.
  • Melt butter in a skillet over medium heat and add minced garlic, cooking until fragrant.
  • Cook fish fillets in the garlic butter for 3-4 minutes per side until cooked through.
  • Drizzle lemon juice over the fish and sprinkle with chopped parsley.
  • Serve the fish with steamed vegetables and cooked rice or quinoa.

Notes

For extra flavor, add a pinch of red pepper flakes or a squeeze of additional lemon.
Calories: 350kcal
Cost: $15
Course: Main Course
Keyword: butter, fish, Garlic

There’s something magical about the combination of sweet blueberries and zesty lemon. This Blueberry Lemon Loaf recipe is not just an ordinary loaf; it’s a delightful treat that brings sunshine to your kitchen. Whether you’re enjoying it for breakfast, a snack, or dessert, this loaf is packed with flavor and is simple enough for anyone to make. Let’s dive into this delicious recipe that’s sure to become a favorite!

Why You’ll Love This Recipe

  • Flavorful Balance: The tartness of lemon perfectly complements the sweetness of blueberries, creating a refreshing taste that’s perfect for spring and summer.
  • Moist Texture: Thanks to the combination of sour cream and oil, this loaf is incredibly moist, ensuring every bite is a delight.
  • Easy to Make: This recipe requires minimal prep and baking time, making it a great project for both beginner and experienced bakers.
  • Flexible Ingredients: You can easily customize this loaf with various add-ins or substitutions, allowing you to use what you have on hand.
  • Perfect for Sharing: This loaf makes an excellent gift or dessert for gatherings, bringing joy to friends and family alike.

Ingredient Breakdown

Before you start baking, let’s look at the ingredients you’ll need for this Blueberry Lemon Loaf, along with some substitutions to cater to your pantry and dietary needs.

  • Sugar: 3/4 cup granulated sugar. You can substitute with coconut sugar for a lower glycemic index option.
  • Lemon Zest: Zest from 1 lemon adds a bright flavor. Feel free to use more zest for an extra lemony punch.
  • Vegetable Oil: 1/2 cup of vegetable oil keeps the loaf moist. Alternatively, you can use melted coconut oil or melted butter.
  • Lemon Extract: 1 tsp (optional) enhances the lemon flavor. If you don’t have it, simply increase the lemon juice.
  • Lemon Juice: Juice from 1 whole lemon adds acidity and flavor. Freshly squeezed is best!
  • Sour Cream: 1/2 cup adds moisture and richness. Plain yogurt can also work if you’re out of sour cream.
  • Egg: 1 large egg binds the ingredients together. For an eggless version, use 1/4 cup unsweetened applesauce.
  • All-purpose Flour: 1.5 cups, sifted for a lighter loaf. Whole wheat flour can be used for a healthier option.
  • Baking Powder: 2 tsp helps the loaf rise. Make sure it’s fresh for the best results.
  • Salt: 1/2 tsp balances the sweetness. This is essential for flavor.
  • Milk: 1/2 cup of milk adds moisture. You can use plant-based milk if you prefer.
  • Blueberries: 2 cups of fresh blueberries tossed in flour to prevent sinking. If using frozen, no need to thaw, just toss them in flour.
  • Crumble Topping: 1/2 cup flour, 1/4 cup brown sugar, 2 tbsp sugar, and 3 tbsp melted butter for a delightful crunch on top.
  • Lemon Glaze: Combine 3 tbsp lemon juice with 1 cup powdered sugar for a sweet finish.

How to Make Blueberry Lemon Loaf

Follow these simple steps to create your delicious loaf. Remember, baking is all about enjoying the process, so have fun!

  1. Prepare the Crumble Topping: In a bowl, rub together 1/2 cup flour, 2 tbsp sugar, and 3 tbsp melted butter until crumbly. Set aside.
  2. Preheat the Oven: Set your oven to 350°F (175°C) and prepare a 9-inch loaf tin by lining it with parchment paper and greasing it.
  3. Mix Dry Ingredients: In a bowl, whisk together 1.5 cups sifted all-purpose flour, 2 tsp baking powder, and 1/2 tsp salt. Set aside.
  4. Toss the Blueberries: In a separate bowl, toss 2 cups of blueberries in 1/4 cup flour until well coated. This helps keep them suspended in the batter.
  5. Combine Wet Ingredients: In a large mixing bowl, combine 3/4 cup sugar, lemon zest, 1/2 cup vegetable oil, and 1 tsp lemon extract. Stir until the mixture is well blended.
  6. Add Egg and Lemon Juice: Mix in 1 large egg and juice from 1 lemon, stirring until fully combined.
  7. Incorporate Dry Ingredients: Gradually add 1/3 of the dry mixture to the wet ingredients, stirring until just combined. Repeat with the remaining dry ingredients until fully incorporated.
  8. Fold in Milk and Sour Cream: Gently fold in 1/2 cup milk and 1/2 cup sour cream until the batter is smooth.
  9. Add Blueberries: Carefully fold in the flour-coated blueberries until evenly distributed throughout the batter.
  10. Transfer to Loaf Tin: Pour the batter into the prepared loaf tin and sprinkle the crumble topping evenly over the top.
  11. Bake: Place in the oven and bake for 60-80 minutes or until a toothpick inserted in the center comes out clean.
  12. Cool and Glaze: Once baked, remove from the oven and let it cool in the tin for about 15 minutes. Transfer to a wire rack to cool completely. Drizzle the lemon glaze over the top before serving.

Pro Tips for the Best Blueberry Lemon Loaf

Close-up of a freshly baked blueberry lemon loaf, highlighting the texture and juicy fruit inside.
  • Fresh is Best: Always use fresh blueberries for the best flavor. If using frozen, ensure they’re well-coated in flour to prevent them from bleeding into the batter.
  • Room Temperature Ingredients: Allow your eggs and sour cream to come to room temperature for a smoother batter.
  • Do Not Overmix: Mix until just combined to keep your loaf light and fluffy. Overmixing can lead to a dense texture.
  • Check on It Early: Start checking for doneness at around 50 minutes to avoid overbaking.
  • Use a Toothpick: Insert a toothpick in the center; if it comes out clean or with a few crumbs, your loaf is ready.
  • Let It Cool: Ensure the loaf cools completely before glazing to avoid melting the glaze into the bread.
  • Experiment with Flavors: Add nuts, such as walnuts or pecans, for an added crunch or swap out blueberries for other berries.

Common Mistakes and Troubleshooting

Even the most seasoned bakers can encounter hiccups. Here’s how to troubleshoot common issues with your Blueberry Lemon Loaf:

  • Loaf Sinking in the Middle: This could be due to underbaking or too much liquid. Make sure to measure ingredients accurately.
  • Dry Texture: Ensure not to overbake and double-check your measurements. Adding an extra tablespoon of sour cream can help keep it moist.
  • Blueberries Sinking: Tossing them in flour helps, but also make sure the batter is thick enough to support them.
  • Crumble Topping Burnt: If the topping is browning too quickly, cover the loaf with aluminum foil until the baking time is complete.

Creative Variations

Add a twist to your Blueberry Lemon Loaf with these creative variations:

  • Nutty Delight: Add 1/2 cup of chopped walnuts or pecans to the batter for a crunchy texture.
  • Berry Medley: Substitute blueberries with raspberries or strawberries, or mix them for a berry medley loaf.
  • Lemon Poppy Seed: Incorporate 2 tablespoons of poppy seeds into the batter for a delightful crunch and flavor.
  • Chocolate Chip: Add 1/2 cup of white or dark chocolate chips for a sweet twist.

Storage and Make-Ahead Instructions

Planning ahead? Here’s how to store your Blueberry Lemon Loaf:

  • Room Temperature: Store the loaf in an airtight container at room temperature for up to 3 days.
  • Refrigerator: For longer storage, keep it in the fridge for up to a week.
  • Freezing: Wrap the cooled loaf tightly in plastic wrap and then in aluminum foil. Freeze for up to 3 months. Thaw in the fridge overnight before serving.

Frequently Asked Questions

Got questions? Here are answers to some common queries about the Blueberry Lemon Loaf:

  • Can I use frozen blueberries? Yes, you can use frozen blueberries without thawing them first. Just toss them in flour.
  • How can I make this loaf gluten-free? Substitute all-purpose flour with a gluten-free flour blend, ensuring it contains xanthan gum for structure.
  • Can I double the recipe? Absolutely! Just ensure you have a large enough mixing bowl and adjust the baking time if using larger pans.
  • What can I use instead of sour cream? Plain yogurt is a great substitute for sour cream in this recipe.
  • How do I know when the loaf is done? A toothpick inserted into the center should come out clean or with a few moist crumbs.
  • Can I add spices? Yes! A teaspoon of cinnamon or nutmeg can add warmth to the loaf.
  • How should I serve it? Serve slices plain, or with butter or cream cheese for an extra treat.
  • Can I glaze it with something else? Yes, you can use a simple vanilla glaze or even a cream cheese frosting.

Nutritional Tips and Dietary Adaptations

This Blueberry Lemon Loaf can be adapted to fit various dietary needs:

  • Low Sugar Option: Use a sugar substitute like erythritol or stevia in place of granulated sugar.
  • Dairy-Free: Substitute sour cream and milk with plant-based alternatives.
  • Vegan Option: Use flax eggs (1 tbsp ground flaxseed + 2.5 tbsp water) instead of an egg and non-dairy milk.

Equipment Recommendations

Having the right tools can make your baking experience smoother:

  • 9-Inch Loaf Pan: A good quality loaf pan ensures even baking.
  • Mixing Bowls: Use a set of mixing bowls in various sizes for convenience.
  • Whisk: Essential for mixing dry and wet ingredients effectively.
  • Spatula: A silicone spatula is great for folding in ingredients gently.
  • Cooling Rack: Allows the loaf to cool evenly and prevents sogginess.

Serving Suggestions

Get creative with how you serve your Blueberry Lemon Loaf:

  • With Tea or Coffee: Pair slices with your favorite hot beverage for a delightful afternoon treat.
  • As a Dessert: Serve with whipped cream or vanilla ice cream for a refreshing dessert.
  • Breakfast Delight: Toast slices and spread with butter or cream cheese for a fulfilling breakfast.

In conclusion, this Blueberry Lemon Loaf is more than just a recipe; it’s a way to bring joy and flavor into your kitchen. With its bright flavors, moist texture, and endless variations, it’s a delicious treat you can feel good about making. So roll up your sleeves, gather your ingredients, and let’s bake something wonderful together!

Blueberry and Lemon Loaf

Prep Time 15 minutes
Cook Time 1 hour 10 minutes
Total Time 1 hour 25 minutes
Servings 8 slices
Calories 350
A moist and tangy blueberry lemon loaf with a crunchy crumble topping, perfect for breakfast or dessert.

Ingredients

Main ingredients

  • 3 4 cup sugar
  • 1 lemon zest lemon zest
  • 1 2 cup vegetable oil
  • 1 tsp lemon extract (optional) (optional)
  • 1 whole lemon juice
  • 1 2 cup sour cream
  • 1 egg egg
  • 1.5 cups all-purpose flour, sifted
  • 2 tsp baking powder
  • 1 2 tsp salt
  • 1 2 cup milk
  • 2 cups blueberries tossed in flour
  • ½ cup flour
  • ÂĽ cup brown sugar
  • 2 tablespoons sugar
  • 3 tablespoons melted butter
  • 3 tablespoons lemon juice
  • 1 tbsp unsalted butter, melted
  • 1 cup powdered sugar

Instructions 

  • Prepare the crumble topping by rubbing flour, butter, and sugar until crumbly; set aside.
  • Preheat oven to 160°C (fan 175°C, 350°F), line and grease a 9-inch loaf tin.
  • Mix flour, baking powder, and salt; set aside. Toss blueberries in flour and set aside.
  • Combine sugar, lemon zest, oil, and lemon extract; add egg and lemon juice, mix well. Alternate adding dry ingredients and milk/sour cream, then fold in blueberries.
  • Pour batter into prepared tin, sprinkle crumble topping, bake for 60-80 minutes. Cool, then drizzle with lemon glaze made from lemon juice, melted butter, and powdered sugar.

Notes

Ensure blueberries are coated in flour to prevent sinking during baking.
Calories: 350kcal
Cost: $15
Course: Dessert
Cuisine: American
Keyword: Blueberry, lemon, loaf

Welcome to the delightful world of baking, where flavors meld together to create something truly special. These Salted Caramel Apple Crumble Bars are a perfect way to embrace the cozy vibes of autumn, combining the tartness of apples with the rich sweetness of salted caramel. This recipe is not just about making a dessert; it’s about creating a cherished memory in your kitchen. Let’s dive into this comforting recipe that’s perfect for any occasion!

Why You’ll Love This Recipe

These bars are more than just a treat; they offer a range of delightful benefits that will make you want to bake them again and again:

  • Quick and Simple: You can have these scrumptious bars ready in just about an hour, making them a perfect last-minute dessert for any gathering.
  • Perfect Balance of Flavors: The combination of tart apples, rich caramel, and a crumbly topping creates a harmonious taste experience.
  • Versatile Recipe: Whether you prefer to use Granny Smith, Braeburn, or even Honeycrisp apples, this recipe allows for personal customization.
  • Make-ahead Friendly: These bars can be prepared in advance, making them an excellent option for busy schedules or holiday feasts.
  • Family Favorite: With their irresistible flavors and textures, these bars are sure to become a beloved treat in your household!

Ingredients You’ll Need

This recipe calls for the following ingredients to create the perfect salted caramel apple crumble bars:

  • 300g all-purpose flour: Essential for the base and crumble topping.
  • 150g cold butter: Use unsalted butter or a vegan alternative for a dairy-free option.
  • 100g granulated sugar: For sweetness in the crust.
  • 50g brown sugar: Adds a deeper flavor to the crumble.
  • Pinch of salt: Enhances the overall taste.
  • 50g rolled oats (optional): Adds texture to the crumble topping.
  • 4-5 medium tart apples: Such as Granny Smith or Braeburn, peeled and diced.
  • 50g sugar for the filling: To sweeten the apple mixture.
  • Juice of half a lemon: Prevents the apples from browning and adds brightness.
  • 1 teaspoon cinnamon: A warm spice that complements the apples.
  • Pinch of nutmeg: For an extra layer of warmth.
  • 2 tablespoons cornstarch: Helps thicken the apple filling.
  • 150g sugar for the salted caramel: The star of the show!
  • 50ml water: To help dissolve the sugar.
  • 100ml cream or plant-based cream: For a rich caramel sauce.
  • 30g butter: Adds richness to the caramel.
  • ½ teaspoon Fleur de Sel or coarse sea salt: Enhances the flavor of the caramel.

How to Make Salted Caramel Apple Crumble Bars

Follow these simple steps to create your own indulgent salted caramel apple crumble bars:

  • Preheat the Oven: Start by preheating your oven to 180°C (350°F). Prepare a square baking pan (20x20cm) or a rectangular one (20x30cm) by lining it with parchment paper.
  • Make the Crumble Base: In a large bowl, mix the flour, granulated sugar, brown sugar, salt, and oats (if using). Cut in the cold, diced butter with your fingers or a pastry cutter until the mixture resembles coarse crumbs.
  • Press and Bake: Press about half of the crumble mixture evenly into the bottom of the prepared pan. Bake for 15 minutes until lightly golden.
  • Prepare the Apples: While the crust is baking, peel, core, and slice your apples into 0.5 cm thick pieces. In a bowl, combine the apples with lemon juice, sugar, cinnamon, nutmeg, and cornstarch.
  • Make the Salted Caramel: In a saucepan, combine the sugar and water over medium heat, stirring until the sugar dissolves. Allow it to cook undisturbed until it turns a deep amber color (about 8-12 minutes). Carefully add the warmed cream and butter, stirring until smooth. Add Fleur de Sel.
  • Assemble the Bars: Spread the apple filling evenly over the pre-baked crust. Drizzle half of the salted caramel over the apples, then sprinkle the remaining crumble mixture on top.
  • Bake Again: Return the pan to the oven and bake for an additional 30-40 minutes, or until the topping is golden brown and the apples are tender.
  • Cool and Slice: Let the bars cool completely in the pan before lifting them out and cutting into squares.

Pro Tips for Success

Side view of freshly baked Salted Caramel Apple Crumble Bars topped with caramel drizzle.

To ensure your salted caramel apple crumble bars turn out perfectly, consider these expert tips:

  • Use Cold Butter: For a flaky crust and crumble texture, make sure your butter is very cold.
  • Uniform Apple Sizes: Slice your apples evenly for consistent cooking throughout.
  • Control the Caramel Temperature: Watch the sugar closely to avoid burning; the perfect caramel is a deep amber color.
  • Let the Bars Cool Completely: Cooling allows the bars to set properly, making them easier to slice.
  • Experiment with Apples: Try different apple varieties for unique flavor profiles.
  • Don’t Rush the Caramel: Allow the sugar to melt completely before adding cream to prevent graininess.
  • Make it Gluten-Free: Substitute with a gluten-free flour blend for a gluten-free option.
  • Drizzle Extra Caramel: For an indulgent touch, drizzle more salted caramel on top before serving.

Common Mistakes and Troubleshooting

Here are some common pitfalls to avoid, along with solutions:

  • Bars are too crumbly: This could be due to overbaking—ensure to check doneness frequently.
  • Caramel is grainy: If the sugar isn’t dissolved completely or you stir it while cooking, it can crystallize. Stir gently and avoid agitating the sugar.
  • Apple filling is watery: Ensure you use cornstarch to help thicken the filling. Let the mixture sit for a few minutes before adding it to the crust.
  • Crust is too hard: This can happen if too much flour is used; measure carefully for best results!

Variations to Try

Feel free to customize these bars with the following variations:

  • Nutty Crumble: Add chopped pecans or walnuts to the crumble for a nutty crunch.
  • Chocolate Drizzle: Drizzle melted chocolate over the top for added richness.
  • Spiced Apples: Add more spices such as ginger or cloves for a warm twist.
  • Berry Addition: Mix in some fresh or frozen berries with the apples for a fruity explosion.

Storage and Make-Ahead Instructions

These bars store beautifully and can be made ahead of time:

  • Storage: Keep in an airtight container in the refrigerator for up to 5 days.
  • Freezing: Freeze the bars in a single layer for up to 3 months. Thaw in the fridge overnight before serving.
  • Make-Ahead: You can prepare the apple filling and salted caramel a day in advance. Assemble and bake the bars the day of serving.

Frequently Asked Questions

Here are some common questions about making salted caramel apple crumble bars:

  • Can I use store-bought caramel? Yes, for convenience, you can use store-bought salted caramel sauce instead of making it from scratch.
  • What’s the best apple variety? Granny Smith apples are recommended for their tartness, which balances the sweetness of the caramel.
  • Can I make these bars gluten-free? Absolutely! Simply substitute the all-purpose flour with a gluten-free flour blend.
  • How do I know when the bars are done? Look for a golden brown topping and tender apples. A toothpick inserted should come out clean.
  • Can I add nuts to the filling? Yes, chopped nuts can add a nice crunch to the apple filling.
  • What if my caramel hardens? If your caramel hardens, gently reheat it on low heat with a splash of cream to loosen it up.
  • Can I use other fruits? Yes! Pears, peaches, or even berries can be substituted for apples.
  • How do I serve these bars? Slice into squares and serve warm with a scoop of vanilla ice cream or a dollop of whipped cream.

Nutritional Tips and Dietary Adaptations

For a healthier twist, consider these adaptations:

  • Reduce Sugar: You can cut back on the sugar in both the crust and filling without sacrificing flavor.
  • Use Whole Wheat Flour: Substitute half of the all-purpose flour with whole wheat flour for added fiber.
  • Plant-Based Options: Use coconut cream and dairy-free butter for a completely plant-based recipe.

Equipment Recommendations

To make your baking experience seamless, here’s what you’ll need:

  • Mixing Bowls: A variety of sizes for mixing ingredients.
  • Measuring Cups and Spoons: Accurate measurements ensure the best results.
  • Pastry Cutter: Ideal for cutting butter into the flour.
  • Baking Pan: A square or rectangular pan lined with parchment paper for easy removal.
  • Whisk: Great for mixing dry ingredients and making the caramel.

Serving Suggestions

For the perfect presentation, consider these serving tips:

  • Warm it Up: Serve the bars warm for an ooey-gooey experience.
  • Top with Ice Cream: A scoop of vanilla ice cream or whipped cream complements the flavors beautifully.
  • Drizzle Extra Caramel: Drizzle more salted caramel sauce on top just before serving for that extra indulgence.
  • Garnish: Sprinkle with extra sea salt or a dusting of powdered sugar to elevate the dish.

With this comprehensive guide, you’re all set to create the most indulgent salted caramel apple crumble bars that not only satisfy your sweet tooth but also warm your heart. Happy baking, and enjoy the cozy moments these bars bring!

Himmlische Salted Caramel Apple Crumble Bars backen

Prep Time 20 minutes
Cook Time 45 minutes
Total Time 1 hour 5 minutes
Servings 12 bars
Calories 350
Delight in these heavenly salted caramel apple crumble bars, combining tart apples, crunchy streusel, and rich salted caramel for a perfect treat.

Ingredients

Dough and Streusel

  • 300 g Weizenmehl Type 405
  • 150 g kalte Butter oder pflanzliche Margarine (fĂĽr eine vegane Option)
  • 100 g Zucker
  • 50 g brauner Zucker
  • 1 Prise Salz
  • 50 g Haferflocken (optional)
  • 4-5 mittelgroĂźe säuerliche Ă„pfel (z.B. Granny Smith, Braeburn, Elstar)
  • 50 g Zucker fĂĽr die ApfelfĂĽllung
  • 0.5 Zitrone Saft einer halben Zitrone
  • 1 Teelöffel Zimt
  • 1 Prise Muskatnuss
  • 2 Esslöffel Speisestärke

Salted Caramel

  • 150 g Zucker fĂĽr das Salted Caramel
  • 50 ml Wasser
  • 100 ml Sahne oder pflanzliche Sahnealternative
  • 30 g Butter oder pflanzliche Margarine
  • 0.5 Teelöffel Fleur de Sel oder grobes Meersalz

Instructions 

  • Heizen Sie den Ofen auf 180°C vor und bereiten Sie eine 20x20cm Backform mit Backpapier vor.
  • Vermengen Sie Mehl, Zucker, braunen Zucker, Salz und Haferflocken, fĂĽgen Sie die kalte Butter hinzu und verreiben Sie alles zu Streuseln. DrĂĽcken Sie die Hälfte in die Form und backen Sie 15 Minuten.
  • Schälen, entkernen und schneiden Sie die Ă„pfel, mischen Sie sie mit Zitronensaft, Zucker, Zimt, Muskatnuss und Speisestärke. Verteilen Sie die ApfelfĂĽllung auf dem vorgebackenen Boden.
  • Zubereiten Sie das Karamell, indem Sie Zucker und Wasser erhitzen, bis es bernsteinfarben ist. Vom Herd nehmen, Sahne und Butter einrĂĽhren, salzen und ĂĽber die Ă„pfel geben.
  • Streuen Sie die restlichen Streusel darĂĽber und backen Sie weitere 30-40 Minuten, bis alles goldbraun ist. AbkĂĽhlen lassen, in StĂĽcke schneiden und servieren.

Notes

FĂĽr eine vegane Variante verwenden Sie pflanzliche Butter und Sahne.
Calories: 350kcal
Cost: $15
Course: Dessert
Cuisine: German
Keyword: apple, caramel, Crumble

Elevate Your Taco Night with Spicy Chipotle Shrimp Tacos

Are you ready to take your taco night to the next level? These Spicy Chipotle Shrimp Tacos are not just a meal; they’re a fiesta of flavors waiting to happen! With the perfect balance of spice, freshness, and crunch, this recipe is designed for anyone looking to create a quick yet impressive dinner. Let’s dive into this culinary adventure together!

Why You’ll Love This Recipe

  • Quick & Easy: Whip up these tacos in just 30 minutes, making them ideal for busy weeknights.
  • Flavor Explosion: The combination of chipotle peppers and spices creates a smoky, savory taste that’s sure to impress.
  • Health-Conscious: Packed with shrimp and fresh veggies, these tacos are a nutritious choice that doesn’t compromise on flavor.
  • Customizable: From toppings to spice levels, you can personalize every aspect of your tacos to fit your taste.
  • Perfect for Gatherings: Whether it’s a casual family dinner or a lively taco party, these shrimp tacos are a crowd-pleaser.

Essential Ingredients for Spicy Chipotle Shrimp Tacos

Here’s what you’ll need to bring these tacos to life:

  • 1 lb shrimp: Peeled and deveined, the star ingredient that cooks quickly and absorbs flavors beautifully.
  • 2 tbsp olive oil: Adds richness and helps the spices adhere to the shrimp.
  • 2 tbsp chipotle peppers in adobo sauce: Minced for that signature smoky heat.
  • 1 tsp garlic powder: Enhances flavor without the hassle of fresh garlic.
  • 1 tsp cumin: Adds warmth and depth to the dish.
  • 1/2 tsp salt: Essential for enhancing all the flavors.
  • 8 small corn tortillas: The perfect vessel for holding all that deliciousness.
  • 1 cup shredded cabbage: Provides crunch and freshness.
  • 1/2 cup diced tomatoes: Juicy and bright, they add a refreshing contrast.
  • 1/4 cup chopped cilantro: The herb that ties all the flavors together.
  • 1 lime: Cut into wedges for a zesty finish.

Ingredient Substitutions

  • Shrimp: Use chicken or tofu for a different protein option.
  • Chipotle peppers: Substitute with smoked paprika if you prefer milder heat.
  • Cabbage: Swap with lettuce or radicchio for a different crunch.
  • Cilantro: Omit or replace with parsley if cilantro isn’t your favorite.

Step-by-Step Instructions to Make Spicy Chipotle Shrimp Tacos

Side view of juicy shrimp tacos topped with cabbage and tomatoes.

Step 1: Marinate the Shrimp

In a mixing bowl, combine the shrimp with olive oil, minced chipotle peppers, garlic powder, cumin, and salt. Toss well to ensure every shrimp is coated in this flavorful marinade. Let it marinate for about 10-15 minutes to enhance the flavor.

Step 2: Cook the Shrimp

Heat a pan over medium-high heat. Add the marinated shrimp and cook for about 2-3 minutes per side, until they turn pink and opaque. Be careful not to overcook them, as shrimp can become tough.

Step 3: Warm the Tortillas

While the shrimp are cooking, warm the corn tortillas in a dry skillet over medium heat for about 30 seconds on each side, or until they are pliable. Alternatively, zap them in the microwave for about 15-20 seconds.

Step 4: Assemble the Tacos

To assemble, place a generous amount of cooked shrimp on each tortilla. Top with shredded cabbage, diced tomatoes, and chopped cilantro. Squeeze fresh lime juice over the top for an added zing!

Pro Tips for Perfect Tacos

  • Don’t Rush the Marination: Allowing the shrimp to marinate enhances the flavor significantly.
  • Fresh Ingredients Matter: Use fresh lime and high-quality shrimp for the best results.
  • Experiment with Heat: Adjust the amount of chipotle peppers based on your spice preference.
  • Use a Hot Pan: Ensure your pan is hot to achieve a nice sear on the shrimp.
  • Warm Tortillas Properly: Warming them prevents tearing and enhances flavor.
  • Layer Flavors: Consider adding avocado or a creamy sauce for extra richness.
  • Don’t Overcook Shrimp: They’re done when they’re opaque and firm to the touch.
  • Garnish Wisely: Fresh herbs and lime wedges elevate the overall dish.

Common Mistakes and Troubleshooting

Even the best cooks can run into issues. Here’s how to avoid common pitfalls:

  • Overcooked Shrimp: Keep an eye on the shrimp while cooking; they only need a few minutes.
  • Flavorless Tacos: If under-seasoned, add more salt or lime juice to enhance flavors.
  • Torn Tortillas: If this happens, ensure they’re warmed properly before filling.

Delicious Variations of Spicy Chipotle Shrimp Tacos

Feel free to get creative with these variations:

  • Fish Tacos: Replace shrimp with your favorite white fish for a lighter version.
  • Vegetarian Tacos: Use black beans or grilled vegetables for a meatless meal.
  • Spicy Chipotle Chicken: Substitute shrimp with diced chicken marinated in the same sauce.
  • Chipotle Shrimp Burritos: Wrap the ingredients in a large tortilla for a hearty burrito.

Storage and Make-Ahead Instructions

You can prepare parts of this dish in advance:

  • Make-Ahead: Marinate the shrimp up to 2 hours in advance for deeper flavor.
  • Storage: Store leftover shrimp in an airtight container in the fridge for up to 3 days.
  • Reheating: Reheat shrimp in a pan over low heat to avoid overcooking.

Frequently Asked Questions

  • Can I use frozen shrimp? Yes, just ensure they are fully thawed and pat them dry before marinating.
  • What can I use instead of chipotle peppers? Smoked paprika or cayenne pepper can add heat, albeit with different flavors.
  • Can I make these tacos gluten-free? Yes, use gluten-free tortillas instead of corn tortillas.
  • How spicy are these tacos? The spiciness can be adjusted based on how many chipotle peppers you use.
  • Can I add cheese? Absolutely! Feta or cotija cheese can add a delicious creaminess.
  • How do I make the slaw? Combine shredded cabbage with lime juice, salt, and a touch of sugar for a quick slaw.
  • What sides go well with these tacos? Consider serving with Mexican rice, refried beans, or a fresh corn salad.
  • Can I grill the shrimp instead? Yes! Grilling adds a wonderful smoky flavor.

Nutritional Tips and Dietary Adaptations

This recipe is naturally low in carbohydrates and high in protein, making it a great option for various diets:

  • Low-Carb: Enjoy as is or serve with a salad instead of tortillas.
  • Whole30: Ensure your ingredients meet Whole30 guidelines for a compliant meal.
  • Paleo: Skip the tortillas and serve the shrimp over a bed of greens.
  • Vegan: Replace shrimp with marinated tofu or jackfruit for a plant-based option.

Essential Equipment for Cooking

Here’s what you’ll need to make this recipe:

  • Skillet: A non-stick or cast-iron skillet works best for searing shrimp.
  • Mixing Bowl: For marinating the shrimp.
  • Spatula: To flip the shrimp while cooking.
  • Serving Platter: For a beautiful presentation.

Serving Suggestions for Spicy Chipotle Shrimp Tacos

To make your taco night even more special, consider these serving ideas:

  • Garnish: Fresh cilantro, avocado slices, and extra lime wedges.
  • Side Dishes: Serve with Mexican rice, black beans, or a light salad.
  • Sauces: Drizzle with sour cream, guacamole, or a homemade salsa for extra flavor.

In conclusion, these Spicy Chipotle Shrimp Tacos are not just a recipe; they’re an invitation to enjoy cooking and share joy with others. With simple steps and bold flavors, you’ll feel confident and excited to prepare a delicious meal. So gather your ingredients, bring your loved ones to the table, and savor the delightful taste of homemade tacos tonight!

Spicy Chipotle Shrimp Tacos

Prep Time 10 minutes
Cook Time 10 minutes
Total Time 20 minutes
Servings 4 servings
Calories 350
Enjoy these flavorful tacos featuring spicy chipotle shrimp, fresh vegetables, and warm corn tortillas for a quick and delicious meal.

Ingredients

Protein

  • 1 lb shrimp, peeled and deveined

Oil

  • 2 tbsp olive oil

Sauce & Seasonings

  • 2 tbsp chipotle peppers in adobo sauce, minced
  • 1 tsp garlic powder
  • 1 tsp cumin
  • 1 2 tsp salt

Tortillas & Vegetables

  • 8 small corn tortillas
  • 1 cup shredded cabbage
  • 1 2 cup diced tomatoes
  • 1 4 cup chopped cilantro
  • 1 whole lime, cut into wedges

Instructions 

  • Combine shrimp with olive oil, minced chipotle, garlic powder, cumin, and salt.
  • Cook shrimp in a pan over medium-high heat for 2-3 minutes per side until pink and opaque.
  • Warm tortillas until pliable.
  • Assemble tacos with shrimp, cabbage, tomatoes, cilantro, and lime wedges.

Notes

Use fresh ingredients for best flavor.
Calories: 350kcal
Cost: $15
Course: Main Course
Cuisine: Mexican
Keyword: shrimp

Unlock the Secrets to Flavorful Cheesy Garlic Chicken Wraps

Welcome to your next culinary adventure! If you’re looking for a quick, delicious meal that doesn’t skimp on flavor, you’ve landed in the right place. These Cheesy Garlic Chicken Wraps are not only easy to whip up, but they also bring a burst of flavor that will make any weeknight feel special. In this guide, we’ll explore everything from choosing the right ingredients to expert tips for perfecting your wraps. So, let’s roll up our sleeves and get cooking!

Why You’ll Love This Recipe

These wraps are a fantastic meal solution for busy weeknights or lazy weekends. Here are five reasons why you’ll enjoy making them:

  • Quick Prep Time: Ready in under 30 minutes, making them a perfect option for those hectic evenings.
  • Customizable: You can easily swap out ingredients based on your taste preferences or what you have on hand.
  • Flavor-Packed: The combination of garlic, cheese, and spices elevates the dish into something truly special.
  • Perfect for Meal Prep: Make them ahead of time and store in the fridge or freezer for easy reheating.
  • Kid-Friendly: The cheesy goodness is sure to be a hit with the little ones (and grown-ups too!).

Essential Ingredients

Let’s break down the ingredients you’ll need to create these cheesy delights, along with some nifty substitutions:

  • Chicken: Use 2 large breasts or 4 thighs. Thighs tend to be juicier, which can enhance the flavor.
  • Tortillas: Opt for 10-inch flour tortillas for easy rolling; they provide the perfect balance of softness and structure.
  • Cheese: A blend of low-moisture mozzarella and sharp cheddar creates that gooey, melty texture.
  • Garlic: 3-4 cloves, minced, for that aromatic punch.
  • Butter and Olive Oil: A combination adds richness and helps achieve a golden crust.
  • Spices: Don’t forget salt, pepper, smoked paprika, and onion powder for seasoning.
  • Fresh Herbs: Parsley or chives can brighten up the dish.
  • Optional Add-Ins: Consider adding yogurt or mayo, spinach, pickled jalapeños, or roasted red peppers for extra flavor.

Step-by-Step: How to Make Cheesy Garlic Chicken Wraps

Side angle of a juicy chicken wrap filled with garlic, cheese, and fresh herbs.

Now that you have your ingredients ready, let’s dive into the cooking process. Follow these simple steps:

  • Season the Chicken: Coat your chicken pieces with salt, pepper, smoked paprika, and onion powder. Toss with olive oil and let it marinate for about 10 minutes.
  • Cook the Chicken: In a hot skillet, cook the chicken until browned and fully cooked through. Allow it to rest for 5 minutes before slicing it into bite-sized pieces.
  • Prepare the Garlic Butter: In the same pan, lower the heat and add a knob of butter along with the minced garlic. Stir for 30-60 seconds until fragrant.
  • Combine Chicken and Garlic: Add the sliced chicken back into the pan, coating it well with the garlicky butter. Sprinkle in your fresh herbs and adjust the seasoning if needed.
  • Warm the Tortillas: Heat each tortilla for 10-15 seconds in the microwave. This helps them bend without cracking.
  • Assemble Your Wrap: Spread a thin layer of optional mayo or yogurt on the tortilla. Add cheese, followed by the garlicky chicken and any additional toppings you prefer.
  • Roll It Up: Fold the sides in and roll tightly from the bottom up to secure the filling.
  • Cook the Wrap: Place the wrap seam-side down in a non-stick pan over medium heat. Cook for 2-3 minutes per side until golden and melty.

Pro Tips for Perfect Wraps

To take your wraps to the next level, consider these expert insights:

  • Keep It Warm: If you’re making multiple wraps, keep them warm in the oven on a low setting.
  • Cheese Strategy: Use a mix of cheeses for a more complex flavor profile.
  • Don’t Overfill: Less is more! Overfilling can lead to messy wraps.
  • Seam-Side Down: Start cooking your wrap seam-side down to prevent it from unrolling.
  • Experiment with Sauces: Try different sauces for dipping, like spicy mayo or ranch, to amp up the flavor.
  • Use an Air Fryer: For a healthier alternative, consider using an air fryer to achieve that crispy texture.
  • Customize Your Fillings: Get creative with additional vegetables or proteins to make it your own.
  • Master the Heat: Keep the heat at medium to prevent burning while ensuring everything is cooked through.

Common Mistakes and Troubleshooting

Even seasoned cooks can run into hiccups, so here are some common pitfalls to avoid:

  • Burnt Garlic: If garlic burns, it can turn bitter. Keep an eye on the pan and reduce the heat if necessary.
  • Too Much Filling: Overstuffing can lead to leaks and a messy wrap. Stick to a manageable amount!
  • Dry Chicken: Make sure to not overcook the chicken; use a meat thermometer to check for doneness (165°F).
  • Cold Tortillas: If the tortillas aren’t warmed, they can crack when rolling. Always warm them before assembling.

Flavor Variations to Try

Want to mix things up? Here are some delicious variations you can try:

  • Buffalo Chicken Wrap: Swap out the spices for buffalo sauce and add blue cheese crumbles.
  • Veggie Delight: Replace chicken with sautĂ©ed vegetables like bell peppers, zucchini, and mushrooms.
  • BBQ Chicken Wrap: Toss the chicken in your favorite BBQ sauce before assembling.
  • Tex-Mex Twist: Add black beans, corn, and a sprinkle of taco seasoning for a south-of-the-border flair.

Storage and Make-Ahead Instructions

If you want to prepare these wraps in advance, here’s how you can store them:

  • Refrigerate: Store assembled wraps in an airtight container in the fridge for up to 3 days.
  • Freeze: Wrap individually in foil, then place in a freezer bag. They can be frozen for up to 2 months.
  • Reheating: To reheat, place frozen wraps in the oven at 350°F for 20-25 minutes or until heated through.

Frequently Asked Questions

Got questions? We’ve got answers! Here are some common queries regarding cheesy garlic chicken wraps:

  • Can I use other meats? Yes! Feel free to substitute with turkey, pork, or even tofu for a vegetarian option.
  • What if I don’t have tortillas? You can use pita bread, lettuce wraps, or even crĂŞpes!
  • How can I make these gluten-free? Use gluten-free tortillas or lettuce for wrapping.
  • Can I make these wraps in advance? Absolutely! They’re great for meal prep. Just store them correctly.
  • What sides pair well with these wraps? Consider serving with a fresh salad, sweet potato fries, or a light soup.
  • How do I know when the chicken is done? Use a meat thermometer; it should reach 165°F for safe consumption.
  • What if I have leftover filling? Use it in salads, omelets, or as a topping for baked potatoes.
  • Can I use a different type of cheese? Yes! Feel free to experiment with your favorite cheeses.

Nutritional Tips and Dietary Adaptations

Want to tailor this recipe to fit your dietary needs? Here are some tips:

  • Lower Calorie Option: Use Greek yogurt instead of mayo for a lighter spread.
  • Increase Fiber: Add more veggies and consider whole grain tortillas for added nutrients.
  • Dairy-Free: Swap out cheese for a dairy-free alternative or nutritional yeast.
  • Paleo-Friendly: Use lettuce wraps instead of tortillas and opt for minimal processed ingredients.

Equipment Recommendations

To make these wraps, you’ll want to have a few key pieces of equipment on hand:

  • Non-Stick Skillet: Essential for cooking your wraps without them sticking.
  • Sharp Knife: For slicing chicken and chopping herbs.
  • Meat Thermometer: To ensure your chicken is cooked to the perfect temperature.
  • Spatula: For flipping your wraps during cooking.

Serving Suggestions

Finally, here are a few ideas for how to serve your cheesy garlic chicken wraps:

  • Garnish: Top with fresh herbs or a squeeze of lemon for an extra zing.
  • Dipping Sauce: Serve with ranch, salsa, or your favorite hot sauce.
  • Accompaniments: Pair with a side salad or crunchy veggie sticks for a complete meal.

Now that you have all the tools you need, it’s time to roll up your sleeves and get cooking! Remember, cooking is about enjoying the process and having fun. So, gather your ingredients, invite a friend or family member to join, and enjoy the delicious Cheesy Garlic Chicken Wraps that you’ve created together. Happy cooking!

Cheesy Garlic Chicken Wraps

Prep Time 15 minutes
Cook Time 10 minutes
Total Time 25 minutes
Servings 4 servings
Calories 550
Delicious and easy to make, these cheesy garlic chicken wraps are perfect for a quick lunch or dinner, packed with flavor and customizable with your favorite extras.

Ingredients

Protein

  • 2 large chicken breasts
  • 10 inch flour tortillas

Cheese

  • Low-moisture mozzarella cheese mozzarella cheese
  • Sharp cheddar cheese cheddar cheese

Garlic

  • 3 4 cloves cloves garlic, minced

Fats & Oils

  • Butter butter
  • Olive oil olive oil

Seasonings & Herbs

  • Salt salt
  • Pepper pepper
  • Smoked paprika smoked paprika
  • Onion powder onion powder

Fresh herbs

  • Parsley or chives fresh herbs (parsley or chives)

Extras (optional)

  • Yogurt or mayo yogurt or mayonnaise (optional)
  • Spinach or arugula greens (spinach or arugula) (optional)
  • Pickled jalapeños pickled jalapeños (optional)
  • Roasted red peppers roasted red peppers (optional)

Instructions 

  • Season chicken with salt, pepper, smoked paprika, and onion powder; toss with olive oil and let sit 10 minutes.
  • Cook chicken in a hot skillet with oil until browned and cooked through; rest 5 minutes, then slice into bite-sized pieces.
  • In the same pan, lower heat, add butter and minced garlic; stir 30-60 seconds until fragrant.
  • Add chicken back to pan, coat with garlic butter, sprinkle herbs, and adjust salt to taste.
  • Warm tortillas briefly, spread optional mayo or yogurt, add cheese, chicken, extras, top with more cheese, fold, and roll tightly.
  • Cook wraps in a nonstick pan over medium heat 2-3 minutes per side until golden and melty, or use oven/air fryer as preferred.

Notes

For extra flavor, add your favorite hot sauce or additional herbs.
Calories: 550kcal
Cost: $15
Course: Main Course
Cuisine: American
Keyword: Cheese, Chicken, Wraps

Elevate Your Weeknight Dinner with Creamy Garlic Chicken Pasta

If you’re looking for a weeknight dinner that combines comfort and convenience, look no further than this creamy garlic chicken pasta! This dish is not only quick to prepare but also brings together tender chicken, a rich creamy sauce, and a blend of cheeses that will make your taste buds dance. In just under 30 minutes, you can whip up a satisfying meal that feels like a treat after a long day. Plus, it’s a fantastic way to enjoy a cozy dinner without the fuss.

Why You’ll Love This Recipe

This creamy garlic chicken pasta is a game-changer for busy evenings. Here are five reasons why:

  • Quick and Easy: With just a few ingredients, you can have dinner on the table in under 30 minutes.
  • Comfort Food: The creamy sauce and tender chicken create a dish that feels indulgent yet simple.
  • Customizable: Easily modify the recipe to suit your taste preferences or dietary needs.
  • Perfect for Leftovers: This dish reheats beautifully, making it a great option for meal prep or lunches.
  • Kid-Friendly: Kids love the creamy sauce and cheesy goodness, making it a hit for the whole family.

Ingredients Breakdown

Here’s what you’ll need to make this delicious garlic chicken pasta:

  • 8 oz pasta: Choose your favorite type—fettuccine, penne, or spaghetti work wonderfully.
  • 2 tablespoons olive oil: For sautĂ©ing the chicken to golden perfection.
  • 1 lb chicken breast, cut into bite-sized pieces: Tender chicken is key; boneless, skinless breasts are ideal.
  • 4 cloves garlic, minced: Fresh garlic adds robust flavor; feel free to adjust to taste.
  • 1 cup heavy cream: This creates a luscious sauce; for a lighter version, substitute half-and-half.
  • 1 cup shredded mozzarella cheese: For that melty, gooey goodness.
  • 1/2 cup grated Parmesan cheese: Adds a nutty flavor that complements the dish.
  • 1 teaspoon Italian seasoning: A blend of herbs that enhances the dish’s flavor profile.
  • Salt and pepper to taste: Essential for seasoning the dish to your liking.
  • Fresh parsley, chopped, for garnish: A pop of color and freshness to finish off the dish.

Pro Tips for Success

Close-up of a creamy Garlic Chicken Pasta dish, with chicken pieces and cheese visible.

Here are some expert insights to ensure your creamy garlic chicken pasta turns out perfectly:

  • Use a large skillet: This allows the chicken to cook evenly and prevents overcrowding.
  • Cook pasta al dente: Follow package instructions but aim for a slightly firmer texture to maintain bite.
  • Don’t burn the garlic: Cook it just until fragrant; burnt garlic can turn bitter.
  • Reserve pasta water: Adding a splash of reserved water can help adjust the sauce’s consistency.
  • Taste as you go: Adjust seasoning throughout the cooking process for the best flavor.
  • Let the sauce thicken: Give it a couple of extra minutes to develop a creamy consistency.
  • Experiment with cheeses: Try adding gouda or cheddar for a different flavor twist.
  • Store properly: If you have leftovers, store in an airtight container and refrigerate for up to 3 days.

Common Mistakes to Avoid

Cooking can be tricky, but avoiding these common pitfalls can make all the difference:

  • Overcooking the chicken: Aim for golden brown on the outside, juicy on the inside; use a meat thermometer for accuracy.
  • Adding too much liquid: Start with less cream and adjust as needed to avoid a runny sauce.
  • Skipping the seasoning: Make sure to season each component for maximum flavor.
  • Not letting the sauce simmer: Allowing the sauce to simmer helps meld the flavors together.

Variations to Try

Feel free to get creative with this recipe! Here are some variations to consider:

  • Add vegetables: Incorporate spinach, broccoli, or bell peppers for added nutrition and color.
  • Swap the protein: Use shrimp or turkey instead of chicken for a different protein option.
  • Make it spicy: Add red pepper flakes or diced jalapeños for a kick of heat.
  • Use whole grain or gluten-free pasta: Adapt the recipe to fit your dietary preferences.

Storage and Make-Ahead Instructions

You can easily prepare this creamy garlic chicken pasta ahead of time:

  • Refrigerator: Store leftovers in an airtight container for up to 3 days.
  • Freezer: This dish can be frozen; just be aware that the cream may separate upon reheating.
  • Make-ahead: Cook the chicken and sauce in advance, then combine with freshly cooked pasta before serving.

Frequently Asked Questions

Here are some common questions about this recipe:

  • Can I use a different type of pasta? Yes! Any pasta shape will work, just adjust cooking time accordingly.
  • Is this dish suitable for a gluten-free diet? Absolutely! Use gluten-free pasta to make this recipe suitable for gluten-free diets.
  • Can I substitute heavy cream? Yes! Half-and-half or even coconut milk can be used for a lighter sauce.
  • How do I make this dish vegetarian? Swap the chicken for mushrooms or tofu and use vegetable broth instead of chicken broth.
  • Can I make this dish dairy-free? Yes! Use dairy-free cheese and substitute heavy cream with a plant-based alternative.
  • What can I serve with this pasta? A fresh salad or garlic bread pairs wonderfully with this dish.
  • How do I reheat leftovers? Gently reheat in a skillet over low heat, adding a splash of chicken broth or water to loosen the sauce.
  • Can I add more garlic? If you love garlic, feel free to add more to suit your taste!

Nutrition Tips and Dietary Adaptations

This creamy garlic chicken pasta can be adapted to fit various dietary needs:

  • Lower Calories: Use less cream and cheese, or substitute with lighter options.
  • Add Fiber: Incorporate whole grain pasta for added fiber content.
  • Boost Protein: Add beans or lentils for a vegetarian protein option.

Equipment Recommendations

To make this creamy garlic chicken pasta, you’ll need:

  • Large pot: For boiling pasta.
  • Large skillet: For cooking chicken and sauce.
  • Wooden spoon: For stirring the sauce.
  • Meat thermometer: To ensure chicken is cooked perfectly.

Serving Suggestions

To elevate your serving experience:

  • Garnish with parsley: Fresh herbs add color and brightness to your dish.
  • Pair with wine: A glass of white wine complements the creamy flavors beautifully.
  • Serve with crusty bread: Perfect for soaking up any leftover sauce.
  • Offer a side salad: A light salad balances the richness of the pasta.

Conclusion

There you have it—your go-to recipe for creamy garlic chicken pasta! With its comforting flavors and elegant presentation, this dish is sure to impress your family or guests. Remember, cooking is about enjoying the process and embracing creativity. So, roll up your sleeves, gather your ingredients, and get ready to enjoy a delightful dinner that celebrates the joy of cooking. Happy cooking!

🍽 Looking for More Recipes to Cook Every Day?

Get my full cookbook with 50 Recipes You’ll Want to Cook Again and Again perfect for busy days and family dinners.

🍗 Download Your Cookbook Now

Instant download • 50 tested recipes

Garlic Chicken Pasta Recipe with Cheese

Prep Time 10 minutes
Cook Time 20 minutes
Total Time 30 minutes
Servings 4 servings
Calories 650
A creamy, cheesy pasta dish featuring tender chicken and fragrant garlic, perfect for a satisfying meal.

Ingredients

Pasta

  • 8 oz pasta
  • 2 tablespoons olive oil
  • 1 lb chicken breast (cut into bite-sized pieces)
  • 4 cloves garlic (minced)
  • 1 cup heavy cream
  • 1 cup shredded mozzarella cheese
  • 0.5 cup grated Parmesan cheese
  • 1 teaspoon Italian seasoning
  • to taste Salt and pepper
  • for garnish Fresh parsley chopped

Instructions 

  • Cook pasta in salted boiling water until al dente, then drain, reserving 1 cup of pasta water.
  • In a skillet, heat olive oil and cook chicken until golden, then remove and set aside.
  • In the same skillet, sautĂ© garlic until fragrant, then add heavy cream and simmer briefly.
  • Add cooked pasta and reserved water, then stir in cheeses and seasonings until melted and coated.
  • Serve hot, garnished with chopped parsley.

Notes

For a richer flavor, sprinkle extra Parmesan on top before serving.
Calories: 650kcal
Cost: $15
Course: Main Course
Cuisine: Italian
Keyword: Cheese, Chicken, Pasta