Author

Steven

Browsing

Are you ready to elevate your weeknight dinners with a dish that not only delights the palate but also fills your kitchen with vibrant colors and aromas? This Vegetable-Packed Chicken Pasta Primavera is your go-to recipe for a healthy, delicious, and quick dinner that the whole family will love. Combining tender chicken, fresh veggies, and al dente pasta, this dish is packed with flavor and nutrition. Let’s dive into why this recipe is a must-try and how you can whip it up in no time!

Why You’ll Love This Recipe

  • Quick and Easy: This dish comes together in under 30 minutes, making it perfect for busy weeknights.
  • Colorful and Nutritious: With a variety of vegetables, you’re not just eating well; you’re also enjoying a feast for the eyes!
  • Customizable: Use whatever veggies you have on hand, making this recipe adaptable to your tastes and dietary needs.
  • Comfort Food with a Twist: It tastes like a comforting bowl of pasta while being packed with nutrients.
  • Meal Prep Friendly: Make a big batch and enjoy it throughout the week—great for lunches or quick dinners.

Gather Your Ingredients

Here’s what you’ll need to create this delicious Chicken Pasta Primavera:

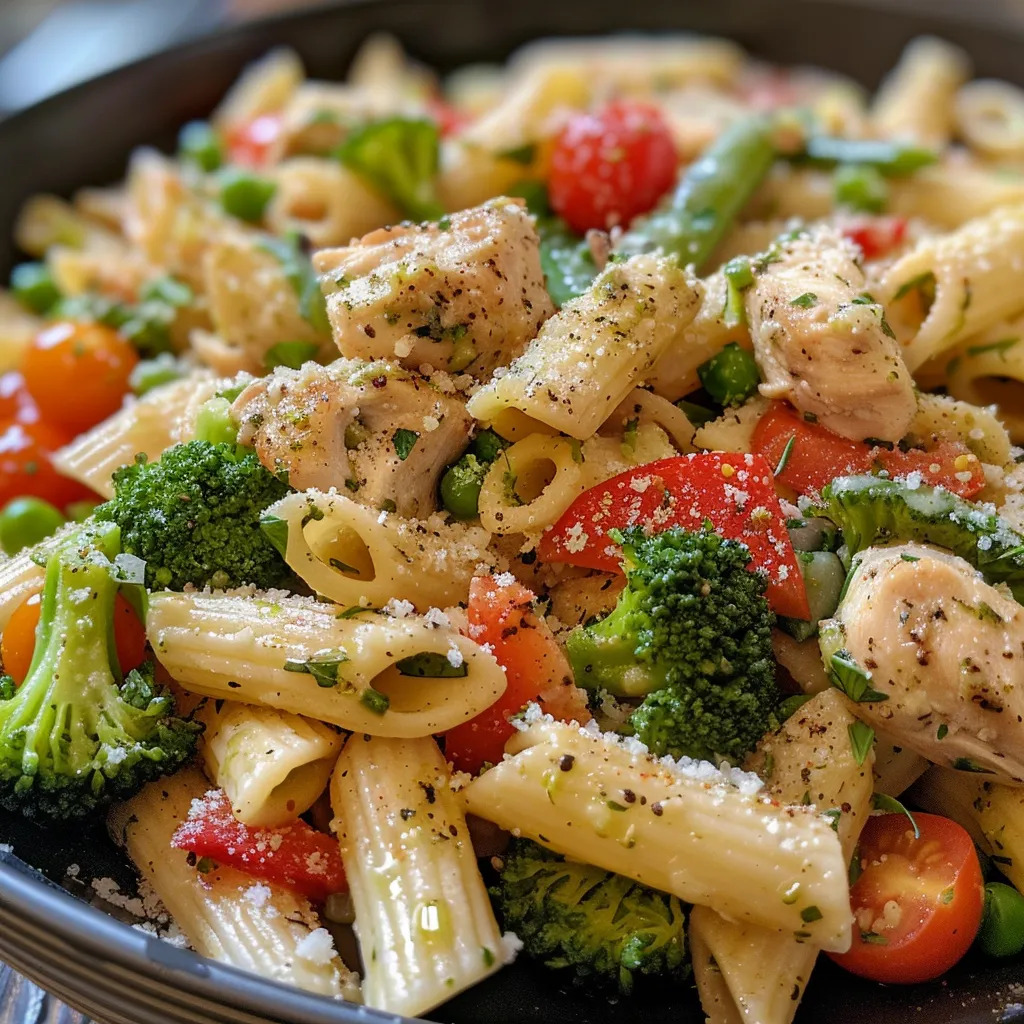
  • 8 oz penne or rotini: Whole wheat pasta adds extra fiber and nutrition.
  • 2 boneless skinless chicken breasts: Cut into bite-sized pieces for even cooking.
  • Salt + pepper: Essential for seasoning.
  • 1 tbsp olive oil: For sautéing the chicken and veggies.
  • 1 red bell pepper: Sliced thin for sweetness and crunch.
  • 1 zucchini: Halved and sliced for added texture.
  • 1 cup cherry tomatoes: Halved; they add a juicy burst of flavor.
  • 1 cup broccoli florets: For a nutrient boost.
  • 1 cup snap peas or green beans: Fresh and crisp, they add a nice crunch.
  • 3 cloves garlic: Minced for aromatic flavor.
  • 1/2 tsp dried oregano: Adds a warm, earthy flavor.
  • 1/2 tsp crushed red pepper flakes: Optional, for a spicy kick.
  • 1 tbsp butter: For creamy richness.
  • Juice of 1/2 lemon: Brightens up the dish.
  • 1/2 cup grated parmesan cheese: Freshly grated is best for flavor.
  • 1/3 cup reserved pasta water: To help bind everything together.
  • More parmesan: Because you can never have enough cheese!
  • Chopped fresh parsley or basil: For garnish and freshness.
  • A squeeze of lemon juice: To finish the dish with a zing!

Step-by-Step Instructions

Ready to cook? Let’s get started with these simple steps:

  1. Bring a big pot of salted water to a boil.
  2. Cook the pasta according to package directions until al dente. Reserve 1/2 cup of pasta water before draining.
  3. While the pasta cooks, heat 1 tbsp olive oil in a large skillet over medium-high heat.
  4. Season the chicken pieces with salt and pepper. Sauté until golden brown and cooked through, about 6–8 minutes. Set aside.
  5. In the same skillet, add a little more olive oil if needed.
  6. Toss in all your veggies except the tomatoes: bell pepper, zucchini, broccoli, and snap peas. Sauté for 5–6 minutes until just tender.
  7. Add garlic, oregano, red pepper flakes, and cherry tomatoes. Sauté for 2 more minutes until fragrant.
  8. Lower the heat to medium-low. Push the veggies to the side of the pan.
  9. Add butter and olive oil to the pan and let it melt.
  10. Add the cooked pasta, sautéed chicken, parmesan cheese, lemon juice, and a splash of reserved pasta water. Toss everything together until silky and well combined. Add more pasta water if it looks dry.
  11. Taste and adjust seasoning—do you want more lemon? More cheese? Go for it!
  12. Plate it up and top with extra parmesan, fresh herbs, and a final squeeze of lemon.

Pro Tips for Perfect Pasta Primavera

A rich and appetizing dish of chicken pasta primavera adorned with fresh herbs and lemon zest.
  • Perfect Chicken: Ensure chicken pieces are cut evenly for consistent cooking. Use a meat thermometer; chicken is done at 165°F (75°C).
  • Reserve Pasta Water: This starchy water is a magical ingredient that helps the sauce cling to the pasta.
  • Veggie Variations: Feel free to swap in your favorite seasonal vegetables or whatever you have on hand.
  • Don’t Overcook: Keep your veggies vibrant and crisp by not overcooking them.
  • Cheese Choices: Experiment with different cheeses like feta or goat cheese for a unique flavor.
  • Herb Infusion: Fresh herbs can elevate the dish; try adding basil, parsley, or even mint for a refreshing twist.
  • Make It Ahead: You can prepare the chicken and chop the vegetables in advance for a quicker cooking time on busy nights.
  • Serving Size: This recipe serves about 4, but feel free to double it for meal prep!

Common Mistakes and Troubleshooting

Even the best home cooks can run into issues. Here are some common pitfalls and how to avoid them:

  • Overcooked Pasta: Always cook pasta al dente; it will continue to cook when combined with the hot sauce.
  • Dry Chicken: Avoid overcooking the chicken by monitoring its internal temperature closely.
  • Flavorless Dish: Don’t skip seasoning! Salt and pepper are essential for bringing out flavors.
  • Too Watery: If your dish ends up too watery, let it cook a bit longer to evaporate excess moisture.

Delicious Variations to Try

Feeling adventurous? Here are some fun variations to customize your Chicken Pasta Primavera:

  • Vegetarian Version: Replace chicken with chickpeas or tofu for a protein-packed vegetarian option.
  • Pasta Primavera Alfredo: Add heavy cream and more parmesan for a creamy twist.
  • Spicy Kick: Include jalapeños or sriracha for some heat.
  • Herb-Infused: Add fresh basil or dill to enhance the freshness of the dish.

Storage and Make-Ahead Instructions

This Chicken Pasta Primavera is perfect for meal prep! Here’s how to store it:

  • Refrigeration: Store in an airtight container for up to 4 days in the fridge.
  • Freezing: Freeze in individual portions for up to 3 months. Thaw overnight in the fridge before reheating.
  • Reheating: To reheat, add a splash of water or olive oil to keep it moist and warm in the microwave or on the stove.

Frequently Asked Questions

Got questions? We’ve got answers! Here are some common inquiries about this recipe:

  • Can I use other pasta types? Absolutely! Any pasta shape will work; just adjust the cooking time as needed.
  • What can I substitute for parmesan? Try pecorino, nutritional yeast, or even a dairy-free cheese alternative.
  • How can I make it gluten-free? Use gluten-free pasta and check labels for other ingredients.
  • Can I make this in advance? Yes! You can prepare the components and combine just before serving.
  • Is it suitable for kids? Definitely! It’s colorful and flavorful, which kids usually love.
  • What’s the best way to reheat leftovers? A splash of water or oil in the pan will help revive the dish without drying it out.
  • Can I add more vegetables? Yes! Feel free to add or substitute any vegetables you enjoy.
  • How spicy is this dish? It’s not spicy unless you add the red pepper flakes; adjust to your taste!

Nutrition Tips and Dietary Adaptations

This Chicken Pasta Primavera can easily fit various dietary needs:

  • Low-Carb Option: Substitute pasta with zucchini noodles (zoodles) or spaghetti squash for a lower-carb meal.
  • Dairy-Free: Omit the cheese or use a dairy-free alternative.
  • High-Protein: Add more chicken or toss in some beans for an extra protein boost.
  • Vegan: Replace chicken with chickpeas and omit the cheese for a fully vegan dish.

Equipment Recommendations

Here’s what you’ll need to whip up this dish:

  • Large Pot: For boiling pasta.
  • Skillet: A large non-stick skillet works best for sautéing.
  • Wooden Spoon: For tossing everything together.
  • Meat Thermometer: To ensure chicken is perfectly cooked.

Serving Suggestions

Here are some ideas to elevate your dining experience:

  • Side Salad: Pair with a fresh green salad for a light meal.
  • Garlic Bread: Serve with garlic bread for that traditional Italian feel.
  • Wine Pairing: A crisp white wine like Pinot Grigio complements this dish beautifully.
  • Fresh Herbs: Add more chopped parsley or basil on top for a fresh finish.

Cooking is all about creativity and confidence, and this Vegetable-Packed Chicken Pasta Primavera is the perfect way to express that. You’ll not only enjoy a delicious meal but also feel accomplished in the kitchen. So gather your ingredients, follow these steps, and watch your weeknight dinners transform into something special. Happy cooking!

Vegetable-Packed Chicken Pasta Primavera: Your Weeknight Glow-Up

Prep Time 10 minutes
Cook Time 20 minutes
Total Time 30 minutes
Servings 4 servings
Calories 550
This vibrant pasta dish combines tender chicken and fresh vegetables in a light, flavorful sauce, perfect for a quick weeknight dinner.

Ingredients

Pasta

  • 8 oz penne or rotini (whole wheat if you’re feeling virtuous)
  • 2 pieces boneless skinless chicken breasts, cut into bite-size pieces

Vegetables

  • 1 each red bell pepper, sliced thin
  • 1 each zucchini, halved and sliced
  • 1 cup cherry tomatoes, halved
  • 1 cup broccoli florets
  • 1 cup snap peas or green beans

Aromatics & Seasonings

  • 3 cloves garlic, minced
  • 0.5 tsp dried oregano
  • 0.5 tsp crushed red pepper flakes (optional)

Dairy & Fats

  • 1 tbsp butter
  • 1 tbsp olive oil
  • Juice of 1/2 lemon lemon juice
  • 1/2 cup grated parmesan cheese (freshly grated if possible)
  • 1/3 cup reserved pasta water (start with this, add more if needed)

Fresh Herbs & Final Touches

  • to taste chopped fresh parsley or basil
  • a squeeze of lemon final squeeze of lemon

Instructions 

  • Cook pasta in salted boiling water until al dente; reserve 1/2 cup pasta water, then drain.
  • Sauté chicken with salt and pepper until golden and cooked through; set aside.
  • Sauté veggies (except tomatoes) until tender, then add garlic, oregano, red pepper flakes, and tomatoes; cook 2 minutes.
  • Add butter, olive oil, cooked pasta, chicken, parmesan, lemon juice, and reserved pasta water; toss until combined and silky.
  • Finish with fresh herbs and a squeeze of lemon before serving.

Notes

Feel free to add more lemon or cheese to suit your taste.
Calories: 550kcal
Cost: $15
Course: Main Course
Cuisine: American
Keyword: Chicken, Pasta, Vegetables

The Comforting Power of Tomato Soup

Welcome to your new favorite cozy meal! Tomato soup is not just a dish; it’s a hug in a bowl. In this guide, we’ll explore the ultimate tomato soup recipe that is rich in flavor and easy to prepare. Whether you’re getting home after a long day or looking for a comforting lunch, this soup is sure to satisfy. With simple ingredients and straightforward steps, you’ll soon understand why this classic is a staple in kitchens everywhere.

Why You’ll Love This Recipe

There are so many reasons to get excited about this tomato soup recipe. Here are just a few:

  • Quick and Easy: Perfect for busy weeknights, this recipe takes less than an hour from start to finish.
  • Versatile Ingredients: Most ingredients are pantry staples, making it easy to whip up whenever you crave comfort.
  • Rich Flavor: Combining onions, garlic, and balsamic vinegar creates a depth of flavor that elevates the dish.
  • Customizable: You can easily adapt the recipe to fit your dietary preferences or ingredient availability.
  • Perfect Pairing: This soup goes wonderfully with a classic grilled cheese sandwich, making for a nostalgic meal.

Ingredients Breakdown

Let’s take a closer look at what you’ll need for the best tomato soup:

  • 2 tablespoons extra-virgin olive oil: Adds richness and flavor.
  • 2 tablespoons unsalted butter: Enhances the soup’s creaminess; substitute with more olive oil for a vegan option.
  • 2 medium yellow onions (chopped): Provides a sweet and savory base.
  • 2 medium carrots (chopped): Adds natural sweetness and nutrition.
  • 6 garlic cloves (chopped): Infuses the soup with aromatic flavor.
  • 2 tablespoons balsamic vinegar: Balances the acidity of the tomatoes.
  • 2 28-ounce cans diced tomatoes: The star of the show, providing that rich tomato flavor.
  • 3 cups water or vegetable broth: For depth and body.
  • 1⅓ cups full-fat coconut milk or heavy cream: Adds creaminess; use coconut milk for a dairy-free option.
  • 1 teaspoon dried thyme: A classic herb that complements the tomato beautifully.
  • ½ teaspoon red pepper flakes: A hint of heat; adjust to your taste.
  • 1 teaspoon sea salt (plus more to taste): Enhances the overall flavor.
  • Freshly ground black pepper: Adds depth.
  • Fresh basil leaves: For garnish and fresh flavor.

Cooking Steps Made Simple

Bowl of homemade tomato soup with a smooth consistency, decorated with basil leaves.

Ready to dive into making this comforting soup? Follow these easy steps:

  1. In a large pot, heat the olive oil and butter over medium flame. Add the chopped onions, carrots, garlic, and a pinch of salt. Cook for about 8 minutes until softened, stirring occasionally.
  2. Pour in the balsamic vinegar, mixing it in well. Then add the diced tomatoes, water or broth, coconut milk or heavy cream, dried thyme, red pepper flakes, salt, and a few twists of black pepper. Allow the soup to simmer gently for 20 to 25 minutes until the carrots are tender.
  3. Remove 4 cups of the soup and set aside. Pour the remaining soup into a blender and blend until smooth. Combine this pureed soup with the chunky soup you set aside.
  4. Season the soup to your taste. Serve it garnished with a drizzle of coconut milk or olive oil, freshly ground black pepper, and fresh basil leaves.

Pro Tips for the Best Tomato Soup

To ensure your tomato soup turns out perfectly every time, consider these expert tips:

  • Use high-quality tomatoes: San Marzano tomatoes are renowned for their sweet flavor and low acidity.
  • Experiment with herbs: Fresh herbs like basil or oregano can elevate the flavor profile even more.
  • Let it simmer longer: If you have extra time, allowing the soup to simmer longer can deepen the flavors.
  • Adjust thickness: For a thicker soup, reduce the amount of broth; for a thinner soup, add more.
  • Blend carefully: If blending hot soup, let it cool slightly to avoid splattering.
  • Garnish creatively: Try adding croutons, a swirl of cream, or even grated cheese for extra texture.
  • Save leftovers: Tomato soup can be stored in the fridge for up to 4 days or frozen for later.
  • Try adding protein: For a heartier soup, consider adding cooked chicken or beans.

Common Mistakes and Troubleshooting

Even the best cooks can run into issues. Here are some common mistakes and how to avoid them:

  • Overcooking vegetables: Avoid mushy vegetables by cooking them just until tender.
  • Too acidic: Balance acidity with a touch of sugar or more cream if needed.
  • Not seasoning enough: Always taste and adjust seasoning before serving.
  • Using cold ingredients: Room temperature ingredients blend better and cook more evenly.

Delicious Variations

Don’t be afraid to mix things up! Here are some delightful variations of this tomato soup:

  • Spicy Tomato Soup: Add more red pepper flakes or a splash of hot sauce for heat.
  • Tomato Basil Soup: Integrate fresh basil leaves during blending for a fresh flavor.
  • Creamy Tomato and Spinach Soup: Stir in fresh spinach just before serving for added nutrition.
  • Roasted Tomato Soup: Roast the tomatoes and vegetables in the oven before blending for a smoky flavor.

Storage and Make-Ahead Instructions

Planning to enjoy this soup later? Here’s how to store it properly:

  • Refrigeration: Store cooled soup in an airtight container in the fridge for up to 4 days.
  • Freezing: This soup freezes beautifully. Store portions in freezer-safe containers for up to 3 months.
  • Reheating: Reheat on the stovetop or in the microwave, adding a splash of broth or water if needed to thin it out.

Frequently Asked Questions

Let’s address some common questions about tomato soup:

  • Can I use fresh tomatoes? Yes! For a fresh tomato soup, use about 3-4 pounds of ripe tomatoes, blanched and peeled.
  • Is tomato soup gluten-free? Yes, this recipe is naturally gluten-free, but always check labels on your broth and other products.
  • How can I make it vegan? Simply replace the butter with additional olive oil and use coconut milk instead of cream.
  • What to serve with tomato soup? Grilled cheese is a classic pairing, but it also goes well with a fresh salad or crusty bread.
  • Can I add meat to the soup? Absolutely! Cooked chicken or sausage can add heartiness.
  • How do I know when the soup is done? The soup is done when the carrots are soft and the flavors have melded together.
  • Can I blend the soup without a blender? You can use an immersion blender directly in the pot for convenience.
  • What’s the best way to store leftovers? Let the soup cool before storing it in airtight containers in the fridge or freezer.

Nutritional Tips and Dietary Adaptations

While this tomato soup is already nutritious, here are some tips to make it even better for your dietary needs:

  • Low-sodium option: Use low-sodium broth and adjust salt according to taste.
  • Adding fiber: Consider blending in cooked lentils or beans for extra protein and fiber.
  • Low-carb option: Skip the cream and use cauliflower for a creamy texture without the carbs.

Recommended Equipment

To make the cooking process easier, here’s some kitchen equipment you might need:

  • Large Pot: Ideal for cooking and simmering the soup.
  • Blender: For achieving a smooth texture; an immersion blender is a great option.
  • Cutting Board and Knives: Sharp knives and a sturdy cutting board make prep easier.

Serving Suggestions

Now that your soup is ready, here are some creative serving ideas:

  • Top with Croutons: Homemade croutons add a delightful crunch.
  • Drizzle with Olive Oil: A splash of high-quality olive oil enhances the flavor.
  • Fresh Herbs: A sprinkle of fresh herbs like basil or parsley adds a pop of color and flavor.

Conclusion

You’ve successfully made a comforting bowl of tomato soup! With its rich flavors and simple ingredients, this recipe is sure to become a staple in your kitchen. Remember, great cooking is all about confidence and creativity. So, whether you enjoy it on a chilly evening or share it with family and friends, this cozy tomato soup will warm your heart and nourish your soul. Thank you for sharing this cooking journey with me. Happy cooking!

Tomato Soup

Prep Time 10 minutes
Cook Time 25 minutes
Total Time 35 minutes
Servings 4 servings
Calories 180
A comforting and flavorful tomato soup made with fresh ingredients and a creamy finish, perfect for any season.

Ingredients

Vegetables and liquids

  • 2 tablespoons extra-virgin olive oil
  • 2 tablespoons unsalted butter
  • 2 medium yellow onions (chopped)
  • 2 medium carrots (chopped)
  • 6 cloves garlic (chopped)
  • 2 tablespoons balsamic vinegar
  • 2 28-ounce cans diced tomatoes
  • 3 cups water or vegetable broth
  • 1⅓ cups full-fat coconut milk or heavy cream
  • 1 teaspoon dried thyme
  • ½ teaspoon red pepper flakes
  • 1 teaspoon sea salt (plus more to taste)
  • to taste Freshly ground black pepper
  • a handful Fresh basil leaves

Instructions 

  • Heat olive oil and butter in a large pot over medium heat. Add onions, carrots, garlic, and salt; cook for 8 minutes until softened.
  • Add balsamic vinegar, diced tomatoes, water or broth, coconut milk, thyme, red pepper flakes, salt, and black pepper. Simmer for 20-25 minutes.
  • Remove 4 cups of soup and set aside. Blend the remaining soup until smooth, then combine with the set-aside chunky soup.
  • Adjust seasoning as desired. Serve garnished with basil leaves and a drizzle of coconut milk or olive oil.

Notes

For a richer flavor, use homemade vegetable broth and fresh basil.
Calories: 180kcal
Cost: $12
Course: Soup
Cuisine: American
Keyword: Tomato

Start Your Day Right with Cheese and Egg Breakfast Wraps

Welcome to your new favorite morning ritual! These Cheese and Egg Breakfast Wraps are perfect for those busy mornings when you need something quick, delicious, and satisfying. With fluffy scrambled eggs, melty cheese, and a warm tortilla, this breakfast wrap is not just a meal; it’s a promise of a great start to your day. Let’s dive into why this recipe is a must-try!

Why You’ll Love This Recipe

This recipe is more than just a quick fix; it’s packed with benefits that make it a game-changer in your morning routine. Here are five reasons to love these wraps:

  • Unbeatable Speed: Ready in just minutes, these wraps are perfect for a chaotic morning. You can whip them up faster than your coffee brews!
  • Customizable: Whether you’re a meat lover or a vegetarian, you can easily adapt this wrap to suit your taste. The possibilities are endless!
  • Portable: These wraps are easy to hold and eat on the go, making them ideal for busy families and professionals alike.
  • Protein-Packed: With eggs and cheese, you’ll get a hearty dose of protein to keep you energized throughout the day.
  • Kid-Approved: Even picky eaters will love these wraps! You can sneak in veggies without them even noticing.

Ingredient Breakdown

Let’s take a closer look at the ingredients you’ll need to make these delicious breakfast wraps. Don’t worry if you’re missing something; I’ll also provide some handy substitutions!

  • Large Eggs: (4 per wrap) The star of the show, providing a fantastic source of protein. Fresh eggs yield the best flavor.
  • Flour Tortillas: (4 tortillas, 8-10 inches) Choose large burrito-sized tortillas for the perfect wrap. Whole wheat or gluten-free options work too!
  • Shredded Cheese: (1 cup, e.g., sharp cheddar and Monterey Jack) You can mix and match your favorite cheeses for a flavor explosion!
  • Unsalted Butter or Oil: (1 tablespoon) Use butter for richness or a neutral oil like avocado for health benefits.
  • Whole Milk or Heavy Cream: (1 tablespoon per egg) This adds creaminess to your scrambled eggs. Substitute with almond milk for a lighter option.
  • Salt & Pepper: To taste – these basics enhance the flavor beautifully.
  • Optional Spices: A pinch of garlic or onion powder can elevate your wraps even further!

How to Make Your Cheese and Egg Breakfast Wraps

Appetizing close-up of a golden-brown breakfast wrap filled with cheese and eggs.

Ready to get cooking? Follow these simple steps to create your breakfast wraps:

  • Prep Ingredients: Grate the cheese and whisk together the eggs, milk, salt, pepper, and optional spices in a bowl.
  • Warm the Tortillas: Use a microwave, dry skillet, or toaster oven to warm your tortillas until they’re pliable.
  • Cook the Eggs: Heat a skillet over medium-low heat and add butter or oil. Pour in the egg mixture and let it sit for about 10 seconds. Gently push the set edges toward the center until mostly set but still slightly wet.
  • Add Cheese: Remove from heat, sprinkle 3/4 of the shredded cheese over the eggs, and fold gently to incorporate and melt.
  • Assemble the Wrap: Lay a warm tortilla on a plate, spoon about 1/4 of the cheesy egg mixture down the center, fold the sides inward, and roll tightly.
  • Serve: Enjoy your wraps immediately with optional sides like salsa, hot sauce, avocado slices, or sour cream!

Pro Tips for the Perfect Wrap

To elevate your cooking game, consider these tips:

  • Use Fresh Ingredients: Fresh eggs and good-quality cheese make a noticeable difference in flavor.
  • Don’t Overcook the Eggs: Aim for soft, fluffy scrambled eggs for the best texture.
  • Experiment with Fillings: Try adding sautéed mushrooms, spinach, or cooked bacon for variety.
  • Wrap Tightly: A tight wrap keeps the filling from spilling out, making it easier to eat.
  • Warm the Tortilla: A warm tortilla is easier to roll and makes for a more enjoyable eating experience.
  • Make Ahead: Prepare the egg mixture the night before and store it in the fridge for a quicker morning prep.
  • Use Non-stick Cookware: This helps prevent the eggs from sticking, ensuring easy cleanup.
  • Garnish Creatively: Add fresh herbs or a sprinkle of chili flakes for a flavor boost.

Common Mistakes to Avoid

Even the best of us make mistakes in the kitchen! Here are a few to watch out for:

  • Overcooking the Eggs: Keep an eye on them. Overcooked eggs can become rubbery.
  • Using Cold Tortillas: Cold tortillas are not as pliable and can crack when rolled.
  • Skipping Seasoning: Don’t forget to season your eggs! Salt and pepper make a big difference.
  • Filling Too Much: While it’s tempting to pile on the fillings, too much can make it hard to wrap.

Delicious Variations

Switch things up with these fun variations:

  • Southwestern Style: Add black beans, corn, and avocado for a southwestern twist.
  • Veggie Delight: Incorporate sautéed bell peppers, onions, and spinach for a healthy option.
  • Smoky Bacon: Toss in crispy bacon bits to add a savory crunch.
  • Sweet Breakfast Wrap: Spread peanut butter, add sliced bananas, and drizzle honey for a sweet alternative!

Storage and Make-Ahead Instructions

If you want to prep these wraps in advance:

  • Refrigerate: Store assembled wraps in an airtight container for up to 2 days.
  • Freeze: Wrap individually in foil and store in the freezer for up to one month. Reheat in the microwave or toaster oven.
  • Reheat: For best results, reheat in a skillet to maintain the wrap’s texture.

Frequently Asked Questions

Got questions? I’ve got answers!

  • Can I freeze these wraps? Yes! Wrap them tightly and freeze. They’re great for quick meals later.
  • What can I use instead of eggs? Try silken tofu or chickpea flour for a vegan option!
  • How do I make it spicier? Add jalapeños or hot sauce to the egg mixture for a kick.
  • Can I use different types of cheese? Absolutely! Mix and match to find your favorite combinations.
  • How long do they last in the fridge? They’ll last up to two days in an airtight container.
  • Is this wrap kid-friendly? Yes! Kids love the taste, and you can sneak in veggies without them knowing.
  • What’s the best way to warm tortillas? A quick microwave or stovetop skillet works wonders!
  • Can I make these wraps ahead of time? Yes! You can prepare the egg mixture and store it for the next morning.

Nutrition Tips and Dietary Adaptations

These wraps can fit into various dietary plans. Here are some tips:

  • Low-Carb Option: Use lettuce wraps instead of tortillas for a low-carb meal.
  • Gluten-Free: Ensure you use gluten-free tortillas.
  • Dairy-Free: Substitute cheese with a dairy-free alternative or nutritional yeast for flavor.
  • Extra Protein: Add cooked turkey sausage or extra eggs for a protein boost.

Equipment Recommendations

To make your cooking experience seamless, here are some handy tools:

  • Non-stick Skillet: Perfect for cooking eggs without sticking.
  • Whisk: Essential for mixing your eggs and milk smoothly.
  • Grater: For fresh cheese that melts beautifully.
  • Spatula: A silicone spatula helps gently scramble the eggs.

Serving Suggestions

Pair your wraps with these sides for a complete breakfast:

  • Fresh Fruit: A side of berries or sliced bananas adds a refreshing touch.
  • Salsa or Hot Sauce: For those who love a spicy kick!
  • Greek Yogurt: A dollop of yogurt on the side can add creaminess and probiotics.
  • Herbal Tea or Fresh Juice: Balance your meal with a nutritious drink.

Wrap Up Your Morning with Confidence!

Cooking should be a joyful experience, and these Cheese and Egg Breakfast Wraps embody just that. With their quick prep time, delightful flavor, and endless customization options, they’re sure to become a staple in your kitchen. So, let’s embrace the joy of cooking and start your day with a delicious breakfast wrap—you deserve it!

Simple Cheese and Egg Breakfast Wraps

Prep Time 5 minutes
Cook Time 10 minutes
Total Time 15 minutes
Servings 4 servings
Calories 350
A quick and delicious breakfast wrap combining fluffy eggs, melted cheese, and warm tortillas for a satisfying start to your day.

Ingredients

Eggs

  • 4 large large eggs

Tortillas

  • 4 large large flour tortillas (8-10 inch)

Cheese

  • 1 cup shredded cheese (e.g., sharp cheddar and Monterey Jack)

Butter/Oil

  • 1 tablespoon unsalted butter or neutral oil (like avocado or canola)

Milk/Cream

  • 1 tablespoon whole milk or heavy cream (per egg)

Salt

  • to taste Salt

Black Pepper

  • to taste Freshly ground black pepper

Optional Powders

  • pinch pinch of garlic powder or onion powder (optional)

Instructions 

  • Whisk eggs with milk/cream, salt, pepper, and optional powders.
  • Warm tortillas using microwave, skillet, or toaster oven.
  • Heat skillet over medium-low, add butter/oil, then pour in egg mixture. Cook until mostly set, then add cheese and fold to melt.
  • Place a tortilla on a plate, spoon cheesy eggs in center, fold sides, and roll tightly.
  • Serve immediately with sides like salsa, avocado, or sour cream.

Notes

Use fresh ingredients for best flavor. Feel free to customize with your favorite add-ins.
Calories: 350kcal
Cost: $10
Course: Breakfast
Cuisine: American
Keyword: Cheese, Eggs, Tortilla

Start Your Day Right with Energizing Peanut Butter Overnight Oats

Welcome to your new favorite breakfast! If you’re looking for a quick, nutritious option that will keep you energized throughout your busy mornings, you’ve landed in the right place. These Peanut Butter Overnight Oats are not only delicious but also packed with essential nutrients, making them a perfect start to your day. In this article, we’ll dive deep into everything you need to know about making the best overnight oats, including tips, variations, and answers to all your questions!

Why You’ll Love This Recipe

This recipe is a game-changer for anyone seeking a healthy breakfast option. Here are some specific benefits:

  • Quick and Easy: Prep takes just minutes the night before, giving you a hassle-free morning.
  • Protein-Packed: With peanut butter and protein powder, these oats will keep you full and satisfied.
  • Customizable: Feel free to add your favorite toppings or adjust sweetness levels to your liking.
  • Budget-Friendly: Using simple pantry staples means you can enjoy a healthy breakfast without breaking the bank.
  • Health Benefits: Rich in fiber and healthy fats, these oats support digestion and provide lasting energy.

Ingredient Breakdown

Let’s take a closer look at the ingredients you’ll need and some potential substitutions:

  • ½ cup rolled oats: The base for your oats; they absorb liquid overnight, giving you a creamy texture. You can substitute quick oats for a softer consistency but avoid instant oats as they can become mushy.
  • 1 cup unsweetened almond milk: A fantastic dairy-free option that adds creaminess. You can swap it for any milk of your choice, like oat or soy milk.
  • 2 tablespoons natural peanut butter: Provides flavor and healthy fats. If you prefer, almond butter or sunflower seed butter are great alternatives.
  • 1 scoop vanilla protein powder: Boosts protein content. This can be omitted if you want a lower protein option.
  • 1 tablespoon chia seeds: Adds texture and omega-3 fatty acids. Flaxseeds can be used if you’re out of chia seeds.
  • 1 tablespoon honey or maple syrup: Sweetens your oats naturally; adjust to taste or use a sugar substitute if preferred.
  • ½ banana, sliced: Delicious topping that adds natural sweetness. Any fresh fruit can be used here, like berries or apples.
  • 1 tablespoon chopped peanuts: For crunch and flavor. Feel free to replace with granola or another nut.
  • A pinch of salt: Enhances the flavors of the oats.
  • A dash of cinnamon: Adds warmth and spice; nutmeg or pumpkin spice can be used for a different flavor profile.

Step-by-Step Instructions

An appetizing close-up of peanut butter overnight oats with a sprinkle of cinnamon and fresh banana slices.

Making Peanut Butter Overnight Oats is a breeze! Follow these simple steps:

  1. In a mixing bowl or jar, combine the rolled oats, almond milk, peanut butter, protein powder, chia seeds, and salt.
  2. Add honey or maple syrup if desired, and stir until well blended.
  3. Add a dash of cinnamon and mix again until everything is combined.
  4. Cover the bowl or jar with a lid or plastic wrap.
  5. Refrigerate overnight or for at least 4 hours to allow the oats to soak.
  6. Before serving, stir the mixture and adjust the consistency with additional almond milk if needed.
  7. Top with banana slices and chopped peanuts before enjoying your delicious breakfast!

Pro Tips for Perfect Overnight Oats

Here are some expert insights to ensure your overnight oats turn out perfect every time:

  • Consistency is Key: Adjust the liquid based on your preference; use less for thicker oats and more for creamier oats.
  • Layering Matters: If using a jar, layer your ingredients to prevent clumping and ensure even soaking.
  • Mix It Up: Don’t hesitate to try different nut butters, milk types, or sweeteners to find your favorite combination.
  • Batch Prep: Make several jars at once to enjoy throughout the week for quick breakfasts.
  • Mind the Toppings: Add nuts and fruits just before serving to keep them fresh and crunchy.
  • Chill Time: Letting them sit overnight is crucial; this allows the oats to absorb flavors and soften.
  • Health Boost: Add a scoop of your favorite superfood powder for an extra nutritional punch.
  • Serving Size: This recipe yields one serving, but you can easily double it for sharing!

Common Mistakes to Avoid

To make sure your peanut butter overnight oats are a success, here are some common pitfalls to avoid:

  • Using Instant Oats: They can become too mushy and lose their delightful texture.
  • Not Mixing Well: Ensure all ingredients are well combined to avoid clumps of dry oats.
  • Skipping the Chia Seeds: They help thicken the mixture, adding both texture and nutrition.
  • Forgetting to Adjust Consistency: Always check the mixture before serving; it may need more liquid after soaking.

Variations to Try

Here are some fun variations to keep your breakfast exciting:

  • Chocolate Peanut Butter: Add cocoa powder or chocolate protein powder for a chocolatey twist.
  • Berry Bliss: Top with fresh berries like strawberries or blueberries for a refreshing taste.
  • Apple Cinnamon: Mix in diced apples and extra cinnamon for a fall-inspired flavor.
  • Nutty Banana: Combine with walnuts or pecans for added crunch and flavor.

Storage and Make-Ahead Instructions

You can easily store your overnight oats in the fridge for up to 5 days. Simply make them as directed and store them in airtight jars or containers. Enjoy the convenience of having a healthy breakfast ready to go!

Frequently Asked Questions

Here are some common questions about making peanut butter overnight oats:

  • Can I eat overnight oats warm? Yes! You can warm them in the microwave, but it’s best to enjoy them cold for optimal texture.
  • How long do overnight oats last? They can last in the fridge for up to 5 days if stored properly.
  • Are overnight oats healthy? Absolutely! They’re rich in fiber, protein, and healthy fats, making them a balanced breakfast choice.
  • Can I make these oats vegan? Yes! Just use plant-based milk and maple syrup for sweetening.
  • What’s the best way to sweeten overnight oats? Honey and maple syrup are great, but feel free to try agave syrup or stevia as well.
  • Can I add other mix-ins? Definitely! Nuts, seeds, and dried fruits all make excellent additions.
  • What if I don’t have chia seeds? You can omit them or substitute with flaxseeds, though it may alter the texture slightly.
  • Do I have to use protein powder? No, it’s optional! You can skip it if you prefer.

Nutrition Tips and Dietary Adaptations

For those looking to adapt this recipe to fit specific dietary needs:

  • Gluten-Free: Ensure you use certified gluten-free oats.
  • Nut-Free: Substitute peanut butter with sunflower seed butter for a nut-free alternative.
  • Lower Sugar Options: Use less honey or maple syrup, or try a sugar substitute like erythritol.

Equipment Recommendations

To get the most out of your overnight oats, consider these handy tools:

  • Glass Mason Jars: Perfect for portioning and easy to transport.
  • Mixing Bowls: For easily combining ingredients.
  • Measuring Cups and Spoons: Ensures accurate ingredient quantities for consistent results.

Serving Suggestions

These peanut butter overnight oats can be served as is or topped with:

  • Fresh Fruits: Berries, sliced bananas, or diced apples for added flavor and nutrients.
  • Yogurt: A dollop of Greek yogurt for creaminess and extra protein.
  • Nuts and Seeds: Almonds, walnuts, or additional chia seeds for crunch.
  • Granola: A sprinkle on top adds a delightful crunch and extra flavor.

In conclusion, these Energizing Peanut Butter Overnight Oats are not just a breakfast; they are a nourishing start to your day that you can customize endlessly. Embrace the convenience and deliciousness of overnight oats and make your mornings brighter and healthier. Happy cooking!

Protein-Packed Peanut Butter Overnight Oats

Prep Time 10 minutes
Total Time 10 minutes
Servings 2 servings
Calories 350
A quick and nutritious breakfast that combines oats, protein, and healthy fats for sustained energy.

Ingredients

Dry ingredients

  • 0.5 cup rolled oats
  • 1 cup unsweetened almond milk
  • 2 tablespoons natural peanut butter
  • 1 scoop vanilla protein powder
  • 1 tablespoon chia seeds
  • 1 tablespoon honey or maple syrup
  • 0.5 banana sliced banana
  • 1 tablespoon chopped peanuts
  • a pinch salt pinch salt
  • a dash cinnamon dash cinnamon

Instructions 

  • Combine oats, almond milk, peanut butter, protein powder, chia seeds, and salt in a jar or bowl.
  • Add honey or maple syrup and stir until smooth.
  • Mix in cinnamon until evenly distributed.
  • Cover and refrigerate overnight or at least 4 hours.
  • Stir before serving, top with banana slices and chopped peanuts.

Notes

For extra flavor, add a drizzle of honey on top before serving.
Calories: 350kcal
Cost: $10
Course: Breakfast
Cuisine: American
Keyword: Healthy, Oats, Protein

Welcome to Your New Favorite Weeknight Meal!

If you’re looking to elevate your dinner game without feeling overwhelmed, then these Grilled Lemon Chicken Flatbread Wraps are just what you need! Packed with zesty flavors, tender chicken, and a spicy garlic sauce, this recipe transforms simple ingredients into a mouthwatering meal that the whole family will love. Perfect for busy weeknights, these wraps are easy to prepare and even easier to enjoy. Let’s dive into what makes this dish so special!

Why You’ll Love This Recipe

  • Quick and Easy Prep: With minimal ingredients and straightforward steps, you can whip this up in under 30 minutes. Perfect for those hectic evenings!
  • Flavor Explosion: The combination of lemon, garlic, and spices infuses the chicken with a bright, bold taste that’s irresistible.
  • Customizable: You can easily adapt the wraps with your favorite toppings or sauces, making it a versatile option for everyone.
  • Healthy yet Satisfying: With lean protein from the chicken and fresh veggies, these wraps are a nutritious choice that won’t leave you feeling heavy.
  • Great for Meal Prep: Make extra chicken and sauce to enjoy these wraps all week long, or pack them for lunch!

Ingredients Breakdown

Before we get cooking, let’s take a closer look at the ingredients you’ll need for these delicious wraps. Each component plays a crucial role in maximizing flavor and texture.

  • 1 pound skinless, boneless chicken breasts: Cut into bite-sized pieces for optimal marinating and grilling. You can also use chicken thighs for a juicier option.
  • Olive oil: A drizzle helps to keep the chicken moist and enhances its flavor.
  • 2 cloves garlic: Pressed to release maximum flavor into the marinade.
  • Zest of 1 lemon: Adds a concentrated lemon flavor that brightens the dish.
  • 1 tablespoon lemon juice: Freshly squeezed juice brings acidity and brightness.
  • Spices: Salt, black pepper, dried oregano, ground cumin, coriander, and paprika create a well-rounded flavor profile.
  • 4 flatbreads: Middle Eastern-style flatbreads work best, but pitas can also be used for convenience.
  • Fresh greens: Arugula or spinach adds a peppery crunch.
  • Sliced tomatoes: Juicy and refreshing, they balance the richness of the chicken.
  • Spicy Garlic Sauce: A creamy blend of mayonnaise, sour cream or Greek yogurt, garlic, tahini, sriracha, and lemon juice for a kick!

How to Make Grilled Lemon Chicken Flatbread Wraps

Delicious grilled chicken flatbreads with fresh ingredients, showcasing a hearty and flavorful meal.

Now that we have everything ready, let’s walk through the steps for making these flavorful wraps.

  1. Marinate the Chicken: In a medium bowl, combine the cubed chicken with olive oil, garlic, lemon zest, lemon juice, salt, black pepper, oregano, cumin, coriander, and paprika. Toss well to coat the chicken evenly. Allow it to marinate for at least 20 minutes, or overnight for enhanced flavor.
  2. Prepare the Spicy Garlic Sauce: In another bowl, whisk together mayonnaise, sour cream or Greek yogurt, pressed garlic, tahini, sriracha, salt, pepper, cayenne pepper, and lemon juice until smooth. Store in the fridge until ready to use.
  3. Grill the Chicken: Preheat your grill pan over medium-high heat, adding a drizzle of oil. Skewer the marinated chicken pieces (soaking skewers in water beforehand helps prevent burning). Grill for about 6-8 minutes, turning occasionally until cooked through and lightly charred. Let the chicken rest for 5-10 minutes before removing the skewers.
  4. Assemble the Wraps: On each flatbread, drizzle some spicy garlic sauce, pile on the arugula and sliced tomatoes, and add the grilled chicken. Top with more garlic sauce and wrap tightly, folding in the sides.
  5. Enjoy!: Serve immediately, or wrap in parchment paper for easy on-the-go meals.

Pro Tips for Perfect Wraps

  • Marinate Longer: For even more flavor, marinate your chicken overnight!
  • Don’t Overcrowd the Pan: If grilling multiple skewers, ensure they have space to cook evenly.
  • Use a Meat Thermometer: Chicken should reach an internal temperature of 165°F (75°C) for safety.
  • Customize Your Toppings: Feel free to add sliced cucumbers, feta cheese, or olives for extra flair.
  • Make It Spicier: Adjust the amount of sriracha in the sauce to your heat preference!
  • Experiment with Herbs: Fresh herbs like cilantro or parsley can add another layer of freshness.
  • Use Fresh Ingredients: The fresher the ingredients, the better the overall taste of your wraps.
  • Grill on High Heat: A hot grill helps achieve those beautiful grill marks and a nice char.

Common Mistakes and Troubleshooting

Even the best cooks can run into issues, so here are some common pitfalls and how to avoid them:

  • Overcooked Chicken: Keep an eye on the grilling time—overcooked chicken can become dry. Use a meat thermometer for accuracy.
  • Flatbreads Falling Apart: Ensure you wrap them tightly. If using store-bought flatbreads, warm them slightly to make them more pliable.
  • Too Much Sauce: Start with a little sauce and add more to taste, so the wrap doesn’t get soggy.
  • Not Enough Flavor: If the chicken lacks flavor, try increasing the marinade time or adding more spices.

Variations to Try

Add some excitement to your wraps with these variations:

  • BBQ Chicken Wraps: Substitute the marinade with your favorite BBQ sauce for a smoky twist.
  • Vegetarian Option: Replace chicken with grilled zucchini, bell peppers, and mushrooms for a hearty plant-based wrap.
  • Spicy Southwest Wrap: Add jalapeños and use chipotle mayo instead of spicy garlic sauce for a kick!
  • Greek Chicken Wraps: Incorporate feta cheese, olives, and tzatziki sauce for a Mediterranean flair.

Storage and Make-Ahead Instructions

If you want to prepare ahead of time, here’s how to store and enjoy your wraps later:

  • Refrigeration: Store assembled wraps in an airtight container for up to 2 days. They taste best fresh, but can be enjoyed cold or lightly reheated.
  • Meal Prep: Grill extra chicken and store it in the fridge. Assemble wraps as needed to keep them fresh.
  • Freezing: For longer storage, freeze the grilled chicken separately (up to 3 months). Wraps can be frozen, but the texture of the flatbread may change.

Frequently Asked Questions

Here are some common questions about grilled lemon chicken flatbread wraps:

  • Can I use frozen chicken? Yes, but make sure to thaw it completely before marinating and grilling.
  • What if I don’t have a grill? You can use a grill pan or bake the chicken in the oven at 400°F (200°C) for about 20 minutes.
  • Can I make the sauce ahead of time? Absolutely! The sauce can be made a day in advance and stored in the fridge.
  • How do I reheat the wraps? If you have assembled wraps, you can gently warm them in a pan or microwave, but be careful not to make them soggy.
  • Are these wraps kid-friendly? Yes! The flavors are mild enough, but you can adjust the spice level in the sauce for younger palates.
  • Can I use whole grain flatbreads? Definitely! Whole grain or any preferred flatbread works great.
  • What sides go well with these wraps? Fresh salads, roasted veggies, or sweet potato fries complement the wraps beautifully.
  • How can I make these gluten-free? Use gluten-free flatbreads or lettuce wraps instead.

Nutrition Tips and Dietary Adaptations

These grilled lemon chicken flatbread wraps can easily fit into a balanced diet!

  • Low-Carb Option: Opt for lettuce wraps instead of flatbreads to reduce carbs.
  • Dairy-Free Adaptation: Use vegan mayo and coconut yogurt for the sauce if you’re avoiding dairy.
  • Increased Fiber: Add more veggies like bell peppers and cucumbers for extra fiber and nutrients.

Essential Equipment

To make these delicious wraps, you’ll need:

  • Grill Pan or Outdoor Grill: For that perfect char on the chicken.
  • Mixing Bowls: For marinating the chicken and preparing the sauce.
  • Skewers: If grilling, bamboo skewers work best.
  • Whisk: For mixing the sauce ingredients smoothly.

Serving Suggestions

These wraps are versatile and can be served in many delightful ways:

  • As a Main Course: Serve with a side of crispy sweet potato fries for a complete meal.
  • For a Picnic: Wrap them tightly in parchment paper for an easy, portable meal.
  • Pair with a Salad: A fresh garden salad or coleslaw makes for a refreshing accompaniment.

Conclusion: Your New Go-To Recipe

These Grilled Lemon Chicken Flatbread Wraps are not just a meal; they’re a celebration of flavor, convenience, and creativity in the kitchen. Whether you’re cooking for family or meal prepping for the week, this dish is sure to impress. So grab your ingredients and get ready to enjoy a wrap that’s as delicious as it is easy to make. Happy cooking, and thank you for letting me guide you on this culinary journey!

Grilled Lemon Chicken Flatbread Wraps

Prep Time 20 minutes
Cook Time 10 minutes
Total Time 30 minutes
Servings 4 servings
Calories 650
Delicious grilled chicken wrapped in flatbread with fresh greens, tomatoes, and spicy garlic sauce for a flavorful meal.

Ingredients

Chicken

  • 1 pound skinless, boneless chicken breasts (cubed into bite-size pieces)
  • 2 tablespoons olive oil
  • 2 cloves garlic (pressed through garlic press)
  • 1 tablespoon lemon zest (about 1 tablespoon)
  • 1 tablespoon lemon juice
  • 1 teaspoon salt
  • Pinch black pepper
  • 1/2 teaspoon dried oregano
  • 1/2 teaspoon ground cumin
  • 1/4 teaspoon coriander
  • 1/4 teaspoon paprika

Flatbreads

  • 4 pieces middle eastern-style flatbreads (or pita bread)

Greens

  • to taste Arugula greens
  • to taste Sliced tomatoes

Garlic sauce

  • 1/2 cup mayonnaise
  • 1/2 cup sour cream or Greek yogurt (full-fat, plain)
  • 3 cloves garlic (pressed through garlic press)
  • 1 tablespoon tahini
  • 2-3 teaspoons sriracha (adjust to spice preference)
  • 1 teaspoon salt
  • Pinch black pepper
  • Pinch cayenne pepper (optional, for spice)
  • 1/2 teaspoon lemon juice

Instructions 

  • Toss chicken with olive oil, garlic, and spices; marinate for 20 minutes.
  • Skewer chicken and grill over medium-high heat for 6-8 minutes, then rest.
  • Mix all garlic sauce ingredients until smooth; refrigerate if needed.
  • Assemble wraps: spread sauce on flatbread, add greens, tomatoes, chicken, and more sauce.

Notes

Use fresh ingredients for best flavor. Adjust spice levels to taste.
Calories: 650kcal
Cost: $15
Course: Main Course
Cuisine: Middle Eastern
Keyword: Chicken

Kickstart Your Day with a Wholesome Breakfast Wrap

Are you looking for a quick, delicious, and satisfying meal to energize your mornings? Look no further! This high-protein breakfast wrap is not just a meal; it’s a delightful way to start your day with vibrant flavors and nourishing ingredients. Packed with cottage cheese, fresh veggies, and creamy avocado, this protein breakfast wrap will keep you full and fueled until lunchtime. Let’s dive into why you’ll love this recipe and how to make it effortlessly!

Why You’ll Love This High-Protein Breakfast Wrap

This breakfast wrap isn’t just tasty; it’s brimming with benefits that make it an ideal choice for busy mornings:

  • High in Protein: With cottage cheese and eggs, this wrap offers a substantial protein boost to help you stay full and satisfied.
  • Quick and Convenient: In just a few minutes, you can whip up a delicious breakfast that’s perfect for on-the-go eating.
  • Customizable: Feel free to swap out ingredients based on your preferences or what you have on hand.
  • Nutritious Ingredients: Incorporating fresh veggies and healthy fats from avocado makes this meal nourishing and wholesome.
  • Meal Prep Friendly: Make a batch ahead of time for easy breakfasts throughout the week.

Ingredient Breakdown

Here’s what you’ll need for your high-protein breakfast wrap:

  • 1 cup cottage cheese: A creamy base that adds protein and calcium. For a dairy-free option, use almond or soy yogurt.
  • 2 large eggs: The star of the show! Eggs provide essential nutrients and a fluffy texture. You can substitute with scrambled tofu for a vegan alternative.
  • 1 ripe avocado, sliced: Adding healthy fats and creaminess to your wrap. If you don’t have avocado, try sliced cheese or hummus.
  • 1 medium tomato, diced: Fresh and juicy, tomatoes add flavor and nutrients. You can also use diced bell peppers for a different taste.
  • 2 tablespoons cilantro, chopped: This herb adds freshness and flavor. Feel free to replace it with parsley if you prefer.
  • 1 lime, juiced: A splash of lime juice brightens up the flavors in the wrap.
  • 2 whole-wheat tortillas: The perfect wrap option, but you can use corn tortillas or lettuce wraps for a gluten-free version.
  • Salt and pepper to taste: Essential for seasoning your eggs and enhancing flavors.

How to Make Your High-Protein Breakfast Wrap

Detailed view of a hearty breakfast wrap featuring ingredients like cottage cheese, tomato, and lime.

Follow these simple steps to create your delicious breakfast wrap:

  1. In a bowl, whisk together the eggs and season with salt and pepper. Heat a non-stick skillet over medium heat and scramble the eggs until fluffy and cooked through. Set aside.
  2. In a separate bowl, mix together the cottage cheese, diced tomatoes, chopped cilantro, and lime juice until well combined.
  3. Lightly warm the whole-wheat tortillas in the non-stick skillet for about a minute on each side or microwave them for about 20 seconds until they are pliable and warm.
  4. On each tortilla, layer the scrambled eggs first, followed by the cottage cheese mixture, and finally, the sliced avocado.
  5. Carefully roll the tortilla tightly into a wrap and seal the fillings inside.
  6. Enjoy immediately or wrap tightly in foil or parchment for meal prep.

Pro Tips for a Perfect Breakfast Wrap

Enhance your cooking experience with these helpful tips:

  • Use fresh ingredients: Fresh veggies and ripe avocados make a significant difference in flavor.
  • Don’t overcook the eggs: Aim for fluffy, soft scrambled eggs for the best texture.
  • Experiment with spices: Add spices like cumin or chili powder to the eggs for a flavor boost.
  • Layer ingredients wisely: Place the heavier fillings at the bottom to prevent tearing the tortilla.
  • Try different tortillas: Whole-wheat is great, but don’t hesitate to try spinach or tomato-flavored wraps!
  • Make it a burrito: For a heartier meal, add black beans and rice to transform it into a burrito.
  • Chill your avocado: A chilled avocado adds a refreshing touch to the wrap.
  • Pack extra flavors: Consider adding hot sauce or salsa for a kick!

Common Mistakes and Troubleshooting

Even the best cooks can run into issues. Here’s how to avoid common pitfalls:

  • Wrap tearing: If your tortillas are tearing, try warming them before filling to make them more pliable.
  • Eggs too dry: Remove eggs from heat as soon as they’re no longer runny for the best texture.
  • Flavorless wrap: Always season your ingredients well, especially the eggs.
  • Too much filling: Be cautious not to overfill your wrap to prevent it from bursting.

Delicious Variations to Try

Feel free to customize your breakfast wrap with these variations:

  • Southwestern Style: Add black beans, corn, and jalapeños for a spicy twist.
  • Veggie Lovers: Incorporate sautéed spinach, mushrooms, and bell peppers for added nutrients.
  • Smoky Bacon: Swap out eggs for crispy bacon or turkey bacon for a smoky flavor.
  • Cheesy Delight: Add shredded cheese like cheddar or pepper jack for an extra layer of creaminess.

Storage and Make-Ahead Instructions

This wrap is perfect for meal prep! Here’s how to store it:

  • Refrigerate: Wrap your breakfast wrap tightly in foil or parchment paper and store in the fridge for up to 3 days.
  • Freezing: For longer storage, freeze individual wraps in plastic wrap and store in a freezer-safe bag for up to 2 months. Reheat in the microwave when ready to eat.
  • Make Ahead: Prepare the cottage cheese mixture and scramble the eggs the night before to save time in the morning.

Nutritional Insights and Dietary Adaptations

This high-protein breakfast wrap is not only delicious but also packed with nutrients:

  • Protein: Egg and cottage cheese provide a hearty protein punch, essential for muscle repair and growth.
  • Healthy Fats: Avocado adds beneficial fats that support heart health and keep you satiated.
  • Fiber: Whole-wheat tortillas and veggies offer fiber for digestive health.
  • Vitamin Boost: Fresh tomatoes and cilantro are rich in vitamins and antioxidants.

Essential Kitchen Equipment

To make this breakfast wrap, you’ll need:

  • Non-stick skillet: A must for perfectly scrambled eggs without sticking.
  • Mixing bowls: For combining your ingredients easily.
  • Whisk or fork: To scramble your eggs to fluffy perfection.
  • Knife and cutting board: For slicing your avocado and dicing your tomatoes.

Serving Suggestions

Elevate your breakfast experience with these serving ideas:

  • Fresh Salsa: Serve with a side of homemade salsa for a zesty kick.
  • Fruit Salad: Pair with a refreshing fruit salad for a balanced meal.
  • Herbal Tea: Enjoy with a cup of herbal tea for a soothing morning beverage.

FAQ: Your Questions Answered

Here are some common questions about high-protein breakfast wraps:

  • Can I use egg whites instead of whole eggs? Yes, you can substitute egg whites to reduce cholesterol and calories.
  • How do I make this wrap dairy-free? Use plant-based yogurt in place of cottage cheese and skip any cheese toppings.
  • What’s the best way to reheat frozen wraps? Microwave for 1-2 minutes or bake in the oven at 350°F until warmed through.
  • Can I add fruits to this wrap? Absolutely! Sliced strawberries or banana can provide sweetness and freshness.
  • How do I store leftovers? Wrap tightly in foil and refrigerate for up to 3 days.
  • Is this wrap suitable for kids? Yes! It’s a fun and nutritious option for kids’ breakfasts.
  • Can I use other proteins? Certainly! Feel free to swap in cooked chicken, turkey sausage, or even tofu.
  • What if I’m gluten-free? Use gluten-free tortillas or lettuce wraps as a substitute.

Conclusion

Your mornings just got a whole lot brighter with this high-protein breakfast wrap! With its delicious flavors, nutrient-packed ingredients, and flexibility to adapt, this recipe is not only a feast for your taste buds but also a nourishing start to your day. Whether you’re busy on the go or taking your time at home, this wrap is sure to energize and satisfy. So, roll up your sleeves and give it a try—you’ve got this!

High-Protein Breakfast Wrap with Cottage Cheese and Avocado

Prep Time 10 minutes
Cook Time 10 minutes
Total Time 20 minutes
Servings 2 wraps
Calories 450
A nutritious and delicious breakfast wrap packed with protein, healthy fats, and fresh ingredients to start your day energized.

Ingredients

Dairy

  • 1 cup cottage cheese
  • 2 large eggs

Produce

  • 1 ripe avocado, sliced
  • 1 medium tomato, diced
  • 2 tablespoons cilantro, chopped
  • 1 lime lime, juiced

Grains

  • 2 whole-wheat tortillas whole-wheat tortillas

Seasonings

  • to taste Salt and pepper

Instructions 

  • Whisk eggs with salt and pepper, scramble in a skillet until cooked.
  • Mix cottage cheese, diced tomato, cilantro, and lime juice in a bowl.
  • Warm tortillas briefly in a skillet or microwave.
  • Layer eggs, cottage cheese mixture, and avocado on each tortilla, then roll into wraps.
  • Serve immediately or wrap for later.

Notes

For extra flavor, add hot sauce or a sprinkle of chili flakes.
Calories: 450kcal
Cost: $12
Course: Breakfast
Keyword: Healthy, High-Protein, Wrap

Welcome to Your New Favorite Meal: The Balanced Chicken & Veggie Power Bowl!

Looking for a quick, nutritious meal that brings joy to your table? Look no further! This Balanced Chicken & Veggie Power Bowl is a delightful fusion of flavors and colors, making it not only a treat for your taste buds but also a feast for your eyes. Perfect for busy weeknights or a leisurely weekend brunch, this recipe combines tender chicken, vibrant vegetables, and fluffy rice into a wholesome dish that is both satisfying and nourishing. Let’s dive into why you’ll love this recipe and how you can whip it up with ease!

Why You’ll Love This Recipe

This power bowl is more than just a meal; it’s an experience that enriches your cooking repertoire. Here are some compelling reasons to fall in love with this recipe:

  • Quick Preparation: With simple steps, you can have this nutritious meal ready in under 30 minutes—ideal for those busy days.
  • Customizable Ingredients: Feel free to swap in your favorite veggies or grains. Whether you prefer quinoa or sweet potatoes, this recipe embraces creativity!
  • Nutrient-Dense: Packed with lean protein, fresh veggies, and wholesome grains, this bowl supports your health and keeps you energized.
  • One-Pan Wonder: Most of the cooking happens in one pan, making cleanup a breeze—perfect for those who want to enjoy delicious food without the hassle!
  • Meal Prep Friendly: This recipe can easily be scaled up for meal prep, ensuring you have healthy meals ready to go throughout the week.

Ingredient Breakdown

Each ingredient in this Balanced Chicken & Veggie Power Bowl plays a crucial role in flavor and nutrition. Let’s break it down:

  • 1 chicken breast, cut into strips: A lean source of protein that’s easy to cook and pairs beautifully with the veggies.
  • 1 tbsp olive oil: This healthy fat helps to keep the chicken moist and adds richness to the dish.
  • 1/2 tsp smoked paprika: Adds a warm, smoky flavor that elevates the chicken.
  • 1/4 tsp garlic powder: For that aromatic kick that complements the chicken perfectly.
  • Salt & pepper to taste: Essential for enhancing the flavors of all your ingredients.
  • Juice of 1/2 lemon: Brightens the dish and adds a fresh zing.
  • 1/2 cup broccoli florets: These vibrant green veggies are rich in vitamins and provide a lovely crunch.
  • 1/4 red bell pepper, sliced: Sweet and crunchy, this pepper adds color and flavor.
  • 1/4 yellow bell pepper, sliced: A great source of vitamins and adds a lovely contrast in texture.
  • 1 medium carrot, sliced: Adds sweetness and a nice crunch to the bowl.
  • 1/2 cup jasmine or basmati rice: This fluffy grain serves as the perfect base for your power bowl.
  • 1 cup water: Essential for cooking the rice to perfection.
  • Pinch of salt: To enhance the flavor of the rice.

How to Make Your Balanced Chicken & Veggie Power Bowl

Freshly prepared Balanced Chicken & Veggie Power Bowl showcasing bright broccoli, bell peppers, and carrots.

Now that we have our ingredients ready, let’s walk through the steps to create this delicious power bowl:

  • Marinate the Chicken: Toss chicken strips in olive oil, smoked paprika, garlic powder, lemon juice, salt, and pepper. Let sit for about 10 minutes to allow the flavors to meld.
  • Cook the Chicken: Sear the marinated chicken in a hot skillet or grill pan over medium heat until golden brown and cooked through, about 6-8 minutes.
  • Steam the Veggies: While the chicken is cooking, steam the broccoli and carrot slices until just tender, approximately 3-5 minutes. For the bell peppers, you can keep them raw for a crunch or steam them lightly for about 1 minute.
  • Prepare the Rice: Rinse the rice under cold water. In a small pot, combine the rice, water, and a pinch of salt. Bring to a boil, cover, and simmer on low heat for 12-15 minutes until the water is absorbed. Let sit for 5 minutes, then fluff with a fork.
  • Assemble the Bowl: On a plate or in a bowl, artfully arrange the rice, chicken, and vegetables side by side. Serve warm and enjoy your colorful, nutritious meal!

Pro Tips for Perfecting Your Bowl

Here are some expert insights to ensure your power bowl comes out perfectly every time:

  • Prep Ahead: Chop your veggies and marinate the chicken the night before to save time on busy days.
  • Use Leftover Chicken: If you have leftover grilled chicken, this is a great way to use it up!
  • Season Your Rice: Add a bay leaf or some herbs to your rice while it cooks for added flavor.
  • Check Doneness: Ensure the chicken is cooked through by checking that it reaches an internal temperature of 165°F (75°C).
  • Experiment with Textures: For a crunchy addition, sprinkle some toasted nuts or seeds on top.
  • Fresh Herbs: Garnish with fresh herbs like cilantro or parsley for an extra pop of flavor.
  • Gluten-Free Option: Substitute rice with quinoa or cauliflower rice for a gluten-free alternative.
  • Make It Vegan: Swap the chicken for chickpeas or tofu for a delicious plant-based version.

Common Mistakes and Troubleshooting

Even the best chefs make mistakes! Here’s how to avoid common pitfalls:

  • Overcooking the Chicken: Keep an eye on the chicken while it cooks to avoid dryness. It should be golden and juicy!
  • Undercooking the Rice: Always check the rice at the minimum cooking time. If it’s still crunchy, cover and cook for a few more minutes.
  • Vegetable Texture: If you prefer softer veggies, steam them a little longer, but be careful not to overdo it and lose their nutrients.
  • Too Much Oil: If your chicken is greasy, reduce the amount of olive oil next time or use a non-stick pan.

Delicious Variations

One of the best parts about this recipe is its flexibility! Here are some tasty variations to try:

  • Southwestern Bowl: Add black beans, corn, and avocado for a southwest twist.
  • Asian-Inspired Bowl: Use teriyaki sauce, snow peas, and bok choy for a flavorful Asian flair.
  • Mediterranean Bowl: Incorporate olives, feta cheese, and cherry tomatoes for a Mediterranean touch.
  • Breakfast Bowl: Top with a fried egg and add roasted sweet potatoes for a hearty breakfast option.

Storage and Make-Ahead Instructions

This power bowl is perfect for meal prep! Here’s how to store and reheat:

  • Refrigeration: Store any leftovers in an airtight container for up to 3 days.
  • Freezing: You can freeze the chicken and veggies separately for up to 3 months. Reheat before serving.
  • Reheating: Microwave in a covered dish or reheat in a skillet over low heat until warmed through.

Frequently Asked Questions (FAQs)

Here are some common questions about the Balanced Chicken & Veggie Power Bowl:

  • Can I use frozen vegetables?: Yes, frozen vegetables work great! Just add them directly to the pan.
  • Is this recipe gluten-free?: Yes, just ensure your rice is gluten-free, and you can use gluten-free soy sauce if desired.
  • How can I make this recipe vegan?: Substitute chicken with tofu or chickpeas and use vegetable broth instead of chicken broth.
  • Can I meal prep this recipe?: Absolutely! Prepare the ingredients ahead of time and assemble when ready to eat.
  • What other grains can I use?: Quinoa, farro, or barley are excellent alternatives to rice.
  • How do I add more flavor?: Consider marinating the chicken longer or adding sauces like sriracha or teriyaki.
  • How do I keep the veggies crisp?: Don’t overcook them; steam just until tender.
  • Can I make this bowl without cooking?: Yes! Use rotisserie chicken and pre-cut veggies for a no-cook option.

Nutritional Tips and Dietary Adaptations

Want to make this meal even healthier? Here are some tips:

  • Add More Greens: Incorporate spinach or kale for additional nutrients and fiber.
  • Healthy Fats: Include avocado for healthy fats and creaminess.
  • Reduce Sodium: Use low-sodium soy sauce or chicken broth to keep the dish healthier.
  • Protein Boost: Add nuts or seeds for extra protein and crunch.

Essential Equipment Recommendations

To create your Balanced Chicken & Veggie Power Bowl, here are some handy kitchen tools:

  • Non-Stick Skillet: Ideal for searing chicken and steaming veggies.
  • Rice Cooker: Makes cooking rice effortless and perfectly fluffy.
  • Steamer Basket: Essential for steaming veggies while keeping them vibrant and crisp.
  • Cutting Board: A sturdy board for chopping your ingredients with ease.

Serving Suggestions

Serve your Balanced Chicken & Veggie Power Bowl with a side of:

  • Fresh Salad: A light green salad with a vinaigrette balances the meal.
  • Whole Grain Bread: A slice of whole grain bread for added fiber and satisfaction.
  • Yogurt Sauce: A dollop of yogurt or tzatziki adds creaminess and flavor.

Enjoy the delightful experience of creating and savoring this Balanced Chicken & Veggie Power Bowl. Remember, cooking is about joy and creativity—so feel free to experiment and make it your own. Happy cooking!

Balanced Chicken & Veggie Power Bowl

Prep Time 10 minutes
Cook Time 20 minutes
Total Time 30 minutes
Servings 2 servings
Calories 450
A nutritious and colorful meal combining lean chicken, fresh vegetables, and fragrant rice for a satisfying and healthy dish.

Ingredients

Protein

  • 1 piece chicken breast, cut into strips
  • 1 tbsp olive oil
  • 1/2 tsp smoked paprika
  • 1/4 tsp garlic powder
  • Salt & pepper to taste Salt & pepper
  • Juice of 1/2 lemon lemon juice

Vegetables

  • 1/2 cup broccoli florets
  • 1/4 red bell pepper, sliced red bell pepper
  • 1/4 yellow bell pepper, sliced yellow bell pepper
  • 1 medium carrot, sliced

Rice

  • 1/2 cup jasmine or basmati rice
  • 1 cup water
  • Pinch salt salt

Instructions 

  • Toss chicken in olive oil, paprika, garlic powder, lemon juice, salt, and pepper. Marinate for 10 minutes.
  • Cook chicken in a skillet until golden and cooked through (6-8 min). Steam broccoli and carrots for 3-5 min. Keep bell peppers raw or lightly steam for 1 min.
  • Rinse rice, then cook with water and salt for 12-15 min until water is absorbed. Fluff with a fork.
  • Assemble the bowl with rice, chicken, and vegetables. Serve warm.

Notes

Feel free to customize vegetables or add your favorite herbs for extra flavor.
Calories: 450kcal
Cost: $12
Course: Main Course
Cuisine: Healthy
Keyword: Chicken, rice, Vegetables

Master the Art of Blueberry Chiffon Cake: A Delightful Journey

Welcome to a culinary adventure where we elevate your dessert game with a Fluffy Blueberry Chiffon Cake that’s sure to impress. This cake is not just a treat; it’s an experience—light, airy, and bursting with flavor. Whether it’s for a special occasion or a simple weeknight dessert, this recipe combines the freshness of blueberries with a luscious whip of cream, making it the perfect finishing touch to any meal. Let’s dive into the magic of creating this blueberry chiffon masterpiece!

Why You’ll Love This Recipe

  • Incredible Lightness: The unique chiffon texture makes every bite feel like you’re floating on a cloud, thanks to the whipped egg whites that provide lift.
  • Fresh Flavor Explosion: Using real blueberries enhances the taste profile, offering a burst of natural sweetness that pairs perfectly with the creamy layers.
  • Versatile Serving Options: This cake is perfect for any occasion – from birthdays to brunches, it adapts beautifully to your needs.
  • Simple Yet Impressive: With a few straightforward steps, you can create a visually stunning dessert that will leave your guests in awe.
  • Make-Ahead Convenience: The cake can be made a day in advance, allowing you to spend more time with your loved ones and less time in the kitchen.

Ingredient Breakdown

To create this beautiful blueberry chiffon cake, gather the following ingredients:

  • 400 g frozen blueberries: Use frozen for a thick and luscious compote.
  • 50 g granulated sugar: Sweetens the compote; feel free to adjust based on your preference.
  • 50 g water: Essential for making the compote.
  • 5 large eggs, at room temperature: Room temperature eggs whip better for a fluffier texture.
  • 1/4 tsp cream of tartar: Stabilizes the egg whites, ensuring they hold their volume.
  • 120 g granulated sugar: For the cake batter; this adds sweetness and moisture.
  • 80 g milk (dairy or non-dairy): Adds richness to the batter.
  • 50 g neutral oil: Keeps the cake moist and tender.
  • 1 tsp vanilla extract: Enhances the flavor profile of the cake.
  • 100 g cake flour: Provides the perfect texture; all-purpose flour can be used in a pinch.
  • 1 tsp baking powder: Helps the cake rise.
  • 400 g heavy whipping cream or whipped cream: For the frosting, making it rich and creamy.
  • 30 g powdered sugar: Sweetens the whipped cream.
  • 3 tbsp blueberry compote: Adds flavor and moisture to the frosting.
  • 1 tsp vanilla extract: For the frosting to enhance flavor.
  • Fresh or defrosted blueberries: For garnish and added flavor.
  • Thyme sprigs: Optional garnish for a touch of elegance.

Step-by-Step Instructions

A visually appealing blueberry chiffon cake captured in a side view, highlighting its fluffy layers and colorful topping.

Now that you have your ingredients, let’s break down the process:

  1. Make the Blueberry Compote: In a saucepan, combine frozen blueberries, sugar, and water. Cook over medium heat until the blueberries break down and the mixture thickens slightly, about 10 minutes. Set aside to cool.
  2. Prepare the Cake Layers: Preheat your oven to 325°F (163°C). Grease and flour two 8-inch round cake pans. In a bowl, whisk together flour, baking powder, and sugar. In another bowl, mix the egg yolks, milk, oil, and vanilla. Combine the wet and dry ingredients, mixing until just combined.
  3. Whip the Egg Whites: In a clean bowl, beat the egg whites with cream of tartar until soft peaks form. Gradually add the remaining sugar and continue beating until stiff peaks form. Fold the egg whites gently into the cake batter.
  4. Bake the Cake: Pour the batter evenly into the prepared pans. Bake for 25-30 minutes or until a toothpick inserted in the center comes out clean. Let the cakes cool in the pans for 10 minutes before transferring to wire racks to cool completely.
  5. Whip the Cream: In a mixing bowl, whip heavy cream with powdered sugar and 3 tablespoons of blueberry compote until soft peaks form.
  6. Assemble the Cake: Level the tops of the cooled cakes if needed. Place one layer on a serving plate, spread a layer of whipped cream, then drizzle with blueberry compote. Top with the second cake layer and frost the top and sides with the remaining whipped cream. Garnish with fresh blueberries and thyme.

Pro Tips for Perfecting Your Blueberry Chiffon Cake

  • Room Temperature Ingredients: Ensure your eggs and milk are at room temperature for better emulsification and volume.
  • Don’t Overmix: When combining the wet and dry ingredients, mix until just combined to maintain a light texture.
  • Stabilizing Cream: If making the cake ahead, consider adding gelatin to the whipped cream for stability.
  • Test for Doneness: Every oven is different; check your cake a few minutes before the suggested baking time.
  • Cool Completely: Allow the cake layers to cool completely before frosting to prevent melting the whipped cream.
  • Use Fresh Ingredients: Fresh, high-quality blueberries will enhance the flavor significantly.
  • Garnish Creatively: Add a sprinkle of lemon zest over the top for a citrusy kick.
  • Experiment: Feel free to swap out blueberries for other berries such as raspberries or strawberries for a delicious twist.

Common Mistakes and Troubleshooting

Even seasoned bakers can have hiccups. Here’s how to avoid common pitfalls:

  • Flat Cake: This can happen if the egg whites are not whipped to stiff peaks or if the batter is overmixed.
  • Dry Cake: Overbaking can lead to dryness; always check for doneness with a toothpick.
  • Runny Frosting: If your whipped cream is too soft, try stabilizing with powdered sugar or gelatin.
  • Compote Too Thick: If your blueberry compote is too thick, add a splash of water and heat gently to loosen it.

Delicious Variations

Why not switch things up? Here are some tasty variations for your blueberry chiffon cake:

  • Lemon Blueberry Chiffon Cake: Add zest and juice of a lemon to the batter for a citrusy twist.
  • Chocolate Blueberry Chiffon: Incorporate cocoa powder into the batter for a rich chocolate flavor.
  • Berry Medley: Mix blueberries with raspberries and strawberries in the compote for a berry explosion.
  • Vegan Option: Substitute eggs with flaxseed meal and use plant-based milk for a vegan-friendly version.

Storage and Make-Ahead Instructions

This cake is perfect for making ahead of time. Here’s how to store it:

  • Refrigerate: Store the assembled cake in the fridge for up to 3 days. Cover it lightly to prevent drying out.
  • Freeze Cake Layers: Wrap cooled cake layers tightly in plastic wrap and freeze for up to 3 months. Thaw completely before frosting.
  • Compote Storage: The blueberry compote can be made in advance and stored in the fridge for up to a week.

Frequently Asked Questions

  • Can I use fresh blueberries instead of frozen? Yes, fresh blueberries can be used, but frozen berries work better for the compote.
  • How do I know when my cake is done baking? A toothpick inserted into the center should come out clean or with a few moist crumbs.
  • What can I substitute for cake flour? You can use all-purpose flour mixed with cornstarch in a 1:1 ratio.
  • Can I make this cake gluten-free? Yes, use a gluten-free flour blend suitable for baking.
  • How should I serve this cake? This cake is delightful on its own, but you can also serve it with additional whipped cream or a scoop of vanilla ice cream.
  • Can I make this cake in advance? Absolutely! The cake can be baked a day ahead; just frost it right before serving.
  • What’s the best way to store leftovers? Keep the cake in the fridge in an airtight container for up to 3 days.
  • Can I add other fruits? Yes! Feel free to experiment with different berries or even peaches for delicious combinations.

Nutritional Tips and Dietary Adaptations

This blueberry chiffon cake can be enjoyed by everyone! Consider these adaptations:

  • Low-Sugar Version: Use sugar substitutes in the compote and batter to reduce sugar content.
  • Gluten-Free: Use gluten-free flour blends to cater to gluten sensitivities.
  • Dairy-Free: Substitute milk and cream with almond or coconut milk and whipped coconut cream.

Essential Equipment Recommendations

To make this recipe a breeze, ensure you have the following:

  • Mixing Bowls: A set of varying sizes for mixing ingredients.
  • Electric Mixer: For whipping egg whites and cream efficiently.
  • 8-Inch Round Cake Pans: Essential for baking the cake layers evenly.
  • Spatula: For folding ingredients and frosting your cake.
  • Whisk: To blend dry ingredients and whip eggs.

Serving Suggestions

Present your beautiful blueberry chiffon cake with style:

  • Garnish with Fresh Berries: A handful of fresh blueberries adds a pop of color and flavor.
  • Drizzle with Compote: A spoonful of blueberry compote on each slice brings a delightful touch.
  • Serve with Ice Cream: A scoop of vanilla ice cream complements the cake perfectly.

In conclusion, this blueberry chiffon cake is more than just a dessert; it’s a celebration of flavor, texture, and creativity. With simple ingredients and clear steps, you’ll inspire confidence in your baking skills. So grab your apron, and let’s create something delicious together! Happy baking!

Fluffy Blueberry Chiffon Cake - jesslovescooking

Prep Time 30 minutes
Cook Time 45 minutes
Total Time 1 hour 15 minutes
Servings 8 pieces
Calories 420
A light and airy blueberry chiffon cake that combines fresh blueberries with a delicate sponge, topped with whipped cream and blueberry compote for a delightful treat.

Ingredients

Blueberry Filling

  • 400 g frozen blueberries
  • 50 g granulated sugar
  • 50 g water

Cake Batter

  • 5 large eggs, at room temperature
  • 0.25 tsp cream of tartar
  • 120 g granulated sugar
  • 80 g milk (dairy or non-dairy)
  • 50 g neutral oil (such as canola or avocado oil)
  • 1 tsp vanilla extract
  • 100 g cake flour
  • 1 tsp baking powder

Whipped Cream Topping

  • 400 g heavy whipping cream or whipped cream
  • 30 g powdered sugar
  • 3 tbsp blueberry compote (prepared above)
  • 1 tsp vanilla extract

Garnish & Decoration

  • Fresh or defrosted blueberries blueberries (for garnish)
  • Thyme sprigs thyme sprigs (for garnish)

Instructions 

  • Prepare blueberry filling by simmering blueberries, sugar, and water until thickened; set aside.
  • Whisk eggs and cream of tartar, then gradually add sugar, milk, oil, and vanilla; fold in sifted cake flour and baking powder to make batter.
  • Gently fold blueberry filling into batter, then pour into a prepared cake pan and bake at 170°C (340°F) for 45 minutes.
  • Allow cake to cool, then top with whipped cream mixed with powdered sugar and blueberry compote.
  • Garnish with fresh blueberries and thyme sprigs before serving.

Notes

Ensure eggs are at room temperature for best volume.
Calories: 420kcal
Cost: $15
Course: Dessert
Cuisine: American
Keyword: Blueberry

Kickstart Your Day with a Healthy Greek Yogurt Parfait

Are you looking for a delicious and nutritious breakfast that fuels your day without taking too much time? Look no further than this Healthy Greek Yogurt Parfait. Packed with protein, vibrant fruits, and crunchy granola, this parfait is not only easy to make but also completely customizable to suit your taste buds. In this guide, we’ll explore everything you need to know about crafting the perfect yogurt parfait, from ingredient breakdowns to expert tips, ensuring you can whip this up whether you’re in a rush or enjoying a leisurely brunch.

Why You’ll Love This Recipe

  • Protein-Packed Energy: Each serving contains around 15-20 grams of protein thanks to Greek yogurt, keeping you satisfied and energized throughout the morning.
  • Quick and Easy: In just a few minutes, you can prepare a delightful meal. It’s perfect for busy mornings when you need something nutritious on the go.
  • Customizable to Your Taste: You can experiment with different fruits, nuts, and sweeteners, making it uniquely yours every time.
  • Healthy Ingredients: With fresh fruits and optional chia seeds, you’re not just enjoying a tasty treat; you’re fueling your body with vitamins, minerals, and fiber.
  • Great for Meal Prep: Make a few servings ahead of time, and you’ll have a healthy breakfast ready to grab when you need it.

Ingredients Breakdown

To make your Greek Yogurt Parfait, gather the following ingredients:

  • 1 cup (240 ml) Greek yogurt: Choose full-fat or 2% for a creamier texture. Greek yogurt is ideal for its thick consistency and high protein content.
  • ½ cup (75 g) fresh berries: Use strawberries, blueberries, or raspberries. They add natural sweetness and are rich in antioxidants.
  • ¼ cup (30 g) granola: Opt for homemade or store-bought. Granola adds crunch and flavor, but you can substitute with nuts or seeds if desired.
  • 1 tbsp (12 g) chia seeds: These little seeds are packed with omega-3 fatty acids and fiber, making them a nutritious addition.
  • 1 tbsp (20 ml) honey or maple syrup (optional): Sweeten your yogurt to taste, but feel free to omit if you prefer a less sweet parfait.
  • ½ tsp (2.5 ml) vanilla extract (optional): Adds a lovely flavor to the yogurt, elevating your parfait experience.
  • 2 tbsp (15 g) nuts: Almonds, walnuts, or pecans can be added for additional crunch and healthy fats.

How to Make Your Greek Yogurt Parfait: Step-by-Step

Delicious Greek yogurt parfait with vibrant fruits and crunchy granola in a glass.

Now that you’ve gathered your ingredients, let’s dive into the simple steps to create your parfait:

  1. Prep your ingredients (2 minutes): Gather Greek yogurt, fresh berries, granola, chia seeds, and any optional add-ins. If using frozen berries, rinse and pat dry.
  2. Sweeten the yogurt (optional, 1 minute): Mix Greek yogurt with honey or maple syrup and vanilla extract until smooth and creamy.
  3. Start layering (3 minutes): Spoon about ⅓ of the yogurt into a glass or bowl. Sprinkle a layer of berries and chia seeds over the yogurt.
  4. Add granola and nuts (1 minute): Add a layer of granola and chopped nuts if using.
  5. Repeat layers (1-2 minutes): Add another ⅓ of yogurt, more berries, chia seeds, granola, and nuts. Finish with the remaining yogurt and a final topping of berries and granola.
  6. Serve immediately or chill: Enjoy right away or refrigerate for up to 24 hours. Add granola right before serving to keep it crunchy.

Pro Tips for the Perfect Parfait

  • Choose Quality Yogurt: Opt for full-fat Greek yogurt for a creamier texture and more satisfying flavor.
  • Fresh vs. Frozen Berries: Fresh berries provide the best texture and flavor, but frozen berries are a great option if fresh aren’t available.
  • Add Flavor: Stir in spices like cinnamon or nutmeg for an extra kick. You can also use flavored yogurt for convenience.
  • Layering Technique: For the best presentation, alternate layers of yogurt and toppings for visual appeal.
  • Make-Ahead Options: Prepare jars the night before for a quick grab-and-go breakfast in the morning.
  • Experiment with Textures: Add different textures by including crunchy granola, creamy yogurt, and juicy fruits in your layers.
  • Nut-Free Options: Substitute nuts with seeds like pumpkin or sunflower seeds for a nut-free alternative.
  • Portion Control: Use smaller glasses to control portions while still enjoying the layered look.

Common Mistakes and Troubleshooting

Here are some common pitfalls to avoid when making your parfait:

  • Too Much Sweetener: Start with a small amount of honey or syrup. You can always add more later if needed.
  • Overloading on Granola: While it adds crunch, too much granola can overpower the other flavors. Stick to the recommended portion.
  • Inconsistent Layers: Ensure even layering for a beautiful presentation. Use a spoon to create clean layers.
  • Using Low-Quality Yogurt: Avoid low-fat or sugary yogurts, which can compromise flavor and health benefits.

Variations to Try

Don’t be afraid to get creative! Here are some delicious variations:

  • Tropical Twist: Substitute berries with diced mango, pineapple, and coconut flakes for a tropical flair.
  • Chocolate Delight: Add cocoa powder to your yogurt or layer with chocolate granola and banana slices for a chocolatey treat.
  • Overnight Oats Parfait: Layer yogurt with overnight oats for an extra filling breakfast.
  • Nutty Banana: Include sliced bananas and almond butter for a rich, nutty flavor.

Storage and Make-Ahead Instructions

If you want to prepare your parfait in advance, here’s how:

  • Make-Ahead Instructions: Prepare your yogurt and layer with fruits and chia seeds in jars. Seal and refrigerate for up to 24 hours.
  • To Store Leftovers: If you have any leftovers, store them in an airtight container in the fridge. Eat within one day for the best texture.

Frequently Asked Questions

Got questions? Here are some common queries about Greek yogurt parfaits:

  • Can I use regular yogurt instead of Greek yogurt? Yes, but Greek yogurt offers more protein and a thicker texture.
  • How can I make my parfait vegan? Use plant-based yogurt alternatives and maple syrup as a sweetener.
  • What fruits work best? Berries, bananas, and stone fruits like peaches work wonderfully, but feel free to experiment!
  • Can I freeze yogurt parfaits? Freezing is not ideal as it can change the texture, but you can freeze individual components like yogurt and fruits separately.
  • How do I know if my yogurt is bad? Check for off smells, discoloration, or an unusual texture. If in doubt, discard it.
  • Is it okay to add protein powder? Absolutely! Mixing in a scoop of your favorite protein powder can boost the protein content.
  • Can I substitute chia seeds? Yes! Flaxseeds or hemp seeds are great alternatives that also add nutritional benefits.
  • What’s the best way to serve it? Serve in clear glasses or jars to show off the beautiful layers and colors.

Nutrition Tips and Dietary Adaptations

To enhance the nutritional profile of your parfait, consider the following:

  • Fiber Boost: Add more fruits or a tablespoon of flaxseeds for extra fiber.
  • Low-Sugar Options: Use unsweetened yogurt and fresh fruit to control sugar levels.
  • Dairy-Free Needs: Choose coconut or almond yogurt for a dairy-free version that’s still creamy and delicious.
  • Low-Carb Alternatives: Skip the granola and add nuts and seeds for a low-carb breakfast option.

Equipment Recommendations

You don’t need fancy tools to make this parfait, but here are some helpful items:

  • Glass Jars: Perfect for layering and serving, plus they’re easy to store.
  • Measuring Cups: Ensure accurate measurements for ingredients.
  • Mixing Bowls: Use these for combining yogurt and any other ingredients.
  • Spoons: Ideal for layering your parfait and enjoying each delicious bite!

Serving Suggestions

To enhance your parfait experience, consider these serving suggestions:

  • Pair with Coffee or Tea: A warm beverage complements the cool parfait beautifully.
  • Garnish with Fresh Mint: A sprig of mint adds a refreshing touch.
  • Serve with a Side of Toast: Whole grain toast topped with avocado or nut butter makes for a complete meal.

In Conclusion

Your journey to a delicious and nutritious breakfast starts here with this Healthy Greek Yogurt Parfait. Not only is it a breeze to prepare, but it also offers endless customization options to keep your mornings exciting. So grab your ingredients, unleash your creativity, and enjoy a breakfast that is both satisfying and delightful. Remember, cooking is about enjoying the process, so embrace your inner chef and dig into this delicious parfait!

Healthy Greek Yogurt Parfait Recipe Easy Protein-Packed Breakfast Ideas

Prep Time 5 minutes
Total Time 5 minutes
Servings 2 servings
Calories 250
A quick and nutritious breakfast parfait layered with Greek yogurt, fresh berries, granola, and nuts for a protein boost.

Ingredients

Dairy

  • 1 cup Greek yogurt (full-fat or 2%)
  • 0.5 cup fresh berries (strawberries, blueberries, raspberries)
  • 0.25 cup granola (homemade or store-bought)
  • 1 tbsp chia seeds
  • 1 tbsp honey or maple syrup (optional)
  • 0.5 tsp vanilla extract (optional)
  • 2 tbsp nuts (almonds, walnuts, or pecans)

Instructions 

  • Gather all ingredients and rinse berries if frozen.
  • Mix Greek yogurt with honey, maple syrup, and vanilla extract if using.
  • Layer ⅓ of yogurt in a glass, add berries and chia seeds.
  • Add granola and nuts, then repeat layers with remaining ingredients.
  • Finish with a layer of yogurt, berries, and granola on top. Serve immediately or chill.

Notes

Adding granola last keeps it crunchy.
Calories: 250kcal
Cost: $10
Course: Breakfast
Cuisine: Greek
Keyword: Yogurt

Welcome to Your Cozy Kitchen: Hearty Veggie Loaded Lentil Soup

Welcome, fellow kitchen adventurers! Today, we’re diving into a delightful recipe that not only warms your soul but also nourishes your body: Hearty Veggie Loaded Lentil Soup. This veggie-loaded marvel is packed with flavors and textures that will make your taste buds dance with joy. Whether you’re a beginner or a seasoned cook, this soup is all about simplicity and satisfaction. Let’s get started!

Why You’ll Love This Recipe

This recipe is more than just a meal; it’s a wholesome experience. Here are five reasons you’ll adore this hearty soup:

  • Nutrient-Dense Ingredients: Loaded with vegetables, lentils, and spices, this soup is a powerhouse of vitamins, minerals, and antioxidants.
  • Comfort in a Bowl: The rich, savory flavors combined with the hearty texture make this soup the ultimate comfort food.
  • Easy to Customize: Whether you want to add more veggies, switch up the spices, or make it creamier, this recipe is versatile and forgiving.
  • Meal Prep Friendly: This soup keeps well in the fridge and can even be frozen for up to three months, making it perfect for busy weeknights.
  • Family-Friendly: This veggie-loaded lentil soup appeals to both kids and adults, ensuring everyone leaves the dinner table satisfied.

Ingredients You’ll Need

Before we jump into the cooking process, let’s gather our ingredients. Here’s what you’ll need to create this delicious loaded lentil soup:

  • 2 tablespoons Olive oil: Adds healthy fat and richness; it’s optional if using vegetable broth.
  • 1 medium Onion: Enhances overall flavor; yellow onions work best.
  • 3 cloves Garlic: Fresh garlic is recommended for the best flavor.
  • 6 cups Low-sodium chicken broth or vegetable stock: Ensure it’s vegetarian-friendly if needed.
  • 1 tablespoon Herbes de Provence: Adds a mix of aromatic flavors.
  • 2 medium Carrots: Provide natural sweetness and texture.
  • 2 stalks Celery: Contributes flavor and crunch.
  • 2 cups Butternut squash: Adds sweetness and creaminess.
  • 2 medium Potatoes: Ensure hearty texture.
  • 1 bunch Kale: Brings nutritional value and a splash of color.
  • 1 teaspoon Paprika: Provides depth and slight smokiness.
  • 1 teaspoon Kosher sea salt: Adjust according to your broth’s saltiness.
  • 1 teaspoon Ground black pepper: Introduces mild heat.
  • 1 teaspoon Rosemary: Delivers a robust herbal flavor.
  • 1 cup Yellow/green split peas: Adds thickness and protein.
  • 1 cup Green lentils: The base for ample protein and heartiness.
  • 1 bunch Fresh parsley: For a burst of freshness.
  • 1/2 cup Parmesan cheese (optional): For richness and flavor.

Step-by-Step Instructions

Close-up of a delicious veggie-loaded lentil soup garnished with herbs.

Now that we have everything ready, let’s walk through the steps to create your amazing veggie loaded lentil soup:

  1. Sauté the Aromatics: In a large pot, heat the olive oil over medium heat. Add the diced onion and sauté until translucent (about 5 minutes). Stir in the minced garlic and cook for an additional minute until fragrant.
  2. Add the Vegetables: Toss in the carrots, celery, and butternut squash. Cook for about 5-7 minutes, stirring occasionally, until they begin to soften.
  3. Stir in the Lentils: Add the green lentils and split peas to the pot, mixing them with the vegetables. This step helps to coat the lentils with the fragrant oils.
  4. Pour in the Broth: Carefully add the low-sodium chicken broth (or vegetable stock). Stir in the Herbes de Provence, paprika, salt, and pepper. Bring to a boil.
  5. Simmer the Soup: Reduce the heat to low and let the soup simmer for about 25-30 minutes, or until the lentils and split peas are tender.
  6. Add the Greens: Stir in the chopped kale and let it wilt for about 5 minutes before removing the soup from the heat.
  7. Final Touches: If you like, stir in freshly chopped parsley and Parmesan cheese for an extra layer of flavor.

Pro Tips for Perfect Lentil Soup

Here are some expert tips to ensure your veggie loaded lentil soup turns out perfectly:

  • Fresh Ingredients: Always use fresh vegetables for the best flavor. Frozen vegetables can also work in a pinch.
  • Adjust the Consistency: This soup thickens as it sits. If you prefer a thinner soup, add more broth or water when reheating.
  • Season to Taste: Always taste your soup before serving. Adjust the seasoning as necessary to suit your palate.
  • Make It Creamy: For a creamier texture, puree a portion of the soup and stir it back in.
  • Experiment with Spices: Feel free to add spices like cumin or curry powder for a different flavor profile.
  • Batch Cooking: Double the recipe to have leftovers for the week or for freezing.
  • Garnish Creatively: Top your soup with a dollop of sour cream or yogurt for added richness.
  • Check Lentil Types: Different lentils have varying cooking times; ensure you choose green or brown lentils for this recipe.

Common Mistakes and Troubleshooting

Even the most seasoned cooks can make mistakes! Here are some common pitfalls and how to avoid them:

  • Overcooking the Lentils: Keep an eye on the cooking time. Overcooked lentils turn mushy.
  • Underseasoned Soup: Don’t be shy with the spices. Proper seasoning elevates the dish.
  • Neglecting Texture: Ensure your vegetables are cut uniformly for even cooking.
  • Not Using Enough Broth: If the soup is too thick, don’t hesitate to add more broth or water.

Variations to Try

Want to switch things up? Here are some fun variations of your loaded lentil soup:

  • Spicy Lentil Soup: Add a diced jalapeño or red pepper flakes for a kick!
  • Curried Lentil Soup: Stir in a tablespoon of curry powder for a warm, aromatic flavor.
  • Mexican-Inspired: Add corn, black beans, and diced tomatoes; serve with avocado and lime.
  • Italian Style: Incorporate diced tomatoes and Italian sausage for a hearty twist.

Make Ahead and Storage Instructions

This soup is perfect for meal prep! Here’s how to make it ahead and store it:

  • Make Ahead: Prepare the soup up to 2 days in advance. Store it in the fridge in an airtight container.
  • Freezing: Cool the soup completely, then transfer it to freezer-safe containers. It can be frozen for up to 3 months.
  • Reheating: Thaw overnight in the fridge and reheat on the stove over low heat, adding more broth if necessary.

Comprehensive FAQ

Here are some frequently asked questions about this hearty veggie loaded lentil soup:

  • Can I use red lentils instead? Yes, but note that red lentils cook faster and will create a different texture.
  • Is this soup gluten-free? Yes, as long as you use gluten-free broth and avoid any gluten-containing toppings.
  • How can I make it vegan? Simply use vegetable broth and omit the Parmesan cheese.
  • Can I add meat? Absolutely! Cooked chicken or sausage can be added for extra protein.
  • What other vegetables can I add? Feel free to experiment with zucchini, bell peppers, or spinach.
  • How long will leftovers last? The soup can last for up to 5 days in the fridge.
  • Can I blend the soup? Yes! Blending part or all of the soup can make it creamier.
  • What should I serve with this soup? Serve with crusty bread, a fresh salad, or a side of grilled cheese for a complete meal.

Nutritional Tips and Dietary Adaptations

This veggie loaded lentil soup is inherently nutritious, but here are ways to enhance its health benefits:

  • Increase Fiber: Add more vegetables like spinach or beans for extra fiber.
  • Lower Sodium: Use low-sodium broth and adjust salt to control sodium levels.
  • Boost Protein: Add cooked quinoa or chickpeas for additional protein.

Equipment Recommendations

To make your cooking experience smooth and enjoyable, here are some essential tools:

  • Large Soup Pot: A sturdy pot is essential for even cooking.
  • Sharp Knife: Invest in a good chef’s knife for chopping vegetables.
  • Cutting Board: A stable surface is crucial for safe chopping.
  • Measuring Cups and Spoons: Accurate measurements ensure the best results.

Serving Suggestions

To elevate your serving experience, consider these ideas:

  • Top with Fresh Herbs: A sprinkle of parsley or cilantro adds freshness.
  • Drizzle with Olive Oil: A splash of high-quality olive oil enhances flavor.
  • Serve with Crusty Bread: Perfect for dipping and soaking up the delicious broth.
  • Add a Side Salad: A simple green salad complements the richness of the soup.

Final Thoughts

Cooking should be a joyful experience, and this Hearty Veggie Loaded Lentil Soup embodies that spirit. With its vibrant flavors and nourishing ingredients, you’ll find it becoming a staple in your kitchen. Remember, cooking is about experimenting and having fun, so don’t hesitate to make this recipe your own. Cozy up with a big bowl of this delightful soup and enjoy every comforting spoonful. Happy cooking!

Cozy Up with Hearty Veggie Loaded Lentil Soup Delight

Prep Time 15 minutes
Cook Time 45 minutes
Total Time 1 hour
Servings 6 servings
Calories 350
Enjoy a warm, nourishing bowl of lentil soup packed with vegetables and aromatic herbs, perfect for comforting meals.

Ingredients

Oil

  • 2 tablespoons Olive oil (Adds healthy fat and richness; it's optional if using vegetable broth.)

Vegetables

  • 1 medium Onion (Enhances overall flavor; yellow onions work best.)
  • 3 cloves Garlic (Fresh garlic is recommended for the best flavor.)
  • 2 medium Carrots (Provide natural sweetness and texture.)
  • 2 stalks Celery (Contributes flavor and crunch.)
  • 2 cups Butternut squash (Adds sweetness and creaminess.)
  • 2 medium Potatoes (Ensure hearty texture.)

Herbs & Spices

  • 1 teaspoon Paprika (Provides depth and slight smokiness.)
  • 1 teaspoon Kosher sea salt (Adjust according to your broth's saltiness.)
  • 1 teaspoon Ground black pepper (Introduces mild heat.)
  • 1 teaspoon Rosemary (Delivers a robust herbal flavor.)

Legumes

  • 1 cup Yellow/green split peas (Adds thickness and protein.)
  • 1 cup Green lentils (The base for ample protein and heartiness.)

Fresh herbs & cheese

  • 1 bunch Fresh parsley (For a burst of freshness.)
  • 1/2 cup Parmesan cheese (Optional for richness and flavor.)

Instructions 

  • Heat olive oil in a large pot over medium heat. Sauté chopped onion and minced garlic until fragrant.
  • Add chopped carrots, celery, diced potatoes, and butternut squash. Cook for 5-7 minutes.
  • Pour in vegetable broth, add herbs and spices, then bring to a boil. Stir in split peas and lentils.
  • Reduce heat and simmer for 30-40 minutes until vegetables and legumes are tender.
  • Chop fresh parsley and stir into the soup. Optional: sprinkle with Parmesan cheese before serving.

Notes

For a creamier texture, blend a portion of the soup before serving.
Calories: 350kcal
Cost: $15
Course: Soup
Cuisine: Vegetarian
Keyword: Lentils, Vegetables