Author

Steven

Browsing

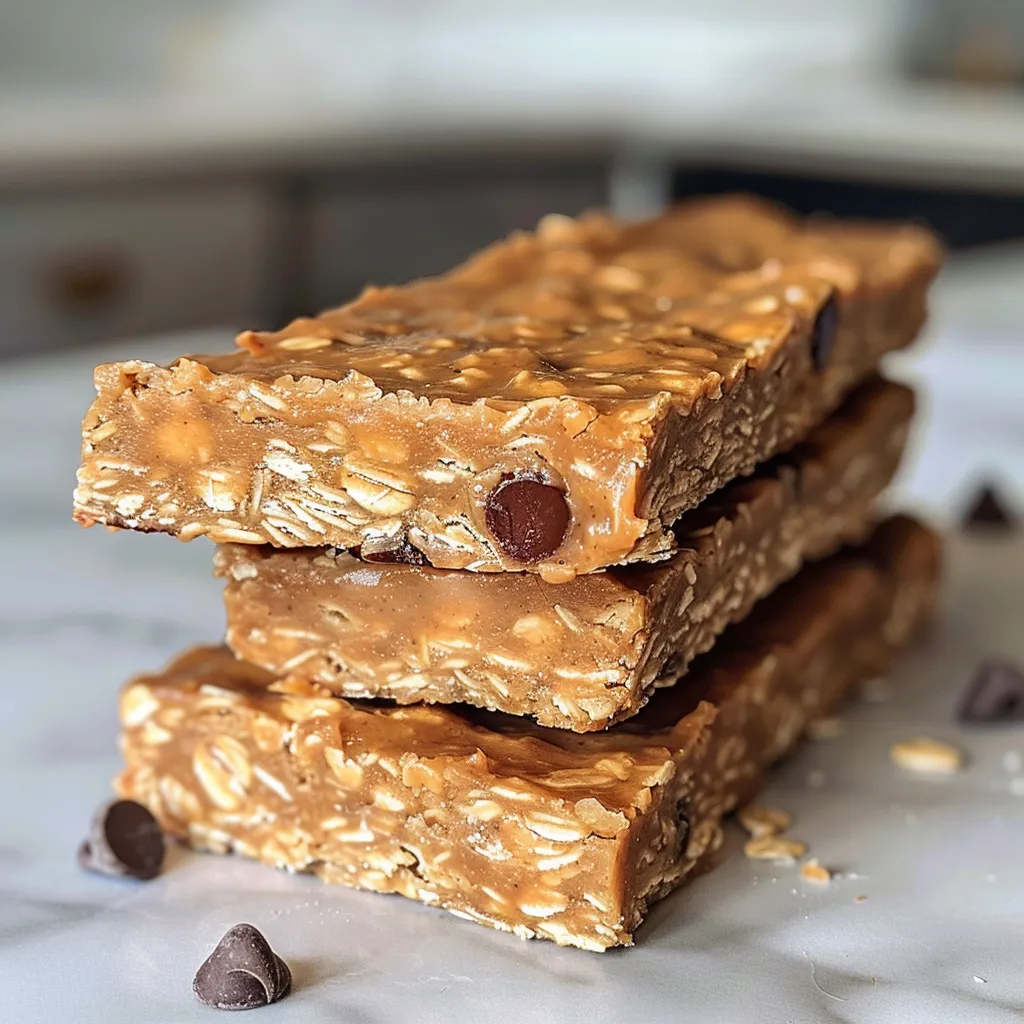
Your New Favorite Snack is Just Minutes Away!

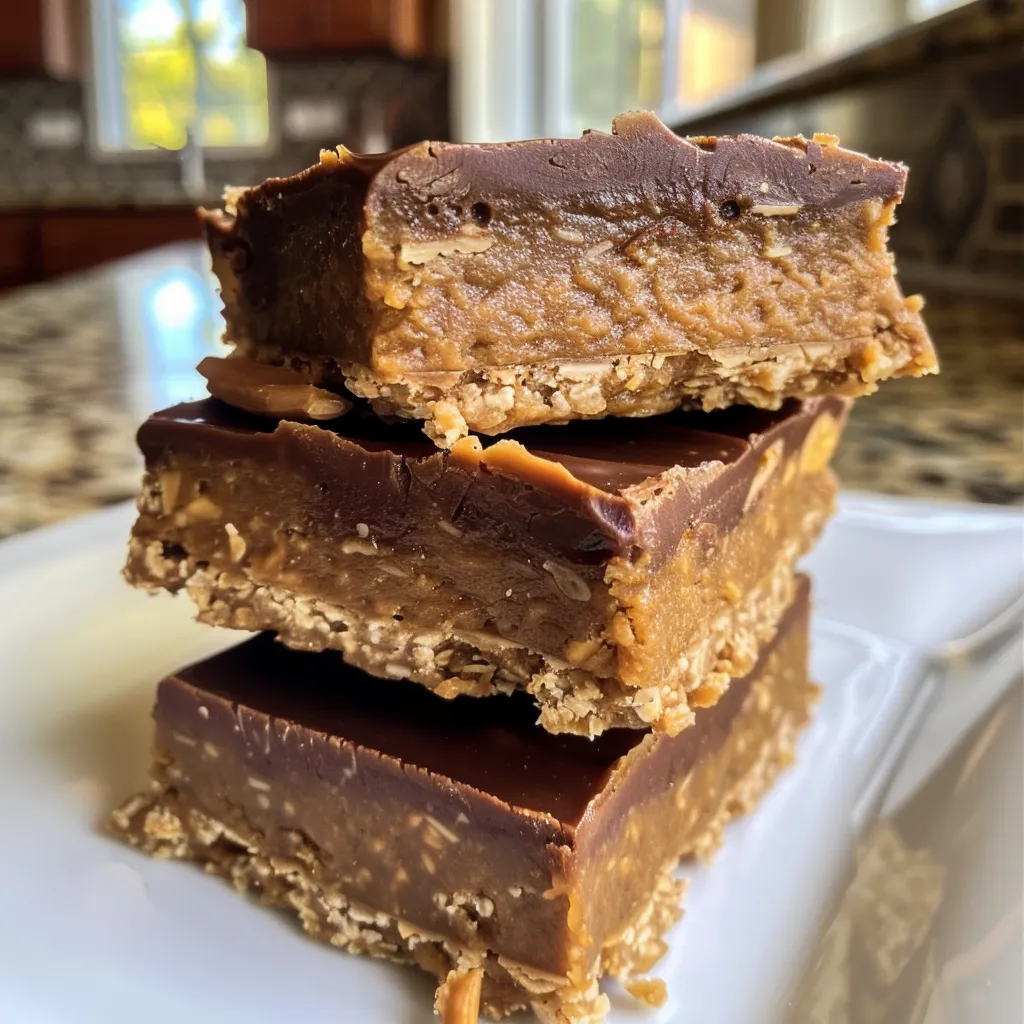
Welcome to your next go-to recipe for energy-packed snacks! No Bake Peanut Butter Banana Oat Bars are not only simple to whip up, but they’re also loaded with wholesome ingredients that fuel your day. Perfect for busy mornings, after-school treats, or a mid-afternoon boost, these bars are deliciously satisfying and can be customized to suit your taste. Let’s dive into why you’ll love making these!

Why You’ll Love This Recipe

  • Quick and Easy: With no baking required, you can mix these bars in just 10 minutes.
  • Nutritious Ingredients: Packed with oats, bananas, and peanut butter, these bars offer a wholesome balance of fiber, protein, and healthy fats.
  • Customizable: Feel free to swap in your favorite nut butter or add different mix-ins like dried fruits or seeds.
  • Kid-Friendly: These bars are a hit with kids and make for a great lunchbox treat or snack.
  • Make Ahead: Prepare a batch at the beginning of the week for easy snacking all week long.

Ingredients Breakdown with Substitutions

Here’s what you need to create these delicious bars:

  • 2 ripe bananas: Mash them well for maximum sweetness. If bananas aren’t your thing, try using unsweetened applesauce.
  • 1 3/4 cup peanut butter: You can use any nut butter you prefer; almond or cashew butter work beautifully too!
  • 2 tbsp maple syrup: For a vegan option, stick with maple syrup or agave nectar.
  • 1 tsp cinnamon: This adds warmth and flavor. Feel free to omit if you’re not a fan.
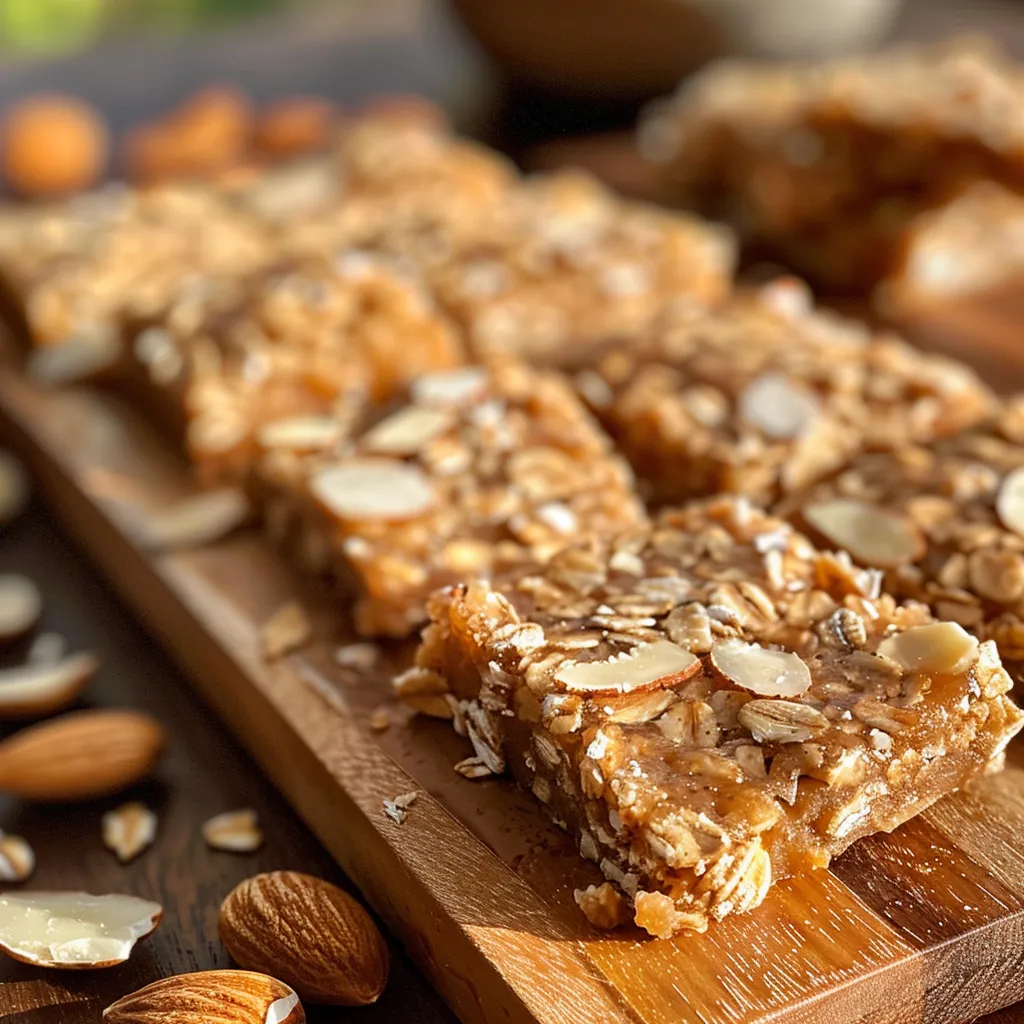
  • 2 cups rolled oats: Use gluten-free oats if necessary.
  • 1/2 cup flaxseed meal: This provides fiber and omega-3 fatty acids; chia seeds can be used as a substitute.
  • 1/4 cup shredded coconut: Unsweetened is best for a healthy option. You can skip this if you’re not a coconut fan.
  • 2 tbsp chia seeds: Great for added texture and nutrition. You can also use hemp seeds!
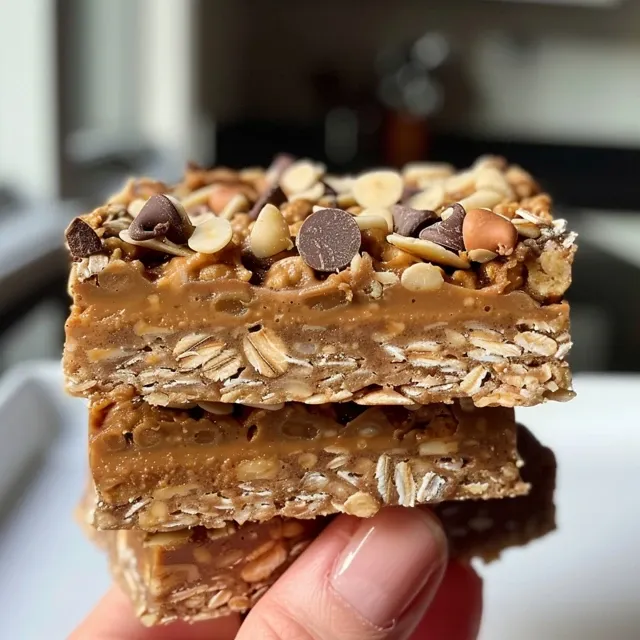
  • 1/3 cup chocolate chips: Choose dark, semi-sweet, or dairy-free options based on your dietary preferences.

Step-by-Step Instructions

Close-up of layered No Bake Peanut Butter Banana Oat Bars showcasing oats and banana texture.

Making these bars is as easy as pie—no, wait, easier! Just follow these simple steps:

  1. In a large bowl, mix together the mashed bananas, peanut butter, maple syrup, and cinnamon until well combined.
  2. Add the oats, flaxseed meal, shredded coconut, and chia seeds. Stir until everything is evenly mixed.
  3. Fold in the chocolate chips for a sweet touch.
  4. Press the mixture into an 8×8 baking dish lined with parchment paper, ensuring it’s even.
  5. Refrigerate for 3-4 hours until set, then cut into squares.
  6. Store in the fridge to keep them fresh and ready for snacking!

Pro Tips for Perfect Bars

  • Choose Ripe Bananas: The riper the bananas, the sweeter your bars will be!
  • Press Firmly: Make sure to press the mixture firmly into the dish so that the bars hold together when cut.
  • Chill Longer: If you find your bars are crumbly, allow them to chill longer in the fridge.
  • Use Parchment Paper: Lining the baking dish with parchment makes removal and cutting a breeze.
  • Mix-In Options: Consider adding nuts, seeds, or dried fruits for extra texture and flavor.
  • Storage: Keep them in an airtight container in the fridge to maintain freshness.
  • Experiment with Flavors: Try adding cocoa powder for a chocolatey version or vanilla extract for a fragrant twist.
  • Cutting Tips: Use a sharp knife or pizza cutter for clean edges.

Common Mistakes and Troubleshooting

Even the best of us can have hiccups in the kitchen! Here are some common issues and how to avoid them:

  • Bars Too Crumbly: Ensure that the mixture is pressed firmly into the dish and chilled long enough.
  • Not Sweet Enough: If you prefer sweeter bars, add a touch more maple syrup or sweetener of choice.
  • Too Wet: If the mixture feels too wet, add a bit more oats or flaxseed meal to absorb excess moisture.
  • Chocolate Chips Melting: If you’re worried about melting, let the mixture cool slightly before folding them in.

Delicious Variations to Try

Feel free to mix things up with these fun variations!

  • Chocolate Peanut Butter Bars: Add 1/4 cup cocoa powder to the mixture for a rich chocolatey treat.
  • Fruit & Nut Bars: Incorporate dried cranberries, apricots, or nuts for added flavor and crunch.
  • Protein-Packed Version: Mix in a scoop of your favorite protein powder for an extra boost.
  • Spiced Pumpkin Bars: Substitute pumpkin puree for bananas and add pumpkin spice for a seasonal twist.

Storage and Make-Ahead Instructions

These bars can be made ahead of time and stored for convenience:

  • Refrigerator: Store in an airtight container in the fridge for up to a week.
  • Freezer: For longer storage, wrap individual bars in plastic wrap and freeze for up to 3 months. Thaw in the fridge overnight before enjoying.

Frequently Asked Questions

  • Can I use a different nut butter? Absolutely! Almond butter or sun butter are excellent alternatives.
  • How do I know if the bars are set? They should feel firm to the touch and hold their shape when cut.
  • What if I don’t like chocolate? You can leave out the chocolate chips or substitute with dried fruit.
  • Can I make these bars vegan? Yes, simply use maple syrup and ensure your nut butter is vegan-friendly.
  • How do I make these bars gluten-free? Just make sure to use certified gluten-free oats.
  • How long do these bars last? They can last up to a week in the refrigerator and longer if frozen.
  • Can I add protein powder? Yes, adding protein powder can enhance the nutritional value.
  • What’s the best way to serve these bars? Enjoy them chilled or at room temperature as a snack or breakfast on the go!

Nutritional Tips and Dietary Adaptations

These bars are not just tasty but also nutritious! Here are some dietary tips:

  • High Fiber: The oats and flaxseed meal provide a good source of dietary fiber.
  • Healthy Fats: Nut butter and chia seeds contribute essential fatty acids for heart health.
  • Protein Boost: Add protein powder or seeds to increase the protein content for those needing extra fuel.
  • Low Sugar Option: Adjust the amount of maple syrup or use stevia for a lower sugar alternative.

Equipment Recommendations

To make your cooking experience smooth, here’s what you’ll need:

  • Mixing Bowl: A large bowl for combining ingredients.
  • Spatula: For mixing and folding ingredients together.
  • Baking Dish: An 8×8 square dish works perfectly for this recipe.
  • Parchment Paper: Great for easy cleanup and removing the bars once set.

Serving Suggestions

Pair these bars with your favorite beverages or enjoy them on their own:

  • With Milk: Enjoy a bar with a glass of milk or a dairy-free alternative.
  • On-the-Go: Perfect for a quick breakfast or snack while commuting.
  • With Fruit: Serve alongside fresh fruit for a balanced snack.

Now you have everything you need to create your own batch of No Bake Peanut Butter Banana Oat Bars. Enjoy the process and remember, cooking is all about experimenting and having fun. Happy snacking!

No Bake Peanut Butter Banana Oat Bars

Prep Time 10 minutes
Total Time 10 minutes
Servings 8 bars
Calories 250
Delicious and healthy no-bake bars combining bananas, peanut butter, oats, and chocolate chips for a quick snack or dessert.

Ingredients

Fruits

  • 2 pieces bananas, mashed
  • 1.5 cups peanut butter or nut butter
  • 2 tbsp maple syrup
  • 1 tsp cinnamon
  • 2 cups rolled oats GF if needed
  • 0.5 cup flaxseed meal
  • 0.25 cup unsweetened shredded coconut
  • 2 tbsp chia seeds
  • 0.33 cup chocolate chips or chunks

Instructions 

  • Mix mashed bananas, peanut butter, maple syrup, and cinnamon until well combined.
  • Add oats, flaxseed meal, coconut, and chia seeds; mix until combined. Fold in chocolate chips.
  • Press mixture into an 8x8 inch (20x20 cm) parchment-lined dish.
  • Refrigerate for 3-4 hours until firm. Cut into squares and store in the fridge.

Notes

Store in an airtight container in the fridge for best freshness.
Calories: 250kcal
Cost: $10
Course: Snack
Keyword: bars, Healthy, no bake

Are you ready to transform your breakfast routine? Let’s dive into the world of coconut smoothie bowls! This deliciously creamy, vibrant dish combines the goodness of Greek yogurt, a medley of frozen fruits, and your favorite toppings for an unforgettable start to your day. Not only is it quick to make, but it’s also packed with nutrients that will fuel your mornings. So grab your blender, and let’s bring the tropics to your kitchen!

Why You’ll Love This Coconut Smoothie Bowl

This Coconut Smoothie Bowl isn’t just another breakfast option; it’s a delightful experience! Here are five reasons why you’ll love making this dish:

  • Quick and Easy: With just a few minutes of blending, you can whip up a nutritious meal that’s ready to enjoy.
  • Customizable: Adjust the ingredients based on what you have on hand. This recipe is versatile, allowing you to mix and match flavors.
  • Nutrient-Packed: With Greek yogurt and a variety of fruits, you’ll be loading up on vitamins, minerals, and probiotics.
  • Beautiful Presentation: The colorful toppings make this bowl not just tasty but also Instagram-worthy!
  • Perfect for Any Meal: Whether it’s breakfast, a snack, or dessert, this smoothie bowl fits all occasions.

Ingredients for the Coconut Smoothie Bowl

Let’s gather our ingredients! This recipe is simple yet full of flavor:

  • 1/2 cup ice: To create that refreshing, chilled texture.
  • 1/2 cup Greek yogurt (plain, strawberry, pineapple, vanilla, or coconut): Adds creaminess and protein.
  • 1/4 cup frozen pineapple chunks: A tropical touch that brings sweetness.
  • 1/4 cup frozen peach chunks: Adds a lovely flavor and smooth texture.
  • 1/2 cup frozen strawberries: For a burst of berry goodness.
  • 1/4-1/3 cup orange juice: To blend everything smoothly.
  • Handful fresh spinach (optional): Boosts nutrition without altering flavor.
  • 2 tbsp flax, chia, and/or coconut (optional): For added texture and health benefits.
  • Fresh blueberries: A classic topping for color and flavor.
  • Fresh strawberries (halved): For a fresh zing.
  • Fresh peach (sliced): Adds a refreshing sweetness.
  • Coconut granola: For crunch and flavor.
  • Almonds (whole): For a nutty crunch.
  • Unsweetened coconut flakes: For that tropical flair.
  • Chia seeds: A nutritious topping that also adds fiber.

Step-by-Step Instructions for Your Smoothie Bowl

Now that we have everything, let’s blend it all together!

  1. Blend the Ingredients: Place all smoothie ingredients into your blender, placing the heavier items on top. Blend until smooth, about 2 minutes.
  2. Pour and Smooth: Pour the blended mixture into a bowl, smoothing the top with the back of a spoon.
  3. Add Your Toppings: Get creative! Layer your toppings on the smoothie base in a visually appealing way.
  4. Serve Immediately: Enjoy your delicious creation right away for the best flavor and texture.

Pro Tips for the Perfect Coconut Smoothie Bowl

Side view of a colorful Coconut Smoothie Bowl filled with strawberries, peaches, and granola.

Want to elevate your smoothie bowl game? Here are some expert tips:

  • Thicker Consistency: To achieve a thicker smoothie bowl, limit the amount of liquid you add. Less liquid means more thickness!
  • Frozen Fruits are Key: Use frozen fruits for that creamy texture. Fresh fruits can make the mixture too runny.
  • Layering Toppings: Add toppings in layers to create a beautiful presentation that will impress.
  • Experiment with Flavors: Don’t hesitate to try different fruit combinations or yogurt flavors to find your favorite.
  • Make Ahead: Blend your smoothie base ahead of time and store it in the fridge for a quick breakfast option.
  • Top with Protein: Add a scoop of protein powder or nut butter for an extra boost.
  • Balance the Sweetness: If you find your smoothie too sweet, add a squeeze of lemon juice to balance the flavors.
  • Clean Your Blender Right Away: To make cleanup easier, rinse your blender immediately after use.

Common Mistakes and Troubleshooting

Even the best of us can make mistakes in the kitchen. Here are some common pitfalls and how to avoid them:

  • Too Runny: If your smoothie bowl is too runny, add more frozen fruits or a scoop of Greek yogurt to thicken it up.
  • Unpleasant Texture: Be sure to blend until completely smooth. If there are chunks, try blending for a bit longer.
  • Lack of Flavor: If your smoothie lacks flavor, add a pinch of salt or a splash of vanilla extract.
  • Overloading on Toppings: While toppings are great, too many can overwhelm the flavor. Keep it simple!

Coconut Smoothie Bowl Variations

Get ready to switch things up! Here are some fun variations of the classic coconut smoothie bowl:

  • Berry Blast: Substitute frozen strawberries with mixed berries like blueberries, raspberries, and blackberries.
  • Green Power: Add a handful of kale or spinach for an extra nutrient boost without sacrificing flavor.
  • Chocolate Delight: Blend in a tablespoon of cocoa powder for a chocolaty twist, and top with dark chocolate shavings.
  • Tropical Paradise: Swap the orange juice for coconut water and add mango chunks for a true island vibe.

Storage and Make-Ahead Instructions

If you want to prepare ahead, here’s how to store your smoothie bowl:

  • Refrigerate: The smoothie base can be stored in an airtight container in the fridge for up to 24 hours. Stir well before serving.
  • Freeze: If you want to make it even earlier, blend and freeze your smoothie mixture. Thaw in the fridge overnight before serving.

FAQs About Coconut Smoothie Bowls

Here are some commonly asked questions about coconut smoothie bowls:

  • Can I use fresh fruit instead of frozen? Yes, but the texture will be different. Frozen fruit gives a creamier texture.
  • Is this smoothie bowl vegan? You can make it vegan by using plant-based yogurt and omitting honey.
  • How can I increase protein content? Add a scoop of protein powder or nut butter to your base.
  • Can I make this smoothie bowl in advance? Yes, you can prepare the base ahead of time and top it just before serving.
  • What toppings do you recommend? Fresh fruits, granola, nuts, and seeds are all excellent choices!
  • How do I make it dairy-free? Use dairy-free yogurt and plant-based milk alternatives.
  • What’s the best way to serve this? Serve immediately after preparation for the best taste and texture.
  • Can I substitute Greek yogurt? Yes, you can use any yogurt you prefer, including dairy-free options.

Nutritional Tips and Dietary Adaptations

This smoothie bowl is not only delicious but also adaptable to fit various dietary needs:

  • Gluten-Free: Naturally gluten-free, just ensure all toppings are also gluten-free.
  • Dairy-Free: Use coconut yogurt or any plant-based yogurt for a dairy-free option.
  • Low Sugar: Limit sweet fruits and use unsweetened yogurt to keep sugar levels down.
  • High Fiber: Add flaxseeds or chia seeds to increase fiber content.

Equipment Recommendations

Here’s what you’ll need to get started:

  • Blender: A high-speed blender is ideal for achieving a smooth consistency.
  • Bowl: A nice bowl to showcase your colorful creation.
  • Spoon: For serving and enjoying your delicious smoothie bowl.

Serving Suggestions

Pair your Coconut Smoothie Bowl with these delightful options:

  • Herbal Tea: A warm cup of chamomile or mint tea complements the refreshing bowl perfectly.
  • Toast: Whole grain or avocado toast makes a hearty side.
  • Fruit Salad: A mixed fruit salad adds extra freshness to your meal.

As you can see, making a Coconut Smoothie Bowl is not just easy, it’s an exciting way to enjoy breakfast! Remember, the key is to have fun and experiment with flavors and toppings. Enjoy every spoonful, and don’t forget to share your delicious creations with friends and family.

Coconut Smoothie Bowl Recipe

Prep Time 10 minutes
Total Time 10 minutes
Servings 2 bowls
Calories 250
A delicious and nutritious smoothie bowl perfect for a quick breakfast or snack, customizable with your favorite fruits and toppings.

Ingredients

Base ingredients

  • 1/2 cup ice
  • 1/2 cup Greek Yogurt plain, strawberry, pineapple, vanilla, or coconut
  • 1/4 cup frozen pineapple chunks
  • 1/4 cup frozen peach chunks
  • 1/2 cup frozen strawberries
  • 1/4-1/3 cup orange juice
  • handful fresh spinach optional
  • 2 tbsp flax, chia, and/or coconut optional
  • to taste fresh blueberries
  • to taste fresh strawberries halved
  • to taste fresh peach sliced
  • to taste coconut granola
  • to taste almonds whole
  • to taste unsweetened coconut flakes
  • to taste chia seeds

Instructions 

  • Place all ingredients in a blender, starting with the heaviest on top. Blend until smooth, about 2 minutes.
  • Pour into bowls and top with fruit, granola, almonds, coconut flakes, and chia seeds. Serve immediately.

Notes

Feel free to customize toppings and fruits for variety.
Calories: 250kcal
Cost: $12
Course: Breakfast
Keyword: Fruit, Healthy, Smoothie

Elevate Your Drinks with Refreshing Fruit Ice Cubes

Are you looking for a delightful way to enhance your beverages this summer? Look no further! This guide will show you how to make refreshing fruit ice cubes that not only look stunning but also add a burst of flavor to your drinks. With just three simple ingredients, you can transform plain water into a vibrant, fruity refreshment that everyone will love. Let’s dive in and discover the joy of making these refreshing treats!

Why You’ll Love This Recipe

Making fruit ice cubes is not only easy but also incredibly rewarding. Here’s why you’ll want to give this recipe a try:

  • Fun and Creative: Experiment with different fruits and combinations to make each batch unique and exciting.
  • Visually Stunning: Add a pop of color to your drinks, making them Instagram-worthy and appealing at gatherings.
  • Flavor Boost: Infuse your water or cocktails with natural flavors, elevating your hydration game.
  • Healthy Choice: Enjoy the benefits of fresh fruit without added sugars or artificial flavors.
  • Easy to Make: With just a few simple steps, you can prepare a batch in minutes and let your freezer do the work!

Ingredients You’ll Need

Here’s what you’ll need to whip up these delightful fruit ice cubes:

  • Water: The base of your ice cubes; feel free to use flavored water for an extra kick.
  • 1 cup fresh strawberries, chopped: Sweet and juicy, strawberries add a delightful flavor.
  • 1 cup fresh kiwi, chopped: A tangy contrast that pairs perfectly with strawberries.

Substitutions: If you don’t have strawberries or kiwi, you can use any combination of your favorite fruits such as:

  • Blueberries: Great for a burst of antioxidants.
  • Mango: Adds a tropical sweetness.
  • Mint leaves: For a refreshing twist.

How to Make Fruit Ice Cubes

Close-up view of vibrant fruit ice cubes with fruit pieces.

Ready to create your fruity masterpieces? Follow these simple steps:

  • Step 1: Gather your ingredients: Make sure everything is prepped and ready to go.
  • Step 2: Arrange the fruit: Add chopped strawberries and kiwi to an ice cube tray or a baking sheet.
  • Step 3: Fill with water: Pour water over the fruit until each compartment is full.
  • Step 4: Freeze: Place in the freezer and let it freeze until hardened, usually a few hours.

Pro Tips for Making Fruity Ice Cubes

Here are some expert insights to perfect your fruit ice cubes:

  • Use cold water: Cold water helps the fruit stay suspended and prevents them from sinking.
  • Double boil water: For crystal-clear ice, double boil your water before pouring.
  • Don’t overfill: Leave a little space at the top of each compartment to allow for expansion as the water freezes.
  • Mix flavors: Combine different fruits for a unique taste and visual appeal.
  • Try herbs: Add fresh mint or basil for a refreshing herbal note.
  • Use sparkling water: For a fizzy twist, use sparkling water instead of regular water.
  • Serve immediately: To enjoy the full flavor, serve the ice cubes in your drinks right after they’re frozen.
  • Experiment: Don’t hesitate to try different fruits, juices, or even edible flowers!

Storage and Make-Ahead Instructions

These fruit ice cubes are perfect for making ahead:

  • Storage: Keep your ice cubes in an airtight container in the freezer for up to three months.
  • Make-Ahead: Prepare a large batch at the beginning of the week and have them ready for any occasion.

Common Mistakes and Troubleshooting

Everyone makes mistakes in the kitchen! Here are some common issues and how to fix them:

  • Cloudy Ice: This often happens due to impurities in the water. Use filtered or boiled water for clearer ice.
  • Fruit Sinking: If your fruit sinks, try freezing the water halfway, adding the fruit, and then topping up with more water.
  • Too Hard: If your cubes are too hard to break, let them sit at room temperature for a few minutes before serving.

Variations to Try

Get creative! Here are some fun variations to spice things up:

  • Citrus Splash: Use orange slices and lemon zest for a bright, zesty flavor.
  • Berry Medley: Combine strawberries, blueberries, and raspberries for a berry-infused ice.
  • Tropical Twist: Add pineapple and mango for a taste of the tropics.
  • Herbal Infusion: Mix in fresh herbs like basil or mint for a refreshing herbal touch.

Comprehensive FAQ

Got questions? We’ve got answers! Here are some frequently asked questions:

  • Can I use frozen fruit for ice cubes? Yes! Just make sure to thaw them slightly before adding them to your tray.
  • How can I prevent my ice cubes from becoming cloudy? Use filtered water and consider double boiling it before freezing.
  • How long can I store fruit ice cubes? They can last in the freezer for up to three months if stored properly.
  • Can I add juice to the ice cubes? Absolutely! Mix in 100% fruit juice for added flavor.
  • What drinks pair well with fruit ice cubes? They work well in water, lemonade, iced tea, or even cocktails.
  • Can I make larger ice cubes? Yes! Use a larger mold or tray for bigger ice cubes.
  • Are these ice cubes vegan-friendly? Yes, all ingredients used are vegan.
  • How do I remove the ice cubes from the tray? Run warm water over the bottom of the tray to loosen them up.

Nutrition Tips and Dietary Adaptations

Making fruit ice cubes is not just about flavor; it’s about nutrition too! Here are some tips:

  • Low-Calorie Treat: These cubes are a guilt-free way to enjoy flavored beverages without added sugars.
  • Hydration Aid: They encourage hydration by making water more exciting and flavorful.
  • Diet-Friendly: Suitable for vegan, paleo, and gluten-free diets, making them perfect for everyone.

Helpful Kitchen Tools

Having the right tools makes the process seamless:

  • Ice Cube Tray: Choose a silicone tray for easy removal of the ice cubes.
  • Chopping Board: For easy and safe chopping of your fruits.
  • Measuring Cup: To ensure you’re using the right amount of fruit and water.

Serving Suggestions

Now that you’ve made your fruit ice cubes, here’s how to serve them:

  • Refreshing Water: Add a few cubes to a tall glass of water for a fruity twist.
  • Summer Cocktails: Use them in cocktails to keep your drinks cool and flavorful.
  • Creative Mocktails: Mix them in with your favorite juices for a fun, alcohol-free beverage.

Enjoy the process of making these delightful fruit ice cubes as much as you enjoy the final result! They’re a simple way to bring joy and flavor to your drinks, making every sip a refreshing experience. Happy freezing!

Fruit Ice Cubes

Prep Time 10 minutes
Total Time 10 minutes
Servings 8 cubes
Calories 20
Enjoy refreshing fruit-infused ice cubes that add flavor and fun to your drinks.

Ingredients

Water

  • 1 cup fresh strawberries, chopped
  • 1 cup fresh kiwi, chopped

Instructions 

  • Gather your ingredients.
  • Add chopped fruit to an ice cube tray or baking sheet.
  • Pour water over the fruit until full.
  • Freeze until hardened.
  • Add the fruit ice cubes to water or beverage of choice.

Notes

Use fresh, ripe fruit for the best flavor.
Calories: 20kcal
Cost: $5
Course: Beverage, Snack
Cuisine: American
Keyword: Fruit, ice cubes

Quick and Easy Mediterranean Chickpea Salad

If you’re looking for a vibrant, nutritious dish that can double as a hearty lunch or a lively side for gatherings, you’ve come to the right place! This Mediterranean Chickpea Salad is not only bursting with fresh flavors but is also incredibly easy to whip up. In this guide, we’ll explore everything you need to know about making this delightful salad, from ingredients to variations, tips, and beyond. Let’s dive in!

Why You’ll Love This Recipe

  • Quick to Prepare: With just a handful of ingredients and minimal prep time, this salad can be on your table in no time.
  • Nutritious & Wholesome: Packed with protein-rich chickpeas, fresh veggies, and healthy fats, it’s a dish that nourishes your body.
  • Versatile: Enjoy it as a main dish, a side, or even as a filling for wraps and pita pockets!
  • Make Ahead Friendly: Ideal for meal prep, this salad stays fresh in the fridge, making it perfect for busy weekdays.
  • Customizable: With endless variations, you can easily adapt this recipe to suit your taste preferences.

Ingredients Breakdown

Here’s what you’ll need to create this delicious Mediterranean Chickpea Salad. Feel free to mix and match based on what’s available in your kitchen!

  • 2 cups cooked chickpeas: The base of the salad, offering protein and fiber. You can use canned chickpeas for convenience or cook your own.
  • 1/4 cup red onion, diced: Adds a sharp, sweet flavor. If red onion is too pungent for your taste, use green onions instead.
  • 2 Persian cucumbers, diced: Crisp and refreshing, these cucumbers add a delightful crunch. If unavailable, use English cucumbers.
  • 1 tomato, diced and seeded: Provides juiciness. Cherry tomatoes can be a sweeter alternative!
  • 2 tbsp fresh parsley, finely diced: For an aromatic touch, fresh herbs elevate the flavor.
  • 1 tbsp jalapeño, finely diced: For a bit of heat; feel free to adjust the amount to your spice preference.
  • 1/3 cup olive oil: A key component of the dressing, contributing richness and flavor.
  • 1/8 cup fresh lemon juice (from 1 lemon): Brightens the dish and balances the richness.
  • 2 garlic cloves, mashed into a paste: For depth of flavor. You can use garlic powder if you’re in a hurry.
  • 1 tsp sea salt: Enhances all the flavors; adjust to taste.
  • 1 1/2 tsp cumin: Adds an earthy, warm note; it’s a staple in Mediterranean cuisine.

How to Make Mediterranean Chickpea Salad

Juicy Mediterranean Chickpea Salad with fresh ingredients like cucumbers, tomatoes, and red onions.

Follow these simple steps to whip up your Mediterranean Chickpea Salad:

  • Prepare Salad: In a large bowl, combine the chickpeas, red onion, cucumbers, tomato, parsley, and jalapeño.
  • Mix the Dressing: In a small jar with a lid, add olive oil, lemon juice, garlic, salt, and cumin. Close the lid and shake until well combined. This is a fun part—kids love shaking the jar!
  • Combine Everything: Pour the dressing over the salad ingredients and mix until everything is well coated.
  • Time to Wait: Let the salad marinate for at least 30 minutes. This will help the flavors meld beautifully—who doesn’t want that?
  • Serve and Enjoy!: Toss again just before serving and enjoy your vibrant dish!

Pro Tips for the Best Mediterranean Chickpea Salad

  • Chickpeas: If using canned chickpeas, rinse and drain them well to reduce sodium content.
  • Freshness: For the best flavor, use fresh herbs and quality olive oil; your taste buds will thank you!
  • Rest Time: Allowing the salad to sit for a while enhances the flavors. If you have time, let it sit for up to two hours.
  • Balancing Flavors: Taste the salad before serving—adjust the salt, lemon, or spices to suit your palate.
  • Texture: If you prefer a softer texture, let the salad marinate longer, but keep an eye on the cucumbers to avoid them getting too mushy.
  • Meal Prep: This salad is perfect for meal prep; store it in an airtight container in the fridge for up to three days.
  • Serving Temperature: This salad is delicious cold but can also be served at room temperature.
  • Experiment: Don’t hesitate to add other ingredients like feta cheese, olives, or even roasted vegetables to make it your own!

Common Mistakes & Troubleshooting

Here are some tips to avoid common pitfalls when making your Mediterranean Chickpea Salad:

  • Overdressing: Be cautious not to add too much dressing at once; start with half and adjust to taste.
  • Skipping Marination: Don’t skip the marination step; it’s essential for flavor development.
  • Soggy Ingredients: If you notice your salad gets watery, try using less tomato or draining it properly.
  • Forgotten Seasoning: Always taste before serving—adding a pinch more salt or lemon can make a world of difference.

Variations to Try

Here are some tasty variations to keep your Mediterranean Chickpea Salad exciting:

  • Greek Style: Add crumbled feta cheese, kalamata olives, and oregano for a classic Greek twist.
  • Spicy Chickpea Salad: Incorporate diced bell peppers and a splash of hot sauce for an extra kick.
  • Quinoa Chickpea Salad: Mix in cooked quinoa for added texture and protein.
  • Asian-Inspired: Swap the cumin for sesame oil and add shredded carrots and edamame for a refreshing twist.

Storage & Make-Ahead Instructions

This Mediterranean Chickpea Salad is perfect for making ahead of time. Here’s how to store it:

  • In the Fridge: Keep it in an airtight container for up to three days. The flavors will deepen as it sits!
  • Freezing: We don’t recommend freezing this salad, as the texture of the vegetables can change.
  • Make Ahead: Prep the ingredients a day in advance and mix them just before serving for optimal freshness.

Frequently Asked Questions

  • Can I make this salad vegan?: Yes! This recipe is already vegan-friendly. Just skip the feta if you add it.
  • What can I serve with Mediterranean Chickpea Salad?: It pairs wonderfully with grilled meats, crusty olive bread, or can be served inside pita pockets.
  • Can I use dried chickpeas?: Absolutely! Just make sure to soak and cook them properly before using.
  • How do I make this salad gluten-free?: This salad is naturally gluten-free; just be sure to check any added ingredients like croutons.
  • What if I don’t like cumin?: You can replace it with coriander or even smoked paprika for a different flavor profile.
  • Can I add fruits?: Yes! Consider adding diced apples or pomegranate seeds for a sweet twist.
  • How spicy is this salad?: The spice level is adjustable! You can omit jalapeño or use a milder pepper.
  • Is there a substitute for olive oil?: You can use avocado oil or any neutral oil in its place, but olive oil adds a distinct flavor.

Nutrition Tips and Dietary Adaptations

This salad is not only delicious but also rich in nutrients. Here are some tips to enhance its nutritional value:

  • Boost Fiber: Add more beans or seeds for extra fiber.
  • Healthy Fats: Include avocados for added creaminess and healthy fats.
  • Low Sodium: Use low-sodium chickpeas and dressings to keep the salt content in check.
  • Protein-Packed: To increase protein, toss in some grilled chicken or chickpea pasta.

Equipment Recommendations

Having the right tools makes cooking easier and more enjoyable. Here are some essentials for making Mediterranean Chickpea Salad:

  • Mixing Bowl: A large bowl is essential for combining all ingredients.
  • Jar with Lid: Great for shaking up your dressing without any mess.
  • Knife and Cutting Board: For chopping veggies easily and efficiently.
  • Measuring Cups and Spoons: Ensure accurate ingredient measurements for the best results.

Serving Suggestions

This salad is incredibly versatile! Here are some fun ways to serve it:

  • As a Main Course: Load it onto a bed of mixed greens for a filling meal.
  • Wrap It Up: Use it as a filling for whole grain wraps or pita pockets.
  • Alongside Grilled Meats: Pair it with grilled chicken, lamb, or fish for a balanced meal.
  • As a Picnic Dish: Perfect for outdoor gatherings—just pack it in a cooler!

Final Thoughts

There you have it! A comprehensive guide to making a delightful Mediterranean Chickpea Salad that is sure to impress. Remember, cooking is about enjoying the process and experimenting with flavors. Don’t hesitate to make this recipe your own! Happy cooking, and I hope you enjoy every bite of this refreshing salad!

Mediterranean Chickpea Salad

Prep Time 10 minutes
Total Time 10 minutes
Servings 4 servings
Calories 250
A fresh and flavorful Mediterranean chickpea salad perfect for a quick lunch or side dish.

Ingredients

Main

  • 2 cups cooked chickpeas
  • 0.25 cup red onions, diced
  • 2 tbsp fresh parsley, finely diced
  • 1 tomato diced seeded tomato
  • 2 Persian cucumbers diced
  • 1 tbsp jalapeno, finely diced
  • 0.33 cup olive oil
  • 0.75 cup fresh lemon juice (from 1 lemon)
  • 2 garlic cloves mashed into a paste
  • 1 tsp sea salt
  • 1.5 tsp cumin

Instructions 

  • Combine all salad ingredients in a large bowl.
  • Mix dressing ingredients in a jar, shake well.
  • Pour dressing over salad and toss to combine.
  • Let marinate for 30 minutes before serving.

Notes

For extra flavor, add a sprinkle of feta cheese or olives.
Calories: 250kcal
Cost: $12
Course: Salad
Cuisine: Mediterranean
Keyword: Chickpeas

Fuel Your Day with Easy No Bake Oatmeal Protein Bars

Are you looking for a quick and nutritious snack that keeps your energy up throughout the day? Look no further! These no bake oatmeal protein bars are here to save the day. Packed with wholesome ingredients and designed for a range of dietary needs, they make the perfect post-workout boost or an energizing snack for busy mornings. You’ll find that making these bars is not only simple but also customizable to fit your flavor preferences. Let’s dive into the world of these delicious bars!

Why You’ll Love This Recipe

These oatmeal protein bars are more than just a tasty treat. Here are five compelling reasons to give them a try:

  • Quick and Easy: With just a few simple steps, you can whip up a batch in no time—perfect for those hectic days.
  • Customizable: Feel free to swap ingredients based on your taste and dietary needs, such as using different nut butters or sweeteners.
  • Nutritious Boost: Each bar is loaded with protein and fiber, making them a great choice for fueling your workouts or keeping you full between meals.
  • Deliciously Satisfying: The combination of oats, nut butter, and chocolate chips creates a mouthwatering flavor profile that feels indulgent without the guilt.
  • Perfect for Meal Prep: Make a batch ahead of time and store them for a grab-and-go option that’s ready whenever you need it.

Ingredients You’ll Need

Let’s gather our ingredients! Here’s what you’ll need to create these delightful bars:

  • 2 cups rolled oats: Use certified gluten-free oats if needed for a gluten-free option.
  • 1 cup nut butter: Choose from peanut or almond butter; you can also use sunflower seed butter for a nut-free version.
  • 1/2 cup honey or maple syrup: Maple syrup works well for a vegan alternative.
  • 1/2 cup chocolate chips: Use dairy-free chocolate chips if you’re keeping it vegan.
  • 1/2 cup protein powder (optional): Vanilla or unflavored protein powder works best.
  • 1 teaspoon vanilla extract: For added flavor.

How to Make No Bake Oatmeal Protein Bars

Side view of homemade No Bake Oatmeal Protein Bars stacked on parchment paper.

Now that we have our ingredients, let’s get to the fun part—making the bars! Follow these simple steps:

Step 1: Mix the Wet Ingredients

In a large bowl, combine the nut butter, honey (or maple syrup), and vanilla extract. Mix until smooth and well combined.

Step 2: Combine Dry Ingredients

In another bowl, mix the rolled oats and protein powder. This ensures that the protein powder is evenly distributed.

Step 3: Combine Wet and Dry Mixes

Add the dry ingredients to the wet ingredients and stir until everything is well combined. The mixture should be thick.

Step 4: Add the Chocolate Chips

Gently fold in the chocolate chips until they are evenly distributed throughout the mixture.

Step 5: Press into a Pan

Line an 8×8 inch baking pan with parchment paper. Press the mixture firmly into the pan, ensuring it’s evenly distributed.

Step 6: Chill and Slice

Refrigerate the bars for at least 1 hour to set. Once firm, lift them out of the pan and slice into squares or rectangles.

Pro Tips for Best Results

To ensure your bars turn out perfectly every time, consider these expert insights:

  • Use firm nut butter: Ensure your nut butter is creamy and doesn’t have oil separation to avoid crumbling.
  • Chill thoroughly: Allow the bars to chill long enough to set properly; this helps them hold together better.
  • Experiment with mix-ins: Feel free to add seeds, dried fruits, or different flavors of protein powder for variety.
  • Adjust sweetness: Taste the mixture before pressing it into the pan; add more sweetener if desired.
  • Store wisely: Keep the bars in an airtight container in the refrigerator for up to a week or freeze for longer storage.

Common Mistakes and Troubleshooting

Even the best of us can make mistakes in the kitchen. Here are some common pitfalls and how to avoid them:

  • Bars falling apart: If your bars crumble, ensure you used enough nut butter and pressed the mixture firmly into the pan.
  • Too sweet or not sweet enough: Adjust the amount of honey or maple syrup according to your taste preference.
  • Ingredient substitutions: Be cautious when substituting ingredients; not all nut butters or sweeteners behave the same way.

Variations to Try

Let’s shake things up! Here are some unique variations you can try:

  • Chocolate Mint: Add a few drops of peppermint extract and use dark chocolate chips for a refreshing twist.
  • Fruit and Nut: Incorporate dried cranberries or chopped nuts for added texture and flavor.
  • Coconut Bliss: Mix in shredded coconut and use coconut oil instead of nut butter for a tropical flavor.
  • Spicy Cinnamon: Add a teaspoon of cinnamon and use almond butter for a warm, comforting flavor.

Storage and Make-Ahead Instructions

These bars are perfect for meal prep! Here’s how to store them:

  • Refrigeration: Store in an airtight container in the refrigerator for up to a week.
  • Freezing: For longer storage, wrap individual bars in plastic wrap and place them in a freezer bag. They can be frozen for up to three months.
  • Serving suggestions: Enjoy these bars as a quick breakfast, a post-workout snack, or a healthy dessert option!

FAQs About Oatmeal Protein Bars

Got questions? We’ve got answers!

  • Can I use quick oats instead of rolled oats? Yes, but rolled oats provide a better texture.
  • Can I make these bars vegan? Absolutely! Just use maple syrup and sunflower seed butter.
  • How long will these bars last? They can last up to a week in the fridge and three months in the freezer.
  • Can I add protein powder? Yes, adding protein powder can enhance the nutritional content.
  • What can I substitute for honey? Maple syrup or agave nectar works well as a substitute.
  • Can I use almond flour instead of oats? Oats provide bulk and texture; almond flour will not yield the same results.
  • What if my bars are too sticky? You can add more oats or protein powder to absorb the moisture.
  • Can I add fresh fruit? Fresh fruit may add moisture; it’s better to stick with dried fruits for this recipe.

Nutrition Tips and Dietary Adaptations

These bars can fit into various dietary lifestyles. Here are some tips:

  • For low-carb diets: Replace honey with a low-carb sweetener like erythritol.
  • For nut allergies: Use seed butters like sunflower seed butter instead of nut butters.
  • For gluten-free diets: Always check that your oats are certified gluten-free.

Equipment Recommendations

To make your experience seamless, here’s what you’ll need:

  • Mixing bowls: A large bowl for mixing ingredients and a smaller one for dry ingredients.
  • Baking pan: An 8×8 inch pan lined with parchment paper works best for easy removal.
  • Spatula: A silicone spatula is great for mixing and pressing the mixture into the pan.

Serving Suggestions

These bars are versatile, so feel free to enjoy them in different ways:

  • With yogurt: Crumble over Greek yogurt for a protein-packed breakfast or snack.
  • As a dessert: Serve with a drizzle of melted chocolate or a dollop of nut butter.
  • On-the-go: Wrap them individually for a quick snack during your busy day.

In conclusion, these no bake oatmeal protein bars are an excellent way to fuel your day while satisfying your taste buds. With their customizable nature and simplicity, you can enjoy them exactly how you like them. So, gather your ingredients, get cooking, and enjoy the deliciousness!

No Bake Oatmeal Protein Bars

Prep Time 10 minutes
Total Time 10 minutes
Servings 12 bars
Calories 250
These easy, no-bake oatmeal protein bars are perfect for a quick snack or post-workout boost, customizable with your favorite ingredients.

Ingredients

Dry ingredients

  • 2 cups rolled oats (Use certified gluten-free oats if needed)
  • 1 cup nut butter (peanut or almond; sunflower seed butter works for nut-free)
  • 0.5 cup honey or maple syrup (Maple for vegan)
  • 0.5 cup chocolate chips (Dairy-free chips for vegan)
  • 0.5 cup protein powder (optional, vanilla or unflavored works best)
  • 1 teaspoon vanilla extract

Instructions 

  • Mix all dry ingredients in a large bowl.
  • Add nut butter, honey or maple syrup, and vanilla extract; stir until well combined.
  • Press mixture into a lined baking dish and flatten evenly.
  • Refrigerate for at least 1 hour to set.
  • Cut into bars and serve.

Notes

Store in an airtight container in the fridge for up to a week.
Calories: 250kcal
Cost: $10
Course: Snack
Keyword: Oats

Your Ultimate Guide to Homemade Protein Bars

Are you looking to fuel your day with a delicious and nutritious snack? Look no further! In this comprehensive guide, we’ll explore how to make your very own protein bars from the comfort of your kitchen. Packed with wholesome ingredients like peanut butter and protein powder, these bars are perfect for a quick energy boost or a post-workout treat. Plus, making protein bars at home allows you to customize them to your taste and dietary needs. Let’s dive in!

Why You’ll Love This Recipe

This protein bar recipe isn’t just easy to make; it’s designed to fit seamlessly into your lifestyle. Here are five reasons you’ll love preparing these bars:

  • Customizable Flavors: You can tailor the taste of these bars to your liking by experimenting with different protein powders, sweeteners, and add-ins.
  • Nutritious Ingredients: Made with wholesome ingredients, these bars provide a balanced mix of protein, healthy fats, and carbohydrates.
  • Quick and Easy: With minimal preparation time and no baking required, you can whip these up in a flash!
  • Cost-Effective: Homemade bars are often cheaper than store-bought options, plus you can avoid added preservatives and artificial ingredients.
  • Perfect for Meal Prep: Make a batch at the beginning of the week for easy grab-and-go snacks.

Ingredients Breakdown

Before you get started, let’s take a closer look at the ingredients you’ll need to make these protein bars. Each ingredient plays a crucial role in the final product, providing flavor, texture, and nutrition.

  • Peanut Butter (1 1/2 cups): This is the base of your bars, providing creaminess and healthy fats. If you have nut allergies, feel free to substitute with sunflower seed butter or soy nut butter.
  • Protein Powder (3/4 cup or 90g): Choose a protein powder you enjoy the taste of, as it significantly impacts the flavor of the bars. Options include whey, casein, or plant-based proteins like pea or hemp.
  • Maple Syrup (1/4 cup): This natural sweetener adds flavor and helps bind the ingredients together. Honey can also be used for a similar effect.
  • Salt (1/2 tsp): A pinch of salt enhances the sweetness and balances the flavors.
  • Melted Chocolate Chips (4 oz, optional): For those who love a sweet touch, drizzle or dip your bars in melted chocolate for an indulgent treat.

Step-by-Step Instructions

Side view of a delicious protein bar showing a peanut butter and chocolate texture.

Making your own protein bars is straightforward and fun! Follow these simple steps to create delicious homemade bars:

  • In a large mixing bowl, combine the peanut butter, protein powder, maple syrup, and salt.
  • Mix everything together until it forms a dough-like consistency. If using chocolate chips, fold them in at this stage.
  • You can either shape the mixture into bars with your hands or pour it into a lined 8×8 pan for a more uniform shape.
  • Refrigerate the mixture for at least 30 minutes to allow it to set.
  • Once chilled, cut into bars of your desired size. For a chocolate coating, spread melted chocolate over the bars before chilling again.

Pro Tips for Perfect Protein Bars

To ensure your protein bars turn out perfectly every time, consider these expert tips:

  • Flavor Matters: The taste of your protein powder can make or break the bars—choose one you enjoy.
  • Texture Variations: For a chewier texture, add oats or dried fruits. For crunch, consider nuts or seeds.
  • Experiment with Sweeteners: If you prefer lower sugar, try using stevia or monk fruit sweetener instead of maple syrup.
  • Storage Tips: Keep your bars in an airtight container in the refrigerator for up to two weeks, or freeze for longer storage.
  • Don’t Skip the Salt: A little salt goes a long way in enhancing the sweetness and overall flavor of the bars.
  • Chill Time: Allowing the bars to chill properly helps them hold their shape and texture.
  • Get Creative: Feel free to add spices like cinnamon or vanilla extract for extra flavor.
  • Batch Size: Consider making a double batch to have plenty of snacks on hand.

Common Mistakes and Troubleshooting

Even the best cooks can encounter a few hiccups. Here are some common mistakes to avoid when making protein bars:

  • Too Dry: If your mixture feels dry, add a splash of water or extra nut butter to moisten it.
  • Too Sticky: If the mixture is too sticky, you may need to add more protein powder or oats to absorb the excess moisture.
  • Not Chilling Long Enough: Ensure you allow enough time for the bars to set in the refrigerator—this is key for achieving the right consistency.

Variations to Try

One of the best things about homemade protein bars is the ability to customize! Here are four tasty variations to consider:

  • Chocolate Chip Peanut Butter: Add mini chocolate chips to the dough for a delicious chocolatey twist.
  • Almond Joy: Incorporate shredded coconut and chopped almonds for a tropical flavor.
  • Cookie Dough: Mix in mini chocolate chips and a dash of vanilla extract for a cookie dough-inspired treat.
  • Berry Blast: Fold in dried berries like cranberries or blueberries for a fruity option.

Storage and Make-Ahead Instructions

To keep your homemade protein bars fresh and ready to enjoy, here’s how to store them:

  • Store your bars in an airtight container for up to two weeks in the refrigerator.
  • If you want to keep them for longer, wrap individual bars in plastic wrap and freeze them for up to three months.
  • When ready to enjoy, simply thaw in the fridge or at room temperature.

Frequently Asked Questions (FAQ)

Here are some common questions about making protein bars:

  • Can I use different protein powders? Yes! Feel free to experiment with different types of protein powder based on your dietary preferences.
  • Are these bars gluten-free? They can be gluten-free if you use gluten-free oats and protein powder.
  • How many grams of protein are in each bar? It depends on the protein powder and serving size, but each bar typically contains around 10-15 grams of protein.
  • Can I add fruits or nuts? Absolutely! Dried fruits, nuts, and seeds can add flavor and texture to your bars.
  • Is it necessary to refrigerate the bars? While refrigeration helps them maintain their shape, it’s not mandatory; just be sure to store them in a cool place.
  • Can I make these bars vegan? Yes! Just use plant-based protein powder and a vegan sweetener like agave or maple syrup.
  • What if I want a lower-calorie option? Consider reducing the amount of nut butter or using lower-calorie sweeteners.
  • What’s the best way to cut them? Use a sharp knife or a pizza cutter for clean edges when slicing your bars.

Nutritional Tips and Dietary Adaptations

When creating your protein bars, here are some nutritional considerations to keep in mind:

  • Protein Content: Ensure your protein powder is high-quality and suitable for your needs (whey, casein, or plant-based).
  • Healthy Fats: Incorporate healthy fats from nut butters or seeds to help keep you full longer.
  • Fiber Boost: Add oats or seeds for extra fiber, which aids digestion and keeps you satisfied.
  • Low Sugar Options: Opt for natural sweeteners like stevia or erythritol to reduce sugar content.

Recommended Equipment

To make the process as smooth as possible, here’s a quick list of equipment you may need:

  • Mixing Bowl: A large mixing bowl to combine all your ingredients.
  • Spatula: For mixing and spreading the mixture evenly in your pan.
  • 8×8 Pan: A square pan for shaping your bars.
  • Parchment Paper: Line your pan with parchment paper for easy removal of the bars.
  • Sharp Knife: For cutting the bars into evenly sized pieces.

Serving Suggestions

Enjoy your homemade protein bars in a variety of ways:

  • As a quick breakfast on-the-go, paired with a piece of fruit.
  • Post-workout snack to refuel your body.
  • With a dollop of yogurt for a delicious dessert.
  • Crumbled over oatmeal or smoothie bowls for added texture.

In conclusion, making your own protein bars is not only easy but also incredibly rewarding. With endless possibilities for customization, you can cater these bars to fit your taste and nutritional needs. So roll up your sleeves and get ready to enjoy a delicious snack that you made yourself!

Protein Bars

Prep Time 10 minutes
Total Time 10 minutes
Servings 8 bars
Calories 250
Delicious homemade protein bars that are easy to customize with your favorite flavors and ingredients.

Ingredients

Main ingredients

  • 0.5 cup peanut butter or allergy-friendly sub
  • 0.75 cup protein powder (90g)
  • 0.25 cup pure maple syrup or honey (or try Keto Protein Bars)
  • 0.5 tsp salt
  • 4 oz melted chocolate chips (optional)

Instructions 

  • Stir all ingredients except optional chocolate chips to form a dough.
  • Shape into bars with your hands or press into an 8x8 lined pan.
  • Refrigerate until chilled, then cut into bars.
  • If using chocolate coating, spread melted chocolate over the bars before chilling.

Notes

Make sure to use a protein powder you enjoy the taste of; unsweetened works best.
Calories: 250kcal
Cost: $10
Course: Snack
Keyword: bars, Protein

Effortless Almond Oat Bars: Your Go-To Recipe for Anytime Snacking

If you’re looking for a quick, healthy snack that you can whip up in no time, these no-bake almond oat bars are your answer! With just a handful of simple ingredients, these bars are perfect for satisfying your sweet tooth while providing the energy boost you need throughout the day. Packed with wholesome oats, almond butter, and honey, they make for a delicious treat that you can enjoy anytime, anywhere. Plus, you can customize them to fit your taste! Let’s dive into why you’ll love this recipe.

Why You’ll Love This Recipe

  • Quick and Easy: No baking required! Just mix, press, and chill—perfect for busy days.
  • Healthy Ingredients: Made with almond butter and oats, these bars are nutritious and satisfying.
  • Customizable: Add your favorite nuts, seeds, or dried fruits to make them your own.
  • Great for Meal Prep: Make a batch ahead of time and store them for a healthy snack all week long.
  • Kid-Friendly: A delicious way to get kids involved in the kitchen—let them help mix and press!

Ingredients Breakdown

Here’s what you’ll need to make these scrumptious almond oat bars:

  • 250 g smooth sugar-free almond butter: Provides a creamy texture and nutty flavor. You can substitute with peanut butter if desired.
  • 300 g smooth natural honey: Acts as a natural sweetener and binds the ingredients together. Maple syrup can be a vegan alternative.
  • 225 g porridge oats: The base of the bars, giving them a chewy texture. Use rolled oats for the best results.
  • 75 g flaked almonds: Adds crunch and flavor. Feel free to use any chopped nuts you prefer!

How to Make No-Bake Almond Oat Bars

Side perspective of delicious No-Bake Almond Oat Bars with a textured surface.

Ready to get started? Follow these simple steps to create your own almond oat bars:

  1. Line the bottom and sides of an 8″ x 8″ square baking tin with greaseproof parchment paper.
  2. In a large saucepan over gentle heat, combine the almond butter and honey, stirring constantly until melted and well mixed. Remove from heat.
  3. Stir in the oats and flaked almonds, ensuring everything is well combined.
  4. Transfer the mixture into the lined baking tin, using the tips of your fingers to press it evenly down to create a firm layer.
  5. Place the tin in the fridge overnight to allow the bars to set.
  6. The next morning, remove from the fridge, lift out using the parchment paper, and cut into 8 bars.
  7. Store in an airtight container in the fridge to keep them fresh until you’re ready to enjoy!

Pro Tips for Perfect Almond Oat Bars

  • Use Fresh Ingredients: Make sure your almond butter and honey are fresh for the best flavor.
  • Chill Time: Allowing the bars to set overnight improves their texture and makes cutting easier.
  • Don’t Overmix: Combine the ingredients just until they’re unified to keep the bars from becoming too dense.
  • Portion Control: Cut the bars into smaller pieces if you prefer bite-sized snacks.
  • Experiment with Add-ins: Try adding dark chocolate chips or dried fruit for added sweetness and flavor.
  • Check Consistency: If the mixture feels too dry, add a little more almond butter or honey.
  • Perfect Storage: Keep them in the fridge to maintain freshness, or freeze for longer storage.
  • Cut with a Warm Knife: For clean cuts, warm your knife under hot water before slicing.

Common Mistakes and Troubleshooting

Here are some common pitfalls and how to avoid them:

  • Bars Crumbling: Ensure you’ve pressed the mixture firmly into the tin. If they’re still crumbly, try adding a bit more almond butter.
  • Too Sticky: If the mixture is too sticky, consider chilling it for a bit before pressing it into the tin.
  • Not Sweet Enough: Adjust the sweetness by increasing the honey or adding a bit of maple syrup.
  • Uneven Texture: Make sure to mix the ingredients thoroughly for a uniform texture.

Variations & Customizations

Feel free to mix things up with these variations:

  • Chocolate Chip Almond Oat Bars: Add dark chocolate chips for a sweet touch.
  • Fruit & Nut Bars: Incorporate dried cranberries or apricots along with walnuts or pecans.
  • Protein-Packed Bars: Add a scoop of your favorite protein powder to boost nutrition.
  • Coconut Almond Bars: Mix in shredded coconut for a tropical twist.

Storage and Make-Ahead Instructions

These bars can be made ahead and stored in the fridge for up to a week or frozen for up to a month. Here’s how:

  • In the Fridge: Store in an airtight container to keep them fresh and prevent them from drying out.
  • In the Freezer: Wrap individual bars in plastic wrap and place them in a freezer-safe bag for easy grab-and-go snacks.

Frequently Asked Questions (FAQs)

  • Can I use crunchy almond butter instead of smooth? Absolutely! Crunchy almond butter will give your bars a different texture, adding extra crunch.
  • How long do these bars last? When stored properly, they can last up to a week in the fridge or a month in the freezer.
  • Can I substitute honey? Yes! Maple syrup is a great vegan alternative that works well in this recipe.
  • Are these bars gluten-free? As long as you use certified gluten-free oats, these bars are gluten-free.
  • What if I don’t have a baking tin? You can use any container that’s similar in size, just make sure to line it with parchment paper.
  • Can I make these bars nut-free? Yes! Substitute the almond butter with sunflower seed butter or soy nut butter.
  • How can I make these bars more filling? Consider adding chia seeds or protein powder for an extra boost.
  • What’s the best way to cut these bars? Use a warm knife for clean cuts, and make sure they’re well chilled before slicing.

Nutritional Tips and Dietary Adaptations

These almond oat bars can easily fit into various dietary preferences:

  • Vegan: Use maple syrup instead of honey and ensure your almond butter is pure.
  • Paleo-Friendly: Replace oats with nuts and seeds for a grain-free version.
  • High-Protein: Add protein powder or swap almond butter for a higher protein nut butter.

Essential Equipment

To make these almond oat bars, you will need:

  • 8″ x 8″ Baking Tin: For molding your bars.
  • Large Saucepan: To melt the almond butter and honey together.
  • Parchment Paper: To line the baking tin for easy removal.
  • Mixing Spoon: For combining all ingredients effectively.

Serving Suggestions

These bars are perfect for:

  • On-the-Go Breakfast: Pair them with a smoothie for a quick morning meal.
  • Post-Workout Snack: Enjoy them after a workout for a healthy energy boost.
  • Lunchbox Treat: Pack them in your kids’ lunchboxes for a nutritious snack.

There you have it—your definitive guide to making effortless almond oat bars! I hope you feel inspired to get into the kitchen and create these delicious snacks. Remember, cooking is all about enjoying the process and experimenting, so don’t hesitate to make these your own. Happy cooking!

No-Bake Almond Oat Bars

Prep Time 10 minutes
Total Time 10 minutes
Servings 8 bars
Calories 1500
Delicious and healthy no-bake almond oat bars perfect for a quick snack or energy boost.

Ingredients

Main ingredients

  • 250 g smooth sugar free almond butter
  • 300 g smooth natural honey
  • 225 g porridge oats
  • 75 g flaked almonds

Instructions 

  • Line an 8x20cm square baking tin with parchment paper.
  • Gently heat almond butter and honey in a saucepan until melted and combined.
  • Mix in oats and flaked almonds until well combined.
  • Press the mixture into the prepared tin and flatten evenly.
  • Refrigerate overnight until set, then cut into 8 bars.
  • Store in an airtight container in the fridge.

Notes

Keep the bars refrigerated for freshness.
Calories: 1500kcal
Cost: $10
Course: Snack
Keyword: almond, Oats

Unleash Your Culinary Creativity with the Creamy Avocado Chicken Rice Bowl

Welcome to a world of flavor, comfort, and simplicity! If you’ve ever struggled with dinner ideas or felt overwhelmed in the kitchen, you’re not alone. The Creamy Avocado Chicken Rice Bowl is here to transform your cooking experience. This one-pan wonder is not just a meal; it’s an invitation to explore your culinary skills and enjoy the satisfaction of a delicious home-cooked dinner.

This delightful dish combines tender chicken, creamy avocados, and fluffy rice, creating a wholesome and flavorful dinner that comes together in no time. With easy-to-follow steps and a few key ingredients, you’ll be serving up a plate that your family will love. Let’s dive in!

Why You’ll Love This Recipe

  • Quick and Easy: This dish can be prepared in under 30 minutes, making it perfect for busy weeknights.
  • Flavorful and Satisfying: The creamy avocado sauce paired with perfectly seasoned chicken and rice creates a delightful harmony of flavors.
  • Customizable: Whether you prefer additional toppings or different proteins, this recipe is easily adaptable to your taste.
  • Healthy Ingredients: Packed with nutritious avocados and lean chicken, this bowl is not just delicious but also good for you.
  • One-Pan Wonder: Less cleanup means more time enjoying your meal and less time scrubbing dishes!

Ingredients You’ll Need

Before we get cooking, let’s gather our ingredients. This recipe is simple, but each component plays an essential role in achieving the perfect chicken rice bowl.

  • 1 cup of uncooked rice: I recommend using jasmine or basmati for their fragrant aroma.
  • 2 boneless, skinless chicken breasts: About 1 pound total. Feel free to substitute with thighs for a juicier option.
  • 2 ripe avocados: The creamier, the better! Choose avocados that yield slightly to pressure.
  • 1 tablespoon of olive oil: Extra virgin olive oil adds a richer taste.
  • 1 lime: Fresh lime juice enhances the avocado sauce and adds brightness.
  • Salt and pepper: To taste. Essential for seasoning your chicken perfectly.
  • 1 teaspoon of garlic powder: A quick way to infuse flavor into your chicken.
  • 1 teaspoon of paprika: This adds a subtle smokiness and beautiful color.
  • Optional toppings: Fresh cilantro, cherry tomatoes, black beans, corn, shredded cheese, and hot sauce.

Feel free to mix and match these ingredients based on what you have on hand or your personal preferences!

How to Prepare the Creamy Avocado Chicken Rice Bowl

Side view of a colorful rice bowl topped with sliced avocado, chicken, and garnishes.

Now that we have our ingredients ready, let’s walk through the steps to create this delicious meal.

Step 1: Cook the Rice

Cooking the rice perfectly is the foundation of this dish. Here’s how to do it:

  • Rinse 1 cup of rice under cold water until the water runs clear.
  • In a pot, combine the rinsed rice with 2 cups of water and a pinch of salt.
  • Bring it to a boil over medium-high heat.
  • Once boiling, reduce the heat to low, cover, and let it simmer for about 15-20 minutes or until the water is absorbed.
  • Remove from heat and let it sit, covered, for another 5 minutes. Fluff with a fork before serving.

Step 2: Prepare the Chicken

Next, let’s get that chicken seasoned and cooked just right:

  • Season the chicken breasts with salt, pepper, garlic powder, and paprika.
  • In a skillet, heat 1 tablespoon of olive oil over medium heat.
  • Add the seasoned chicken breasts and cook for about 6-7 minutes on each side or until golden brown and cooked through (internal temperature should reach 165°F).
  • Remove from the skillet and let it rest for a few minutes before slicing into bite-sized pieces.

Step 3: Make the Creamy Avocado Sauce

This sauce is the star of the show. Here’s how to whip it up:

  • In a blender or food processor, combine 2 ripe avocados, juice of 1 lime, a pinch of salt, and a splash of water.
  • Blend until smooth and creamy, adjusting the consistency with more water if needed.

Step 4: Assemble Your Bowl

Now, let’s put it all together for the ultimate rice bowl experience:

  • Start with a scoop of rice at the bottom of your bowl.
  • Add sliced chicken on top.
  • Drizzle generously with the creamy avocado sauce.
  • Add optional toppings like cherry tomatoes, black beans, or corn for an extra burst of flavor.

Pro Tips for the Perfect Bowl

  • Don’t skip rinsing your rice: This removes excess starch and helps achieve fluffy, non-sticky rice.
  • Use a meat thermometer: Ensures your chicken is perfectly cooked without being dry.
  • Customize your toppings: Experiment with different toppings to keep the meal fresh and exciting each time.
  • Make it spicy: Add sliced jalapeños or a drizzle of your favorite hot sauce for a kick!
  • Store leftovers properly: Keep separate components (chicken, rice, sauce) in the fridge to maintain freshness.

Common Mistakes and Troubleshooting

Even the best cooks encounter hiccups! Here are some common issues you might face and how to fix them:

  • Rice too sticky: Ensure you rinsed the rice thoroughly before cooking.
  • Chicken dry: Avoid overcooking; use a meat thermometer to check doneness.
  • Avocado sauce too thick: Add a splash of water or lime juice to reach your desired consistency.
  • Flavor lacking: Don’t be shy with seasonings; taste as you go!

Variations to Try

The beauty of the Creamy Avocado Chicken Rice Bowl is its versatility! Here are some fun variations you can try:

  • Southwestern Style: Add black beans, corn, and a sprinkle of taco seasoning for a Southwestern twist.
  • Asian-Inspired: Use soy sauce, ginger, and sesame oil, and top with sliced green onions.
  • Greek Flavor: Incorporate feta cheese, olives, and a drizzle of tzatziki sauce.
  • Vegan Option: Substitute chicken with grilled tofu or chickpeas for a plant-based meal.

Storage and Make-Ahead Instructions

If you want to prep ahead of time, here’s how to store and reheat your ingredients:

  • Cooked rice: Store in an airtight container in the fridge for up to 4 days.
  • Chicken: Keeps well in the fridge for 3-4 days; reheat gently to avoid drying out.
  • Avocado sauce: Best used fresh, but can be stored in the fridge for up to 2 days in an airtight container. Squeeze extra lime juice on top to slow browning.

Frequently Asked Questions

Here are some common questions about the Creamy Avocado Chicken Rice Bowl:

  • Can I use brown rice instead of white? Yes, just adjust the cooking time as brown rice takes longer to cook.
  • What else can I add to the bowl? Feel free to add any of your favorite vegetables, nuts, or seeds!
  • Is this recipe gluten-free? Absolutely, as long as you use gluten-free seasoning and sauces.
  • How can I make this dish spicier? Add chili powder or fresh jalapeños to the chicken seasoning.
  • Can I freeze the leftovers? Yes, the chicken and rice can be frozen, but the avocado sauce is best fresh.
  • What if my avocados are not ripe? Leave them at room temperature until they yield slightly to pressure.
  • Can I substitute the chicken for another protein? Yes! Feel free to use turkey, shrimp, or even plant-based proteins.
  • How do I know when the chicken is fully cooked? Use a meat thermometer to ensure it reaches an internal temperature of 165°F.

Nutrition Tips and Dietary Adaptations

This recipe can easily be adjusted to fit various dietary preferences:

  • Low-Carb: Use cauliflower rice instead of regular rice to reduce carbs.
  • Dairy-Free: The avocado sauce is naturally dairy-free, making this recipe suitable for those with lactose intolerance.
  • Protein Boost: Add more protein by incorporating beans or legumes.

Essential Equipment

To make your cooking experience even smoother, here’s a list of equipment you’ll need:

  • Skillet: A good non-stick skillet is perfect for cooking the chicken.
  • Pot: Use a medium pot for cooking the rice.
  • Blender or Food Processor: Essential for making that creamy avocado sauce.
  • Meat Thermometer: To ensure your chicken is cooked perfectly!

Serving Suggestions

When it comes to enjoying your Creamy Avocado Chicken Rice Bowl, here are a few serving suggestions to elevate your meal:

  • Add a side of fresh green salad for extra crunch and nutrition.
  • Serve with warm tortillas for a fun twist.
  • Pair with a refreshing drink, such as iced tea or lemonade.

Ready to dive in? The Creamy Avocado Chicken Rice Bowl is more than just a meal; it’s a celebration of flavors, textures, and the joy of cooking. Embrace your inner chef and enjoy this delightful dish tonight!

Creamy Avocado Chicken Rice Bowl

Prep Time 10 minutes
Cook Time 30 minutes
Total Time 40 minutes
Servings 4 servings
Calories 550
A delicious and nutritious bowl combining tender chicken, creamy avocado sauce, and fluffy rice, perfect for a quick and satisfying meal.

Ingredients

Rice

  • 1 cup uncooked jasmine or basmati rice

Chicken

  • 2 pieces boneless, skinless chicken breasts (about 1 pound total)

Avocado

  • 2 pieces ripe avocados

Olive Oil

  • 1 tablespoon extra virgin olive oil

Lime

  • 1 piece lime (juice for sauce)

Seasonings

  • to taste Salt and pepper
  • 1 teaspoon garlic powder
  • 1 teaspoon paprika

Optional toppings

  • optional Fresh cilantro, cherry tomatoes, black beans, corn, shredded cheese, hot sauce

Instructions 

  • Rinse rice and cook with water and salt until water is absorbed, then let sit covered for 5 minutes.
  • Season chicken with salt, pepper, garlic powder, and paprika; cook in a skillet with olive oil until golden and cooked through, then rest and slice.
  • Blend avocados with lime juice, salt, and water until smooth to make the sauce.
  • Assemble bowls starting with rice, add sliced chicken, drizzle with avocado sauce, and top with optional garnishes.

Notes

Feel free to customize with your favorite toppings for added flavor and nutrition.
Calories: 550kcal
Cost: $15
Course: Main Course
Cuisine: Fusion
Keyword: Avocado, Chicken, rice

Kickstart Your Day with This Berry and Banana Smoothie

If you’re looking for a quick, nutritious, and delicious way to fuel your mornings, you’ve landed in the right spot! This Berry and Banana Smoothie is not just another drink; it’s a delightful blend of flavors that packs a punch of nutrients. With a vibrant mix of berries, banana, and yogurt, it’s perfect for breakfast or a midday snack. Let’s dive into why this recipe is a keeper and how you can whip it up in no time.

Why You’ll Love This Recipe

There are many reasons to adore this Berry and Banana Smoothie. Here are just a few:

  • Quick and Easy: This recipe takes just minutes to prepare, making it ideal for busy mornings.
  • Nutritious Boost: Packed with vitamins and antioxidants from berries, this smoothie supports your immune system.
  • Customizable: You can easily swap ingredients based on what you have on hand or your dietary preferences.
  • Thick and Creamy: The addition of Greek yogurt gives this smoothie a satisfying texture without extra calories.
  • Deliciously Satisfying: The sweet flavors of banana and berries make every sip enjoyable!

Ingredients You’ll Need

Let’s gather what you need to make this delicious smoothie:

  • 4 Ice cubes
  • 1 Banana (peeled)
  • 1 cup Strawberries (fresh or frozen)
  • 1 cup Blueberries (fresh or frozen)
  • 1 cup Raspberries (fresh or frozen)
  • ½ cup Orange juice
  • ¾ cup Fat-free Strawberry Greek yogurt
  • ½ teaspoon Agave nectar or honey (optional)
  • 1 Tablespoon Ground flax seed (optional)
  • 1 Tablespoon Wheat germ (optional)

How to Make Your Berry and Banana Smoothie

Side view of a thick berry and banana smoothie, showcasing fresh strawberries and blueberries on top.

Follow these simple steps to create your smoothie:

  1. In a blender, add the ice cubes and crush them until finely crushed.
  2. Add the banana, strawberries, blueberries, raspberries, orange juice, and Greek yogurt to the blender.
  3. If you’re using them, add the agave nectar, ground flax seed, and wheat germ.
  4. Puree all the ingredients until smooth.
  5. Serve immediately and enjoy your refreshing drink!

Pro Tips for the Perfect Smoothie

Here are some expert insights to elevate your smoothie game:

  • Frozen Fruits: Using frozen berries or bananas can create a thicker, colder smoothie without needing extra ice.
  • Protein Boost: Add a scoop of your favorite protein powder or nut butter for extra energy and satisfaction.
  • Flavor Variations: Experiment with different fruits like mango or pineapple for a tropical twist.
  • Sweetness Control: Adjust the level of sweetness by altering the amount of honey or agave nectar.
  • Yogurt Swap: Try different flavors of Greek yogurt for additional taste variations.
  • Nutty Crunch: Add a handful of nuts or seeds for texture and healthy fats.
  • Herbal Infusion: A mint or basil leaf can add a refreshing herbal note to your smoothie.
  • Superfood Add-ins: Consider adding chia seeds or spirulina for extra nutritional benefits.

Common Mistakes and Troubleshooting

Don’t let these common pitfalls ruin your smoothie experience:

  • Pulverizing Too Long: Blending too long can cause the smoothie to become warm. Blend just until smooth.
  • Too Thick: If your smoothie is too thick, add a splash more orange juice or water to reach your desired consistency.
  • Overly Sweet: If it’s too sweet, balance it out with a bit of lemon juice or add more yogurt.
  • Unbalanced Flavors: Taste your smoothie before serving to adjust sweetness or acidity as needed.

Delicious Variations to Try

Mix things up with these fun variations:

  • Tropical Paradise: Replace the berries with pineapple and mango for a tropical vibe.
  • Green Machine: Add spinach or kale for a nutrient boost without altering the flavor.
  • Chocolate Delight: Mix in cocoa powder or chocolate protein powder for a chocolatey twist.
  • Nutty Banana: Add peanut butter for a creamy, nutty flavor that’s incredibly satisfying.

Storage and Make-Ahead Instructions

This smoothie is best enjoyed fresh, but here are some tips for storing:

  • Make-Ahead: Prep the ingredients the night before. Keep them in the fridge and blend in the morning.
  • Freezing: You can freeze your smoothie in an airtight container for up to 3 months. Thaw it overnight in the fridge before serving.
  • Freshness Tip: If you have leftovers, store them in the fridge in a sealed container for up to 24 hours. Give it a good shake before drinking!

Frequently Asked Questions

Got questions? We’ve got answers! Here are some common queries:

  • Can I use other fruits? Absolutely! Feel free to mix in your favorites or what’s in season.
  • Is it okay to skip the yogurt? Yes, but keep in mind it might change the texture. You can use dairy-free yogurt as a substitute.
  • How can I make it vegan? Use plant-based yogurt and skip the honey, opting for agave nectar instead.
  • What if I don’t have flaxseed? You can substitute with chia seeds or simply omit them.
  • Can I add greens? Definitely! Spinach or kale can be blended in without overpowering the taste.
  • How do I adjust the thickness? Add more yogurt for thickness or more juice for a thinner consistency.
  • What’s the best way to clean my blender? Blend warm soapy water in the blender right after use; it makes cleaning a breeze!
  • Can I add ice to a frozen smoothie? If using frozen fruits, you may not need extra ice. Blend to your desired consistency first.

Nutritional Tips and Dietary Adaptations

This smoothie is naturally packed with nutrients, but here are a few tips to enhance its health benefits:

  • Low-Calorie Option: Use unsweetened almond milk instead of orange juice for fewer calories.
  • Fiber Boost: Incorporate oats for an added fiber kick, which helps keep you full longer.
  • Protein Power: Greek yogurt is great, but you can also add silken tofu for a dairy-free protein source.
  • Low-Sugar Version: Use less fruit or opt for berries that are lower in sugar, like blackberries.

Essential Equipment Recommendations

To make your smoothie-making process easier, here’s what you’ll need:

  • High-Speed Blender: A quality blender ensures a smooth texture without any chunks.
  • Measuring Cups: Accurate measurements help with consistency every time.
  • Smoothie Cups: Invest in insulated smoothie cups for on-the-go enjoyment.

Serving Suggestions

Enjoy your Berry and Banana Smoothie in style with these serving ideas:

  • Garnish: Top with a few whole berries or a sprinkle of granola for added crunch.
  • Pair it: Serve alongside whole-grain toast or a handful of nuts for a balanced meal.
  • Share: It’s fun to make smoothies for friends! Double or triple the recipe for gatherings.

Final Thoughts

So there you have it! This Berry and Banana Smoothie is not only delicious, but it’s also a fantastic way to start your day or power through your afternoon slump. With its vibrant flavors and health benefits, it’s a recipe you’ll love to keep in your kitchen repertoire. Remember, cooking should be fun, so don’t hesitate to experiment with flavors and ingredients. Happy blending!

Berry And Banana Smoothie

Prep Time 5 minutes
Total Time 5 minutes
Servings 2 cups
Calories 250
A delicious and healthy smoothie packed with berries and bananas, perfect for a quick breakfast or snack.

Ingredients

Ice

  • 4 pieces Ice cubes

Fruits

  • 1 piece Banana peeled
  • 1 cup Strawberries
  • 1 cup Blueberries
  • 1 cup Raspberries

Liquid

  • ½ cup Orange juice
  • ¾ cup Strawberry Greek yogurt fat free

Sweetener

  • ½ teaspoon Agave nectar or honey

Add-ins (optional)

  • 1 tablespoon Ground flax seed (optional)
  • 1 tablespoon Wheat germ (optional)

Instructions 

  • In a blender, crush ice cubes.
  • Add remaining ingredients and puree until smooth.
  • Serve immediately.

Notes

For a creamier texture, add a splash of milk or more yogurt.
Calories: 250kcal
Cost: $8
Course: Breakfast
Cuisine: American
Keyword: Banana, Berries, Smoothie

Experience the Joy of Cooking with This Refreshing Greek Chicken Salad

Welcome to your new favorite weeknight dinner! This Greek Chicken Salad is not just a meal; it’s a celebration of fresh ingredients, vibrant flavors, and a healthy lifestyle. Perfect for busy evenings, this recipe combines tender grilled chicken, crispy veggies, and a tangy dressing that will make your taste buds dance. Let’s dive in and discover why this recipe will become your go-to dish!

Why You’ll Love This Recipe

  • Quick and Easy: This Greek chicken salad can be prepared in under 30 minutes, making it ideal for a weeknight dinner.
  • Flavorful and Fresh: Packed with fresh veggies, herbs, and a zesty dressing that brings everything together for a delicious bite.
  • Healthy Ingredients: With lean protein from the chicken and plenty of colorful veggies, this dish is nutritious and satisfying.
  • Versatile: Customize the salad with your favorite ingredients or make it your own with various substitutions.
  • Meal Prep Friendly: Great for making ahead and storing, allowing you to enjoy it throughout the week.

Ingredients for Your Greek Chicken Salad

Gather the following ingredients for a delightful Greek Chicken Salad:

  • 600 g Chicken thighs: Skinless and boneless for a healthier choice.
  • 200 g Feta cheese: Crumbled, adds a creamy, salty flavor.
  • Juice of one lemon: Freshly squeezed for the best taste.
  • 400 g Plum tomatoes: Chopped for a juicy texture.
  • 2 Cucumbers: Hollowed and thinly sliced for crunch.
  • 5 Mixed peppers: Sliced into chunks for color and sweetness.
  • 30 g Kalamata olives: Pitted, to add a briny flavor.
  • 3 tbsp Yogurt: For marinating the chicken.
  • 1 tbsp + 2 tsp Oregano: Essential for that Mediterranean flavor.
  • 4 tbsp Extra virgin olive oil: A key ingredient in the dressing.
  • 450 g 0% fat yogurt: To serve, creating a creamy base.

Step-by-Step Instructions to Make Greek Chicken Salad

Detailed view of Greek Chicken Salad featuring chicken, vegetables, and feta cheese.

Follow these simple steps to create a mouthwatering Greek Chicken Salad:

  1. Marinate the Chicken: In a bowl, combine 3 tbsp yogurt, 1 tbsp oregano, the juice of half a lemon, and a pinch of salt and pepper. Add chicken thighs and ensure they are well-coated in the marinade. Cover with cling film and refrigerate for at least 2 hours.
  2. Cook the Chicken: Heat a griddle pan over medium-high heat and add a spray of oil. Add the marinated chicken to the pan and cook for about 5 minutes on each side, or until the internal temperature reaches 165°F (74°C). Allow it to cool before slicing into chunks.
  3. Prepare the Dressing: In a small bowl, whisk together 4 tbsp extra virgin olive oil, the juice of the remaining half lemon, 2 tsp oregano, and 1 tsp sea salt. This will be your flavorful dressing.
  4. Assemble the Salad: In a large bowl, combine the chopped tomatoes, sliced cucumbers, mixed peppers, and Kalamata olives. Add the cooled grilled chicken chunks and drizzle the dressing over the top.
  5. Serve: Top with crumbled feta cheese and a big scoop of yogurt. Toss gently to combine and enjoy!

Pro Tips for the Perfect Greek Chicken Salad

  • Marinate Longer: For even more flavor, marinate the chicken overnight.
  • Grill for Extra Flavor: If you have a grill, use it for cooking the chicken to add a smoky flavor.
  • Fresh Herbs: Add fresh parsley or mint for an extra burst of freshness.
  • Use Seasonal Veggies: Substitute or add seasonal vegetables based on what’s available for a unique twist.
  • Balance the Flavors: Taste and adjust the dressing; add more lemon juice or olive oil to suit your preference.
  • Texture Matters: Ensure all vegetables are cut uniformly for a consistent texture and appearance.
  • Leftover Chicken: Use leftover grilled chicken from a previous meal to save time on preparation.
  • Make it Vegan: Substitute the chicken with chickpeas or grilled tofu and use vegan yogurt and feta.

Common Mistakes and Troubleshooting

Here are some common pitfalls to avoid when making your Greek Chicken Salad:

  • Overcooking Chicken: Ensure the chicken is cooked just until it reaches the correct temperature to avoid dryness.
  • Ignoring the Marinade Time: Skipping marination will result in less flavorful chicken; always allow enough time.
  • Not Tasting Dressing: Always taste your dressing before adding it to the salad so you can adjust flavors as needed.

Delicious Variations

Feel free to mix things up with these variations:

  • Greek Chicken Wrap: Use the salad as a filling for a wrap with pita bread.
  • Quinoa Greek Salad: Add cooked quinoa for a heartier option.
  • Spicy Chicken Salad: Add a pinch of red pepper flakes to the marinade for a spicy kick.
  • Fruit Twist: Incorporate fruits like watermelon or strawberries for sweetness.

Storage and Make-Ahead Instructions

This Greek Chicken Salad is perfect for meal prep:

  • Store leftovers in an airtight container in the refrigerator for up to 3 days.
  • Keep the salad and dressing separate until ready to serve to maintain freshness.
  • For meal prep, divide the salad into portions and store in separate containers.

Frequently Asked Questions (FAQs)

  • Can I use chicken breasts instead of thighs? Yes, boneless chicken breasts can be used but may require shorter cooking time.
  • Is this salad gluten-free? Yes, all ingredients are gluten-free, but check labels on packaged items.
  • Can I make this salad vegan? Absolutely! Substitute chicken with chickpeas or tofu and use vegan yogurt and cheese.
  • How can I make the salad spicier? Add red pepper flakes or chopped jalapeños to the salad or dressing.
  • What other veggies can I add? Feel free to add artichokes, zucchini, or radishes for extra flavor.
  • How do I know when the chicken is cooked? Use a meat thermometer to check for an internal temperature of 165°F (74°C).
  • Can I make the dressing in advance? Yes, the dressing can be made a few days ahead and stored in the refrigerator.
  • How can I make this salad more filling? Add grains like quinoa or farro for added texture and nutrition.

Nutrition Tips and Dietary Adaptations

This Greek Chicken Salad is not only delicious but also packed with nutrients:

  • Protein-Packed: Chicken provides lean protein, essential for muscle health.
  • Rich in Vitamins: Colorful veggies contribute vitamins A and C, crucial for immune health.
  • Healthy Fats: Olive oil and feta offer healthy fats that support heart health.

Recommended Equipment

Make your cooking experience smooth with the right tools:

  • Griddle Pan: Ideal for grilling chicken to achieve perfect char and flavor.
  • Mixing Bowls: Use various sizes for marinating and mixing ingredients.
  • Meat Thermometer: To ensure chicken is cooked perfectly and safely.

Serving Suggestions

This Greek Chicken Salad pairs wonderfully with:

  • Pita Bread: Soft, warm pita is perfect for scooping up salad.
  • Rice or Quinoa: Serve over a bed of warm rice or quinoa for a filling meal.
  • Grilled Vegetables: Add grilled zucchini or eggplant on the side for extra flavor.

In conclusion, this Greek Chicken Salad is not just a meal; it’s an invitation to explore vibrant Mediterranean flavors and enjoy cooking again. Remember, cooking should be an enjoyable experience, and this recipe makes it easy to create something delicious without the stress. So roll up your sleeves, gather your ingredients, and let’s make some magic in the kitchen!

Greek Chicken Salad

Prep Time 20 minutes
Cook Time 10 minutes
Total Time 30 minutes
Servings 4 servings
Calories 650
A fresh and flavorful Greek Chicken Salad combining marinated grilled chicken with crisp vegetables and creamy yogurt dressing.

Ingredients

Protein

  • 600 g Chicken thighs

Dairy

  • 200 g feta
  • 30 g Kalamata olives
  • 3 tbsp yoghurt
  • 450 g 0 fat yogurt to serve

Produce

  • Juice of one lemon lemon juice
  • 400 g plum tomatoes
  • 2 cucumbers cucumbers, hollowed and thinly sliced
  • 5 mixed peppers mixed peppers, sliced into chunks

Seasonings & Oils

  • 4 tbsp extra virgin olive oil
  • 1 tbsp oregano
  • 2 tsp oregano
  • 1 tbsp sea salt

Instructions 

  • Marinate chicken with 3 tbsp yogurt, 1 tbsp oregano, lemon juice, salt, and pepper for 2 hours.
  • Grill marinated chicken until cooked through, then cool and slice into chunks.
  • Whisk together olive oil, lemon juice, oregano, and salt to make dressing.
  • Combine salad vegetables, grilled chicken, and dressing in a bowl. Serve with yogurt.

Notes

Use fresh ingredients for best flavor and serve immediately.
Calories: 650kcal
Cost: $15
Course: Salad
Cuisine: Greek
Keyword: Chicken, Salad