Author

Steven

Browsing

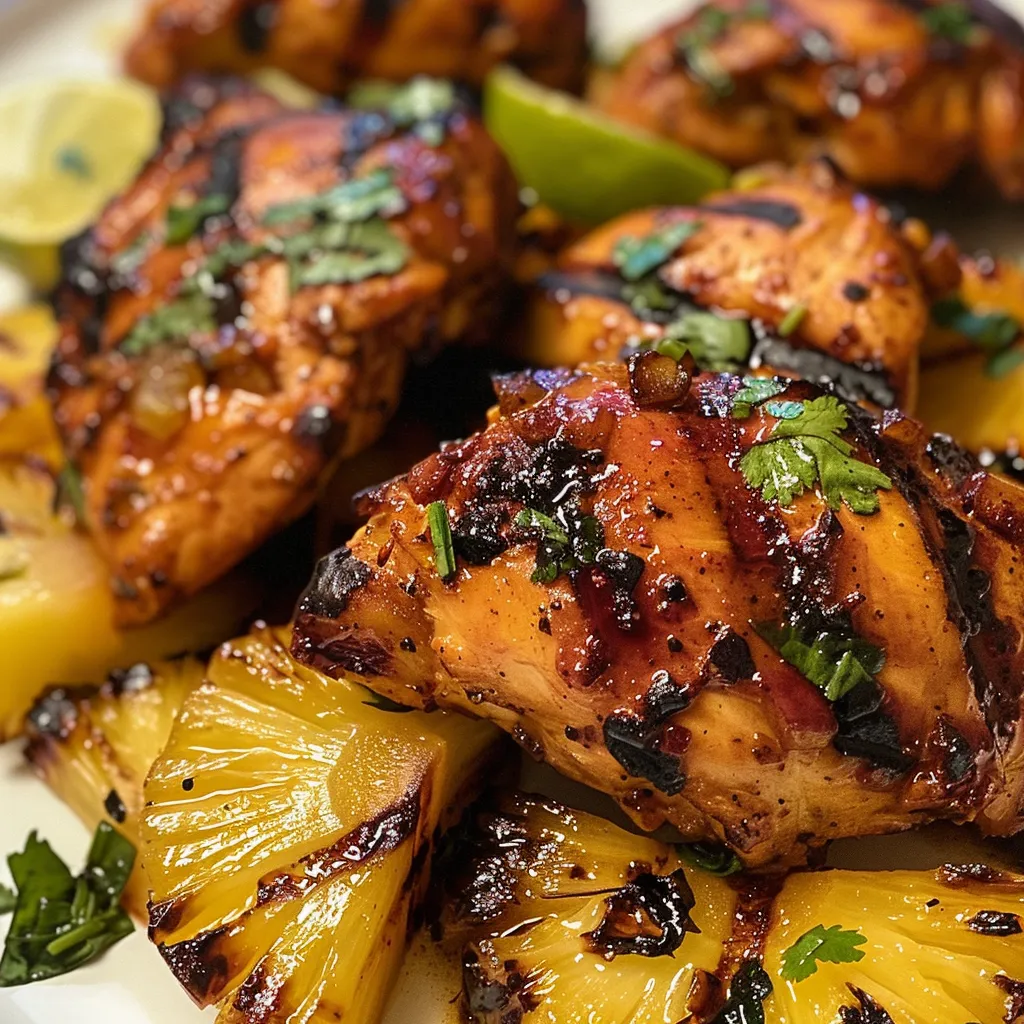
Welcome to your new favorite weeknight dinner! This Grilled Pineapple Chicken recipe is not only a breeze to prepare, but it also fills your kitchen with mouthwatering aromas and brings a tropical twist to your table. Imagine juicy chicken breasts marinated in a delightful blend of spices, topped with sweet, caramelized pineapple. Whether you’re cooking for the family or hosting friends, this dish is sure to impress and satisfy.

In this comprehensive guide, we’ll explore everything you need to know to make the perfect grilled pineapple chicken that not only tastes amazing but also makes you feel like a culinary rockstar. Let’s dive into the details!

Why You’ll Love This Recipe

  • Quick and Easy: This recipe can be made in under 30 minutes, perfect for busy weeknights.
  • Flavorful Marinade: The combination of pineapple glaze and spices adds a burst of sweetness and tanginess that elevates the dish.
  • Healthy Option: Using lean chicken breasts and fresh ingredients makes this a nutritious choice for dinner.
  • Versatile: You can easily customize the recipe with different spices or ingredients based on your preferences.
  • A Crowd-Pleaser: The sweet and savory flavors are loved by both kids and adults, making it a hit at any gathering.

Ingredients Breakdown

Here’s what you’ll need to make your delicious grilled pineapple chicken along with some helpful substitutions:

  • 2 boneless, skinless chicken breasts: For best results, use fresh chicken breasts. If you prefer, you can substitute with boneless chicken thighs for a juicier option.
  • 1 tablespoon olive oil: This helps to keep the chicken moist while grilling. Feel free to use avocado oil for a different flavor.
  • 1 teaspoon garlic powder: Adds depth to the marinade. Fresh minced garlic works great too!
  • 1 teaspoon onion powder: Enhances the savory taste. You can also use finely chopped onions if you prefer.
  • 1 teaspoon paprika: Provides a subtle smokiness. Smoked paprika can give an even richer flavor.
  • 1/2 teaspoon salt: Essential for bringing out the flavors. Adjust according to your taste preference.
  • 1/4 teaspoon black pepper: Adds a mild kick; feel free to use cayenne pepper for extra heat.
  • 1 cup fresh pineapple, chopped: The star of the dish! You can use canned pineapple in its own juice, but fresh is best for flavor.
  • 1/4 cup honey: This sweetener balances the tanginess of the chicken and pineapple. Maple syrup can be a great vegan substitute.
  • 2 tablespoons lime juice: Fresh lime juice brightens the dish. Lemon juice can be used in a pinch.
  • 1 tablespoon soy sauce: Adds umami depth. Use tamari for a gluten-free option.
  • 1 tablespoon fresh cilantro, chopped: Garnish that adds freshness. You can omit this if you’re not a fan of cilantro.

How to Make Grilled Pineapple Chicken

Follow these simple steps to create your delightful dish:

  1. Preheat the grill: Set your grill to medium-high heat. Ensure the grates are clean and lightly oiled to prevent sticking.
  2. Prepare the chicken: Trim any excess fat from the chicken breasts and place them on a clean cutting board.
  3. Make the seasoning mixture: In a small bowl, combine olive oil, garlic powder, onion powder, paprika, salt, and black pepper. Mix until well combined.
  4. Marinate the chicken: Rub the seasoning mixture evenly over both sides of the chicken breasts. Let them marinate for at least 5 minutes.
  5. Prepare the pineapple glaze: Chop the fresh pineapple into bite-sized chunks. In a separate bowl, mix chopped pineapple, honey, lime juice, soy sauce, and cilantro.
  6. Grill the chicken: Place the chicken breasts on the preheated grill. Cook for about 6-7 minutes on each side, checking for an internal temperature of 165°F (74°C).
  7. Simmer the glaze: While the chicken cooks, transfer the pineapple glaze mixture to a saucepan over medium heat. Bring to a simmer and cook for 5-7 minutes, stirring occasionally until it thickens.
  8. Serve: Once the chicken is fully cooked, remove it from the grill and place it on a plate. Brush generously with the pineapple glaze and garnish with extra cilantro.

Pro Tips for Perfect Grilled Pineapple Chicken

Side view of succulent grilled chicken topped with fresh pineapple pieces.
  • Use a meat thermometer: Ensure your chicken is cooked perfectly by checking the internal temperature.
  • Let it rest: Allow the grilled chicken to rest for a few minutes before slicing to maintain juiciness.
  • Experiment with spices: Feel free to adjust the seasoning to match your taste preferences. A pinch of chili powder can add a nice kick!
  • Double the glaze: Make extra pineapple glaze to use as a dipping sauce on the side.
  • Prep ahead: Marinate the chicken in advance to save time during dinner prep.
  • Use fresh pineapple: Fresh pineapple has a superior flavor and texture compared to canned.
  • Grill with indirect heat: If your grill has hot spots, move the chicken to a cooler area to prevent burning.
  • Pair with sides: This dish goes perfectly with rice, grilled veggies, or a fresh salad.

Common Mistakes and Troubleshooting

Even the best cooks can face challenges. Here are some common mistakes and how to avoid them:

  • Chicken sticks to the grill: Ensure the grill is preheated and well-oiled. Marinating the chicken also helps.
  • Overcooked chicken: Use a meat thermometer to check for doneness. Remove the chicken immediately once it reaches 165°F (74°C).
  • Glaze too thick: If your glaze thickens too much, add a splash of water to achieve the desired consistency.
  • Pineapple not caramelized: Make sure the grill is hot enough to achieve that beautiful caramelization.

Recipe Variations

Mix it up with these exciting variations:

  • Spicy Pineapple Chicken: Add chopped jalapeños to the marinade for a spicy kick.
  • Teriyaki Twist: Substitute soy sauce with teriyaki sauce for a sweeter flavor profile.
  • Herb-Infused: Incorporate fresh herbs like rosemary or thyme into the marinade for an aromatic twist.
  • Grilled Veggies: Toss some bell peppers and zucchini on the grill for a colorful and nutritious side.

How to Store Grilled Pineapple Chicken

If you have leftovers (which is rare!), here’s how to store your delicious creation:

  • Refrigeration: Store in an airtight container in the fridge for up to 3 days.
  • Freezing: You can freeze cooked chicken for up to 3 months. Thaw in the refrigerator before reheating.
  • Reheating: Heat gently in the microwave or on the stove to avoid drying out the chicken.

Frequently Asked Questions

  • Can I use frozen chicken? Yes, but make sure to thaw it completely before marinating and grilling.
  • How can I make this dish gluten-free? Use gluten-free soy sauce or tamari in the marinade.
  • What can I serve with grilled pineapple chicken? It pairs well with rice, quinoa, or a fresh green salad.
  • Can I cook this on a stovetop grill pan? Absolutely! Just preheat the pan and follow the same cooking instructions.
  • Is this recipe suitable for meal prep? Yes, it can be made ahead and stored for easy meals throughout the week.
  • How long should I marinate the chicken? A minimum of 5 minutes is recommended, but longer (up to 2 hours) will enhance the flavor.
  • Can I grill the pineapple separately? Yes, grilling pineapple slices enhances their sweetness and caramelization.
  • What if I don’t have a grill? You can bake the chicken in the oven at 400°F (200°C) for about 25-30 minutes.

Nutrition Tips and Dietary Adaptations

This recipe is a great source of protein while being low in carbs. To adapt it for various dietary needs:

  • Low-carb: Pair with a side of steamed vegetables instead of rice.
  • Keto-friendly: Use erythritol or stevia as a sugar substitute in the glaze.
  • Vegan: Substitute chicken with tofu or tempeh and use agave syrup instead of honey.

Essential Equipment Recommendations

To make this recipe a success, consider having the following tools:

  • Grill: A good quality grill, whether gas or charcoal, is essential for perfect grilling.
  • Meat thermometer: This tool helps you achieve the perfect doneness.
  • Mixing bowls: Use for preparing the marinade and glaze.
  • Basting brush: Perfect for applying the glaze while grilling.

Serving Suggestions

Here are some delightful ways to serve your grilled pineapple chicken:

  • On a bed of rice: Serve over fluffy jasmine or brown rice for a wholesome meal.
  • With a side salad: A fresh mango or avocado salad complements the tropical flavors.
  • As tacos: Shred the chicken and serve in corn tortillas with avocado and salsa.
  • With grilled veggies: Add a side of grilled asparagus or corn on the cob to complete the meal.

In conclusion, this grilled pineapple chicken recipe is not just a meal; it’s an experience that brings joy and flavor to your dining table. With its simple preparation and delicious results, you’ll find yourself making it time and again. Enjoy your cooking and happy grilling!

Grilled Pineapple Chicken

Prep Time 10 minutes
Cook Time 15 minutes
Total Time 25 minutes
Servings 4 servings
Calories 350
A delicious combination of grilled chicken and sweet pineapple glaze, perfect for a flavorful summer meal.

Ingredients

Protein

  • 2 pieces boneless, skinless chicken breasts
  • 1 tablespoon olive oil
  • 1 teaspoon garlic powder
  • 1 teaspoon onion powder
  • 1 teaspoon paprika
  • 1/2 teaspoon salt
  • 1/4 teaspoon black pepper
  • 1 cup fresh pineapple, chopped
  • 1/4 cup honey
  • 2 tablespoons lime juice
  • 1 tablespoon soy sauce
  • 1 tablespoon fresh cilantro, chopped

Instructions 

  • Preheat grill to medium-high and prepare chicken with seasoning mixture, then marinate for 5 minutes.
  • Chop pineapple and mix with honey, lime juice, soy sauce, and cilantro to make glaze.
  • Grill chicken for 6-7 minutes per side until internal temperature reaches 165°F (74°C).
  • Simmer pineapple glaze for 5-7 minutes until slightly thickened.
  • Brush grilled chicken with glaze, serve with extra on the side, and garnish with cilantro.

Notes

Marinate the chicken briefly for extra flavor and ensure proper grilling for safety.
Calories: 350kcal
Cost: $15
Course: Main Course
Cuisine: American
Keyword: Chicken, Pineapple

Unlock the Joy of Cold Sesame Noodles

If you’re on the hunt for a quick, delicious meal that packs a flavor punch, look no further than these Cold Sesame Noodles. In just 7 minutes, you can whip up a dish that’s not only satisfying but also versatile enough to suit any palate. Whether you’re preparing a solo dinner or impressing guests, this recipe promises an exciting culinary experience that turns simple ingredients into a delightful feast.

Why You’ll Love This Cold Sesame Noodles Recipe

This recipe for cold sesame noodles is a lifesaver for busy weeknights and lazy weekends alike. Here are five compelling reasons you’ll adore this dish:

  • Speedy Preparation: With only 7 minutes of cooking time, you can enjoy a flavorful meal without spending hours in the kitchen.
  • Easy to Customize: This recipe serves as a blank canvas; feel free to add your favorite proteins or vegetables for a personalized touch.
  • Perfect for Meal Prep: Make a big batch ahead of time and store it in the fridge for quick lunches or dinners throughout the week.
  • Flavor Explosion: The combination of savory soy sauce, creamy tahini, and zesty ginger creates a symphony of flavors that will leave your taste buds dancing.
  • Health Benefits: Packed with wholesome ingredients, these noodles offer a nutritious option that doesn’t skimp on flavor.

Essential Ingredients for Cold Sesame Noodles

Gathering your ingredients is the first step to making these scrumptious noodles. Here’s what you’ll need:

  • Dried Noodles: 1 pound of spaghetti, linguine, or lo mein noodles work beautifully.
  • Soy Sauce: 1/4 cup adds that essential umami flavor.
  • Rice Vinegar: 2 tablespoons for a hint of tang.
  • Sesame Oil: 1 tablespoon enriches the dish with its nutty aroma.
  • Sweetener: 1 tablespoon of honey or maple syrup (for a vegan option) balances the flavors.
  • Fresh Ginger: 1 teaspoon, grated, for a fresh kick.
  • Garlic: 1 clove, minced, for an aromatic touch.
  • Red Pepper Flakes: Optional, but adds a delightful heat.
  • Tahini: 2 tablespoons bring creaminess to the sauce.
  • Water: 2 tablespoons to adjust the sauce’s consistency.
  • Garnishes: Chopped scallions and toasted sesame seeds for that finishing touch.

Step-by-Step Instructions for Making Cold Sesame Noodles

Juicy cold sesame noodles in a bowl, showcasing a glossy sauce and toppings.

Ready to get cooking? Follow these simple steps for a flawless dish:

  1. Cook the noodles according to package directions. Drain and rinse with cold water until completely cool.
  2. In a large bowl, whisk together the soy sauce, rice vinegar, sesame oil, honey or maple syrup, grated ginger, minced garlic, and red pepper flakes if using.
  3. In a separate small bowl, whisk together the tahini and water until smooth and creamy.
  4. Add the tahini mixture to the soy sauce mixture and whisk until well combined and smooth.
  5. Add the cooled noodles to the bowl with the sauce and toss gently until the noodles are evenly coated.
  6. Divide the noodles among serving bowls. Garnish with chopped scallions and toasted sesame seeds.
  7. Serve immediately or chill in the refrigerator for at least 30 minutes before serving for a colder dish.

Pro Tips for Perfect Cold Sesame Noodles

To ensure your cold sesame noodles are a hit, consider these expert insights:

  • Don’t Overcook Noodles: Follow package directions closely to avoid mushy noodles. Aim for al dente for the best texture.
  • Rinse Thoroughly: Rinsing the noodles helps to stop the cooking process and prevents them from clumping together.
  • Adjust Sauce Thickness: If your sauce is too thick, add a little more water until it reaches your desired consistency.
  • Add Protein: Toss in cooked chicken, shrimp, or tofu for a heartier meal.
  • Experiment with Vegetables: Add in sliced bell peppers, cucumbers, or carrots for extra crunch and nutrition.
  • Store Smart: Keep leftovers in an airtight container in the fridge for up to 3 days.
  • Chill Before Serving: For maximum flavor, let the noodles sit in the refrigerator for at least 30 minutes before serving.
  • Make It Spicy: Add more red pepper flakes or a drizzle of chili oil for a kick.

Common Mistakes and Troubleshooting

A few common pitfalls can derail your noodle-making experience, but don’t worry! Here’s how to avoid them:

  • Too Salty?: If your noodles are too salty, add a splash of rice vinegar to balance the flavor.
  • Sticky Noodles: If your noodles clump together, toss them with a little sesame oil after rinsing.
  • Not Enough Flavor?: Taste and adjust the sauce ingredients to suit your preference; a little more soy sauce or honey can make a big difference.
  • Too Thick?: If your sauce is too thick, thin it out with a bit of water or more sesame oil.

Delicious Variations to Try

Switch things up with these fun variations:

  • Spicy Peanut Sauce: Substitute tahini with creamy peanut butter and add Sriracha for a spicy twist.
  • Veggie-Packed Noodles: Toss in steamed broccoli, snap peas, or bell peppers for added nutrition.
  • Sesame Noodle Salad: Serve the noodles cold on a bed of mixed greens for a refreshing salad.
  • Asian-Inspired Grain Bowl: Use these noodles as a base for a grain bowl topped with grilled chicken and pickled vegetables.

Storage and Make-Ahead Instructions

If you’re thinking ahead, here’s how to store and prepare your cold sesame noodles:

  • Make Ahead: You can prepare the sauce in advance and store it in the refrigerator for up to a week.
  • Leftovers: Store any leftover noodles in an airtight container in the fridge for up to 3 days.
  • Reheating: These noodles are best enjoyed cold, but you can briefly reheat them in the microwave if desired.

Frequently Asked Questions About Cold Sesame Noodles

Got questions? Here are some answers to common inquiries:

  • Can I make cold sesame noodles ahead of time? Yes! These noodles taste even better after sitting in the fridge for a bit, allowing the flavors to meld.
  • What kind of noodles are best for cold sesame noodles? Thin wheat noodles, like lo mein or spaghetti, work best, but feel free to use whatever you have on hand.
  • How can I adjust the spice level? Add more red pepper flakes or a drizzle of chili oil for extra heat.
  • Can I use other types of vinegar? While rice vinegar is preferred, you can substitute with apple cider vinegar in a pinch.
  • Is this recipe vegan? Yes, simply use maple syrup instead of honey for a vegan-friendly option.
  • How do I store leftovers? Keep them in an airtight container in the fridge for up to 3 days.
  • Can I freeze these noodles? It’s not recommended as the texture may change, but you can freeze the sauce separately.
  • What can I serve with cold sesame noodles? These noodles pair well with grilled meats, tofu, or a fresh green salad.

Nutritional Tips and Dietary Adaptations

These cold sesame noodles are not only delicious but also relatively healthy. Here are some tips to enhance the nutritional value:

  • Whole Grain Noodles: Opt for whole wheat noodles to increase fiber content.
  • Load Up on Veggies: Increase your veggie intake by adding extra vegetables or serving with a side salad.
  • Low-Sodium Soy Sauce: Choose low-sodium soy sauce to reduce salt intake.
  • Protein Boost: Adding grilled chicken, shrimp, or tofu can enhance the protein content of your meal.

Equipment Recommendations

Here’s what you’ll need to make this recipe a breeze:

  • Large Pot: For boiling the noodles.
  • Whisk: To mix your sauce ingredients thoroughly.
  • Mixing Bowls: At least two for different components of the dish.
  • Measuring Cups and Spoons: For accurate ingredient measurements.

Serving Suggestions

Make your meal even more delightful with these serving ideas:

  • Garnish Generously: Top with extra scallions and sesame seeds for added flavor and crunch.
  • Pair with Proteins: Serve alongside grilled chicken, shrimp, or a protein of your choice for a complete meal.
  • Accompany with a Refreshing Drink: Enjoy with a chilled green tea or a fruity Asian-inspired beverage.

Conclusion

In just 7 minutes, you can create a dish that’s not only quick and easy but also bursting with flavor and versatility. These cold sesame noodles are perfect for any occasion, whether it’s a weeknight dinner or a meal prep option. With the ability to customize ingredients and flavors, you’ll find yourself coming back to this delightful recipe time and again. So, roll up your sleeves, gather your ingredients, and let’s make cooking fun and enjoyable!

Cold Sesame Noodles Experience Pure Bliss in 7 Minutes

Prep Time 10 minutes
Cook Time 5 minutes
Total Time 15 minutes
Servings 4 servings
Calories 350
Enjoy a quick and flavorful cold sesame noodle dish that's perfect for a fast lunch or dinner.

Ingredients

Dried Noodles

  • 1 pound dried noodles such as spaghetti, linguine, or lo mein noodles
  • 0.25 cup soy sauce
  • 2 tablespoons rice vinegar
  • 1 tablespoon sesame oil
  • 1 tablespoon honey or maple syrup for vegan
  • 1 teaspoon grated fresh ginger
  • 1 clove garlic, minced
  • 0.25 teaspoon red pepper flakes (optional)
  • 2 tablespoons tahini sesame paste
  • 2 tablespoons water
  • Chopped scallions, for garnish
  • Toasted sesame seeds, for garnish

Instructions 

  • Cook noodles according to package, rinse with cold water, and drain.
  • Whisk soy sauce, rice vinegar, sesame oil, honey, ginger, garlic, and red pepper flakes.
  • Mix tahini and water until smooth, then combine with the sauce mixture.
  • Toss noodles with the sauce until evenly coated, then garnish with scallions and sesame seeds.
  • Serve immediately or chill for 30 minutes for a colder dish.

Notes

For extra flavor, toast the sesame seeds before garnishing.
Calories: 350kcal
Cost: $10
Course: Main Course
Cuisine: Asian
Keyword: Noodles

Discover the Joy of Chocolate Banana Pops

If you’re looking for a delightful way to cool down on a hot day, you’ve found it! This Frozen Chocolate Banana Pops recipe is your ticket to a quick, satisfying treat that combines the natural sweetness of bananas with the rich flavor of chocolate. With just four simple ingredients, these pops are not only easy to make but also fun to customize. Let’s dive into why you’ll love this recipe and how to make it your own!

Why You’ll Love This Recipe

There are countless reasons to fall in love with these chocolate banana pops:

  • Quick and Easy: This recipe takes less than 30 minutes of active preparation, making it perfect for busy days.
  • Healthy Treat: Bananas are naturally sweet and packed with potassium, offering a guilt-free indulgence.
  • Dairy-Free Option: Using dairy-free chocolate chips makes this dessert suitable for various dietary preferences.
  • Customizable: Choose your favorite toppings (like nuts or sprinkles) to create your unique flavor.
  • Fun for All Ages: Kids and adults alike will enjoy making and eating these pops!

Ingredient Breakdown

Let’s take a closer look at the ingredients you’ll need:

  • Bananas: Look for ripe bananas with a few brown spots for maximum sweetness. You can also use frozen bananas for a creamier texture!
  • Dairy-Free Chocolate Chips: I love the Hu Kitchen brand for their rich flavor. Don’t hesitate to use your favorite brand!
  • Coconut Oil: This helps the chocolate melt and harden perfectly. You can substitute with vegetable oil if needed.
  • Sprinkles: A fun addition! Feel free to use colorful sprinkles or chopped nuts for extra texture.

Pro Tips for Perfect Chocolate Banana Pops

Side view of frozen chocolate banana pops, featuring a glossy chocolate coating and vibrant sprinkles.

To ensure your chocolate banana pops turn out perfectly, consider these expert insights:

  • Use a ripe banana: The riper the banana, the sweeter your pops will be.
  • Don’t skip the coconut oil: It helps the chocolate maintain a smooth consistency.
  • Freeze well: Ensure your bananas are completely frozen before dipping to prevent melting.
  • Coat thoroughly: Dip the bananas fully in chocolate for a rich flavor.
  • Experiment with toppings: Try crushed nuts, shredded coconut, or even a drizzle of peanut butter!
  • Store properly: Keep your pops in an airtight container to prevent freezer burn.
  • Use parchment paper: This prevents the pops from sticking to your plate or baking sheet.
  • Be patient: Allow the pops to freeze fully before serving for the best texture.

Common Mistakes and Troubleshooting

Here are some common pitfalls and how to avoid them:

  • Chocolate Seizing: If your chocolate hardens instead of melting, try adding a little more coconut oil to smooth it out.
  • Bananas are too soft: If your bananas are mushy, they won’t hold the popsicle stick well. Choose firm yet ripe bananas.
  • Not enough chocolate coverage: Dip the bananas while they’re still frozen, and use a spoon to help coat them thoroughly.

Variations to Try

Feeling adventurous? Here are some fun variations to mix up your chocolate banana pops:

  • Nutty Banana Pops: Roll the dipped bananas in crushed nuts for an added crunch.
  • Peanut Butter Swirl: Drizzle melted peanut butter over the chocolate coating before it sets.
  • Mint Chocolate: Add a few drops of peppermint extract to the melted chocolate for a minty twist.
  • Fruit and Nut Mix: Sprinkle dried fruit or mini marshmallows on top of the chocolate before freezing.

Storage and Make-Ahead Instructions

These pops are great for meal prep! Here’s how to store them:

  • Freezing: After preparing, place the pops in an airtight container, separating layers with parchment paper.
  • Refrigeration: If you plan to eat them within a few days, they can be kept in the fridge, but freezing is best for long-term storage.
  • Defrosting: Let them sit at room temperature for a few minutes for easy eating.

Frequently Asked Questions

Got questions? Here are some answers to common queries:

  • Can I use other fruits? Absolutely! Try strawberries or peaches for a fruity twist.
  • Do I need popsicle sticks? Not at all! You can serve them as banana bites without sticks.
  • How long do they last in the freezer? They can last up to two months if properly stored.
  • Can I use regular chocolate chips? Yes, just be mindful of dietary restrictions if serving to others.
  • Is this recipe kid-friendly? Definitely! Kids will love helping to dip and decorate their pops.
  • What if my chocolate hardens too fast? Just reheat it gently; it will melt back into a smooth consistency.
  • Can I use chocolate syrup instead of chocolate chips? Yes, but it may not set as firmly.
  • Can I make these ahead of time? Yes! They freeze wonderfully, making them a perfect make-ahead treat.

Nutrition Tips and Dietary Adaptations

For a healthier spin, consider these tips:

  • Low-Sugar Option: Use unsweetened chocolate chips or reduce the amount of chocolate.
  • High-Protein Boost: Dip in Greek yogurt instead of chocolate for a creamy, protein-rich alternative.
  • Vegan-Friendly: Ensure all ingredients, including chocolate, are vegan-certified.

Essential Equipment

Here’s what you’ll need to successfully make chocolate banana pops:

  • Parchment Paper: For easy cleanup and to prevent sticking.
  • Microwave-Safe Bowl: For melting your chocolate efficiently.
  • Popsicle Sticks: Optional, but they make for easier handling!
  • Freezer-Safe Container: For storing your pops after making them.

Serving Suggestions

Ready to serve your delicious chocolate banana pops? Here are some fun ideas:

  • Party Treat: Serve at parties for a fun and colorful dessert option.
  • Snack Time: A perfect after-school snack for kids.
  • Summer BBQs: Great for cooling down on hot summer days.

Now that you have all the tips and tricks to create the most delicious Frozen Chocolate Banana Pops, it’s time to get in the kitchen and start making your own! Remember, cooking is about enjoying the process and sharing the love with those around you. Happy cooking!

Frozen Chocolate Banana Pops

Prep Time 10 minutes
Cook Time 2 hours
Total Time 2 hours 10 minutes
Servings 4 pieces
Calories 150
Enjoy these delicious and easy-to-make frozen banana pops dipped in dairy-free chocolate and topped with sprinkles.

Ingredients

Fruits

  • 4 pieces Bananas (ripe and peeled)
  • 3/4 cup Dairy-Free Chocolate Chips (preferably Watkins brand)
  • 1 teaspoon Coconut Oil
  • 3 tablespoons Sprinkles (optional, for topping)

Instructions 

  • Peel bananas and insert popsicle sticks into the bottom of each.
  • Line a baking sheet with parchment paper and place bananas on top. Freeze for about 2 hours.
  • Microwave chocolate chips and coconut oil in 30-second intervals, stirring until fully melted.
  • Dip frozen bananas into the melted chocolate and top with sprinkles if desired. Return to the baking sheet and freeze until ready to serve.

Notes

Use ripe bananas for best flavor and ensure the chocolate is fully melted for smooth dipping.
Calories: 150kcal
Cost: $10
Course: Dessert
Keyword: Banana, chocolate, pops

Start Your Day Right with a Berry Smoothie Bowl

Boost your mornings with this easy-to-make berry smoothie bowl, featuring a delightful blend of frozen mixed berries, banana, and yogurt. This refreshing breakfast option is not only delicious but also packed with nutrients, making it perfect for busy mornings. Top it off with fresh fruits, granola, and a drizzle of nut butter to create a satisfying meal that will keep you energized throughout the day!

Why You’ll Love This Recipe

This berry smoothie bowl is a delightful way to start your day. Here are just a few reasons why you’ll love it:

  • Quick and Easy: Ready in just 5 minutes, this recipe is perfect for busy mornings when you need something nutritious and delicious.
  • Customizable: Add your favorite toppings or ingredients, making it a versatile meal that suits your taste.
  • Nutrient-Dense: Packed with vitamins, minerals, and antioxidants from the berries and yogurt, it’s a wholesome way to fuel your body.
  • Perfect for Sharing: This recipe makes enough for two bowls, allowing you to enjoy it with a friend or family member.
  • Taste and Texture: The creamy base combined with crunchy toppings creates a delightful contrast that’s satisfying to eat.

Ingredients Breakdown

Here’s what you’ll need to make a delicious berry smoothie bowl:

  • 2 cups frozen mixed berries (280 g): A mix of strawberries, blueberries, and raspberries provides a burst of flavor.
  • 1 banana (frozen, sliced): Adds natural sweetness and creaminess.
  • 1/2 cup milk (120 ml): Use dairy or non-dairy milk based on your preference.
  • 1/2 cup Greek yogurt (120 g): For a protein boost and creaminess; coconut yogurt works for a dairy-free option.
  • 1 tablespoon honey or maple syrup (optional): Sweeten to taste.
  • 1 teaspoon chia seeds or ground flaxseed (optional): For added nutrition, these seeds provide fiber and omega-3 fatty acids.
  • Salt (pinch, optional): Enhances flavor.
  • Toppings: Fresh berries, granola, sliced banana, coconut flakes, nut butter drizzle, chia seeds, or hemp hearts.

How to Make Your Berry Smoothie Bowl

A delicious berry smoothie bowl garnished with sliced bananas and coconut flakes.

Follow these simple steps to whip up your smoothie bowl:

  1. Add the frozen berries, frozen banana, milk, yogurt, and sweetener (if using) to a blender. If you’re adding chia or flax seeds, toss them in as well.
  2. Blend until very thick and smooth, stopping to scrape down the sides as needed. If it’s too thick, add 1 tablespoon of milk at a time until it blends smoothly.
  3. Spoon the mixture into bowls immediately — it should be thick enough to mound.
  4. Add your favorite toppings and enjoy right away!

Pro Tips for the Perfect Smoothie Bowl

Here are some expert insights to elevate your smoothie bowl game:

  • Use Frozen Ingredients: Frozen fruits create a creamier texture and help your smoothie bowl hold its shape.
  • Experiment with Yogurt: Try different flavors of yogurt for a unique twist or use dairy-free alternatives for a vegan version.
  • Balance Your Flavors: If your smoothie is too sweet, add a pinch of salt or a squeeze of lemon juice to brighten the flavor.
  • Texture Matters: For a thicker smoothie bowl, use less milk and more frozen fruit; blend in short bursts and tamp down as needed.
  • Make Ahead: Prepare your ingredients in advance and store them in the freezer for a quick breakfast option.
  • Layering Toppings: For a visually appealing presentation, layer your toppings in a pattern on top of the smoothie bowl.
  • Try Different Milks: Almond, oat, and coconut milk all lend different flavors and textures to your smoothie bowl.
  • Don’t Skip the Seeds: Chia or flax seeds add a nutritional boost and help thicken the smoothie.

Common Mistakes and Troubleshooting

Here are some common pitfalls and solutions:

  • Too Runny? If your smoothie bowl is too runny, add more frozen fruit or yogurt to thicken it up.
  • Not Blending Well? Stop and scrape down the sides of your blender to ensure everything gets mixed well. If it’s still struggling, add a little more liquid.
  • Too Thick? If the mixture is too thick to blend, add a splash of milk to help it along.
  • Toppings Falling Off? Make sure to spoon the smoothie base high enough to hold the toppings in place.

Variations to Try

Feel free to get creative! Here are some variations to consider:

  • Chocolate Berry Smoothie Bowl: Add 1 tablespoon of cocoa powder for a chocolatey twist.
  • Green Smoothie Bowl: Blend in a handful of spinach or kale for added nutrients without altering the flavor much.
  • Tropical Smoothie Bowl: Substitute blueberries for frozen mango or pineapple for a tropical flair.
  • Peanut Butter Banana Smoothie Bowl: Add 1 tablespoon of peanut butter for a nutty flavor and extra protein.

Storage and Make-Ahead Instructions

If you want to prepare your smoothie bowl in advance:

  • Prepare the smoothie base and store it in an airtight container in the fridge for up to 24 hours.
  • For longer storage, freeze the smoothie base in individual portions for up to 2 months. Just thaw overnight in the fridge before enjoying!

Frequently Asked Questions

Here are some common questions about smoothie bowls:

  • Can I use fresh berries instead of frozen? Fresh berries can be used, but they won’t create the same thick texture.
  • How can I make my smoothie bowl healthier? Use unsweetened yogurt, skip the sweeteners, and load up on nutrient-rich toppings like seeds and nuts.
  • Can I add protein powder? Absolutely! A scoop of protein powder blends beautifully into the smoothie base.
  • What can I use instead of yogurt? Try silken tofu or a dairy-free yogurt for a creamy texture without dairy.
  • Is this recipe vegan? Yes, if you use plant-based yogurt and non-dairy milk.
  • How do I make it lower in sugar? Opt for unsweetened yogurt and skip the added sweeteners.
  • Can I make this smoothie bowl in a blender? Yes! A high-speed blender is great for making a smooth consistency.
  • What toppings do you recommend? Fresh fruits, nuts, seeds, and granola are all fantastic options!

Nutritional Tips and Dietary Adaptations

When making your smoothie bowl, consider these nutritional tips:

  • Protein Boost: Add protein powder or Greek yogurt for an extra protein kick.
  • Fiber Rich: Include chia seeds or ground flaxseed for added fiber.
  • Healthy Fats: Nut butters or avocado can enhance your smoothie bowl while providing healthy fats.

Equipment Recommendations

To create the perfect berry smoothie bowl, here’s what you’ll need:

  • High-Speed Blender: Essential for achieving a creamy texture.
  • Measuring Cups and Spoons: For accurate ingredient measurements.
  • Bowl and Spoon: To serve your delicious creation!

Serving Suggestions

Serve your smoothie bowl immediately for the best texture and flavor. Consider pairing it with:

  • Whole Grain Toast: A slice of whole grain toast with avocado or nut butter makes a great side.
  • Fresh Juice: A glass of fresh juice or a cup of herbal tea complements the meal beautifully.

In conclusion, this berry smoothie bowl is not just a meal; it’s an experience that combines health, flavor, and creativity. With so many ways to customize it, you can make it your own. So go ahead, gather your ingredients, and enjoy a refreshing start to your day!

Berry Smoothie Bowl

Prep Time 10 minutes
Total Time 10 minutes
Servings 2 bowls
Calories 250
A vibrant and nutritious breakfast option, this Berry Smoothie Bowl combines frozen berries, banana, yogurt, and toppings for a delicious start to your day.

Ingredients

Fruits

  • 280 g frozen mixed berries
  • 1 frozen banana, sliced
  • 120 ml milk (dairy or non-dairy)
  • 120 g Greek yogurt or coconut yogurt
  • 1 tbsp honey or maple syrup (optional)
  • 1 tsp chia seeds or ground flaxseed (optional)
  • pinch salt (optional)

Toppings

  • fresh berries, granola, sliced banana, coconut flakes, nut butter drizzle, chia seeds or hemp hearts

Instructions 

  • Add frozen berries, banana, milk, yogurt, sweetener, and chia flax to a blender. Blend until very thick and smooth, scraping down as needed.
  • If needed, add 1 tablespoon milk at a time to help blend.
  • Spoon into bowls immediately; it should be thick enough to mound.
  • Add your favorite toppings and enjoy right away.

Notes

Use frozen ingredients for a thicker, colder smoothie bowl.
Calories: 250kcal
Cost: $10
Course: Breakfast
Keyword: Berry, Healthy, Smoothie

Are you looking for a quick and delicious meal that can be whipped up in no time? Look no further! This Quick Pasta Salad with Cherry Tomatoes and Basil is the perfect dish for busy weeknights, packed with fresh flavors and vibrant colors. In this article, we’ll guide you through each step of the process, share valuable tips, and even offer variations to suit your taste. With just a handful of ingredients, you can create a delightful meal that everyone will love.

Why You’ll Love This Recipe

  • Quick and Easy: This pasta salad can be prepared in under 30 minutes, making it ideal for those hectic evenings when time is limited.
  • Fresh Ingredients: Utilizing fresh cherry tomatoes and basil adds a burst of flavor that elevates this dish beyond your average pasta salad.
  • Versatile: You can easily customize this salad with your favorite vegetables, proteins, or dressings, ensuring it fits your family’s preferences.
  • Make-Ahead Friendly: This salad keeps well in the fridge, allowing you to prepare it in advance for lunches or quick dinners.
  • Healthy Option: Packed with vegetables and minimally processed ingredients, this pasta salad is a nutritious choice that doesn’t compromise on flavor.

Ingredient Breakdown

This recipe is simple and requires minimal ingredients. Here’s what you’ll need:

  • 2 cups Pasta: Any pasta shape works, but I recommend using rotini or penne for better sauce adherence.
  • 1 cup Cherry Tomatoes: Halved for a burst of sweetness; feel free to substitute with grape tomatoes if preferred.
  • 1/2 cup Fresh Basil: Chopped for a fragrant touch; you can also experiment with other herbs like parsley or arugula.
  • 1/4 cup Olive Oil: Extra virgin olive oil enhances the flavor; consider flavored oils for a unique twist.
  • 2 tablespoons Balsamic Vinegar: Adds acidity and depth; red wine vinegar also works well.
  • Salt & Pepper: To taste; fresh cracked pepper adds a lovely kick!
  • Optional Add-Ins: Include 1/4 cup freshly grated Parmesan cheese or toasted pine nuts for extra richness.

Pro Tips for a Perfect Pasta Salad

  • Cooking the Pasta: Always cook pasta in salted water for enhanced flavor. Aim for al dente for the best texture.
  • Cooling Quickly: Rinse the cooked pasta under cold water to stop the cooking process and prevent mushiness.
  • Mixing Ingredients: Combine the dressing before adding it to the salad to ensure even coverage.
  • Flavor Development: Allow the salad to sit for about 15 minutes before serving to let the flavors meld beautifully.
  • Seasoning: Taste and adjust the seasoning as necessary; each ingredient brings its own flavor.
  • Storage: Store in an airtight container in the refrigerator for up to 3 days. The flavors continue to develop over time!
  • Serving Temperature: This salad can be enjoyed cold or at room temperature, making it versatile for any occasion.
  • Experimenting: Don’t hesitate to try different dressings or ingredients; this salad is a blank canvas!

Common Mistakes and Troubleshooting

Juicy pasta salad featuring halved cherry tomatoes and vibrant green basil leaves.

Even simple recipes can have pitfalls. Here are some common mistakes to avoid:

  • Overcooking Pasta: Keep an eye on the cooking time; overcooked pasta turns mushy and loses its appeal.
  • Skipping the Salt: Neglecting to salt the pasta water results in bland pasta. Don’t skip this step!
  • Too Much Dressing: Adding too much dressing can make the salad soggy. Start with less and add more as needed.
  • Skipping the Chill: Serving immediately without letting it sit can result in a less flavorful dish. Give it at least 15 minutes!

Variations to Try

Feel free to mix things up! Here are some delightful variations of this pasta salad:

  • Italian Style: Add diced salami, mozzarella balls, and black olives for a more traditional Italian flair.
  • Greek Twist: Include feta cheese, cucumbers, and kalamata olives for a Mediterranean touch.
  • Protein-Packed: Toss in grilled chicken, shrimp, or chickpeas for added protein, making it a complete meal.
  • Veggie Delight: Incorporate bell peppers, red onion, or even spinach for extra crunch and flavor.

Storage and Make-Ahead Instructions

This salad is perfect for meal prep! Here’s how to store it:

  • Refrigeration: Keep in an airtight container in the refrigerator for up to 3 days. The flavors only get better!
  • Make-Ahead: Prepare the salad a day in advance, but leave out delicate ingredients like basil until just before serving.

Frequently Asked Questions

Here are some common queries about this pasta salad:

  • Can I use gluten-free pasta? Absolutely! Gluten-free pasta works well; just follow the package instructions for cooking.
  • How can I make it vegan? Omit cheese and use a vegan dressing or simply stick to olive oil and vinegar.
  • What can I substitute for balsamic vinegar? Red wine vinegar or apple cider vinegar can be excellent alternatives.
  • How can I enhance the flavor? Add garlic powder, lemon juice, or a dash of red pepper flakes for an extra kick.
  • Is it safe to eat after a few days? Yes, as long as it’s stored properly in the refrigerator, it should be safe to eat for 3-5 days.
  • Can I freeze pasta salad? It’s not recommended as the texture may change upon thawing.
  • Will the salad get soggy? If stored correctly, it should hold up well. Just avoid adding too much dressing initially.
  • What type of pasta is best? Short pasta shapes like fusilli or penne work best as they catch the dressing and ingredients nicely.

Nutrition Tips and Dietary Adaptations

This recipe is not only delicious but can also be tailored to fit various dietary needs:

  • Low-Carb: Substitute pasta with spiralized zucchini or cauliflower rice for a lower-carb option.
  • High-Protein: Incorporate grilled chicken or legumes to boost protein content.
  • Reduced Sodium: Use low-sodium versions of dressings and seasonings if you’re watching your salt intake.
  • Dairy-Free: Skip the cheese or use vegan cheese alternatives to make it dairy-free.

Equipment Recommendations

While you don’t need much to make this salad, a few tools can help:

  • Large Pot: For boiling the pasta; a large pot ensures ample room for the pasta to cook evenly.
  • Colander: To drain and rinse the cooked pasta effectively.
  • Mixing Bowl: A large bowl is essential for combining all the ingredients.
  • Chef’s Knife: For chopping vegetables and herbs easily.

Serving Suggestions

This pasta salad is versatile and can be served in various ways:

  • As a Side Dish: Pair it with grilled meats or fish for a complete meal.
  • For Lunch: Pack it in a lunchbox for a tasty midday treat.
  • At Potlucks: This salad shines at gatherings; prepare it in bulk for a crowd.
  • On Picnics: It’s perfect for outdoor dining, easy to transport and serve cold.

In conclusion, this Quick Pasta Salad with Cherry Tomatoes and Basil is not just another recipe; it’s a practical solution for busy lives. With its fresh ingredients and customizable options, you can enjoy a meal that excites your taste buds without adding stress to your day. So gather your ingredients, follow the simple steps, and enjoy the process of creating something delicious. Happy cooking!

Quick Pasta Salad with Cherry Tomatoes and Basil

Prep Time 10 minutes
Cook Time 10 minutes
Total Time 20 minutes
Servings 4 servings
Calories 350
A fresh and easy pasta salad perfect for a quick lunch or side dish, combining cherry tomatoes, basil, and a simple vinaigrette.

Ingredients

Pasta

  • 2 cups Pasta
  • 1 cup Cherry tomatoes, halved
  • 0.25 cup Fresh basil, chopped
  • 0.25 cup Olive oil
  • 2 tablespoons Balsamic vinegar
  • to taste Salt
  • to taste Pepper
  • 0.25 cup Freshly grated Parmesan cheese (optional) (optional)
  • 0.25 cup Pine nuts, toasted (optional) (optional)

Instructions 

  • Cook the pasta in salted boiling water until al dente, then rinse under cold water.
  • Halve the cherry tomatoes and place in a large bowl with chopped basil.
  • Whisk together olive oil, balsamic vinegar, salt, and pepper to make the dressing.
  • Add the cooled pasta to the bowl with tomatoes and basil, then pour dressing over and toss.
  • Let sit for 15 minutes before serving for flavors to meld.

Notes

You can add grated Parmesan or toasted pine nuts for extra flavor.
Calories: 350kcal
Cost: $10
Course: Salad
Cuisine: Italian
Keyword: Pasta

If you’re looking for a quick and nutritious snack that satisfies your cravings and fuels your day, look no further! These homemade no bake granola bars are not just easy to make, they’re also customizable to fit your taste and dietary preferences. With just a few simple ingredients and no need for an oven, you can whip up a batch of these delightful bars in no time. Let’s dive into why you’ll love making these at home and how to get started!

Why You’ll Love This Recipe

  • Quick and Easy: You can make these granola bars in under 30 minutes, plus chilling time, making them perfect for busy days.
  • Nutritious Ingredients: Packed with oats, nut butter, and seeds, these bars provide a wholesome energy boost without any hidden sugars.
  • Customizable: Feel free to mix and match your favorite add-ins like chocolate chips, dried fruits, or nuts to create your perfect bar.
  • Cost-Effective: Save money by making these bars at home instead of buying expensive store-bought versions.
  • Great for Meal Prep: Make a batch at the beginning of the week for a grab-and-go snack throughout the week!

Ingredient Breakdown

Understanding the ingredients will help you customize these bars to your liking. Here’s what you’ll need:

  • Old-Fashioned Rolled Oats: The base of your granola bars. They provide fiber and a satisfying chew. You can substitute quick oats for a softer texture.
  • Nut Butter: Peanut butter, almond butter, or cashew butter work best. Feel free to use a nut-free alternative like sun butter if you have allergies.
  • Sweetener: Honey, maple syrup, or agave syrup add sweetness and help bind the ingredients together. Use your preferred sweetener based on your dietary needs.
  • Mix-Ins: Chocolate chips, dried fruits, seeds, or nuts can be added for extra flavor and texture. Get creative!
  • Vanilla Extract: While optional, adding vanilla can enhance the flavor significantly.
  • Salt: A pinch of salt balances the sweetness and enhances overall flavor.

Pro Tips for Perfect Bars

Here are some expert tips to ensure your granola bars turn out perfectly every time:

  • Use Fresh Ingredients: Ensure your oats and nuts are not stale for the best flavor.
  • Press Firmly: When transferring the mixture to your pan, press it down firmly to avoid crumbly bars.
  • Chill Thoroughly: Allow the bars to chill for at least 2 hours in the fridge to set properly.
  • Experiment with Flavors: Add spices like cinnamon or cocoa powder for a flavor twist!
  • Adjust Sweetness: Taste the mixture before pressing it into the pan; you can always add more sweetener if desired.
  • Storage Tips: Store bars in an airtight container in the fridge for up to a week.
  • Slice with Care: Use a sharp knife to cut the bars cleanly after they’ve set.
  • Keep it Clean: Use parchment paper for easy removal and cleanup.

Common Mistakes and Troubleshooting

Side view of delicious no-bake granola bars, featuring visible oats and chocolate chips against a rustic backdrop.

Even the best cooks make mistakes sometimes! Here are some common issues and how to fix them:

  • Bars Crumble: If your bars are falling apart, you may need to add more nut butter or sweetener to help bind them.
  • Too Sweet: If you’ve added too much sweetener, balance it out with a pinch of salt.
  • Not Firm Enough: Ensure you chill the bars long enough before cutting. If they’re still soft, chill longer.

Granola Bar Variations

Why stick to just one flavor when you can mix it up? Here are some fun variations to try:

  • Chocolate Chip Almond Joy: Add shredded coconut and dark chocolate chips for a tropical twist.
  • Peanut Butter Banana: Incorporate dried banana chips and a sprinkle of cinnamon.
  • Trail Mix Delight: Use a mix of nuts, seeds, and dried fruits for a classic trail mix flavor.
  • Berry Bliss: Add freeze-dried raspberries and white chocolate chips for a sweet and tangy treat.

Storage and Make-Ahead Instructions

To keep your granola bars fresh and delicious, follow these storage tips:

  • Refrigerate: Store your bars in an airtight container in the fridge for up to 1 week.
  • Freeze: For longer storage, wrap individual bars in plastic wrap and place them in a freezer-safe bag. They can last up to 3 months!
  • Thawing: When ready to eat, simply remove from the freezer and let thaw at room temperature for about 10-15 minutes.

Frequently Asked Questions (FAQ)

Here are some commonly asked questions about making no bake granola bars:

  • Can I use quick oats instead of rolled oats? Yes, but the texture may be softer.
  • What can I use instead of nut butter? Sunflower seed butter or tahini are great nut-free alternatives.
  • Can I add protein powder? Absolutely! Just be aware that it may change the texture slightly.
  • How long do these bars last? In the fridge, they last about a week; in the freezer, up to three months.
  • Can I make these vegan? Yes, just use maple syrup and a nut-free butter!
  • Can I bake these bars? This recipe is designed for no baking, but you can bake them at a low temperature for a different texture.
  • Why are my bars too hard? This can happen if you used too much nut butter or didn’t chill them long enough.
  • How do I cut the bars neatly? Use a sharp knife and cut slowly for clean edges!

Nutrition Tips and Dietary Adaptations

These no bake granola bars can be adapted to fit various dietary needs:

  • Gluten-Free: Use certified gluten-free oats to make these bars gluten-friendly.
  • Low-Carb: Substitute oats with protein powder and nuts for a lower-carb option.
  • Nut-Free: Replace nut butter with sun butter or seed butter to cater to nut allergies.

Equipment Recommendations

Here’s what you’ll need to make these delightful bars:

  • Mixing Bowl: A large bowl for combining ingredients.
  • Measuring Cups: For accurate ingredient measurements.
  • Parchment Paper: For easy removal of the bars.
  • Sharp Knife: For cutting the bars into even pieces.
  • 8×8 inch Baking Dish: The perfect size for this recipe.

Serving Suggestions

These granola bars are versatile and can be served in various ways:

  • With Yogurt: Crumble over yogurt for a delicious breakfast.
  • As a Snack: Perfect for on-the-go snacking or as a post-workout energy boost.
  • Pair with Fruit: Serve with fresh fruit for a balanced snack.

Now that you’re equipped with all the knowledge to make the perfect no bake granola bars, it’s time to get cooking! Enjoy the process, experiment with flavors, and most importantly, savor every delicious bite. Happy cooking!

Homemade No Bake Granola Bars

Prep Time 15 minutes
Total Time 15 minutes
Servings 10 bars
Calories 180
Enjoy these easy, no-bake granola bars made with wholesome ingredients, perfect for a quick snack or breakfast on the go.

Ingredients

Dry Ingredients

  • 2 cups old-fashioned rolled oats
  • 0.5 cup mix-ins (chocolate chips, dried fruit, seeds, or nuts)

Wet Ingredients

  • 0.5 cup nut butter (peanut, almond, or cashew)
  • 0.33 cup honey or maple syrup
  • 1 teaspoon vanilla extract (optional)
  • a pinch salt

Instructions 

  • Line an 8x8-inch baking dish with parchment paper.
  • Mix oats and mix-ins in a large bowl.
  • Heat nut butter and honey in a saucepan until smooth, then stir in vanilla and salt.
  • Pour wet mixture over dry ingredients and stir to coat evenly.
  • Press mixture into the prepared pan and chill for at least 2 hours.
  • Cut into 10-12 bars and enjoy or store for later.

Notes

Press firmly when packing the mixture into the pan for best bars.
Calories: 180kcal
Cost: $10
Course: Snack
Cuisine: American
Keyword: Granola, Healthy, no bake

Welcome to a delightful culinary journey that will elevate your meal prep game! This Lemon Herb Chicken Salad is a vibrant and satisfying dish that’s not just easy to make but also packed with flavor. Whether you’re looking for a light lunch or a quick dinner, this recipe is here to inspire you. With simple ingredients and straightforward steps, you can create a dish that not only tastes fantastic but also brings a touch of sunshine to your table. Let’s dive into the world of zesty chicken salad!

Why You’ll Love This Recipe

This recipe isn’t just another chicken salad; it’s a celebration of fresh flavors and healthy eating. Here are five compelling reasons why you’ll adore this dish:

  • Quick and Easy: With just a few simple steps, you can whip up this salad in under 30 minutes, making it perfect for busy weeknights.
  • Flavor-Packed: The combination of lemon juice, fresh herbs, and creamy dressing creates a flavor explosion that’s both refreshing and satisfying.
  • Versatile and Adaptable: Customize this salad with your favorite ingredients or whatever you have on hand—it’s perfect for using leftovers!
  • Healthy and Wholesome: Packed with protein from the chicken and a medley of vegetables, this salad is a nutritious choice that keeps you feeling energized.
  • Great for Meal Prep: Make a big batch and store it in the fridge for quick, healthy lunches throughout the week.

Ingredients You’ll Need

Gathering high-quality ingredients is key to making this lemon herb chicken salad shine. Here’s a detailed breakdown of what you’ll need:

  • 3 cups cooked chicken: Shredded or diced. This is the star of the salad, providing protein and heartiness.
  • 1/2 cup mayonnaise: For a creamy base. You can substitute with Greek yogurt for a lighter option.
  • 2 tablespoons Greek yogurt: Adds creaminess and a tangy flavor. Use plain for best results.
  • 2 tablespoons fresh lemon juice: Essential for that zesty flavor. Freshly squeezed is always best!
  • 1 teaspoon lemon zest: Enhances the lemon flavor without adding extra liquid.
  • 1/2 cup finely chopped celery: Adds crunch and freshness.
  • 1/4 cup finely chopped red onion: Provides a mild sweetness and a pop of color.
  • 1/4 cup chopped fresh parsley: For a burst of flavor and a touch of green.
  • 1 tablespoon chopped fresh dill: Complements the lemon beautifully.
  • 1/2 teaspoon salt: To enhance all the flavors.
  • 1/4 teaspoon black pepper: For a hint of spice.
  • 1/4 cup chopped cucumbers (optional): For extra crunch and freshness.
  • 2 tablespoons chopped almonds or walnuts (optional): Adds a delightful texture and nutty flavor.
  • 1 tablespoon chopped chives (optional): A finishing touch that adds color and flavor.

Pro Tips for Perfecting Your Salad

To ensure your lemon herb chicken salad is the best it can be, consider these expert insights:

  • Use leftover chicken: Rotisserie chicken works wonders here and saves you time.
  • Adjust the flavors: Taste the dressing and adjust the lemon juice or seasoning according to your preference.
  • Chill before serving: Refrigerating the salad for at least 20-30 minutes allows the flavors to meld beautifully.
  • Mix gently: When combining the salad, be gentle to keep the chicken pieces intact.
  • Add a pop of color: Consider using colorful bell peppers or cherry tomatoes for visual appeal.
  • Experiment with herbs: Fresh basil or cilantro can add unique flavors if you want to switch things up.
  • Make it creamy: For a richer dressing, fold in additional Greek yogurt or avocado.
  • Storage tips: Store leftovers in an airtight container in the fridge for up to 3 days.

Common Mistakes and Troubleshooting

Side angle of a creamy Lemon Herb Chicken Salad in a white bowl with colorful ingredients visible.

Even the best cooks can encounter hiccups. Here are some common mistakes to avoid:

  • Overmixing: This can lead to mushy chicken. Mix just until combined.
  • Too much dressing: Start with less and add more as needed to avoid a soggy salad.
  • Using dry chicken: If your chicken is dry, consider adding extra mayo or yogurt to moisten it.
  • Skipping the chill: Don’t skip chilling the salad; it really enhances the flavors!

Variations to Try

Feel free to get creative with your lemon herb chicken salad! Here are some fun variations:

  • Southwestern Chicken Salad: Add black beans, corn, and diced avocado for a Southwest twist.
  • Mediterranean Chicken Salad: Incorporate feta cheese, olives, and sun-dried tomatoes for Mediterranean flair.
  • Curried Chicken Salad: Mix in curry powder, raisins, and chopped apples for a unique flavor profile.
  • Fruit-Infused Salad: Consider adding diced apples or grapes for a sweet contrast to the savory flavors.

Storage and Make-Ahead Instructions

This salad is perfect for meal prep! Here’s how to store it properly:

  • Refrigerate: Store in an airtight container for up to 3 days. The flavors will continue to develop!
  • Make-ahead: Prepare the salad one day in advance for gatherings—just leave out the nuts until right before serving to keep them crunchy.

Comprehensive FAQ

Here are some frequently asked questions to help you maximize your lemon herb chicken salad experience:

  • Can I use raw chicken?: Yes, but ensure to cook it fully before adding it to the salad.
  • How can I make this salad gluten-free?: All ingredients listed are gluten-free; just confirm your mayonnaise is certified gluten-free.
  • Can I freeze this salad?: It’s best enjoyed fresh; freezing can alter the texture of the ingredients.
  • Is this salad keto-friendly?: Yes! It’s low in carbs and high in protein, fitting well into a keto diet.
  • What can I serve with this salad?: Serve alongside whole grain crackers, pita bread, or on a bed of leafy greens.
  • How can I make this salad dairy-free?: Simply omit the Greek yogurt and use a dairy-free mayo.
  • What’s the best way to slice chicken for salads?: Slice against the grain for tender pieces.
  • Can I add more vegetables?: Absolutely! Feel free to include any vegetables you enjoy.

Nutrition Tips and Dietary Adaptations

This lemon herb chicken salad is not only delicious but also can be tailored to meet various dietary needs:

  • High-Protein: Great source of protein from chicken and yogurt, perfect for post-workout recovery.
  • Low-Carb: Ideal for those following low-carb or keto diets.
  • Vegan Adaptation: Substitute chicken with chickpeas or tofu, and use vegan mayo.

Equipment Recommendations

To make your cooking experience smoother, here are a few tools that might come in handy:

  • Mixing Bowls: A large bowl for mixing your salad ingredients.
  • Chef’s Knife: For chopping your veggies and herbs quickly.
  • Measuring Cups and Spoons: Ensuring precise measurements for balanced flavors.

Serving Suggestions

Now that your salad is ready, here are some ways to serve it:

  • On a bed of greens: Serve over spinach or arugula for added nutrients.
  • In a wrap: Use whole grain or lettuce wraps for a portable meal.
  • With crackers: Serve alongside whole grain crackers for extra crunch.

In conclusion, this Lemon Herb Chicken Salad is a delightful dish that’s bound to impress. With its refreshing flavors and healthy ingredients, it’s not just a meal—it’s an experience. So gather your ingredients, follow the steps, and enjoy the satisfaction of creating something delicious. Happy cooking!

Lemon Herb Chicken Salad

Prep Time 15 minutes
Cook Time 10 minutes
Total Time 25 minutes
Servings 4 servings
Calories 350
A fresh and flavorful chicken salad infused with lemon and herbs, perfect for a light lunch or dinner.

Ingredients

Protein

  • 3 cups cooked chicken, shredded or diced

Dressing

  • 0.5 cup mayonnaise
  • 2 tablespoons Greek yogurt
  • 2 tablespoons fresh lemon juice
  • 1 teaspoon lemon zest
  • 0.5 cup finely chopped celery
  • 0.25 cup finely chopped red onion
  • 0.25 cup chopped fresh parsley
  • 1 tablespoon chopped fresh dill
  • 0.5 teaspoon salt
  • 0.25 teaspoon black pepper
  • 0.25 cup chopped cucumbers (optional) (optional)
  • 2 tablespoons chopped almonds or walnuts (optional) (optional)
  • 1 tablespoon chopped chives (optional) (optional)

Instructions 

  • Combine cooked chicken in a large bowl.
  • Finely chop celery, red onion, parsley, and dill; add to chicken.
  • Mix mayonnaise, Greek yogurt, lemon juice, lemon zest, salt, and pepper to make dressing.
  • Pour dressing over chicken and vegetables; stir gently to coat.
  • Fold in optional cucumbers, nuts, and chives if desired. Chill before serving.

Notes

For best flavor, refrigerate for at least 20-30 minutes before serving.
Calories: 350kcal
Cost: $12
Course: Salad
Cuisine: American
Keyword: Chicken, herbs, lemon

Welcome to your new go-to recipe for chicken salad lettuce wraps! If you’re looking for a quick, nutritious, and satisfying meal that can be whipped up in no time, you’re in the right place. This recipe combines the vibrant crunch of fresh veggies with the creamy goodness of chicken salad, all wrapped in crisp lettuce leaves. Perfect for those busy weeknights when you need something healthy yet delicious. So, roll up your sleeves, and let’s get cooking!

Why You’ll Love This Recipe

Here are just a few reasons why you’ll want to make these chicken salad lettuce wraps a staple in your kitchen:

  • Quick to Prepare: With only 15 minutes of prep time, you can have a delicious meal ready to enjoy in no time.
  • Versatile Ingredients: This recipe allows for easy substitutions, making it perfect for using up leftovers or whatever veggies you have on hand.
  • Light and Healthy: Wrapped in fresh lettuce, these wraps are a low-carb option that doesn’t skimp on flavor.
  • Great for Meal Prep: Make a big batch ahead of time and store it for easy lunches or dinners throughout the week.
  • Kid-Friendly: The fun presentation makes these wraps a hit with kids, encouraging them to eat more veggies!

Ingredients Breakdown

Let’s dive into what you need to make these flavorful chicken salad lettuce wraps just right!

  • 2 cups cooked shredded chicken: Rotisserie chicken works wonderfully for this recipe. You can also use leftover grilled chicken or poach some fresh chicken.
  • 1/2 cup mayonnaise: For a lighter option, use Greek yogurt instead. It adds creaminess while cutting down on calories.
  • 1 teaspoon Dijon mustard: This gives your chicken salad a slight tang. You can substitute with yellow mustard if that’s what you have.
  • 1 tablespoon lemon juice: Fresh lemon juice brightens up the flavors. Lime juice is also a great alternative!
  • 1/2 teaspoon garlic powder: For a hint of garlic flavor. Fresh minced garlic is another option for a stronger taste.
  • 1 celery stalk, finely chopped: Adds a crunchy texture. Feel free to add more if you love that crunch!
  • 2 tablespoons red onion, finely diced: This provides a nice bite. Substitute with green onions for a milder flavor.
  • 2 tablespoons fresh parsley (optional): This adds a fresh herbaceous flavor. You can also use cilantro for a different twist.
  • Salt and black pepper to taste: Essential for seasoning. Adjust according to your preference.
  • 8-10 large lettuce leaves: Romaine or butter lettuce works best. They are sturdy enough to hold the filling without tearing.

Step-by-Step Instructions

Ready to construct your delicious wraps? Follow these simple steps:

  1. Place the shredded chicken in a large mixing bowl. Break apart any large pieces so the texture is even.
  2. Add mayonnaise, Dijon mustard, lemon juice, and garlic powder to the bowl.
  3. Stir until the chicken is evenly coated and the mixture is creamy.
  4. Add chopped celery, red onion, and parsley. Mix until all ingredients are evenly distributed.
  5. Season with salt and black pepper. Taste and adjust if needed—add a little more lemon juice for brightness or salt for depth.
  6. Cover and refrigerate for at least 20-30 minutes to allow flavors to develop.
  7. Separate, rinse, and thoroughly dry the lettuce leaves.
  8. Spoon the chicken salad into the center of each leaf.
  9. Fold or roll the lettuce around the filling and serve immediately!

Pro Tips for Perfect Lettuce Wraps

Side view of fresh Chicken Salad wrapped in crisp lettuce leaves ready to eat.

Enhance your chicken salad lettuce wraps with these handy tips:

  • Chill for Flavor: Allowing the chicken salad to chill enhances the flavors. Prepare it a few hours ahead if time permits.
  • Use Fresh Ingredients: Fresh, high-quality ingredients will yield the best flavor. Opt for organic veggies if possible.
  • Customize Your Wraps: Feel free to mix in your favorite nuts, seeds, or dried fruits for added texture and flavor.
  • Keep It Crunchy: Serve the wraps immediately after assembling to maintain the crispness of the lettuce.
  • Make It Your Own: Experiment with different dressings or spices to create your unique version!

Common Mistakes and Troubleshooting

Here are a few common mistakes to avoid when making chicken salad lettuce wraps:

  • Overmixing: Be gentle when mixing your ingredients to avoid mushy chicken salad.
  • Using Wilting Lettuce: Always use fresh, crisp lettuce leaves for the best wrap experience.
  • Too Much Dressing: Start with less mayonnaise or yogurt and add more as needed to avoid sogginess.
  • Neglecting Seasoning: Don’t forget to taste your chicken salad! Adjust the seasoning before serving for the best flavor.

Variations to Try

Get creative with these variations to keep things exciting:

  • Spicy Chicken Salad: Add chopped jalapeños or a dash of hot sauce for a spicy kick!
  • Asian-Inspired Wraps: Substitute soy sauce for mayonnaise and add chopped peanuts and sesame oil.
  • Curried Chicken Salad: Mix in curry powder for a unique twist. Serve with raisins for sweetness.
  • Greek Chicken Salad: Add diced cucumbers, Kalamata olives, and feta cheese for a Mediterranean flavor.

Storage and Make-Ahead Instructions

Planning ahead? Here’s how to store your chicken salad and lettuce wraps:

  • Storage: Store any leftover chicken salad in an airtight container in the fridge for up to 3 days.
  • Lettuce Preparation: Keep the lettuce leaves separate until you’re ready to serve to prevent wilting.
  • Make-Ahead: You can prepare the chicken salad a day in advance. Just mix and store in the fridge until ready to assemble.

Frequently Asked Questions

Here are some common questions about making chicken salad lettuce wraps:

  • Can I use canned chicken? Yes! Canned chicken is a great time-saver and works well in this recipe.
  • What type of lettuce is best? Romaine and butter lettuce are both excellent choices for wrapping.
  • Can I freeze the chicken salad? It’s best to avoid freezing chicken salad as the texture may change upon thawing.
  • How do I make this recipe dairy-free? Substitute the mayonnaise with avocado or a dairy-free dressing.
  • What can I serve with these wraps? Pair with fresh fruit, a side salad, or crispy baked sweet potato fries.
  • How do I store leftover lettuce? Wrap lettuce leaves in a damp paper towel and store in an airtight container in the fridge.
  • Can I add fruits to the chicken salad? Absolutely! Diced apples, grapes, or even pineapple can add a sweet crunch.
  • What if the chicken salad is too dry? Add a splash more mayonnaise or yogurt until you reach your desired consistency.

Nutrition Tips and Dietary Adaptations

Here are some nutrition tips and adaptations to consider:

  • Protein-Packed: Keep your chicken salad high in protein by using breast meat, which is leaner.
  • Low-Carb Option: Swapping traditional bread for lettuce wraps makes this meal perfect for low-carb diets.
  • Vegetarian Version: Substitute chicken with chickpeas or tofu for a delicious vegetarian alternative.
  • Heart-Healthy Fats: Use avocado in place of mayonnaise to incorporate healthy fats into your meal.

Equipment Recommendations

Here’s what you’ll need to make these delicious wraps:

  • Large Mixing Bowl: For mixing all your chicken salad ingredients.
  • Sharp Knife: Essential for chopping veggies and herbs finely.
  • Cutting Board: A sturdy board makes prep easy and safe.
  • Measuring Cups and Spoons: Accurate measurements ensure balanced flavors.

Serving Suggestions

To elevate your meal, consider these serving suggestions:

  • Garnish: Top with extra parsley or a sprinkle of paprika for color.
  • Side Dishes: Serve with a light salad or a refreshing fruit platter.
  • Presentation: Arrange wraps on a platter with toothpicks for easy serving at gatherings.

Thank you for stopping by! I hope this delightful recipe for chicken salad lettuce wraps brings joy to your kitchen and makes your busy nights a little easier. Remember, cooking is all about enjoying the process and the company of those you share your meals with. Happy cooking!

Chicken Salad Lettuce Wraps

Prep Time 15 minutes
Total Time 15 minutes
Servings 4 servings
Calories 250
Enjoy these fresh and flavorful chicken salad lettuce wraps, perfect for a light lunch or appetizer.

Ingredients

Protein

  • 2 cups cooked shredded chicken (rotisserie works well)
  • 0.5 cup mayonnaise
  • 1 teaspoon Dijon mustard
  • 1 tablespoon lemon juice
  • 0.5 teaspoon garlic powder
  • 1 stalk celery (finely chopped)
  • 2 tablespoons red onion (finely diced)
  • 2 tablespoons fresh parsley (optional but recommended)
  • to taste Salt and black pepper
  • 8-10 large lettuce leaves (romaine or butter lettuce)

Instructions 

  • Place shredded chicken in a bowl, then add mayonnaise, Dijon mustard, lemon juice, and garlic powder. Mix until coated and creamy.
  • Add chopped celery, red onion, and parsley; stir to combine. Season with salt and pepper to taste.
  • Cover and refrigerate for 20-30 minutes to let flavors meld.
  • Prepare lettuce leaves by rinsing and drying thoroughly.
  • Spoon chicken salad into each leaf, fold or roll, and serve.

Notes

For extra flavor, add a dash of hot sauce or a squeeze of additional lemon.
Calories: 250kcal
Cost: $15
Course: Appetizer, Lunch
Cuisine: American
Keyword: Chicken, Lettuce Wraps

Welcome to your new favorite summer treat! This Frozen Yogurt Strawberry Bark is not only refreshing but also easy to make—perfect for satisfying that sweet tooth while keeping it healthy. In just a few simple steps, you can create a delicious snack that everyone will love. Plus, it’s a fantastic way to incorporate fresh fruits into your diet. Let’s dive into the details of this delightful recipe!

Why You’ll Love This Recipe

  • Quick and Easy: With minimal prep time, you can whip this up in under 30 minutes, making it perfect for last-minute cravings.
  • Healthy Indulgence: Made with fresh strawberries and yogurt, this bark is a guilt-free treat that’s packed with nutrients.
  • Customizable: Feel free to swap in your favorite fruits or toppings—chocolate chips, nuts, or even a sprinkle of granola work beautifully!
  • Kid-Friendly: This recipe is fun to make with kids. Let them help layer the ingredients and sprinkle toppings!
  • Perfect for Meal Prep: Make a big batch and store it in the freezer for a quick snack or dessert whenever you need a pick-me-up.

Ingredients

Here’s what you’ll need to create this delicious bark:

  • 2 1/2 cups chopped fresh California strawberries
  • 2 cups vanilla-flavored yogurt (Greek yogurt works well for extra creaminess!)
  • 1/2 cup coconut butter, melted
  • Drizzle of honey: Optional, for added sweetness

Ingredient Breakdown and Substitutions

Understanding your ingredients can help you customize this recipe to your liking:

  • Fresh Strawberries: You can substitute with frozen strawberries, but make sure to thaw them and drain any excess liquid before use.
  • Vanilla Yogurt: Feel free to switch to almond milk yogurt or any flavored yogurt you prefer. Just remember that flavored yogurts often come pre-sweetened, so adjust the honey accordingly.
  • Coconut Butter: If you don’t have coconut butter, you can use almond butter or even peanut butter for a delicious twist.
  • Honey: Maple syrup or agave nectar can be used in place of honey for a vegan option.

How to Make Frozen Yogurt Strawberry Bark

Side angle of frozen yogurt bark with chunks of fresh strawberries and a glossy coconut layer.

Let’s get into the fun part—making the bark!

  1. Prepare Your Baking Sheet: Line a baking sheet with parchment paper to prevent the bark from sticking. This will make your cleanup a breeze!
  2. Mix the Ingredients: In a bowl, combine the yogurt and melted coconut butter. Stir until smooth. If you’re using honey, mix it in now.
  3. Layer the Bark: Spread half of the yogurt mixture onto the prepared baking sheet. Distribute half of the chopped strawberries evenly over the yogurt layer. Repeat the process with the remaining yogurt and strawberries.
  4. Freeze It: Place the baking sheet in the freezer and let it chill for at least 2 hours or until the bark is completely firm.
  5. Break Into Pieces: Once frozen, remove the bark from the baking sheet and break it into pieces. Store in an airtight container in the freezer.

Pro Tips for Perfect Yogurt Bark

  • Use High-Quality Ingredients: The better the ingredients, the better the bark will taste. Opt for organic strawberries and high-quality yogurt.
  • Don’t Overload on Toppings: While it’s tempting to add too many toppings, stick to a few key ones to ensure the bark holds together well.
  • Chill for Longer: If you want a firmer bark, let it freeze longer than the minimum time suggested.
  • Experiment with Flavors: Try adding a splash of vanilla extract or a sprinkle of cinnamon to the yogurt mixture for added flavor.
  • Check for Sticking: If the bark is difficult to remove from the parchment paper, let it sit at room temperature for a few minutes before breaking it into pieces.
  • Store Properly: Keep the bark in the freezer to prevent it from melting. It’s best enjoyed frozen!
  • Make Ahead: Prep a batch on the weekend for a week’s worth of healthy snacks!
  • Use a Silpat Mat: Instead of parchment paper, you can use a silicone baking mat to make removal even easier.

Common Mistakes and Troubleshooting

Here are a few tips to help you avoid mistakes while making your bark:

  • Too Soft: If your bark isn’t freezing properly, ensure your freezer is set to a low enough temperature.
  • Sticky Bark: If the bark sticks to the parchment paper, it may need more time to freeze, or you may need to use a non-stick spray on the parchment.
  • Uneven Toppings: For a more visually appealing bark, try to layer your toppings evenly.

Variations on Yogurt Bark

Feeling adventurous? Here are some tasty variations you can try:

  • Chocolate Delight: Add mini chocolate chips or drizzle melted dark chocolate on top for a decadent twist.
  • Nutty Banana: Swap strawberries for ripe banana slices and sprinkle chopped nuts over the top.
  • Berry Medley: Use a mix of berries like blueberries, raspberries, and blackberries for a colorful and fruity bark.
  • Coconut Bliss: Add shredded coconut on top of the yogurt layer for a tropical flavor.

Storage and Make-Ahead Instructions

To keep your yogurt bark fresh:

  • Store in an airtight container in the freezer for up to 2 months.
  • Separate pieces with parchment paper in the container to prevent sticking.
  • Make ahead of time and enjoy as a quick snack or dessert whenever you like!

Frequently Asked Questions

Here are some common questions about making Frozen Yogurt Strawberry Bark:

  • Can I use frozen strawberries? Absolutely! Just make sure to thaw and drain them before using.
  • How long does it take for yogurt bark to freeze? Typically, it takes about 2 hours to freeze completely, but longer is better for a firmer texture.
  • Can I make this vegan? Yes! Use almond milk yogurt and maple syrup instead of honey.
  • What toppings can I use? Feel free to experiment! Nuts, seeds, and even granola can add a delightful crunch.
  • How do I know when the bark is ready? It should be solid and easily breakable into pieces when frozen properly.
  • Is yogurt bark healthy? Yes! It’s a nutritious snack packed with protein, vitamins, and antioxidants from the fruit.
  • Can I use flavored yogurt? Yes, but be mindful of the sweetness level if using pre-flavored yogurt.
  • How should I serve it? Serve it straight from the freezer as a cool treat, or let it sit out for a minute for softer bites.

Nutrition Tips and Dietary Adaptations

While this yogurt bark is nutritious, here are some tips to enhance its health benefits:

  • Increase Fiber: Add chia seeds or flaxseeds to the yogurt mixture for an extra fiber boost.
  • Reduce Sugar: Opt for unsweetened yogurt and omit the honey for a lower-sugar option.
  • Boost Protein: Use Greek yogurt, which has more protein than regular yogurt, keeping you full longer.

Equipment Recommendations

Here’s what you’ll need to make this recipe:

  • Baking Sheet: A standard baking sheet works best for spreading the yogurt mixture.
  • Parchment Paper: Essential for easy removal of the bark.
  • Mixing Bowls: Use medium-sized bowls to mix your ingredients easily.
  • Spatula: A silicone spatula can help spread the yogurt evenly.

Serving Suggestions

Enjoy your Frozen Yogurt Strawberry Bark in various ways:

  • As a refreshing snack on a hot day.
  • Serve it as a healthy dessert after dinner.
  • Pair it with a bowl of fresh fruit for a wholesome breakfast.

In conclusion, this Frozen Yogurt Strawberry Bark is a fantastic treat that combines simplicity with deliciousness. With a few easy steps, you can make a dessert that everyone will love while keeping health in mind. So gather your ingredients, get creative, and enjoy this delightful bark that brings joy and flavor to your kitchen!

Tasty Frozen Yogurt Strawberry Bark

Prep Time 10 minutes
Total Time 10 minutes
Servings 8 pieces
Calories 150
A delicious and easy frozen treat combining fresh strawberries, creamy yogurt, and coconut butter for a refreshing snack or dessert.

Ingredients

Fruits

  • 2 1/2 cups chopped fresh California strawberries
  • 2 cups vanilla-flavored yogurt
  • 1/2 cup coconut butter, melted
  • drizzle optional honey (optional)

Instructions 

  • Spread the chopped strawberries evenly on a baking sheet lined with parchment paper.
  • Mix the yogurt and melted coconut butter until smooth.
  • Pour the yogurt mixture over the strawberries and spread evenly.
  • If desired, drizzle honey on top.
  • Freeze for at least 4 hours until firm, then break into pieces and serve.

Notes

For a sweeter taste, add more honey or sweetener as desired.
Calories: 150kcal
Cost: $10
Course: Dessert
Keyword: strawberries

Discover the Joy of a Bright and Fresh Tomato Cucumber Avocado Salad

Welcome to a culinary adventure that brings together the vibrant flavors of summer in a single bowl! This Tomato Cucumber Avocado Salad is not just a dish; it’s an experience that’s quick, easy, and bursting with flavor. Whether you’re looking to impress guests or whip up a refreshing side for your weeknight dinner, this salad is your go-to recipe. With its colorful ingredients and delightful textures, it’s sure to become a staple in your kitchen.

The beauty of this salad lies in its simplicity. In under 15 minutes, you can create a dish that’s as visually appealing as it is delicious. Perfect for busy weekdays or laid-back weekend gatherings, you’ll find that this salad is versatile enough to complement any meal. Let’s dive into why you’ll love this salad and how to make it shine!

Why You’ll Love This Tomato Cucumber Avocado Salad

  • Quick and Easy: This salad comes together in just 15 minutes, making it the ideal choice for last-minute meals or gatherings.
  • Fresh Ingredients: Packed with wholesome ingredients like tomatoes, cucumbers, and avocados, it’s a refreshing dish that celebrates vibrant flavors.
  • Healthy and Nutritious: With healthy fats from avocados and plenty of vitamins from the vegetables, this salad is a guilt-free choice.
  • Customizable: Feel free to add your favorite ingredients or dressings to make this salad uniquely yours!
  • Perfect for Any Occasion: Whether it’s a summer barbecue or a cozy family dinner, this salad fits right in.

Ingredients and Substitutions

Here’s what you’ll need to make this delightful salad:

  • 1 cup grape tomatoes: Halved for easy eating and vibrant color.
  • 1/2 large English cucumber: Sliced and quartered for a refreshing crunch.
  • 1 avocado: Chopped for creamy texture and rich flavor.
  • 1/4 cup cilantro: Chopped to enhance freshness.
  • 1 1/2 tablespoons lemon juice: Roughly from 1/2 lemon, providing a zesty kick.
  • 1 tablespoon extra virgin olive oil: For a smooth dressing that ties it all together.
  • 1/4 teaspoon salt: Enhances the natural flavors of the ingredients.
  • 1/8 teaspoon ground black pepper: Adds just the right amount of spice.

**Substitutions**: If you don’t have certain ingredients on hand, feel free to get creative!

  • Tomatoes: Substitute with cherry tomatoes or heirloom varieties for a different flavor profile.
  • Cucumber: Any cucumber variety works, but Persian cucumbers add a pleasant sweetness.
  • Avocado: If you’re looking for a lower-fat option, try using diced bell peppers instead.
  • Cilantro: If you’re not a fan, fresh parsley or basil can be used for a different herbal twist.

How to Make the Best Tomato Cucumber Avocado Salad

Side view of a vibrant salad featuring grape tomatoes, cucumber, and avocado.

Let’s get cooking! Follow these simple steps to create your salad:

  1. In a large mixing bowl, add the halved grape tomatoes, quarter cucumber slices, chopped avocado, and cilantro.
  2. In a small mixing bowl, whisk together the lemon juice, olive oil, salt, and pepper until smooth and combined.
  3. Pour the dressing over the salad ingredients and toss gently to combine, ensuring everything is evenly coated.

Pro Tips for a Perfect Salad

  • Choose Ripe Avocados: For the best flavor and texture, ensure your avocados are perfectly ripe but not overripe.
  • Don’t Overmix: When tossing the salad, be gentle to keep the avocado chunks intact.
  • Chill Before Serving: Let the salad sit in the refrigerator for about 10 minutes to allow the flavors to meld.
  • Season to Taste: Adjust the lemon juice and salt according to your preference for brightness and flavor.
  • Use Fresh Ingredients: The fresher your ingredients, the better your salad will taste!

Common Mistakes and Troubleshooting

Even the best of us can make a few missteps in the kitchen. Here’s how to avoid common pitfalls:

  • Overripe Avocado: If your avocado is too mushy, it can ruin the dish. Choose firm avocados that yield slightly when pressed.
  • Too Much Dressing: Start with less dressing and add more as needed to prevent the salad from becoming soggy.
  • Ignoring Texture: Ensure a balance of crunchy (cucumbers) and creamy (avocado) elements for a satisfying bite.

Variations to Keep it Interesting

Feeling adventurous? Here are some variations to consider:

  • Greek Twist: Add feta cheese and Kalamata olives for a Mediterranean flair.
  • Quinoa Salad: Mix in cooked quinoa for added protein and texture.
  • Spicy Kick: Incorporate diced jalapeños for a spicy twist.
  • Fruit Fusion: Toss in diced mango or strawberries for a sweet contrast.

Storage and Make-Ahead Instructions

This salad is best enjoyed fresh, but you can prepare components ahead:

  • Pre-Chop Ingredients: You can chop tomatoes, cucumber, and cilantro in advance. Store them separately in airtight containers in the fridge.
  • Make the Dressing Ahead: Whisk together the dressing and store it in the refrigerator for up to a week.
  • Assemble Right Before Serving: For the freshest taste, combine all ingredients just before serving.

FAQs about Tomato Cucumber Avocado Salad

  • Can I make this salad ahead of time? It’s best to assemble the salad just before serving to keep the avocado from browning.
  • What can I serve with this salad? This salad pairs well with grilled meats, seafood, or as a light lunch on its own.
  • How long does this salad last in the fridge? If stored properly, it can last up to 2 days, but the avocado may brown.
  • Can I use frozen avocado? Fresh is best, but if you have frozen avocado, defrost it and use it cautiously to maintain texture.
  • What dressing works well with this salad? The lemon-olive oil dressing is ideal, but balsamic vinaigrette also adds a tasty twist.
  • Is this salad vegan? Yes, this salad is completely vegan and gluten-free!
  • Can I add protein? Absolutely! Grilled chicken, chickpeas, or shrimp can elevate this salad to a complete meal.
  • Which herbs can I use? Fresh dill or mint can be delightful alternatives to cilantro.

Nutritional Tips and Dietary Adaptations

This salad is not only delicious but also packed with nutrients:

  • Avocado: A great source of healthy fats that support heart health.
  • Cucumbers: Low in calories and hydrating, perfect for weight management.
  • Tomatoes: Rich in antioxidants, they contribute to a healthy diet.

If you’re looking to adapt this recipe for specific dietary needs, feel free to substitute ingredients as mentioned earlier. You can also adjust the dressing for lower fat options, or skip the oil altogether and use vinegar instead.

Equipment Recommendations

To make your cooking experience easier, consider these tools:

  • Sharp Knife: A good knife will make chopping vegetables a breeze.
  • Cutting Board: A sturdy surface is essential for safe and efficient chopping.
  • Mixing Bowls: Use a large bowl for mixing the salad and a smaller one for the dressing.
  • Measuring Spoons: Accurate measurements ensure your dressing is just right.

Serving Suggestions

Here are some ideas for enjoying your Tomato Cucumber Avocado Salad:

  • As a Side Dish: It pairs beautifully with grilled chicken, fish, or steak.
  • On a Bed of Greens: Serve it on a bed of mixed greens for a heartier salad.
  • With Whole Grain: Add quinoa or farro for a filling lunch or dinner.

Now that you have all the tools and tips at your disposal, it’s time to get cooking! Enjoy the process, savor the flavors, and share this delightful Tomato Cucumber Avocado Salad with family and friends. Remember, cooking is about joy and creativity—so don’t stress, just have fun in the kitchen!

Tomato Cucumber Avocado Salad

Prep Time 10 minutes
Total Time 10 minutes
Servings 4 servings
Calories 150
A fresh and vibrant salad combining juicy tomatoes, crisp cucumbers, and creamy avocado, perfect for a light meal or side dish.

Ingredients

Vegetables

  • 1 cup grape tomatoes, halved
  • 2 large English cucumber, sliced and quartered
  • 1 piece avocado, chopped
  • 0.25 cup cilantro, chopped
  • 1.5 tablespoons lemon juice (roughly from 1/2 lemon)
  • 1 tablespoon extra virgin olive oil
  • 0.25 teaspoon salt
  • 0.125 teaspoon ground black pepper

Instructions 

  • Combine tomatoes, cucumber, avocado, and cilantro in a large bowl.
  • Mix lemon juice, olive oil, salt, and pepper in a small bowl.
  • Pour dressing over the salad and toss gently.

Notes

Use fresh ingredients for best flavor.
Calories: 150kcal
Cost: $8
Course: Salad
Keyword: Avocado, Cucumber, Tomato