Author

Steven

Browsing

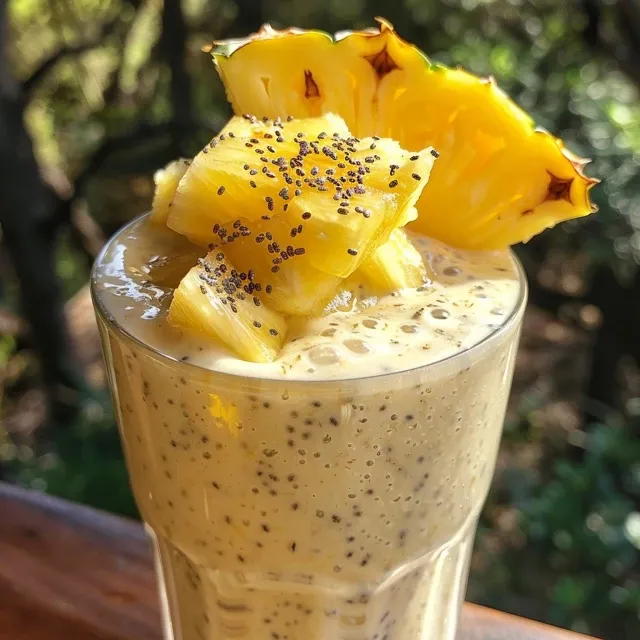
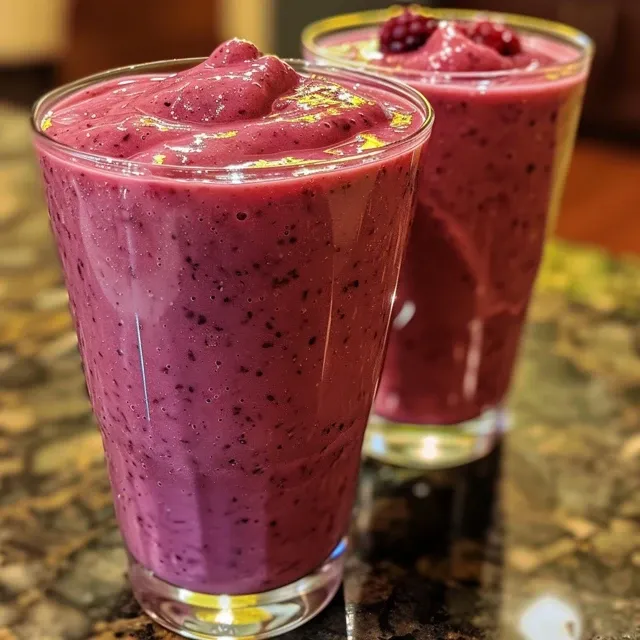
Discover the Ultimate Banana Berry Smoothie

If you’re looking for a delicious and nutritious way to start your day, look no further than this banana berry smoothie. This smoothie is not only refreshing but also packed with essential nutrients that will give you a boost of energy and keep you satisfied throughout the morning. Made with frozen ripe bananas, mixed berries, Greek yogurt, and a touch of honey, this smoothie is the perfect blend of flavors and health benefits. Let’s dive into why this smoothie should become your new favorite pick-me-up!

Why You’ll Love This Recipe

Here are just a few reasons why this banana berry smoothie is a must-try:

  • Quick and Easy: This smoothie can be whipped up in just a few minutes, making it perfect for busy mornings or a midday snack.
  • Nutrient-Packed: Filled with vitamins and antioxidants from berries and bananas, this smoothie supports overall health and wellness.
  • Customizable: You can easily swap in different fruits or yogurts based on your personal preferences or what you have on hand.
  • Natural Sweetness: The honey adds just the right amount of sweetness without overpowering the natural flavors of the fruits.
  • Kid-Friendly: This smoothie is a hit with kids, making it an excellent choice for a healthy breakfast or snack.

Ingredients You’ll Need

Gather these simple ingredients for your banana berry smoothie:

  • 1 piece frozen ripe banana, peeled and cut into 1-inch (2.5 cm) pieces
  • 1 cup frozen mixed berries (strawberries, blueberries, raspberries)
  • 0.5 cup low-fat plain Greek yogurt
  • 0.5 cup pomegranate juice (or any fruit juice of your choice)
  • 4 teaspoons honey (adjust based on your sweetness preference)

Feel free to substitute any of the ingredients based on what you have at home:

  • Yogurt Swap: Use flavored yogurt for extra taste or a dairy-free alternative if needed.
  • Berry Mix: Any frozen berries work well—try blackberries or a berry blend for more variety!
  • Juice Alternatives: Apple juice or coconut water can replace pomegranate juice for a different flavor profile.

How to Make Your Banana Berry Smoothie

A vibrant smoothie made with bananas and mixed berries in a clear glass.

Follow these simple steps to create your perfect smoothie:

  1. Peeled and cut the banana into 1-inch pieces.
  2. Place the banana, frozen berries, Greek yogurt, pomegranate juice, and honey into a blender.
  3. Blend until smooth, stopping to stir if necessary.
  4. If the smoothie is too thick, add more juice and blend again until you achieve your desired consistency.
  5. Pour into glasses and serve immediately for the best taste and texture.

Expert Tips for the Perfect Smoothie

Here are some pro tips to elevate your banana berry smoothie:

  • Frozen Ingredients: Always use frozen fruits for a thicker and colder smoothie.
  • Optimal Blending: Start blending on low speed and gradually increase to high for a smoother texture.
  • Personalize Your Sweetness: Adjust the amount of honey according to your taste; you can also use maple syrup or agave nectar.
  • Add Greens: Sneak in a handful of spinach or kale for added nutrients without altering the taste.
  • Protein Boost: Add a scoop of protein powder or nut butter to make it more filling.
  • Chill Your Glass: For an extra refreshing experience, chill your glasses in the freezer before serving.
  • Mix It Up: Experiment with flavor combinations—try adding a dash of cinnamon or vanilla extract!
  • Batch Blend: Make a larger batch and store leftovers in the fridge for a quick grab-and-go option.

Common Mistakes & Troubleshooting

Even the best recipes have their pitfalls. Here’s how to avoid common mistakes:

  • Too Thick: If your smoothie is too thick, simply add more juice or a splash of milk and blend again.
  • Too Sweet: If it’s too sweet, balance it with a splash of lemon juice or add more yogurt.
  • Not Blending Well: Ensure your blender is powerful enough and add liquid first for easier blending.
  • Off-Flavors: Always use fresh ingredients; old fruit can lead to undesirable flavors.

Delicious Variations to Try

Feeling adventurous? Here are some fun variations of the classic banana berry smoothie:

  • Peanut Butter Banana Berry: Add a tablespoon of peanut butter for a creamy texture and nutty flavor.
  • Chocolate Berry Delight: Blend in a tablespoon of cocoa powder for a chocolatey twist on your smoothie.
  • Coconut Bliss: Use coconut milk instead of juice and add shredded coconut for a tropical flavor.
  • Green Power: Add a handful of spinach or kale for a nutrient boost without compromising flavor.

Storage & Make-Ahead Instructions

Want to prepare your smoothie in advance? Here’s how:

  • Prepped Ingredients: You can prep and freeze the banana, berries, and yogurt in a bag. Just add juice and blend when you’re ready.
  • Leftover Smoothie: Store any leftover smoothie in an airtight container in the fridge for up to 24 hours. Stir well before drinking.
  • Frozen Smoothie Packs: Create smoothie packs with all the ingredients; just blend with your liquid of choice in the morning!

Frequently Asked Questions

Here are some common questions about this banana berry smoothie:

  • Can I use fresh fruit instead of frozen? Yes, but you may need to add ice to achieve a thicker consistency.
  • Is this smoothie vegan-friendly? Use a dairy-free yogurt and substitute honey with maple syrup.
  • How can I make this smoothie more filling? Add oats or protein powder for extra fiber and protein.
  • Can I make this smoothie without yogurt? Absolutely! You can replace it with a banana or use more juice or milk.
  • How long does this smoothie last? It’s best enjoyed fresh, but you can store it in the refrigerator for up to 24 hours.
  • What’s the best blender for smoothies? A high-speed blender is ideal for achieving a creamy texture, but any blender will work.
  • Can I add other fruits? Definitely! Feel free to experiment with mango, peaches, or any favorite fruits.
  • How do I make it less sweet? Reduce the amount of honey or use unsweetened yogurt.

Nutritional Tips & Dietary Adaptations

This banana berry smoothie is not just delicious; it’s also packed with health benefits:

  • Rich in Antioxidants: The mixed berries provide essential vitamins and antioxidants that help fight inflammation.
  • High in Protein: Greek yogurt adds protein, which is essential for muscle recovery and satiety.
  • Low in Calories: This smoothie is low in calories and can fit easily into most diets.
  • Fiber-Rich: Bananas and berries are high in fiber, promoting healthy digestion.

Essential Equipment for Smoothie Success

To make your smoothie preparation seamless, here’s what you’ll need:

  • High-Speed Blender: A powerful blender makes all the difference for a smooth consistency.
  • Measuring Cups: Accurate measuring ensures you get the right balance of flavors.
  • Spatula: Handy for scraping down the sides of the blender to ensure everything is well mixed.
  • Glass or Mason Jar: Perfect for serving your smoothie and on-the-go convenience.

Serving Suggestions

Serve your banana berry smoothie with a few of these ideas:

  • Top with Granola: Sprinkle some granola on top for added crunch and texture.
  • Garnish with Fresh Berries: A few whole berries make a beautiful presentation.
  • Pair with Whole Grain Toast: Enjoy with a slice of whole grain toast for a balanced meal.

In conclusion, this banana berry smoothie is an easy, delicious, and nutritious recipe that anyone can make in minutes. Whether you’re looking for a quick breakfast or a refreshing snack, it’s sure to satisfy. Remember, cooking is all about experimenting and finding what works best for you, so don’t hesitate to make this recipe your own. Happy blending!

Banana Berry Smoothies Recipe

Prep Time 5 minutes
Total Time 5 minutes
Servings 2 cups
Calories 250
A delicious and healthy smoothie combining ripe bananas and berries for a refreshing treat.

Ingredients

Fruits

  • 1 piece frozen ripe banana (peeled and cut into 1-inch pieces)
  • 1 cup frozen berries
  • 0.5 cup low-fat plain Greek yogurt
  • 0.5 cup pomegranate juice (plus more if necessary)
  • 4 teaspoons honey

Instructions 

  • Peel and cut the banana into 1-inch pieces.
  • Place banana, berries, yogurt, juice, and honey into blender.
  • Blend until smooth, stopping to stir if needed.
  • If too thick, add more juice and blend again.
  • Pour into glasses and serve immediately.

Notes

For a colder smoothie, use frozen berries and banana.
Calories: 250kcal
Cost: $8
Course: Breakfast, Snack
Cuisine: American
Keyword: Fruit, Smoothie

Discover the Joy of Cooking with This Lemon Herb Chicken Salad

If you’re looking for a refreshing, flavorful dish that’s easy to prepare and perfect for any occasion, you’ve come to the right place! This Lemon Herb Chicken Salad is not just a delight for your taste buds but also a simple way to impress your family and friends. With its vibrant ingredients and zesty dressing, this salad is a breeze to whip up, making it ideal for quick meals or laid-back gatherings. Let’s dive into the reasons why you’ll love this recipe and how you can make it your own!

Why You’ll Love This Recipe

This Lemon Herb Chicken Salad is a must-try for several reasons:

  • Quick and Easy: Perfect for busy weeknights, this salad can be prepared in under 30 minutes with minimal cooking.
  • Flavorful and Refreshing: The combination of fresh herbs and zesty lemon juice brings a bright flavor that elevates the dish.
  • Healthy and Nutritious: Packed with lean protein from chicken and fresh vegetables, this salad is a wholesome option for any meal.
  • Versatile Ingredients: You can easily customize this salad with your favorite veggies and nuts, making it adaptable for various dietary preferences.
  • Make-Ahead Friendly: This salad tastes even better after chilling, allowing the flavors to meld beautifully.

Ingredients You’ll Need

Here’s the ingredient list for this delightful Lemon Herb Chicken Salad. Feel free to customize based on your preferences!

  • 3 cups cooked chicken: Shredded or diced, you can use rotisserie chicken for convenience.
  • 1/2 cup mayonnaise: For creaminess; Greek yogurt can be substituted for a lighter option.
  • 2 tablespoons Greek yogurt: Adds tanginess and creaminess.
  • 2 tablespoons fresh lemon juice: Essential for that bright, zesty flavor.
  • 1 teaspoon lemon zest: Enhances the lemon flavor, giving a fragrant touch.
  • 1/2 cup finely chopped celery: Adds crunch and freshness.
  • 1/4 cup finely chopped red onion: Provides a mild sweetness and color.
  • 1/4 cup chopped fresh parsley: Adds a burst of color and freshness.
  • 1 tablespoon chopped fresh dill: Complements the lemon beautifully with its unique flavor.
  • 1/2 teaspoon salt: Enhances all the flavors.
  • 1/4 teaspoon black pepper: Adds a hint of spice.
  • 1/4 cup chopped cucumbers (optional): For extra crunch and freshness.
  • 2 tablespoons chopped almonds or walnuts (optional): For added texture and nutty flavor.
  • 1 tablespoon chopped chives (optional): A mild onion flavor that enhances the dish.

How to Make This Lemon Herb Chicken Salad

Juicy Lemon Herb Chicken Salad displayed in a bowl, showing fresh herbs and chicken.

Let’s break down the steps to create this mouth-watering salad:

  • Step 1: Prepare the Chicken: Start with 3 cups of cooked chicken, either shredded or diced into small pieces. Place the chicken into a large mixing bowl.
  • Step 2: Chop the Vegetables and Herbs: Finely chop 1/2 cup of celery and 1/4 cup of red onion. Chop 1/4 cup of fresh parsley and 1 tablespoon of fresh dill. Add all the chopped vegetables and herbs to the bowl with the chicken.
  • Step 3: Make the Lemon Herb Dressing: In a small bowl, combine 1/2 cup of mayonnaise, 2 tablespoons of Greek yogurt, 2 tablespoons of fresh lemon juice, and 1 teaspoon of lemon zest. Add 1/2 teaspoon of salt and 1/4 teaspoon of black pepper. Mix until smooth and creamy.
  • Step 4: Combine Everything: Pour the dressing over the chicken and vegetable mixture. Stir gently until everything is evenly coated.
  • Step 5: Add Optional Ingredients: If using, fold in 1/4 cup of chopped cucumbers, 2 tablespoons of chopped nuts, and 1 tablespoon of chives. Mix gently to combine.
  • Step 6: Chill and Serve: Cover the bowl and refrigerate the salad for at least 20-30 minutes before serving. This allows the flavors to meld beautifully. Serve chilled.

Pro Tips for the Best Lemon Herb Chicken Salad

To ensure your salad is a hit, consider these expert tips:

  • Use Fresh Ingredients: Fresh herbs and vegetables significantly enhance the flavor of your salad.
  • Marinate Chicken: Marinate your chicken in lemon juice and herbs for added flavor before cooking.
  • Chill Before Serving: Chilling the salad allows the flavors to develop and blend better.
  • Experiment with Add-Ins: Feel free to add diced apples, grapes, or even feta cheese for a unique twist.
  • Make It a Meal: Serve this salad on a bed of greens or in a wrap for a complete meal.
  • Adjust Seasoning: Taste and adjust the seasoning to your liking; everyone’s palate is different.
  • Store Properly: Keep any leftovers in an airtight container in the fridge for up to 3 days.
  • Use Different Proteins: Try substituting chicken with turkey or chickpeas for a vegetarian version.
  • Garnish for Presentation: Add extra herbs or lemon slices on top for an inviting look.
  • Mind the Dressing: If the salad seems too dry, add a splash more lemon juice or yogurt to moisten it.

Common Mistakes and Troubleshooting

Here are some common pitfalls and how to avoid them:

  • Over-Dressing: Avoid soggy salad by adding the dressing gradually and mixing well.
  • Too Much Salt: Start with less salt and gradually add more to taste.
  • Using Dried Herbs: Fresh herbs elevate the dish, so use them whenever possible.
  • Skipping the Chill Time: Allowing the salad to chill is key for flavor development; don’t skip this step!

Variations to Try

Feel free to customize your Lemon Herb Chicken Salad with these variations:

  • Spicy Kick: Add diced jalapeños or a pinch of cayenne pepper for heat.
  • Fruit Infusion: Toss in diced apples or grapes for a sweet contrast.
  • Mediterranean Style: Incorporate olives and feta cheese for a Mediterranean twist.
  • Asian Flair: Substitute the dressing with a sesame ginger dressing and add sliced almonds.

Storage and Make-Ahead Instructions

This salad can be made ahead of time:

  • Make Ahead: Prepare the salad up to a day in advance and store it in the fridge.
  • Storage: Keep it in an airtight container for up to 3 days. The flavors will continue to develop.
  • Freezing: Not recommended, as the texture of the salad will change upon thawing.

Nutrition Tips and Dietary Adaptations

This Lemon Herb Chicken Salad can easily be adapted to fit various dietary needs:

  • Low-Carb Option: Skip the mayonnaise and use avocado instead for a creamy texture.
  • Dairy-Free: Omit Greek yogurt and use a dairy-free alternative.
  • Paleo-Friendly: Use homemade mayonnaise and skip any added sugars.
  • Gluten-Free: All ingredients are naturally gluten-free, making this salad safe for gluten-sensitive individuals.

Frequently Asked Questions

Got questions? Here are some common inquiries about Lemon Herb Chicken Salad:

  • Can I use leftover chicken? Absolutely! Leftover rotisserie chicken works great.
  • How long does this salad last? It stays fresh in the fridge for up to 3 days.
  • Can I freeze the salad? It’s not recommended due to the change in texture upon thawing.
  • What can I substitute for mayonnaise? Greek yogurt or avocado works well as a substitute.
  • Is this salad suitable for meal prep? Yes! It’s perfect for meal prep and keeps well in the fridge.
  • Can I add other vegetables? Definitely! Feel free to add your favorite veggies.
  • How can I make it spicier? Add diced jalapeños or a dash of hot sauce to the dressing.
  • What’s the best way to serve it? Serve it chilled on a bed of greens, in a wrap, or with crackers.

Equipment Recommendations

To make this Lemon Herb Chicken Salad, you’ll need:

  • Mixing Bowl: A large bowl for combining all ingredients.
  • Cutting Board and Knife: For chopping vegetables and herbs effectively.
  • Measuring Cups and Spoons: To ensure precise ingredient measurements.
  • Whisk: For mixing the dressing until smooth.

Serving Suggestions

Here are some delightful ways to serve your Lemon Herb Chicken Salad:

  • On a Bed of Greens: Serve it over mixed greens for a fresh, healthy meal.
  • In a Wrap: Use a tortilla or lettuce leaves for a low-carb option.
  • With Crackers: Serve with whole-grain crackers as a light snack or appetizer.
  • As a Sandwich Filling: Spread it between slices of your favorite bread for a delicious sandwich.

Conclusion

This Lemon Herb Chicken Salad is more than just a recipe; it’s a celebration of fresh flavors and simple cooking. With its versatility, you can easily adapt it to suit your tastes or dietary needs. Whether you’re hosting a gathering, preparing a quick dinner, or simply looking for a satisfying lunch, this salad is sure to impress. So grab your ingredients and let’s create something delicious together! Happy cooking!

Lemon Herb Chicken Salad

Prep Time 15 minutes
Cook Time 15 minutes
Total Time 30 minutes
Servings 4 servings
Calories 250
A fresh and flavorful chicken salad infused with lemon and herbs, perfect for a light lunch or dinner.

Ingredients

Chicken

  • 3 cups cooked chicken, shredded or diced

Dressing

  • 0.5 cup mayonnaise
  • 2 tablespoons Greek yogurt
  • 2 tablespoons fresh lemon juice
  • 1 teaspoon lemon zest

Vegetables and Herbs

  • 0.5 cup finely chopped celery
  • 0.25 cup finely chopped red onion
  • 0.25 cup chopped fresh parsley
  • 1 tablespoon chopped fresh dill
  • 0.5 teaspoon salt
  • 0.25 teaspoon black pepper
  • 0.25 cup chopped cucumbers (optional) (optional)
  • 2 tablespoons chopped almonds or walnuts (optional) (optional)
  • 1 tablespoon chopped chives (optional) (optional)

Instructions 

  • Combine cooked chicken in a large bowl.
  • Finely chop celery, red onion, parsley, and dill; add to the chicken.
  • Mix mayonnaise, Greek yogurt, lemon juice, lemon zest, salt, and black pepper to make the dressing.
  • Pour dressing over chicken and vegetables; stir gently to coat.
  • Fold in optional cucumbers, nuts, and chives if desired. Chill for 20-30 minutes before serving.

Notes

For best flavor, refrigerate the salad for at least 20 minutes before serving.
Calories: 250kcal
Cost: $12
Course: Salad
Cuisine: American
Keyword: Chicken, herbs, lemon

Discover the Joy of Baking: 4-Ingredient Banana Oatmeal Bars

If you’re searching for a delicious and healthy snack that’s easy to whip up, look no further! These 4-Ingredient Banana Oatmeal Bars are a perfect blend of sweetness, nutrition, and simplicity. Made with ripe bananas, creamy almond butter, rolled oats, and chocolate chips, these bars are not only satisfying but also incredibly versatile. Whether you enjoy them as a breakfast option, a post-workout snack, or a treat for your kids, these bars are sure to become a staple in your kitchen.

Let’s dive deeper into why this recipe is a must-try and how you can make it your own!

Why You’ll Love This Recipe

  • Quick and Easy Preparation: With only four main ingredients, you can have these bars ready in no time, making it perfect for busy weekdays.
  • Nutritious Snack: Packed with fiber and healthy fats, these bars keep you full longer and are a great choice for a guilt-free indulgence.
  • Customizable: Feel free to add your favorite nuts, seeds, or dried fruits to make these bars uniquely yours!
  • Kid-Friendly: Kids will love the sweet taste of bananas and chocolate chips, making these bars an excellent option for school lunches.
  • Freezer-Friendly: Make a big batch and freeze them for a quick snack any time you need it!

Ingredient Breakdown

To make your banana oatmeal bars, you’ll need the following ingredients:

  • 3 large ripe bananas (about 1 ½ cups mashed): The riper the banana, the sweeter the bars will be. Look for bananas with brown spots for the best flavor.
  • ½ cup creamy almond butter (120g): This adds richness and healthy fats. You can substitute with peanut butter if you prefer.
  • 2 cups rolled oats (200g): Old-fashioned oats work best for this recipe, providing the right texture. Quick oats can also be used if that’s what you have on hand.
  • 1 cup chocolate chips (170g): Semi-sweet or dark chocolate chips add a delightful sweetness. For a healthier option, consider using dark chocolate or cacao nibs.
  • 1 tsp pure vanilla extract: This enhances the flavor of the bars.
  • ¼ tsp sea salt: A pinch of salt balances the sweetness.
  • 1 tsp ground cinnamon: This adds warmth and depth to the flavor. Feel free to adjust according to your taste.
  • 2/3 cup chopped walnuts or pecans (100g): Optional, but they add a nice crunch and extra nutrition.

How to Make 4-Ingredient Banana Oatmeal Bars

Side view of freshly baked banana oatmeal bars showcasing their chewy texture.

Follow these simple steps to create your delicious bars:

  1. Preheat the oven: Set your oven to 350°F (175°C) and line a 9 x 9-inch baking pan with parchment paper. You can also use an 8 x 8-inch cake pan for thicker bars.
  2. Mash the bananas: In a large bowl, mash the bananas until creamy, ensuring there are no large chunks left.
  3. Mix in almond butter: Stir the almond butter into the mashed bananas until well combined, forming a thick mixture.
  4. Add oats and chocolate chips: Fold in the rolled oats, chocolate chips, and any optional nuts until everything is well mixed.
  5. Transfer to pan: Pour the mixture into the prepared baking pan and smooth it out evenly.
  6. Bake: Place the pan in the center of the oven and bake for 18 to 25 minutes, or until the edges are golden brown and the bars look set.
  7. Cool and slice: Allow the bars to cool completely in the pan before slicing into squares or bars.

Pro Tips for Perfect Bars

  • Use overripe bananas: They not only provide natural sweetness but also create a smoother texture for the bars.
  • Don’t overmix: When combining ingredients, mix just until everything is incorporated to keep the bars tender.
  • Adjust sweetness: If you prefer sweeter bars, add a tablespoon of honey or maple syrup to the mixture.
  • Watch the bake time: Ovens can vary; check your bars at the 18-minute mark to prevent over-baking.
  • Chill before serving: For a firmer texture, refrigerate the bars for about an hour before slicing.
  • Try different nut butters: If almond butter isn’t your thing, feel free to experiment with cashew or sunflower seed butter.
  • Use a toothpick: Insert a toothpick into the center of the bars; if it comes out clean, they’re done!
  • Store properly: Keep the bars in an airtight container to maintain freshness.

Common Mistakes and Troubleshooting

Here are some common pitfalls to avoid when making your banana oatmeal bars:

  • Bananas not ripe enough: Using bananas that aren’t fully ripe will result in less sweet bars. Always choose brown-spotted bananas!
  • Using too much liquid: If your almond butter is runny, use a little less to balance the moisture.
  • Not cooling before slicing: Cutting the bars too soon can make them crumble. Allow them to cool completely!
  • Overbaking: Keep an eye on the bars; they should be golden and set, not dry.

Variations to Try

Get creative with your banana oatmeal bars by trying these variations:

  • Peanut Butter Chocolate Chip: Substitute almond butter with peanut butter for a classic flavor combo.
  • Berry Bliss: Add ½ cup of fresh or frozen berries like blueberries or raspberries for a fruity twist.
  • Coconut Delight: Stir in ½ cup of shredded coconut for added texture and flavor.
  • Protein-Packed: Incorporate a scoop of your favorite protein powder for an extra boost.

Storage and Make-Ahead Instructions

To keep your banana oatmeal bars fresh:

  • Store in an airtight container in the refrigerator for up to 1 week.
  • For longer storage, freeze the bars in a single layer on a baking sheet, then transfer to a freezer-safe bag for up to 3 months.
  • To enjoy frozen bars, let them thaw in the fridge overnight or pop them in the microwave for a few seconds.

Comprehensive FAQ

Here are some frequently asked questions about making banana oatmeal bars:

  • Can I make these bars gluten-free? Yes! Use certified gluten-free oats for a gluten-free version.
  • What if I don’t have chocolate chips? You can replace them with nuts, seeds, or dried fruits according to your preference.
  • Can I use instant oats instead of rolled oats? Instant oats can work, but the texture may be different—more mushy than chewy.
  • Can I add protein powder? Absolutely! Just reduce the amount of oats slightly to maintain the balance.
  • Are these bars suitable for kids? Yes! They’re a healthy, delicious snack that kids will enjoy.
  • How do I know when the bars are done? They should be golden brown around the edges and firm to the touch.
  • Can I use another nut butter? Yes! Feel free to swap almond butter with any nut or seed butter you like.
  • What’s the best way to slice these bars? Use a sharp knife or pizza cutter for clean cuts after they’ve cooled completely.

Nutritional Information and Dietary Adaptations

These banana oatmeal bars are not only delicious but also nutritious! Each bar provides a good balance of carbohydrates, healthy fats, and fiber. You can easily adapt this recipe for various dietary needs:

  • Vegan: Ensure the chocolate chips are dairy-free and check the almond butter for any added ingredients.
  • Nut-Free: Substitute almond butter with sunflower seed butter.
  • Lower Sugar: Reduce the amount of chocolate chips or omit them entirely.

Equipment Recommendations

To make the process easier, here are some essential kitchen tools:

  • Mixing Bowl: A medium-sized bowl for mixing your ingredients.
  • Measuring Cups: Accurate measurements are key to a successful recipe.
  • Baking Pan: A 9 x 9-inch or 8 x 8-inch pan works perfectly for this recipe.
  • Parchment Paper: Helps prevent sticking and makes for easy cleanup.
  • Spatula: For mixing and spreading the batter into the pan.

Serving Suggestions

These banana oatmeal bars can be enjoyed in various ways:

  • Serve warm with a drizzle of honey or maple syrup for a sweet breakfast treat.
  • Pair with yogurt and fresh fruit for a balanced meal.
  • Crumble over ice cream for a delightful dessert.
  • Enjoy as a mid-afternoon snack with a cup of tea or coffee.

Conclusion

With their delightful taste and health benefits, these 4-Ingredient Banana Oatmeal Bars are sure to become a favorite in your home. They’re simple to make, customizable, and perfect for any time of the day. So grab those ripe bananas and start baking! You’ll be amazed at how something so easy can bring so much joy to your kitchen. Happy cooking!

4-Ingredient Banana Oatmeal Bars

Prep Time 10 minutes
Cook Time 20 minutes
Total Time 30 minutes
Servings 9 bars
Calories 250
These easy, healthy banana oatmeal bars require just four ingredients and are perfect for a quick snack or breakfast.

Ingredients

Main

  • 3 large ripe bananas (mashed)
  • 0.5 cup creamy almond butter
  • 2 cups rolled oats
  • 0.25 cup chocolate chips
  • 1 tsp pure vanilla extract
  • 0.25 tsp sea salt
  • 1 tsp ground cinnamon
  • 0.33 cup chopped walnuts or pecans

Instructions 

  • Preheat oven to 350°F and line a 9x9 pan with parchment paper.
  • Mash bananas until smooth and creamy.
  • Mix in almond butter until well combined.
  • Stir in oats and chocolate chips until evenly distributed.
  • Transfer mixture to pan, smooth the top, and bake for 18-25 minutes. Cool before slicing.

Notes

Store in an airtight container for up to 3 days.
Calories: 250kcal
Cost: $10
Course: Snack
Cuisine: American
Keyword: Banana, oatmeal

Discover the Refreshing Delight of Strawberry Watermelon Juice

Are you ready to quench your thirst with a cool and invigorating drink? Look no further than this simple yet delightful strawberry watermelon juice recipe! Combining the natural sweetness of watermelon with the tartness of strawberries and a zesty lemon twist, this juice is perfect for any occasion—be it a hot summer day, a family gathering, or just a refreshing treat at home. In this comprehensive guide, we’ll explore everything you need to know about making this delicious juice, from ingredient breakdowns to expert tips, variations, and more!

Why You’ll Love This Recipe

This recipe is not just about delicious flavors; it’s also packed with benefits that make it a fantastic choice for your next juice drink. Here’s why you’ll love making this strawberry watermelon juice:

  • Hydrating goodness: Watermelon is composed of over 90% water, making this juice a fantastic way to stay hydrated.
  • Boosts immune health: Strawberries are rich in vitamin C, which can help enhance your immune system.
  • Natural sweetness: This juice recipe is naturally sweetened with fruits, so you don’t need to add any sugar!
  • Quick and easy: With just three ingredients and a high-speed blender, you can whip this up in minutes.
  • Kid-friendly: This colorful drink is sure to be a hit with kids and adults alike!

Essential Ingredients for Strawberry Watermelon Juice

To create this delicious juice, you will need the following ingredients:

  • 2 cups Watermelon: Choose ripe, juicy watermelon for the best flavor. You can use seedless watermelon or remove the seeds yourself.
  • 2 cups Frozen Strawberries: Using frozen strawberries adds a nice chill to the juice without diluting it. Feel free to use fresh strawberries if you prefer; just add a few ice cubes when blending.
  • Juice of 1 Lemon: The lemon juice adds a zesty twist that complements the sweetness of the fruits.

If you don’t have these exact ingredients on hand, here are some substitutions you can consider:

  • Watermelon: You can replace it with cantaloupe or honeydew for a different flavor profile.
  • Frozen Strawberries: Fresh strawberries or even other frozen berries like raspberries or blueberries can work well.
  • Lemon Juice: If you don’t have fresh lemons, bottled lemon juice can be used in a pinch.

Step-by-Step Instructions for Juicing

Side view of a refreshing strawberry watermelon juice served in a clear glass, showcasing its rich color.

Making this strawberry watermelon juice is a breeze! Just follow these simple steps:

  1. Pour the watermelon, frozen strawberries, and juice of 1 lemon into a blender container.
  2. Blend on high speed until the mixture becomes liquefied. If needed, use a tamper tool to help push down the ingredients for even blending.
  3. Once blended to your desired consistency, pour into glasses and enjoy immediately!

Expert Tips for the Best Juice

To ensure your juice is the best it can be, here are some expert tips to keep in mind:

  • Choose ripe fruits: The quality of your juice depends on the ripeness of the fruits used. Make sure your watermelon is sweet and your strawberries are bright red.
  • Don’t forget to chill: If you prefer a super refreshing drink, chill your watermelon beforehand or add some ice after blending.
  • Experiment with herbs: For an extra twist, add a few mint leaves or basil to the blender for a fresh flavor.
  • Adjust sweetness: Taste your juice before serving and adjust the sweetness to your liking. You can add a little honey or agave syrup if desired.
  • Use a quality blender: A high-speed blender will give you a smoother juice, so consider investing in a good one if you enjoy juicing regularly.

Common Mistakes and Troubleshooting

Even the best recipes can have hiccups! Here are some common mistakes to avoid and how to troubleshoot them:

  • Too thick: If your juice is too thick, add a little water or more lemon juice to thin it out.
  • Not sweet enough: If the juice lacks sweetness, try adding a small amount of honey or agave syrup.
  • Seeds in the juice: If you’re using watermelon with seeds, make sure to remove them before blending for a smooth texture.

Delicious Variations to Try

Feeling adventurous? Here are some fun variations to this basic juice recipe:

  • Berry Blast: Add a cup of mixed berries (like blueberries or raspberries) for an antioxidant boost.
  • Peachy Watermelon: Incorporate some fresh peaches for a sweet, summery twist.
  • Green Juice: Blend in a handful of spinach or kale for an added nutritional punch.
  • Citrus Twist: Add orange juice or lime juice for a different citrus flavor.

Storage and Make-Ahead Instructions

This juice is best enjoyed fresh, but if you have leftovers, here’s how to store them:

  • Refrigeration: Store any remaining juice in an airtight container in the refrigerator for up to 2 days.
  • Freezing: You can freeze the juice in ice cube trays and use them later in smoothies or other drinks.

Frequently Asked Questions

Here are some common questions about making strawberry watermelon juice:

  • Can I use fresh strawberries instead of frozen? Yes, but adding some ice will help chill the juice.
  • Is this juice suitable for kids? Absolutely! It’s a nutritious and tasty drink for all ages.
  • How long does this juice last in the fridge? It’s best consumed within 48 hours for optimal freshness.
  • Can I add other fruits? Definitely! Feel free to get creative with your favorite fruits.
  • Does this juice contain any added sugar? No, it’s naturally sweetened from the fruits.
  • What can I serve this juice with? This juice pairs wonderfully with breakfast items, light snacks, or as a refreshing drink on its own.
  • Can I use a juicer instead of a blender? While this recipe is designed for a blender, you can use a juicer, but you may need to adjust the ingredient ratios.
  • Is this juice vegan? Yes, it’s completely plant-based and suitable for vegans.

Nutritional Benefits and Dietary Adaptations

This strawberry watermelon juice is not only delicious but also packed with nutrients:

  • Low in calories: Perfect for those watching their calorie intake.
  • High in vitamins: Vitamin C from strawberries and hydration from watermelon.
  • Vegan-friendly: Made entirely from plant-based ingredients.

Recommended Equipment

For making this juice, here’s what you’ll need:

  • High-speed blender: To ensure a smooth and creamy texture.
  • Tamper tool: Helpful for pushing down ingredients during blending.
  • Juice strainer (optional): If you prefer a smoother juice, you can strain it after blending.

Serving Suggestions

Serve this refreshing juice in chilled glasses, garnished with a slice of lemon or a fresh strawberry on the rim. It’s perfect as a standalone drink or paired with light snacks like cheese platters, fruit salads, or even breakfast options like pancakes and waffles.

Conclusion

Now that you have all the tools and tips you need, it’s time to enjoy making and sipping on this refreshingly simple strawberry watermelon juice. Remember, cooking and creating should be fun and stress-free! So gather your ingredients, fire up your blender, and treat yourself to a delicious and nutritious drink. Happy juicing!

Strawberry Watermelon Juice Recipe

Prep Time 5 minutes
Total Time 5 minutes
Servings 2 cups
Calories 120
A refreshing and healthy juice combining sweet watermelon and strawberries with a hint of lemon.

Ingredients

Fruits

  • 2 cups Watermelon
  • 2 cups frozen Strawberries
  • 1 piece Lemon (Juice of 1 lemon)

Instructions 

  • Pour the watermelon, strawberries, and lemon juice into a blender.
  • Blend until liquified, pushing down with a tamper if needed.
  • Pour into glasses and enjoy!

Notes

Use chilled fruits for a colder, more refreshing drink.
Calories: 120kcal
Cost: $8
Course: Beverage
Keyword: lemon, strawberries, Watermelon

Discover the Joy of a Peach Mango Smoothie

If you’re looking for a refreshing and energizing drink that brightens up any time of day, look no further! This Peach Mango Smoothie is not only delicious but also packed with nutrients. Whether it’s breakfast, a midday snack, or a post-workout treat, this smoothie is perfect for a quick boost. With sweet and tangy flavors, you’ll find yourself reaching for this recipe time and time again.

In this comprehensive guide, we’ll explore everything you need to know about making the perfect peach mango smoothie. From ingredient breakdowns to expert tips, we’ve got you covered. Let’s get blending!

Why You’ll Love This Recipe

  • Quick and Easy: You can whip this smoothie up in just 10 minutes, making it a go-to for busy mornings.
  • Nutritious Ingredients: This smoothie is loaded with vitamins, antioxidants, and fiber from fresh or frozen fruits.
  • Customizable: Adjust the sweetness and creaminess to your taste with optional ingredients like yogurt and honey.
  • Perfect for All Ages: Kids and adults alike will enjoy this naturally sweet treat!
  • Versatile: Enjoy it as a breakfast, snack, or dessert—this smoothie is perfect for any occasion.

Ingredients You’ll Need

To create this delightful peach mango smoothie, gather the following ingredients:

  • 1 cup fresh or frozen peach slices: Use ripe peaches for a naturally sweet flavor.
  • 1 cup fresh or frozen mango chunks: Make sure your mangoes are at peak ripeness for the best taste.
  • ½ cup orange juice or coconut water: This adds a refreshing liquid base.
  • ½ cup plain yogurt or plant-based yogurt (optional): For a creamier texture.
  • 1 teaspoon honey or maple syrup (optional): Adjust sweetness to your liking.
  • 1 teaspoon chia seeds or flaxseeds (optional): Boost your smoothie with healthy omega-3s.
  • ½ teaspoon ground cinnamon or turmeric (optional): For added flavor and health benefits.
  • ½ cup ice cubes (optional): For a chilled, slushy texture.

Pro Tips for the Perfect Smoothie

Side view of a creamy peach mango smoothie topped with chia seeds.
  • Choose ripe fruit: Ripe peaches and mangoes will give your smoothie a rich, sweet flavor.
  • Blend in stages: Start with liquids, then add fruits, and finally any optional ingredients for a smooth consistency.
  • Taste as you go: Adjust sweetness by tasting the smoothie before adding more sweeteners.
  • Use frozen fruit: For a thicker texture, especially if you’re skipping ice.
  • Experiment with dairy alternatives: Almond, soy, or coconut yogurt can add unique flavors.
  • Add greens: Spinach or kale can be blended in without affecting the taste too much.
  • Prep ahead: Freeze portioned fruit for quick smoothie prep any time.
  • Invest in a good blender: A high-speed blender will ensure smooth, creamy results.
  • Mind your ratios: Keep a balance between fruits, liquids, and optional ingredients for the best flavor.
  • Garnish creatively: Top with extra chia seeds or a slice of fruit for a beautiful presentation.

Common Mistakes and Troubleshooting

Even the best cooks make mistakes! Here are some common pitfalls to avoid:

  • Too thick: If your smoothie is too thick, add more liquid a little at a time until you reach your desired consistency.
  • Too sweet: If it’s overly sweet, balance it out with a squeeze of lemon juice or a handful of greens.
  • Chunky texture: Ensure your blender is high-powered enough to break down the fruits completely.
  • Flavor imbalance: Add a pinch of salt to enhance the flavors if the smoothie tastes flat.

Variations to Try

Feel free to get creative with your peach mango smoothie! Here are some delicious variations:

  • Peach Mango Green Smoothie: Add a handful of spinach or kale for extra nutrients without compromising flavor.
  • Protein-Packed Smoothie: Mix in a scoop of your favorite protein powder for a post-workout boost.
  • Tropical Twist: Add a banana and some shredded coconut for an even more tropical vibe.
  • Berry Blast: Toss in a cup of mixed berries for an antioxidant-rich smoothie.

How to Store Your Smoothie

If you have leftovers (or want to prep in advance), here’s how to store your smoothie:

  • Refrigeration: Store in an airtight container for up to 24 hours. Shake well before consuming.
  • Freezing: Pour into freezer-safe containers or ice cube trays for up to 3 months. Blend with a little liquid after thawing.

Frequently Asked Questions

Here are some common questions regarding the peach mango smoothie:

  • Can I use canned peaches and mangoes? Yes, but choose options without added sugars for a healthier choice.
  • Is this smoothie vegan? Yes, if you use plant-based yogurt and sweeteners like maple syrup.
  • What if I don’t have yogurt? You can skip it or substitute with silken tofu for creaminess.
  • Can I make this smoothie without ice? Absolutely! Just use frozen fruit for thickness instead.
  • How can I increase the fiber content? Add more chia seeds or include a tablespoon of oats.
  • Is this smoothie kid-friendly? Yes! Kids will love the fruity flavors and it’s a great way to sneak in nutrition.
  • How can I make this smoothie lower in sugar? Use less sweetener and focus on ripe fruits for natural sweetness.
  • What’s the best time to drink this smoothie? Enjoy it as a breakfast, snack, or post-exercise refuel anytime!

Nutritional Benefits

This Peach Mango Smoothie not only tastes great but also offers numerous health benefits:

  • Rich in vitamins: Packed with vitamins A and C, essential for immune support and skin health.
  • High in antioxidants: Peaches and mangoes contain antioxidants that help combat free radicals.
  • Good source of fiber: Helps with digestion and keeps you feeling full longer.
  • Hydrating: The liquid base from orange juice or coconut water contributes to hydration.

Equipment Recommendations

To make the best peach mango smoothie, consider investing in the following kitchen tools:

  • High-speed blender: A powerful blender will ensure a smooth, creamy texture.
  • Measuring cups and spoons: For precise measurements of ingredients.
  • Storage containers: Use glass jars or BPA-free containers for storing leftovers.

Serving Suggestions

For a delightful presentation, consider these serving ideas:

  • Garnish: Top with fresh fruit slices or a sprinkle of chia seeds.
  • Pair it up: Serve with whole-grain toast or granola for a wholesome breakfast.
  • Smoothie bowl: Pour into a bowl and top with granola, nuts, or seeds for added texture.

Conclusion

Now that you have all the tools and knowledge to create a perfect Peach Mango Smoothie, it’s time to get blending! Remember, cooking is about enjoyment, so don’t stress over perfection. With this simple recipe, you can create a delicious, nutritious drink that may just become your new favorite. So go ahead, gather your ingredients, and enjoy the vibrant flavors of this refreshing smoothie. Happy blending!

Peach Mango Smoothie

Prep Time 5 minutes
Total Time 5 minutes
Servings 2 cups
Calories 180
A refreshing and nutritious smoothie combining the sweet flavors of peach and mango with optional add-ins for extra health benefits.

Ingredients

Fruits

  • 1 cup fresh or frozen peach slices
  • 1 cup fresh or frozen mango chunks
  • 0.5 cup orange juice or coconut water
  • 0.5 cup plain yogurt or plant-based yogurt (optional)
  • 1 teaspoon honey or maple syrup (optional)
  • 1 teaspoon chia seeds or flaxseeds (optional)
  • 0.5 teaspoon ground cinnamon or turmeric (optional)
  • 0.5 cup ice cubes (optional)

Instructions 

  • Place peach slices and mango chunks into a blender.
  • Pour in orange juice or coconut water.
  • Add yogurt and optional ingredients like chia seeds, spices.
  • Taste and add honey or syrup if needed.
  • Add ice cubes and blend until smooth.
  • Pour into glasses and serve immediately.

Notes

For a creamier texture, use frozen fruits and add more yogurt if desired.
Calories: 180kcal
Cost: $8
Course: Breakfast, Snack
Cuisine: Fusion
Keyword: Fruits, Smoothie

Revitalize Your Day with the Easiest Healthy Pineapple Smoothie Recipe

If you’re looking for a quick and refreshing drink to boost your energy and nutrition, this Healthy Pineapple Smoothie is your answer! Packed with flavor and health benefits, it’s a delightful way to start your day or enjoy as a mid-afternoon snack. In just five easy steps, you can whip up this vibrant smoothie that combines the sweetness of pineapple with the creaminess of Greek yogurt and the refreshing taste of coconut water. Let’s dive into why this smoothie is not just delicious but also a fantastic choice for your health!

Why You’ll Love This Recipe

This healthy pineapple smoothie isn’t just delicious; it’s also a powerhouse of nutrients! Here are five reasons you’ll adore it:

  • Packed with Vitamin C: Pineapple is rich in vitamin C, an essential antioxidant that supports your immune system and skin health.
  • Natural Electrolytes: Coconut water provides natural electrolytes, making this smoothie a perfect post-workout drink.
  • Quick and Easy: With just five ingredients, you can blend this smoothie in under 10 minutes, making it a hassle-free option for busy mornings.
  • Customizable: This recipe lends itself well to various modifications, allowing you to tailor the flavor and nutrition to your taste.
  • Gut-Friendly: Greek yogurt offers probiotics that promote gut health, adding creaminess and a protein boost to your smoothie.

Ingredients for the Perfect Healthy Pineapple Smoothie

Here’s what you’ll need to create your smoothie:

  • 1 cup frozen pineapple: This ensures a thick and frosty texture without watering it down.
  • 1/2 cup Greek yogurt: For a creamy base and a significant protein boost.
  • 1/2 banana: Adds natural sweetness and enhances the smoothie’s texture.
  • 1/2 cup coconut water: Provides hydration and electrolytes.
  • 1 tbsp chia seeds: Boosts fiber and omega-3 fatty acids, making your smoothie more filling.

Substitutions and Variations

Side view of a healthy smoothie featuring pineapple, banana, and chia seeds in a clear glass.

If you’re looking to switch things up, here are some substitutions and variations you can try:

  • Non-Dairy Option: Substitute Greek yogurt with coconut yogurt for a fully dairy-free smoothie.
  • Protein Boost: Add a scoop of your favorite protein powder for an extra protein punch.
  • Fruit Variations: Swap out pineapple for other fruits like mango or berries for a different flavor profile.
  • Green Smoothie: Toss in a handful of spinach or kale for added nutrients without compromising flavor.

Step-by-Step Guide to Making a Healthy Pineapple Smoothie

Follow these simple steps to create your smoothie:

  1. Layer the ingredients in your blender starting with the frozen pineapple, Greek yogurt, banana, coconut water, and chia seeds.
  2. Blend until smooth and creamy. If it’s too thick, you can add a little more coconut water or regular water to reach your desired consistency.
  3. Serve immediately in a chilled glass. Enjoy your refreshing drink!

Pro Tips for the Best Pineapple Smoothie

To ensure your smoothie turns out perfectly every time, keep these pro tips in mind:

  • Use Frozen Fruit: Frozen pineapple not only thickens the smoothie but also keeps it cold and refreshing.
  • Quality Ingredients: Opt for high-quality Greek yogurt and fresh coconut water for the best flavor.
  • Adjust Sweetness: Taste your smoothie before serving. If you prefer it sweeter, add a drizzle of honey or maple syrup.
  • Blend in Stages: If your blender struggles, start with the liquid and yogurt, then gradually add the frozen ingredients.
  • Chill Your Glass: For an extra refreshing experience, chill your serving glass in the freezer before pouring your smoothie.

Common Mistakes to Avoid

Here are a few common pitfalls to watch out for:

  • Using Fresh Pineapple: Fresh pineapple can make your smoothie too watery. Always use frozen for the best texture.
  • Over-blending: Blend just until smooth to avoid a warm, less refreshing drink.
  • Skipping the Chia Seeds: They add beneficial fiber and omega-3s, enhancing the nutritional value of your smoothie.

Storage and Make-Ahead Instructions

If you want to prepare your smoothie in advance, here’s how:

  • Make-Ahead Packs: Combine all the solids (fruits, chia seeds, yogurt) in a freezer bag and freeze. When you’re ready, just add your coconut water and blend.
  • Storage: If you have leftovers, store your smoothie in the refrigerator for up to 24 hours in a tightly sealed container. Stir before consuming, as it may separate.

Comprehensive FAQ About Healthy Pineapple Smoothies

Got questions? Here are some common inquiries:

  • 1. Is a healthy pineapple smoothie good for weight loss? Yes, it’s low in calories and packed with nutrients, making it a great option for weight management.
  • 2. Can I use fresh pineapple instead of frozen? While you can, using frozen pineapple helps achieve a thicker texture without diluting the flavor.
  • 3. How can I make this smoothie vegan? Substitute Greek yogurt with a plant-based yogurt and ensure your protein powder is vegan.
  • 4. How long can I store a smoothie? It’s best consumed fresh, but you can store leftovers in the fridge for up to 24 hours.
  • 5. Can I add greens? Absolutely! A handful of spinach or kale blends well without overpowering the flavor.
  • 6. What if I don’t have coconut water? You can substitute with regular water or almond milk for a different taste.
  • 7. How do I sweeten my smoothie? If you prefer a sweeter smoothie, add a bit of honey, agave syrup, or a few dates.
  • 8. Can I make this smoothie in bulk? Yes! Just quadruple the ingredients, blend, and store in individual portions for easy access.

Nutrition Tips and Dietary Adaptations

This smoothie is naturally nutritious, but here are a few tips to enhance its health benefits:

  • Add Fiber: Include a tablespoon of ground flaxseeds for added fiber and omega-3s.
  • Boost Antioxidants: Toss in a handful of berries to increase the antioxidant content.
  • Lower Sugar: Use half the banana or replace it with avocado for creaminess without the sugar.

Equipment Recommendations

Here’s what you’ll need to make your smoothie:

  • High-Powered Blender: A quality blender ensures a smooth consistency.
  • Measuring Cups: For precise ingredient measurements.
  • Spatula: To scrape down the sides of the blender for thorough mixing.

Serving Suggestions

Enjoy your smoothie on its own or consider these serving ideas:

  • Top with Fresh Fruit: Garnish with additional pineapple chunks or banana slices for a beautiful presentation.
  • Serve in a Bowl: Transform your smoothie into a smoothie bowl topped with granola, nuts, and seeds.
  • Pair with Breakfast: Enjoy with a slice of whole-grain toast or a handful of nuts for a balanced meal.

With its vibrant flavor and refreshing qualities, this Healthy Pineapple Smoothie is bound to become a staple in your kitchen. Don’t hesitate to get creative with the ingredients and make it your own. Happy blending, and enjoy the delicious journey of making your smoothie!

Healthy Pineapple Smoothie 5 Easy Steps to the Ultimate Refreshing Drink

Prep Time 5 minutes
Total Time 5 minutes
Servings 2 cups
Calories 180
Enjoy a delicious and nutritious pineapple smoothie that's quick to prepare and perfect for a refreshing treat.

Ingredients

Fruits and Dairy

  • 1 cup frozen pineapple
  • 0.5 cup Greek yogurt
  • 0.5 banana banana
  • 0.5 cup coconut water
  • 1 tbsp chia seeds

Instructions 

  • Layer ingredients in blender.
  • Blend until smooth.
  • Adjust consistency with water if needed.
  • Serve cold.

Notes

This smoothie is perfect for a quick, healthy refreshment any time of day.
Calories: 180kcal
Cost: $8
Course: Beverage
Keyword: Pineapple

Discover Your New Favorite Chicken Taco Salad

Are you ready to add some excitement to your dinner table? This Chicken Taco Salad is not just quick and easy; it’s bursting with flavors that will make your taste buds dance! With tender chicken, fresh veggies, and a zesty dressing, this dish is perfect for busy weeknights or casual gatherings. In just a few simple steps, you’ll impress your family and friends with a salad that’s healthy, delicious, and fun to eat. Let’s dive into the wonderful world of taco salads!

Why You’ll Love This Recipe

  • Quick to Prepare: Whip up this meal in under 30 minutes, perfect for those hectic evenings when time is short.
  • Flavor-Packed: The combination of seasoned chicken, fresh vegetables, and a creamy ranch dressing creates a delightful explosion of flavor in every bite.
  • Customizable: Make it your own! Add your favorite toppings or substitute ingredients based on your preferences.
  • Healthy Ingredients: Loaded with fresh veggies and lean protein, this salad is a nutritious option that satisfies.
  • Great for Meal Prep: Prepare in advance and store it for quick lunches or dinners throughout the week.

Ingredients You’ll Need

Gather the following ingredients to create this delicious Chicken Taco Salad:

  • 3/4 cup light ranch dressing
  • 1/4 cup mild salsa
  • 2 medium boneless, skinless chicken breasts
  • 2 tablespoons taco seasoning
  • 2 tablespoons vegetable oil
  • 2 tablespoons butter
  • 1 small bag frozen corn
  • 2 heads green leaf lettuce, shredded thin
  • 3 whole Roma tomatoes, diced
  • 1/2 cup shredded Pepper-Jack cheese
  • 3 whole green onions, sliced
  • 1/3 cup chopped cilantro
  • Tortilla chips, slightly crushed

Ingredient Substitutions: If you’re missing any of these ingredients, don’t worry! Here are some alternatives:

  • Chicken: Substitute with grilled chicken or ground turkey for a different flavor profile.
  • Ranch Dressing: Use a homemade dressing or a vinaigrette for a lighter twist.
  • Cheese: Swap out Pepper-Jack for Cheddar or Feta cheese if preferred.
  • Corn: Fresh corn off the cob or canned corn works just as well.
  • Greens: Spinach or mixed greens can replace green leaf lettuce.

How to Make Your Chicken Taco Salad

Juicy Chicken Taco Salad with fresh vegetables and toppings in a side view.

Put on your apron and get ready to make a delightful salad! Follow these simple steps:

  1. Prepare the Dressing: In a bowl, combine the ranch dressing and salsa. Mix well, cover, and refrigerate while preparing the salad.
  2. Cook the Chicken: Generously season both sides of the chicken breasts with taco seasoning. In a large skillet, heat the oil and butter over medium-high heat. Cook the chicken for about 5 minutes per side until golden brown and cooked through. Remove from the skillet, let cool, and then cut into cubes.
  3. Cook the Corn: Prepare the frozen corn according to package directions.
  4. Assemble the Salad: On a large platter, layer the shredded lettuce, then top with chicken, diced tomatoes, cheese, corn, sliced green onions, cilantro, and crushed tortilla chips.
  5. Dress the Salad: Drizzle the prepared dressing over the salad and serve in individual bowls.

Pro Tips for the Perfect Salad

  • Let the Chicken Rest: Allow the chicken to rest for a few minutes after cooking so it retains its juices.
  • Chill the Dressing: Chilling the dressing enhances the flavors and makes it more refreshing.
  • Keep Ingredients Fresh: Add the crushed chips just before serving to maintain their crunch.
  • Layering is Key: Layering the ingredients keeps the salad visually appealing and ensures every bite is loaded with flavor.
  • Spice it Up: For a kick, add jalapeños or a spicy dressing.
  • Mix Up the Greens: Try different greens like kale or arugula for a unique twist.
  • Make It a Wrap: Use the salad ingredients to create a delicious wrap!
  • Leftover Chicken: Use leftover grilled chicken to save time and add flavor.

Common Mistakes and Troubleshooting

Even the best cooks can make mistakes! Here are some pitfalls to avoid:

  • Overcooking the Chicken: Keep an eye on the chicken to prevent it from drying out. It should be golden brown and cooked through but not overdone.
  • Too Much Dressing: Start with a little dressing and add more as needed to avoid sogginess.
  • Not Enough Flavor: Make sure to season every component well; seasoning is key to a flavorful salad.

Fun Variations to Try

Get creative and try these variations for your Chicken Taco Salad:

  • Southwestern Twist: Add black beans, corn, and avocado for a heartier salad.
  • Asian Fusion: Incorporate sesame dressing, shredded carrots, and chopped peanuts.
  • Mexican Street Corn: Mix in grilled corn, cotija cheese, and a squeeze of lime.
  • Spicy Chicken Taco Salad: Use spicy taco seasoning and add sliced jalapeños for heat.

Storage and Make-Ahead Instructions

This Chicken Taco Salad is great for meal prep! Here’s how to store it:

  • Refrigeration: Store the salad in an airtight container in the fridge for up to 3 days.
  • Dressing: Keep the dressing separate until you’re ready to serve to maintain freshness.
  • Make Ahead: You can prepare the chicken and chop the veggies a day in advance, making assembly a breeze!

Frequently Asked Questions

Here are some common questions regarding this delicious salad:

  • Can I make this salad vegan? Absolutely! Swap the chicken for grilled tofu and use a dairy-free dressing.
  • How can I make the salad gluten-free? Ensure the tortilla chips are gluten-free or omit them altogether.
  • Can I freeze this salad? It’s best served fresh, but you can freeze the chicken separately for future use.
  • What can I serve with this salad? Pair it with a side of guacamole, queso, or tortilla soup!
  • How do I change the serving size? Adjust the ingredient quantities proportionately based on how many servings you need.
  • What’s the best way to store leftovers? Keep leftovers in an airtight container in the refrigerator.
  • Can I add fruit? Yes, diced mango or pineapple can add a sweet twist to your salad!
  • Is this salad kid-friendly? Definitely! Kids love the crunch and the fun toppings.

Nutrition Tips and Dietary Adaptations

For those mindful of nutrition, here are some tips:

  • Low-Calorie Option: Use Greek yogurt instead of ranch dressing to cut calories.
  • High-Protein: Add beans or chickpeas for an extra protein boost.
  • Low-Carb: Skip the tortilla chips and serve in lettuce wraps.

Essential Equipment Recommendations

To make this Chicken Taco Salad, you’ll need:

  • Skillet: A large skillet for cooking the chicken.
  • Mixing Bowls: For preparing the dressing and assembling the salad.
  • Cutting Board and Knife: For chopping veggies and chicken.

Serving Suggestions

Serve your salad in individual bowls or a large platter. Consider adding:

  • Lime Wedges: A squeeze of fresh lime adds a zesty kick.
  • Extra Cilantro: Fresh cilantro on top enhances the flavor.
  • Additional Toppings: Avocado slices, extra cheese, or jalapeños for those who like a bit more heat.

Now that you have all the tools and tips to create your own Chicken Taco Salad, it’s time to get cooking! Embrace the joy of making something delicious and enjoy every bite. Remember, cooking is about having fun and experimenting, so don’t hesitate to make this recipe your own. Happy cooking!

Chicken Taco Salad

Prep Time 10 minutes
Cook Time 20 minutes
Total Time 30 minutes
Servings 4 servings
Calories 450
A flavorful and easy-to-make chicken taco salad perfect for a quick lunch or dinner, combining fresh ingredients with a creamy ranch salsa dressing.

Ingredients

Dressing

  • 0.75 cup light ranch dressing
  • 0.25 cup mild salsa

Chicken

  • 2 pieces boneless, skinless chicken breasts
  • 2 tablespoons taco seasoning
  • 2 tablespoons vegetable oil
  • 2 tablespoons butter

Vegetables

  • 1 small bag frozen corn
  • 2 heads green leaf lettuce, shredded
  • 3 whole Roma tomatoes, diced
  • 0.5 cup shredded Pepper-Jack cheese
  • 3 whole green onions, sliced
  • 0.75 cup chopped cilantro

Tortilla Chips

  • to taste slightly crushed tortilla chips

Instructions 

  • Combine ranch dressing and salsa in a bowl, stir, cover, and refrigerate.
  • Season chicken breasts, cook in oil and butter until golden and cooked through, then cool and cube.
  • Cook corn according to package instructions.
  • Assemble salad with lettuce, chicken, tomatoes, cheese, corn, green onions, cilantro, and crushed chips. Drizzle dressing and serve.

Notes

For extra flavor, add a squeeze of lime before serving.
Calories: 450kcal
Cost: $15
Course: Main Course
Cuisine: Mexican-American
Keyword: Chicken, Salad, Tacos

Unlock the Flavors of Greece with Easy Greek Chicken Souvlaki Skewers

Welcome to the world of Greek cuisine, where vibrant flavors and simple ingredients come together to create delightful meals. Today, we’re diving into the art of making Greek Chicken Souvlaki Skewers. This dish is not just a meal; it’s a celebration of fresh ingredients and the joy of cooking. Whether you’re planning a quick weeknight dinner or a lively weekend barbecue, this recipe is your ticket to culinary bliss.

In this comprehensive guide, you’ll find everything you need to know about making tender, juicy souvlaki skewers that are bursting with flavor. From understanding the marinade to grilling tips and serving suggestions, we’ve got you covered. Let’s get started!

Why You’ll Love This Recipe

  • Quick to Prepare: With minimal prep time, these skewers are perfect for busy weeknights.
  • Flavor-Packed Marinade: The marinade infuses the chicken with a delicious mix of garlic, lemon, and oregano, making every bite irresistible.
  • Versatile Serving Options: Serve these skewers with fresh salads, pita bread, or your favorite dips for a complete meal.
  • Healthy and Nutritious: Made with lean chicken and fresh vegetables, this dish fits perfectly into a balanced diet.
  • Fun for the Whole Family: Get everyone involved in skewering the ingredients for a fun cooking experience!

Ingredients to Create Your Greek Chicken Souvlaki

Here’s what you’ll need to whip up these delicious chicken souvlaki skewers:

  • 1/4 cup olive oil: A key ingredient that adds richness and flavor.
  • 3 cloves garlic, minced: Fresh garlic brings a robust aroma and taste.
  • 2 tablespoons fresh lemon juice: Adds brightness and acidity to the marinade.
  • 1 teaspoon dried oregano: A classic herb that defines Greek cuisine.
  • Salt and pepper to taste: Essential for seasoning the chicken.
  • 1 1/2 pounds boneless, skinless chicken breasts: The star of the dish, cut into bite-sized chunks.
  • Cherry tomatoes: Add a pop of color and sweetness.
  • Red onion, cut into chunks: Provides a crunchy texture and sharp flavor.
  • Bell peppers, assorted colors, cut into chunks: For vibrant presentation and taste.
  • Wooden skewers, soaked in water: Prevents burning on the grill.

Step-by-Step Instructions for Perfect Chicken Souvlaki

Side view of grilled chicken souvlaki skewers featuring cherry tomatoes and bell peppers.

Let’s break down the process into simple steps to ensure your success:

  1. Prepare the Marinade: In a bowl, whisk together the olive oil, minced garlic, lemon juice, oregano, salt, and pepper.
  2. Marinate the Chicken: Place the chicken chunks in the marinade, ensuring they’re well coated. Allow to marinate for at least 30 minutes (or longer for deeper flavor).
  3. Prepare the Skewers: Thread the marinated chicken, cherry tomatoes, onion, and bell peppers onto the soaked skewers.
  4. Preheat the Grill: Heat your grill to medium-high for optimal cooking.
  5. Grill the Skewers: Cook the skewers for about 10-15 minutes, turning occasionally until the chicken is fully cooked and has nice grill marks.
  6. Rest and Serve: Let the skewers rest for a few minutes before serving to retain juiciness.
  7. Enjoy! Serve with your favorite sides, like tzatziki sauce or a fresh salad.

Expert Tips for Success

  • Marinate Longer: If time permits, marinate the chicken overnight for the best flavor infusion.
  • Use Fresh Ingredients: Fresh herbs and vegetables make a noticeable difference in flavor.
  • Don’t Overcrowd Skewers: Leave some space between the ingredients for even cooking.
  • Check Doneness: Use a meat thermometer; chicken should reach an internal temperature of 165°F.
  • Experiment with Vegetables: Feel free to add zucchini or mushrooms for added variety.
  • Grill Marks: For those beautiful grill marks, avoid moving the skewers too much while grilling.
  • Serve with Dips: Accompany your skewers with tzatziki or hummus for extra flavor.
  • Safety Tip: If using wooden skewers, soak them in water for at least 30 minutes before grilling to prevent burning.

Common Mistakes and How to Avoid Them

  • Not Soaking Skewers: Skewers can catch fire if not soaked. Always soak wooden skewers in water before grilling.
  • Overcooking the Chicken: Keep an eye on grilling time to prevent dryness. Chicken should be juicy and tender.
  • Skipping the Marinade: Don’t skip marinating; it’s essential for flavor. Even a short marination can elevate your dish.
  • Using Cold Chicken: Let the chicken sit at room temperature for about 15-20 minutes before grilling for more even cooking.

Variations to Try

Mix things up with these exciting variations:

  • Greek Chicken Souvlaki with Tzatziki: Add a refreshing tzatziki sauce on the side for a traditional touch.
  • Vegetarian Souvlaki: Substitute chicken with firm tofu or grilled halloumi for a vegetarian option.
  • Spicy Souvlaki: Incorporate red pepper flakes into the marinade for a spicy kick.
  • BBQ Chicken Souvlaki: Use a barbecue sauce instead of marinade for a smoky flavor.

Storage and Make-Ahead Instructions

Want to prep ahead? Here’s how to store your skewers:

  • Make Ahead: Prepare the marinade and marinate the chicken a day in advance. Store it in the refrigerator until ready to grill.
  • Storage: Leftover cooked skewers can be stored in an airtight container in the fridge for up to three days.
  • Reheating: Reheat leftovers in a skillet over medium heat or in the microwave until warmed through.

Frequently Asked Questions

  • What is chicken souvlaki? Chicken souvlaki is a popular Greek dish consisting of marinated chicken skewers grilled to perfection.
  • Can I use other meats? Absolutely! This recipe works well with pork, beef, or even shrimp.
  • How do I know when the chicken is done? The chicken should reach an internal temperature of 165°F for safe consumption.
  • Can I bake these skewers instead? Yes! Bake them in a preheated oven at 400°F for about 20-25 minutes, turning halfway through.
  • What should I serve with chicken souvlaki? Serve with pita bread, tzatziki, and a fresh Greek salad for a complete meal.
  • Can I freeze the skewers? Yes, you can freeze uncooked skewers. Thaw in the fridge before grilling.
  • What can I substitute for olive oil? You can use avocado oil or canola oil if you prefer.
  • Is this recipe gluten-free? Yes, the ingredients listed are gluten-free, but always check labels for any packaged items.

Nutrition Tips and Dietary Adaptations

This Greek chicken souvlaki dish is naturally healthy, but here are some tips to make it even better:

  • Lean Proteins: Use skinless chicken breasts to keep the dish light and nutritious.
  • Incorporate More Veggies: Add a variety of colorful vegetables to increase fiber and vitamins.
  • Low-Sodium Options: Opt for low-sodium soy sauce or tamari instead of regular soy sauce in your marinade.

Essential Equipment for Your Souvlaki

To make the cooking process smooth and enjoyable, here’s what you’ll need:

  • Grill or Grill Pan: Essential for those perfect char marks and smoky flavor.
  • Skewers: Use either wooden or metal skewers for threading your ingredients.
  • Mixing Bowls: For marinating and mixing the ingredients.
  • Meat Thermometer: To ensure your chicken is cooked to perfection.

Serving Suggestions for a Festive Meal

When it comes to serving your chicken souvlaki skewers, consider these delightful options:

  • Fresh Greek Salad: Combine cucumbers, tomatoes, olives, and feta for a refreshing side.
  • Pita Bread: Warm, soft pita is perfect for wrapping around the skewers.
  • Tzatziki Sauce: Creamy and tangy, this yogurt-based sauce complements the flavors beautifully.
  • Rice Pilaf: Serve over a bed of fluffy rice pilaf for a hearty meal.

Cooking should be an enjoyable experience, and I hope this guide makes you feel confident in your ability to create delicious Greek chicken souvlaki skewers. Remember, it’s all about the love and care you put into your cooking. So grab your ingredients, gather your loved ones, and let’s make some unforgettable meals together!

Greek Chicken Souvlaki Skewers

Prep Time 20 minutes
Cook Time 15 minutes
Total Time 35 minutes
Servings 4 servings
Calories 350
Enjoy flavorful Greek-inspired chicken skewers perfect for grilling or oven roasting, served with fresh vegetables.

Ingredients

Marinade

  • 0.25 cup olive oil
  • 3 cloves garlic, minced
  • 2 tablespoons fresh lemon juice
  • 1 teaspoon dried oregano
  • to taste Salt and pepper

Chicken and Vegetables

  • 1.5 pounds boneless, skinless chicken breasts, cut into chunks
  • 1 cup cherry tomatoes
  • 1 red onion red onion, cut into chunks
  • 1 cup bell peppers, assorted colors, cut into chunks

Skewers

  • 4 wooden skewers soaked in water

Instructions 

  • Mix olive oil, garlic, lemon juice, oregano, salt, and pepper to make the marinade.
  • Marinate chicken chunks in the mixture for at least 30 minutes.
  • Thread chicken and vegetables onto soaked skewers alternately.
  • Grill or bake skewers until chicken is cooked through, about 15 minutes.

Notes

Soaking skewers prevents burning during grilling.
Calories: 350kcal
Cost: $15
Course: Main Course
Cuisine: Greek
Keyword: Chicken, Grilled, Skewers

Welcome to the world of culinary creativity! If you’re looking for a delicious and unique dish that effortlessly combines the beloved flavors of spinach artichoke dip with the hearty texture of pasta, you’ve come to the right place. This Spinach Artichoke Dip Pasta Salad is not just a salad; it’s a creamy, flavor-packed twist on a classic favorite that’s perfect for everything from quick weeknight dinners to entertaining guests. Let’s dive into this delightful recipe that’s sure to become a staple in your kitchen!

Why You’ll Love This Recipe

This pasta salad is more than just a side dish; it offers a multitude of benefits that make it a must-try for any cooking enthusiast:

  • Crowd-pleaser: Its rich, creamy texture and familiar flavors make it a hit at any gathering.
  • Quick and Easy: With minimal prep and cooking time, you can whip this up in under 30 minutes!
  • Versatile: Perfect as a side dish, main course, or even a picnic delight.
  • Healthy Options: Easily adaptable with whole wheat pasta and Greek yogurt for lighter versions.
  • Make Ahead: This salad tastes even better the next day, making it ideal for meal prep.

Ingredients You’ll Need for This Delicious Pasta Salad

Let’s gather our ingredients! Here’s what you’ll need to create this flavorful dish:

  • 12 ounces medium pasta: Rotini or bow ties work well. Whole wheat pasta can be a healthier substitute.
  • 1 cup sour cream: Swap with Greek yogurt for a lighter texture.
  • ¾ cup mayonnaise: Consider using light mayonnaise to cut calories.
  • 1 package (1.4 oz) vegetable soup mix: Create your own blend of seasonings for a homemade touch.
  • 3 green onions: Sliced for fresh crunch and mild sharpness.
  • 1 can (14 oz) artichokes: Water-packed, drained, and quartered before adding.
  • 4 cups fresh spinach: Chopped lightly packed for added color and health benefits.

Step-by-Step Instructions for Spinach Artichoke Dip Pasta Salad

Ready to get cooking? Follow these simple steps to create your delicious spinach artichoke dip pasta salad:

Step 1: Cook the Pasta

Bring a large pot of salted water to a boil. Add the pasta and cook according to package instructions until al dente. Drain and rinse under cold water to stop the cooking process.

Step 2: Prepare the Vegetables

While the pasta is cooking, slice the green onions and chop the spinach. Set aside.

Step 3: Make the Dressing

In a large mixing bowl, combine the sour cream, mayonnaise, and vegetable soup mix. Stir until well combined.

Step 4: Combine Ingredients

Add the cooked pasta, green onions, artichokes, and spinach to the dressing. Gently fold the ingredients together until everything is well coated.

Step 5: Chill and Serve

Cover the salad and refrigerate for at least 1 hour before serving. This allows the flavors to meld beautifully.

Expert Tips for Perfecting Your Pasta Salad

A delicious serving of pasta salad featuring colorful rotini, green onions, and creamy dressing.

To ensure your dish turns out perfectly every time, here are some pro tips:

  • Perfect texture: Cook the pasta al dente to prevent a mushy texture.
  • Flavor infusion: Allow the salad to chill in the refrigerator for at least 1 hour for enhanced flavors.
  • Customizable ingredients: Feel free to add other vegetables like bell peppers, cucumbers, or even shredded carrots for extra crunch.
  • Herb enhancement: Fresh herbs like dill or parsley can elevate the freshness of your salad.
  • Storage tips: Keep your salad in an airtight container to maintain freshness for up to 3 days.
  • Experiment with dressings: Try swapping in different dressings for a unique twist.
  • Layering flavors: Consider marinating the artichokes in olive oil or balsamic vinegar for extra flavor.
  • Temperature check: Serve chilled for the best taste experience.

Common Mistakes and Troubleshooting

To avoid hiccups during your cooking experience, here are some common mistakes and solutions:

  • Overcooked pasta: This can lead to a mushy salad. Always cook the pasta al dente.
  • Too much dressing: Start with less dressing and add more as needed to avoid a soggy salad.
  • Forgetting to chill: Don’t skip the chilling step; it’s crucial for flavor.
  • Skipping the seasoning: Be generous with seasoning to enhance the overall taste.

Delicious Variations to Try

Want to switch things up? Here are some delicious variations to consider:

  • Italian Twist: Add diced salami and mozzarella for an Italian-inspired version.
  • Greek Style: Incorporate feta cheese, olives, and cherry tomatoes for a Mediterranean flair.
  • Mexican Flair: Mix in black beans, corn, and diced jalapeños for a spicy kick.
  • Vegan Option: Substitute sour cream and mayonnaise with vegan alternatives and use chickpeas instead of artichokes.

Storage and Make-Ahead Instructions

This salad is perfect for meal prep! Here’s how to store and prepare it ahead of time:

  • Make Ahead: Prepare the salad a day in advance for the best flavor.
  • Storage: Keep it in an airtight container in the refrigerator for up to 3 days.
  • Freezing: Not recommended, as the texture of the salad may change upon thawing.

Comprehensive FAQ

Here are some frequently asked questions to help you troubleshoot and enhance your pasta salad experience:

  • Can I make this dish ahead of time? Yes! It tastes even better after chilling for a few hours or overnight.
  • Can I use frozen artichokes? Yes, just ensure they are thawed and drained before adding them.
  • How do I make it gluten-free? Use gluten-free pasta as a substitute.
  • What can I serve with this salad? Pair it with grilled chicken, shrimp, or enjoy it on its own.
  • Can I add more vegetables? Absolutely! Feel free to get creative with your favorites.
  • How long does it last in the fridge? It stays fresh for up to 3 days in an airtight container.
  • Can I use low-fat sour cream? Yes, low-fat options work great for a lighter salad.
  • What’s the best pasta shape to use? Rotini and bow ties are ideal for holding onto the dressing!

Nutritional Tips and Dietary Adaptations

This recipe can be adapted to fit a variety of dietary needs:

  • Low-Calorie: Use Greek yogurt and light mayonnaise to cut calories.
  • High Protein: Add grilled chicken or chickpeas for added protein.
  • Vegetarian: Suitable for vegetarians as is; just ensure your mayonnaise is egg-free.
  • Vegan: Substitute dairy ingredients with plant-based alternatives.

Equipment Recommendations

Here’s what you’ll need to prepare your pasta salad:

  • Large Pot: For boiling pasta.
  • Mixing Bowl: To combine all ingredients.
  • Cutting Board and Knife: For chopping vegetables.
  • Measuring Cups and Spoons: For accurate ingredient measurements.

Serving Suggestions

This creamy pasta salad is incredibly versatile. Here are some ideas on how to serve it:

  • As a Side Dish: Perfect alongside grilled meats or fish.
  • For Lunch: Pack it in lunchboxes for a delightful midday meal.
  • At Picnics: An ideal addition to your picnic spread.
  • For Potlucks: Always a hit at gatherings—just make sure to bring enough to share!

In conclusion, the Spinach Artichoke Dip Pasta Salad is a fantastic dish that brings together the comforting flavors of a classic dip with the heartiness of pasta. Whether you’re preparing a meal for your family or impressing guests, this recipe guarantees satisfaction. Enjoy cooking, and remember—great food doesn’t require perfection, just a little creativity and love!

Spinach Artichoke Dip Pasta Salad A Creamy, Flavorful Twist

Prep Time 15 minutes
Cook Time 10 minutes
Total Time 25 minutes
Servings 6 servings
Calories 350
This vibrant pasta salad combines the creamy flavors of spinach and artichokes with a tangy dressing, perfect for a refreshing meal or side dish.

Ingredients

Pasta

  • 12 ounces medium pasta rotini or bow ties (Whole wheat pasta can be a healthier substitute.)
  • 1 cup sour cream (Swap with Greek yogurt for a lighter texture.)
  • ¾ cup mayonnaise (Consider using light mayonnaise to cut calories.)
  • 1 package 1.4 oz vegetable soup mix (Create your own blend of seasonings for a homemade touch.)
  • 3 green onions sliced green onions (Adds fresh crunch and mild sharpness.)
  • 1 can 14 oz artichokes (Water-packed, drain and quarter before adding.)
  • 4 cups fresh spinach (Chopped lightly packed.)

Instructions 

  • Cook the pasta according to package instructions, then drain and let cool.
  • In a large bowl, combine sour cream, mayonnaise, and vegetable soup mix to make the dressing.
  • Add cooked pasta, sliced green onions, chopped spinach, and quartered artichokes to the bowl. Toss to combine.
  • Chill in the refrigerator for at least 30 minutes before serving.

Notes

For a lighter version, substitute Greek yogurt for sour cream and light mayonnaise.
Calories: 350kcal
Cost: $15
Course: Salad
Keyword: Artichoke, Pasta, Spinach

Welcome to your new favorite recipe! If you’re looking for a simple and satisfying snack, these banana oatmeal bars are the perfect solution. Made with just four wholesome ingredients, these bars are not only easy to prepare but also packed with flavor. Whether you need a quick breakfast on the go or a delicious post-workout treat, you’re in for a delightful experience.

In this article, we’ll dive deep into everything you need to know about making these fantastic bars, including tips, variations, and even some common pitfalls to avoid. Let’s get started!

Why You’ll Love This Recipe

Here are just a few reasons to fall in love with these banana oatmeal bars:

  • Quick and Easy: With only four main ingredients, you can whip these bars up in no time—perfect for busy mornings!
  • Nutritious: Packed with healthy oats and bananas, these bars offer a great source of energy and nutrients.
  • Customizable: Add your favorite mix-ins like nuts, dried fruits, or even a swirl of peanut butter for extra flavor.
  • Minimal Clean-Up: Made in one bowl, these oatmeal bars mean less mess and fewer dishes to wash.
  • Kid-Friendly: A healthy snack that kids will love, making it an excellent choice for lunchboxes or after-school treats.

Ingredient Breakdown

Let’s take a closer look at the ingredients you’ll need to make these delicious bars:

  • Ripe Bananas: You’ll need 3 large ripe bananas, mashed. The riper the bananas, the sweeter your bars will be!
  • Almond Butter: For a creamy texture, use ½ cup of almond butter. You can substitute with peanut butter or sunflower seed butter if you prefer.
  • Rolled Oats: 2 cups of rolled oats give these bars their chewy texture. Old-fashioned oats work best, but quick oats can also be used.
  • Chocolate Chips: 1 cup of chocolate chips adds a delightful sweetness. Dark chocolate chips are a healthier option, but feel free to use your favorite kind!

Substitutions

  • Nut Allergies: Use sunflower seed butter or tahini instead of nut butter.
  • Sweetness: If you want to reduce sugar, substitute chocolate chips with dried fruits or nuts.
  • Gluten-Free: Ensure you use certified gluten-free oats if necessary.

Step-By-Step Instructions

Ready to get baking? Follow these simple steps to create your banana oatmeal bars:

  1. Preheat the Oven: Preheat your oven to 350°F (175°C) and line a 9×9 inch baking pan with parchment paper.
  2. Mash the Bananas: In a large mixing bowl, mash the ripe bananas until smooth. You should have about 1 ½ cups of mashed bananas.
  3. Add the Almond Butter: Stir in the almond butter until fully combined with the bananas, creating a creamy mixture.
  4. Mix in the Oats and Chips: Add the rolled oats and chocolate chips to the bowl and mix until everything is well incorporated.
  5. Transfer to Baking Pan: Pour the mixture into the lined baking pan, smoothing it into an even layer.
  6. Bake: Bake in the preheated oven for 18-25 minutes, or until the edges are golden brown and the center is set.
  7. Cool and Slice: Allow the bars to cool completely in the pan before slicing them into squares.

Pro Tips for Perfect Bars

Appetizing banana oatmeal bars with visible chocolate chips and pieces of nuts.
  • The Right Bananas: Use bananas with brown spots for maximum sweetness and flavor.
  • Don’t Overmix: Mix just until combined to keep the bars tender and chewy.
  • Check for Doneness: If the bars are still soft in the center, bake for a few more minutes.
  • Let Them Cool: Cooling completely helps the bars firm up for easier slicing.
  • Storage: Store in an airtight container at room temperature for up to 3 days, or refrigerate for longer freshness.

Common Mistakes and Troubleshooting

Even the best of us can run into issues while baking. Here are some common mistakes and how to fix them:

  • Bars Falling Apart: If your bars crumble, they likely needed more binding. Ensure you’re using enough mashed bananas or nut butter.
  • Too Dry: Overbaking can lead to dry bars. Keep an eye on them during baking and remove when just set.
  • Not Sweet Enough: If you find the bars lacking in sweetness, consider adding a tablespoon of honey or maple syrup next time.

Delicious Variations

Want to mix things up? Here are some tasty variations to try:

  • Peanut Butter Banana Oatmeal Bars: Substitute almond butter with creamy peanut butter for a nutty twist.
  • Dried Fruit Mix: Add ½ cup of dried cranberries or apricots for a chewy, fruity flavor.
  • Nutty Delight: Throw in ½ cup of chopped walnuts or pecans for added crunch.
  • Spiced Up: Experiment with spices like nutmeg or pumpkin spice for a seasonal flavor boost.

Storage and Make-Ahead Instructions

These bars are perfect for meal prep! Here’s how to store and prepare them in advance:

  • Make-Ahead: You can prepare the batter a day ahead and keep it in the fridge until you’re ready to bake.
  • Storing: Keep the bars in an airtight container to maintain freshness. They can also be frozen for up to three months.
  • Reheating: For a warm treat, pop individual bars in the microwave for about 15 seconds.

Frequently Asked Questions

Here are some common questions about making banana oatmeal bars:

  • Can I use quick oats instead of rolled oats? Yes, but rolled oats give a chewier texture.
  • Is this recipe vegan? Yes, if you use dairy-free chocolate chips!
  • What can I use instead of chocolate chips? Try nuts, seeds, or dried fruits for a healthier option.
  • How can I make these bars more protein-rich? Add a scoop of protein powder to the mixture.
  • Can I double the recipe? Absolutely! Just use a larger baking pan and increase baking time as needed.
  • What’s the best way to cut these bars? Use a sharp knife after the bars have cooled completely for clean cuts.
  • Can I add protein powder to the bars? Yes, you can mix in a scoop to boost protein content.
  • How do I know when they are done baking? The edges should be golden brown, and a toothpick inserted in the center should come out clean.

Nutritional Benefits and Dietary Adaptations

These banana oatmeal bars are not only delicious but also nutritious! Here’s a breakdown of their benefits:

  • Whole Grains: Rolled oats are an excellent source of fiber, which aids digestion.
  • Natural Sweetness: Bananas provide sweetness without added sugars, making these bars a healthier dessert alternative.
  • Healthy Fats: Almond butter contributes healthy fats, making these bars a satisfying snack.

Equipment Recommendations

For the best results, here’s what you’ll need:

  • Mixing Bowl: A large mixing bowl for combining ingredients.
  • Baking Pan: A 9×9 inch or 8×8 inch baking pan lined with parchment paper for easy removal.
  • Measuring Cups and Spoons: Accurate measurements are key for the best flavor and texture.

Serving Suggestions

These bars are versatile and can be enjoyed in various ways:

  • Breakfast: Pair with yogurt and fresh fruit for a wholesome breakfast.
  • Snack: Enjoy as an afternoon pick-me-up or post-workout recovery.
  • Dessert: Drizzle with melted dark chocolate for an indulgent treat.

With all these tips and tricks, you’re well on your way to mastering the art of banana oatmeal bars. Remember, cooking is about experimenting and having fun in the kitchen! Enjoy your delicious creations and share them with friends and family. Happy baking!

4-Ingredient Banana Oatmeal Bars

Prep Time 10 minutes
Cook Time 20 minutes
Total Time 30 minutes
Servings 9 bars
Calories 180
These easy, healthy banana oatmeal bars require just four ingredients and are perfect for a quick snack or breakfast.

Ingredients

Bananas

  • 3 large ripe bananas (mashed)
  • 0.5 cup creamy almond butter

Oats

  • 2 cups rolled oats

Chocolate Chips

  • 1 cup chocolate chips
  • 1 tsp pure vanilla extract
  • 0.25 tsp sea salt
  • 1 tsp ground cinnamon
  • 0.75 cup chopped walnuts or pecans

Instructions 

  • Preheat oven to 350°F (180°C) and line a 9x9 baking pan with parchment paper.
  • Mash bananas until smooth, then stir in almond butter until well combined.
  • Mix in oats, chocolate chips, cinnamon, salt, and nuts until evenly incorporated.
  • Transfer mixture to prepared pan and press into an even layer.
  • Bake for 18-25 minutes until edges are golden and bars are set. Cool before slicing.

Notes

Store in an airtight container for up to 3 days.
Calories: 180kcal
Cost: $10
Course: Snack
Cuisine: American
Keyword: Banana