Author

Steven

Browsing

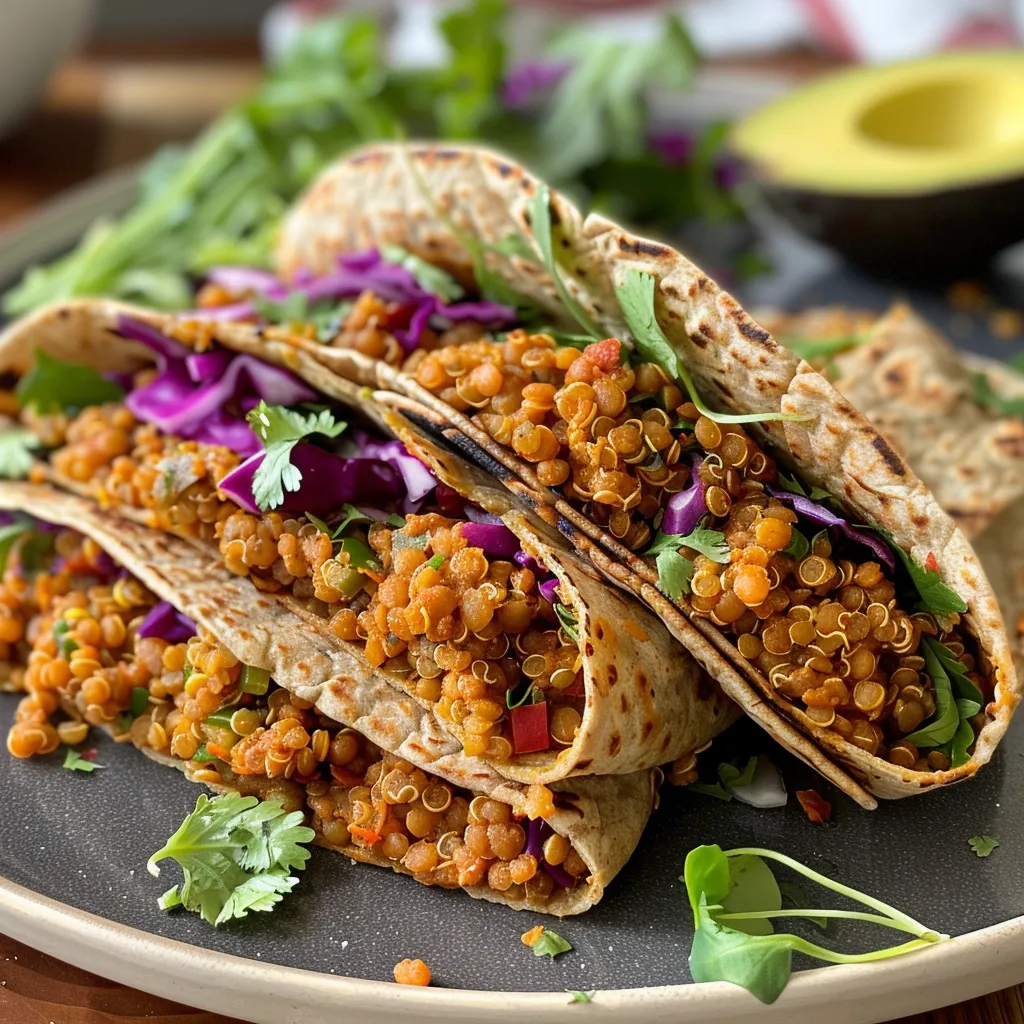
If you’re searching for a quick, satisfying dinner that bursts with flavor, look no further than these **mushroom tacos**. With the earthy taste of **portobello mushrooms**, colorful **red peppers**, and a medley of spices, this recipe is not just easy to make but also a delightful way to enjoy a meatless meal. Whether you’re a seasoned home cook or just starting out, this guide will help you master the art of creating the perfect mushroom taco in no time!

Why You’ll Love This Recipe

  • Quick Preparation: With a total prep and cook time of just 25 minutes, you can whip this dish together on even your busiest weeknights.
  • Flavorful and Satisfying: The combination of sautéed mushrooms, sweet red peppers, and spices creates a rich flavor profile that satisfies any palate.
  • Versatile Ingredients: You can easily substitute ingredients to suit your dietary needs or what you have on hand, making it a flexible meal option.
  • Perfect for Meal Prep: These tacos keep well, making them a great choice for meal prepping for the week ahead.
  • Family-Friendly: Even picky eaters will love the taste of these easy mushroom tacos, making them a hit with the whole family!

Ingredients for Mushroom Tacos

To get started, gather the following ingredients:

  • 4 large portobello mushrooms (about 3/4 pound): Remove the stems and gills for the best texture.
  • 1 tablespoon olive oil: This adds richness and helps sauté the vegetables perfectly.
  • 1 medium sweet red pepper: Cut into strips for a pop of color and sweetness.
  • 1 medium onion: Halved and thinly sliced for a savory base.
  • 2 garlic cloves: Minced to enhance the overall flavor.
  • 1 1/2 teaspoons chili powder: Adds a warm kick to the dish.
  • 1/2 teaspoon salt: Essential for bringing out the flavors.
  • 1/2 teaspoon ground cumin: Provides an earthy aroma and depth of flavor.
  • 1/4 teaspoon crushed red pepper flakes: For those who enjoy a little heat.
  • 1 teaspoon grated lime zest: Lively citrus notes to brighten the dish.
  • 2 tablespoons lime juice: Fresh lime juice enhances the taco mixture.
  • 8 corn tortillas (6 inches, warmed): The base for your delicious filling.
  • 1 cup shredded pepper jack cheese: Optional, but recommended for extra creaminess.

How to Make Mushroom Tacos

Follow these simple steps for a delicious mushroom taco experience:

  1. Remove the stems from the mushrooms, and if desired, remove the gills using a spoon. Cut the mushrooms into 1/2-inch slices.
  2. In a large skillet, heat the olive oil over medium-high heat. Add the sliced mushrooms, red pepper, and onion. Sauté until the mushrooms are tender, about 5 to 7 minutes.
  3. Stir in the minced garlic, chili powder, salt, cumin, crushed red pepper flakes, lime zest, and lime juice. Cook and stir for another minute.
  4. Serve the mushroom taco mixture in warmed tortillas, topped with shredded cheese if desired. Enjoy!

Pro Tips for the Best Mushroom Tacos

Close-up of portobello mushroom tacos on a plate.
  • Choose Fresh Mushrooms: Fresh portobello mushrooms will provide the best flavor and texture.
  • Customize Your Seasoning: Feel free to adjust the spices to suit your taste; add more chili powder for heat or omit the red pepper flakes if you prefer milder flavors.
  • Warm Your Tortillas: Warming tortillas enhances their flavor and makes them more pliable.
  • Experiment with Toppings: Add avocado, cilantro, or a dollop of sour cream for extra richness.
  • Use Leftover Filling: The mushroom taco mixture makes a great filling for burritos or quesadillas!
  • Texture Matters: Ensure you sauté the mushrooms properly to achieve a meaty texture.
  • Make It Vegan: Leave out the cheese or use a plant-based alternative to keep these tacos entirely vegan.
  • Try Different Tortillas: While corn tortillas are traditional, flour tortillas also work well if you prefer them.

Common Mistakes to Avoid

Everyone makes mistakes in the kitchen, but here are a few common ones to avoid when making mushroom tacos:

  • Overcooking the Mushrooms: This can lead to a rubbery texture. Sauté until just tender.
  • Skipping Seasoning: Don’t skip the spices! They are essential to achieving a flavorful taco mixture.
  • Cold Tortillas: Always warm your tortillas before serving to enhance the overall experience.
  • Using Dull Knives: A sharp knife makes prep work safer and more efficient.
  • Not Tasting: Always taste your taco mixture before serving to adjust flavors as needed.

Variations on Mushroom Tacos

Feel free to get creative! Here are some tasty variations to try:

  • Spicy Chipotle Mushroom Tacos: Add chipotle powder for a smoky kick.
  • Mushroom and Black Bean Tacos: Mix in a can of black beans for added protein and texture.
  • Thai-Inspired Mushroom Tacos: Incorporate coconut milk and Thai spices for a unique twist.
  • Breakfast Mushroom Tacos: Add scrambled eggs for a hearty morning meal.

Storage and Make-Ahead Instructions

These mushroom tacos can be easily made ahead of time:

  • Make-Ahead: Prepare the mushroom taco mixture and store it in an airtight container in the refrigerator for up to 3 days.
  • Freezing: Freeze the taco mixture in a freezer-safe container for up to 3 months. Thaw before reheating.
  • Reheating: Reheat in a skillet over medium heat until warmed through, adding a splash of water if needed to prevent sticking.

Frequently Asked Questions (FAQ)

  • Can I use other types of mushrooms? Absolutely! Button mushrooms or shiitake mushrooms can also work well in this recipe.
  • How do I make these tacos gluten-free? Use gluten-free tortillas and check the ingredient labels of all seasonings.
  • Can I make this recipe vegan? Yes! Simply omit the cheese or use a plant-based alternative.
  • What can I serve with mushroom tacos? Consider serving them with a side of rice, beans, or a fresh salad.
  • Can I prepare the filling ahead of time? Yes, the filling can be made in advance and stored in the fridge or freezer.
  • How spicy are these tacos? The spice level can be adjusted based on personal preference by modifying the amount of chili powder and red pepper flakes.
  • Can I add more vegetables? Definitely! Feel free to add zucchini, corn, or even spinach for extra nutrition.
  • What’s the best way to reheat leftover tacos? Gently reheat the filling in a skillet over medium heat for the best texture.

Nutritional Information and Dietary Adaptations

These mushroom tacos are not only delicious but also nutritious. Here’s a quick breakdown:

  • Calories: Approximately 300 calories per serving (with cheese).
  • Protein: 10 grams per serving, mainly from the mushrooms and cheese.
  • Fiber: High in fiber due to the mushrooms and vegetables.

To adapt for dietary needs, consider the following:

  • For a low-carb version, use lettuce wraps instead of tortillas.
  • To increase protein, add cooked lentils or quinoa to the filling.
  • Opt for dairy-free cheese to make it suitable for those avoiding dairy.

Essential Equipment for Making Mushroom Tacos

To create these tasty tacos, you’ll need:

  • Large Skillet: A sturdy skillet is essential for sautéing the vegetables evenly.
  • Cutting Board: For chopping your ingredients safely and efficiently.
  • Sharp Knife: A good knife will make slicing the mushrooms and vegetables a breeze.
  • Spatula: To stir the taco mixture and serve it easily.

Serving Suggestions

To elevate your mushroom tacos, consider these serving suggestions:

  • Top with fresh cilantro or chopped green onions for added flavor.
  • Serve with lime wedges on the side for an extra zing.
  • Pair with a fresh salsa or guacamole for a delightful contrast in flavor and texture.
  • Include a side of corn or avocado salad for a colorful, nutritious accompaniment.

Conclusion

These **mushroom tacos** are a fantastic way to enjoy a hearty, flavorful meal without the fuss. With simple ingredients and an easy preparation process, you’ll find yourself returning to this recipe time and again. Remember, cooking is all about experimenting and having fun, so don’t hesitate to make it your own. Happy cooking!

Mushroom Tacos

Prep Time 10 minutes
Cook Time 10 minutes
Total Time 20 minutes
Servings 4 servings
Calories 250
Enjoy these flavorful mushroom tacos packed with spices and fresh ingredients, perfect for a quick and satisfying meal.

Ingredients

Main

  • 4 large portobello mushrooms (about 3/4 pound)
  • 1 tablespoon olive oil
  • 1 medium sweet red pepper (cut into strips)
  • 1 medium onion (halved and thinly sliced)
  • 2 cloves garlic (minced)
  • 1.5 teaspoons chili powder
  • 0.5 teaspoon salt
  • 0.5 teaspoon ground cumin
  • 0.25 teaspoon crushed red pepper flakes
  • 1 teaspoon grated lime zest
  • 2 tablespoons lime juice
  • 8 pieces corn tortillas (6 inches, warmed)
  • 1 cup shredded pepper jack cheese

Instructions 

  • Remove stems from mushrooms, and if desired, gills using a spoon. Slice into 1/2-inch pieces.
  • Heat oil in a large skillet over medium-high heat. Saute mushrooms, red pepper, and onion until tender, about 5-7 minutes.
  • Add garlic, chili powder, salt, cumin, red pepper flakes, lime zest, and lime juice. Cook and stir for 1 minute.
  • Serve the mushroom mixture in warmed tortillas, topped with shredded cheese.

Notes

For extra flavor, add chopped cilantro or a squeeze of lime before serving.
Calories: 250kcal
Cost: $12
Course: Main Course
Cuisine: Mexican
Keyword: Mushrooms

Welcome to your new favorite dish! Today, we’re diving into the world of lemon butter beef cubes that not only promise incredible flavor but also deliver on simplicity. This recipe is perfect for busy weeknights or special occasions. With a creamy garlic ranch sauce to accompany the beef, you’re sure to impress your family and friends. Let’s roll up our sleeves and get cooking!

Why You’ll Love This Recipe

This lemon butter steak recipe is more than just a meal; it’s an experience! Here are five reasons why you’ll absolutely love it:

  • Quick Preparation: With a total cooking time of under 30 minutes, this dish is ideal for those hectic evenings when you want something delicious without spending hours in the kitchen.
  • Simple Ingredients: You probably have most of the ingredients on hand, making it easy to whip up whenever the craving strikes.
  • Flavor Explosion: The combination of zesty lemon, rich butter, and aromatic garlic creates a mouthwatering flavor profile that elevates your everyday beef cubes.
  • Versatile Pairing: These beef cubes pair wonderfully with various sides, from roasted veggies to creamy mashed potatoes, making them adaptable for any meal.
  • Impressive Presentation: The vibrant colors and rich sauce make this dish visually appealing, perfect for entertaining guests or family dinners.

Ingredients and Necessary Utensils

Let’s gather everything we need!

Ingredients

  • 1 lb beef cubes: Tender cuts such as sirloin or ribeye work best.
  • 2 tbsp olive oil: For sautéing the beef to a perfect sear.
  • 3 tbsp unsalted butter: Adds richness and flavor.
  • 3 cloves garlic, minced: Fresh garlic brings a robust flavor.
  • Juice and zest of 1 lemon: For that zesty kick!
  • 1 tsp salt: Enhances all the flavors.
  • 1/2 tsp black pepper: For a touch of heat.
  • 1 tsp dried thyme: Adds a lovely herbal note.
  • 1/2 cup ranch dressing: Creamy and tangy, perfect for dipping.
  • 1/4 cup sour cream: For added creaminess.
  • 1 tbsp fresh parsley, chopped: For garnish, adding a pop of color.

Recommended Tools or Utensils

  • Large skillet: A non-stick or cast-iron skillet will yield the best results.
  • Sharp knife: For cutting the beef cubes into uniform pieces.
  • Cutting board: To safely chop and prepare your ingredients.
  • Measuring spoons: To ensure accurate ingredient proportions.

Step-by-Step Instructions

Now, let’s get cooking!

  1. Prepare the Beef: Pat the beef cubes dry with a paper towel. This helps to achieve a nice sear. Season the cubes with salt, pepper, and thyme.
  2. Heat the Pan: In a large skillet, heat the olive oil over medium-high heat. Once hot, add the beef cubes in a single layer.
  3. Sear the Beef: Cook for about 3-4 minutes on each side until golden brown. Avoid overcrowding the pan; you may need to do this in batches.
  4. Add Garlic and Butter: Once the beef is nearly done, add the minced garlic and butter to the pan. Stir to coat the beef in the melted butter and cook for an additional minute.
  5. Add Lemon: Squeeze in the lemon juice and sprinkle the zest over the beef. Toss everything to combine well.
  6. Make the Sauce: In a separate bowl, mix the ranch dressing and sour cream until smooth. Set aside.
  7. Serve: Plate the beef cubes and drizzle with the creamy ranch sauce. Garnish with fresh parsley and enjoy!

Pro Tips for Perfect Lemon Butter Beef Cubes

Juicy beef cubes topped with creamy garlic ranch and fresh parsley.

Want to elevate your cooking game? Here are some expert insights:

  • Choose Quality Beef: Using high-quality cuts, like Angus beef, will enhance the flavor and texture.
  • Let the Beef Rest: After cooking, allow the beef to rest for a few minutes. This helps retain juices and ensures a tender bite.
  • Experiment with Spices: Try adding a pinch of smoked paprika or cayenne pepper for an extra kick.
  • Fresh Herbs Matter: Fresh parsley or even cilantro can be switched up for garnish to match your taste.
  • Storage Savvy: Store leftovers in an airtight container in the refrigerator for up to 3 days.
  • Make It Ahead: You can marinate the beef cubes in the lemon juice and spices for an hour before cooking for deeper flavor.
  • Perfect Your Searing: Ensure your skillet is hot enough before adding the beef to achieve that perfect golden crust.
  • Adjust the Creaminess: If you prefer a lighter sauce, reduce the sour cream or substitute with Greek yogurt.

Common Mistakes and Troubleshooting

Even the best of us make mistakes! Here’s how to avoid common pitfalls:

  • Overcrowding the Pan: This can lead to steaming rather than searing. Always cook in batches if necessary.
  • Not Drying the Meat: Make sure the beef is patted dry before seasoning to achieve a nice sear.
  • Undercooking the Garlic: Garlic burns quickly; add it towards the end of the cooking process for the best flavor.
  • Using Cold Ingredients: Let the beef come to room temperature before cooking for even cooking.

Variations of Lemon Butter Beef Cubes

Here are some fun twists on this recipe:

  • Spicy Lemon Butter Beef: Add a dash of chili flakes or hot sauce to the butter for a spicy kick.
  • Herb-Infused Butter: Incorporate fresh herbs like rosemary or thyme into the butter for added depth.
  • Lemon Garlic Shrimp: Swap out the beef for shrimp and follow the same cooking method for a seafood twist!
  • Vegetarian Option: Substitute beef with hearty vegetables like mushrooms or eggplant, and follow the same steps for a plant-based delight.

Storage and Make-Ahead Instructions

This dish can be made ahead for your convenience. Here’s how:

  • Refrigerate Leftovers: Store in an airtight container for up to 3 days. Reheat in a skillet over low heat to maintain the flavor.
  • Freezer-Friendly: You can freeze cooked beef cubes for up to 2 months. Just thaw overnight in the refrigerator before reheating.
  • Prep Ahead: Marinate the beef cubes a few hours or the night before to deepen the flavors.

Frequently Asked Questions

Here are some common queries about this delicious dish:

  • Can I use chicken instead of beef? Yes! Chicken thighs or breasts work well, just adjust the cooking time accordingly.
  • How long can I store leftovers? Leftovers can be stored in the refrigerator for up to 3 days.
  • What can I use instead of ranch dressing? A homemade garlic aioli or even a yogurt-based dressing works beautifully.
  • Can I make this dish dairy-free? Substitute butter with olive oil and ranch dressing with a dairy-free alternative.
  • What sides pair well with these beef cubes? Roasted vegetables, rice, or a fresh salad make excellent companions.
  • Is it possible to double the recipe? Certainly! Just ensure your skillet is large enough to accommodate the increased quantity.
  • What type of beef is best for this recipe? Tender cuts like sirloin or ribeye are ideal for their flavor and texture.
  • Can I add other vegetables? Absolutely! Bell peppers or asparagus can be added in the last few minutes of cooking for a complete meal.

Nutrition Tips and Dietary Adaptations

This recipe can be easily adapted to meet various dietary needs:

  • Low-Carb Option: Pair with a fresh salad instead of starchy sides for a keto-friendly meal.
  • Gluten-Free: All ingredients are naturally gluten-free; just ensure any dressings are certified gluten-free.
  • Paleo-Friendly: Replace sour cream with a cashew cream for a creamy texture while keeping it paleo.

Equipment Recommendations

Using the right tools can enhance your cooking experience:

  • Cast-Iron Skillet: Perfect for achieving a great sear on your beef cubes.
  • Meat Thermometer: Ensures your meat is cooked to the perfect internal temperature.
  • Mixing Bowls: Useful for preparing sauces and marinades ahead of time.

Serving Suggestions

When it comes to serving, consider these ideas:

  • On Rice: Serve the beef cubes over a bed of fluffy rice for a hearty meal.
  • With Vegetables: Pair with steamed broccoli or sautéed green beans for a balanced plate.
  • As Appetizers: Serve the beef cubes on skewers with the ranch sauce as a delicious appetizer for gatherings.

In conclusion, these lemon butter beef cubes with creamy garlic ranch sauce are sure to become a staple in your home! With their robust flavors and straightforward preparation, you’ll find yourself making this dish again and again. Get ready to impress your loved ones with a meal that’s not only easy to make but also incredibly satisfying. Happy cooking!

Lemon Butter Beef Cubes with Creamy Garlic Ranch

Prep Time 10 minutes
Cook Time 15 minutes
Total Time 25 minutes
Servings 4 servings
Calories 450
A flavorful and creamy beef dish featuring tender cubes cooked in lemon butter with a savory ranch and garlic sauce, perfect for a quick and satisfying meal.

Ingredients

Meat

  • 1 lb Beef cubes
  • 2 tbsp Olive oil
  • 3 tbsp Unsalted butter
  • 3 cloves Garlic, minced
  • 1 each Lemon juice
  • 1 each Lemon zest
  • 1 tsp Salt
  • 1.5 tsp Black pepper
  • 1 tsp Dried thyme
  • 0.25 cup Ranch dressing
  • 0.25 cup Sour cream
  • 1 tbsp Fresh parsley, chopped

Instructions 

  • Sear beef cubes in olive oil until browned, then set aside.
  • In the same pan, melt butter and sauté minced garlic until fragrant.
  • Add lemon juice, lemon zest, salt, pepper, and thyme; cook briefly.
  • Stir in ranch dressing and sour cream, then return beef to the pan and simmer for 5 minutes.
  • Garnish with chopped parsley and serve hot.

Notes

For extra flavor, add a splash of white wine during cooking.
Calories: 450kcal
Cost: $15
Course: Main Course
Cuisine: American
Keyword: Beef, Creamy, lemon

Welcome to your new favorite weeknight meal! This creamy garlic chicken is a delicious dish that marries tender chicken breasts with a rich, savory sauce. Perfect for busy evenings, this recipe balances ease and flavor, ensuring you can whip up a gourmet meal in no time. With a few simple ingredients and straightforward steps, you’ll have a comforting dish that will impress anyone at your dinner table.

Why You’ll Love This Recipe

This creamy garlic chicken recipe is not just about satisfying your hunger; it’s about bringing joy and a sense of accomplishment to your cooking journey. Here’s why this dish is destined to become a staple in your kitchen:

  • Quick Preparation: With a total cooking time of just 30 minutes, you can have dinner ready in no time, perfect for those hectic weeknights.
  • Simple Ingredients: Made with everyday ingredients that you probably already have in your pantry, this recipe eliminates the need for last-minute grocery runs.
  • Rich Flavor: The combination of garlic, Parmesan cheese, and herbs creates a sauce that is bursting with flavor, elevating the simple chicken to gourmet status.
  • Versatile Dish: This creamy garlic chicken pairs wonderfully with rice, pasta, or steamed vegetables, allowing for endless meal variations.
  • Family-Friendly: With its creamy texture and familiar flavors, this dish is sure to please even the pickiest eaters in your family.

Ingredient Breakdown

Let’s dive into the ingredients you’ll need to make this delicious creamy garlic chicken. Each component plays a crucial role in creating the final dish.


Nonstick Grill Pan

★ Recommended Kitchen Tool

Nonstick Grill Pan

Make this recipe even easier with a quality Nonstick Grill Pan — a must-have kitchen staple!


🛒 View on Amazon →

As an Amazon Associate, we earn from qualifying purchases.
  • Chicken Breasts: 2 large boneless skinless chicken breasts are the star of the show. Feel free to use thighs for more flavor and moisture.
  • Salt and Pepper: Simple seasonings that enhance the flavor of the chicken. Adjust to taste.
  • Italian Seasonings: 3 teaspoons will add a herby note to the dish. You can substitute with a mix of dried basil, oregano, and thyme.
  • Flour: ⅓ cup flour is used to coat the chicken, helping to create a lovely crust when seared.
  • Parmesan Cheese: 4 tablespoons of shredded Parmesan cheese adds a savory richness to the sauce. For a lighter option, use nutritional yeast.
  • Olive Oil: 3 tablespoons for cooking the chicken, providing flavor and moisture.
  • Chicken Broth: 2 ½ cups will form the base of your creamy sauce. Homemade or low-sodium varieties work best.
  • Beef Bouillon Cube: Adds depth to the flavor profile. You can substitute with vegetable bouillon if preferred.
  • Soy Sauce: 1 teaspoon enhances umami flavor. Worcestershire sauce is a good alternative.
  • Garlic Cloves: 10 cloves, minced, bring a punch of flavor. Adjust based on your love for garlic!
  • Butter: 3 tablespoons contribute to the creaminess of the sauce.
  • Heavy Cream: ½ cup helps achieve that luxurious creamy texture.

Pro Tips for Perfect Chicken

Ready to take your creamy garlic chicken to the next level? Here are some expert insights to ensure your dish turns out flawlessly every time:

  • Choose the Right Chicken: If you’re using smaller chicken breasts, opt for 3-4 instead of 2 large ones for even cooking.
  • Pat the Chicken Dry: Before seasoning, pat the chicken dry with paper towels. This helps achieve a better sear!
  • Use Medium Heat: Start cooking on medium-high heat, then adjust as needed. A consistent temperature helps avoid burning.
  • Deglaze the Pan: After searing the chicken, pour in a splash of chicken broth to lift the flavorful bits stuck to the pan.
  • Don’t Rush the Sauce: Allow the sauce to simmer for a few minutes to deepen the flavors before adding the cream.
  • Use Fresh Ingredients: Fresh garlic and herbs will significantly enhance the flavor compared to dried versions.
  • Taste as You Go: Always taste your sauce and adjust seasonings before serving for the best flavor.
  • Let It Rest: After cooking, allow the chicken to rest for a few minutes before slicing. This keeps it juicy!

Common Mistakes and Troubleshooting

['Close-up of juicy creamy garlic chicken with a rich sauce.', 'Side view of tender chicken breasts coated in creamy garlic sauce.', 'Delicious creamy garlic chicken garnished with herbs.', 'Succulent chicken dish featuring a thick, creamy garlic sauce.']

Even the best cooks make mistakes! Here are some common pitfalls and how to avoid them:

  • Overcooking the Chicken: Use a meat thermometer to check for doneness. Chicken is perfectly cooked at an internal temperature of 165°F.
  • Too Thick of Sauce: If your sauce becomes too thick, add a bit of chicken broth or cream until the desired consistency is reached.
  • Burnt Garlic: Garlic cooks quickly; add it towards the end of the cooking process to avoid bitterness.
  • Flavorless Sauce: Taste and adjust seasoning regularly. A little extra salt or herbs can make a big difference!

Flavor Variations

Feel free to customize this creamy garlic chicken recipe to suit your taste. Here are some delicious variations:

  • Herb-Infused: Add fresh herbs like thyme or rosemary for a fragrant twist.
  • Lemon Zest: A teaspoon of lemon zest can brighten the sauce and cut through the creaminess.
  • Mushroom Medley: Sauté sliced mushrooms before adding the chicken for an earthy flavor.
  • Spicy Kick: Add a pinch of red pepper flakes or a splash of hot sauce for heat.

Storage and Make-Ahead Instructions

This creamy garlic chicken is perfect for meal prep! Here’s how to store and reheat it:

  • Storage: Store in an airtight container in the refrigerator for up to 3 days.
  • Freezing: Freeze leftovers in a freezer-safe container for up to 3 months. Thaw in the refrigerator overnight before reheating.
  • Reheating: Gently reheat in a skillet over medium heat, adding a splash of broth or cream to loosen it up.

FAQs About Creamy Garlic Chicken

Here are some commonly asked questions to help you with your creamy garlic chicken experience:

  • Can I use chicken thighs instead of breasts? Yes! Chicken thighs are juicier and can add more flavor to your dish.
  • What can I serve with creamy garlic chicken? It pairs well with rice, pasta, or a fresh salad.
  • Can I use low-fat options? Yes! You can substitute heavy cream with half-and-half or a plant-based cream for a lighter version.
  • How can I make this dish dairy-free? Use coconut cream and omit the Parmesan cheese for a dairy-free alternative.
  • Can I add vegetables? Absolutely! Spinach, bell peppers, or broccoli can be added for extra nutrition.
  • How do I know when the chicken is cooked? Use a meat thermometer; chicken should reach an internal temperature of 165°F.
  • Can this recipe be doubled? Yes! Simply adjust the cooking time if necessary, ensuring the chicken is cooked through.
  • Is this recipe gluten-free? To make it gluten-free, substitute the flour with cornstarch or a gluten-free flour blend.

Nutrition Tips and Dietary Adaptations

Making this creamy garlic chicken healthy is easy! Consider these tips:

  • Lean Protein: Opt for skinless chicken breasts or thighs to reduce fat content.
  • Whole Grains: Serve with whole grain pasta or brown rice for added fiber.
  • Vegetable Boost: Add vegetables to increase nutrients and fiber in your meal.
  • Portion Control: Be mindful of portion sizes if you’re watching your calorie intake.

Essential Equipment Recommendations

To make your cooking experience smooth, here are some equipment suggestions:

  • Skillet: A heavy-bottomed skillet is ideal for searing chicken and making sauces.
  • Meat Thermometer: Ensure your chicken is cooked safely without drying it out.
  • Wooden Spoon: Great for stirring sauces and scraping up those delicious bits from the skillet.
  • Measuring Cups and Spoons: Accurate measurements are key for successful cooking.

Serving Suggestions

To elevate your creamy garlic chicken experience, consider these serving ideas:

  • Garnish with Fresh Herbs: Sprinkle chopped parsley or basil for a fresh touch.
  • Pair with a Side Salad: A crisp green salad balances the richness of the dish.
  • Serve with Crusty Bread: Perfect for soaking up the creamy sauce!

Conclusion

Your journey to mastering creamy garlic chicken starts here. With its simple steps and rich flavors, this dish is sure to become a favorite in your kitchen. Remember, cooking is about confidence and creativity. Don’t hesitate to make this recipe your own and enjoy the delicious results!

Creamy Garlic Chicken

Prep Time 10 minutes
Cook Time 20 minutes
Total Time 30 minutes
Servings 4 servings
Calories 550
A rich and flavorful dish featuring tender chicken breasts in a creamy garlic sauce, perfect for a comforting meal.

Ingredients

Protein

  • 2 large boneless skinless chicken breasts

Seasonings

  • Salt/Pepper Salt/Pepper
  • 3 teaspoons Italian seasonings
  • 1/3 cup flour
  • 4 tablespoons Parmesan cheese (shredded)

Cooking Oils

  • 3 tablespoons olive oil

Broth & Bouillon

  • 2 ½ cups chicken broth
  • 1 beef bouillon cube beef bouillon cube (or 1 tsp better than bouillon)
  • 1 teaspoon low sodium soy sauce (can sub Worcestershire sauce)
  • 1 teaspoon onion powder
  • ½ teaspoon Dried thyme
  • ½ teaspoon mustard powder

Dairy & Butter

  • 3 tablespoons butter
  • 10 whole cloves garlic
  • ½ cup heavy cream
  • ½ cup Parmesan cheese (optional)

Instructions 

  • Season chicken with salt, pepper, and Italian herbs, then dredge in flour.
  • Heat olive oil in a skillet and cook chicken until golden, then set aside.
  • In the same skillet, sauté garlic and add broth, bouillon, soy sauce, onion powder, thyme, and mustard powder. Simmer.
  • Stir in butter, heavy cream, and Parmesan cheese, then return chicken to the sauce and cook until heated through.
  • Serve hot, garnished with extra Parmesan if desired.

Notes

For a richer flavor, use freshly grated Parmesan and fresh garlic.
Calories: 550kcal
Cost: $15
Course: Main Course
Cuisine: American
Keyword: Chicken, cream, Garlic

Transform Your Dinner Routine with Spicy Quinoa-Lentil Wraps

Are you ready to elevate your weeknight dinners? These Spicy Quinoa-Lentil Wraps packed with flavor, nutrition, and vibrant spices are here to excite your taste buds! This easy recipe combines the hearty goodness of lentils, the nutty flavor of quinoa, and a deliciously creamy tahini sauce that ties everything together. Perfect for busy weeknights, these wraps are not just filling but also versatile and fun to make!

Why You’ll Love This Recipe

  • Quick and Easy: With just a few simple ingredients, you can whip up these wraps in less than 30 minutes, making them an ideal choice for busy evenings.
  • Nutritious Powerhouse: Packed with protein from lentils and quinoa, these wraps will keep you full and energized.
  • Customizable: Feel free to add your favorite veggies or spices to make these wraps truly your own!
  • Meal Prep Friendly: Make a batch ahead of time and enjoy them throughout the week—perfect for lunch or dinner!
  • Deliciously Versatile: Whether you serve them warm or chilled, these wraps are tasty at any temperature!

Ingredient Breakdown

Here’s everything you need to make these scrumptious wraps, along with some great substitution ideas:

  • 3/4 cup red lentils: Rich in protein and fiber, these lentils cook quickly and blend seamlessly into the filling. You can substitute with green or brown lentils, but cooking times may vary.
  • 1/2 cup quinoa: This gluten-free grain adds a nutty flavor and additional protein. Swap with couscous or rice if desired.
  • 2 1/2 cups water: Essential for cooking the lentils and quinoa. Adjust as needed for desired consistency.
  • 2 heaping teaspoons cumin: Adds warmth and depth to the filling. Experiment with coriander or chili powder for a different flavor profile.
  • 1 teaspoon garlic powder: For a robust flavor; fresh minced garlic works too.
  • 1 teaspoon onion powder: Enhances the savory notes; diced onions are a fresh alternative.
  • 1/2 teaspoon pink salt: Adjust to taste; sea salt can be used as a substitute.
  • 1 teaspoon red pepper flakes (optional): For those who love a kick! Adjust the amount based on your spice tolerance.
  • 2 tablespoons chopped parsley: Fresh herbs brighten the dish; feel free to use cilantro or basil instead.
  • 1 green onion, thinly sliced: Adds crunch and flavor; regular onion works too.
  • 1/4 cup tahini: Creamy and rich, tahini brings a nutty flavor; peanut butter can be a substitute if you’re in a pinch.
  • 1/3 cup water (for tahini sauce): This will help thin out the sauce. Adjust as necessary for your preferred consistency.
  • Juice of 1/2 lemon: Brightens up the tahini sauce; vinegar can also work in a pinch.
  • Pinch of pink salt and red pepper flakes: For seasoning the sauce to your liking.
  • 1 tablespoon parsley, finely chopped: To garnish the tahini sauce.
  • Shredded cabbage or microgreens: For crunch and freshness in your wraps.
  • Lavash bread or corn tortillas: These serve as the wrap base; flour tortillas are also an option. Choose gluten-free varieties if needed.
  • Chili paste or sriracha (optional): For an extra layer of heat.
  • Sliced avocado (optional): For a creamy finish to your wraps.

Step-by-Step Instructions

Side view of a delicious wrap filled with quinoa, lentils, and fresh greens.

1. Prepare the Lentil-Quinoa Mix

In a medium saucepan, combine the water, red lentils, quinoa, cumin, garlic powder, onion powder, pink salt, and red pepper flakes. Bring the mixture to a boil, then cover and reduce the heat to a simmer. Cook for about 20 minutes, or until the lentils and quinoa are tender and fluffy.

2. Mix in Fresh Herbs

Once cooked, remove from heat and stir in the chopped parsley and green onions. If the mixture feels too dry, add a couple of tablespoons of water to achieve a creamy consistency. Taste and adjust the spices as needed.

3. Make the Tahini Sauce

In a small bowl, whisk together the tahini, water, lemon juice, salt, red pepper flakes, and parsley until smooth. Set aside.

4. Assemble the Wraps

Lay the lavash bread or tortillas flat on a clean surface. Spread about a tablespoon of chili paste along the edge of the wrap. Spoon 1/2 cup of the lentil-quinoa mixture on top, followed by shredded cabbage. Fold the wrap over and roll tightly, leaving the ends open. Slice in half and serve with a drizzle of tahini sauce.

5. For Tacos

Warm your tortillas and layer them with the lentil-quinoa mix, microgreens or cabbage, and drizzle with tahini dressing. Add sliced avocado for extra creaminess.

Pro Tips for Perfect Wraps

  • Cook lentils properly: Make sure the lentils are fully cooked and tender for the best texture.
  • Adjust seasonings: Feel free to modify spices according to your taste preferences.
  • Experiment with toppings: Add your favorite veggies or dips to enhance flavor.
  • Use fresh ingredients: Fresh herbs and vegetables will elevate the dish significantly.
  • Store properly: Keep leftovers in an airtight container in the fridge for up to 3-4 days.
  • Warm before serving: If you prefer warm wraps, reheat in a skillet for a few minutes.
  • Make ahead: Prepare the filling and sauce in advance for quick assembly later.
  • Try different wraps: Experiment with various types of wraps like collard greens for a low-carb option.

Common Mistakes and Troubleshooting

  • Too dry filling: If your lentil-quinoa mix is too dry, add a bit more water while cooking.
  • Overcooked lentils: Keep an eye on your lentils; they should be tender but not mushy.
  • Wraps falling apart: Ensure you fold the wraps tightly and use a sturdy base like lavash bread.
  • Too spicy: If you find the wraps too spicy, reduce the amount of red pepper flakes next time.

Variations to Try

  • Southwestern Twist: Add black beans, corn, and diced bell peppers for a Southwestern flair.
  • Asian-Inspired: Incorporate soy sauce, ginger, and sesame oil into the filling for an Asian twist.
  • Breakfast Wraps: Add scrambled eggs and sautéed vegetables for a hearty breakfast option.
  • Stuffed Peppers: Use the filling to stuff bell peppers, top with cheese, and bake until bubbly.

Storage and Make-Ahead Instructions

These Spicy Quinoa-Lentil Wraps can be stored in the refrigerator for up to 3-4 days. For longer storage, consider freezing the filling in individual portions. Just reheat and assemble your wraps when ready to enjoy!

Frequently Asked Questions (FAQs)

  • Can I make these wraps vegan?

    Absolutely! This recipe is already vegan-friendly.

  • How spicy are these wraps?

    The spice level can be adjusted based on your preference. Feel free to omit the red pepper flakes.

  • Can I use other grains?

    Yes! You can substitute quinoa with couscous, rice, or even farro.

  • What can I serve with these wraps?

    Pair with a side salad, roasted veggies, or your favorite dips.

  • Can I store leftovers?

    Yes, store them in an airtight container in the fridge for up to 3-4 days.

  • How do I reheat the wraps?

    Reheat in a skillet over medium heat for a few minutes until warmed through.

  • Can I make these wraps gluten-free?

    Yes! Use gluten-free tortillas or lavash bread for a gluten-free option.

  • What else can I put in these wraps?

    Add your favorite veggies, nuts, or sauces to customize your wraps!

Nutritional Tips and Dietary Adaptations

These wraps are nutrient-dense, providing a good balance of protein, fiber, and healthy fats. Feel free to tweak the ingredients based on your dietary needs—substituting tahini with sunflower seed butter for nut-free options or using low-sodium broth instead of water can enhance flavor without compromising health.

Equipment Recommendations

  • Medium saucepan: For cooking the lentils and quinoa.
  • Mixing bowls: For preparing the tahini sauce and assembling the wraps.
  • Whisk: To blend the tahini sauce smoothly.
  • Measuring cups and spoons: Essential for accurate ingredient measurements.
  • Cutting board and knife: For chopping veggies and herbs.

Serving Suggestions

Serve your Spicy Quinoa-Lentil Wraps with a side of fresh salad, sliced avocado, or a tangy yogurt sauce for a complete meal. Enjoy them warm or at room temperature for a delightful lunch or dinner option!

Cooking is all about exploration and enjoyment! I hope you find these wraps as delightful and fulfilling as I do. Happy cooking, and remember—great food doesn’t require perfection, just a willingness to try and enjoy the process!

SPICY QUINOA-LENTIL WRAPS TAHINI SAUCE

Prep Time 10 minutes
Cook Time 20 minutes
Total Time 30 minutes
Servings 4 servings
Calories 350
A flavorful and healthy wrap combining spiced lentil and quinoa mixture with creamy tahini sauce, perfect for a quick lunch or dinner.

Ingredients

Lentil-Quinoa Mix

  • 0.75 cup red lentils (sorted and rinsed)
  • 0.5 cup quinoa (rinsed)
  • 2.5 cups water (more as needed)
  • 2 teaspoons cumin (heaping)
  • 1 teaspoon garlic powder
  • 1 teaspoon onion powder
  • 0.5 teaspoon pink salt (or to taste)
  • 1 teaspoon red pepper flakes (optional)
  • 2 tablespoons chopped parsley
  • 1 green onion green onion (thinly sliced)
  • 0.25 cup tahini
  • 0.33 cup water (more as needed)
  • 1 tablespoon lemon juice (juice of 1/2 lemon or 1 tablespoon)
  • 0.25 teaspoon pink salt (pinch)
  • 0.25 teaspoon red pepper flakes (pinch)
  • 1 tablespoon finely chopped parsley

Additional ingredients

  • as needed shredded cabbage or micro greens
  • as needed lavash bread or corn tortillas (flour tortillas work too)
  • to taste chili paste or sriracha
  • optional sliced avocado (for tacos)

Instructions 

  • In a medium saucepan, combine water, lentils, quinoa, cumin, garlic powder, onion powder, salt, and red pepper flakes. Bring to a boil, cover, and simmer for 20 minutes. Remove from heat, stir in parsley and scallions, and let rest for 10 minutes. Add water if too dry.
  • In a small bowl, whisk together tahini, water, lemon juice, salt, red pepper flakes, and parsley to make the sauce. Set aside.
  • Lay lavash or tortillas flat, spread chili paste, add lentil-quinoa mixture, cabbage or micro greens, and sliced avocado if using. Roll up, slice, and serve with tahini sauce.

Notes

Wraps can be stored in the refrigerator for up to 3-4 days.
Calories: 350kcal
Cost: $15
Course: Main Course
Cuisine: Mediterranean
Keyword: Healthy, Vegetarian, Wrap

Elevate Your Mornings with Nourishing Protein Oatmeal

There’s something incredibly comforting about a warm bowl of oatmeal, especially when it’s packed with protein to kickstart your day. In this guide, I’ll show you how to make the ultimate protein oatmeal that is not only easy to prepare but also delicious and versatile. Whether you’re rushing out the door or planning a slow morning at home, this recipe is designed to be your go-to fuel. Let’s dive in!

Why You’ll Love This Recipe

This protein oatmeal isn’t just a basic breakfast; it’s a powerhouse of nutrition and flavor. Here are a few reasons why you’ll adore this recipe:

  • Quick and Easy: You can whip this up in just five minutes, making it perfect for busy mornings.
  • Customizable: With endless flavor options, from seasonal fruits to nut butters, no two bowls need to be the same!
  • Nutrient-Packed: Combining oats with protein powder boosts your meal’s protein content, helping you stay fuller longer.
  • Make-Ahead Friendly: Prepare a big batch and store it for quick breakfasts throughout the week.
  • Versatile for Any Diet: This recipe can easily be adapted for vegan, gluten-free, or low-carb diets.

Key Ingredients for Your Protein Oatmeal

Let’s break down the essential ingredients you’ll need to create this delicious protein oatmeal:


Glass Mason Jars for Oats

★ Recommended Kitchen Tool

Glass Mason Jars for Oats

Make this recipe even easier with a quality Glass Mason Jars for Oats — a must-have kitchen staple!


🛒 View on Amazon →

As an Amazon Associate, we earn from qualifying purchases.
  • Rolled Oats: Use 1/2 cup for a hearty base. Choose gluten-free oats if necessary.
  • Protein Powder: A 1/4 cup adds a significant protein boost. Feel free to experiment with different flavors like vanilla or chocolate.
  • Liquid: A cup of water and 1/2 cup of milk (dairy or non-dairy) provide the perfect creaminess.
  • Salt: Just a pinch enhances the flavors beautifully.

How to Make Perfect Protein Oatmeal

['Close-up view of a bowl of Protein Oatmeal, showcasing its creamy texture and colorful toppings.', 'Side view of a hearty serving of Protein Oatmeal in a white bowl, highlighting the oats and protein powder.', 'A vibrant bowl of Protein Oatmeal, focusing on its smooth appearance and ingredient details.', 'Detailed shot of Protein Oatmeal, featuring the glossy surface and healthy ingredients in a breakfast setting.']

Follow these simple steps to prepare your nourishing protein oatmeal:

  1. Add the oats, water, milk, and salt to a small saucepan or microwave-safe bowl.
  2. Bring the mixture to a boil, then reduce to a simmer. Cook until the oats are thick and creamy, about five minutes.
  3. Remove from heat and whisk in the protein powder until well combined.
  4. Top with your favorite mix-ins and enjoy immediately!

Pro Tips for the Best Protein Oatmeal

To ensure your protein oatmeal turns out perfectly every time, keep these expert tips in mind:

  • Texture Control: Adjust the liquid based on your texture preference; more for creamier oats, less for thicker.
  • Mixing It Up: Add protein powder gradually to avoid clumping. Whisking helps achieve a smooth consistency.
  • Timing Is Key: Allow the oats to simmer long enough to absorb the liquid for a satisfying dish.
  • Flavor Enhancements: Consider adding a dash of cinnamon or a splash of vanilla extract for extra flavor.
  • Fruit Additions: Fresh or frozen fruits can be added during cooking or as a topping to enhance nutrition and taste.
  • Nut Butters: Swirling in almond or peanut butter not only adds creaminess but also healthy fats.
  • Protein Variety: Try different protein powders, such as whey, casein, or plant-based options to find your favorite.
  • Chill for Overnight Oats: Make your oatmeal the night before for a quick grab-and-go breakfast.

Common Mistakes and Troubleshooting

Even the best cooks can face challenges. Here are some common mistakes to avoid:

  • Overcooking: Keep an eye on your oats; overcooking can lead to a gluey texture. Aim for a creamy finish.
  • Not Adding Enough Liquid: If your oatmeal turns out too thick, simply stir in more water or milk until you reach your desired consistency.
  • Skipping the Salt: A little salt enhances the sweetness of your oatmeal, so don’t skip this step!
  • Mixing Protein Powder Too Late: Whisk it in right after cooking to ensure it dissolves properly.

Delicious Variations to Try

Here are some fun variations to keep your protein oatmeal exciting:

  • Chocolate Banana: Mix in a tablespoon of cocoa powder and top with sliced bananas for a delightful treat.
  • Berry Bliss: Add a handful of mixed berries (fresh or frozen) for a burst of antioxidants.
  • Apple Cinnamon: Dice a small apple and sprinkle with cinnamon for a cozy fall-inspired oatmeal.
  • Nutty Caramel: Swirl in caramel extract and top with chopped nuts for a sweet, crunchy finish.

Storage and Make-Ahead Instructions

Want to save time? Here’s how to store your protein oatmeal:

  • Fridge: Store cooked oatmeal in an airtight container in the fridge for up to 5 days. Reheat with a splash of milk.
  • Freezer: Portion into freezer-safe containers for up to 3 months. Thaw overnight in the fridge before reheating.

Frequently Asked Questions

Let’s tackle some common questions about protein oatmeal:

  • Can I use any type of protein powder? Yes! Whey, casein, or plant-based powders all work well.
  • Is oatmeal gluten-free? Rolled oats are naturally gluten-free, but ensure they are certified gluten-free if you have celiac disease.
  • Can I make it vegan? Absolutely! Use plant-based milk and a vegan protein powder.
  • How much protein does this oatmeal contain? Depending on the protein powder, expect around 20-30 grams of protein per serving.
  • Can I make this in the microwave? Yes! Combine ingredients in a microwave-safe bowl and heat for about 2-3 minutes, stirring halfway through.
  • What can I add for extra fiber? Chia seeds or ground flaxseeds are great additions to boost fiber content.
  • How do I sweeten my oatmeal? Consider natural sweeteners like honey, maple syrup, or agave nectar.
  • Can I eat protein oatmeal at night? Definitely! It makes for a great post-workout meal or evening snack.

Nutrition Tips and Dietary Adaptations

This protein oatmeal can easily fit into various dietary needs:

  • Low Carb: Use almond milk and sugar-free protein powder for a low-carb option.
  • High Fiber: Incorporate flaxseeds or chia seeds for added fiber and omega-3s.
  • Nut-Free: Choose seeds instead of nuts for toppings to keep it nut-free.

Equipment Recommendations

Here’s what you’ll need to whip up your protein oatmeal:

  • Small Saucepan: For stovetop preparation, a non-stick saucepan works best.
  • Microwave-Safe Bowl: Ideal for quick microwave oatmeal.
  • Whisk: A whisk helps combine the protein powder smoothly.
  • Measuring Cups: Accurate measurements ensure consistency in your recipe.

Serving Suggestions

Make your protein oatmeal a meal to remember with these serving ideas:

  • Top with Fresh Fruit: Sliced bananas, berries, or diced apples add color and nutrients.
  • Drizzle Nut Butter: A tablespoon of almond or peanut butter enhances flavor and adds healthy fats.
  • Sprinkle with Seeds: Chia or flaxseeds boost nutrition and crunch.
  • Finish with a Sweetener: A drizzle of honey or maple syrup can elevate your oatmeal experience.

With this comprehensive guide, you’re now equipped to make the ultimate protein oatmeal that’s not only tasty but also packed with nutrients. Remember, cooking should be enjoyable and stress-free. So, gather your ingredients, follow these steps, and create a breakfast that’s as good for your taste buds as it is for your body. Happy cooking!

Protein Oatmeal

Prep Time 2 minutes
Cook Time 5 minutes
Total Time 7 minutes
Servings 1 serving
Calories 250
A quick and nutritious breakfast combining oats and protein powder for sustained energy.

Ingredients

Dry ingredients

  • 1/2 cup rolled oats (gluten-free if necessary)
  • 1/4 cup protein powder

Liquid

  • 1 cup water
  • 1/2 cup milk (any milk works)
  • 1/4 teaspoon salt

Instructions 

  • Add oats, water, milk, and salt to a saucepan or microwave-safe bowl.
  • Bring to a boil, then simmer until thick, about five minutes.
  • Remove from heat and whisk in protein powder.
  • Serve immediately with toppings of choice.

Notes

Feel free to add fruits or nuts for extra flavor and nutrients.
Calories: 250kcal
Cost: $3
Course: Breakfast
Keyword: Oats, Protein

Transform Your Meals with This Avocado, Egg, and Roasted Sweet Potato Bowl

Welcome to a culinary adventure that will not only nourish your body but also delight your taste buds! This Avocado, Egg, and Roasted Sweet Potato Bowl is the perfect dish for breakfast, lunch, or dinner. Combining creamy avocados, protein-packed eggs, and sweet roasted potatoes, this bowl is a celebration of flavors and nutrients. With simple ingredients and straightforward steps, you’ll find that cooking can be both enjoyable and rewarding. Let’s dive into this delicious recipe and discover why it’ll become a staple in your kitchen!

Why You’ll Love This Recipe

  • Quick and Easy: In just 30 minutes, you can prepare a wholesome meal that satisfies your hunger and cravings.
  • Nutrient-Dense: Packed with healthy fats from avocado, protein from eggs, and fiber from sweet potatoes, this bowl supports a balanced diet.
  • Versatile: Customize it with your favorite toppings or ingredients based on what you have on hand, making it a go-to for any occasion.
  • Flavor Explosion: The combination of sweet, savory, and creamy textures creates a delightful experience in every bite.
  • Meal Prep Friendly: Prepare components in advance for a quick assembly during busy weekdays.

Ingredients You’ll Need

Here’s what you’ll need to create this delicious bowl:

  • 2 hard- or medium-boiled eggs: These provide a great source of protein.
  • 1 medium sweet potato, peeled and cubed: Sweet potatoes add natural sweetness and are rich in vitamins.
  • 1 tsp olive oil: For roasting the sweet potatoes to perfection.
  • Salt and freshly cracked black pepper, to taste: Essential for seasoning and enhancing flavor.
  • 1 ripe avocado, sliced: Adds creaminess and healthy fats to your bowl.

How to Make Your Avocado, Egg, and Roasted Sweet Potato Bowl

A close-up view of a vibrant avocado, egg, and sweet potato bowl with fresh ingredients.

Step-by-Step Preparation

  1. Preheat your oven: Set it to 400°F (200°C).
  2. Toss the sweet potatoes: In a bowl, combine the cubed sweet potatoes with olive oil, salt, and pepper. Spread them evenly on a baking sheet.
  3. Roast: Bake the sweet potatoes for 20-25 minutes, or until they are golden and tender.
  4. Boil the eggs: While the sweet potatoes roast, bring a pot of water to a boil. Gently add the eggs and boil for 8-9 minutes for firm yolks. Once done, cool them under cold water, peel, and slice.
  5. Prepare the avocado: Slice the avocado and season it lightly with salt.
  6. Assemble your bowl: In a bowl, arrange the roasted sweet potatoes, sliced eggs, and avocado. Finish with a sprinkle of extra black pepper before serving.

Pro Tips for Perfecting Your Bowl

  • Choose ripe avocados: Look for avocados that yield slightly to pressure for the best flavor and texture.
  • Variations: Try adding spinach, kale, or other greens for extra nutrients.
  • Seasoning: Experiment with spices like paprika or chili flakes to elevate the flavors.
  • Texture matters: Ensure your sweet potatoes are evenly cut for consistent roasting.
  • Make ahead: Pre-cook sweet potatoes and eggs for an even quicker meal assembly later.
  • Watch the boil: For perfectly cooked eggs, avoid overcooking them to prevent a gray ring around the yolk.
  • Storage tips: Store components separately to maintain freshness if preparing in advance.
  • Fresh toppings: Add fresh herbs like cilantro or parsley for a burst of flavor.

Common Mistakes to Avoid

  • Overcrowding the baking sheet: This can cause uneven cooking—spread your sweet potatoes out for better roasting.
  • Not preheating the oven: Always preheat for the best results when roasting.
  • Skipping the ice bath: Cooling boiled eggs quickly helps ensure easy peeling.
  • Ignoring seasoning: Don’t forget to season your ingredients well to enhance their natural flavors.

Delicious Variations to Try

  • Vegetarian Delight: Add sautéed spinach or kale for a nutritious boost.
  • Southwestern Twist: Top with black beans and salsa for a Tex-Mex flavor.
  • Nutty Crunch: Sprinkle with toasted nuts or seeds for added texture.
  • Global Flavors: Incorporate feta cheese and olives for a Mediterranean flair.

Make-Ahead and Storage Instructions

This bowl is perfect for meal prep! You can:

  • Store roasted sweet potatoes: Keep them in an airtight container in the fridge for up to 5 days.
  • Prep eggs: Hard-boiled eggs can last up to a week in the fridge.
  • Slice avocado last: To maintain freshness, slice the avocado just before serving.

Frequently Asked Questions

  • Can I use other types of potatoes? Absolutely! Yukon gold or red potatoes work well too.
  • What can I substitute for eggs? Try tofu or chickpeas for a plant-based protein option.
  • Is this bowl gluten-free? Yes, all ingredients are naturally gluten-free!
  • How can I make this dish vegan? Omit the eggs and replace with extra avocado or tofu.
  • Can I reheat leftovers? Yes, just warm up the sweet potatoes and eggs gently in the microwave.
  • What are the best toppings? Fresh herbs, nuts, and a drizzle of hot sauce can elevate your bowl.
  • How do I know when sweet potatoes are done? They should be golden brown and tender when pierced with a fork.
  • Can I add cheese? Yes! A sprinkle of goat cheese or feta adds a nice flavor contrast.

Nutritional Benefits and Dietary Adaptations

This bowl is not only delicious but also packed with nutritional benefits:

  • Healthy fats: Avocados provide heart-healthy monounsaturated fats.
  • Protein-rich: Eggs are a complete protein source, supporting muscle health.
  • Fiber: Sweet potatoes are high in fiber, aiding digestion and keeping you full.

Recommended Kitchen Equipment

  • Baking sheet: A sturdy baking sheet is essential for roasting sweet potatoes.
  • Pot for boiling: A medium pot will do the trick for boiling eggs.
  • Knife and cutting board: For slicing up your ingredients smoothly.
  • Mixing bowl: To toss the sweet potato cubes with oil and seasoning.

Serving Suggestions

This versatile bowl can be served on its own or with:

  • Whole grain toast: A slice of whole grain bread makes a great side.
  • Fresh fruit: Pair it with seasonal fruits for a refreshing contrast.
  • A side salad: A simple green salad can complement the meal beautifully.

In conclusion, the Avocado, Egg, and Roasted Sweet Potato Bowl is more than just a meal; it’s a celebration of wholesome ingredients that satisfy and nourish. By following the steps outlined here and incorporating some of the tips and variations, you can easily create a dish that not only tastes amazing but also makes you feel great. So grab your ingredients, get cooking, and enjoy the joy of making this delicious bowl!

Avocado, Egg Roasted Sweet Potato Bowl

Prep Time 10 minutes
Cook Time 25 minutes
Total Time 35 minutes
Servings 2 servings
Calories 350
A nutritious and colorful bowl combining roasted sweet potatoes, sliced eggs, and creamy avocado for a satisfying meal.

Ingredients

Main

  • 2 pieces hard- or medium-boiled eggs
  • 1 medium sweet potato, peeled and cubed
  • 1 tsp olive oil
  • to taste Salt freshly cracked black pepper
  • 1 Avocado, sliced

Instructions 

  • Preheat oven to 400F (200C). Toss sweet potato cubes with olive oil, salt, and pepper; roast for 20-25 minutes.
  • Boil eggs for 8-9 minutes, then cool, peel, and slice.
  • Slice the avocado and season lightly with salt.
  • Assemble the bowl with roasted sweet potatoes, sliced eggs, and avocado. Sprinkle with black pepper before serving.

Notes

For extra flavor, add a squeeze of lemon or a drizzle of hot sauce.
Calories: 350kcal
Cost: $10
Course: Breakfast, Brunch
Cuisine: Healthy
Keyword: Avocado, Egg, sweet potato

Transform Your Dinner Routine with a Flavor-Packed Chicken Burrito Bowl

Are you tired of the same old dinner options? Look no further! This Chicken Burrito Bowl is here to elevate your weeknight meals into something truly special. With its vibrant ingredients and bold flavors, you’ll find yourself looking forward to cooking again. In just a few simple steps, you can create a mouthwatering dish that not only satisfies your taste buds but also adds excitement to your dinner table. Let’s dive in!

Why You’ll Love This Recipe

This Chicken Burrito Bowl is more than just a meal; it’s an experience! Here are five reasons why you’ll love making this dish:

  • Quick and Easy: With minimal prep time and straightforward steps, this dish is perfect for busy weeknights.
  • Customizable: Tailor the ingredients to your family’s preferences, making it kid-friendly or spicy, just how you like it.
  • Healthy Ingredients: Packed with wholesome ingredients, including lean protein and fresh veggies, it’s a nutritious choice.
  • Meal Prep Friendly: Make a big batch and enjoy leftovers throughout the week, saving you time and effort.
  • Flavorful and Satisfying: The combination of spices and fresh ingredients creates a taste explosion that will leave everyone wanting more!

Ingredient Breakdown

Let’s gather our ingredients! Here’s what you’ll need for this delicious Chicken Burrito Bowl:


Digital Meat Thermometer

★ Recommended Kitchen Tool

Digital Meat Thermometer

Make this recipe even easier with a quality Digital Meat Thermometer — a must-have kitchen staple!


🛒 Shop This Tool →

As an Amazon Associate, we earn from qualifying purchases.
  • 3 Tbsp fresh lime juice: Adds a zesty kick!
  • 3 Tbsp olive oil (divided): For marinating the chicken and cooking.
  • 1 Tbsp chili powder: A must for that classic burrito flavor.
  • 2 tsp ground cumin: Provides a warm, earthy touch.
  • 1 1/2 tsp minced garlic: Adds depth and savory notes.
  • Salt and black pepper: To taste, enhancing all flavors.
  • 1 3/4 lbs. boneless skinless chicken thighs: Juicy and flavor-packed, perfect for this recipe.
  • Cilantro lime rice (1 batch): The ideal base for your burrito bowl.
  • 2 ears fresh corn: Sweet and crunchy, adds texture.
  • 1 1/2 cans black beans: A great source of protein and fiber.
  • 1 cup shredded cheddar cheese: Because who doesn’t love cheese?
  • 2 roma tomatoes: Freshness is key!
  • 2 medium avocados: Creamy and delicious.
  • 6 Tbsp chopped red onion: For a bit of crunch and flavor.
  • 1/2 cup sour cream (or Mexican crema): For that creamy finish.
  • Mexican hot sauce (e.g., Tapatio or Valentino): Spice it up to your liking!

Pro Tips for Perfecting Your Chicken Burrito Bowl

['A close-up view of a Chicken Burrito Bowl with colorful ingredients.', 'Side view of a Chicken Burrito Bowl showcasing chicken, rice, and toppings.', 'Juicy Chicken Burrito Bowl filled with vibrant vegetables and cheeses.', 'A delicious Chicken Burrito Bowl with layers of chicken, beans, and avocado.']

Ready to impress your family with your cooking skills? Here are some expert tips:

  • Marinate Longer: For enhanced flavor, marinate the chicken for at least 1 hour, or overnight if possible.
  • High Heat Cooking: Sear the chicken on high heat to lock in juices and create a nice crust.
  • Fresh Ingredients: Use the freshest avocados and veggies for the best taste and texture.
  • Customize Your Rice: Try brown rice or cauliflower rice for a healthier option!
  • Use Cast Iron: A cast iron skillet distributes heat evenly, perfect for cooking the chicken.
  • Layering is Key: Assemble your bowl in layers for the best flavor experience with each bite.
  • Garnish Wisely: Fresh cilantro or lime wedges make for a beautiful presentation.
  • Store Smart: Keep ingredients separate for meal prep to maintain freshness.

Common Mistakes and Troubleshooting

Even the best cooks make mistakes! Here’s how to avoid common pitfalls:

  • Overcooking Chicken: Use a meat thermometer; chicken is perfectly cooked at 165°F.
  • Skipping the Marinade: Don’t skip marinating; it’s crucial for flavor!
  • Using Dull Knives: A sharp knife makes chopping veggies easier and safer.
  • Too Much Rice: Balance the rice with proteins and veggies for a well-rounded bowl.

Variations of the Chicken Burrito Bowl

Want to switch things up? Here are some delicious variations:

  • Vegetarian Burrito Bowl: Substitute chicken with grilled veggies or tofu.
  • Spicy Chipotle Chicken: Add chipotle peppers in adobo sauce to the marinade for a smoky flavor.
  • Southwestern Style: Include black olives and jalapeños for an extra kick.
  • Breakfast Burrito Bowl: Use scrambled eggs instead of chicken, topped with salsa and avocado.

Storage and Make-Ahead Instructions

This Chicken Burrito Bowl makes meal prep a breeze!

  • Refrigeration: Store leftovers in an airtight container in the fridge for up to 3 days.
  • Freezing: You can freeze the marinated chicken for up to 3 months; just thaw before cooking.
  • Make-Ahead Rice: Prepare the cilantro lime rice a day in advance for quick assembly.

Comprehensive FAQ

Here are some frequently asked questions that can help you get the most out of this recipe:

  • Can I use chicken breasts instead of thighs? Absolutely! Just be mindful as breasts can dry out more quickly.
  • What can I substitute for lime juice? Lemon juice works well in a pinch!
  • Can I make this bowl vegan? Yes! Swap chicken for tofu and use plant-based sour cream.
  • How do I prevent the avocados from browning? Squeeze lime juice over them before serving.
  • What else can I add to my bowl? Try adding grilled peppers or different types of cheese!
  • Is this dish gluten-free? Yes, as long as your hot sauce and other ingredients are gluten-free.
  • Can I assemble the bowls in advance? Yes, but keep the components separate to maintain freshness.
  • How can I make this a low-carb dish? Use cauliflower rice instead of regular rice!

Nutrition Tips and Dietary Adaptations

This Chicken Burrito Bowl is not only delicious but also nutritious. Here are some tips:

  • Lean Protein: Chicken thighs provide protein without excess fat, perfect for a balanced diet.
  • Fiber Boost: Beans and veggies add fiber, aiding digestion and keeping you full longer.
  • Healthy Fats: Avocados offer healthy fats, essential for heart health.

Essential Equipment Recommendations

Here’s what you’ll need to whip up your Chicken Burrito Bowl:

  • Cast Iron Skillet: Ideal for searing chicken to perfection.
  • Meat Thermometer: To ensure your chicken is cooked safely.
  • Cutting Board: For chopping veggies and assembling your bowl.
  • Mixing Bowls: To prepare your marinade and mix ingredients.

Serving Suggestions

How to serve your Chicken Burrito Bowl:

  • Garnish generously: Fresh cilantro or a squeeze of lime adds a finishing touch.
  • Serve with chips: A side of tortilla chips for crunch is always a hit.
  • Pair with a drink: Enjoy with a refreshing iced tea or your favorite beverage!

In conclusion, this Chicken Burrito Bowl is your new go-to recipe for busy weeknights. With its ease of preparation, customizable options, and delicious flavors, you’ll be well on your way to becoming a confident home cook. So grab your ingredients, gather your loved ones, and enjoy a hearty, satisfying meal together. Happy cooking!

Chicken Burrito Bowl

Prep Time 15 minutes
Cook Time 20 minutes
Total Time 35 minutes
Servings 4 servings
Calories 650
A flavorful and customizable chicken burrito bowl packed with fresh ingredients and vibrant flavors.

Ingredients

Marinade

  • 3 Tbsp fresh lime juice
  • 3 Tbsp olive oil (divided)
  • 1 Tbsp chili powder
  • 2 tsp ground cumin
  • 1.5 tsp minced garlic
  • Salt and black pepper (to taste) Salt and black pepper
  • 1.75 lbs boneless skinless chicken thighs (trimmed of excess fat)

Other ingredients

  • 1 batch cilantro lime rice
  • 2 ears fresh corn (shucked and kernels cut from cobs)
  • 1.5 cans black beans (with liquid undrained)
  • 1 cup shredded cheddar cheese (or more to taste)
  • 2 roma tomatoes (chopped)
  • 2 medium avocados (chopped)
  • 6 Tbsp chopped red onion
  • 0.5 cup sour cream (or Mexican crema)
  • 6 Tbsp Mexican hot sauce (e.g., Tapatio or Valentino)

Instructions 

  • Combine lime juice, 2 Tbsp olive oil, chili powder, cumin, garlic, salt, and pepper in a large bowl.
  • Add chicken thighs to the marinade, coat well, cover, and refrigerate for at least 1 hour.
  • Heat a skillet over medium-high heat, add 1/2 Tbsp olive oil, and sear chicken for 6 minutes per side until cooked through. Rest the chicken.
  • Warm black beans in a saucepan over medium-low heat, season with salt.
  • Cook corn in the skillet for 3-4 minutes until golden. Assemble bowls with rice, chicken, corn, beans, cheese, tomatoes, avocados, red onion, sour cream, and hot sauce.

Notes

For extra flavor, marinate the chicken longer or add fresh lime juice just before serving.
Calories: 650kcal
Cost: $15
Course: Main Course
Cuisine: Mexican
Keyword: Chicken

Unlock the Secret to a Flavorful Chicken Veggie Rice Bowl

If you’re looking to elevate your dinner routine with a dish that’s not only nourishing but also bursting with flavor, this Chicken Veggie Rice Bowl is your answer! With a perfect balance of wholesome ingredients, this meal is designed for busy weeknights when you want something quick yet satisfying. In just a few simple steps, you can whip up a meal that feels like a treat, all while knowing you’re serving something nutritious to your loved ones. Let’s dive into everything you need to know about creating this delightful dish!

Why You’ll Love This Recipe

Here are some reasons why this Chicken Veggie Rice Bowl should be your next go-to recipe:

  • Quick and Easy: Ready in under 30 minutes, making it perfect for busy weeknights.
  • Customizable: Easily swap out vegetables or proteins to suit your taste or what’s in your fridge.
  • Healthy and Nourishing: Packed with lean protein, colorful veggies, and whole grains for a balanced meal.
  • Meal Prep Friendly: Prepare a big batch on the weekend for quick lunches or dinners throughout the week.
  • Deliciously Versatile: Works as a main dish, side, or even a lunchbox favorite!

Ingredients Breakdown

Here’s what you’ll need to make this delicious Chicken Veggie Rice Bowl, along with some suggested substitutions:

  • 1 cup cooked brown rice: You can use white rice, quinoa, or cauliflower rice for a lower-carb option.
  • 1 cup diced cooked chicken breast: Feel free to substitute with shredded rotisserie chicken or tofu for a vegetarian option.
  • 1 cup mixed vegetables: Use a blend of bell peppers, broccoli, or snap peas. Frozen veggies work great too!
  • 2 tablespoons low-sodium soy sauce: For a gluten-free option, use tamari or coconut aminos.
  • 1 tablespoon extra virgin olive oil: Avocado oil or sesame oil can add a different flavor profile.
  • 1 teaspoon garlic powder: Fresh minced garlic can be used for a more robust flavor.
  • 1 teaspoon ground ginger: Fresh ginger can also be a zesty substitute.
  • Salt and freshly cracked black pepper to taste: Adjust based on your preference.
  • Fresh green onions for garnish: Cilantro or sesame seeds can also add a nice touch.

How to Make the Chicken Veggie Rice Bowl

Juicy chicken breast and mixed vegetables served over brown rice in a bowl.

Follow these simple steps to create your flavorful bowl:

  1. Heat the olive oil: In a large skillet over medium heat, warm the olive oil for about a minute.
  2. Sauté the vegetables: Add the mixed vegetables and sauté for approximately 5 minutes until tender.
  3. Add the chicken and seasonings: Incorporate the diced chicken, garlic powder, ground ginger, salt, and pepper. Stir and cook for 3-4 minutes.
  4. Prepare the rice: In a separate bowl, mix the cooked brown rice with the soy sauce until evenly coated.
  5. Combine everything: Add the seasoned rice to the skillet and gently stir to combine. Cook for another 2-3 minutes to meld the flavors.
  6. Serve hot: Garnish with chopped green onions, and enjoy!

Pro Tips for Success

Here are some expert insights to ensure your Chicken Veggie Rice Bowl turns out perfectly:

  • Prep Ahead: Chop your veggies and cook the rice in advance to save time during the week.
  • Even Cooking: Make sure your pan is hot enough before adding ingredients for even cooking.
  • Flavor Boost: Add a splash of lime juice just before serving for a zesty kick.
  • Don’t Overcrowd the Pan: If you’re making a large batch, cook in batches to avoid steaming the vegetables.
  • Texture Matters: Use a combination of fresh and cooked vegetables for varied textures.
  • Keep It Colorful: The more colorful your veggies, the more nutrients your dish will have.
  • Storage: Store leftovers in an airtight container in the fridge for up to 3 days.
  • Reheat Gently: Reheat in a skillet with a splash of water for the best texture.

Common Mistakes and Troubleshooting

Even the best cooks can make mistakes! Here’s how to avoid common pitfalls:

  • Soggy Rice: Make sure your cooked rice is cooled before adding it to the skillet to prevent it from becoming mushy.
  • Overcooked Veggies: Keep an eye on the veggies; they should be tender but still vibrant and crisp.
  • Lack of Flavor: Adjust the soy sauce and seasoning to your taste; don’t be afraid to experiment!
  • Burnt Ingredients: If the pan is too hot, ingredients may burn. Lower the heat if necessary.

Variations to Try

Customize your Chicken Veggie Rice Bowl with these delicious variations:

  • Spicy Kick: Add sriracha or red pepper flakes for some heat.
  • Asian Flair: Mix in sesame oil and top with sesame seeds for an Asian-inspired bowl.
  • Southwest Style: Swap the soy sauce for taco seasoning, and add black beans and corn.
  • Mediterranean Twist: Use olives, feta cheese, and a drizzle of tzatziki for a Mediterranean flavor.

Storage and Make-Ahead Instructions

Planning ahead can help you enjoy your meals without the stress:

  • Make Ahead: Prepare the chicken and veggies in advance, then just sauté them when ready to eat.
  • Storage: Store leftovers in an airtight container in the fridge for up to 3 days.
  • Freezing: This dish can be frozen for up to 2 months. Just reheat in the microwave or on the stovetop.

Frequently Asked Questions

Got questions? Here are the answers to common queries:

  • Can I use frozen vegetables? Absolutely! They are convenient and will cook quickly.
  • What can I substitute for chicken? Tofu, tempeh, or chickpeas are great vegetarian alternatives.
  • Is this dish gluten-free? It can be gluten-free if you use tamari or coconut aminos instead of soy sauce.
  • How do I make this dish spicier? Add fresh chili peppers, sriracha, or red pepper flakes to your liking.
  • Can I use white rice? Yes, you can use any type of rice, but cooking times may vary.
  • How long does it take to prepare? This dish is ready in about 30 minutes, making it a perfect weeknight meal.
  • What other vegetables can I use? Feel free to get creative! Broccoli, carrots, or zucchini work well.
  • Can I make this dish vegan? Yes, simply replace the chicken with chickpeas or tofu and omit the soy sauce if necessary.

Nutrition Tips and Dietary Adaptations

Here’s how to make this dish even healthier:

  • Whole Grain Options: Use quinoa or brown rice for more fiber and nutrients.
  • Lean Proteins: Choose skinless chicken breast or plant-based proteins for lower fat content.
  • Increase Fiber: Add beans or lentils to boost the fiber content.
  • Customizable Portions: Adjust portion sizes based on dietary needs; serve smaller sizes for kids.

Equipment Recommendations

To make your cooking experience smoother, here are some must-have tools:

  • High-Quality Skillet: A non-stick skillet ensures even cooking without sticking.
  • Measuring Cups: For accurate ingredient measurements to achieve the perfect balance of flavors.
  • Spatula: A sturdy spatula helps you stir and combine ingredients without damaging them.
  • Cutting Board: A reliable cutting board makes prep work easier and more efficient.

Serving Suggestions

Here are some ideas for what to serve alongside your Chicken Veggie Rice Bowl:

  • Fresh Salad: A light side salad with a tangy vinaigrette complements the dish well.
  • Fruit Salad: A refreshing fruit salad adds a sweet contrast to the savory bowl.
  • Spring Rolls: Serve with fresh spring rolls for a fun and crunchy side.
  • Soup: Pair with a light soup, like miso or vegetable, for a complete meal.

So there you have it! This Wholesome Chicken Veggie Rice Bowl is not only simple to prepare but also a delightful way to enjoy a nutritious meal. With endless possibilities for customization, this dish is sure to become a favorite in your household. Happy cooking, and remember, the best meals come from the heart—so enjoy the process and have fun in the kitchen!

Wholesome Chicken Veggie Rice Bowl Recipe

Prep Time 10 minutes
Cook Time 15 minutes
Total Time 25 minutes
Servings 2 servings
Calories 450
A nutritious and flavorful rice bowl combining tender chicken, vibrant vegetables, and savory seasonings for a wholesome meal.

Ingredients

Cooked Brown Rice

  • 1 cup cooked brown rice

Cooked Chicken Breast

  • 1 cup diced cooked chicken breast

Mixed Vegetables

  • 1 cup mixed vegetables

Low-sodium Soy Sauce

  • 2 tablespoons low-sodium soy sauce

Extra Virgin Olive Oil

  • 1 tablespoon extra virgin olive oil

Garlic Powder

  • 1 teaspoon garlic powder

Ground Ginger

  • 1 teaspoon ground ginger

Salt and Black Pepper

  • to taste Salt and freshly cracked black pepper

Fresh Green Onions

  • for garnish Fresh green onions

Instructions 

  • Heat olive oil in a skillet over medium heat for 1 minute.
  • Sauté mixed vegetables for 5 minutes until tender.
  • Add chicken, garlic powder, ginger, salt, and pepper; cook for 3-4 minutes.
  • Mix cooked rice with soy sauce in a bowl.
  • Add rice to skillet, stir, and cook for 2-3 minutes. Garnish with green onions and serve.

Notes

Feel free to customize with your favorite vegetables or add a dash of hot sauce for extra flavor.
Calories: 450kcal
Cost: $12
Course: Main Course
Cuisine: Healthy
Keyword: Chicken, rice, Vegetables

Discover the Refreshing Benefits of Cucumber Detox Drinks

Are you looking to revitalize your day with a refreshing drink that not only quenches your thirst but also provides numerous health benefits? Look no further than this easy Cucumber Detox Drink! Packed with hydrating ingredients like cucumber, lemon, and fresh mint, this drink is a delightful treat that’s as good for your body as it is for your taste buds. Perfect for any time you need a little pick-me-up, this detox drink is not just a recipe; it’s a lifestyle choice aimed at enhancing your overall well-being.

In this comprehensive guide, we’ll delve into the myriad advantages of incorporating cucumber detox drinks into your routine, explore ingredient substitutions, and share expert tips to help you make the most out of this delightful beverage. Whether you’re looking to hydrate better, enhance your skin’s glow, or simply enjoy a delicious drink, there’s something here for everyone. Let’s jump in!

Why You’ll Love This Recipe

This Cucumber Detox Drink isn’t just a pretty beverage; it offers a treasure trove of benefits that can enhance your daily routine. Here are five specific reasons why you’ll love it:

  • Hydration Hero: With its high water content, this drink helps keep your body hydrated, especially during hot summer days or after workouts.
  • Detox Delight: Cucumber is known for its detoxifying properties, aiding your body in flushing out toxins and promoting a healthy digestive system.
  • Low-Calorie Wonder: This drink is extremely low in calories, making it a guilt-free way to stay refreshed without compromising your daily caloric budget.
  • Flavorful Fusion: The combination of cucumber, lemon, and mint creates a refreshing flavor profile that can easily replace sugary sodas and juices.
  • Beauty Boost: The antioxidants in cucumber and lemon not only hydrate but can also contribute to healthier skin, giving you a radiant glow.

Ingredient Breakdown and Substitutions

Creating the perfect Cucumber Detox Drink requires just a handful of simple ingredients. Here’s a detailed look at what you’ll need and how you can customize them:

  • Cucumber: The star of the show! Aim for a large, firm cucumber (about 300g) for optimal flavor. If you’re in a pinch, you can substitute with pickling cucumbers, which are smaller but flavorful.
  • Lemon: Adds a zesty brightness to your drink. If you prefer a sweeter taste, consider using lime or grapefruit instead.
  • Fresh Ginger: This ingredient brings a subtle spice and numerous health benefits. If ginger isn’t your favorite, you can skip it or substitute with fresh mint for a milder taste.
  • Fresh Mint Leaves: Lightly crushed, these contribute a refreshing aroma. If fresh mint is unavailable, you can use dried mint, but reduce the quantity.
  • Green Powder (optional): Matcha, spirulina, or spinach powder can add a beautiful green color and extra nutrients. Feel free to omit it if you prefer a simpler drink.
  • Filtered Water: The base of your drink. Always opt for filtered water to ensure the best taste.
  • Sea Salt (optional): A pinch of sea salt can help replenish electrolytes, especially after exercise.

Pro Tips for Making the Best Cucumber Detox Drink

Close-up of a vibrant cucumber detox drink with slices of lemon and ginger, placed on a wooden table.

To ensure your Cucumber Detox Drink is as delicious and effective as possible, here are some expert insights:

  • Choose Fresh Ingredients: Always select fresh and firm cucumbers and lemons. This ensures your drink is flavorful and vibrant.
  • Infusion Time Matters: Allow your drink to infuse in the fridge for at least 4 hours, or overnight for the best flavor.
  • Serve Chilled: A cold drink is more refreshing! Serve your cucumber detox drink with ice for an extra chill.
  • Experiment with Flavors: Feel free to add other fruits like strawberries or blueberries for a fruity twist!
  • Stay Consistent: For optimal detox benefits, consider making this drink a daily habit.
  • Use a Pitcher: Infuse your drink in a large pitcher to make serving easier and encourage more hydration throughout the day.
  • Mix and Match: Try different herbs, such as basil or rosemary, to change up the flavor profile.
  • Keep It Simple: Don’t overcomplicate the process; the beauty of this drink lies in its simplicity!

Common Mistakes and Troubleshooting

Making your Cucumber Detox Drink should be an enjoyable experience. Here are some common mistakes to avoid and solutions to ensure your drink turns out perfect:

  • Using Overripe Produce: Avoid using soft or overly ripe cucumbers or lemons, as they can alter the flavor negatively.
  • Not Infusing Long Enough: If the flavor is too weak, it may require more infusion time. Aim for at least 4 hours.
  • Skipping the Chill: Serving this drink warm can diminish its refreshing qualities; always serve chilled!
  • Overcomplicating Ingredients: Stick to the basics for the best flavors. Too many ingredients can muddle the taste.

Variations on Your Cucumber Detox Drink

Feeling adventurous? Here are some fun and unique variations to try:

  • Berry Bliss: Add mixed berries (like strawberries or blueberries) for a fruity twist.
  • Spicy Kick: Include a slice of jalapeño for a spicy version that adds an interesting kick!
  • Citrus Burst: Use a mix of citrus fruits, such as oranges and limes, for a tangy explosion of flavor.
  • Herbal Infusion: Experiment with different herbs like basil or thyme for a unique twist.

Storage and Make-Ahead Instructions

This Cucumber Detox Drink is perfect for meal prep! Here’s how to store it:

  • Refrigerate: Store your infused drink in a sealed pitcher in the refrigerator for up to 3 days.
  • Infuse Ahead: Prepare your drink the night before for a refreshing start to your day.
  • Keep Ingredients Separate: If you’d like to prepare the ingredients ahead of time, keep them separate until you’re ready to infuse to maintain freshness.

Comprehensive FAQ

You might have questions about your Cucumber Detox Drink, so here are answers to some common inquiries:

  • How long should I infuse the drink? Infuse for at least 4 hours or overnight for maximum flavor.
  • Can I use frozen cucumber? Fresh cucumber is best, but if you have frozen, it can work in a pinch but may alter the texture.
  • How many servings does this recipe yield? This recipe makes about 8 servings, depending on how much you fill each glass.
  • Is it okay to drink this every day? Yes! It’s a great way to incorporate hydration into your daily routine.
  • Can I add sweeteners? If you prefer a sweeter drink, consider adding a touch of honey or a natural sweetener like stevia.
  • What are the detox benefits? The ingredients work together to help flush out toxins, improve digestion, and enhance hydration.
  • Can I mix this with other beverages? Absolutely! You can mix it with tea or sparkling water for an effervescent twist.
  • What’s the best time to drink it? It’s beneficial to drink this in the morning or throughout the day to stay hydrated.

Nutritional Tips and Dietary Adaptations

This Cucumber Detox Drink is not only refreshing but also offers a wealth of nutritional benefits. Here are some tips:

  • Low-Calorie Option: This drink is naturally low in calories, making it a great choice for weight loss or maintaining a healthy diet.
  • Diet-Friendly: Suitable for vegan, vegetarian, and gluten-free diets, this drink can fit into almost any dietary plan.
  • Rich in Antioxidants: Ingredients like lemon and mint are high in antioxidants, which can help combat oxidative stress in the body.

Equipment Recommendations

To make your Cucumber Detox Drink, you’ll need a few simple tools:

  • Glass Pitcher: A large glass pitcher is perfect for infusing and serving your drink.
  • Sharp Knife: For slicing your ingredients with precision.
  • Cutting Board: To provide a stable surface for chopping.
  • Measuring Cups: Useful for accurately measuring your water and ingredients.

Serving Suggestions

When it comes to serving your Cucumber Detox Drink, consider these tips:

  • Garnish: Add extra mint leaves or a slice of lemon for a beautiful presentation.
  • Serve with Ice: Always serve chilled, preferably over ice, for maximum refreshment.
  • Pair with Snacks: This drink pairs wonderfully with light snacks such as fresh fruits or veggie platters for a healthy afternoon treat.

Conclusion

Now that you’ve explored the numerous benefits and variations of the Cucumber Detox Drink, it’s time to dive in and enjoy this refreshing, hydrating beverage! Remember, cooking and preparing drinks should be a joyful experience—don’t hesitate to experiment and make this recipe your own. With just a few simple ingredients, you can hydrate your body, detoxify, and enjoy a delicious drink that fits seamlessly into your daily routine. Cheers to a healthier, more refreshing you!

Cucumber Detox Drink

Prep Time 10 minutes
Total Time 10 minutes
Servings 8 cups
Calories 50
A refreshing and healthy detox drink made with fresh cucumber, lemon, ginger, mint, and green powder to boost hydration and nutrients.

Ingredients

Vegetables and Fruits

  • 1 large cucumber (about 300g, thinly sliced)
  • 1 large lemon (thinly sliced)
  • 1 small knob fresh ginger (about 20g, peeled and thinly sliced)

Herbs and Powders

  • 1 tsp matcha powder (or spirulina powder or spinach powder for green color)

Water and Salt

  • 8 cups filtered water
  • 1 pinch sea salt (optional, for electrolytes)

Instructions 

  • Thinly slice the cucumber, lemon, and ginger.
  • Lightly crush the fresh mint leaves.
  • In a large pitcher, combine the sliced cucumber, lemon, ginger, crushed mint, and green powder.
  • Add filtered water and stir well to combine.
  • Infuse in the refrigerator for at least 4 hours or overnight before serving.

Notes

For best flavor, let the drink infuse overnight in the refrigerator.
Calories: 50kcal
Cost: $10
Course: Beverage
Cuisine: Healthy
Keyword: detox, Green, hydration

If you’re looking for a sweet treat that doesn’t compromise on health, you’ve come to the right place! These Chocolate-Covered Strawberry Yoghurt Bites are not only delicious but also incredibly easy to make. Perfect for a snack or a fun dessert, this recipe combines the natural sweetness of strawberries with creamy yoghurt and rich chocolate. Let’s dive into why you’ll love this recipe and how to make it!

Why You’ll Love This Recipe

  • Guilt-Free Indulgence: These bites satisfy sweet cravings without the guilt—perfect for health-conscious dessert lovers.
  • Quick and Easy: With minimal prep time and no baking required, these bites are perfect for busy days.
  • Customizable Flavors: You can easily tweak the ingredients to suit your taste, making them versatile for any occasion.
  • Family-Friendly: Kids love these fun bites; they are a great way to sneak in some fruit!
  • Diet-Friendly: With options for dairy-free and vegan adaptations, everyone can enjoy these treats!

Ingredient Breakdown

Let’s explore the ingredients you’ll need to create these delightful bites, along with some substitution options for dietary needs.

  • Strawberries (250g): Use fresh, ripe strawberries for the best flavor. Make sure they are washed and dried thoroughly.
  • Plain or Greek Yoghurt (200g): You can opt for dairy-free or vegan yoghurt if needed. Greek yoghurt will give a creamier texture.
  • Gluten-Free Chocolate Buttons (300g): Dark chocolate is recommended for a richer flavor, but you can also choose milk or white chocolate if you prefer.
  • Vanilla Extract (1 teaspoon): This is optional, but it adds depth to the flavor.
  • Coconut Oil (1 tablespoon): This is used if you’re melting milk or white chocolate, helping to create a smooth consistency.

Step-by-Step Instructions

Now that you have your ingredients ready, let’s go through the simple steps to make these Chocolate-Covered Strawberry Yoghurt Bites.

  1. Wash, dry, and dice the strawberries into small pieces.
  2. Add the strawberries, yoghurt, and vanilla (if using) to a bowl and mix until well combined.
  3. Spoon dollops of the mixture onto a tray lined with baking paper and freeze for 1 ½ – 2 hours or until completely frozen.
  4. Melt the chocolate and coconut oil (if using) in the microwave or using a double boiler on the stovetop.
  5. Using a fork, dip each frozen bite into the melted chocolate, ensuring they are fully coated.
  6. Place the chocolate-coated bites back onto the tray and return to the freezer for 30 minutes.
  7. Serve and enjoy your delicious, guilt-free treats!

Pro Tips for Perfect Bites

Side view of juicy chocolate-dipped strawberries coated in yogurt.

Here are some expert insights to help you make the best Chocolate-Covered Strawberry Yoghurt Bites:

  • Choose Quality Chocolate: A good quality dark chocolate will enhance the overall flavor of your bites.
  • Don’t Skip Freezing: Make sure the yoghurt bites are fully frozen before dipping to prevent them from falling apart.
  • Experiment with Toppings: After coating in chocolate, sprinkle toppings like nuts, coconut flakes, or crushed graham crackers for added texture.
  • Use a Double Boiler: For melting chocolate, using a double boiler will help prevent burning and create a smooth consistency.
  • Adjust Sweetness: If you prefer sweeter bites, consider adding a touch of honey or maple syrup to the yoghurt mixture.
  • Keep Everything Cold: Work quickly when dipping the bites to maintain their frozen state and achieve the best chocolate coating.
  • Perfect Serving Size: Use a small cookie scoop for uniform bites, making them easy to grab and enjoy.
  • Mind the Temperature: If it’s warm in your kitchen, consider chilling your melted chocolate before dipping for better adherence.

Common Mistakes and Troubleshooting

To ensure success, here are some common mistakes to avoid:

  • Not Drying Strawberries: Ensure strawberries are completely dry before mixing to prevent excess moisture from affecting the texture.
  • Overheating Chocolate: Be cautious when melting chocolate; overheating can cause it to seize up.
  • Skipping the Freezing Step: Ensure the bites are thoroughly frozen before dipping to maintain shape.
  • Too Thin Chocolate Coating: If the chocolate is too thick, add a bit more coconut oil for a smoother dip.

Variations and Substitutions

Feel free to get creative with these variations:

  • Nut Butter Swirl: Add a dollop of almond or peanut butter to the yoghurt mixture for added creaminess and flavor.
  • Fruit Mix-Ins: Mix in other fruits like blueberries or banana slices for a fruity twist.
  • Yoghurt Flavors: Use flavored yoghurt, such as strawberry or vanilla, for an extra flavor boost.
  • Vegan Option: Choose dairy-free chocolate and coconut yoghurt for a fully vegan treat.

Storage and Make-Ahead Instructions

These bites are perfect for meal prep!

  • Storage: Keep the bites in an airtight container in the freezer for up to 3 months.
  • Make-Ahead: You can prepare these bites ahead of time, making them a convenient option for parties or spontaneous cravings.

Comprehensive FAQ

Here are answers to some common questions about Chocolate-Covered Strawberry Yoghurt Bites:

  • Can I use frozen strawberries? Yes, but fresh strawberries yield better texture and flavor.
  • How do I adjust the sweetness? Add honey or maple syrup to the yoghurt mixture as desired.
  • Can I use white chocolate? Absolutely! Just remember to add coconut oil for a smoother coat.
  • Are these bites gluten-free? Yes, ensure you’re using gluten-free chocolate and ingredients.
  • How long do they take to freeze? Approximately 2 hours initially and 30 minutes after chocolate dipping.
  • Can I make them dairy-free? Yes! Use coconut or almond yoghurt and dairy-free chocolate.
  • What’s the best way to serve these? Serve them straight from the freezer for the best texture!
  • Can I double the recipe? Definitely! Just ensure you have enough space in your freezer.

Nutritional Tips and Dietary Adaptations

These bites can fit into various dietary plans:

  • Low-Calorie Snack: With the right ingredients, these can be a low-calorie option that satisfies your sweet tooth.
  • High-Protein Boost: Using Greek yoghurt increases the protein content, making them a nutritious snack.
  • Low-Sugar Option: Choose dark chocolate and unsweetened yoghurt to minimize sugar intake.

Equipment Recommendations

To make your cooking experience easier, here’s what you’ll need:

  • Baking Sheet: Essential for freezing the yoghurt bites.
  • Parchment Paper: Prevents sticking and makes cleanup a breeze.
  • Double Boiler or Microwave-Safe Bowl: For melting your chocolate smoothly.
  • Fork: Perfect for dipping the bites into the melted chocolate.
  • Airtight Container: For storing your finished bites in the freezer.

Serving Suggestions

These bites can be enjoyed in various ways:

  • As a Snack: Perfect for a mid-afternoon treat or a post-workout snack.
  • Party Treat: Serve them at gatherings for a healthy dessert option that everyone will love.
  • With Coffee or Tea: Pair them with your favorite beverage for a delightful afternoon pick-me-up.

In conclusion, Chocolate-Covered Strawberry Yoghurt Bites are a delicious, easy-to-make treat that everyone can enjoy. Whether you’re looking for a quick afternoon snack or a fun dessert, these bites can be customized to fit your taste and dietary needs. So gather your ingredients and get ready to indulge in this guilt-free delight!

Chocolate-covered Strawberry Yoghurt Bites

Prep Time 10 minutes
Cook Time 30 minutes
Total Time 40 minutes
Servings 12 pieces
Calories 150
Delight in these easy, frozen treats combining fresh strawberries, creamy yoghurt, and rich chocolate for a perfect summer snack.

Ingredients

Fruits and Dairy

  • 250 g strawberries, washed and dried
  • 200 g plain or Greek yoghurt, dairy-free or vegan optional
  • 300 g gluten-free chocolate buttons, preferably dark chocolate, dairy-free or vegan optional
  • 1 tsp vanilla extract optional
  • 1 tbsp coconut oil if using milk or white chocolate

Instructions 

  • Wash, dry, and dice the strawberries into small pieces.
  • Mix strawberries, yoghurt, and vanilla extract in a bowl.
  • Spoon dollops onto a lined tray and freeze for 1.5-2 hours.
  • Melt chocolate and coconut oil if using, then dip frozen bites into the chocolate.
  • Place coated bites back on tray and freeze for 30 minutes before serving.

Notes

Ensure chocolate is fully melted for smooth coating.
Calories: 150kcal
Cost: $12
Course: Dessert
Keyword: chocolate, Strawberry, yoghurt