Author

Steven

Browsing

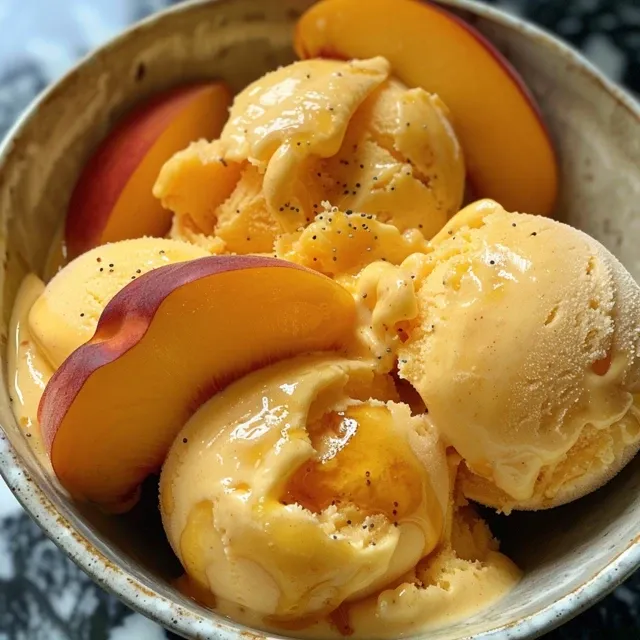
Are you ready to beat the heat with a homemade treat that’s as delightful as it is simple? This Peach Frozen Yogurt recipe is your go-to solution for a refreshing dessert that requires just a handful of ingredients and minimal effort! Perfect for those warm afternoons or whenever you need a healthy sweet fix, this creamy frozen treat is sure to impress. Let’s dive into the world of peachy goodness and make your own frozen yogurt!

Why You’ll Love This Recipe

  • Healthier alternative: Made with plain Greek yogurt, this recipe is lower in sugar and higher in protein than traditional ice cream.
  • Fresh ingredients: The vibrant taste of ripe peaches shines through, ensuring that you enjoy a refreshing flavor without artificial additives.
  • Quick preparation: With only 20 minutes of active time and a few hours in the freezer, you’ll be enjoying your homemade frozen yogurt in no time!
  • Versatile base: This recipe serves as a fantastic foundation for various fruit combinations, allowing you to experiment with different flavors and ingredients.
  • Kid-friendly fun: Involve your little ones in the process! They’ll love helping with the blending and can customize their servings with toppings.

What You’ll Need

Gather these simple ingredients to get started:

  • 3 cups fresh peaches: Slice and pit them for the best flavor.
  • 2 3 cup plain Greek yogurt: This adds creaminess and a protein boost.
  • 1 teaspoon lemon juice: Brightens the flavor and balances the sweetness.
  • 2 teaspoons raw honey: Melted, for a touch of natural sweetness.
  • Optional for serving: A few thin peach slices and mint leaves for garnish.

How to Make Healthy Peach Frozen Yogurt

Let’s break down the steps to create your delicious Peach Frozen Yogurt:

  1. Freeze the Peaches: Line a rimmed baking sheet with parchment paper. Spread the sliced and pitted fresh peaches in a single layer. Place the tray in the freezer for at least 2 to 3 hours, or until the peaches are fully frozen.
  2. Process the Peaches: Take the frozen peach slices from the freezer and add them to your food processor. Pulse and process until the peaches turn into a crumbly, snowy mixture.
  3. Add the Yogurt and Honey: Add the plain Greek yogurt, lemon juice, and melted raw honey to the crumbly frozen peaches in the food processor. Blend for 2 to 4 minutes, scraping down the sides as needed, until the mixture looks smooth, thick, and creamy.
  4. Achieve Creamy Perfection: Keep processing the mixture until it’s completely smooth and creamy, with no big frozen chunks left. This is where the magic happens!
  5. Serve or Store: Scoop the peach frozen yogurt into a round serving bowl and serve right away for a softer texture. For a firmer scoop, transfer it to an airtight container and freeze for an additional 1 to 2 hours. Before serving, let it sit out for a few minutes to soften slightly.

Pro Tips for the Perfect Frozen Yogurt

Side view of creamy Peach Frozen Yogurt, showcasing its smooth texture and vibrant peach color.
  • Choosing Peaches: Use ripe, juicy peaches for the best flavor. If they’re not in season, frozen peaches can work as a substitute!
  • Experiment with Sweetness: Adjust the amount of honey based on your taste preference and the natural sweetness of the peaches.
  • Texture Control: For a creamier texture, you can blend in a little coconut cream or a small amount of heavy cream.
  • Vegan Option: Substitute Greek yogurt with a plant-based yogurt to make this recipe vegan-friendly.
  • Flavor Variations: Try adding a splash of vanilla extract or a pinch of cinnamon for extra flavor depth.
  • Storage Tips: Store any leftovers in an airtight container in the freezer for up to a week. Just remember to let it sit out for a few minutes before serving again!
  • Serving Suggestions: Top with granola, chopped nuts, or more fresh fruit for added texture and flavor.
  • Make-Ahead Magic: You can prep the peach slices in advance and store them in the freezer, so you’re ready to whip up this treat at a moment’s notice.

Common Mistakes and Troubleshooting

Here are some pitfalls to avoid:

  • Over-processing: If you process the mixture too long, it may become watery. Stop once it’s creamy and smooth!
  • Under-freezing: Make sure the peaches are completely frozen before blending to achieve the right texture.
  • Too Sweet: If the mixture tastes too sweet, add a splash more lemon juice to balance it out.
  • Immediate Serving: Remember, serving right away gives a soft-serve consistency, while freezing longer gives you a firmer texture.

Variations to Try

Want to mix things up? Here are some delicious variations:

  • Berry Bliss: Swap peaches for a mix of frozen strawberries and blueberries for a berry-forward frozen yogurt.
  • Tropical Twist: Use mangoes instead of peaches, and add a splash of coconut milk for a tropical vibe.
  • Nutty Delight: Incorporate almond or cashew butter into the mixture for a nutty flavor boost.
  • Chocolate Lover’s: Blend in cocoa powder or melted dark chocolate for a decadent dessert.

Storage and Make-Ahead Instructions

To ensure your Peach Frozen Yogurt stays fresh and delicious:

  • Storage: Keep it in an airtight container in the freezer. It’s best enjoyed within a week.
  • Make-Ahead: Prepare the peach slices in advance and freeze them. This way, you can whip up your frozen yogurt whenever a craving hits!

Frequently Asked Questions

Here are some common questions regarding this recipe:

  • Can I use frozen peaches? Absolutely! Frozen peaches work well and can save you time.
  • Can I make this without a food processor? Yes, a high-speed blender can also do the trick. Just ensure it’s powerful enough to handle frozen fruit.
  • Is this recipe gluten-free? Yes, all the ingredients are gluten-free, making it a safe choice for those with gluten sensitivities.
  • How can I adjust sweetness? Start with the suggested honey, then taste and adjust as necessary. You can always add more, but it’s hard to take it out!
  • Can I use a different type of yogurt? Yes, any plain yogurt will work; just note that it may alter the flavor and texture slightly.
  • How long does it take to freeze? Allow at least 2 to 3 hours for the peaches to freeze and an additional 1 to 2 hours if you want a firmer texture.
  • Can I add other fruits? Definitely! Just ensure they complement the flavor of the peaches, like raspberries or cherries.
  • How do I serve it? Serve it in bowls, topped with your favorite toppings like nuts, granola, or fresh fruit!

Nutrition Tips and Dietary Adaptations

This recipe is not only delicious but also nutritious! Here’s how you can adapt it:

  • Lower Calorie: Use low-fat or non-fat Greek yogurt to reduce calorie content.
  • Diabetic-Friendly: Opt for a sugar substitute instead of honey to cater to diabetic dietary needs.
  • Low-FODMAP Option: Use lactose-free yogurt to make this recipe suitable for those following a low-FODMAP diet.

Equipment Recommendations

To make this recipe easier, here are some recommended tools:

  • Food Processor: A high-quality food processor will help you achieve that creamy texture.
  • Rimmed Baking Sheet: Ideal for freezing the peach slices evenly.
  • Parchment Paper: Prevents sticking and makes cleanup a breeze.
  • Airtight Containers: Essential for storing your frozen yogurt and keeping it fresh.

Serving Suggestions

Now that you’ve made your Peach Frozen Yogurt, here are a few ways to serve it:

  • Garnish: Top with thin peach slices, mint leaves, or a sprinkle of cinnamon.
  • Pair with: Serve alongside a slice of almond cake or homemade granola for a delightful snack.
  • Make it a Sundae: Add a dollop of nut butter and some chocolate shavings for a fun twist on the classic sundae.

In conclusion, making Peach Frozen Yogurt at home is an enjoyable and rewarding experience. With just a few simple steps and ingredients, you can create a deliciously creamy dessert that is sure to become a family favorite. So grab some fresh peaches, fire up your food processor, and let’s make a treat that’s not only healthy but packed with flavor. Happy cooking!

Peach Frozen Yogurt

Prep Time 10 minutes
Cook Time 3 hours
Total Time 3 hours 10 minutes
Servings 4 cups
Calories 150
A refreshing and creamy frozen treat made with fresh peaches, Greek yogurt, and honey, perfect for a hot day.

Ingredients

Fruits

  • 3 cups fresh peaches, sliced and pitted
  • 2 3/4 cups plain Greek yogurt
  • 1 teaspoon lemon juice
  • 2 teaspoons raw honey, melted
  • Optional a few thin peach slices and mint leaves (for serving)

Instructions 

  • Spread sliced peaches on a parchment-lined baking sheet and freeze for 2-3 hours.
  • Process frozen peaches in a food processor until crumbly and snowy.
  • Add yogurt, lemon juice, and honey; blend until smooth and creamy.
  • Continue processing until no large chunks remain, then serve immediately or freeze for 1-2 hours for a firmer texture.

Notes

For a creamier texture, let the frozen yogurt sit at room temperature for a few minutes before serving.
Calories: 150kcal
Cost: $10
Course: Dessert
Cuisine: American
Keyword: Peach

Discover the Delight of Effortless Caprese Skewers

Welcome to the vibrant world of Caprese Skewers! If you’re looking for a fresh and flavorful appetizer that’s as easy to make as it is to eat, you’ve come to the right place. With just a handful of ingredients, you can create these delightful skewers that are perfect for any occasion—whether it’s a summer picnic, a family dinner, or a festive gathering. In this guide, we’ll walk through everything you need to know to make your Caprese Skewers shine, from selecting the best ingredients to serving suggestions and even some variations to keep things exciting.

Why You’ll Love This Recipe

Caprese Skewers are more than just a pretty presentation; they offer a host of benefits that make them a must-try:

  • Quick and Easy: With minimal prep time, these skewers can be assembled in under 15 minutes, making them perfect for last-minute gatherings.
  • Fresh and Flavorful: Featuring ripe tomatoes, creamy mozzarella, and fragrant basil, every bite bursts with freshness.
  • Customizable: You can easily swap ingredients or add your favorites, making these skewers versatile for any palate.
  • Health-Conscious: Packed with nutritious ingredients, they are a light and satisfying option for health-conscious eaters.
  • Perfect for Sharing: These bite-sized delights are great for parties, encouraging guests to mingle and enjoy.

Ingredients Breakdown

To create your Caprese Skewers, gather the following ingredients:

  • Cherry or Grape Tomatoes: Approximately 1 pint. Look for firm, ripe tomatoes for the best flavor.
  • Fresh Basil Leaves: About 36 leaves, preferably small and vibrant for maximum aroma.
  • Miniature Cherry-Sized Fresh Mozzarella Balls (Ciliegine): One 12-ounce container. Opt for high-quality mozzarella for a creamy texture.
  • Wooden Skewers: 16 to 18 skewers, ideally 4 inches long for a perfect bite-sized portion.
  • Extra-Virgin Olive Oil: For drizzling, adds richness and enhances flavors.
  • Balsamic Glaze: For drizzling, gives a tangy sweetness that complements the freshness.
  • Kosher Salt: To season and enhance the natural flavors.
  • Freshly Ground Black Pepper: Adds a touch of spice.

Pro Tips for Perfect Caprese Skewers

Side view of Caprese skewers drizzled with balsamic glaze and olive oil.

Here are some expert insights to elevate your Caprese Skewers:

  • Choose Quality Ingredients: Fresh, high-quality tomatoes, basil, and mozzarella make a significant difference in flavor.
  • Marinate for Flavor: If time allows, marinate your ingredients in olive oil, salt, and pepper before assembling for an extra flavor boost.
  • Presentation Matters: Arrange skewers neatly on a platter for a visually stunning effect that will impress your guests.
  • Experiment with Sizes: Use larger skewers for more substantial bites or smaller ones for appetizer portions.
  • Make Ahead: Assemble skewers a few hours in advance and refrigerate, but add olive oil and balsamic glaze just before serving to keep them fresh.
  • Use a Variety of Colors: Mix and match different colored tomatoes for a more vibrant dish.
  • Skewer Order: Alternate ingredients for an appealing visual. Try tomato, basil, mozzarella, then repeat.
  • Fresh Herbs: Consider adding other herbs, like mint or oregano, for a unique twist.
  • Don’t Overcrowd: Leave a little space between ingredients on the skewers for easier eating and better flavor interaction.
  • Think Beyond Appetizers: These skewers can also serve as a light meal when paired with crusty bread or a salad.

Avoid Common Mistakes

Here are a few common pitfalls to watch out for when making Caprese Skewers:

  • Using Overripe Tomatoes: Ensure your tomatoes are firm and ripe. Overripe tomatoes can be mushy and less flavorful.
  • Skipping Seasoning: Don’t forget to season your skewers; a sprinkle of salt and pepper can elevate the dish immensely.
  • Not Allowing Flavors to Meld: Refrigerate your skewers for at least 10-15 minutes to let the flavors combine before serving.
  • Using Low-Quality Mozzarella: Avoid pre-shredded mozzarella; fresh mozzarella provides a creamy, delightful texture.
  • Over-Drizzling: While olive oil and balsamic glaze enhance flavors, too much can overpower the dish. Drizzle sparingly!

Delicious Variations to Try

Keep your Caprese Skewers exciting with these fun variations:

  • Caprese Skewers with Avocado: Add cubes of ripe avocado for a creamy texture and healthy fats.
  • Grilled Caprese Skewers: Grill the skewers for a smoky flavor; just be sure to soak wooden skewers first!
  • Caprese Skewers with Prosciutto: Add thin slices of prosciutto for a savory touch that complements the fresh ingredients.
  • Caprese Salad Skewers: Serve your skewers on a bed of arugula or mixed greens for an added salad element.

Storage and Make-Ahead Instructions

To keep your Caprese Skewers fresh:

  • Storing Leftovers: If you have any skewers left, store them in an airtight container in the refrigerator for up to 2 days.
  • Make-Ahead: Assemble your skewers a few hours in advance and keep them covered in the fridge until serving.
  • Refrigeration Tip: Avoid adding olive oil and balsamic glaze until just before serving to maintain freshness.

Frequently Asked Questions

Here are some common questions about Caprese Skewers:

  • Can I use different types of cheese? Yes! Feel free to experiment with burrata or feta for unique flavors.
  • How long can I make these in advance? You can prepare them up to 8 hours before serving, just keep them refrigerated.
  • What can I serve with Caprese Skewers? They pair beautifully with crusty bread, olives, or a refreshing salad.
  • Are these skewers gluten-free? Yes, all the ingredients are gluten-free, making them suitable for gluten-sensitive guests.
  • Can I freeze Caprese Skewers? It’s not recommended, as the texture of the tomatoes and mozzarella may change upon thawing.
  • How do I prevent the skewers from splintering? Soak wooden skewers in water for 30 minutes before use to minimize splintering.
  • Can I add other vegetables? Absolutely! Bell peppers, zucchini, or cucumber can add extra freshness and crunch.
  • What’s the best way to serve these skewers? Arrange them on a platter with a small bowl of balsamic glaze for dipping, and watch them disappear!

Nutrition Tips and Dietary Adaptations

Caprese Skewers are naturally nutritious. Here are some tips to keep them healthy:

  • Low-Fat Option: Use part-skim mozzarella to reduce fat content while retaining flavor.
  • Vegan Alternative: Swap mozzarella with marinated tofu or cashew cheese for a plant-based version.
  • Low-Sodium: Use low-sodium balsamic glaze and salt to make them heart-friendly.
  • High-Protein Option: Add grilled chicken or chickpeas for a protein boost.

Equipment Recommendations

For the best results, have the following kitchen tools ready:

  • Skewers: Choose wooden or stainless steel skewers; wooden should be soaked to prevent burning.
  • Knife: A sharp knife is essential for cutting tomatoes and mozzarella cleanly.
  • Cutting Board: A sturdy cutting board will make your prep easier and safer.
  • Platter: A beautiful serving platter enhances presentation.

Serving Suggestions

To serve your Caprese Skewers:

  • Garnish: Consider garnishing with extra basil leaves or a sprinkle of pine nuts for added texture.
  • Accompaniments: Serve with crusty bread, a fresh green salad, or a glass of chilled white wine.
  • Presentation: Create a colorful display by alternating the colors of the tomatoes or using a variety of mozzarella.

With this comprehensive guide, you’re now ready to impress your family and friends with your delicious, homemade Caprese Skewers. Cooking is about confidence, creativity, and enjoying the process. So gather your ingredients, roll up your sleeves, and let’s make some delightful skewers that everyone will love!

Caprese Skewers Recipe

Prep Time 10 minutes
Total Time 10 minutes
Servings 8 skewers
Calories 150
Enjoy these colorful and flavorful Caprese skewers, perfect as an elegant appetizer or light summer snack.

Ingredients

Produce

  • 1 pint cherry or grape tomatoes
  • 1 bunch fresh basil leaves (about 36 leaves)
  • 12 ounces miniature cherry-sized fresh mozzarella balls ciliegine
  • 16 to 18 pieces 4-inch wooden skewers
  • Extra-virgin olive oil (for drizzling)
  • Balsamic glaze (for drizzling)
  • Kosher salt
  • Freshly ground black pepper

Instructions 

  • Pierce cherry tomatoes, basil leaf, mozzarella, another basil leaf, then a cherry tomato onto each skewer.
  • Arrange skewers on a serving platter neatly and attractively.
  • Drizzle olive oil over the skewers lightly and evenly.
  • Zigzag balsamic glaze over the skewers for decoration and flavor.
  • Sprinkle with kosher salt and black pepper to taste, then refrigerate for 10-15 minutes before serving.
  • Serve immediately, enjoying the fresh flavors and vibrant presentation.

Notes

Use fresh ingredients for the best flavor and presentation.
Calories: 150kcal
Cost: $15
Course: Appetizer
Cuisine: Italian
Keyword: Basil, Mozzarella, Tomato

Delightful Mini Ice Cream Cookie Sandwiches: The Perfect Summer Treat

Are you ready to elevate your dessert game with something that’s not just delicious but also easy to make? These delightful mini ice cream cookie sandwiches are here to steal the show! Perfect for parties, family gatherings, or simply a sweet treat to enjoy at home, this recipe is all about combining fun flavors with a simple process. In under 30 minutes, you can create an impressive dessert that will leave everyone wanting more.

Let’s dive into why you’ll love this recipe and how it can become your go-to dessert for any occasion.

Why You’ll Love This Recipe

  • Quick and Easy: With minimal prep time, you can whip these up in no time, making them perfect for spontaneous gatherings.
  • Customizable Flavors: Choose your favorite ice cream and cookie combinations to create a unique flavor profile every time.
  • Fun for All Ages: Kids and adults alike will enjoy assembling and decorating these cookie sandwiches, making it a fun family activity.
  • Make Ahead Convenience: Prepare these sandwiches in advance and keep them in the freezer for a ready-to-serve treat.
  • Perfect for Any Occasion: Whether it’s a birthday party, BBQ, or just a cozy night in, these sandwiches fit right in.

Ingredients Breakdown

To create these delightful mini ice cream cookie sandwiches, gather the following ingredients:

  • Vanilla Cream Sandwich Cookies: These form the base of your sandwiches. You can use any brand, but I recommend classic vanilla wafers for a light texture.
  • Chocolate Cream Sandwich Cookies: For a richer taste, chocolate cookies add a delicious contrast to the ice cream.
  • Chocolate Vanilla Cream Sandwich Cookies: A mix of both worlds, these cookies are perfect for those who can’t decide!
  • Vanilla Ice Cream: Classic vanilla is a hit, but feel free to experiment with flavors like mint chocolate chip or cookies and cream.
  • Pistachio Gelato: For a nutty twist, add pistachio gelato as a filling option.

Pro Tips for Perfect Sandwiches

Side view of colorful mini ice cream cookie sandwiches arranged attractively.
  • Choosing Cookies: Opt for cookies that are sturdy enough to hold the ice cream without crumbling. Thin cookies like gingersnaps or shortbread work well.
  • Keep Ice Cream Soft: Let your ice cream sit out for a few minutes to soften. This makes scooping and spreading easier.
  • Layering Toppings: Get creative! Roll the edges of your sandwiches in chopped nuts, sprinkles, or mini chocolate chips for added texture.
  • Freezing Time: Allow the sandwiches to freeze for at least 1-2 hours after assembly for the best texture.
  • Individual Wrapping: If making ahead, wrap each sandwich in wax paper to prevent sticking and keep them fresh.
  • Softening Before Serving: Let the sandwiches sit at room temperature for a few minutes before serving for an easier bite.

Common Mistakes and Troubleshooting

Even the best cooks can make mistakes. Here are some common pitfalls and how to avoid them:

  • Overfilling: Use just enough ice cream to fill the cookie without spilling over. Too much can lead to messy sandwiches.
  • Not Freezing Long Enough: Skipping proper freezing time can result in soft sandwiches that are hard to eat. Be patient!
  • Using Soft Cookies: Soft cookies may crumble under the weight of the ice cream. Stick with firmer options.

Variations to Try

Want to mix things up? Here are some fun variations to try:

  • Chocolate Chip Cookie Sandwiches: Use freshly baked chocolate chip cookies for a classic flavor.
  • Brownie Ice Cream Sandwiches: Swap cookies for brownies for a rich, fudgy treat.
  • Fruit Flavored Ice Creams: Experiment with strawberry or mango ice cream for a fruity twist.
  • Nutty Crunch: Incorporate crushed pretzels or nuts into your cookie dough for added crunch.

Storage and Make-Ahead Instructions

If you want to prepare these sandwiches ahead of time, follow these simple steps:

  • Assemble the sandwiches as directed, then place them on a cookie sheet lined with wax paper.
  • Once assembled, cover with plastic wrap and freeze until firm.
  • After they’re frozen, transfer to a zip-top freezer bag, separating layers with wax paper to prevent sticking.
  • These sandwiches can be stored in the freezer for up to 2 weeks—perfect for those unexpected cravings!

Frequently Asked Questions

Here are some common questions about making mini ice cream cookie sandwiches:

  • Can I use different flavors of ice cream? Absolutely! Feel free to mix and match flavors according to your taste preferences.
  • Do I need an ice cream maker? No, you can use store-bought ice cream or gelato for this recipe.
  • How do I prevent the cookies from getting soggy? Freeze the assembled sandwiches for a couple of hours before serving to keep them firm.
  • What’s the best way to serve these? Allow them to soften slightly at room temperature before serving for optimal texture.
  • Can I add fillings between the cookies? Yes! Feel free to add layers of whipped cream, peanut butter, or fruit preserves inside.
  • What kind of toppings can I use? Get creative! Try sprinkles, chopped nuts, or even crushed candy bars.
  • How long will they last in the freezer? They can stay fresh for up to 2 weeks if properly stored.
  • Can I make these vegan? Yes, use vegan cookies and dairy-free ice cream for a delicious vegan option!

Nutrition Tips and Dietary Adaptations

While these mini ice cream cookie sandwiches are a treat, here are some tips to make them a bit healthier:

  • Choose Low-Fat Ice Cream: Opt for low-fat or sugar-free ice cream to reduce calories.
  • Use Whole Grain Cookies: Look for whole grain or gluten-free cookie options to enhance nutrition.
  • Portion Control: Keep the sandwiches small to enjoy the flavor without overindulging.

Equipment Recommendations

To make your cooking experience even smoother, consider using the following equipment:

  • Cookie Sheet: A flat, sturdy surface is essential for assembling and freezing the sandwiches.
  • Wax Paper: Use wax paper to line your cookie sheet and prevent sticking.
  • Scoop: An ice cream scoop makes it easy to portion out your ice cream evenly.

Serving Suggestions

These mini ice cream cookie sandwiches are best served cold and can be paired with:

  • Fresh Fruit: Serve with a side of berries or sliced bananas for a refreshing touch.
  • Chocolate Sauce: Drizzle chocolate sauce over the top for an extra indulgent treat.
  • Coffee or Tea: Pair with a warm beverage for a delightful contrast.

In conclusion, making delightful mini ice cream cookie sandwiches is not just about enjoying a tasty dessert; it’s about creating memories and enjoying the process of cooking. With this comprehensive guide, you can confidently explore flavors and get creative in your kitchen. Remember, cooking is about having fun and trying new things. So gather your ingredients, invite some friends or family, and enjoy the sweet joy of making these delightful treats!

Mini Ice Cream Cookie Sandwiches Part 2

Prep Time 15 minutes
Total Time 15 minutes
Servings 12 pieces
Calories 150
Delight in these easy-to-make mini ice cream cookie sandwiches, perfect for a cool treat with customizable toppings.

Ingredients

Cookies

  • 6 pieces vanilla vanilla cream sandwich cookies
  • 6 pieces chocolate chocolate cream sandwich cookies
  • 6 pieces chocolate vanilla cream sandwich cookies

Ice Cream & Gelato

  • 1 cup vanilla ice cream
  • 1 cup pistachio gelato

Toppings

  • to taste sprinkles
  • to taste Andes mint chips
  • to taste chopped pistachios

Instructions 

  • Line a baking sheet with wax paper and prepare cookie halves.
  • Scoop ice cream onto each bottom cookie half and press to form sandwiches.
  • Roll the sandwiches in desired toppings and place on the sheet.
  • Freeze until firm, then store in a zip-top bag or layers separated by wax paper.
  • Allow to soften slightly at room temperature before serving.

Notes

Make sure to freeze the sandwiches until firm for the best texture.
Calories: 150kcal
Cost: $15
Course: Dessert
Keyword: cookies, ice cream, Sandwich

Why Chicken Pesto Wraps are Your New Weeknight Favorite

If you’re looking for a recipe that’s quick, tasty, and satisfying, chicken pesto wraps are the answer! These wraps combine tender chicken, fresh veggies, and zesty pesto, making them perfect for a busy weeknight dinner or a light lunch. In this article, we’ll dive deep into making the best chicken pesto wraps, ensuring you feel confident and excited to whip them up in your own kitchen!

Why You’ll Love This Recipe

  • Quick and Easy: You can prepare this meal in under 30 minutes, making it ideal for busy weeknights.
  • Flavor-Packed: The combination of creamy pesto and fresh veggies delivers a burst of flavors with every bite.
  • Customizable: Tailor the wraps to your liking with various ingredients and dressings, ensuring everyone enjoys their meal.
  • Healthy Ingredients: Packed with protein from chicken and nutrients from romaine and tomatoes, these wraps are a delicious and nutritious choice.
  • Perfect for Leftovers: Use up any leftover chicken or veggies you have, reducing waste while creating a new meal.

Ingredients You’ll Need

To make your chicken pesto wraps, gather the following ingredients:

  • 2 cups cooked chicken: Chopped into small bite-sized pieces. You can use grilled chicken, rotisserie chicken, or even leftover chicken.
  • ⅓ cup pesto: Spinach walnut pesto is recommended for a unique twist, but any pesto will do.
  • 3 Tbsp grated Parmesan cheese: Optional, but it adds a delicious layer of flavor.
  • 4 wraps: Flour or whole wheat tortillas work best; feel free to choose gluten-free options if needed.
  • 4 cups romaine lettuce: Shredded for crunch and freshness.
  • 1 cup cherry tomatoes: Sliced for added sweetness and color.
  • ½ cup mayonnaise: You can substitute with plain Greek yogurt for a healthier option.
  • 2 Tbsp olive oil: For drizzling and flavor.
  • 3 Tbsp fresh lemon juice: Adds brightness; adjust to taste.
  • ¼ cup Parmesan cheese: Grated, for garnish.
  • 2 garlic cloves: Minced, to enhance the flavor.
  • 1 ½ Tbsp capers and brine: For a tangy kick.
  • 2 tsp Dijon mustard: Adds a subtle zing.
  • 2 tsp Worcestershire sauce: For depth of flavor.
  • ¼ tsp salt: Adjust based on taste.
  • ¼ tsp freshly cracked black pepper: To season.

How to Make Chicken Pesto Wraps

Close-up view of Chicken Pesto Wraps with vibrant lettuce and cherry tomatoes, showcasing fresh ingredients.

Follow these simple steps to prepare your delicious chicken pesto wraps:

  • Step 1: Chop the grilled chicken into small bite-sized pieces and set aside. If making pesto from scratch, prepare the spinach walnut pesto and set aside.
  • Step 2: Shred the romaine lettuce and slice the cherry tomatoes.
  • Step 3: In a small food processor or blender, combine all Caesar dressing ingredients. Blend until smooth, taste, and adjust salt if necessary.
  • Step 4: In a medium-sized bowl, combine the shredded romaine and sliced tomatoes with half of the Caesar dressing. Mix well to evenly coat all greens and tomatoes.
  • Step 5: In a large bowl, add the chopped chicken and pesto. Mix thoroughly so that the chicken is evenly coated with pesto.
  • Step 6: Lay each wrap flat and add a layer of the salad mixture to the center, careful not to overstuff to prevent the wrap from falling apart.
  • Step 7: Add a generous portion of the pesto-coated chicken. Sprinkle extra Parmesan cheese if desired, and drizzle with some of the leftover Caesar dressing or save it for dipping.
  • Step 8: Fold the wrap tightly like a burrito. You can eat the wraps as is or warm them in a hot skillet. To toast, lightly spritz a skillet with oil, heat to medium, and place the wrap seam side down. Toast for 2-3 minutes per side until golden and warm.

Pro Tips for Making Chicken Pesto Wraps

  • Prep Ahead: Prepare the Caesar dressing and chop the veggies in advance for a quick assembly during busy nights.
  • Use Rotisserie Chicken: For an even quicker meal, use store-bought rotisserie chicken to save time.
  • Experiment with Pesto: Try different pesto varieties, such as sun-dried tomato or arugula, for a unique twist.
  • Don’t Overstuff: Be cautious not to overfill your wraps; this helps prevent messiness and makes them easier to eat.
  • Warm the Tortillas: Gently warming tortillas makes them more pliable and easier to wrap without tearing.
  • Fresh Herbs: Adding fresh herbs like basil or cilantro can elevate the flavor profile significantly.
  • Make It a Meal: Serve with a side of sweet potato fries or a fresh fruit salad for a complete meal.
  • Keep It Crunchy: Add crunchy vegetables like cucumbers or bell peppers for an extra texture boost.

Common Mistakes and Troubleshooting

Here are some common pitfalls and how to avoid them:

  • Wraps Falling Apart: Ensure not to overstuff the wraps and fold them tightly.
  • Soggy Wraps: If you’re using a dressing, serve it on the side rather than drenching the wrap to maintain crispness.
  • Chicken Dryness: If using leftover chicken, be sure to mix in enough pesto to keep it moist and flavorful.

Variations and Substitutions

Feel free to get creative! Here are some delicious variations:

  • Veggie Pesto Wrap: Substitute chicken with roasted vegetables like zucchini and bell peppers for a vegetarian option.
  • Spicy Chicken Wrap: Add sliced jalapeños or a drizzle of hot sauce for those who like a kick.
  • Caprese Style: Add fresh mozzarella and basil for a Caprese-inspired wrap.
  • Asian-Inspired: Use teriyaki chicken, sesame dressing, and add shredded carrots and cabbage for a different flavor profile.

Storage and Make-Ahead Instructions

Want to prepare your chicken pesto wraps in advance? Here’s how:

  • Storing: Wrap each prepared wrap tightly in plastic wrap and store in the refrigerator for up to 2 days.
  • Make-ahead: Prepare the chicken, pesto, and veggies a day in advance, and assemble the wraps just before serving.
  • Freezing: While not recommended for assembled wraps, you can freeze cooked chicken and pesto separately for future meals.

Frequently Asked Questions

  • Can I make these wraps ahead of time? Yes! Prepare the filling and wrap them just before serving for the best texture.
  • What other proteins can I use? Turkey, tofu, or even chickpeas can be great substitutes for chicken.
  • Are these wraps healthy? Yes! They’re loaded with protein, healthy fats, and fresh vegetables.
  • What can I serve with chicken pesto wraps? Pair with a salad, sweet potato fries, or some fresh fruit for a well-rounded meal.
  • Can I use store-bought pesto? Absolutely! Store-bought pesto is a great time-saver and works perfectly in this recipe.
  • How do I make these wraps gluten-free? Simply use gluten-free tortillas or wraps.
  • How long do they last in the fridge? They can be stored in the fridge for up to 2 days when wrapped properly.
  • Can I toast the wraps? Yes! Toasting adds a nice crunch and enhances the flavors.

Nutrition Tips and Dietary Adaptations

To suit various dietary needs, consider the following:

  • Low-carb option: Use lettuce leaves instead of wraps for a low-carb alternative.
  • Dairy-free: Substitute cheese with nutritional yeast or omit it entirely.
  • Vegan: Use chickpeas or tofu as protein sources and plant-based pesto.

Equipment Recommendations

Here are some tools that can help you in making chicken pesto wraps:

  • Food Processor: Essential for making pesto and blending dressing quickly.
  • Sharp Knife: For chopping vegetables and chicken precisely.
  • Cutting Board: A sturdy surface for preparing ingredients.
  • Skillet: Perfect for toasting the wraps for extra flavor and texture.

Serving Suggestions

Make your meal even more delightful with these serving ideas:

  • Dip Options: Serve with extra Caesar dressing or a homemade yogurt sauce on the side.
  • Fresh Herbs: Garnish with fresh basil or parsley for added color and flavor.
  • Side Salads: A light side salad with vinaigrette complements the wraps beautifully.

Conclusion

Chicken pesto wraps are not only quick and easy to make but also packed with flavor and nutrition. With endless possibilities for customization, these wraps can easily become a staple in your meal rotation. So gather your ingredients, put on your apron, and experience the joy of creating delicious chicken pesto wraps in your own kitchen!

Chicken Pesto Wraps Recipe

Prep Time 15 minutes
Cook Time 5 minutes
Total Time 20 minutes
Servings 4 servings
Calories 450
Delight in these flavorful chicken pesto wraps, combining fresh greens, juicy tomatoes, and savory pesto for a quick and satisfying meal.

Ingredients

Protein

  • 2 cups cooked chicken, chopped into small bite-sized pieces

Sauce & Condiments

  • cup pesto spinach walnut pesto (recommended, add more as needed)
  • 3 Tbsp grated Parmesan cheese (optional)
  • ½ cup mayonnaise or plain Greek yogurt
  • 2 Tbsp olive oil
  • 3 Tbsp fresh lemon juice
  • ¼ cup Parmesan cheese, grated
  • 2 cloves garlic (minced)
  • 1.5 Tbsp capers and brine
  • 2 tsp Dijon mustard
  • 2 tsp Worcestershire sauce
  • ¼ tsp salt
  • ¼ tsp black pepper (freshly cracked)

Wraps & Greens

  • 4 wraps wraps
  • 4 cups romaine lettuce, shredded
  • 1 cup cherry tomatoes, sliced

Instructions 

  • Chop the cooked chicken and prepare pesto if making from scratch.
  • Blend all dressing ingredients until smooth, then toss with shredded lettuce and sliced tomatoes.
  • Mix chopped chicken with pesto until evenly coated.
  • Lay each wrap flat, add salad mixture, pesto-coated chicken, sprinkle Parmesan, and drizzle with dressing if desired. Fold tightly and serve or toast in a skillet for 2-3 minutes per side.

Notes

Feel free to add more pesto or Parmesan for extra flavor.
Calories: 450kcal
Cost: $15
Course: Lunch
Cuisine: American
Keyword: Chicken, Pesto, Wraps

Discover Your New Favorite Rice Noodle Salad with Chicken

Welcome to a delightful culinary journey! If you’re seeking a refreshing, vibrant dish, look no further than this Rice Noodle Salad with Chicken. This recipe combines the perfect balance of flavors and textures, making it ideal for a quick weeknight dinner or a satisfying lunch. Packed with fresh ingredients and a zingy dressing, this noodle salad is sure to become a staple in your kitchen. Let’s dive into why you’ll love this recipe!

Why You’ll Love This Rice Noodle Salad

This dish isn’t just about taste; it’s about convenience and versatility. Here are five reasons why this rice noodle salad will quickly become a favorite:

  • Quick and Easy: Ready in under 30 minutes, this meal is perfect for busy weeknights or a refreshing lunch.
  • Vibrant Ingredients: The combination of fresh vegetables and herbs offers a burst of color and flavor, making it visually appealing as well.
  • Customizable: Feel free to swap in your favorite veggies or proteins, allowing you to tailor the dish to your taste.
  • Healthy and Nutritious: With lean chicken, a variety of vegetables, and a light dressing, this salad packs a nutritious punch.
  • Meal Prep Friendly: Make it ahead and store it in the fridge for a quick grab-and-go meal!

Ingredient Breakdown

Getting the ingredients right is key to a perfect rice noodle salad. Here’s what you’ll need:

  • Rice Vermicelli Noodles: 8 ounces, the star of our salad. These noodles are light yet satisfying.
  • Shredded Carrots: 2 cups, add a sweet crunch that complements the other ingredients.
  • Scallions: 6, thinly sliced, for a zesty kick.
  • Cilantro, Basil, and Mint: ⅓ cup each, fresh herbs bring incredible flavor and freshness.
  • Rotisserie Chicken: 16 ounces, shredded, an easy protein option that adds richness.
  • Dry Roasted Peanuts: ¼ cup, crushed, optional but recommended for added texture.
  • Dressing Ingredients: ¼ cup fish sauce, 2 tablespoons brown sugar, 3 tablespoons lime juice, 2 tablespoons rice vinegar, 1 clove garlic (minced), and ⅓ teaspoon crushed red pepper.

Substitutions

If some ingredients aren’t available or you want to customize the salad, consider these substitutions:

  • Chicken: Use grilled shrimp, tofu, or chickpeas for a vegetarian option.
  • Fish Sauce: Substitute with soy sauce or a vegan alternative for a different flavor profile.
  • Vegetables: Try bell peppers, cucumbers, or any seasonal veggies you have on hand.
  • Herbs: Experiment with other herbs like parsley or dill for a twist.

How to Make Rice Noodle Salad: Step-by-Step

Side angle of a colorful rice noodle dish with fresh herbs and vegetables.

Creating this salad is simple and straightforward. Follow these steps for a delicious outcome:

  1. Start by rehydrating the vermicelli noodles. Soak them in boiling water for about 3 minutes or until soft. Drain and rinse with cold water to stop the cooking process.
  2. While the noodles are soaking, prepare the dressing. In a bowl, whisk together the fish sauce and brown sugar until the sugar dissolves. Then, add the remaining dressing ingredients and mix well.
  3. In a large mixing bowl, toss the cooled noodles with the dressing until well-coated.
  4. Add the shredded carrots, scallions, and herbs to the noodles, mixing gently to combine.
  5. Serve the salad topped with shredded chicken and a sprinkle of crushed peanuts for added crunch.

Pro Tips for a Perfect Salad

To elevate your noodle salad game, consider these expert insights:

  • Fresh Ingredients: Always use fresh herbs and crisp vegetables for the best flavor and texture.
  • Let It Marinate: Allow the salad to sit for 10-15 minutes after mixing for flavors to meld.
  • Adjust the Dressing: Feel free to tweak the lime juice and fish sauce to suit your taste preferences.
  • Chill Before Serving: For an extra refreshing experience, refrigerate the salad for an hour before serving.
  • Save Some Dressing: Keep extra dressing on the side to drizzle over leftovers for renewed freshness.
  • Play with Textures: Incorporate crispy vegetables like bell peppers or radishes to add crunch.
  • Meal Prep: Store components separately to maintain freshness and crispness throughout the week.
  • Garnish Creatively: Add lime wedges or extra herbs on top for a lovely presentation.

Common Mistakes and Troubleshooting

Even simple recipes can go awry. Here’s how to avoid common pitfalls:

  • Overcooking Noodles: Watch the cooking time closely; over-soaked noodles can turn mushy.
  • Too Much Dressing: Start with a little dressing and add more as needed to avoid overwhelming flavors.
  • Skipping Herbs: Don’t skip fresh herbs—they’re crucial for authentic flavor!
  • Not Rinsing Noodles: Always rinse noodles with cold water to stop the cooking process and prevent clumping.

Delicious Variations to Try

Mix things up with these tasty variations of the rice noodle salad:

  • Spicy Thai Version: Incorporate sliced jalapeños or sriracha for added heat.
  • Asian Tofu Salad: Substitute chicken with marinated and cubed tofu for a vegetarian delight.
  • Crunchy Veggie Delight: Add shredded cabbage, snap peas, or cucumber for extra crunch.
  • Fruit Infusion: Toss in some mango or pineapple for a sweet and tropical twist.

Storing and Make-Ahead Tips

This rice noodle salad is perfect for meal prep! Here’s how to store and enjoy it later:

  • Refrigeration: Store in an airtight container in the fridge for up to 3 days.
  • Separate Components: Keep dressing and noodles separate until ready to serve to maintain texture.
  • Make Ahead: Prepare the salad components a day in advance; just mix in the dressing before serving.

Frequently Asked Questions

Here are some common questions about this rice noodle salad:

  • Can I use a different type of noodle? Yes! Feel free to substitute rice noodles with soba or even whole wheat pasta.
  • Is this dish gluten-free? To keep it gluten-free, use gluten-free soy sauce or tamari instead of fish sauce.
  • Can I make this salad vegan? Absolutely! Replace chicken with tofu and use a vegan fish sauce alternative.
  • How do I serve this salad? It’s best served chilled or at room temperature, perfect for lunch boxes or picnics.
  • What can I add for protein? Besides chicken, you can add shrimp, tofu, or chickpeas.
  • How can I make it spicier? Add more crushed red pepper or fresh chilies to the dressing or salad.
  • Can I use frozen veggies? While fresh is best, you can use thawed frozen vegetables if fresh isn’t available.
  • How long does it last in the fridge? This salad stays fresh for about 3 days when stored properly.

Nutrition Tips and Dietary Adaptations

This rice noodle salad is not only delicious, but it can also be adapted for various dietary needs:

  • Low Carb: Substitute noodles with spiralized zucchini or cauliflower rice.
  • High Protein: Add extra chicken or a scoop of protein powder into the dressing for a boost.
  • Low Sodium: Use a low-sodium fish sauce or soy sauce for a healthier option.

Equipment Recommendations

To whip up this delightful salad, you’ll need some basic kitchen tools:

  • Large Pot: For boiling water and cooking the noodles.
  • Mixing Bowl: A large bowl for mixing the salad and dressing.
  • Whisk: Essential for blending the dressing ingredients smoothly.
  • Knife and Cutting Board: For chopping vegetables and herbs.

Serving Suggestions

Serve your rice noodle salad as a main dish or side:

  • Main Course: Enjoy it as a standalone meal, perfect for lunch or dinner.
  • Side Dish: Pair it with grilled meats or seafood for a complete meal.
  • Garnish: Add lime wedges or extra herbs on top for a beautiful presentation.

In conclusion, this Rice Noodle Salad with Chicken is not just a recipe; it’s an invitation to enjoy cooking and share delightful meals with loved ones. With its vibrant flavors and easy preparation, it’s guaranteed to become a go-to dish in your home. So gather your ingredients, follow the steps, and enjoy the creation of a meal that tastes as good as it looks. Happy cooking!

Rice Noodle Salad with Chicken

Prep Time 10 minutes
Cook Time 5 minutes
Total Time 15 minutes
Servings 4 servings
Calories 450
A fresh and flavorful rice noodle salad topped with shredded chicken and herbs, perfect for a light meal or appetizer.

Ingredients

Noodles

  • 8 ounces rice vermicelli noodles
  • 2 cups shredded carrots
  • 6 scallions scallions thinly sliced
  • cup minced cilantro
  • cup minced basil
  • cup minced mint
  • 16 ounces cold rotisserie chicken shredded
  • ¼ cup dry roasted peanuts crushed (optional)
  • ¼ cup fish sauce
  • 2 Tablespoons brown sugar
  • 3 Tablespoons lime juice
  • 2 Tablespoons rice vinegar
  • 1 clove garlic minced
  • teaspoon crushed red pepper

Instructions 

  • Rehydrate noodles in boiling water for 3 minutes, drain, rinse with cold water, and set aside.
  • Whisk fish sauce and sugar until dissolved, then add remaining dressing ingredients.
  • Toss noodles with dressing, stir in vegetables, top with chicken and crushed peanuts.

Notes

Adjust the amount of red pepper for desired spice level.
Calories: 450kcal
Cost: $15
Course: Salad
Cuisine: Vietnamese
Keyword: Chicken, herbs, Rice Noodle

Are you ready to elevate your weeknight dinners with a dish that’s not only easy to prepare but also bursting with flavor? This Light Pesto Caprese Pasta Salad is your answer! In just about 30 minutes, you can whip up a delightful meal that combines the freshness of basil, the creaminess of mozzarella, and the tanginess of balsamic vinegar. Whether you’re hosting a gathering or simply looking for a quick dinner idea, this pasta salad is sure to impress.

Why You’ll Love This Recipe

This recipe isn’t just another pasta salad; it’s a culinary experience that brings together fresh ingredients and simple techniques. Here’s why you’ll fall in love with it:

  • Quick and Easy: Ready in about 30 minutes, making it perfect for busy weeknights.
  • Flavor Explosion: The combination of fresh basil, juicy cherry tomatoes, and creamy mozzarella creates a delightful taste in every bite.
  • Versatile: Enjoy it as a main dish, side dish, or even a light lunch. It pairs beautifully with grilled meats or can stand alone.
  • Make-Ahead Friendly: This salad gets even better after a few hours in the fridge, allowing the flavors to meld.
  • Customizable: With easy substitutions and variations, you can make it your own!

Ingredient Breakdown

Let’s dive into the ingredients that make this pasta salad shine. Here’s what you’ll need, along with some suggested substitutions:

  • 6 oz farfalle pasta: This cute bowtie shape holds the dressing wonderfully. You can substitute with any pasta shape you prefer, like rotini or penne.
  • 1 bouillon cube: Boosts flavor without heaviness. For a vegetarian option, use vegetable bouillon.
  • 1 large or 2 small shallots: Minced fine for a hint of bite. Red onion is a great alternative.
  • 1 pint cherry tomatoes: Halved for juicy bursts. Grape tomatoes work just as well!
  • 1/4 cup fresh basil: Because it’s gotta be fresh! Dried basil can be used in a pinch, but fresh is best.
  • 3 oz mini mozzarella balls: Little bites of creamy yum. You can replace these with diced mozzarella or even feta cheese for a different flavor.
  • 1/4 cup pesto: The star that makes everything sing. Feel free to make your own or use store-bought for convenience.
  • 1/4 cup balsamic vinegar: Adds a tangy punch. You can substitute with lemon juice for a brighter flavor.
  • 1/2 teaspoon kosher salt: Keeps all flavors balanced; adjust to taste.

Step-by-Step Instructions

Now that we have our ingredients ready, let’s walk through the simple steps to create this delicious salad:

1. Cook the Pasta

Bring a large pot of salted water to a boil. Add the farfalle pasta and the bouillon cube, and cook according to package directions until al dente. Drain and rinse under cold water to stop the cooking process.

2. Prepare the Creamy Pesto Dressing

In a large bowl, combine the pesto and balsamic vinegar. Whisk until smooth and well blended.

3. Combine the Pasta with the Dressing

Once the pasta is cool, add it to the bowl with the dressing. Toss to coat evenly.

4. Fold in the Fresh Ingredients

Add the shallots, cherry tomatoes, basil, and mozzarella to the pasta. Gently fold in to combine, being careful not to break the mozzarella.

5. Season the Salad

Sprinkle with kosher salt and toss again. Taste and adjust seasoning if needed.

Pro Tips for Making Light Pesto Caprese Pasta Salad

A vibrant pasta salad with farfalle, cherry tomatoes, mozzarella, and pesto showcased in a side view close-up.

To ensure your pasta salad turns out perfectly every time, consider these expert tips:

  • Chill before serving: Let the salad chill in the fridge for at least 30 minutes to allow the flavors to meld beautifully.
  • Don’t overcook the pasta: Al dente pasta holds up better in salads and prevents a mushy texture.
  • Use quality ingredients: Fresh basil, ripe tomatoes, and high-quality pesto make a significant difference in flavor.
  • Adjust the dressing: If you prefer a creamier salad, feel free to mix in some light mayonnaise or Greek yogurt.
  • Gently fold ingredients: Use a folding motion when combining to keep the mozzarella intact.
  • Experiment with flavors: Add ingredients like olives, artichokes, or spinach for an extra flavor boost.
  • Make it a meal: Add grilled chicken or shrimp for a heartier dish.
  • Pack it for lunch: This salad makes for excellent leftovers, just store in an airtight container.

Common Mistakes and Troubleshooting

Even the best cooks make mistakes! Here are some common pitfalls and how to avoid them:

  • Pasta sticking together: Rinse the pasta under cold water after draining to prevent clumping.
  • Salad too dry: If it seems dry after chilling, mix in a splash of olive oil or additional pesto.
  • Flavor imbalance: Taste frequently as you mix and adjust seasonings to ensure a balanced flavor.

Variations

Feel free to get creative with this recipe! Here are some variations to try:

  • Caprese Twist: Add sliced avocado for a creamy texture and healthy fats.
  • Grilled Veggie Medley: Toss in grilled zucchini, bell peppers, or asparagus for a smoky flavor.
  • Protein-Packed: Add diced grilled chicken or chickpeas for a filling meal.
  • Cheesy Delight: Mix in some crumbled feta or goat cheese for an extra tangy twist.

Storage and Make-Ahead Instructions

This salad is perfect for meal prep! Here’s how to store it:

  • Refrigerator: Store in an airtight container for up to 3 days. The salad tastes even better the next day!
  • Freezer: Not recommended, as the texture of the pasta and fresh ingredients may change.
  • Make-Ahead: Prepare the salad up to a day in advance, but add the mozzarella and basil just before serving to keep them fresh.

Frequently Asked Questions

Got questions? We’ve got answers!

  • Can I use whole wheat pasta? Absolutely! Whole wheat pasta is a great way to add extra fiber.
  • Is this recipe vegan-friendly? Yes, simply omit the mozzarella and use a vegan pesto.
  • Can I make this salad gluten-free? Yes, just use gluten-free pasta.
  • How long can I keep leftovers? Store leftovers in the fridge for up to 3 days.
  • Can I use store-bought pesto? Definitely! Just make sure it’s a quality brand for the best flavor.
  • What can I serve with this salad? It pairs well with grilled chicken, fish, or a light soup.
  • Can I add nuts? Yes! Pine nuts or walnuts add a nice crunch.
  • How do I make it spicier? Add red pepper flakes or a dash of hot sauce to the dressing.

Nutrition Tips and Dietary Adaptations

Here are some ways to adapt the recipe to fit your dietary needs:

  • Low-carb option: Substitute pasta with zucchini noodles (zoodles) for a lighter dish.
  • Low-calorie dressing: Use Greek yogurt instead of pesto for a creamy, lower-calorie version.
  • High-protein: Consider adding cooked quinoa or chickpeas for an extra protein boost.

Equipment Recommendations

To make this recipe, you’ll need:

  • Large pot: For boiling pasta.
  • Colander: To drain the pasta.
  • Large mixing bowl: For combining all ingredients.
  • Whisk: To mix the dressing well.

Serving Suggestions

When it comes to serving your Light Pesto Caprese Pasta Salad, consider these ideas:

  • Chilled: Serve straight from the fridge for a refreshing meal.
  • Garnish: Top with additional basil or a drizzle of balsamic glaze for a beautiful presentation.
  • Picnic Perfect: Pack it for picnics or potlucks; it travels well!

With this comprehensive guide, you’re all set to create a delicious Light Pesto Caprese Pasta Salad that will wow your family and friends. Cooking is all about enjoying the process and sharing great food, so don’t stress about perfection—embrace the joy of cooking!

Light Pesto Caprese Pasta Salad

Prep Time 10 minutes
Cook Time 10 minutes
Total Time 20 minutes
Servings 4 servings
Calories 350
A fresh and vibrant pasta salad combining the flavors of pesto, cherry tomatoes, mozzarella, and basil for a quick, light meal or side dish.

Ingredients

Broth & Pasta

  • 6 oz farfalle pasta (dry weight)
  • 1 large shallot (minced fine)
  • 1 pint cherry tomatoes (halved)
  • 0.25 cup fresh basil (chopped)
  • 3 oz mini mozzarella balls (little bites of creamy yum)
  • 0.25 cup pesto (the star that makes everything sing)
  • 0.25 cup balsamic vinegar (for a tangy punch)
  • 0.5 teaspoon kosher salt (keeps all flavors balanced)

Instructions 

  • Cook the pasta according to package instructions, then drain and set aside.
  • In a large bowl, combine cooked pasta, minced shallots, cherry tomatoes, basil, mozzarella, pesto, balsamic vinegar, and salt.
  • Toss gently to combine all ingredients evenly.
  • Serve immediately or chill for 15 minutes for extra flavor.

Notes

Use fresh basil for the best flavor and adjust salt to taste.
Calories: 350kcal
Cost: $12
Course: Salad
Cuisine: Italian
Keyword: Caprese, Pasta, Pesto

Welcome to your new favorite weeknight meal! These Quick and Flavorful Grilled Chicken Wraps are not only delicious but also incredibly easy to make. With a handful of fresh ingredients and straightforward steps, you’ll have a satisfying meal ready in no time. Perfect for busy nights, these wraps are versatile and can be customized to suit your taste. Let’s dive in!

Why You’ll Love This Recipe

Here are some reasons why these grilled chicken wraps will become a staple in your kitchen:

  • Speedy Preparation: With just a few simple steps, you can have a hearty meal on the table in less than 30 minutes.
  • Customizable Ingredients: Use whatever veggies and spices you have on hand to personalize your wraps.
  • Healthy and Wholesome: Packed with lean protein, fresh veggies, and healthy fats, these wraps are a nutritious choice.
  • Kid-Friendly: Even picky eaters will enjoy the fun of assembling their own wraps!
  • Meal Prep Friendly: Make extra chicken and veggies for lunches throughout the week.

Ingredient Breakdown

Let’s take a look at the ingredients you’ll need:

  • 500g chicken breast: Boneless skinless chicken is best for a quick cook time.
  • 2 Tbsps spice mix: Use your favorite spice blend—think taco seasoning, garlic powder, or Mediterranean herbs.
  • Salt and pepper: Essential for enhancing flavor.
  • 1 zucchini: Peeled into noodles; you can substitute with cucumber for a refreshing crunch.
  • 1 avocado: Adds creaminess; feel free to swap with hummus if you prefer a different texture.
  • Handful of red and yellow cherry tomatoes: They add sweetness and color; any tomato variety will work!
  • Mesclun lettuce: Provides a fresh, crunchy element; spinach or arugula are great alternatives.
  • Mayo: For a rich flavor, but Greek yogurt can be a healthier substitute.
  • Sliced almonds, toasted: For a delightful crunch; you can omit them for a nut-free option.

Step-by-Step Instructions

Follow these simple steps to create your grilled chicken wraps:

  • Season the chicken: Rub the chicken breasts with your chosen spice mix, salt, and pepper.
  • Cook the chicken: Heat a grill pan or outdoor grill to medium-high. Grill the chicken for 4-5 minutes per side or until the internal temperature reaches 165°F (75°C).
  • Rest and slice: Once cooked, let the chicken rest for a few minutes before slicing it into strips.
  • Assemble the wraps: On a large flour tortilla, layer sliced chicken, zucchini noodles, avocado, cherry tomatoes, mesclun, mayo, and toasted almonds.
  • Roll tightly: Fold the sides of the tortilla in, then roll from the bottom to the top to form a burrito shape.

Pro Tips for Perfect Wraps

Side angle of a grilled chicken wrap showcasing vibrant ingredients and textures.

Here are some expert insights to elevate your grilled chicken wraps:

  • Marinate for Flavor: Let the chicken sit in the spice mix for at least 30 minutes before grilling to enhance the flavor.
  • Don’t Overcook: Keep an eye on the chicken to prevent dryness; use a meat thermometer for accuracy.
  • Use Fresh Ingredients: Fresh veggies and ripe avocados make a world of difference in taste.
  • Experiment with Wraps: Try different tortillas like whole wheat, spinach, or gluten-free options.
  • Layer Wisely: Place heavier ingredients at the bottom to prevent sogginess.
  • Make it Ahead: Prepare the chicken and veggies in advance for a quick assembly at dinner time.
  • Grill Marks Matter: For that smoky flavor, grill with the lid closed to infuse the chicken with even more taste.
  • Keep it Tight: When rolling, ensure the wrap is tight to avoid ingredients spilling out.

Common Mistakes and Troubleshooting

Here’s how to avoid common pitfalls:

  • Overcooked Chicken: If your chicken is dry, reduce cooking time and use a thermometer.
  • Soggy Wraps: Avoid adding wet ingredients directly onto the tortilla; layer dry ingredients first.
  • Filling Spillage: Make sure to roll tightly and not overstuff to prevent breakage.
  • Lack of Flavor: Don’t skip seasoning; it’s key to a delicious wrap.

Variations on Grilled Chicken Wraps

Feel free to mix things up with these tasty variations:

  • Mediterranean Wrap: Swap the spice mix for za’atar and add feta cheese, olives, and roasted red peppers.
  • BBQ Chicken Wrap: Use BBQ sauce instead of mayo and add coleslaw for crunch.
  • Asian-Inspired Wrap: Use a teriyaki glaze with shredded carrots, snap peas, and sesame seeds.
  • Breakfast Wrap: Replace chicken with scrambled eggs, add spinach, cheese, and a drizzle of hot sauce.

Storage and Make-Ahead Instructions

To keep your wraps fresh:

  • Refrigerate: Store assembled wraps in an airtight container for up to 2 days; keep ingredients separate for freshness.
  • Make Ahead: Grill chicken and prep veggies in advance; assemble the wraps when ready to eat.
  • Freeze: Chicken can be frozen after cooking; thaw and reheat before assembling your wrap.

Comprehensive FAQ

Here are some common questions about grilled chicken wraps:

  • Can I use frozen chicken? Yes, just ensure it’s fully thawed before cooking for even results.
  • What can I substitute for chicken? Try tofu, tempeh, or chickpeas for a vegetarian option.
  • How do I make these wraps gluten-free? Use gluten-free tortillas and check your spice mix for any hidden gluten.
  • Can I add cheese? Absolutely! Cheese like cheddar, mozzarella, or pepper jack can enhance the flavor.
  • Is this recipe suitable for meal prep? Yes! You can prepare the chicken and veggies in advance for quick meals.
  • How can I make these wraps spicier? Add sliced jalapeños or a spicy sauce to kick it up a notch.
  • What side dishes pair well with these wraps? Serve with fresh fruit, a simple salad, or homemade chips.
  • How can I ensure the chicken is juicy? Resting the chicken after cooking helps retain moisture.

Nutrition Tips and Dietary Adaptations

To cater to different dietary needs:

  • Low-Carb Option: Use lettuce wraps instead of tortillas for a lighter choice.
  • High-Protein: Add extra chicken or incorporate beans for added protein.
  • Dairy-Free: Substitute mayo with avocado or a dairy-free spread.
  • Vegetarian Option: Replace chicken with grilled portobello mushrooms or chickpeas.

Equipment Recommendations

Here’s what you’ll need:

  • Grill Pan or Outdoor Grill: Essential for a perfect grilled flavor.
  • Meat Thermometer: To ensure chicken is cooked to a safe internal temperature.
  • Sharp Knife: For easy slicing of chicken and veggies.
  • Cutting Board: A stable surface for food preparation.

Serving Suggestions

Here are some ideas to elevate your meal:

  • Serve with Dips: Accompany with salsa, guacamole, or a yogurt dip for added flavor.
  • Garnish: Top with fresh herbs like cilantro or parsley for a burst of freshness.
  • Pair with Drinks: Enjoy with iced tea, lemonade, or a light beer for a perfect meal experience.

In conclusion, these Quick and Flavorful Grilled Chicken Wraps are a fantastic choice for busy weeknights. They are simple to prepare, healthy, and can be customized to fit your taste. With the tips and variations provided, you can keep this recipe exciting and fresh every time you make it. So grab your ingredients, get cooking, and enjoy the deliciousness!

Grilled Chicken Wraps

Prep Time 10 minutes
Cook Time 10 minutes
Total Time 20 minutes
Servings 4 servings
Calories 450
Enjoy these flavorful grilled chicken wraps packed with fresh vegetables and crunchy almonds for a satisfying meal.

Ingredients

Protein

  • 500 g chicken breast

Spices

  • 2 Tbsps spice mix of your choice
  • to taste Salt and pepper

Vegetables

  • 1 pcs zucchini, peeled into noodles
  • 1 pcs avocado, sliced
  • a handful red and yellow cherry tomatoes, cut into quarters

Greens

  • 1 bowl mesclun lettuce

Condiments

  • to taste Mayo

Nuts

  • a handful sliced almonds, toasted

Instructions 

  • Season the chicken with spice mix, salt, and pepper.
  • Cook the chicken over medium heat for 4-5 minutes per side until cooked through, then slice.
  • Assemble wraps with sliced chicken, zucchini noodles, avocado, cherry tomatoes, mesclun, mayo, and almonds.
  • Roll up the wraps tightly, folding sides first, then roll to form a burrito.

Notes

Feel free to customize the spice mix and vegetables for variety.
Calories: 450kcal
Cost: $12
Course: Main Course
Keyword: Chicken, Wraps

Indulge in Guilt-Free Goodness: No-Bake Chocolate Peanut Butter Oatmeal Bars

If you’re looking for a quick and delicious snack that satisfies your sweet tooth while keeping it healthy, you’ve landed in the right place! These no-bake chocolate peanut butter oatmeal bars are super easy to whip up and perfect for any craving. Packed with wholesome ingredients, they’re not just a treat; they’re a nutritious snack you can feel good about enjoying. In this guide, I’ll walk you through everything you need to know to make these delightful bars, share tips, and help you troubleshoot any issues you may encounter. Let’s dive in!

Why You’ll Love This Recipe

These healthy oatmeal bars offer a perfect blend of flavor and nutrition. Here are just a few reasons you’ll fall in love with them:

  • Quick and Easy: With only a handful of ingredients and no baking required, these bars come together in no time.
  • Nutritious Ingredients: Made with old-fashioned rolled oats, natural peanut butter, and a touch of sweetness, they’re a wholesome snack.
  • Customizable: Feel free to mix in your favorite nuts, seeds, or dried fruits to make them your own.
  • Perfect For Meal Prep: These bars store well, making them an ideal option for busy weeks.
  • Kid-Friendly: They’re a hit with both kids and adults, making healthy snacking easy for the whole family.

Ingredients Breakdown

Let’s take a closer look at what you’ll need to create these tasty bars:

  • Natural Creamy Peanut Butter: 1 cup 2 tablespoons. This adds rich flavor and healthy fats. Opt for organic if possible!
  • Agave Syrup or Pure Maple Syrup: 1 3/4 cup. A natural sweetener that binds everything together. Honey can be substituted, but it won’t be vegan.
  • Old-Fashioned Rolled Oats: 1 1/3 cups. You can use gluten-free oats if needed, and quick oats work too!
  • Semi-Sweet Chocolate Chips: 3/4 cup. Enhance the chocolate flavor with dairy-free chocolate chips for a vegan option.
  • Additional Peanut Butter: 1/3 cup. This gives a delicious chocolate topping a creamy texture.

Step-by-Step Instructions

Side view of textured oatmeal bars showcasing melted chocolate and peanut butter drizzle.

Ready to make these delightful bars? Follow these simple steps:

  1. Prepare the Pan: Line an 8-inch square baking pan with parchment paper or wax paper. This will make it easy to lift the bars out later.
  2. Make the Mixture: In a large bowl, mix together the peanut butter and agave syrup until well combined.
  3. Add the Oats: Stir in the rolled oats until fully incorporated.
  4. Press into the Pan: Transfer the mixture to the prepared pan and press it down firmly using your hands or a spatula.
  5. Prepare the Chocolate Topping: In a microwave-safe bowl, melt the chocolate chips and additional peanut butter together, stirring until smooth.
  6. Spread the Topping: Pour the melted chocolate over the oat mixture evenly, spreading it out to cover the surface.
  7. Chill: Refrigerate for at least 2 hours until set.
  8. Slice and Enjoy: Once set, lift the bars out of the pan using the parchment paper and slice into squares.

Pro Tips for Success

  • Chill Time: Allowing the bars to chill longer ensures they hold together better when slicing.
  • Use a Sharp Knife: Warm the knife slightly under hot water before cutting the bars for clean edges.
  • Customize Flavors: Add a pinch of sea salt on top for a sweet-salty combo that enhances the flavors.
  • Storage Tip: Store bars in an airtight container in the fridge for up to 2 weeks.
  • Experiment: Consider adding shredded coconut, chia seeds, or protein powder for an extra nutritional boost.
  • Texture Check: If the mixture feels too crumbly, add a touch more peanut butter or syrup to help bind it.
  • Allergy Considerations: Substitute almond butter or sunflower seed butter for nut allergies.
  • Family Fun: Involve kids in the process by letting them mix or decorate the bars!

Common Mistakes and Troubleshooting

Even the best cooks make mistakes! Here are some common issues and how to solve them:

  • Bars Falling Apart: If your bars crumble, it may be due to insufficient binding. Try adding more peanut butter or syrup.
  • Too Sweet: If they’re overly sweet for your taste, reduce the amount of syrup next time, or use less chocolate.
  • Chocolate Topping Not Setting: Make sure to melt the chocolate slowly; too much heat can prevent it from firming up.
  • Too Soft After Chilling: Ensure they are refrigerated long enough; they should be firm to the touch.

Delicious Variations

These bars are versatile! Here are some fun variations to try:

  • Nutty Delight: Add chopped walnuts or almonds for extra crunch and flavor.
  • Fruit Fusion: Mix in dried cranberries, raisins, or chopped dates for a chewy texture.
  • Chocolate Lovers: Use dark chocolate chips or drizzle melted chocolate on top after slicing.
  • Spiced Up: Add a dash of cinnamon or vanilla extract to enhance the flavor profile.

Storage and Make-Ahead Instructions

These bars are perfect for meal prep! Here’s how to store them:

  • Refrigerate: Keep in an airtight container in the fridge for up to 2 weeks.
  • Freeze: For longer storage, freeze the bars in a single layer. Once firm, transfer to a freezer-safe bag for up to 3 months.
  • Thawing: Let frozen bars sit at room temperature for about 30 minutes before enjoying.

Frequently Asked Questions

Let’s address some common questions about these oatmeal bars:

  • Can I use quick oats instead of rolled oats? Yes, but rolled oats provide a heartier texture.
  • Do these bars need to stay refrigerated? For best results, yes, they should be kept cool to maintain their texture.
  • Can I make these dairy-free? Absolutely! Just use dairy-free chocolate chips and ensure your peanut butter is dairy-free.
  • Are they sweet enough without added sugar? Yes, the natural sweeteners provide enough sweetness for most palates.
  • How do I keep them from crumbling when slicing? Make sure to compress the mixture firmly when pressing into the pan.
  • What’s the best way to serve these bars? Enjoy them straight from the fridge or at room temperature for a softer texture.
  • Can I add protein powder? Yes, you can mix in a scoop of your favorite protein powder for an added boost.
  • What’s the nutritional information? Each bar (based on 16 servings) is approximately 150 calories, depending on specific ingredients used.

Nutrition Tips and Dietary Adaptations

Here are some tips for those with specific dietary needs:

  • Gluten-Free: Use certified gluten-free oats to ensure the bars are safe for those with celiac disease.
  • Vegan: Substitute honey with agave or maple syrup, and use dairy-free chocolate chips.
  • Low-Sugar: Reduce syrup or use a sugar substitute like stevia to lower the sugar content.

Essential Equipment

To make these bars, you’ll need:

  • 8-inch Square Baking Pan: For shaping the bars.
  • Parchment Paper: To line the pan for easy removal.
  • Mixing Bowls: For combining ingredients.
  • Spatula: To press the mixture into the pan.
  • Microwave-Safe Bowl: For melting chocolate.

Serving Suggestions

These bars are perfect as a snack or dessert! Here are some serving ideas:

  • With a Glass of Milk: Pair them with your favorite milk for a filling snack.
  • On the Go: Pack them in your lunchbox for a quick energy boost during the day.
  • As a Dessert: Serve with fresh fruit or a dollop of yogurt for a delightful dessert.

With these no-bake chocolate peanut butter oatmeal bars, you’re ready to impress your family and friends while keeping it healthy! Whether you need a quick snack, a post-workout treat, or just something to satisfy that sweet craving, this recipe has you covered. Remember, cooking is all about having fun and experimenting, so feel free to make this recipe your own. Enjoy!

Healthy No-Bake Chocolate Peanut Butter Oatmeal Bars

Prep Time 10 minutes
Total Time 10 minutes
Servings 12 bars
Calories 250
These delicious and healthy no-bake bars combine peanut butter, oats, and chocolate for a quick, vegan-friendly treat.

Ingredients

Main Ingredients

  • 1 cup natural creamy peanut butter
  • 1 3/4 cups agave syrup or pure maple syrup (honey can be used, but not vegan)
  • 1 1/3 cups old-fashioned rolled oats (can use gluten-free or quick oats)
  • 3/4 cup semi-sweet chocolate chips (use dairy-free for vegan)
  • 1/3 cup natural creamy peanut butter

Instructions 

  • Line an 8-inch square baking pan with parchment or wax paper.
  • Mix peanut butter, agave syrup, and oats in a bowl until well combined.
  • Press the mixture into the prepared pan evenly.
  • Melt chocolate chips and peanut butter together, then pour over the mixture.
  • Refrigerate for at least 2 hours until set, then cut into bars.

Notes

Store in an airtight container in the fridge for best freshness.
Calories: 250kcal
Cost: $10
Course: Snack
Keyword: chocolate, Oats, peanut butter

Unleash Your Grilling Potential with BBQ Tofu Veggie Skewers

If you’re looking for a simple yet flavorful recipe that celebrates the vibrant tastes of summer, our BBQ Tofu Veggie Skewers are here to inspire your next meal. This dish is perfect for a weeknight dinner or a weekend barbecue, combining marinated tofu with colorful vegetables on skewers that are easy to grill. With minimal effort, you can create a mouthwatering vegan dish that even non-vegans will love. Let’s dive into all the reasons why you’ll adore this recipe!

Why You’ll Love This Recipe

  • Flavorful Marinade: The marinade infuses the tofu with spices and a rich barbecue sauce, creating a perfect balance of smoky and savory flavors.
  • Colorful Presentation: The vibrant vegetables not only add nutrition but also make your dish visually appealing on the grill.
  • Quick and Easy: With a prep time of just 20 minutes, you can have these skewers ready for grilling in no time.
  • Versatile Ingredients: Feel free to use any vegetables you have on hand, making this recipe easily adaptable to your preferences.
  • Healthy and Nutritious: Packed with plant-based protein from the tofu and vitamins from the vegetables, this dish is as nutritious as it is delicious.

Ingredient Breakdown

Here’s what you’ll need to make these delicious BBQ Tofu Veggie Skewers:

  • Extra Firm Tofu: 1 (14-ounce) block, pressed to remove excess water. If you’re not sure how to do this, simply wrap the tofu in a clean towel and place a weight on it for about 15 minutes.
  • Olive Oil: 3 tablespoons. This is essential for the marinade and helps achieve a nice char on the grill.
  • Cumin: 2 teaspoons. Adds a warm flavor that pairs beautifully with the barbecue sauce.
  • Hot Smoked Paprika: 1 2 teaspoon. This gives your skewers a smoky twist.
  • Onion and Garlic Powder: 1/4 teaspoon each. These spices enhance the overall flavor profile.
  • Kosher Salt: 1 teaspoon. Essential for seasoning the tofu and veggies.
  • Black Pepper: 1/2 teaspoon. Freshly ground is best for maximum flavor.
  • Vegetables: 2 small zucchini and 2 small yellow squash, sliced into 1/4-inch thick rounds; 2 red peppers and 1 small red onion, diced into 1-inch pieces. Feel free to mix and match according to your taste!
  • Barbecue Sauce: 1/4 cup. You can use a store-bought variety or make your own for a personalized touch.
  • Fresh Parsley: Chopped, for serving. This adds a fresh pop of color and flavor!

How to Make BBQ Tofu Veggie Skewers

Juicy and colorful skewers featuring marinated tofu, zucchini, yellow squash, red pepper, and red onion.

Follow these simple steps to create your skewers:

  1. Preheat your grill to medium-high heat. You can also use a stovetop grill pan; just ensure it’s hot before adding the skewers.
  2. Pat the tofu dry with a towel, then wrap it in a dry towel and place a cast iron pan or cutting board on top to press out more liquid for about 15 minutes. After that, cut the tofu into 1-inch cubes.
  3. In a large bowl, whisk together 2 tablespoons of olive oil, cumin, hot smoked paprika, onion powder, garlic powder, 1/2 teaspoon of salt, and 1/4 teaspoon of pepper.
  4. Carefully add the tofu to the bowl and gently stir to coat each piece evenly in the marinade.
  5. In another bowl, toss the sliced zucchini, yellow squash, red peppers, and red onion with 1 tablespoon of olive oil, 1/2 teaspoon of salt, and 1/4 teaspoon of black pepper.
  6. Thread the marinated tofu and vegetables onto skewers, alternating between tofu and veggies for a beautiful presentation.
  7. Place the skewers on the grill and cook for about 2 minutes per side, until the tofu and veggies have grill marks and are charred. In the last few minutes of grilling, brush them with your favorite barbecue sauce for an extra flavor boost.
  8. Once done, sprinkle with fresh parsley before serving.

Pro Tips for Perfect Skewers

  • Press the Tofu: Take the time to press your tofu to ensure it absorbs maximum flavor from the marinade.
  • Mix and Match Vegetables: Don’t hesitate to use seasonal vegetables or whatever you have in your fridge.
  • Skewer Separation: Leave a little space between the tofu and vegetables on the skewers to allow for even cooking.
  • Watch Your Grill: Keep a close eye while grilling to avoid burning. Rotate skewers regularly for even cooking.
  • Use Metal Skewers: If you have them, metal skewers are easier and don’t require soaking like wooden ones.
  • Marinate Longer: For even deeper flavor, marinate the tofu for several hours or overnight in the fridge.
  • Experiment with Sauces: Try different sauces or marinades to customize the flavor profile to your liking.
  • Serve with Dips: Pair your skewers with dips like tzatziki or guacamole for added flavor.

Common Mistakes and Troubleshooting

Sometimes, cooking can be a bit tricky. Here are some common pitfalls to avoid:

  • Too Much Liquid: If your tofu is too watery, it won’t soak up the marinade well. Always press excess moisture out.
  • Overcrowding Skewers: If you pack too many pieces onto one skewer, it may not cook evenly. Stick to a few pieces per skewer.
  • Not Using Enough Heat: Ensure your grill is hot enough; otherwise, your skewers will steam rather than grill.
  • Skipping the Marinade: Don’t skip marinating the tofu; it’s essential for flavor.

Delicious Variations

Want to mix things up? Here are some variations to try:

  • Spicy Kick: Add chili flakes or sriracha to your marinade for some heat.
  • Asian-Inspired: Swap the barbecue sauce for teriyaki sauce and add bell peppers and snap peas.
  • Mediterranean Flair: Use zucchini, red onion, cherry tomatoes, and a marinade of olive oil, lemon juice, and oregano.
  • Herb-Infused: Add fresh herbs like basil or cilantro to the marinade for a fresh twist.

Storage and Make-Ahead Instructions

If you have leftovers, here’s how to store them:

  • Refrigerate Leftovers: Store any leftover skewers in an airtight container in the refrigerator for up to 3 days.
  • Reheat with Care: Reheat on a stovetop or grill pan to preserve texture. Avoid microwaving, as it can make the tofu soggy.
  • Make Ahead: You can marinate the tofu a day in advance and assemble the skewers just before grilling.

Comprehensive FAQ

Got questions? Here are some common inquiries about BBQ Tofu Veggie Skewers:

  • Can I use soft tofu instead of firm? Soft tofu is too delicate for skewers. Stick with extra-firm for the best results.
  • What vegetables work best? Bell peppers, zucchini, mushrooms, and onions are all great choices!
  • How long do I grill the skewers? Grill them for about 8-10 minutes, turning occasionally until charred.
  • Can I bake these skewers instead? Yes, bake at 400°F for about 20-25 minutes, flipping halfway through.
  • Is this recipe gluten-free? Yes, just ensure your barbecue sauce is gluten-free.
  • Can I freeze leftover skewers? It’s best to consume them fresh, but you can freeze the marinated tofu before grilling.
  • How can I add more protein? Consider adding chickpeas or edamame to the skewers for an extra protein boost.
  • What should I serve with these skewers? Try serving them with a fresh salad, rice, or quinoa for a complete meal.

Nutritional Tips and Dietary Adaptations

These BBQ Tofu Veggie Skewers are not only delicious but also nutritious. Here are some tips:

  • Plant-Based Protein: Tofu is an excellent source of plant-based protein, making it a great choice for vegans and vegetarians.
  • Low in Calories: With lots of vegetables, these skewers are low in calories while providing essential nutrients.
  • Vegan-Friendly: This recipe is entirely vegan and can be adapted to suit various dietary requirements.
  • Gluten-Free Option: Use gluten-free barbecue sauce to make this dish suitable for gluten-sensitive individuals.

Essential Equipment Recommendations

Here’s what you’ll need to make the grilling process smoother:

  • Skewers: Metal skewers are reusable and easy to handle. If using wooden skewers, soak them in water for 30 minutes before grilling.
  • Grill or Grill Pan: A good-quality grill or grill pan is essential for achieving that perfect char.
  • Mixing Bowls: Use large bowls to prepare your marinade and vegetables for easy mixing.
  • Spatula or Tongs: Handy tools for flipping your skewers on the grill without losing any delicious bits!

Serving Suggestions

To complete your meal, consider these serving ideas:

  • Fresh Salad: Pair your skewers with a crisp green salad dressed in a light vinaigrette.
  • Grains: Serve over a bed of quinoa, couscous, or brown rice for added texture and nutrition.
  • Dipping Sauces: Offer a variety of dipping sauces like garlic aioli or spicy ketchup for extra flavor.
  • Wraps: Use the skewers to fill wraps with fresh greens and sauces for a portable meal option.

Now that you have all the tools and knowledge to create these delightful BBQ Tofu Veggie Skewers, it’s time to fire up your grill and enjoy! Remember, cooking is all about confidence and creativity—so have fun with it. Happy grilling!

Barbecue Tofu Veggie Skewers

Prep Time 20 minutes
Cook Time 10 minutes
Total Time 30 minutes
Servings 4 servings
Calories 250
Enjoy these flavorful grilled tofu and vegetable skewers brushed with barbecue sauce, perfect for a quick and healthy meal.

Ingredients

Tofu

  • 14 ounce extra firm tofu (pressed and cubed)
  • 3 tablespoons olive oil
  • 2 teaspoon cumin
  • 1.5 teaspoon hot smoked paprika
  • 0.5 teaspoon onion powder
  • 0.5 teaspoon garlic powder
  • 0.5 teaspoon kosher salt
  • 0.25 teaspoon black pepper

Vegetables

  • 2 small zucchini (sliced into 1/4-inch rounds)
  • 2 small yellow squash (sliced into 1/4-inch rounds)
  • 2 red red peppers (diced 1 inch)
  • 1 small red onion (diced 1 inch)
  • 0.25 cup barbecue sauce

Chopped fresh parsley

Instructions 

  • Preheat grill to medium-high. Press and cube tofu.
  • Mix 2 tbsp olive oil, cumin, paprika, onion powder, garlic powder, salt, and pepper. Coat tofu in mixture.
  • Toss vegetables with 1 tbsp olive oil, salt, and pepper. Thread tofu and vegetables onto skewers.
  • Grill skewers until charred and grill marks appear, about 2 minutes per side. Brush with barbecue sauce in last minutes.
  • Sprinkle with parsley before serving.

Notes

Soak wooden skewers in water if using before grilling to prevent burning.
Calories: 250kcal
Cost: $15
Course: Main Course
Cuisine: American
Keyword: Grill, Tofu, Vegetables

Elevate Your Meals with This Delightful Garden Pasta Salad

Welcome to a vibrant culinary experience that brings the freshness of the garden right to your table! This Garden Pasta Salad is not just a side dish; it’s a celebration of flavors, colors, and textures that will brighten any meal. In just a few simple steps, you can whip up this delightful dish that’s perfect for busy weeknights or sunny picnics. Packed with fresh vegetables and a zesty dressing, this recipe will leave everyone asking for seconds. Let’s dive into why you’ll absolutely love this garden pasta salad!

Why You’ll Love This Recipe

  • Quick and easy preparation: This salad comes together in under 30 minutes, making it a great choice for last-minute gatherings.
  • Endless customization: The recipe is versatile; swap in your favorite vegetables or proteins to make it your own.
  • Perfect for meal prep: Make this salad ahead of time and store it in the fridge for an easy grab-and-go lunch or side dish.
  • Healthy and satisfying: Bursting with fresh produce, this salad is not just good for your taste buds but also for your health.
  • Great for any occasion: Whether it’s a summer BBQ or a cozy family dinner, this dish fits right in!

Ingredient Breakdown

Let’s explore the vibrant ingredients that make this garden pasta salad shine. Here’s what you’ll need:

  • 12 oz rotini pasta: Any short pasta works, but rotini holds the dressing beautifully.
  • 1 cup cherry tomatoes: Halved for sweetness and color.
  • 1 cup cucumber: Diced for crunch and freshness.
  • 1/2 cup red bell pepper: Adds a sweet, crisp bite.
  • 1/2 cup yellow bell pepper: For a pop of color and flavor.
  • 1/4 cup red onion: Finely chopped for a mild onion flavor.
  • 1/2 cup shredded carrots: Adds sweetness and texture.
  • 1/4 cup black olives: Sliced for a briny depth of flavor.
  • 1/4 cup fresh parsley: Chopped for a burst of freshness.
  • 1/4 cup fresh basil: Adds a fragrant touch.
  • 1/3 cup extra-virgin olive oil: The base of our delicious dressing.
  • 3 tbsp lemon juice: Freshly squeezed for brightness.
  • 1 tsp Dijon mustard: For a hint of tang and depth.
  • 1 clove garlic: Minced for flavor.
  • 1/2 tsp salt: Adjust to taste.
  • 1/4 tsp black pepper: Freshly ground, for extra flavor.
  • 1/2 tsp sugar or honey (optional): Balances the acidity of the dressing.

How to Make Garden Pasta Salad

Close-up view of a fresh Garden Pasta Salad with rotini pasta, cherry tomatoes, and diced cucumbers.

Now that you have your ingredients ready, let’s get cooking! Follow these simple steps to create your garden pasta salad:

  1. Cook the pasta: In a large pot, bring salted water to a boil. Add the rotini and cook according to package instructions until al dente. Drain and rinse under cold water to stop the cooking process.
  2. Prep the veggies: While the pasta cooks, chop your vegetables. Aim for uniform sizes for even texture.
  3. Make the dressing: In a small bowl, whisk together the olive oil, lemon juice, Dijon mustard, garlic, salt, pepper, and sugar or honey until well combined.
  4. Combine pasta and veggies: In a large mixing bowl, combine the cooled pasta with the chopped vegetables.
  5. Add the dressing: Pour the dressing over the pasta and veggies, then toss gently until everything is well-coated.
  6. Chill and serve: For best flavor, let the salad chill in the refrigerator for at least 30 minutes before serving. This allows the flavors to meld beautifully!

Pro Tips for Success

  • Don’t overcook the pasta: Aim for al dente to keep the pasta firm and avoid mushiness.
  • Use fresh herbs: Fresh parsley and basil elevate the flavors significantly. Dried herbs won’t provide the same freshness.
  • Adjust dressing to taste: Feel free to tweak the dressing ingredients according to your preference for acidity or flavor.
  • Mix in proteins: For a heartier salad, consider adding grilled chicken, chickpeas, or crumbled feta cheese.
  • Store properly: Keep leftovers in an airtight container in the fridge for up to 3 days. Just give it a good stir before serving.
  • Experiment with flavors: Add different spices or dressings to keep it interesting; try a balsamic vinaigrette for a twist!
  • Keep it colorful: Use a variety of vegetables to make your salad visually appealing and nutritious.
  • Serve it family-style: Present the salad in a large bowl for a communal feel at your dining table.

Common Mistakes and Troubleshooting

Even the best chefs can make mistakes! Here are some common pitfalls and how to avoid them:

  • Too much dressing: Start with less dressing and add more as needed. It’s easier to add than to take away!
  • Soggy veggies: Make sure to dry your vegetables thoroughly after washing to avoid excess moisture.
  • Not enough flavor: Taste and adjust seasoning before serving; you can always add more salt, pepper, or acidity.
  • Over-chilling: If left too long in the fridge, the salad can become limp. Serve within 1-2 days for best texture.
  • Ignoring leftovers: Use any leftover salad to top a wrap or as a filling for a sandwich to minimize waste.

Variations to Try

Want to mix things up? Here are some delicious variations to try:

  • Italian Garden Pasta Salad: Add salami, mozzarella balls, and Italian seasoning for a hearty twist.
  • Mediterranean Pasta Salad: Incorporate sun-dried tomatoes, artichokes, and feta cheese for a Greek-inspired version.
  • Asian-Inspired Salad: Swap in soba noodles, add edamame, and toss with a sesame-ginger dressing.
  • Protein-Packed Salad: Mix in grilled shrimp or chicken for a complete meal that’s filling and nutritious.

Storage and Make-Ahead Instructions

This garden pasta salad is perfect for meal prep! Here’s how to store it:

  • Refrigerator: Store in an airtight container for up to 3 days. The flavors will continue to develop as it sits.
  • Freezer: It’s best not to freeze this salad, as the vegetables may lose their texture. Stick to the fridge for optimal freshness.
  • Make-ahead: Prepare the salad a day in advance. Just hold off on adding delicate herbs until serving time to keep them fresh.

Frequently Asked Questions (FAQs)

Got questions? We’ve got answers! Here are some common queries about garden pasta salad:

  • Can I use gluten-free pasta? Absolutely! Gluten-free pasta works just as well in this salad.
  • How can I make it vegan? Simply omit any cheese and use a vegan-friendly dressing.
  • What’s the best way to serve it? This salad is best served chilled, making it perfect for summer picnics and potlucks.
  • Can I add fruits? Yes! Chopped apples or grapes can add a sweet twist to your salad.
  • How do I keep the salad from getting soggy? Ensure all ingredients are dry before mixing, and don’t overdress it.
  • What dressing goes well with this salad? A simple vinaigrette or lemon-based dressing complements the flavors beautifully.
  • How can I make it more filling? Add protein sources like grilled chicken, chickpeas, or beans.
  • Can I use frozen vegetables? While fresh is best, you can use thawed frozen veggies in a pinch.

Nutritional Information

This garden pasta salad is not only delicious but also packed with nutrients. Here’s a quick look at the nutritional benefits:

  • Rich in vitamins: The variety of fresh vegetables provides essential vitamins and minerals.
  • Balanced macronutrients: With carbs from pasta, healthy fats from olive oil, and fiber from veggies, it’s a balanced dish.
  • Low in calories: Light and refreshing, this salad is a guilt-free addition to your meals.

Essential Kitchen Equipment

Before you start cooking, make sure you have the following kitchen essentials:

  • Large pot: For boiling pasta.
  • Colander: To drain and rinse the pasta.
  • Mixing bowl: A large bowl for combining all ingredients.
  • Whisk: For mixing the dressing perfectly.
  • Cutting board and knife: Essential for chopping vegetables.

Serving Suggestions

Ready to serve your gorgeous garden pasta salad? Here are some creative serving ideas:

  • On a buffet: Serve in a large bowl for guests to help themselves.
  • In mason jars: For an individual serving option, layer the ingredients in jars for a portable lunch.
  • As a side: Pair with grilled meats or fish for a complete meal.
  • Garnished: Top with extra herbs or a sprinkle of cheese for added flair.

In conclusion, this Garden Pasta Salad is an incredible dish that embodies the essence of fresh ingredients and simple preparation. Whether you’re hosting a summer gathering or looking for a quick weeknight dinner, this recipe is sure to impress. Enjoy the process, and don’t forget to make it your own with your favorite ingredients. Happy cooking!

Garden Pasta Salad

Prep Time 15 minutes
Cook Time 10 minutes
Total Time 25 minutes
Servings 4 servings
Calories 350
A fresh and colorful pasta salad perfect for picnics and gatherings, combining vibrant vegetables with a tangy lemon-olive oil dressing.

Ingredients

Pasta

  • 12 oz rotini pasta (or your favorite short pasta)

Vegetables

  • 1 cup cherry tomatoes (halved)
  • 1 cup cucumber (diced)
  • 0.5 cup red bell pepper (diced)
  • 0.5 cup yellow bell pepper (diced)
  • 0.25 cup red onion (finely chopped)
  • 0.5 cup shredded carrots
  • 0.25 cup black olives (sliced)

Herbs and Dressing

  • 0.25 cup fresh parsley (chopped)
  • 0.25 cup fresh basil (chopped)
  • 0.33 cup extra-virgin olive oil
  • 3 tbsp lemon juice (freshly squeezed)
  • 1 tsp Dijon mustard
  • 1 clove garlic (minced)
  • 0.5 tsp salt (adjust to taste)
  • 0.25 tsp black pepper
  • 0.5 tsp sugar or honey (optional, balances acidity)

Instructions 

  • Cook the pasta according to package instructions, then drain and rinse with cold water.
  • In a large bowl, combine cooked pasta with chopped vegetables and herbs.
  • Whisk together olive oil, lemon juice, Dijon mustard, garlic, salt, pepper, and honey or sugar to make the dressing.
  • Pour the dressing over the pasta and vegetables, tossing to combine.
  • Serve immediately or refrigerate for up to 2 hours before serving.

Notes

For extra flavor, add some crumbled feta or grated Parmesan.
Calories: 350kcal
Cost: $12
Course: Salad
Cuisine: American
Keyword: Pasta