Author

Steven

Browsing

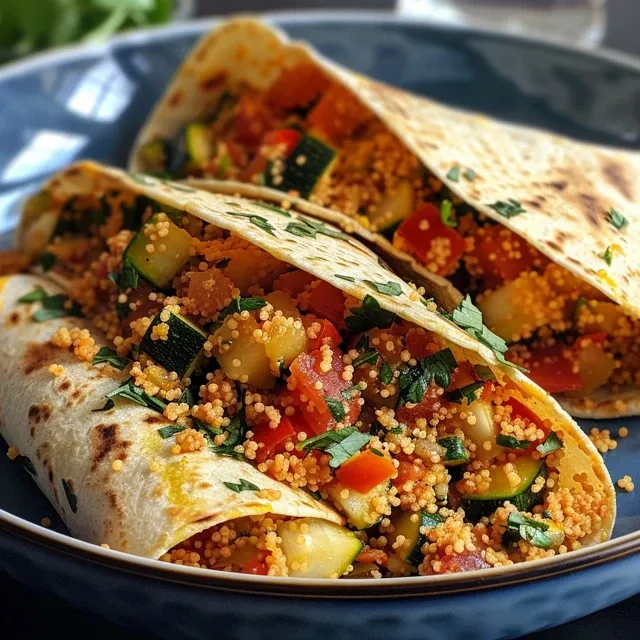
Your New Favorite Healthy Tuna Melt Wrap

Welcome to a delicious culinary journey! Today, we’re diving into a simple yet flavorful recipe that is bound to become your new go-to meal: the Healthy Tuna Melt Wrap. This scrumptious wrap combines protein-packed tuna with fresh ingredients, making it perfect for a quick lunch or dinner. Let’s explore this easy recipe that not only satisfies your cravings but also keeps your health in check!

Why You’ll Love This Recipe

This Healthy Tuna Melt Wrap is more than just a meal; it’s a delightful experience! Here are five reasons why you’ll adore it:

  • Quick to Prepare: Ready in just 15 minutes, perfect for busy weeknights or a quick lunch!
  • Nutritious and Filling: Packed with protein from tuna, fiber from veggies, and healthy fats, it’s a balanced meal.
  • Customizable: Easily adjust ingredients and flavors to suit your taste preferences!
  • Kid-Friendly: A fun and delicious way to introduce healthy ingredients to your little ones.
  • Great for Meal Prep: Make a batch ahead of time for a convenient week of healthy eating.

Ingredients You’ll Need

Let’s gather our ingredients for this tuna melt wrap recipe. Here’s what you’ll need:

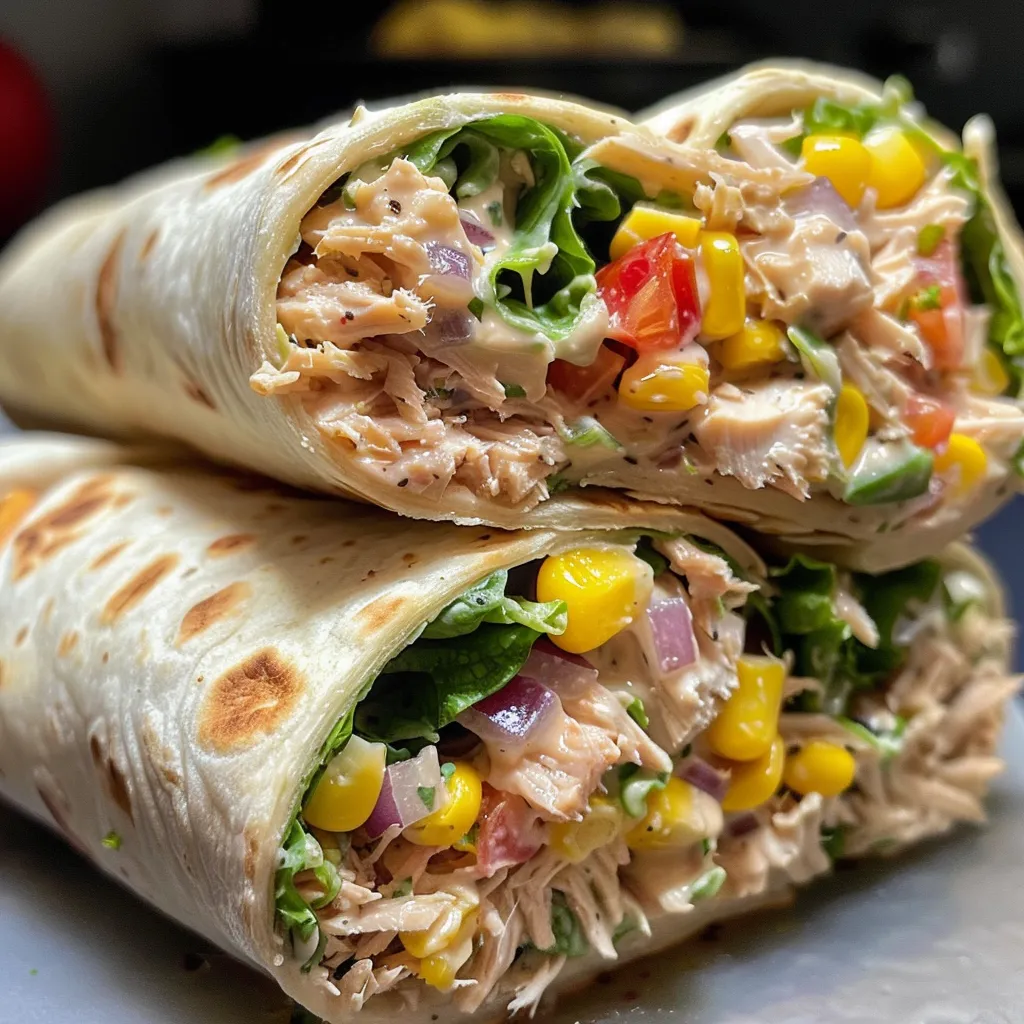
  • 1 can skipjack tuna (5 oz) or yellowfin tuna, drained
  • 2 tablespoons Greek yogurt: A healthier alternative to mayonnaise that adds creaminess and protein.
  • ½ tablespoon Dijon mustard: Adds a delightful tang; regular mustard can work too!
  • ½ lemon, juiced: About 1 tablespoon fresh lemon juice enhances flavor.
  • ¼ cup corn: Fresh or canned, for a sweet crunch.
  • ¼ cup red onion, diced: A little bite and crunch.
  • 1 tablespoon dill relish or capers: For a savory kick.
  • ½ teaspoon garlic powder: Adds aromatic flavor.
  • ¼ teaspoon black pepper: For seasoning.
  • ¼ cup shredded mozzarella cheese: Choose your favorite cheese for gooey deliciousness.
  • 1 large wrap: At least 10 inches; burrito-sized options like Siete or La Tortilla Factory work great!

Feel free to substitute ingredients based on your pantry. For example, you can replace Greek yogurt with sour cream or use a different cheese according to your preference.

How to Make Healthy Tuna Melt Wrap Recipe

Side view of a juicy tuna melt wrap showcasing its filling and texture.

Let’s turn those ingredients into a mouthwatering wrap! Follow these simple steps:

Step 1: Prepare the Tuna Mixture

In a mixing bowl, combine the drained canned tuna, Greek yogurt, Dijon mustard, and fresh lemon juice. Stir until well blended to create a creamy base for the wrap.

Step 2: Mix in the Veggies

Add the corn, diced red onion, dill relish or capers, garlic powder, and black pepper to the tuna mixture. Stir thoroughly to ensure all flavors are evenly incorporated.

Step 3: Assemble the Wrap

Lay the large wrap flat on a clean surface. Spread the prepared tuna mixture evenly over the center of the wrap, leaving space on the edges for folding. Sprinkle the shredded mozzarella cheese evenly on top of the tuna mixture.

Step 4: Cook the Wrap

Fold the sides of the wrap to enclose the filling securely. Place the wrap seam side down in a non-stick skillet or pan over medium heat. Cook for about 2-3 minutes on each side or until the wrap is golden brown and the cheese inside has melted.

Step 5: Serve and Enjoy

Remove the wrap from the skillet and let it cool slightly before slicing in half. Serve immediately for a warm, melty, and hearty meal!

Pro Tips for a Perfect Wrap

Want to elevate your tuna melt wrap? Here are some expert insights:

  • Use Fresh Ingredients: Fresh veggies enhance flavor and nutrition, so opt for the freshest produce you can find.
  • Don’t Overstuff: For easier rolling, avoid overfilling the wrap.
  • Toast Your Wrap: For an extra crispy texture, use a bit of butter or olive oil on the skillet before cooking.
  • Experiment with Cheese: Try different cheese varieties like sharp cheddar or pepper jack for a flavor twist!
  • Season to Taste: Adjust the seasoning—add more lemon juice or spices based on your flavor preference.
  • Keep it Warm: If making multiple wraps, keep them warm in a low oven until ready to serve.
  • Wrap It Right: Practice folding tightly to prevent any spillage while cooking.
  • Make it a Meal: Pair your wrap with a side salad or some baked sweet potato fries for a complete meal.

Variations to Try

Feeling adventurous? Here are some fun variations of the Healthy Tuna Melt Wrap:

  • Spicy Tuna Melt: Add diced jalapeños or a few dashes of hot sauce to the tuna mixture for a spicy kick!
  • Avocado Tuna Melt: Mash in half an avocado for creaminess and healthy fats.
  • Veggie-Packed Wrap: Toss in additional veggies like spinach, bell peppers, or cucumbers for extra crunch and nutrients.
  • Caprese Style: Add fresh basil and sliced tomatoes for a Mediterranean twist.

Storage and Make-Ahead Instructions

Want to prep ahead of time? Here’s how to store your delicious wraps:

  • Make Ahead: Prepare the tuna mixture in advance and store it in the fridge for up to 3 days.
  • Assemble and Store: You can assemble the wraps, but it’s best to store them ungrilled. Wrap them tightly in plastic wrap or foil and refrigerate for a day.
  • Freezing: For longer storage, freeze assembled but ungrilled wraps in an airtight container. Thaw in the fridge overnight before grilling.

Common Mistakes and Troubleshooting

Even the best chefs make mistakes! Here are some common pitfalls to avoid:

  • Soggy Wraps: Ensure that the tuna mixture isn’t too wet. Drain the tuna well and use less yogurt if needed.
  • Burnt Wraps: Keep an eye on the heat; cooking over medium heat is best for even cooking.
  • Filling Falling Out: Don’t overstuff the wrap. Leave enough space at the edges to fold securely.
  • Undercooked Cheese: Ensure the cheese is thoroughly melted by cooking for the full 2-3 minutes on each side.

FAQs About Healthy Tuna Melt Wrap

Here are some frequently asked questions about this wrap:

  • Can I use canned tuna in oil? Yes, but be aware that it will add extra calories and fat. Draining it well is essential.
  • What can I substitute for Greek yogurt? You can use sour cream, plain yogurt, or even mashed avocado for a different flavor.
  • Is this wrap suitable for meal prep? Absolutely! The tuna mixture can be made ahead and stored in the fridge for quick assembly later.
  • Can I make it gluten-free? Yes! Simply use a gluten-free wrap option.
  • What are some good sides to serve with it? Pair with a fresh salad, fruit, or baked chips for a complete meal!
  • How can I make it dairy-free? Substitute the cheese with dairy-free cheese or skip it altogether.
  • Is this recipe kid-friendly? Yes! Kids typically love wraps, and you can adjust the ingredients to their taste.
  • How long will leftovers last? The tuna mixture can last in the fridge for up to three days.

Nutrition Tips and Dietary Adaptations

Here are some tips to make this wrap fit your dietary needs:

  • Low-Carb Option: Use lettuce leaves instead of a wrap for a lighter version.
  • Higher Protein: Add chickpeas or white beans to the tuna mixture for extra protein.
  • Vegan Option: Substitute tuna with chickpeas or a plant-based tuna alternative mixed with vegan mayo.

Equipment Recommendations

To whip up this Healthy Tuna Melt Wrap, you’ll need:

  • Mixing Bowl: For combining the tuna mixture.
  • Skillet or Non-Stick Pan: For cooking the wrap to perfection.
  • Spatula: For flipping the wrap with ease.
  • Slicing Knife: For cutting the wrap in half for serving.

Serving Suggestions

Let’s make your meal a feast! Here are some serving ideas:

  • Fresh Salad: A side of mixed greens or a vibrant quinoa salad complements the wrap beautifully.
  • Chips or Fries: Pair with baked or sweet potato fries for a satisfying crunch.
  • Fruit Salad: Serve with a refreshing fruit salad for a sweet contrast.

Conclusion

With this Healthy Tuna Melt Wrap recipe, you’re not just making a meal; you’re creating a delightful experience that’s quick, simple, and oh-so-satisfying. Enjoy the flavors, the nourishment, and the joy of cooking! Remember, cooking should be fun and stress-free, so don’t hesitate to make it your own. Happy cooking, and enjoy your wrap!

Healthy Tuna Melt Wrap Recipe

Prep Time 10 minutes
Cook Time 6 minutes
Total Time 16 minutes
Servings 2 servings
Calories 350
A quick and nutritious wrap combining tuna, veggies, and melted cheese for a satisfying meal.

Ingredients

Canned Tuna

  • 5 oz skipjack or yellowfin tuna, drained
  • 2 tablespoons Greek yogurt
  • 0.5 tablespoon Dijon mustard
  • 0.5 lemon lemon juice (about 1 tablespoon)
  • 0.25 cup corn, fresh or canned
  • 0.25 cup red onion, diced (about ¼ of a medium red onion)
  • 1 tablespoon dill relish or capers
  • 0.5 teaspoon garlic powder
  • 0.25 teaspoon black pepper
  • 0.25 cup shredded mozzarella cheese (or cheese of choice)
  • 1 large wrap (at least 10 inches in size, burrito-sized brands like Siete or La Tortilla Factory recommended)

Instructions 

  • Combine tuna, Greek yogurt, Dijon mustard, and lemon juice in a bowl. Mix until smooth.
  • Add corn, red onion, relish or capers, garlic powder, and black pepper to the tuna mixture. Stir well.
  • Spread the mixture onto the center of the wrap, then sprinkle with cheese.
  • Fold the sides of the wrap to enclose the filling. Cook in a skillet over medium heat for 2-3 minutes per side until golden and cheese melts.
  • Let cool slightly, then slice in half and serve immediately.

Notes

For extra flavor, add fresh herbs or a dash of hot sauce.
Calories: 350kcal
Cost: $8
Course: Dinner, Lunch
Cuisine: American
Keyword: Healthy, Tuna, Wrap

Effortless Sheet-Pan Balsamic Chicken Veggies: Your New Weeknight Favorite

Welcome to a culinary adventure that transforms your weeknight dinners into something special without the fuss! In this guide, you’ll discover how to create a mouthwatering Sheet-Pan Balsamic Chicken Veggies that combines juicy chicken thighs and vibrant vegetables in one easy-to-clean pan. Perfect for busy evenings, this recipe highlights the harmonious blend of flavors that make it a family favorite. Ready to dive in? Let’s get cooking!

Why You’ll Love This Recipe

This dish is not just about convenience; it offers numerous benefits that will make you fall in love with it:

  • One-pan simplicity: Everything cooks together, saving you time on both prep and cleanup. Just toss everything on a sheet pan and let the oven do the work!
  • Flavor explosion: The balsamic glaze infuses the chicken and vegetables with a tangy-sweet flavor that tantalizes your taste buds.
  • Health-conscious meal: Packed with lean protein and nutrient-rich vegetables, this dish is not only satisfying but also supports your dietary goals.
  • Customizable: You can easily swap out ingredients based on what you have on hand or your personal preferences, making it adaptable for everyone.
  • Perfect for meal prep: This recipe is a fantastic option for prepping ahead of time, ensuring you have a healthy meal ready to go when you need it.

Ingredients Breakdown

To make this delicious dish, you’ll need the following ingredients:

  • 4 bone-in, skin-on chicken thighs: This cut provides moisture and flavor; alternatively, you can use boneless thighs for a quicker cook time.
  • 2 cups broccoli florets: Fresh broccoli adds crunch and nutrients; asparagus or green beans can be great substitutes!
  • 1 large red bell pepper, sliced: Adds sweetness and color; feel free to use any bell pepper or zucchini for variation.
  • 3 tablespoons balsamic vinegar: The star of the glaze, providing that signature tangy flavor.
  • 2 tablespoons olive oil: Helps to create a delicious roasting environment.
  • 1 teaspoon garlic powder: For an aromatic touch; fresh minced garlic works too.
  • ½ teaspoon salt and ¼ teaspoon black pepper: Essential for seasoning. Adjust to taste!
  • 1 tablespoon fresh thyme leaves: Adds a lovely herbal note; you can substitute with rosemary or Italian seasoning.

Step-by-Step Instructions

Side angle photo of juicy balsamic chicken thighs alongside colorful roasted vegetables on a sheet pan.

Follow these simple steps to prepare your Sheet-Pan Balsamic Chicken Veggies:

  1. Preheat your oven to 425°F (220°C) and line a large baking sheet with parchment paper or foil for easy cleanup.
  2. In a small bowl, whisk together the balsamic vinegar, olive oil, garlic powder, salt, and black pepper to create the glaze.
  3. Place the chicken thighs in the center of the baking sheet and generously brush both sides with the balsamic glaze.
  4. Arrange the broccoli florets and bell pepper slices around the chicken. Drizzle the remaining glaze over the vegetables.
  5. Roast everything for 25 to 30 minutes until the chicken skin is crispy and the internal temperature reaches 165°F (74°C), and the vegetables are tender. Stir the vegetables halfway through for even roasting.
  6. Once done, remove from the oven and sprinkle fresh thyme leaves over the dish. Let it rest for 5 minutes before serving to allow the juices to settle.
  7. Serve warm and enjoy your flavorful meal!

Pro Tips for Perfecting Your Dish

To ensure you get the most out of this recipe, here are some expert insights:

  • Marinate for deeper flavor: For an enhanced taste, marinate the chicken in the refrigerator for up to 4 hours before cooking.
  • Don’t overcrowd the pan: Space is key for even cooking; if needed, use a second baking sheet.
  • Experiment with veggies: Feel free to mix in seasonal vegetables like carrots or Brussels sprouts for variety.
  • Use a meat thermometer: This tool helps ensure your chicken is perfectly cooked without overdoing it.
  • Leftovers are a win: This dish holds up well in the fridge and makes for great lunch leftovers the next day.
  • Pair with a grain: Serve over rice or quinoa for a heartier meal.
  • Watch the cooking time: Depending on your oven, cooking times may vary slightly; keep an eye on the chicken’s internal temperature.
  • Add cheese: For an indulgent twist, sprinkle some feta or mozzarella over the veggies before roasting.

Common Mistakes and Troubleshooting

Cooking can sometimes be tricky, but here are common pitfalls and how to avoid them:

  • Dry chicken: Ensure not to overcook; use a meat thermometer to check for doneness.
  • Burnt vegetables: If your veggies are browning too quickly, cover the pan loosely with foil.
  • Flavorless dish: Make sure to season generously; taste the glaze before adding it to the chicken and veggies.
  • Sticking to the pan: Use parchment paper or foil to prevent sticking and make cleanup easier.

Variations to Spice Up Your Meal

This recipe is incredibly versatile. Here are some fun variations to try:

  • Honey Balsamic Chicken: Add a tablespoon of honey to the glaze for sweetness.
  • Spicy Kick: Incorporate red pepper flakes or sliced jalapeños for a spicy version.
  • Mediterranean Style: Add olives, sun-dried tomatoes, and feta cheese for a Mediterranean twist.
  • Asian-Inspired: Use soy sauce instead of balsamic vinegar and add snap peas and bell peppers.

Storage and Make-Ahead Instructions

If you want to prep this dish ahead of time, here’s how to store and reheat:

  • Make-Ahead: You can marinate the chicken and chop the vegetables up to a day in advance. Just store them separately in the fridge.
  • Storage: Keep leftovers in an airtight container in the refrigerator for up to 3 days.
  • Reheating: Reheat in the oven at 350°F (175°C) for about 15 minutes or until heated through.

Frequently Asked Questions

Here are some common questions about this recipe:

  • Can I use boneless chicken thighs? Yes, boneless thighs will cook faster, so adjust the cooking time accordingly.
  • What vegetables can I use? Feel free to swap in your favorites! Carrots, zucchini, and green beans work well.
  • Is this dish gluten-free? Yes, all ingredients are naturally gluten-free!
  • How can I make it dairy-free? This recipe is dairy-free as is; enjoy it without any dairy products!
  • Can I freeze the leftovers? Yes, you can freeze it in an airtight container for up to 3 months.
  • How do I know when the chicken is done? Use a meat thermometer to ensure it reaches 165°F (74°C).
  • Can I add more spices? Absolutely! Feel free to customize the spices to suit your taste!
  • What do I serve with this dish? It pairs wonderfully with rice, quinoa, or a fresh salad!

Nutritional Tips and Dietary Adaptations

This dish is not only delicious but also nutritious. Here are some tips for adapting it to various dietary needs:

  • High-Protein Option: Add beans or chickpeas to the mix for an extra protein boost.
  • Low-Carb Version: Serve over cauliflower rice instead of regular rice.
  • Vegan Adaptation: Substitute chicken with firm tofu and use vegetable broth instead of chicken juices.
  • Keto-Friendly: Stick to low-carb vegetables and use a sugar-free balsamic glaze.

Essential Equipment Recommendations

For this recipe, having the right tools can make a big difference:

  • Large Baking Sheet: A sturdy, rimmed baking sheet is essential for even roasting.
  • Parchment Paper or Foil: These help prevent sticking and make cleanup a breeze.
  • Meat Thermometer: Ensures your chicken is cooked perfectly every time.
  • Mixing Bowl: For whisking the glaze, a medium-sized bowl works best.

Serving Suggestions

To elevate your meal, consider these serving ideas:

  • Garnish with fresh herbs: Fresh parsley or basil can enhance the dish’s flavor and presentation.
  • Serve with a side salad: A simple green salad can complement the meal and add freshness.
  • Pair with a light wine: A crisp white wine like Sauvignon Blanc pairs beautifully with the balsamic flavors.
  • Enjoy with crusty bread: Great for soaking up any leftover glaze on your plate!

Now you have everything you need to create an unforgettable Sheet-Pan Balsamic Chicken Veggies dinner. Remember, cooking is all about experimentation and having fun—so don’t stress about getting it perfect. Enjoy the process, and most importantly, enjoy the delicious meal you’ve created!

Sheet-Pan Balsamic Chicken Veggies

Prep Time 10 minutes
Cook Time 30 minutes
Total Time 40 minutes
Servings 4 servings
Calories 450
A flavorful and easy sheet-pan meal featuring crispy chicken thighs roasted with vibrant vegetables and a tangy balsamic glaze.

Ingredients

Meat

  • 4 pieces bone-in, skin-on chicken thighs
  • 2 cups broccoli florets
  • 1 large red bell pepper, sliced
  • 3 tablespoons balsamic vinegar
  • 2 tablespoons olive oil
  • 1 teaspoon garlic powder
  • ½ teaspoon salt
  • ¼ teaspoon black pepper
  • 1 tablespoon fresh thyme leaves

Instructions 

  • Preheat oven to 425°F (220°C) and line a baking sheet with parchment or foil.
  • Whisk balsamic vinegar, olive oil, garlic powder, salt, and black pepper to make the glaze.
  • Place chicken on the sheet, brush with glaze, then arrange vegetables around it. Drizzle remaining glaze over vegetables.
  • Roast for 25-30 minutes until chicken skin is crispy, internal temp reaches 165°F (74°C), and vegetables are tender. Stir vegetables halfway.
  • Remove from oven, sprinkle thyme, rest for 5 minutes, then serve warm.

Notes

For extra flavor, marinate the chicken in the glaze for 30 minutes before roasting.
Calories: 450kcal
Cost: $15
Course: Main Course
Cuisine: American
Keyword: Balsamic, Chicken, sheet pan

Bright and Fresh Mayo-Free Lemon Dill Potato Salad You’ll Love

If you’re looking for a refreshing and healthy twist on a classic dish, you’ve come to the right place! This **Lemon Dill Potato Salad** is a delightful option that captures the bright flavors of lemon and fresh herbs, all without a drop of mayo. Perfect for picnics, barbecues, or as a side dish for any meal, this salad is both easy to make and incredibly satisfying. In this guide, I’ll walk you through every step to ensure your potato salad is not only delicious but also a showstopper.

Why You’ll Love This Recipe

  • Light and Healthy: This salad is made without mayo, making it a guilt-free choice that’s still full of flavor.
  • Quick to Prepare: With minimal cooking and prep time, you can whip this dish up in under 30 minutes!
  • Versatile Ingredients: You can easily substitute or add your favorite herbs and veggies to make it your own.
  • Great for Meal Prep: Prepare it ahead of time and enjoy it throughout the week for lunches or side dishes.
  • Perfect for Any Occasion: Whether it’s a summer barbecue or a cozy family dinner, this salad fits right in!

Ingredients You’ll Need

To make this healthy lemon dill potato salad, gather the following ingredients:

  • 500 g Baby Potatoes: These are perfect for their creamy texture and small size, which makes them easy to cook and eat.
  • 1 teaspoon Salt: Essential for enhancing the flavor of the potatoes.
  • 1/4 cup Dill (chopped): Fresh dill adds a vibrant flavor that pairs beautifully with lemon.
  • 1/4 cup Spring Onion Greens (finely chopped): These add a mild onion flavor without overpowering the dish.
  • 1/4 cup Extra Virgin Olive Oil: Provides richness and helps the flavors meld together.
  • 2 tablespoons Lemon Juice: Fresh lemon juice brightens the salad and balances the flavors.
  • 1 Lemon (zest): Zesting adds an extra layer of citrus flavor.
  • 1 Garlic Clove (finely minced): Adds depth and aromatic qualities.
  • 2 tablespoons Dijon Mustard: Gives a slight tanginess and creaminess to the dressing.
  • 1/2 teaspoon Salt: For seasoning the dressing.
  • 1/4 teaspoon Black Pepper (ground): Adds a mild spiciness.
  • 1/2 teaspoon Sugar: This helps balance the acidity of the lemon.

How to Make Healthy Lemon Dill Potato Salad

Side view of freshly prepared lemon dill potato salad garnished with herbs.

Follow these simple steps to prepare your potato salad:

  1. Cook the Potatoes: Cut the baby potatoes in half while leaving the skin on. Place them in a pot, cover with water, and add 1 teaspoon of salt. Bring to a boil and then cover, allowing them to simmer for about 15-20 minutes until fork-tender.
  2. Prepare the Dressing: While the potatoes are cooking, combine the olive oil, lemon juice, lemon zest, minced garlic, Dijon mustard, remaining salt, black pepper, and sugar in a bowl. Whisk until well combined.
  3. Combine Ingredients: Once the potatoes are cooked, drain them and place them in a large bowl. Add the chopped dill and spring onions.
  4. Add the Dressing: Pour the dressing over the warm potatoes, tossing gently to combine. This helps the potatoes soak up the dressing for maximum flavor.
  5. Let it Rest: Allow the salad to sit for at least 10 minutes before serving. This resting time lets the flavors meld beautifully.

Pro Tips for the Best Potato Salad

  • Choose the Right Potatoes: Baby potatoes or Yukon golds work best for their creamy texture.
  • Don’t Overcook: Keep an eye on your potatoes; overcooked potatoes can become mushy.
  • Warm Potatoes: Tossing the dressing with warm potatoes allows them to absorb more flavors.
  • Fresh Herbs: Always go for fresh herbs; they make a noticeable difference in flavor.
  • Adjust to Taste: Don’t hesitate to adjust salt, lemon, or mustard according to your preference.
  • Make it Colorful: Add in colorful veggies like bell peppers or carrots for an extra crunch.
  • Chill Before Serving: For the best flavor, refrigerate the salad for an hour before serving.
  • Balance Flavors: Taste the salad before serving and adjust with more lemon juice or salt if needed.

Common Mistakes and Troubleshooting

Here are some pitfalls to avoid when making your lemon dill potato salad:

  • Overcooking Potatoes: This leads to a mushy texture; aim for fork-tender but not falling apart.
  • Skipping the Resting Time: Don’t rush this step! Letting the salad sit helps flavors meld.
  • Using Dried Herbs: While you can use dried herbs in a pinch, fresh herbs are key for this recipe.
  • Not Tasting Before Serving: Always taste your salad for seasoning—we all have different preferences!

Variations to Try

Put your own spin on this delicious dish with these variations:

  • Vegan Option: Use vegan mayo or simply increase the olive oil for creaminess.
  • Spicy Kick: Add a touch of red pepper flakes or diced jalapeños for heat.
  • Crunchy Additions: Toss in diced celery or chopped pickles for added crunch and flavor.
  • Herb Mix: Mix in parsley, chives, or tarragon for different herbal notes.

Storage and Make-Ahead Instructions

Want to prepare this salad in advance? Follow these storage tips:

  • Refrigeration: Store the salad in an airtight container in the fridge for up to 3 days.
  • Make Ahead: You can prepare the salad a day in advance; just add the dressing right before serving.
  • Freezing Not Recommended: This salad doesn’t freeze well due to the potatoes’ texture changing.

Nutrition Tips and Dietary Adaptations

This salad is naturally low in calories and packed with nutrients. Here’s how to adapt it further:

  • Gluten-Free: This recipe is inherently gluten-free, making it suitable for those with gluten sensitivities.
  • Low-Carb Variation: Substitute potatoes with cauliflower for a low-carb version.
  • High-Protein Additions: Mix in chickpeas or grilled chicken for a protein boost.

Equipment Recommendations

For best results, here’s a short list of handy kitchen tools:

  • Large Pot: For boiling the potatoes efficiently.
  • Mixing Bowl: A large bowl to combine all ingredients comfortably.
  • Whisk: Essential for mixing the dressing smoothly.
  • Cutting Board and Knife: For prepping your ingredients with ease.

Serving Suggestions

Pair this lemon dill potato salad with:

  • Grilled Meats: Perfect alongside grilled chicken or steak.
  • Sandwiches: A great side for any sandwich or wrap.
  • Picnic Fare: Ideal for taking to picnics or potlucks.
  • Fresh Greens: Serve over a bed of mixed greens for a light lunch.

Frequently Asked Questions

Here are some common questions about making lemon dill potato salad:

  • Can I use other types of potatoes? Yes! While baby potatoes are ideal, you can use Yukon gold or red potatoes.
  • How long can I store this salad? It stays fresh in the fridge for up to 3 days.
  • Can I make it vegan? Absolutely! Just increase the olive oil or add a vegan mayo substitute.
  • Is this salad gluten-free? Yes, this recipe is naturally gluten-free.
  • Can I add other ingredients? Feel free to get creative! Try adding celery, bell peppers, or even bacon for flavor.
  • What’s the best way to serve it? This salad is best served chilled, so refrigerate it before serving for optimal taste.
  • Can I make this ahead of time? Yes! You can prepare it a day in advance and add the dressing right before serving.
  • What should I do if I overcook the potatoes? If they become mushy, consider mashing them for a different dish, like potato salad dip!

In conclusion, making a **Healthy Lemon Dill Potato Salad** is a delightful journey filled with fresh flavors and satisfying textures. With this guide, you have everything you need to craft a perfect potato salad that will impress your family and friends. Remember, cooking is all about enjoying the process, so relax, have fun, and savor every bite of your delicious creation!

Healthy Lemon Dill Potato Salad No Mayo

Prep Time 10 minutes
Cook Time 20 minutes
Total Time 30 minutes
Servings 4 servings
Calories 250
A light and flavorful potato salad featuring fresh dill, spring onions, and a zesty lemon dressing, perfect for a healthy meal.

Ingredients

Main

  • 500 g Baby Potatoes (whole, with skin)
  • 1 teaspoon Salt (for boiling)
  • 0.25 cup Dill chopped
  • 0.25 cup Spring Onion Greens finely chopped
  • 0.25 cup Olive Oil Extra Virgin
  • 2 tablespoons Lemon Juice
  • 1 lemon Lemon zest
  • 1 clove Garlic finely minced
  • 2 tablespoons Dijon Mustard
  • 0.5 teaspoon Salt (for dressing)
  • 0.25 teaspoon Black Pepper ground
  • 0.5 teaspoon Sugar

Instructions 

  • Boil potatoes in salted water for 15-20 minutes until fork-tender. Drain and set aside.
  • Whisk together lemon juice, lemon zest, garlic, Dijon mustard, olive oil, salt, pepper, and sugar to make the dressing.
  • Add dill and spring onions to the potatoes, pour the dressing over, and toss gently.
  • Let sit for at least 10 minutes before serving to allow flavors to meld.

Notes

This salad is best enjoyed fresh and can be stored in the refrigerator for up to 2 days.
Calories: 250kcal
Cost: $10
Course: Salad
Cuisine: Healthy
Keyword: Potatoes

Elevate Your Weeknight Dinners with This Spicy Ground Beef Stir-Fry Bowl

Welcome to your new dinner hero! This Spicy Ground Beef Stir-Fry Bowl is not just another recipe; it’s a culinary adventure that takes you from a busy day to a delightful meal in under 30 minutes. Packed with vibrant flavors and colorful veggies, this dish promises satisfaction without the fuss. With easy steps and accessible ingredients, you’ll feel confident creating a delicious stir fry that will impress everyone at your table. Let’s dive into why this dish is destined to become a staple in your kitchen!

Why You’ll Love This Recipe

  • Quick and Easy: Ready in just 30 minutes, perfect for busy weeknights or last-minute dinner plans.
  • Flavor Packed: The combination of garlic, soy sauce, and chili flakes creates a savory explosion that tantalizes your taste buds.
  • Versatile Ingredients: Customize with whatever vegetables you have on hand—this stir fry welcomes all!
  • Healthy Options: Use lean ground turkey or chicken for a lighter take without sacrificing flavor.
  • Meal Prep Friendly: Make a big batch and store leftovers for easy lunches throughout the week.

Ingredients Breakdown

Here’s what you’ll need to whip up this delightful stir fry:

  • 1 lb Ground Beef: Provides a hearty base; feel free to substitute with ground turkey or chicken for a leaner option.
  • 0.25 cup Soy Sauce: Adds umami flavor; opt for low-sodium soy sauce for a healthier twist.
  • 1 tsp Chili Flakes: Adjust based on your spice tolerance for the perfect kick.
  • 2 tbsp Brown Sugar: Balances the savory flavors; honey or maple syrup works well too.
  • 2 tbsp Sesame Oil: For a nutty aroma; you can use vegetable oil if preferred.
  • 4 cloves Garlic: Fresh garlic enhances the overall flavor profile.
  • 2 cups Broccoli Florets: Rich in nutrients; substitute with bok choy or snap peas if desired.
  • 1 medium Red Bell Pepper: Adds sweetness; yellow or green bell peppers are great alternatives.
  • 1 medium Zucchini: Provides a nice texture; feel free to swap with eggplant or yellow squash.
  • 1 cup Mushrooms: Any variety works well, adding depth to the dish.
  • 2 tbsp Olive Oil: A good cooking oil; can also use vegetable or canola oil.
  • 4 cups Steamed White Rice: The perfect base for your stir fry; brown rice or quinoa can add extra fiber.

How to Make This Spicy Ground Beef Stir-Fry Bowl

A colorful serving of Spicy Ground Beef Stir-Fry featuring garlic-infused veggies.

Follow these simple steps to create your stir fry:

  1. Prepare the Ingredients: Chop all vegetables into bite-sized pieces for even cooking. Mince the garlic and set aside.
  2. Cook the Ground Beef: In a large skillet or wok, heat 1 tablespoon of olive oil over medium-high heat. Add the ground beef and cook until browned, breaking it apart with a spatula.
  3. Add the Garlic: Stir in the minced garlic and cook for an additional 1-2 minutes until fragrant.
  4. Introduce the Veggies: Add broccoli, bell pepper, zucchini, and mushrooms to the skillet. Stir-fry for about 5 minutes or until veggies are tender yet crisp.
  5. Season the Stir Fry: Pour in soy sauce, brown sugar, and chili flakes. Toss everything together, cooking for another 2-3 minutes.
  6. Prepare the Rice: While the stir fry is cooking, steam the rice according to package instructions.
  7. Serve: Once everything is well combined and heated through, serve the stir fry over a bed of rice. Enjoy!

Pro Tips for the Best Stir-Fry

  • High Heat Cooking: Stir-frying is all about high heat to get that perfect sear on the meat and veggies.
  • Don’t Overcrowd the Pan: Cook in batches if necessary to maintain the right temperature and ensure even cooking.
  • Prep Ahead: Chop your veggies and marinate the beef the day before to save time.
  • Experiment with Flavors: Try adding ginger or hoisin sauce for a different flavor profile.
  • Use Fresh Ingredients: Fresh garlic and seasonal vegetables yield the best taste.
  • Cook Rice Ahead: Prepare rice in advance to save time during the cooking process.
  • Adjust Spice Levels: Start with a small amount of chili flakes and increase to taste.
  • Garnish Wisely: Top your dish with sesame seeds or green onions for added crunch and flavor.

Common Mistakes and Troubleshooting

Even the best cooks can run into issues. Here are some common pitfalls and how to avoid them:

  • Beef Sticking to the Pan: Ensure your skillet is well-oiled and preheated to avoid sticking.
  • Overcooked Vegetables: Keep an eye on cooking times; vegetables should be cooked until tender but still crisp.
  • Too Salty: If the dish turns out too salty, add a splash of water or more vegetables to balance the flavors.
  • Rice Clumping: Rinse rice before cooking to remove excess starch, resulting in fluffy grains.

Variations to Try

Don’t hesitate to get creative! Here are some variations you can try:

  • Veggie-Loaded Version: Add more veggies like snap peas, carrots, or green beans for a nutrient boost.
  • Spicy Peanut Sauce: Mix in a homemade peanut sauce for a nutty kick.
  • Asian-Inspired: Use oyster sauce and add bok choy for an Asian twist.
  • Protein Swap: Replace ground beef with tofu or shrimp for a different protein option.

Storage and Make-Ahead Instructions

This stir fry is perfect for meal prep! Here’s how to store and reheat:

  • Refrigeration: Store in an airtight container in the fridge for up to 3 days.
  • Freezing: Freeze portions in freezer-safe containers for up to 2 months; defrost in the fridge before reheating.
  • Reheating: Warm in the microwave or on the stovetop until heated through. Add a splash of water to keep it moist.

Frequently Asked Questions

  • Can I use frozen vegetables? Yes, frozen veggies can be a great time-saver—just adjust the cooking time accordingly.
  • What can I serve with this stir fry? It pairs wonderfully with steamed rice, quinoa, or even noodles.
  • Can I add more spice? Absolutely! Incorporate fresh chili peppers or a dash of sriracha for extra heat.
  • Is this dish gluten-free? Use tamari instead of soy sauce for a gluten-free option.
  • How can I make it vegetarian? Swap out the ground beef for tofu or tempeh and use vegetable broth instead of soy sauce.
  • What’s the best way to cook rice? Follow the package instructions, or use a rice cooker for perfect results every time.
  • Can I make this ahead of time? Yes! Prepare everything in advance and stir-fry just before serving for optimal freshness.
  • How do I store leftovers? Refrigerate in an airtight container for up to 3 days or freeze for longer storage.

Nutrition Tips and Dietary Adaptations

This recipe is not only delicious but can also be tailored to fit various dietary needs:

  • Low-Carb Option: Serve over cauliflower rice instead of regular rice for a lower-carb alternative.
  • High-Protein Variant: Use extra lean ground beef or add beans for an added protein punch.
  • Dairy-Free: This dish is naturally dairy-free, making it suitable for those with lactose intolerance.

Essential Equipment for Success

Here’s what you’ll need:

  • Large Skillet or Wok: Essential for stir-frying over high heat.
  • Spatula: A sturdy spatula is necessary for tossing ingredients.
  • Measuring Cups and Spoons: For precise ingredient measurements.
  • Knife and Cutting Board: For chopping vegetables and prepping ingredients.

Serving Suggestions

This stir fry is fantastic on its own but can be enhanced with a few simple additions:

  • Fresh Herbs: Top with chopped cilantro or green onions for a fresh burst of flavor.
  • Sesame Seeds: Sprinkle toasted sesame seeds before serving for added texture.
  • Lime Wedges: Serve with lime wedges for a zesty finish that brightens the dish.

Now that you have all the tools and tips, it’s time to unleash your inner chef and create this Spicy Ground Beef Stir-Fry Bowl! Remember, cooking is about enjoying the process and experimenting with flavors. Don’t be afraid to make it your own, and soon you’ll be serving up this delightful dish to family and friends. Happy cooking!

Spicy Ground Beef Stir-Fry Bowl with Garlic Veggies Delight

Prep Time 10 minutes
Cook Time 15 minutes
Total Time 25 minutes
Servings 4 servings
Calories 550
A flavorful and healthy stir-fry featuring ground beef, vibrant vegetables, and a spicy sauce served over steamed rice.

Ingredients

Meat

  • 1 lb Ground Beef Substitute (ground turkey or chicken) (Use leaner option if desired)
  • 0.25 cup Soy Sauce (Use low-sodium for healthier option)
  • 1 tsp Chili Flakes (Adjust according to spice preference)
  • 2 tbsp Brown Sugar (Honey or maple syrup can be used as alternatives)
  • 2 tbsp Sesame Oil (Can substitute with vegetable oil)
  • 4 cloves Garlic (Use fresh for best flavor)
  • 2 cups Broccoli Florets (Substitute with bok choy or snap peas)
  • 1 medium Red Bell Pepper (Yellow or green are suitable substitutes)
  • 1 medium Zucchini (Can replace with eggplant or yellow squash)
  • 1 cup Mushrooms (Any type works well)
  • 2 tbsp Olive Oil (Can use vegetable or canola oil instead)
  • 4 cups Steamed White Rice (Brown rice or quinoa can add fiber)

Instructions 

  • Cook rice and set aside.
  • Heat sesame oil in a large skillet over medium-high heat.
  • Add ground beef and cook until browned, then add garlic and cook for 1 minute.
  • Stir in soy sauce, chili flakes, brown sugar, and vegetables; cook until vegetables are tender.
  • Serve the beef and vegetable mixture over steamed rice.

Notes

For extra flavor, garnish with chopped green onions or sesame seeds.
Calories: 550kcal
Cost: $15
Course: Main Course
Cuisine: Asian
Keyword: Stir Fry

Welcome to a delightful culinary adventure! If you’re looking for a simple yet satisfying meal, you’ve landed in the right spot. These Couscous Vegetable Wraps are not only quick to prepare but also packed with flavor and nutrients. Perfect for those hectic weeknights when time is short but the desire for a delicious meal is strong. Let’s dive into this exciting recipe that will surely become a weeknight staple in your kitchen!

Why You’ll Love This Recipe

  • Quick Preparation: With a total cook time of just 25 minutes, this recipe is ideal for busy lifestyles.
  • Flavor Fusion: The combination of spices and fresh vegetables creates a taste sensation that will leave your taste buds dancing.
  • Healthier Option: Packed with veggies, these wraps are not only delicious but also loaded with nutrients.
  • Customizable: Feel free to mix and match your favorite vegetables and spices to make this recipe your own.
  • Perfect for Meal Prep: These wraps are great for making ahead and can be enjoyed cold, making them ideal for lunches or quick dinners!

Ingredient Breakdown

Let’s gather our ingredients for this wholesome dish:

  • Weizen-Wraps Tortillas (4): These provide a soft, pliable base for your wraps. You can substitute with whole wheat or gluten-free tortillas if needed.
  • Instant Couscous (125 g): A quick-cooking grain that adds texture and heartiness. Quinoa can be a good substitute if you prefer.
  • Water (125 ml): Essential for cooking the couscous. Broth can be used for added flavor.
  • Paprika (1): Sweet or smoked, this adds a rich flavor to the filling.
  • Zucchini (1): Fresh and vibrant, zucchini enhances the texture. Feel free to swap for other seasonal veggies.
  • Frühlingszwiebel (1): Green onions add a mild onion flavor and crunch. Regular onions can be used as an alternative.
  • Olivenöl (2 EL): For sautéing vegetables, bringing a richness to the dish.
  • Tomatenmark (1 EL): Tomato paste thickens the filling and adds depth of flavor.
  • Spices: Kreuzkümmel (1 TL), Chilipulver (1/2 TL), Paprikapulver (1 TL), Meersalz (1 TL), Pfeffer: These spices elevate the flavor profile of the wraps.
  • Petersilie (1/4 Bund): Fresh parsley brightens the dish with its fresh notes.
  • Zitronensaft (2 TL): A splash of lemon juice adds acidity that balances the flavors.
  • Schmand (200 g): For a creamy finish. You can use Greek yogurt as a healthier alternative.

Step-by-Step Instructions

Ready to get cooking? Follow these steps to create your delicious wraps:

  1. Boil the water in a pot or kettle. Once boiling, add the instant couscous, stir, and let it sit off the heat for at least 5 minutes to absorb the water.
  2. Meanwhile, slice the green onions into thin rings. Dice the zucchini into bite-sized pieces and slice the paprika into strips.
  3. Heat the olive oil in a large pan over high heat. Add the zucchini and paprika, sautéing for about 10 minutes until slightly browned and tender.
  4. Chop the parsley finely and set it aside.
  5. Add the tomato paste, cumin, chili powder, paprika, salt, and pepper to the pan. Cook for an additional 5 minutes, stirring to combine.
  6. Stir in the cooked couscous, mixing everything well. Finish with lemon juice and chopped parsley to brighten the flavors.
  7. Warm the tortillas in the microwave or a pan per package instructions, making them pliable for wrapping.
  8. Spread about a teaspoon of sour cream on each tortilla, then add 3-4 tablespoons of the couscous filling.
  9. Fold the left and right sides of the tortilla inward, then roll from the bottom up to create a wrap. Cut in half to serve or pack for later!

Pro Tips for Perfect Wraps

Side profile of a vibrant vegetable wrap filled with couscous, showcasing fresh ingredients.
  • Even Cooking: Cut vegetables into similar sizes for even cooking and better texture.
  • Flavor Boost: Consider marinating your veggies in olive oil and spices for an hour before cooking for enhanced flavor.
  • Texture Matters: For added crunch, incorporate raw veggies, such as shredded carrots or bell peppers, into the filling.
  • Make It Spicy: If you like heat, add fresh jalapeños or a dash of hot sauce to the filling.
  • Wrap It Right: Ensure you don’t overfill your tortillas to avoid messy wraps.
  • Try Different Sauces: Experiment with different sauces like tahini or hummus instead of sour cream for a twist.
  • Make Ahead: Prepare the filling and store it in the fridge for up to 3 days for quick assembly on busy nights.
  • Pack It Up: These wraps are perfect for zum mitnehmen! Just wrap them tightly in foil or parchment paper.

Common Mistakes and Troubleshooting

Even the most seasoned cooks encounter hiccups. Here are some common pitfalls and how to fix them:

  • Dry Filling: If your filling feels dry, add a splash of vegetable broth or extra olive oil to moisten it.
  • Too Much Spice: If it’s too spicy, balance it out with a bit of honey or sugar.
  • Sticking Tortillas: If your tortillas stick together, lightly oil them before stacking or use parchment paper in between.

Variations to Try

These wraps are versatile! Here are some creative variations you can try:

  • Southwestern Style: Add black beans, corn, and chipotle seasoning for a southwestern twist.
  • Greek Delight: Substitute feta cheese, olives, and spinach for a Mediterranean flair.
  • Asian-Inspired: Incorporate sesame oil, ginger, and cabbage for a unique flavor.
  • Breakfast Wrap: Use scrambled eggs, avocado, and fresh salsa for a hearty breakfast option.

Storage and Make-Ahead Instructions

These wraps can be made ahead of time:

  • Refrigerator: Store assembled wraps in an airtight container for up to 3 days.
  • Freezer: Wrap tightly in plastic and freeze for up to 1 month. Thaw in the fridge overnight before reheating.
  • Reheating: To reheat, wrap in foil and place in a preheated oven at 350°F (175°C) for about 15 minutes or until heated through.

Frequently Asked Questions

Here are some common queries about Couscous Vegetable Wraps:

  • Can I use other grains? Yes, quinoa or farro work well as alternatives to couscous.
  • How do I make these vegan? Replace sour cream with a vegan alternative and ensure tortillas are dairy-free.
  • Can I grill the veggies? Absolutely! Grilling adds a smoky flavor that enhances the dish.
  • Is this recipe gluten-free? Use gluten-free tortillas and couscous to make it gluten-free.
  • Can I make these wraps ahead of time? Yes, they can be made in advance and stored in the fridge for quick meals!
  • What sauces pair well? Try tahini, tzatziki, or even a spicy sriracha mayo for dipping!
  • Can I add meat? Definitely! Grilled chicken or turkey can be a great addition for extra protein.
  • How do I store leftovers? Keep leftovers in an airtight container in the fridge for up to 3 days.

Nutrition Tips and Dietary Adaptations

This recipe can be adjusted to suit various dietary needs:

  • Low-Carb Option: Use lettuce leaves instead of tortillas for a low-carb wrap.
  • High-Protein: Add chickpeas or lentils to boost protein content.
  • Low-Fat: Use non-fat yogurt instead of sour cream to reduce calories.

Equipment Recommendations

To make the cooking process easier, here’s what you’ll need:

  • Non-Stick Skillet: For sautéing the vegetables without sticking.
  • Pot or Kettle: To boil water for the couscous.
  • Sharp Knife: For chopping veggies efficiently.
  • Cutting Board: A sturdy surface for prep work.

Serving Suggestions

Make these wraps even more enjoyable with some creative serving ideas:

  • Side Salads: Pair with a fresh green salad or a quinoa salad for a complete meal.
  • Dip Options: Serve with a side of hummus or salsa for extra flavor.
  • Snack Platter: Cut wraps into pinwheels for a fun appetizer or snack!

Conclusion

Cooking doesn’t have to be complicated or stressful. With these Couscous Vegetable Wraps, you can create a flavorful meal quickly and easily. Remember, it’s all about experimenting with flavors and finding what you love. So gather your ingredients, and let’s make this delicious wrap together! Enjoy the journey of cooking and the joy of good food. Happy cooking!

Wraps mit Couscous und Gemüse

Prep Time 10 minutes
Cook Time 15 minutes
Total Time 25 minutes
Servings 4 Portionen
Calories 450
Diese leckeren Wraps mit aromatischem Couscous und frischem Gemüse sind schnell zubereitet und perfekt für eine gesunde Mahlzeit.

Ingredients

Wraps

  • 4 Stück Weizen-Wraps Tortillas

Couscous

  • 125 g Instant-Couscous
  • 125 ml Wasser

Gemüse

  • 1 Stück Paprika
  • 1 Stück Zucchini
  • 1 Stück Frühlingszwiebel

Öl & Gewürze

  • 2 EL Olivenöl
  • 1 EL Tomatenmark
  • 1 TL Kreuzkümmel gemahlen
  • 1.5 TL Chilipulver
  • 1 TL Paprikapulver
  • 1 TL Meersalz
  • etwas Pfeffer

Frische Kräuter & Zitrone

  • 0.25 Bund Petersilie
  • 2 TL Zitronensaft

Sahne & Soße

  • 200 g Schmand
  • 0.5 TL Meersalz
  • etwas Pfeffer

Instructions 

  • Wasser zum Kochen bringen, Couscous einrühren und 5 Minuten quellen lassen.
  • Gemüse in feine Ringe und Würfel schneiden, in Öl 10 Minuten anbraten.
  • Tomatenmark, Gewürze, Salz und Pfeffer hinzufügen, 5 Minuten braten.
  • Couscous unterheben, Zitronensaft und Petersilie untermischen.
  • Wraps erwärmen, mit Schmand bestreichen, Füllung verteilen, einrollen und servieren.

Notes

Für eine cremigere Sauce den Schmand mit Salz und Pfeffer verrühren.
Calories: 450kcal
Cost: $8
Course: Hauptgericht
Cuisine: International
Keyword: couscous, Gemüse, Wraps

Elevate Your Dinner with Quick and Flavor-Packed Chili Oil Garlic Noodles

If you’re searching for a quick yet delicious meal to brighten your weeknight dinners, look no further! These Chili Oil Garlic Noodles come together in just minutes, making them the perfect choice for busy evenings. Bursting with flavor, this dish combines the heat of chili oil, the aromatic essence of garlic, and the satisfying chew of noodles to create a comforting bowl of goodness that your whole family will love.

In this comprehensive guide, we’ll explore everything you need to know about making these irresistible noodles, including ingredient breakdowns, expert tips, variations, and even how to store leftovers. So grab your apron, and let’s get started!

Why You’ll Love This Recipe

  • Quick and Easy: Ready in just 10 minutes, this dish is perfect for a last-minute dinner solution.
  • Flavor Explosion: The combination of garlic, chili flakes, and savory sauces creates a mouthwatering taste that’s hard to resist.
  • Customizable: Use your favorite vegetables or proteins to make this dish your own.
  • Meal Prep Friendly: Make a larger batch for easy lunches throughout the week.
  • One-Pan Wonder: Less cleanup! Most of the cooking happens in one pot.

Ingredients for Chili Oil Garlic Noodles

Here’s what you’ll need to create your own Chili Oil Garlic Noodles:

  • 1 serving Knife-Cut Noodles: Cooked according to package instructions.
  • 2 tbsps Canola Oil: For sautéing and creating the chili oil.
  • 2 stalks Cilantro: Chopped for garnish.
  • 2 stalks Bok Choy: Blanched for added nutrition and color.
  • 1 tbsp Chili Flakes: Adjust to your heat preference.
  • 2 cloves Garlic: Minced for maximum flavor.
  • 1 tbsp Light Soy Sauce: Adds umami richness.
  • 1 tsp Oyster Sauce: Optional, but adds depth to the dish.
  • 1 tbsp Vinegar: For a touch of acidity.
  • 1 tsp Sugar: Balances the flavors.

How to Make Chili Oil Garlic Noodles

Side view of succulent Knife-Cut Noodles drizzled with chili oil and garlic.

Follow these simple steps to whip up your Chili Oil Garlic Noodles:

  1. Blanch the Bok Choy: In boiling water, blanch bok choy or your vegetable of choice for 30 seconds. Drain and set aside.
  2. Cook the Noodles: In the same pot, cook the knife-cut noodles until al dente. Drain and reserve some starchy water.
  3. Prepare the Chili Oil: In a heat-proof bowl, combine chili flakes, minced garlic, light soy sauce, oyster sauce, vinegar, sugar, and sesame seeds if desired.
  4. Heat the Oil: In a pan, heat the canola oil until it begins to bubble. Remove from heat and carefully pour it over the chili oil mixture. Stir to combine.
  5. Toss the Noodles: Add the cooked noodles and chopped cilantro to the bowl. Toss to coat, adding reserved noodle water as needed to achieve your desired consistency.
  6. Serve: Transfer to serving bowls, top with blanched bok choy, and garnish with extra sesame seeds. Enjoy!

Expert Tips for the Best Chili Oil Garlic Noodles

  • Choose the Right Noodles: Knife-cut noodles provide the perfect chewiness, but you can use any noodles you prefer, such as udon, spaghetti, or rice noodles.
  • Mind the Garlic: Mince the garlic finely to create an even flavor infusion and avoid large raw chunks.
  • Adjust the Heat: Feel free to increase or decrease the chili flakes according to your spice tolerance.
  • Fresh Ingredients: Use fresh cilantro and bok choy for the best flavor and nutritional value.
  • Perfect Oil Temperature: Ensure the oil is hot enough to sizzle when poured over the chili mixture, as this helps release aromatic flavors.
  • Don’t Skip the Sugar: A touch of sugar balances out the heat and acidity, enhancing the overall flavor.
  • Save Some Noodle Water: This starchy water is great for thinning sauces while adding a bit of body.
  • Mix and Match: Add proteins like chicken, shrimp, or tofu for a hearty meal.

Common Mistakes and Troubleshooting

  • Overcooking Noodles: Ensure your noodles are cooked al dente; they’ll continue cooking when mixed with the hot oil.
  • Too Much Oil: If the noodles seem greasy, reduce the oil next time or add more noodles to balance it out.
  • Not Enough Flavor: Taste your sauce before adding the noodles; adjust with more soy sauce or chili flakes as needed.
  • Burnt Garlic: When heating the oil, keep an eye on it to prevent the garlic from burning, which can create a bitter taste.

Variations on Chili Oil Garlic Noodles

Feel free to get creative with these variations:

  • Veggie-Packed: Add bell peppers, carrots, or snap peas for extra crunch and nutrition.
  • Protein Boost: Toss in some cooked chicken, shrimp, or tofu for a filling meal.
  • Spicy Peanut Sauce: Mix in peanut butter or tahini for a creamy, nutty twist.
  • Herb Garden: Experiment with fresh herbs like basil or mint for a refreshing flavor profile.

Storage and Make-Ahead Instructions

These noodles can be made ahead of time and stored for later:

  • Refrigeration: Store leftovers in an airtight container in the fridge for up to 3 days.
  • Reheating: Reheat in a pan with a splash of water or oil to loosen up the noodles.
  • Make-Ahead Sauce: Prepare the chili oil in advance and store it in the fridge, just reheat before mixing with noodles.

Frequently Asked Questions

  • Can I use ready-made chili oil? Yes, you can use store-bought chili oil to save time, but fresh garlic and ingredients add more flavor.
  • What type of noodles work best? Knife-cut noodles are ideal, but feel free to use any type of noodle you prefer.
  • Can I make this dish gluten-free? Use gluten-free noodles and tamari instead of soy sauce for a gluten-free version.
  • How spicy are these noodles? The spice level depends on the amount of chili flakes you use, so feel free to adjust according to your taste.
  • Can I add protein? Absolutely! Chicken, shrimp, or tofu are excellent additions.
  • How do I store leftovers? Keep in an airtight container in the fridge for up to 3 days.
  • Can I freeze these noodles? It’s best to avoid freezing as the texture may change, but you can freeze the chili oil.
  • What can I serve with these noodles? Pair with a light salad, steamed vegetables, or grilled meats for a complete meal.

Nutrition Tips and Dietary Adaptations

These Chili Oil Garlic Noodles can fit into various dietary needs:

  • Vegan: Simply omit the oyster sauce or substitute with mushroom sauce.
  • Low-Carb: Use zucchini noodles or shirataki noodles for a low-carb option.
  • Low-Sodium: Choose low-sodium soy sauce to reduce salt intake.

Equipment Recommendations

Having the right tools can make all the difference:

  • Large Pot: For cooking the noodles and blanching the vegetables.
  • Heat-Proof Bowl: Necessary for mixing the chili oil sauce.
  • Pan: For heating the oil and combining the ingredients.

Serving Suggestions

To enhance your dining experience:

  • Add Fresh Herbs: A sprinkle of fresh herbs like cilantro or scallions adds brightness.
  • Serve with Lime: A squeeze of lime juice elevates the flavors beautifully.
  • Pair with Protein: Serve alongside grilled chicken, shrimp, or tofu for a balanced meal.

Now that you have all the tools and knowledge to create delicious, quick, and flavorful Chili Oil Garlic Noodles, it’s time to get cooking! Remember, cooking is about enjoying the process, so don’t be afraid to experiment and make this dish your own. Happy cooking!

Chili Oil Garlic Noodles

Prep Time 10 minutes
Cook Time 10 minutes
Total Time 20 minutes
Servings 1 serving
Calories 450
A flavorful and spicy noodle dish featuring chili oil, garlic, and fresh vegetables, perfect for a quick and satisfying meal.

Ingredients

Noodles

  • 1 serving Knife-Cut Noodles, cooked
  • 2 tbsps Canola Oil
  • 2 stalks Cilantro, chopped
  • 2 stalks Bok Choy, blanched
  • 1 tbsp Chilli Flakes
  • 2 cloves Garlic, minced
  • 1 tbsp Light Soy Sauce
  • 1 tsp Oyster Sauce
  • 1 tbsp Vinegar
  • 1 tsp Sugar

Instructions 

  • Blanch bok choy in boiling water for 30 seconds, drain, and set aside. Cook noodles until al dente, drain, and save some starchy water.
  • Combine chili flakes, garlic, soy sauce, oyster sauce, vinegar, and sugar in a heat-proof bowl.
  • Heat oil until bubbling, then carefully pour over the chili mixture and stir to combine.
  • Add noodles and cilantro, toss to coat, and thin with noodle water if needed.
  • Serve in bowls topped with blanched vegetables and extra sesame seeds.

Notes

Adjust chili flakes for desired spice level.
Calories: 450kcal
Cost: $10
Course: Main Course
Cuisine: Asian
Keyword: Noodles

If you’re looking for a dinner that packs a punch with flavor while being easy to prepare, look no further than these Creamy Sriracha Shrimp Poke Bowls. This recipe combines succulent shrimp, vibrant fresh vegetables, and a spicy creamy sauce that ties all the flavors together, making it perfect for busy weeknights or impressing guests. In just about 30 minutes, you can whip up a dish that’s not only visually stunning but also nourishing and deeply satisfying. Let’s dive into why you’ll love this recipe!

Why You’ll Love This Recipe

  • Quick and Easy: Ready in just 30 minutes, this recipe is ideal for those hectic weeknights when you want something delicious without spending hours in the kitchen.
  • Customizable: Tailor each bowl to your taste by adding your favorite ingredients, making it a perfect choice for every palate.
  • Healthful and Nutritious: Packed with protein from the shrimp and fiber from the fresh vegetables, this dish is a balanced meal that fuels your body.
  • Flavor-Packed: The combination of shrimp, fresh veggies, and creamy sriracha sauce creates a burst of flavors that will keep you coming back for more.
  • Perfect for Meal Prep: Easily scalable for meal prep; just double or triple the recipe and enjoy throughout the week.

Detailed Ingredient Breakdown

To create your shrimp poke bowls, here’s a list of ingredients you’ll need along with some handy substitutions if you’re looking to make adjustments:

  • Shrimp: 1 lb, peeled and deveined. You can use fresh or frozen shrimp—just ensure it’s thawed if frozen.
  • Rice or Greens: 2 cups cooked rice or salad greens. For a low-carb option, use cauliflower rice or quinoa.
  • Soy Sauce or Tamari: 1 tbsp. For a gluten-free option, use tamari.
  • Lime Juice: 1 tbsp, freshly squeezed for the best flavor.
  • Oil: 1 tbsp olive oil or sesame oil for cooking the shrimp.
  • Garlic: 1 clove, minced. You can substitute garlic powder if you’re in a pinch.
  • Mayonnaise: 1/4 cup for the creamy sauce. Use vegan mayo for a plant-based option.
  • Sriracha: 1-2 tbsp, adjust based on your spice preference.
  • Fresh Vegetables: 1/2 cucumber (sliced), 1/2 cup shredded carrots, 1 avocado (sliced), and 2 green onions (chopped).
  • Optional Toppings: Seaweed strips, pickled ginger, or jalapeño slices to enhance your bowl.

Pro Tips for Perfect Poke Bowls

Here are some expert insights to ensure your poke bowls turn out perfectly every time:

  • Watch the Cooking Time: Shrimp cooks quickly, typically 2-3 minutes per side. Keep an eye on them to avoid overcooking, which can make them rubbery.
  • Marination Matters: Let the shrimp marinate for at least 5-10 minutes to absorb those delicious flavors.
  • Rinse Your Rice: If using sushi rice, rinse until the water runs clear to remove excess starch and achieve the perfect texture.
  • Adjust Spice Levels: If you prefer a milder flavor, start with less sriracha in the sauce and add more incrementally.
  • Chill Your Ingredients: For a refreshing bowl, consider chilling your shrimp and vegetables before assembly.
  • Presentation is Key: Arrange your ingredients artfully in the bowl for a restaurant-quality look.
  • Use Quality Ingredients: Fresh, high-quality shrimp and vegetables make a noticeable difference in flavor.
  • Experiment with Sauces: Try adding a drizzle of soy sauce or a sprinkle of sesame oil to enhance the flavor profile.

Common Mistakes and Troubleshooting

Side view of a mouthwatering shrimp poke bowl topped with creamy sriracha sauce, avocado, and carrots.

Here are some common pitfalls and how to avoid them:

  • Overcooked Shrimp: Always remove shrimp from the heat as soon as they turn pink and opaque.
  • Too Much Sauce: Start with a small amount of sriracha sauce and adjust to your taste; it’s easier to add more than to take it away!
  • Unbalanced Flavors: Ensure a good mix of salty (soy sauce), acidic (lime), and spicy (sriracha) for a well-rounded dish.
  • Stale Ingredients: Use fresh vegetables and shrimp for the best flavor and texture.

Creative Variations

Don’t hesitate to get creative with your poke bowls! Here are some fun variations to try:

  • Tropical Twist: Substitute mango for avocado and add some diced pineapple for a fruity flair.
  • Spicy Tuna Alternative: Replace shrimp with marinated tuna for a different protein option.
  • Vegetarian Delight: Use tofu or tempeh instead of shrimp for a plant-based version.
  • Asian-Inspired: Add edamame, radishes, and sesame oil for an extra umami kick.

Storage and Make-Ahead Instructions

This dish is great for meal prep! Here’s how to store it:

  • Refrigeration: Store assembled bowls in airtight containers in the refrigerator for up to 3 days.
  • Make-Ahead: Cook shrimp and rice ahead of time and store separately from fresh veggies and sauce until ready to serve.
  • Freezing: While it’s best to eat fresh, you can freeze cooked shrimp for up to 3 months; just ensure they are well-sealed to avoid freezer burn.

Frequently Asked Questions

Here are some common questions about this recipe:

  • Can I use frozen shrimp? Yes, just ensure they are fully thawed before marinating and cooking.
  • Is this recipe gluten-free? Yes, just use tamari instead of soy sauce.
  • Can I make this dish vegetarian? Absolutely! Substitute shrimp with tofu or chickpeas.
  • How spicy is the creamy sriracha sauce? You can adjust the amount of sriracha to suit your spice tolerance.
  • What can I substitute for rice? Quinoa or cauliflower rice are great options for a healthier twist.
  • Can I prepare this ahead of time? Yes! Prep ingredients separately and assemble just before serving for the freshest result.
  • What toppings are recommended? Seaweed strips, pickled ginger, and sesame seeds are excellent choices.
  • How long can I store leftovers? Store in an airtight container for up to 3 days in the refrigerator.

Nutritional Tips and Dietary Adaptations

This recipe is not only delicious but also offers several health benefits:

  • Protein-Rich: Shrimp is an excellent source of lean protein, perfect for muscle repair and growth.
  • Vitamin Boost: The fresh vegetables provide essential vitamins and minerals, contributing to your overall health.
  • Low-Calorie Option: This dish can be low in calories if you stick to the recommended portion sizes and use less sauce.
  • Heart-Healthy Fats: Avocado adds healthy fats that are good for your heart and overall well-being.

Equipment Recommendations

Here are some kitchen tools that will make your cooking experience smoother:

  • Skillet: A good non-stick skillet is perfect for cooking the shrimp evenly.
  • Rice Cooker: If you cook rice often, a rice cooker can save you time and ensure perfectly cooked rice every time.
  • Sharp Knife: A sharp knife will help you slice vegetables more easily and safely.
  • Measuring Cups and Spoons: Accurate measurements ensure consistent results in your cooking.

Serving Suggestions

When it comes to serving your poke bowls, presentation is everything! Here are some tips:

  • Layering: Start with the rice or greens at the bottom, then layer shrimp and vegetables aesthetically on top.
  • Drizzle Sauce: Finish by drizzling the creamy sriracha sauce over the top for that finishing touch.
  • Garnish: Sprinkle sesame seeds or sliced green onions on top for added crunch and flavor.

Conclusion

These Creamy Sriracha Shrimp Poke Bowls are more than just a meal; they’re an exciting culinary adventure waiting to happen! With the right ingredients, simple preparation steps, and a few expert tips, you’ll create a dish that’s not only delicious but also visually appealing. So roll up your sleeves, gather your ingredients, and enjoy the process of creating something truly special. Happy cooking!

Creamy Sriracha Shrimp Poke Bowls

Prep Time 10 minutes
Cook Time 10 minutes
Total Time 20 minutes
Servings 4 bowls
Calories 450
Enjoy a vibrant and flavorful poke bowl featuring succulent shrimp, fresh vegetables, and a spicy creamy sriracha sauce.

Ingredients

Protein

  • 1 lb shrimp, peeled and deveined

Base

  • 2 cups cooked rice or salad greens

Sauce

  • 1 tbsp soy sauce or tamari
  • 1 tbsp lime juice
  • 1 tbsp olive oil or sesame oil
  • 1 clove garlic, minced
  • 0.25 cup mayonnaise
  • 0.5 tbsp sriracha (adjust to taste)

Vegetables

  • 0.5 cucumber sliced
  • 0.5 cup shredded carrots
  • 1 avocado sliced
  • 2 green onions chopped
  • 1 tbsp sesame seeds

Optional toppings

  • to taste seaweed strips, pickled ginger, jalapeño slices

Instructions 

  • Cook rice or prepare salad greens as the base.
  • Marinate shrimp with oil, soy sauce, lime juice, and garlic for 5-10 minutes.
  • Cook shrimp in a skillet for 2-3 minutes per side until pink and opaque.
  • Whisk mayonnaise and sriracha to make the sauce; adjust spice as desired.
  • Assemble bowls with rice, shrimp, and vegetables; drizzle with sauce and sprinkle sesame seeds.

Notes

Feel free to customize toppings and spice level for your preference.
Calories: 450kcal
Cost: $15
Course: Main Course
Cuisine: Hawaiian
Keyword: Poke, shrimp, Spicy

Welcome to a world where cooking is not just a routine but an adventure! This shrimp and rice recipe is your ticket to effortless weeknight dinners that are both delightful and delicious. With simple ingredients and straightforward steps, you’ll discover that creating a fantastic meal can be stress-free and enjoyable. Let’s dive into the magic of shrimp and rice, where each bite offers a burst of flavor that will make your taste buds dance!

Why You’ll Love This Recipe

Here are five compelling reasons to embrace this shrimp and rice dish:

  • Quick and Easy: This recipe comes together in just about 60 minutes, making it perfect for busy weeknights.
  • Flavorful Profile: The combination of garlic, lemon, and fresh herbs elevates the dish, ensuring every bite is packed with flavor.
  • Nutritious and Wholesome: With lean protein from shrimp and fiber-rich brown rice, this meal is both healthy and satisfying.
  • Versatile Ingredients: You can easily customize the recipe by substituting ingredients based on what you have on hand or your dietary preferences.
  • Impressive Presentation: Serve it up in a beautiful bowl, and you’ll feel like a gourmet chef without the fuss!

Ingredient Breakdown

Let’s take a closer look at the ingredients you’ll need for this shrimp and rice recipe, along with some helpful substitutions:

  • Olive Oil: You’ll need 3 tablespoons, divided. For a different flavor, try using avocado oil or butter.
  • Lemon Juice and Zest: 2 tablespoons of fresh lemon juice and 1 teaspoon of lemon zest add brightness. If you’re out of lemons, try lime juice as a substitute.
  • Garlic: Four cloves of minced garlic infuse the dish with aromatic goodness. Garlic powder can be used in a pinch.
  • Fresh Parsley: 3 tablespoons of chopped parsley add freshness. You can use cilantro or green onions if preferred.
  • Salt and Pepper: Season to taste, but start with 1 ½ teaspoons of salt and ½ teaspoon of black pepper.
  • Shrimp: Use 1 pound of large shrimp, peeled and deveined. Frozen shrimp works well too—just thaw them beforehand.
  • Yellow Onion: One large onion, finely chopped, adds sweetness and depth. Shallots are a great alternative.
  • Brown Rice: 1 ½ cups of long-grain brown rice provides heartiness. You can substitute with white rice or quinoa for a different texture.
  • Vegetable Broth: 2 ¼ cups of low-sodium vegetable broth adds flavor. Chicken broth or water can also be used.

How to Make Shrimp and Rice

Ready to start cooking? Follow these simple steps for a delicious shrimp and rice dish:

  1. In a large bowl, whisk together 2 tablespoons of olive oil, lemon juice, lemon zest, 2 minced garlic cloves, 1 tablespoon of parsley, ½ teaspoon of salt, and ¼ teaspoon of black pepper.
  2. Add the shrimp to the marinade and toss to coat. Cover and let it sit at room temperature for 30-60 minutes to allow the flavors to meld.
  3. Heat the remaining 1 tablespoon of olive oil in a large pot over medium heat. Add the chopped onions and remaining minced garlic, cooking until the onion is translucent and fragrant, about 3-4 minutes.
  4. Stir in the brown rice, along with the remaining 1 teaspoon of salt and ¼ teaspoon of black pepper. Mix well to combine.
  5. Pour in the vegetable broth, bring to a boil, then reduce the heat to medium-low. Cover and simmer for 40 minutes or until the liquid is absorbed and the rice is tender.
  6. Working quickly, layer the marinated shrimp on top of the cooked rice, then cover the pot again. Cook for an additional 5 minutes until the shrimp is opaque and cooked through.
  7. Serve warm, garnished with the remaining parsley and lemon wedges on the side.

Pro Tips for the Perfect Dish

Juicy shrimp served over brown rice with a hint of lemon and garlic.

To ensure your shrimp and rice turns out perfectly, consider these expert insights:

  • Don’t Overcook the Shrimp: Shrimp cooks quickly. Remove it from heat as soon as it turns opaque to avoid rubbery texture.
  • Marinate Longer for Depth: If time allows, marinate the shrimp for up to 2 hours for an even more flavorful dish.
  • Use Fresh Herbs: Fresh parsley brightens the dish. Dried herbs can be used, but fresh offers a vibrant kick.
  • Watch the Liquid Ratio: Ensure you have enough broth for the rice to cook properly. Adjust according to the type of rice used.
  • Experiment with Spices: Add a pinch of cayenne or smoked paprika for a spicy twist.
  • Cook in One Pot: Keeping it in one pot not only simplifies cleanup but also allows the flavors to meld beautifully.
  • Use a Lid: Keeping the pot covered while cooking helps trap steam, ensuring perfect rice.
  • Leftovers are Delicious: This dish reheats beautifully, making it a great choice for meal prep!

Common Mistakes and Troubleshooting

Even the best cooks make mistakes. Here’s how to troubleshoot common issues:

  • Rice is Too Hard: If the rice isn’t cooked through, add a bit more broth and simmer until tender.
  • Shrimp is Overcooked: If overcooked, try serving it with a sauce or broth to add moisture.
  • Too Salty: If the dish turns out salty, a squeeze of fresh lemon juice can cut through the saltiness.
  • Favoring One Flavor: Balance flavors by adjusting the acid (lemon juice) or sweetness (onions).

Variations to Try

Feel free to customize this dish with these delicious variations:

  • Cajun Twist: Add Cajun seasoning to the shrimp marinade for a spicy kick that adds depth and flavor.
  • Vegetable Medley: Toss in your favorite vegetables like bell peppers, peas, or spinach during the last few minutes of cooking for added nutrition.
  • Teriyaki Shrimp: Replace the lemon with teriyaki sauce for a sweet and savory Asian-inspired meal.
  • Herb & Lemon Rice: Infuse the rice with additional herbs like dill or thyme for a fragrant variation.

Storage and Make-Ahead Instructions

Planning ahead? Here’s how to store and prepare your shrimp and rice:

  • Refrigeration: Store leftovers in an airtight container in the refrigerator for up to 3 days.
  • Freezing: This dish can be frozen for up to 2 months. Thaw in the fridge overnight before reheating.
  • Make-Ahead: Prepare the shrimp marinade a day in advance and store it in the fridge. Cook the rice the day of for optimal freshness.

Frequently Asked Questions

Here are some common questions and answers to help you master this recipe:

  • Can I use frozen shrimp? Yes, just be sure to thaw them first. They can be marinated while thawing.
  • What type of rice is best? Brown rice is used in this recipe for its nutritional benefits, but white rice can be substituted.
  • Can I make this dish vegan? Absolutely! Substitute shrimp with tofu or chickpeas and use vegetable broth.
  • How do I know when the shrimp is done? Shrimp is cooked when it turns opaque and curls into a “C” shape.
  • What can I serve with this dish? Pair it with a light salad, steamed vegetables, or a refreshing cucumber salad.
  • Is this recipe spicy? It’s not inherently spicy, but you can add red pepper flakes or cayenne for heat.
  • Can I add more vegetables? Absolutely! Feel free to include your favorites during the cooking process.
  • How do I prevent my rice from sticking? Rinse the rice before cooking to remove excess starch, and ensure there’s enough liquid.

Nutrition Tips and Dietary Adaptations

This shrimp and rice dish can be tailored to fit various dietary needs:

  • Low-Carb Option: Swap brown rice for cauliflower rice to reduce carbs while keeping the dish hearty.
  • Gluten-Free: Ensure your broth is gluten-free and enjoy this dish worry-free.
  • Heart-Healthy: Use less oil and opt for a variety of vegetables to increase fiber and nutrients.

Equipment Recommendations

To make the cooking process smoother, consider using:

  • Large Pot: A heavy-bottomed pot is ideal for even cooking and reduces the risk of burning.
  • Measuring Cups and Spoons: Accurate measurements ensure great flavor and texture.
  • Mixing Bowls: Use these for marinating the shrimp to allow for easy mixing and flavor infusion.
  • Wooden Spoon: Perfect for stirring without scratching your pots.

Serving Suggestions

Make your meal even more delightful with these serving ideas:

  • Garnish: Top with extra parsley and lemon wedges for a fresh touch.
  • Side Dishes: Serve alongside a green salad or roasted vegetables for balance.
  • Drinks: Pair with a refreshing iced tea or a crisp white wine that complements the dish.

Cooking is all about joy and creativity. This shrimp and rice recipe is not just a meal; it’s an experience you’ll want to share with family and friends. So roll up your sleeves, gather your ingredients, and let’s create something wonderful together!

Remember, cooking should be fun and fulfilling. Enjoy the process, savor the flavors, and most importantly—have confidence in your kitchen. Happy cooking!

Shrimp and Rice Recipe

Prep Time 10 minutes
Cook Time 45 minutes
Total Time 55 minutes
Servings 4 servings
Calories 520
A flavorful and easy shrimp and rice dish with fresh lemon and herbs, perfect for a quick weeknight dinner.

Ingredients

Marinade

  • 2 tablespoons olive oil (divided)
  • 2 tablespoons fresh lemon juice
  • 1 teaspoon lemon zest
  • 4 cloves garlic, minced (divided)
  • 3 tablespoons chopped parsley (divided)
  • 1.5 teaspoons salt (divided)
  • 0.5 teaspoon black pepper (divided)
  • 1 pound large shrimp, peeled and deveined
  • 1 large yellow onion, finely chopped
  • 1.5 cups long grain brown rice
  • 2.25 cups low-sodium vegetable broth

Instructions 

  • Mix 2 tbsp olive oil, lemon juice, lemon zest, 2 minced garlic cloves, 1 tbsp parsley, ½ tsp salt, and ¼ tsp black pepper. Marinate shrimp for 30-60 minutes.
  • Heat remaining 1 tbsp olive oil in a large pot. Cook onions and garlic until translucent, about 3-4 minutes.
  • Stir in rice, remaining salt, and black pepper. Add vegetable broth, bring to a boil, then simmer covered for 40 minutes.
  • Arrange marinated shrimp on top of cooked rice, cover, and cook until shrimp turn opaque, about 5 minutes.
  • Serve warm with lemon wedges and garnish with remaining parsley.

Notes

Use fresh lemon for the best flavor and adjust cooking time for rice if needed.
Calories: 520kcal
Cost: $15
Course: Main Course
Cuisine: American
Keyword: lemon, rice, shrimp

Brighten Up Your Meals with Easy Lemon Herb Couscous

Welcome to the world of cooking where flavor meets simplicity! Today, we’re diving into a vibrant recipe for Lemon Herb Couscous that not only elevates your meals but is also incredibly easy to prepare. This delightful dish marries the zesty brightness of lemon with the fresh aroma of herbs, all wrapped up in the delightful texture of couscous. Perfect for any occasion, this recipe is a great side dish or a refreshing main course.

Whether you’re a seasoned chef or just starting out, this Lemon Herb Couscous recipe will inspire confidence in your cooking skills. Let’s roll up our sleeves and create something delicious!

Why You’ll Love This Recipe

  • Quick and Easy: This recipe can be made in under 30 minutes, making it a perfect choice for busy weeknights.
  • Flavorful & Fresh: The combination of lemon juice and fresh herbs creates a refreshing taste that brightens any meal.
  • Versatile: Great as a side dish, a light lunch, or even a base for a hearty salad.
  • Healthy Option: Packed with wholesome ingredients, this couscous dish is low in calories and full of nutrients.
  • Customizable: You can easily switch up the herbs or add your favorite vegetables for a personalized touch.

Ingredients Breakdown

Here’s what you’ll need to create this delicious Lemon Herb Couscous:

  • ¼ cup olive oil: A good quality extra-virgin olive oil is key for flavor.
  • 2 tablespoons lemon juice: Freshly squeezed for the best taste.
  • 1½ teaspoons creamy Dijon mustard: This adds a tangy depth to the dressing.
  • ½ teaspoon kosher salt: Essential for enhancing flavors.
  • ¼ teaspoon garlic powder: For a hint of savory flavor.
  • ¼ teaspoon ground black pepper: Adds a touch of spice.
  • 1 ½ cups Israeli pearl couscous: The star of the dish, offering a delightful texture.
  • 1 teaspoon garlic, minced: Fresh garlic amps up the flavor.
  • 1 tablespoon fresh parsley, chopped: A fresh herb to brighten the dish.

How to Make Lemon Herb Couscous

Side view of a bowl filled with Lemon Herb Couscous, highlighting its texture.

Now that we have our ingredients, let’s go through the simple steps to create this dish:

  1. In a small bowl, whisk together the olive oil, lemon juice, Dijon mustard, salt, pepper, garlic powder, and chopped parsley until fully blended. Adjust seasoning to taste and set aside.
  2. Set a medium saucepan over medium-high heat and add the olive oil. When the oil is hot, add the couscous and cook, stirring frequently, for 1 minute.
  3. Add the minced garlic and cook for an additional 30 seconds, just until fragrant.
  4. Add water (about 2 cups) and salt, then bring to a simmer. Reduce to low heat, cover, and cook without stirring for 10 minutes, until the liquid is absorbed and the couscous is al dente.
  5. Drain and rinse in cold water. Transfer the well-drained couscous to a serving bowl. Add the prepared dressing and toss to coat evenly. Sprinkle with parsley and serve.

Pro Tips for Perfect Couscous

  • Use Quality Ingredients: The flavor of your couscous relies heavily on the quality of your olive oil and lemon juice.
  • Don’t Overcook: Keep an eye on the cooking time to ensure your couscous remains perfectly al dente.
  • Experiment with Herbs: While parsley is a great choice, feel free to switch it out for fresh basil, cilantro, or mint.
  • Make it Colorful: Add diced bell peppers, cherry tomatoes, or cucumbers for a pop of color and flavor.
  • Prepare Ahead: This dish can be made in advance and stored in the fridge for up to 4 days.
  • Use Broth Instead of Water: For even more flavor, cook the couscous in vegetable or chicken broth.
  • Taste as You Go: Adjust the seasoning according to your personal preference for a truly tailored dish.
  • Serve Warm or Cold: This couscous can be enjoyed warm or chilled, making it versatile for any season.

Common Mistakes & Troubleshooting

  • Overcooking the Couscous: Make sure to follow the cooking time closely to avoid mushy couscous.
  • Skipping the Rinse: Rinsing the couscous helps remove excess starch and prevents it from becoming sticky.
  • Not Adjusting the Dressing: Taste the dressing before adding to ensure it meets your flavor preference.
  • Using Pre-Packaged Couscous: If you use pre-packaged couscous, make sure to follow the specific cooking instructions as they may vary.

Delicious Variations

Don’t hesitate to get creative with your Lemon Herb Couscous. Here are some delicious variations:

  • Greek Style: Add crumbled feta cheese, olives, and cherry tomatoes for a Mediterranean twist.
  • Spicy Kick: Incorporate diced jalapeños or crushed red pepper flakes for a spicy version.
  • Nutty Flavor: Toss in some toasted pine nuts or slivered almonds for added crunch.
  • Vegetable Medley: Mix in steamed or roasted seasonal vegetables for a hearty side dish.

Storage and Make-Ahead Instructions

This Lemon Herb Couscous is perfect for meal prep!

  • Refrigeration: Store leftovers in an airtight container in the fridge for up to 4 days.
  • Freezing: For longer storage, freeze the couscous in freezer-safe bags for up to 3 months.
  • Reheating: To reheat, sprinkle with a little water and microwave until warmed through.
  • Make It Ahead: Prepare the dressing and cook the couscous a day in advance; just combine before serving.

Frequently Asked Questions

  • Can I use regular couscous instead of Israeli couscous? Yes, but the cooking time and texture will vary. Adjust accordingly!
  • Is this recipe gluten-free? No, couscous is made from wheat. For a gluten-free option, try quinoa or rice.
  • What can I serve with Lemon Herb Couscous? It pairs well with grilled chicken, fish, or as a base for a hearty salad.
  • Can I make this vegan? Absolutely! Simply omit any animal products and stick to the plant-based ingredients.
  • How can I make it more filling? Add chickpeas or lentils for protein and a heartier meal.
  • What’s the best way to store leftovers? Keep in an airtight container in the fridge to maintain freshness.
  • Can I add other flavors? Definitely! Try adding herbs like dill or tarragon for a unique twist.
  • How long does it take to make? This recipe takes about 25-30 minutes from prep to serving!

Nutrition Tips and Dietary Adaptations

This Lemon Herb Couscous is not only delicious but also packed with nutrients! Here are some tips:

  • Low-Calorie Option: This dish is low in calories, making it a great side for those watching their intake.
  • High in Fiber: Couscous provides a good source of fiber, especially when paired with vegetables.
  • Vegan-Friendly: This recipe is naturally vegan, so it fits perfectly into plant-based diets.
  • Whole Grain Alternative: For a healthier version, opt for whole grain couscous for more fiber and nutrients.

Essential Equipment

To make this dish successfully, you’ll need:

  • Medium saucepan: For cooking the couscous.
  • Whisk: To blend the dressing.
  • Cutting board and knife: For chopping herbs and garlic.
  • Measuring cups and spoons: To ensure accurate ingredient ratios.

Serving Suggestions

Ready to serve your Lemon Herb Couscous? Here are some delightful ideas:

  • As a Side Dish: Pair with grilled meats or roasted vegetables for a balanced meal.
  • In a Salad: Use it as a base for a refreshing salad topped with greens, nuts, and your choice of protein.
  • With a Protein: Serve alongside grilled shrimp, chicken, or tofu for a complete meal.
  • For Meal Prep: Portion into containers for easy lunch options throughout the week.

Now that you have all the steps and tips to make the best Lemon Herb Couscous, it’s time to get cooking! Remember, cooking is all about having fun and experimenting, so don’t hesitate to make this recipe your own. Enjoy your culinary journey!

Lemon Herb Couscous Recipe

Prep Time 10 minutes
Cook Time 15 minutes
Total Time 25 minutes
Servings 4 servings
Calories 250
A flavorful and easy-to-make couscous dish infused with lemon and herbs, perfect as a side or light meal.

Ingredients

Dressing

  • 0.25 cup olive oil
  • 2 tablespoons lemon juice
  • 1.5 teaspoons creamy Dijon mustard
  • 0.5 teaspoon kosher salt
  • 0.25 teaspoon garlic powder
  • 0.25 teaspoon ground black pepper
  • 1.5 cups Israeli pearl couscous
  • 1 teaspoon garlic minced
  • 1 tablespoon fresh parsley chopped

Instructions 

  • Whisk together olive oil, lemon juice, Dijon mustard, salt, pepper, garlic powder, and parsley until blended. Set aside.
  • Heat olive oil in a medium saucepan over medium-high heat. Add couscous and cook, stirring, for 1 minute.
  • Add minced garlic and cook for 30 seconds. Add water and salt, bring to a simmer, then cover and cook for 10 minutes until absorbed.
  • Drain and rinse couscous in cold water. Transfer to a bowl.
  • Toss couscous with dressing, sprinkle with parsley, and serve.

Notes

Adjust seasoning as needed before serving.
Calories: 250kcal
Cost: $10
Course: Side Dish
Cuisine: Mediterranean
Keyword: couscous

If you’re looking to elevate your weeknight meals with a dish that’s both simple and bursting with flavor, you’re in the right place! This Easy Lemon Garlic Pasta is not only quick to prepare but also a delightful combination of fresh ingredients that will leave everyone at the table asking for seconds. In under 30 minutes, you can whip up a creamy, zesty pasta that brings sunshine to your dinner plate. Whether you’re a seasoned chef or just starting out, this recipe is designed to be approachable and stress-free.

Let’s dive into why you’ll love this recipe and how to make it shine!

Why You’ll Love This Recipe

  • Quick and Easy: Ready in just 20 minutes, perfect for busy weeknights or impromptu gatherings.
  • Flavor-Packed: The blend of lemon, garlic, and creamy vegan elements creates a dish that’s vibrant and satisfying.
  • Customizable: Easily adapt this recipe by adding your favorite vegetables or proteins.
  • Healthy Ingredients: Incorporates fresh produce and plant-based products, making it a guilt-free indulgence.
  • Kid-Friendly: The mild flavors and fun texture appeal to pasta lovers of all ages!

Ingredients Breakdown

Here’s what you’ll need to make this delicious Lemon Garlic Pasta, along with some helpful substitutions:

  • Pasta: 6 ounces of your favorite pasta (spaghetti, linguine, or gluten-free options work great). You can also use whole wheat for added fiber.
  • Vegan Butter: 1 tablespoon, or substitute with olive oil if you prefer a lighter option.
  • Extra Virgin Olive Oil: 1 tablespoon, choose high-quality for the best flavor.
  • Garlic: 3 cloves, minced. Fresh garlic provides the best taste, but you can use garlic powder in a pinch.
  • Lemon: Juice and zest from 1 lemon to infuse that zesty flavor.
  • Chili Flakes: ½ teaspoon for a touch of heat. Adjust according to your spice preference.
  • Vegan Cream or Coconut Milk: ½ cup, providing creaminess without dairy.
  • Pasta Water: ½ cup, reserved from cooking the pasta for a smooth sauce.
  • Vegan Parmesan Cheese: 2 tablespoons, for a cheesy finish. You can substitute with nutritional yeast for a nutty flavor.
  • Peas: ½ cup, adding a pop of color and nutrition. Feel free to substitute with spinach or broccoli!

How to Make Lemon Garlic Pasta

Follow these simple steps to create your Lemon Garlic Pasta:

  1. Cook the pasta according to the package instructions until al dente. Drain, reserving ¼ cup of the pasta water.
  2. In a large sauté pan over low-medium heat, combine the vegan butter and olive oil. Once melted, add the minced garlic and sauté for about 30 seconds until fragrant.
  3. Stir in the lemon juice, lemon zest, and chili flakes. Allow the mixture to heat through.
  4. Pour in the reserved pasta water and the vegan cream, stirring to combine.
  5. Introduce the cooked pasta to the sauce, tossing to coat evenly. Add the peas and mix thoroughly.
  6. Serve hot, garnished with vegan Parmesan cheese and extra lemon zest if desired.

Pro Tips for Perfect Lemon Garlic Pasta

Side angle photo of a creamy Lemon Garlic Pasta topped with vegan Parmesan and chili flakes.
  • Don’t Overcook the Pasta: Aim for al dente; it will continue to cook slightly in the sauce.
  • Use Fresh Ingredients: Fresh garlic and lemon make a noticeable difference in flavor.
  • Adjust Consistency: If the sauce seems too thick, add more pasta water until you reach your desired creaminess.
  • Experiment with Herbs: Fresh basil or parsley can elevate the dish with additional freshness.
  • Make it a Meal: For added protein, toss in cooked chickpeas or tofu.
  • Flavor Boost: Add a splash of white wine when sautéing the garlic for extra depth.
  • Chill and Reheat: This pasta keeps well; just reheat gently to maintain texture.
  • Mix in Greens: Adding in baby spinach or arugula can enhance both nutrition and flavor.

Common Mistakes and Troubleshooting

Here are some common issues you might encounter, along with how to solve them:

  • Too Dry: If the pasta looks dry after mixing, add more pasta water or vegan cream until it’s saucy enough.
  • Overpowering Lemon Flavor: If you find it too tart, balance with a pinch of sugar or more cream.
  • Garlic Burnt: If garlic turns brown, lower the heat next time to avoid bitterness.
  • Not Enough Flavor: Taste the sauce before adding the pasta; adjust seasoning with salt, pepper, or more chili flakes as needed.

Variations to Try

Feel free to mix it up! Here are some tasty variations:

  • Creamy Spinach and Artichoke: Incorporate fresh spinach and canned artichokes into the sauce.
  • Sun-Dried Tomato Twist: Add chopped sun-dried tomatoes for a Mediterranean flair.
  • Protein-Packed: Toss in grilled chicken, shrimp, or chickpeas for a more filling meal.
  • Herbed Lemon Pasta: Mix in fresh herbs like dill, parsley, or basil for a fragrant touch.

Storage and Make-Ahead Instructions

This Lemon Garlic Pasta is perfect for meal prep! Here’s how to store it:

  • Refrigerator: Store in an airtight container for up to 3 days. Reheat gently on the stove with a splash of water.
  • Freezer: Freeze in portions for up to 2 months. Thaw overnight in the fridge before reheating.
  • Make Ahead: You can prepare the sauce in advance and combine it with freshly cooked pasta just before serving.

Frequently Asked Questions

Got questions? We’ve got answers!

  • Can I use regular dairy milk instead of vegan cream? Yes, feel free to substitute with regular cream or milk, but it may alter the flavor slightly.
  • What type of pasta works best? Long pasta like spaghetti or linguine is ideal, but you can use any shape you prefer.
  • Can I make this gluten-free? Absolutely! Use gluten-free pasta for a delicious alternative.
  • How can I make this dish spicier? Add more chili flakes or even a dash of hot sauce to kick it up a notch!
  • Can I add other vegetables? Yes! Roasted or sautéed veggies like zucchini, bell peppers, or asparagus work wonderfully.
  • How can I make it creamier? Increase the amount of vegan cream or use a cashew cream in place of the coconut milk for a richer texture.
  • What can I substitute for vegan Parmesan? Nutritional yeast is a great alternative, adding a cheesy flavor without the dairy.
  • Is this pasta good for meal prep? Yes! It stores well in the fridge and is easy to reheat.

Nutrition Tips and Dietary Adaptations

This Lemon Garlic Pasta not only satisfies your taste buds but also supports a healthy lifestyle:

  • Plant-Based Goodness: Packed with nutrients from the peas and healthy fats from olive oil.
  • Balanced Meal: Add protein sources like chickpeas or tofu for a complete meal.
  • Fiber-Rich: Use whole grain or legume-based pasta for additional fiber and nutrients.

Equipment Recommendations

To make the cooking process smoother, here are some kitchen tools you might find helpful:

  • Large Pot: For boiling pasta; choose one with a lid for quicker boiling.
  • Sauté Pan: A wide pan for mixing the pasta with the sauce evenly.
  • Measuring Cups: Essential for accurately measuring ingredients.
  • Garlic Press: Optional, but it can save time when mincing garlic.

Serving Suggestions

Pair your Lemon Garlic Pasta with these delightful options:

  • Side Salad: A fresh green salad with a light vinaigrette complements the dish perfectly.
  • Garlic Bread: Crunchy, buttery garlic bread is always a hit.
  • Wine Pairing: A crisp white wine, such as Sauvignon Blanc, enhances the lemony flavors.

Enjoy your cooking journey with this Lemon Garlic Pasta recipe, and remember: it’s all about having fun in the kitchen! With clear steps and a few quality ingredients, you can create a dish that’s both satisfying and impressive. Happy cooking!

Lemon Garlic Pasta

Prep Time 5 minutes
Cook Time 15 minutes
Total Time 20 minutes
Servings 2 servings
Calories 450
A quick and flavorful vegan pasta dish with lemon, garlic, and peas, perfect for a light meal.

Ingredients

Pasta

  • 6 ounces pasta
  • 1 tablespoon vegan butter
  • 1 tablespoon olive oil extra virgin
  • 3 garlic cloves garlic
  • 1 lemon lemon juice and zest
  • ½ teaspoon chili flakes
  • ½ cup vegan cream or coconut milk
  • ½ cup pasta water
  • 2 tablespoons vegan Parmesan cheese
  • ½ cup peas

Instructions 

  • Cook the pasta according to package instructions; drain, reserving ¼ cup of pasta water.
  • Heat vegan butter and olive oil in a large pan over low-medium heat.
  • Add garlic, lemon juice, lemon zest, and chili flakes; sauté for 30 seconds. Add pasta water and cream, heat through.
  • Mix in cooked pasta and peas; cook until heated. Garnish with vegan Parmesan cheese.

Notes

Use fresh lemon for the best flavor and adjust chili flakes to taste.
Calories: 450kcal
Cost: $12
Course: Main Course
Cuisine: vegan
Keyword: Pasta