Author

Steven

Browsing

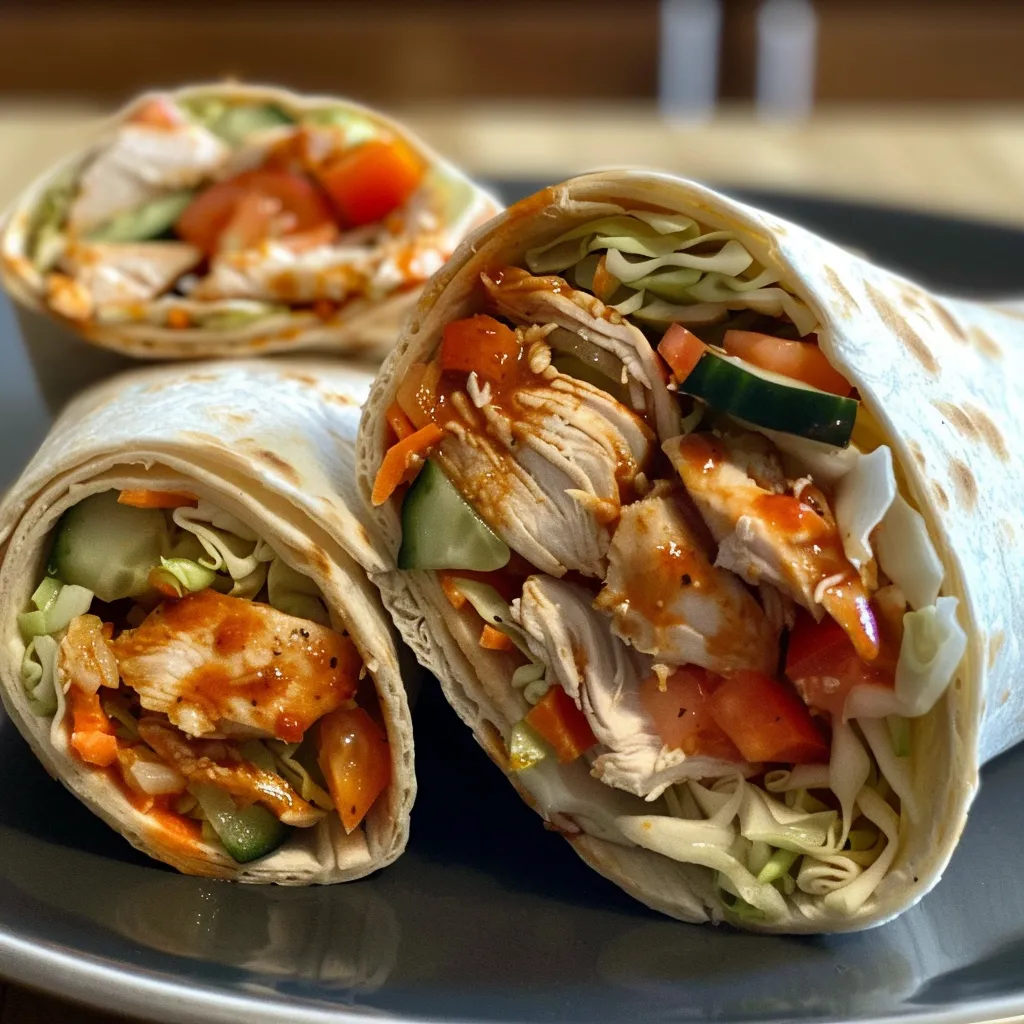
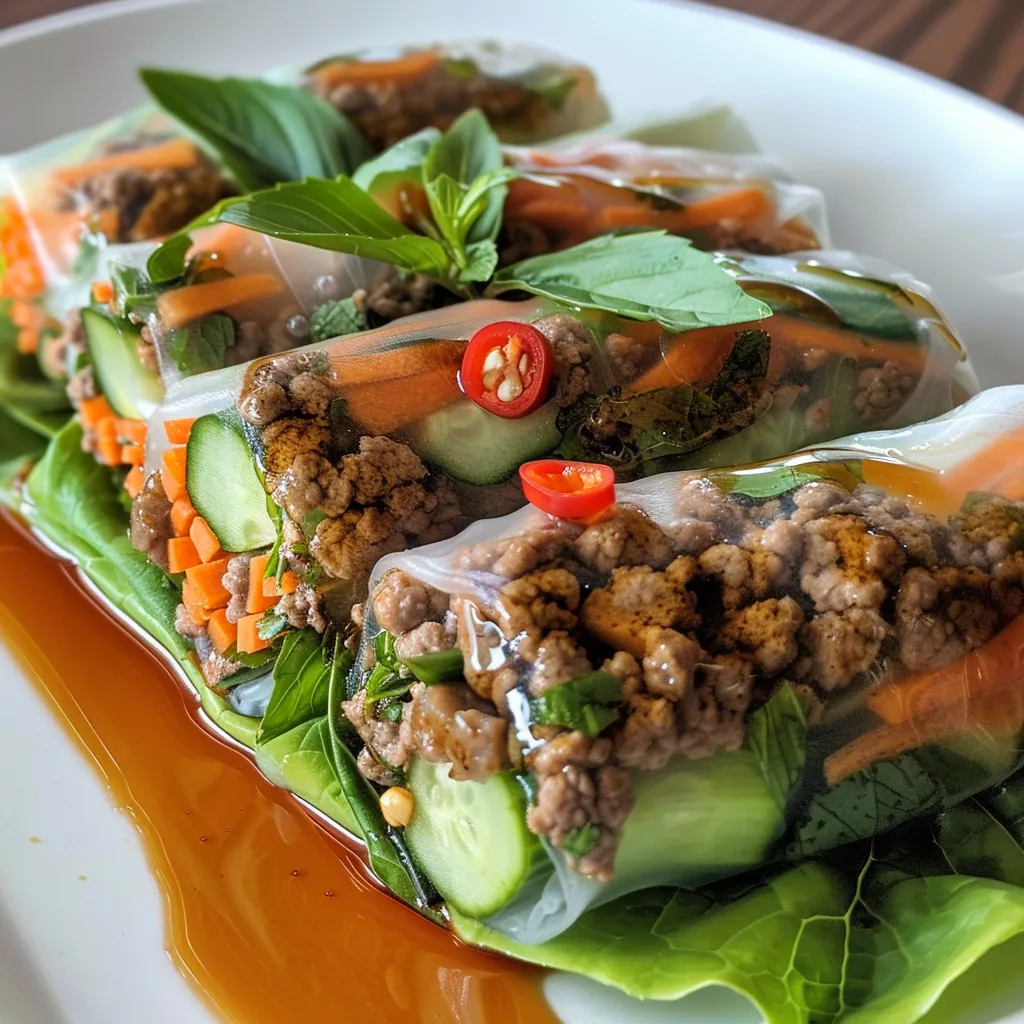
Fresh and Flavorful Thai Basil Beef Rolls: A Culinary Adventure Awaits!

Welcome to the delightful world of Thai Basil Beef Rolls! This quick and easy recipe combines the rich flavors of ground beef, fresh herbs, and crisp vegetables, making it perfect for entertaining or a simple family meal. You’ll love the contrast of textures and the vibrant flavors that come together in each bite. Whether you’re a seasoned cook or just starting, these rolls promise to be a hit. Let’s dive into this culinary journey and discover why you’ll want to make these delicious rolls!

Why You’ll Love This Recipe

This recipe is not just about food; it’s about creating an experience. Here are five reasons why you’ll absolutely adore these Thai Basil Beef Rolls:

  • Quick to prepare: From start to finish, these rolls can be ready in under 30 minutes, making them ideal for weeknight dinners or last-minute gatherings.
  • Flavor explosion: The combination of savory beef, aromatic basil, and a hint of chili creates a taste sensation that will leave your taste buds dancing.
  • Customizable: You can easily swap ingredients to suit your taste or dietary needs, whether you prefer different proteins or vegetables.
  • Healthy and balanced: Packed with lean protein, fresh herbs, and crunchy vegetables, these rolls are a nutritious choice.
  • Perfect for sharing: Serve them as an appetizer or main dish; they’re fun to make and even more fun to eat!

Key Ingredients for Thai Basil Beef Rolls

Let’s explore the essential components that make these beef rolls shine. Understanding your ingredients will empower you to make substitutions and adjustments based on your preferences.

  • Ground beef (450 grams): The star of the show! You can substitute with ground pork, chicken, or even tofu for a vegetarian option.
  • Fish sauce (1 tablespoon): Adds depth and umami flavor to the beef mixture. If you’re avoiding fish, soy sauce is a great alternative.
  • Brown sugar (2 teaspoons): Balances the savory and spicy elements, adding a touch of sweetness.
  • Garlic (2 cloves, minced): Infuses the dish with a rich aroma and flavor base.
  • Red chili (1, sliced): Provides the necessary heat, but feel free to adjust the amount to suit your spice tolerance.
  • Vegetable oil (1 tablespoon): For sautéing, though any neutral oil will work.
  • Lime juice (2 tablespoons): Brightens the dish and enhances the freshness of the herbs.
  • Fresh Thai basil leaves (1 cup): The hero herb that brings the signature flavor; don’t substitute with regular basil as it has a different taste.
  • Rice paper wrappers (8): Essential for rolling up your delicious filling.
  • Lettuce leaves (8): Adds a crisp texture and freshness to each bite.
  • Cucumber (1, sliced): Offers crunch and hydration.
  • Carrot (1, shredded): Adds sweetness and color.
  • Fresh mint leaves (1/2 cup): Optional, but they add an aromatic layer to the rolls.

How to Make Thai Basil Beef Rolls: Step-by-Step Instructions

Juicy Thai Basil Beef Rolls displayed on a plate with vibrant herbs.

Ready to roll? Follow these simple steps to create your Thai Basil Beef Rolls. Each step is designed to ensure you achieve the best flavor and texture.

  1. Heat vegetable oil in a skillet over medium heat.
  2. Add garlic and red chili and sauté until fragrant, about 1 minute.
  3. Add ground beef and cook until browned, breaking it up with a spoon.
  4. Stir in fish sauce and brown sugar, cooking for another 2 minutes until well combined.
  5. Remove from heat and stir in lime juice and Thai basil leaves until wilted.
  6. Fill a large shallow dish with warm water and briefly soak one rice paper wrapper to soften.
  7. Lay the softened wrapper on a flat surface, place a lettuce leaf in the center, then add the beef mixture, cucumber, carrot, and mint leaves.
  8. Fold the sides of the wrapper over the filling, then roll tightly from the bottom up to form a sealed roll.
  9. Repeat with remaining wrappers and ingredients, then serve immediately.

Pro Tips for Perfect Rolls

To ensure your Thai Basil Beef Rolls turn out delicious every time, keep these expert tips in mind:

  • Use warm water: Soaking the rice paper in warm water softens it quickly without tearing.
  • Don’t overfill: Less is more! Overfilling can lead to tears and messy rolls.
  • Practice your rolling technique: Tightly roll the wrapper to keep the filling secure; it might take a few tries to get it just right.
  • Adjust spice levels: Feel free to add more or fewer chilies based on your heat preference.
  • Chill the filling: Let the beef mixture cool slightly before assembling to prevent the rice paper from becoming too mushy.
  • Experiment with herbs: Try adding cilantro or parsley for a different flavor profile.
  • Prepare a dipping sauce: A simple mix of soy sauce, lime juice, and a hint of chili can elevate your rolls.
  • Make ahead: Prepare the beef filling a day in advance to save time on the day you plan to serve.

Common Mistakes and Troubleshooting

Even seasoned cooks can run into a few hiccups. Here are common mistakes to avoid when making your Thai Basil Beef Rolls:

  • Rice paper tearing: Ensure the wrappers are soaked just enough to be pliable, but not too long that they become overly soft.
  • Filling too hot: Allow the beef mixture to cool slightly before wrapping to prevent the rice paper from getting soggy.
  • Overcooked beef: Cook just until browned; overcooking can lead to a tough texture.
  • Insufficient seasoning: Taste the beef mixture before rolling; adjust seasoning as needed.

Delicious Variations to Try

Once you’ve mastered the classic Thai Basil Beef Rolls, why not explore some fun variations? Here are a few ideas to spark your creativity:

  • Spicy shrimp rolls: Substitute ground beef with shrimp for a lighter, seafood option.
  • Vegetarian rolls: Replace the meat with a mixture of sautéed mushrooms, bell peppers, and tofu.
  • Herbed chicken rolls: Use ground chicken instead of beef, adding a hint of sesame oil for flavor.
  • Fruit-infused rolls: Add mango or pineapple slices for a sweet contrast to the savory filling.

Storage and Make-Ahead Instructions

If you want to prepare these rolls in advance, here’s how to store them without losing freshness:

  • Refrigerate: Store unwrapped rolls in an airtight container in the fridge for up to 2 days.
  • Freezing: Freeze uncooked rolls on a baking sheet, then transfer to a freezer bag. They can be kept for up to 2 months. Thaw before cooking.
  • Make-ahead filling: The beef mixture can be prepared a day in advance and stored in the fridge, making assembly a breeze.

Frequently Asked Questions

Here are some common questions about Thai Basil Beef Rolls that might help you out:

  • Can I use different types of meat for these rolls? Absolutely! Ground pork, chicken, or even turkey work wonderfully.
  • How do I make these rolls gluten-free? Use gluten-free soy sauce or tamari as a substitute for fish sauce.
  • Can I prepare these rolls ahead of time? Yes, you can make the filling in advance and assemble the rolls shortly before serving.
  • What should I serve with these rolls? Pair them with a light dipping sauce and a side salad for a complete meal.
  • How do I store leftovers? Keep any uneaten rolls in an airtight container in the fridge for up to two days.
  • Can these rolls be frozen? Yes, freeze uncooked rolls and thaw them in the fridge before cooking.
  • What’s the best way to reheat leftover rolls? Gently steam them to preserve the texture, or microwave for a few seconds.
  • Can I add other vegetables to the filling? Definitely! Feel free to add bell peppers, zucchini, or any other favorites.

Nutritional Insights and Dietary Adaptations

These Thai Basil Beef Rolls are not only delicious but can be tailored to fit various dietary needs:

  • Low-carb option: Skip the rice paper and serve the beef mixture in lettuce cups instead.
  • High-protein twist: Use extra lean beef or turkey to increase protein while reducing fat.
  • Herb boost: Incorporate more fresh herbs to enhance flavor without extra calories.

Essential Equipment for Success

Having the right tools can make your cooking experience smoother:

  • Skillet: A good-quality non-stick skillet is ideal for cooking the beef mixture.
  • Shallow dish: For soaking the rice paper wrappers, a pie dish or large plate works well.
  • Sharp knife: For slicing vegetables and herbs quickly and efficiently.

Serving Suggestions to Impress

When it comes to serving your Thai Basil Beef Rolls, presentation matters! Here are a few ideas:

  • Platter presentation: Arrange the rolls on a large platter with fresh herbs and lime wedges for a beautiful display.
  • Dipping sauce: Serve with a side of homemade peanut sauce or sweet chili sauce for extra flavor.
  • Garnish: Sprinkle with crushed peanuts or sesame seeds for a delightful crunch.

Conclusion: Your Culinary Adventure Awaits!

Thai Basil Beef Rolls are not just a meal; they’re an experience filled with vibrant flavors and satisfying textures. With this comprehensive guide, you have all the tools you need to create these delightful rolls at home. Remember, cooking is about experimenting and having fun, so don’t hesitate to make this recipe your own. I can’t wait for you to try this recipe and impress your family and friends. Happy cooking!

Thai Basil Beef Rolls

Prep Time 15 minutes
Cook Time 10 minutes
Total Time 25 minutes
Servings 4 servings
Calories 250
Delight in these fresh and flavorful Thai basil beef rolls, perfect for a light appetizer or main dish.

Ingredients

Meat and Seasonings

  • 450 grams ground beef
  • 1 tablespoon fish sauce
  • 2 teaspoons brown sugar
  • 2 cloves garlic minced
  • 1 red chili sliced
  • 1 tablespoon vegetable oil
  • 2 tablespoons lime juice
  • 1 cup fresh Thai basil leaves

Wraps and Vegetables

  • 8 rice paper wrappers rice paper wrappers
  • 8 lettuce leaves lettuce leaves
  • 1 medium cucumber sliced
  • 1 medium carrot shredded
  • 0.5 cup fresh mint leaves

Instructions 

  • Heat oil in a skillet, sauté garlic and chili until fragrant, then cook beef until browned. Stir in fish sauce, sugar, lime juice, and basil until wilted. Soak rice paper in warm water, fill with lettuce, beef, cucumber, carrot, and mint, then roll tightly. Repeat and serve immediately.

Notes

Use fresh ingredients for best flavor and serve immediately.
Calories: 250kcal
Cost: $12
Course: Appetizer
Cuisine: Thai
Keyword: Basil, Beef, Rice Paper

Welcome to your new go-to recipe for delicious BBQ Chicken Wraps! Perfect for busy weeknights or a quick lunch, this recipe combines tender BBQ chicken with fresh vegetables, creating a satisfying meal that’s both easy to make and delightful to eat. In this guide, we’ll break down the recipe into simple steps, ensuring you feel confident every step of the way. Let’s dive into the world of BBQ chicken wraps!

Why You’ll Love This Recipe

These BBQ Chicken Wraps are not just tasty; they bring a variety of benefits to your kitchen table. Here’s why you’ll love making them:

  • Quick and Easy: With just a few ingredients and minimal prep time, you can whip up these wraps in under 30 minutes.
  • Customizable: You can easily modify the ingredients to suit your taste preferences, making them perfect for anyone!
  • Healthy Options: Packed with veggies, these wraps are a nutritious choice that doesn’t skimp on flavor.
  • Make-Ahead Friendly: Prepare the ingredients in advance, and you can assemble your wraps in no time during busy days.
  • Kid-Friendly: These wraps are fun to eat, making them a great way to get kids involved in cooking and enjoying healthy meals.

BBQ Chicken Wrap Recipe

Let’s get started with the ingredients and steps needed to create these delicious BBQ Chicken Wraps!

Ingredients

  • 2 large tortillas or lavash breads
  • 1 cup BBQ chicken breast, sliced (use grilled or baked chicken with BBQ sauce)
  • 1 cup shredded cabbage
  • 1 medium carrot, julienned
  • 1 cucumber, sliced into rounds or julienned
  • 1 tomato, sliced
  • ½ small onion, thinly sliced
  • ½ cup plain yogurt (optional, for a yogurt sauce)
  • 1 garlic clove, minced (optional, for a yogurt sauce)
  • BBQ sauce to taste
  • Salt to taste

Instructions

  1. Grill or bake a chicken breast coated with your favorite BBQ sauce until fully cooked, then slice into thin strips.
  2. In a small bowl, mix plain yogurt with minced garlic and a pinch of salt for the yogurt sauce. Stir until smooth and set aside.
  3. Lay a lavash bread on a clean, flat surface and layer with shredded cabbage, julienned carrots, cucumber slices, and sliced BBQ chicken.
  4. Drizzle with your choice of BBQ sauce or the yogurt-garlic sauce, then top with thinly sliced onions and tomato slices.
  5. Fold the sides of the lavash over the filling and roll tightly from the bottom up to enclose all ingredients.
  6. For a warm, crispy finish, place the wrap on a preheated grill or skillet, grilling each side for about 2-3 minutes until golden and slightly crisp.
  7. Slice the wrap in half and serve immediately, enjoying with extra BBQ sauce or yogurt sauce on the side if desired!

Ingredient Breakdown and Substitutions

Understanding your ingredients is essential for a successful BBQ Chicken Wrap. Here’s a detailed breakdown:

  • Tortillas or Lavash: You can use whole wheat tortillas for a healthier option or gluten-free tortillas if needed.
  • BBQ Chicken: Rotisserie chicken is a great time-saver. You can also use leftover grilled chicken for added convenience.
  • Veggies: Feel free to swap in your favorite vegetables like bell peppers, spinach, or even avocado for creaminess.
  • Yogurt Sauce: Substitute Greek yogurt for a thicker sauce or use ranch dressing for a different twist.
  • BBQ Sauce: Experiment with different BBQ sauces for varying flavor profiles; smoky, sweet, or spicy!

Pro Tips for the Best BBQ Chicken Wraps

Side view of a BBQ chicken wrap showcasing grilled chicken and fresh veggies.

To ensure your BBQ Chicken Wraps turn out perfectly, consider these expert tips:

  • Prep Ahead: Chop and prepare all your ingredients in advance to save time during cooking.
  • Don’t Overfill: Be cautious not to overstuff the wraps to avoid messy spills when rolling.
  • Grill for Flavor: Grilling the wraps adds a delightful smoky flavor and crispy texture that enhances the overall taste.
  • Balance Flavors: Balance the sweetness of BBQ sauce with a tangy yogurt sauce for a delicious contrast.
  • Keep It Fresh: Use fresh vegetables for crunch and flavor; add them just before serving to maintain their texture.
  • Experiment with Sauces: Try different sauces like buffalo sauce or honey mustard to change up the flavor profile.
  • Double the Recipe: Make extra wraps for meal prep or to share with friends and family!
  • Serve Warm: These wraps are best served warm, so heat them just before serving for maximum enjoyment.

Common Mistakes and Troubleshooting

Even seasoned cooks can make a few missteps. Here’s how to troubleshoot common issues:

  • Wraps Fall Apart: If your wraps are falling apart, try using a sturdier tortilla or lavash, or reduce the amount of filling.
  • Dry Chicken: Ensure the chicken is properly coated with BBQ sauce before cooking to prevent it from drying out.
  • Too Much Sauce: If they’re too saucy, reduce the amount of sauce you add during assembly.

Variations on BBQ Chicken Wraps

Mix things up by trying these delicious variations:

  • Spicy BBQ Chicken Wrap: Add jalapeños or hot sauce to your BBQ sauce for an extra kick!
  • Veggie-Loaded Wrap: Increase the vegetable content by adding bell peppers, zucchini, or spinach.
  • Tex-Mex Twist: Incorporate black beans, corn, and avocado for a Southwestern flair.
  • Fruit-Inspired Wrap: Add sliced apples or pineapple for a sweet contrast to the savory BBQ chicken.

How to Store and Make Ahead

These BBQ Chicken Wraps are perfect for meal prep! Here’s how to store them properly:

  • In the Fridge: Store assembled wraps in an airtight container in the fridge for up to 3 days.
  • Make in Advance: Prepare all ingredients ahead of time and store them separately until you’re ready to assemble.
  • Freezing: You can freeze unassembled wraps; wrap them tightly in plastic wrap and foil, then store in the freezer for up to a month.

Frequently Asked Questions

Got questions? Here are some common queries about BBQ Chicken Wraps:

  • Can I use store-bought BBQ chicken? Absolutely! Store-bought BBQ chicken is a great time-saver and still delicious.
  • Are these wraps good for meal prep? Yes, they hold up well in the fridge and are perfect for quick lunches or dinners.
  • Can I cook these wraps in the air fryer instead of a skillet? Yes! Air fry them at 375°F for about 5-7 minutes for a crispy finish.
  • What can I substitute for the yogurt sauce? Ranch dressing or a vinaigrette works well if you prefer a different flavor.
  • Can I use other proteins? Definitely! Try using turkey, beef, or even chickpeas for a vegetarian option.
  • What’s a good side dish with these wraps? Serve them with a fresh salad, sweet potato fries, or a fruit salad for a complete meal.
  • What if I don’t have BBQ sauce? You can use any sauce you love, like teriyaki or a spicy salsa.
  • How do I make them gluten-free? Use gluten-free tortillas or lettuce wraps for a low-carb option.

Nutrition Tips and Dietary Adaptations

For a healthier twist on your BBQ Chicken Wraps, try these tips:

  • Low-Carb Option: Use lettuce wraps instead of tortillas to reduce carbs significantly.
  • Higher Protein: Add chickpeas or beans for an extra protein boost.
  • Low-Calorie Sauce: Opt for a low-calorie BBQ sauce or homemade yogurt dressing to keep calories down.

Equipment Recommendations

Here’s what you’ll need to make your BBQ Chicken Wraps:

  • Grill or Skillet: A non-stick skillet or grill pan is ideal for achieving that crispy finish.
  • Knife and Cutting Board: For slicing and prepping your ingredients.
  • Mixing Bowl: To prepare your yogurt sauce or any additional toppings.

Serving Suggestions

Make your meal complete with these serving ideas:

  • Pair with a Salad: A crisp green salad with a light vinaigrette complements the wraps beautifully.
  • Chips on the Side: Serve with tortilla chips and salsa for a casual dining experience.
  • Fruit Platter: A fresh fruit platter adds a refreshing touch to your meal.

In conclusion, these BBQ Chicken Wraps are not just a meal; they’re an experience! With their rich flavors and endless customization options, you’ll find yourself making them again and again. So grab your ingredients, roll up your sleeves, and let’s get cooking! Enjoy this delightful dish with family and friends, and remember, cooking is all about having fun in the kitchen. Happy cooking!

BBQ Chicken Wrap Recipe

Prep Time 10 minutes
Cook Time 10 minutes
Total Time 20 minutes
Servings 2 servings
Calories 450
A delicious and easy-to-make BBQ chicken wrap perfect for a quick lunch or dinner, packed with fresh vegetables and flavorful sauces.

Ingredients

Tortillas

  • 2 pieces large tortillas or lavash breads
  • 1 cup BBQ chicken breast sliced (use grilled or baked chicken with BBQ sauce)
  • 1 cup shredded cabbage
  • 1 medium carrot julienned
  • 1 medium cucumber sliced into rounds or julienned
  • 1 medium tomato sliced
  • ½ small onion thinly sliced
  • ½ cup plain yogurt (optional, for yogurt sauce)
  • 1 clove garlic minced (optional, for yogurt sauce)
  • to taste BBQ sauce
  • to taste Salt

Instructions 

  • Grill or bake a chicken breast coated with BBQ sauce until cooked, then slice into strips.
  • Mix plain yogurt with minced garlic and a pinch of salt to make the yogurt sauce.
  • Lay a tortilla on a flat surface and layer with cabbage, carrots, cucumber, and chicken.
  • Drizzle with BBQ sauce or yogurt-garlic sauce, then add onions and tomato slices.
  • Fold sides and roll tightly, then grill each side for 2-3 minutes until golden.
  • Slice in half and serve immediately with extra sauces if desired.

Notes

For extra flavor, marinate the chicken in BBQ sauce for a few hours before cooking.
Calories: 450kcal
Cost: $15
Course: Main Course
Cuisine: American
Keyword: BBQ Chicken

Warm Up to Comfort: Discover White Bean, Spinach, and Couscous Soup

Welcome to the cozy world of cooking! Today, we’re diving into a delightful bowl of White Bean, Spinach, and Couscous Soup—a recipe that’s not just nourishing but also incredibly satisfying. This soup is perfect for busy weeknights when you want something quick yet flavorful. With its hearty ingredients, this dish promises to warm your heart and fill your belly, making it a go-to for every season.

This recipe is not just about taste; it’s about creating a comforting experience in your kitchen. In less than 30 minutes, you can have a delicious, home-cooked meal that feels like a hug in a bowl. Let’s explore why you’ll love this recipe!

Why You’ll Love This Recipe

  • Quick and Easy: This soup comes together in just 30 minutes, making it the perfect weeknight meal.
  • Healthy Ingredients: Packed with protein from white beans and nutrients from spinach, it’s a wholesome option for everyone.
  • Flavorful Depth: The aromatic touch of cumin and fresh garlic elevates the taste, ensuring every spoonful is a delight.
  • Versatile Recipe: The soup allows for easy substitutions based on what you have on hand, so you can get creative!
  • Great for Meal Prep: It stores well, making it an excellent choice for leftovers or meal prepping for the week.

Ingredient Breakdown

Let’s take a closer look at the ingredients you’ll need for this nourishing soup. Understanding each component can enhance your cooking experience and help with substitutions if necessary.

  • 2 tsp olive oil: A staple in many kitchens, olive oil adds a rich flavor while keeping things healthy.
  • 2 leeks: Use the white parts; they provide a mild onion flavor that complements the soup beautifully. If leeks aren’t available, use yellow onions.
  • 2 large garlic cloves: Fresh garlic is essential for depth of flavor. Minced garlic will warm your kitchen with its aroma.
  • 2 tsp ground cumin: This spice is key for flavoring. It adds warmth and a hint of earthiness. If you prefer a different spice, try smoked paprika!
  • 8 cups chicken broth: A flavorful base for your soup; use vegetable broth for a vegetarian option.
  • 3 cups canned white kidney cannellini beans: Rinsed and drained, they provide protein and a creamy texture. You can substitute with navy or great northern beans.
  • 2 dried bay leaves: These impart a subtle depth of flavor while cooking. Remember to remove them before serving!
  • 1 1/2 cups whole-wheat couscous: This adds heartiness and texture; however, quinoa or rice can serve as gluten-free alternatives.
  • 2 cups fresh spinach leaves: Packed tightly, spinach brings vibrant color and nutrients. Swiss chard is an excellent substitute.
  • Kosher salt and freshly ground black pepper: Essential for seasoning; adjust to your taste.

Step-by-Step Instructions

Side view of a hearty soup featuring white beans, spinach, and couscous in a rustic bowl.

Now that we’ve gathered our ingredients, let’s break down the cooking process into simple, actionable steps.

  1. Heat the olive oil in a large soup pot over medium-high heat.
  2. Add the chopped leeks and minced garlic, sautéing for 2 minutes or until tender.
  3. Stir in the ground cumin, letting it toast slightly for about 30 seconds to release its aroma.
  4. Pour in the chicken broth, then add the rinsed white beans and bay leaves.
  5. Bring the mixture to a boil over high heat.
  6. Once boiling, add the couscous, reduce the heat to low, cover, and let it simmer for 5 minutes.
  7. After 5 minutes, remove the bay leaves and discard them.
  8. Finally, stir in the fresh spinach and cook until wilted, about 30 seconds.
  9. Season with kosher salt and freshly ground black pepper to taste.

Pro Tips for Perfection

  • Don’t rush sautéing: Allow your leeks and garlic to soften and develop flavor before adding other ingredients.
  • Adjust seasoning: Taste your soup before serving; you may want more salt or pepper!
  • Use fresh herbs: Adding fresh herbs like parsley or dill just before serving can elevate the flavor even further.
  • Garnish wisely: A sprinkle of Parmesan cheese or a squeeze of lemon juice just before serving brightens the dish.
  • Storage tip: If you’re making this soup ahead, hold off on adding the spinach until reheating to keep it fresh.
  • Texture matters: For a creamier soup, blend a portion of the soup and mix it back in.
  • Flavor enhancement: Consider adding a splash of lemon juice or vinegar to brighten flavors just before serving.
  • Customize your beans: Mix in different beans for variety and texture; chickpeas work wonderfully!

Common Mistakes and Troubleshooting

Even seasoned cooks can face challenges, so here are some common pitfalls and how to avoid them:

  • Overcooking spinach: Add it at the end to retain its vibrant color and nutrients.
  • Too thick soup: If the soup gets too thick, simply add more broth or water to adjust the consistency.
  • Flavorless soup: Don’t skip the seasoning! Adjusting salt and pepper can make all the difference.
  • Undercooked couscous: Ensure you let it simmer covered for the full 5 minutes to achieve the right texture.

Delicious Variations

Feeling adventurous? Here are some tasty variations you can try:

  • Vegetarian Delight: Swap chicken broth for vegetable broth and add more veggies like carrots or zucchini.
  • Spicy Kick: Toss in a pinch of red pepper flakes or a diced jalapeño for added heat.
  • Herb Infusion: Experiment with herbs like thyme or rosemary for a different flavor profile.
  • Protein Boost: Add shredded rotisserie chicken or cooked sausage for an extra protein kick.

Storage and Make-Ahead Instructions

This soup is perfect for making ahead of time! Here’s how to store it:

  • Refrigeration: Store in an airtight container in the fridge for up to 3 days.
  • Freezing: Freeze portions in freezer-safe containers for up to 3 months. Just remember to leave out the spinach until reheating.
  • Reheating: Thaw overnight in the fridge before reheating on the stove or in the microwave, adding a splash of broth as needed.

FAQ: Your Questions Answered

  • Can I use dried beans instead of canned? Yes, just soak them overnight and adjust the cooking time accordingly.
  • Is this soup gluten-free? If you substitute couscous with quinoa or omit it, the soup can be gluten-free.
  • What can I serve with this soup? Pair it with crusty bread, a fresh salad, or a light sandwich for a complete meal!
  • Can I make this soup in a slow cooker? Absolutely! Sauté the leeks and garlic, then add all ingredients to the slow cooker and cook on low for 6-8 hours.
  • What if I don’t have leeks? You can use onions or shallots as a substitute.
  • How do I make it creamier? Blend a portion of the soup with an immersion blender for a creamier texture.
  • Can I add other vegetables? Definitely! Feel free to add carrots, celery, or any other vegetables you enjoy.
  • How spicy is this soup? It’s mild, but you can easily add spices to adjust the heat to your preference.

Nutritional Tips and Dietary Adaptations

This soup is already a healthy choice, but here are some tips to make it even better:

  • Low-Sodium Option: Use low-sodium broth and rinse your beans to reduce sodium content.
  • High-Protein Variation: Adding cooked quinoa or shredded chicken increases protein content.
  • Fiber Boost: Whole-wheat couscous is a great source of fiber; consider adding extra beans for even more!
  • Vegetarian/Vegan Adaptation: Simply use vegetable broth and omit any animal products for a plant-based meal.

Essential Equipment Recommendations

To make your cooking experience seamless, consider having these essentials on hand:

  • Large Soup Pot: A heavy-bottomed pot is ideal for even heating.
  • Wooden Spoon: Perfect for stirring without scratching your pot.
  • Measuring Cups and Spoons: Accurate measurements ensure consistent results.
  • Immersion Blender: Great for blending soups without transferring to a blender.

Serving Suggestions

To elevate your dining experience, consider these serving suggestions:

  • Garnish: A sprinkle of fresh herbs or a dollop of sour cream adds a nice touch.
  • Side Dishes: Serve with a fresh garden salad or crusty bread for dipping.
  • Presentation: Serve in wide, shallow bowls to showcase the vibrant colors of the soup.

In conclusion, making White Bean, Spinach, and Couscous Soup is not just about the recipe; it’s about enjoying the process and the journey of bringing flavors together. With simple ingredients and clear steps, you can create a meal that nourishes both body and soul. So, roll up your sleeves, gather your ingredients, and let’s make some magic in the kitchen! Happy cooking!

White Bean, Spinach and Couscous Soup

Prep Time 10 minutes
Cook Time 15 minutes
Total Time 25 minutes
Servings 4 servings
Calories 250
A hearty and nutritious soup combining white beans, fresh spinach, and whole-wheat couscous for a comforting meal.

Ingredients

Oil

  • 2 tsp olive oil

Leeks

  • 2 pieces leeks, rinsed and chopped (white parts only)

Garlic

  • 2 cloves garlic cloves, minced

Ground Cumin

  • 2 tsp ground cumin

Chicken Broth

  • 8 cups chicken broth

White Kidney Cannellini Beans

  • 3 cups canned white kidney cannellini beans, rinsed and drained

Bay Leaves

  • 2 dried bay leaves

Whole-Wheat Couscous

  • 0.5 cups whole-wheat couscous

Fresh Spinach Leaves

  • 2 cups fresh spinach leaves, packed

Salt and Pepper

  • to taste Kosher salt and freshly ground black pepper

Instructions 

  • Heat oil in a large pot over medium-high heat.
  • Add leeks and garlic, sauté until tender, about 2 minutes.
  • Stir in cumin, then add broth, beans, and bay leaves. Bring to a boil.
  • Add couscous, reduce heat, cover, and simmer for 5 minutes. Remove bay leaves.
  • Stir in spinach until wilted, season with salt and pepper, then serve.

Notes

For extra flavor, add a squeeze of lemon before serving.
Calories: 250kcal
Cost: $12
Course: Soup
Cuisine: International
Keyword: Healthy, Vegetarian

Welcome to a delicious journey where cooking meets creativity! This vegan bowl recipe is not just a meal; it’s a celebration of flavors that will tantalize your taste buds. With king oyster mushrooms that mimic shrimp and a vibrant medley of veggies, you’re in for a treat. This recipe is perfect for busy weeknights or whenever you crave a hearty, healthy meal. Let’s dive into the world of vegan bowls that are sure to impress!

Why You’ll Love This Recipe

Here are just a few reasons why this vegan bowl will become a staple in your kitchen:

  • Quick Preparation: This dish can be whipped up in under 30 minutes, making it an ideal choice for busy evenings.
  • Flavor Explosion: The combination of chili lime sauce and marinated mushrooms creates a taste experience that is both zesty and satisfying.
  • Highly Customizable: You can easily swap out ingredients to suit your dietary preferences or whatever you have on hand.
  • Healthy Ingredients: Packed with nutrient-dense vegetables and wholesome grains, this bowl is as good for you as it is delicious.
  • Impressive Presentation: With its colorful ingredients and artful arrangement, this bowl will wow your family and friends.

Ingredient Breakdown

Before we get started with the cooking, let’s take a look at the ingredients you’ll need. Each component plays a crucial role in the overall flavor and texture of the dish.

  • King Oyster Mushrooms: About 6 ounces (2 large mushrooms); these mushrooms have a meaty texture that mimics shrimp perfectly.
  • Vegetable Broth: 1 1/4 cups; adds depth of flavor to the marinade and sauce.
  • Fresh Lime Juice: 1/4 cup (juice of about 2 limes); the bright acidity lifts the flavors.
  • Vegan Worcestershire Sauce: 1 tablespoon; this adds a savory umami element.
  • Dried Seaweed or Sushi Nori: 1 large sheet; enhances the umami flavor and is a key component of the marinade.
  • Old Bay Seasoning: 1 teaspoon; provides a classic seafood flavor profile.
  • Salt: 1 teaspoon; essential for seasoning.
  • Chili Powder: 1 teaspoon; adds a hint of heat.
  • Garlic: 2 medium cloves, finely minced; for aromatic depth.
  • Vegan Butter: 2 tablespoons; for sautéing and adding richness.
  • Paprika: 1/4-1/2 teaspoon; adds color and a mild pepper flavor.
  • Cornstarch: 2 teaspoons mixed with 2 teaspoons water; used to thicken the sauce.
  • Jasmine Rice: 2 cups cooked (or 1 cup dry); a fluffy base for the bowl.
  • Tomato: 1 medium, diced; for freshness and color.
  • Frozen Corn: 1 cup; adds sweetness and texture.
  • Avocado: 1 medium, cubed; for creaminess.
  • Cilantro: 2 tablespoons, chopped; for a fresh garnish.
  • Lime Zest: for garnish; enhances the lime flavor.

Pro Tips for Success

Follow these expert tips to ensure your vegan bowl turns out perfectly every time:

  • Marinate Wisely: Allow the mushrooms to sit in the marinade for at least 10 minutes to absorb maximum flavor.
  • Don’t Rush the Cooking: Cook the mushrooms until they’re golden brown for the best texture and flavor.
  • Adjust Seasonings: Feel free to tweak spices based on your palate; taste as you go!
  • Use Fresh Ingredients: Fresh veggies and herbs will enhance the overall flavor and presentation of your bowl.
  • Perfect Rice: Make sure to rinse your jasmine rice before cooking to achieve the fluffiest texture.
  • Heat Management: If your pan gets too hot, reduce the heat to avoid burning the butter.
  • Garnish Generously: Don’t skip the avocado, cilantro, and lime zest—they add vibrant flavors!
  • Experiment with Sauces: Try different sauces or dressings to personalize your bowl.

Common Mistakes and Troubleshooting

Side angle of a delicious vegan bowl featuring cooked jasmine rice, diced tomatoes, and fresh cilantro.

Cooking can be an adventure, and mistakes will happen! Here are some common pitfalls and how to avoid them:

  • Soggy Mushrooms: Ensure the mushrooms are well-drained after marinating to prevent sogginess when cooking.
  • Flavorless Bowl: Don’t skip seasoning; every ingredient needs to be well-seasoned to shine.
  • Overcooked Rice: Follow package instructions for cooking rice and check for doneness frequently.
  • Burnt Garlic: Add garlic toward the end of cooking to avoid burning it, which can create bitterness.
  • Lack of Color: Use a variety of colorful vegetables to make your bowl visually appealing.

Variations of the Vegan Bowl

This recipe is versatile and can be adapted in many ways. Here are a few variations to try:

  • Asian-Inspired Bowl: Use sesame oil instead of vegan butter, and add edamame and sliced radishes.
  • Spicy Southwest Bowl: Add black beans, corn salsa, and a chipotle dressing for a kick.
  • Italian Bowl: Incorporate roasted red peppers, olives, and a balsamic glaze for an Italian twist.
  • Breakfast Bowl: Top with a vegan egg substitute and a sprinkle of nutritional yeast for a breakfast version.

Storage and Make-Ahead Instructions

This vegan bowl is great for meal prepping! Here’s how to store and reheat for future meals:

  • Storage: Store leftovers in an airtight container in the refrigerator for up to 3 days.
  • Reheating: Gently reheat in the microwave or on the stovetop; add a splash of water or broth to prevent drying out.
  • Make-Ahead: You can marinate the mushrooms and prepare the rice ahead of time; assemble the bowl just before serving.
  • Freezing: While the rice and veggies can be frozen, it’s best to keep the avocado fresh to avoid browning.

Frequently Asked Questions

Got questions? We’ve got answers! Here are some common queries about making vegan bowls:

  • Can I use other mushrooms? Absolutely! Any mushroom can work, but king oyster has the best texture for this recipe.
  • What can I substitute for lime juice? Lemon juice can be used as a substitute, though it will change the flavor slightly.
  • Is there a gluten-free option for the sauce? Yes! Make sure to use gluten-free Worcestershire sauce or tamari.
  • Can I make this bowl oil-free? Yes! Skip the vegan butter and use vegetable broth to sauté the mushrooms.
  • How do I make it spicier? Add red pepper flakes or your favorite hot sauce to the marinade for an extra kick.
  • What other grains can I use? Quinoa, farro, or barley are excellent alternatives to jasmine rice.
  • Can I add more veggies? Definitely! Feel free to include any of your favorites like bell peppers, spinach, or broccoli.
  • How do I ensure my bowl is well-balanced? Aim for a mix of protein, healthy fats, and fiber-rich carbs for a nutritious meal.

Nutrition Tips and Dietary Adaptations

This vegan bowl is packed with nutrients, making it a great choice for a healthy meal. Here are some additional tips:

  • Protein Boost: Add chickpeas or lentils for an extra protein punch.
  • Healthy Fats: Incorporate nuts or seeds for added crunch and healthy fats.
  • Low-Carb Option: Swap rice for cauliflower rice or zucchini noodles for a lower-carb version.
  • High-Fiber Choice: Add beans or legumes to increase fiber content and keep you full longer.

Equipment Recommendations

To make this recipe, you’ll need a few essential tools:

  • Nonstick Skillet: Essential for cooking the mushrooms without sticking.
  • Small Pot: For simmering the marinade and making the sauce.
  • Sharp Knife: For cutting the mushrooms and veggies with ease.
  • Measuring Cups and Spoons: To ensure accurate ingredient measurements.

Serving Suggestions

Here’s how to plate your vegan bowl for maximum impact:

  • Layering: Start with a base of rice, then artfully arrange the mushrooms and veggies on top.
  • Garnishing: Don’t forget to sprinkle with cilantro, lime zest, and a drizzle of sauce for a pop of color.
  • Side Dishes: Serve with a light salad or steamed greens for a complete meal.

In conclusion, this flavor-packed vegan bowl is not just a meal; it’s an expression of creativity and a way to enjoy healthy eating. Remember, cooking should be fun and stress-free! I hope this recipe inspires you to get into the kitchen and whip up something delicious. Happy cooking!

Vegan Bowl Recipe with Vegan Shrimp

Prep Time 15 minutes
Cook Time 20 minutes
Total Time 35 minutes
Servings 2 servings
Calories 450
A vibrant and flavorful vegan bowl featuring mushroom shrimp, fresh vegetables, and a zesty sauce, perfect for a satisfying plant-based meal.

Ingredients

Vegetables and Seasonings

  • 6 ounces king oyster mushrooms (about 2 large)
  • 355 ml vegetable broth (1 1/4 cups)
  • 60 ml fresh lime juice (juice of about 2 limes)
  • 1 tablespoon vegan Worcestershire sauce
  • 1 large sheet dried seaweed or sushi nori (folded into a small square)
  • 1 teaspoon old bay seasoning
  • 1 teaspoon salt
  • 1 teaspoon chili powder
  • 2 cloves garlic (finely minced)
  • 2 tablespoons unsalted vegan butter
  • 0.25 teaspoon paprika
  • 2 teaspoons cornstarch (mixed with 2 teaspoons water)
  • 2 cups cooked jasmine rice (or 1 cup dry rice cooked)
  • 1 medium tomato (diced)
  • 1 cup frozen corn
  • 1 medium avocado (cubed)
  • 2 tablespoons chopped fresh cilantro
  • as needed garnish lime zest

Instructions 

  • Trim mushroom caps and slice stems into 1/2 inch rounds, then cut into shrimp shapes. Save excess pieces.
  • Simmer mushroom stems, caps, and seasonings in vegetable broth, lime juice, seaweed, and spices for 10 minutes. Remove seaweed.
  • Marinate mushroom shrimp and scraps in half of the cooled marinade for 10 minutes. Thicken remaining marinade into a sauce with cornstarch slurry.
  • Cook marinated mushroom shrimp in vegan butter until golden, then cook remaining pieces. Char frozen corn in the same skillet.
  • Assemble bowls with rice, tomato, avocado, mushroom shrimp, and charred corn. Garnish with cilantro, lime zest, and drizzle with sauce.

Notes

Ensure to toss the mushrooms well in marinade for maximum flavor and use a nonstick skillet to prevent sticking.
Calories: 450kcal
Cost: $15
Course: Main Course
Cuisine: vegan
Keyword: Vegan Shrimp

Welcome to your new go-to recipe for a cozy weeknight dinner! This Spicy Beef Noodle Soup is not just a dish; it’s a comforting experience that combines tender beef, fresh vegetables, and a delightful kick of spice. Perfect for those evenings when you want something hearty but don’t have hours to spend in the kitchen, this recipe is simple, rewarding, and packed with flavor. Let’s dive into the wonderful world of savory broths and mouthwatering noodles!

Why You’ll Love This Recipe

  • Quick and Easy: This recipe comes together in under 30 minutes, making it perfect for busy weeknights.
  • Flavorful Broth: The combination of soy sauce, fish sauce, and chili paste creates a rich and spicy broth that warms you from the inside out.
  • Customizable Ingredients: Feel free to swap out vegetables and noodles based on what you have at home or your dietary preferences.
  • Family-Friendly: With its balance of spice and savory flavors, it’s a dish that both kids and adults will love.
  • Meal Prep Friendly: Make a big batch and enjoy leftovers throughout the week.

What You’ll Need for Your Spicy Noodle Soup

Essential Ingredients

  • 300 g beef flank steak, sirloin, or shank: Thinly sliced for quick cooking.
  • 2 tbsp vegetable oil: For searing the beef and sautéing aromatics.
  • 1 onion: Thinly sliced to add sweetness and depth.
  • 3 cloves garlic: Minced for a fragrant boost.
  • 2 cm ginger: Grated to infuse the broth with warmth.
  • 1 tbsp chili paste or sambal oelek: Adjust to taste for desired heat.
  • 1 tbsp soy sauce: A must for umami flavor.
  • 1 tbsp fish sauce: To enhance the savory depth.
  • 1 tsp brown sugar: Balances the flavors.
  • 1.5 liters beef broth: The flavorful base for your soup.
  • 200 g rice noodles or egg noodles: Choose your favorite type for the soup.
  • 1 cup bok choy or fresh spinach: Adds freshness and color.

Handy Ingredient Swaps

  • Beef alternatives: Use chicken or tofu for a lighter version.
  • Vegetable broth: Swap in vegetable broth for a vegetarian option.
  • Other greens: Kale or Swiss chard can be used instead of bok choy.
  • Different noodles: Udon or even whole grain options work great.

Let’s Make Your Spicy Beef Noodle Soup!

Step-by-Step Instructions

Ready to whip up a delicious bowl of soup? Follow these simple steps!

  1. Heat the oil: In a large pot over medium heat, add 1 tablespoon of oil. Once hot, add the thinly sliced beef and sear quickly until browned on the outside. Remove and set aside.
  2. Sauté the aromatics: In the same pot, add the remaining oil, then toss in the sliced onion, minced garlic, and grated ginger. Sauté for about 3-4 minutes until fragrant.
  3. Build the spicy broth: Stir in the chili paste, soy sauce, fish sauce, and brown sugar. Mix well, then pour in the beef broth and bring to a boil.
  4. Simmer: Reduce heat and let the broth simmer for 10 minutes to allow the flavors to meld.
  5. Add noodles and greens: Toss in the noodles and cook according to package instructions (usually 3-5 minutes). In the last 2 minutes, add bok choy or spinach.
  6. Return the beef: Add the reserved beef back to the pot to reheat, adjusting seasoning as desired.
  7. Serve: Ladle the soup into bowls and garnish with fresh chili, cilantro, green onions, and lime wedges.

Pro Tips for the Best Soup

Juicy spicy beef noodle soup featuring tender beef slices and fresh vegetables.
  • Don’t overcook the beef: Searing should be quick to keep the beef tender.
  • Adjust spice levels: If you love heat, add more chili paste or fresh chilies to the top.
  • Fresh herbs matter: Garnish with fresh cilantro or basil for a burst of flavor.
  • Let it rest: Allow the soup to sit for a minute after cooking to enhance the flavors.
  • Use good quality broth: A homemade or high-quality store-bought broth can make all the difference.
  • Prep ahead: Chop your vegetables and slice the beef earlier in the day to save time.
  • Experiment with flavors: Play with spices like star anise or cinnamon for a unique twist.
  • Don’t skip the lime: A squeeze of lime juice brightens the whole dish.

Common Mistakes and Troubleshooting

  • Soggy noodles: Make sure not to overcook the noodles in the broth. Cook them separately if you’re worried about this.
  • Bland broth: Always taste and adjust seasoning before serving. A pinch of salt or more fish sauce can help.
  • Too spicy: If your soup turns out too spicy, balance it with a little sugar or coconut milk.
  • Too greasy: If the soup is too oily, skim off any excess fat that floats to the surface before serving.

Variations to Try

  • Vegetarian Delight: Replace beef with mushrooms and use vegetable broth.
  • Spicy Seafood Version: Incorporate shrimp or fish for a seafood twist.
  • Thai-inspired: Add coconut milk and lemongrass for a different flavor profile.
  • One-Pot Wonder: Combine all ingredients and cook together for a simpler approach.

Storage and Make-Ahead Instructions

This soup is perfect for meal prep. You can store it in an airtight container in the refrigerator for up to 3 days. For longer storage, freeze the soup (without noodles) for up to 2 months. When ready to eat, reheat on the stovetop and add freshly cooked noodles.

Frequently Asked Questions (FAQ)

  • Can I use a different type of meat? Absolutely! Chicken or pork would work well, just adjust cooking times as needed.
  • Can I make this soup gluten-free? Yes, use gluten-free soy sauce and rice noodles.
  • How can I make it less spicy? Reduce the amount of chili paste or serve with lime wedges for a fresh taste.
  • What vegetables can I add? Carrots, bell peppers, or snap peas would be excellent additions!
  • Is this recipe suitable for meal prep? Yes! The soup keeps well in the fridge and can be frozen as well.
  • How do I make it creamier? Consider adding a splash of coconut milk or cream for richness.
  • Can I use frozen vegetables? Yes, just add them to the broth during the last few minutes of cooking.
  • What’s the best way to serve this soup? Serve hot, garnished with fresh herbs and lime for a refreshing finish.

Nutrition Tips and Dietary Adaptations

For a healthier version, consider using lean cuts of beef and adding more vegetables. This soup is naturally low in carbs if you use shirataki noodles or skip the noodles altogether. Aim for a balance of protein and vegetables to make it a nutritious meal.

Equipment Recommendations

  • Large Pot: A heavy-bottomed pot is ideal for even cooking.
  • Sharp Chef’s Knife: For quick and safe slicing of beef and vegetables.
  • Measuring Cups and Spoons: Ensure accuracy in your ingredients for the best results.
  • Cutting Board: A sturdy board will make chopping easier and safer.

Serving Suggestions

Serve this delightful soup hot with a side of crusty bread or steamed dumplings. For extra zing, offer lime wedges and chopped fresh herbs at the table, allowing everyone to customize their bowls. Enjoy the warmth of this cozy dish, and don’t forget to share it with loved ones!

Conclusion

This Spicy Beef Noodle Soup is the perfect way to warm up your evenings. With its rich flavors and comforting ingredients, it’s a dish that brings joy and satisfaction. So gather your ingredients, follow the steps, and watch as this recipe becomes a beloved meal in your household. Happy cooking!

Spicy Beef Noodle Soup

Prep Time 10 minutes
Cook Time 20 minutes
Total Time 30 minutes
Servings 4 servings
Calories 450
A flavorful and spicy noodle soup featuring tender beef, fresh vegetables, and a savory broth, perfect for a comforting meal.

Ingredients

Meat

  • 300 g beef flank steak, sirloin, or shank, thinly sliced
  • 2 tbsp vegetable oil
  • 1 piece onion, thinly sliced
  • 3 cloves garlic, minced
  • 2 cm ginger, grated
  • 1 tbsp chili paste or sambal oelek (adjust to taste)
  • 1 tbsp soy sauce
  • 1 tbsp fish sauce
  • 1 tsp brown sugar
  • 1.5 liters beef broth
  • 200 g rice noodles or egg noodles
  • 1 cup bok choy or fresh spinach

Instructions 

  • Heat 1 tablespoon of oil in a large pot over medium heat. Sear the sliced beef until browned, then remove and set aside.
  • Add remaining oil, then sauté onion, garlic, and ginger for 3-4 minutes until fragrant.
  • Stir in chili paste, soy sauce, fish sauce, and brown sugar. Pour in beef broth and bring to a boil, then simmer for 10 minutes.
  • Add noodles to the broth and cook for 3-5 minutes. In the last 2 minutes, add bok choy or spinach.
  • Return beef to reheat, then serve hot, garnished with chili, cilantro, green onions, and lime wedges.

Notes

Adjust spice level with chili paste and seasonings to taste.
Calories: 450kcal
Cost: $15
Course: Main Course
Cuisine: Asian
Keyword: Beef, Noodles, Spicy

If you’re looking for a quick, delicious meal that satisfies both your taste buds and your schedule, you’ve landed in the right place! This Vegan Teriyaki Noodle Bowl is not just another recipe; it’s a celebration of flavors that come together in under 30 minutes. Packed with crispy tofu, fresh vegetables, and a mouthwatering teriyaki sauce, this dish is perfect for busy weeknights when you want something nutritious without the fuss.

Why You’ll Love This Recipe

This vegan teriyaki noodle bowl isn’t just tasty—it also brings a host of benefits that make it a go-to meal in your home. Here are five reasons to give it a try:

  • Quick Preparation: This dish comes together in less than 30 minutes, perfect for those nights when time is tight.
  • Healthy Ingredients: With fresh vegetables and plant-based protein, you’re fueling your body with wholesome goodness.
  • Customizable Flavors: Feel free to swap out veggies or adjust the sauce to match your palate!
  • Meal Prep Friendly: Leftovers taste even better the next day, making it ideal for lunch or dinner prep.
  • Flavor Explosion: The combination of savory, sweet, and umami flavors will keep you coming back for more!

Ingredient Breakdown

Let’s dive into the core ingredients that make this teriyaki noodle bowl a hit, plus some handy substitutions you might need:

  • Extra-Firm Tofu: 1 (14-16 oz / 400-450g) block. Pressed and cut into ¾-inch cubes, this provides a perfect crunch. You can substitute with tempeh for a different texture.
  • Soy Sauce or Tamari: 2 tbsp for marinating tofu; use tamari for gluten-free options.
  • Cornstarch: 1 tbsp helps achieve that coveted crispy coating on the tofu.
  • Neutral Oil: 1 tbsp for sautéing; avocado or canola works best.
  • Teriyaki Sauce Ingredients: A blend of low-sodium soy sauce (½ cup), water (½ cup), maple syrup (¼ cup), rice vinegar (2 tbsp), toasted sesame oil (1 tbsp), minced garlic (2 cloves), and grated ginger (1 tbsp).
  • Noodles of Choice: 8 oz (225g) of udon, soba, ramen, or spaghetti. Choose your favorite for a delightful base!
  • Veggies: A large head of broccoli, 2 medium carrots (julienned), 1 red bell pepper (sliced), and 4-5 green onions (white and green parts separated) add color and nutrition.
  • Edamame: 1 cup (fresh or frozen) for added protein and texture.
  • Garnishes: Toasted sesame seeds and extra sliced green onions enhance the dish visually and flavorfully.

How to Make Your Vegan Teriyaki Noodle Bowl

Ready to whip up this delicious vegan teriyaki noodle bowl? Follow these simple steps:

  • Step 1: Press the Tofu: Eliminate excess moisture by pressing the tofu. This is crucial for achieving crispy tofu. Cut it into cubes and toss with cornstarch and soy sauce.
  • Step 2: Sauté the Tofu: Heat a large frying pan over medium-high heat and add neutral oil. Sauté the tofu cubes for 7-10 minutes until golden brown and crispy.
  • Step 3: Prepare the Teriyaki Sauce: In a medium bowl, whisk together low-sodium soy sauce, water, maple syrup, rice vinegar, toasted sesame oil, minced garlic, grated ginger, and the cornstarch slurry.
  • Step 4: Cook the Noodles: Boil water in a medium saucepan and cook the noodles according to package instructions. Drain and rinse under cold water to stop cooking.
  • Step 5: Sauté the Vegetables: In the same pan used for the tofu, add more neutral oil and sauté broccoli, carrots, red bell pepper, and the whites of the green onions for 3-5 minutes until tender.
  • Step 6: Combine Everything: Pour the teriyaki sauce over the sautéed vegetables and simmer until it thickens slightly. Add the cooked noodles and edamame, tossing gently to coat everything in the sauce.
  • Step 7: Serve and Enjoy: Serve in bowls, topped with crispy tofu, green onion greens, and toasted sesame seeds.

Pro Tips for the Best Vegan Teriyaki Noodle Bowl

A vibrant Vegan Teriyaki Noodle Bowl with noodles, tofu cubes, and assorted fresh vegetables.

To make your cooking experience even smoother, here are some expert insights:

  • Choose the Right Tofu: Always go for extra-firm tofu to achieve the best texture. Pressing it well is key!
  • Customize Your Veggies: Don’t hesitate to add your favorite vegetables. Bell peppers, snap peas, or bok choy work wonderfully!
  • Adjust Sweetness: Feel free to tweak the sweetness of the teriyaki sauce to suit your taste preferences.
  • Make It Spicy: Add a pinch of red pepper flakes to the sauce for a kick!
  • Batch Cook: Prepare extra tofu and sauce to have on hand for quick meals throughout the week.
  • Use Low-Sodium Options: Opt for low-sodium soy sauce to keep the dish healthier without sacrificing flavor.
  • Garnish Generously: Don’t skip the toasted sesame seeds and extra green onions—they add a delightful crunch and freshness.
  • Stir-Fry Technique: Keep the vegetables crisp-tender by avoiding overcrowding the pan while sautéing.

Common Mistakes and Troubleshooting

Even the best cooks can have mishaps! Here are common pitfalls and how to avoid them:

  • Tofu Too Soft: Ensure you’re using extra-firm tofu and pressing it adequately to remove moisture.
  • Sauce Too Thin: Make sure to whisk in the cornstarch slurry thoroughly and simmer until it thickens.
  • Overcooked Vegetables: Sauté vegetables just until tender to preserve their vibrant colors and nutrients.
  • Flavorless Dish: Always taste and adjust the seasonings. A little extra soy sauce or maple syrup can elevate the dish!

Variations to Spice Things Up

Feeling adventurous? Here are some variations to try:

  • Spicy Peanut Sauce: Swap the teriyaki for a spicy peanut sauce for a nutty twist.
  • Asian Noodle Salad: Turn this into a cold noodle salad by serving it chilled with a sesame dressing.
  • Quinoa Bowl: Use quinoa instead of noodles for a protein-packed, gluten-free option.
  • Mixed Mushroom Delight: Add a variety of mushrooms for an earthy flavor boost.

Storage and Make-Ahead Instructions

This vegan teriyaki noodle bowl stores beautifully! Here’s how to keep it fresh:

  • Storing Leftovers: Store any leftovers in an airtight container in the refrigerator for up to 3 days.
  • Reheating: Reheat in a pan over medium heat. Add a splash of water or broth to help revive the sauce.
  • Make-Ahead Options: Prepare the tofu and sauce in advance and store separately. Assemble just before serving!

FAQ

Here are some common questions about this vegan teriyaki noodle bowl:

  • Can I use other proteins instead of tofu? Yes, tempeh, chickpeas, or edamame are great alternatives!
  • Is this dish gluten-free? If using tamari instead of soy sauce, yes, it can be gluten-free!
  • What noodles work best? Udon, soba, ramen, or even whole grain spaghetti are all excellent choices.
  • Can I freeze leftovers? Yes, but the texture may change slightly. Store in an airtight container for up to 2 months.
  • How can I make this recipe nut-free? Simply avoid any nut-based oils or sauces in your cooking!
  • What else can I add? Try adding bell peppers, snap peas, or baby corn for extra crunch!
  • Is the teriyaki sauce spicy? No, but you can add red pepper flakes for a spicy kick if you like!
  • How long does this take to prepare? This dish is quick to prepare, typically in about 30 minutes!

Nutritional Tips and Dietary Adaptations

This teriyaki noodle bowl can easily accommodate various dietary needs:

  • Low-Carb Option: Substitute noodles with spiralized zucchini or cauliflower rice.
  • High-Protein Option: Incorporate additional edamame or chickpeas for a protein boost.
  • Lower Sugar Option: Reduce the amount of maple syrup in the sauce for a healthier alternative.
  • Vegan and Gluten-Free: By using tamari and omitting any non-vegan garnishes, this dish fits both categories!

Equipment Recommendations

To make your cooking process smoother, here are some essential tools:

  • Large Frying Pan: For sautéing tofu and vegetables.
  • Medium Bowl: For mixing the teriyaki sauce.
  • Pasta Pot: For boiling your noodles.
  • Sharp Knife and Cutting Board: Essential for prepping your ingredients efficiently!

Serving Suggestions

To elevate your vegan teriyaki noodle bowl experience, consider these serving ideas:

  • Side Salad: Pair with a simple mixed greens salad dressed with sesame vinaigrette.
  • Spring Rolls: Serve alongside fresh veggie spring rolls for a delightful crunch.
  • Fresh Herbs: Top with cilantro or basil for a burst of freshness.
  • Spicy Sauce: Offer a side of sriracha for those who enjoy an extra kick!

This Vegan Teriyaki Noodle Bowl is not just a meal; it’s an experience that brings excitement back into your kitchen. With its vibrant colors, delightful flavors, and satisfying textures, it’s sure to become a staple in your meal rotation. So gather your ingredients, put on your apron, and let’s cook up something amazing! Enjoy every bite!

Vegan Teriyaki Noodle Bowl

Prep Time 15 minutes
Cook Time 20 minutes
Total Time 35 minutes
Servings 4 servings
Calories 450
A flavorful and healthy vegan noodle bowl featuring crispy tofu and colorful vegetables in a savory teriyaki sauce.

Ingredients

Tofu

  • 14-16 oz extra-firm tofu (pressed and cut into ¾-inch cubes)
  • 2 tbsp soy sauce or tamari
  • 1 tbsp cornstarch
  • 1 tbsp neutral oil (like avocado or canola)
  • ½ cup low-sodium soy sauce or tamari
  • ½ cup water or vegetable broth
  • ¼ cup maple syrup or agave nectar
  • 2 tbsp rice vinegar
  • 1 tbsp toasted sesame oil
  • 2 cloves garlic (minced)
  • 1 tbsp fresh ginger (grated or minced)
  • 1 tbsp cornstarch mixed with water slurry

Optional

  • a pinch red pepper flakes
  • 8 oz noodles of choice (udon, soba, ramen, or spaghetti)
  • 1 tbsp neutral oil (for sautéing vegetables)
  • 1 large broccoli (cut into small florets)
  • 2 medium carrots (peeled and julienned)
  • 1 red bell pepper (seeded and thinly sliced)
  • 4-5 green onions green onions (thinly sliced whites and greens separated)
  • 1 cup shelled edamame (fresh or frozen)

Optional garnish

  • toasted sesame seeds toasted sesame seeds
  • extra sliced green onions

Instructions 

  • Press and cube the tofu, then toss with cornstarch and soy sauce.
  • Heat oil in a pan and sauté tofu until golden, about 7-10 minutes.
  • Whisk together soy sauce, water, maple syrup, rice vinegar, sesame oil, garlic, ginger, and slurry to make the sauce.
  • Cook noodles according to package, drain, and rinse with cold water.
  • Sauté vegetables in the same pan for 3-5 minutes, then add sauce and simmer until thickened.
  • Add noodles and edamame, toss to coat, then serve topped with tofu, green onions, and sesame seeds.

Notes

For extra flavor, sprinkle with additional sesame seeds and green onions before serving.
Calories: 450kcal
Cost: $15
Course: Main Course
Cuisine: vegan
Keyword: Noodles, Tofu, Vegetables

Discover the Joy of Cooking with This Mediterranean Chicken Couscous Bowl

Welcome to your next favorite recipe! This Mediterranean Chicken Couscous Bowl is not only a feast for the eyes but also a delight for the taste buds. Combining tender chicken, vibrant vegetables, and a creamy yogurt sauce, it offers a comforting meal that’s quick and satisfying. This bowl is perfect for those busy weeknights when you want to whip up something delicious without spending hours in the kitchen. Let’s dive into why this recipe is a must-try!

Why You’ll Love This Recipe

  • Quick and Easy: This recipe can be prepared in under 30 minutes, making it ideal for busy weeknights.
  • Flavor-Packed: The combination of Moroccan spices and fresh ingredients creates a dish bursting with flavor.
  • Customizable: You can easily adapt the ingredients to suit your taste preferences or dietary needs.
  • Healthy and Nutritious: Packed with lean protein, fresh vegetables, and whole grains, this bowl is wholesome and satisfying.
  • Meal Prep Friendly: Make a big batch ahead of time for quick lunches or dinners throughout the week.

Ingredients Breakdown

Let’s take a closer look at what you’ll need for this Mediterranean Chicken Couscous Bowl:

  • 1.5 lb Chicken Breast: Cut into 1-inch chunks. Substitute with chicken thighs for more moisture.
  • 1.5 tbsp Olive Oil: Essential for frying and adds flavor.
  • 1 tbsp Moroccan Spice Mix: A blend of spices that adds depth. You can make your own or buy it pre-made.
  • 1/4 cup Tomato Paste: Substitute with tomato sauce if desired.
  • 1 cup Chicken Broth: Forms the sauce base, enhancing the overall flavor.
  • 1/2 tsp Garlic Powder: Adds a subtle garlic flavor.
  • Spices: Include cinnamon, paprika, ground ginger, nutmeg, and cayenne pepper to taste.
  • Salt and Black Pepper: Essential for seasoning.
  • 1 cup Couscous: Acts as a hearty grain base.
  • 1 Cucumber: Diced for a refreshing crunch.
  • 1 cup Cherry Tomatoes: Halved for sweetness.
  • 1 Red Onion: Thinly sliced; soak in water to mellow if needed.
  • 1/3 cup Greek Yogurt: Full-fat for creaminess.
  • 2.5 tbsp Fresh Parsley: Roughly chopped for added brightness.

Step-by-Step Instructions

A vibrant Mediterranean Chicken Couscous Bowl featuring juicy chicken, couscous, and fresh vegetables.

Follow these simple steps to create your Mediterranean Chicken Couscous Bowl:

  1. In a large skillet, heat the olive oil over medium heat.
  2. Add the chicken breast chunks, cooking until browned and cooked through, about 5-7 minutes.
  3. Stir in the Moroccan spice mix, garlic powder, and season with salt and pepper.
  4. Mix in the tomato paste and chicken broth, allowing it to simmer for about 5 minutes.
  5. Meanwhile, prepare the couscous according to package instructions, typically involving boiling water and letting it sit to fluff.
  6. Once everything is ready, layer the couscous in bowls and top with the chicken mixture.
  7. Add the cucumber, cherry tomatoes, and red onion on top.
  8. Drizzle with Greek yogurt and sprinkle with fresh parsley before serving.

Pro Tips for the Perfect Bowl

  • Use Fresh Ingredients: Quality ingredients make a big difference in flavor.
  • Let the Chicken Rest: Allow the chicken to rest for a few minutes after cooking to retain its juices.
  • Adjust Spice Levels: Feel free to adjust the cayenne pepper according to your heat preference.
  • Meal Prep: This dish keeps well in the fridge for up to 3 days, making it perfect for meal prep.
  • Garnishes Matter: A squeeze of lemon juice before serving brightens all the flavors.
  • Experiment with Grains: Try quinoa or bulgur instead of couscous for a different texture.
  • Include More Veggies: Add bell peppers, zucchini, or any seasonal vegetables for added nutrition.
  • Make it Vegan: Substitute chicken with chickpeas or tofu and skip the yogurt for a plant-based version.

Common Mistakes to Avoid

Even simple recipes can have pitfalls. Here are some common mistakes to avoid:

  • Overcooking Chicken: Keep an eye on the chicken to prevent it from becoming dry.
  • Neglecting Seasoning: Don’t be shy with spices; they are the soul of this dish!
  • Skipping the Rest: Allowing the chicken to rest is crucial for juicy results.
  • Incorrect Couscous Ratio: Follow the instructions to avoid mushy couscous.

Variations to Try

Get creative with these variations:

  • Greek Inspired: Use feta cheese and olives instead of Greek yogurt and add a drizzle of olive oil.
  • Spicy Variant: Add jalapeños or harissa for a spicy kick.
  • Curry Twist: Swap the Moroccan spices for curry powder and add coconut milk for a unique flavor.
  • Protein Swap: Use shrimp, turkey, or even roasted vegetables for a different protein source.

Storage and Make-Ahead Instructions

This Mediterranean Chicken Couscous Bowl is great for meal prep! Here’s how to store and reheat:

  • Storage: Keep leftovers in airtight containers in the fridge for up to 3 days.
  • Freezing: You can freeze the chicken mixture separately for up to 2 months. Thaw in the fridge overnight before reheating.
  • Reheating: Warm in the microwave or on the stovetop until heated through.

Frequently Asked Questions

  • Can I make this ahead for meal prep? Absolutely! This dish is perfect for meal prep and can be stored in the fridge.
  • What’s the best way to reheat it? You can microwave it or warm it on the stovetop with a splash of broth.
  • Can I use other grains instead of couscous? Yes, quinoa or brown rice would work well as alternatives.
  • Is this recipe kid-friendly? Yes! Its mild flavors and customizable nature make it appealing for kids.
  • What if I can’t find Moroccan spice mix? You can easily make your own with spices like cumin, coriander, and cinnamon.
  • Can I use frozen chicken? Yes, just make sure to thaw it completely before cooking.
  • How do I add more veggies? Feel free to toss in any seasonal vegetables that you enjoy.
  • Is this dish gluten-free? Substitute couscous with quinoa to make it gluten-free.

Nutritional Tips and Dietary Adaptations

This Mediterranean Chicken Couscous Bowl can fit various dietary needs:

  • Low-Carb: Use cauliflower rice instead of couscous.
  • Dairy-Free: Replace Greek yogurt with a dairy-free alternative.
  • Low-Fat: Trim any excess fat from the chicken and use less oil when cooking.

Essential Equipment

For this recipe, you’ll need:

  • Large Skillet: For cooking the chicken and sauce.
  • Measuring Cups and Spoons: To ensure accuracy with ingredients.
  • Chopping Board: For easy ingredient prep.
  • Serving Bowls: To beautifully present your Mediterranean Chicken Couscous Bowl.

Serving Suggestions

This Mediterranean Chicken Couscous Bowl can be enjoyed on its own or paired with:

  • Fresh Green Salad: A simple salad with lemon vinaigrette complements this dish nicely.
  • Pita Bread: Warm pita bread is perfect for scooping up any leftovers.
  • Hummus: Serve with hummus for an extra layer of flavor and creaminess.

With all these tips and insights, you’re ready to create a delicious Mediterranean Chicken Couscous Bowl that will impress your family and friends! Remember, cooking is about enjoying the process, so take your time and have fun with it. Happy cooking!

Mediterranean Chicken Couscous Bowl Quick Comfort on a Plate

Prep Time 10 minutes
Cook Time 20 minutes
Total Time 30 minutes
Servings 4 servings
Calories 550
A flavorful and quick Mediterranean-inspired chicken couscous bowl perfect for a satisfying meal in minutes.

Ingredients

Protein

  • 1.5 lb Chicken Breast (can substitute chicken thighs for more moisture)
  • 1.5 tbsp Olive Oil (essential for frying and adds flavor)
  • 1 tbsp Moroccan Spice Mix (homemade or store-bought)
  • 0.25 cup Tomato Paste (substitute with tomato sauce if desired)
  • 1 cup Chicken Broth (forms the sauce base)
  • 0.5 tsp Garlic Powder
  • to taste Cinnamon (can use apple pie spice as a substitute)
  • to taste Paprika
  • to taste Ground Ginger
  • to taste Nutmeg
  • to taste Cayenne Pepper (adjust according to desired heat level)
  • to taste Salt
  • to taste Black Pepper

Grains & Vegetables

  • 1 cup Couscous (acts as a hearty grain base)
  • 1 each Cucumber (diced adds a refreshing crunch)
  • 1 cup Cherry Tomatoes (halved brings sweetness)
  • 1 red Red Onion (thinly sliced soak in water to mellow if needed)
  • 0.33 cup Greek Yogurt (plain, full-fat provides creaminess)
  • 2.5 tbsp Fresh Parsley (roughly chopped adds brightness)

Instructions 

  • Sauté chicken chunks in olive oil with Moroccan spice mix until cooked through.
  • Add tomato paste and chicken broth; simmer to create a flavorful sauce.
  • Prepare couscous according to package instructions and fluff.
  • Assemble bowls with couscous, cooked chicken, diced cucumber, cherry tomatoes, sliced onion, and a dollop of Greek yogurt. Garnish with parsley.

Notes

Adjust spices and heat level to taste. For extra moisture, substitute chicken thighs.
Calories: 550kcal
Cost: $15
Course: Main Course
Cuisine: Mediterranean
Keyword: Chicken, couscous, Quick

The Ultimate Guide to Quick and Delicious Avocado Wraps

Are you looking for a quick, nutritious meal that bursts with flavor? Look no further! These avocado wraps are perfect for busy days when you want something delicious without spending hours in the kitchen. With just a handful of fresh ingredients, you can whip up a satisfying and healthy wrap that everyone will love. Let’s dive into the world of avocado wraps, where creativity meets simplicity!

Why You’ll Love This Recipe

These quick and delicious avocado wraps are not just easy to make; they also offer a range of benefits that make them a must-try:

  • Quick Preparation: Ready in under 15 minutes, perfect for lunch or a snack!
  • Nutrient-Packed: Avocados are rich in healthy fats, fiber, and essential vitamins.
  • Customizable: You can easily swap ingredients based on your preferences or what you have on hand.
  • Satisfying and Filling: These wraps keep you full without feeling heavy, thanks to the nutrient-dense ingredients.
  • Vegan and Vegetarian Friendly: A great option for plant-based eaters looking for a delicious meal.

Ingredients Breakdown

Here’s what you’ll need to make your avocado wraps, along with some great substitution ideas:

  • 1 ripe avocado: If you’re out of avocados, try 1/2 cup of guacamole or a few tablespoons of avocado spread.
  • 1 tomato: Cherry tomatoes are a great alternative if you’re short on time.
  • 1 small red onion: You can use green onions or shallots for a milder flavor.
  • ½ bunch parsley: Fresh cilantro or spinach can be substituted for a different taste.
  • 1 garlic clove: Garlic powder or garlic salt can be used in a pinch.
  • ½ lime: Lemon juice works well too if you don’t have lime.
  • Salt and pepper: Essential for seasoning to taste.
  • 1-2 teaspoons cashew butter: You can replace this with hummus or any nut butter you prefer.

Step-by-Step Instructions

A close-up of a delicious avocado wrap showcasing avocado, tomato, and herbs.

Ready to get cooking? Follow these easy steps to create your avocado wraps:

  1. Warm the wraps in the microwave for 20-30 seconds to make them soft and pliable.
  2. **Guacamole Wrap:** Cut the avocado in half, remove the pit, and score the flesh with a knife. Scoop out the avocado into a bowl and mash it with a fork.
  3. Finely chop the tomato, onion, parsley, and garlic, then mix them into the mashed avocado.
  4. Squeeze the lime juice into the mixture and season with salt and pepper to taste.
  5. Spread the guacamole mixture onto the wrap and roll it tightly. Optionally, cut it into bite-sized pieces or wrap it in foil.
  6. **Cashew Butter Wrap:** Halve and pit the avocado, then mash it in a bowl. Stir in cashew butter and season with salt.
  7. Spread the cashew butter avocado onto the wrap and roll it up tightly.

Pro Tips for Perfect Avocado Wraps

Here are some expert insights to elevate your avocado wrap game:

  • Always choose ripe avocados: They should yield slightly when gently squeezed.
  • Experiment with spices: Adding cumin or chili powder can give your wraps an extra kick.
  • Use fresh herbs: They enhance flavor and freshness significantly.
  • Don’t overfill: A little goes a long way; too much filling can make rolling difficult.
  • Wrap tightly: Ensure that you roll your wrap tightly to keep everything together.
  • Serve immediately: Enjoy your wraps fresh to maintain the best texture and flavor.
  • Pair with a dip: Consider pairing your wraps with a side of salsa or ranch dressing.
  • Make ahead: Pre-make your filling and store it in the fridge for a quick assembly later.

Common Mistakes to Avoid

Even the best cooks make mistakes! Here are some pitfalls to avoid:

  • Using unripe avocados: They can be hard and lacking in flavor.
  • Over-mashing the avocado: You want a chunky texture rather than a smooth paste.
  • Neglecting seasoning: Salt and pepper are key to enhancing the flavors.

Variations to Try

Feeling adventurous? Here are some fun variations to switch things up:

  • Spicy Avocado Wrap: Add jalapeños or sriracha for some heat!
  • Protein-Packed Wrap: Include grilled chicken or chickpeas for added protein.
  • BBQ Avocado Wrap: Mix in some barbecue sauce for a smoky flavor.
  • Caprese Wrap: Add mozzarella, basil, and a drizzle of balsamic for a fresh twist.

Storage and Make-Ahead Instructions

Want to prepare these wraps in advance? Here’s how:

  • Store filling separately: Keep the avocado mixture in an airtight container and the wraps in a cool dry place.
  • Use within 24 hours: For the best taste and texture, consume your wraps within a day of preparation.

Nutrition Tips and Dietary Adaptations

These wraps can easily fit into a variety of dietary needs:

  • Gluten-free: Use gluten-free wraps or lettuce leaves.
  • Keto-friendly: Skip the wrap and enjoy the filling in a bowl.
  • High protein: Incorporate beans, lentils, or lean meats.

Equipment Recommendations

Gather these handy tools to make your cooking experience smoother:

  • Mixing bowl: A medium-sized bowl for combining ingredients.
  • Knife: For easy chopping of veggies and slicing avocados.
  • Microwave: To soften your wraps quickly.

Serving Suggestions

Looking for the perfect way to serve your avocado wraps? Consider these ideas:

  • Pair with a salad: A fresh green salad complements the wraps nicely.
  • Offer dips: Salsa, guacamole, or hummus make great side options.
  • Add chips: Serve with tortilla chips for a satisfying crunch!

Frequently Asked Questions (FAQs)

Got questions? Here are some common inquiries about avocado wraps:

  • How long do avocado wraps last? Best enjoyed fresh, but fillings can be stored for up to 24 hours.
  • Can I freeze avocado wraps? It’s not recommended as avocados don’t freeze well in wraps.
  • What can I use instead of a tortilla? Lettuce leaves, flatbreads, or pita are great alternatives.
  • How can I make my wraps spicier? Add chili flakes, hot sauce, or spicy salsa to the filling.
  • Are avocado wraps healthy? Yes! They are packed with healthy fats, fiber, and essential nutrients.
  • Can I use other vegetables? Absolutely! Feel free to add cucumbers, bell peppers, or any veggies you enjoy.
  • What’s the best way to slice an avocado? Cut it in half, twist to separate, remove the pit, and slice while it’s still in the skin for easy removal.
  • Can I make these wraps ahead of time? Yes, prepare the filling in advance and assemble when ready to eat.

In conclusion, these quick and delicious avocado wraps are perfect for anyone looking to enjoy a healthy meal without the hassle. With endless possibilities for customization and plenty of nutrition, you can feel great about this tasty option. So grab your ingredients and get ready to roll up a delicious meal that’s as fun to make as it is to eat!

Schnelle Avocado Wraps

Prep Time 10 minutes
Cook Time 1 minute
Total Time 11 minutes
Servings 2 pieces
Calories 250
Enjoy quick and delicious avocado wraps with fresh ingredients and optional cashew butter for added creaminess.

Ingredients

Wraps

  • 2 pieces Wraps
  • 1 piece Avocado
  • 1 piece Tomate
  • 0.5 bund Petersilie
  • 1 small rote Zwiebel
  • 1 clove Knoblauchzehe
  • 0.5 piece Limette
  • 1-2 TL Cashewmus (Butter)
  • Salz Salz
  • Pfeffer Pfeffer

Instructions 

  • Wraps in der Mikrowelle für 20-30 Sekunden erwärmen, bis sie weich sind.
  • Avocado halbieren, Kern entfernen, fein einschneiden, aushöhlen und zerdrücken.
  • Tomate, Zwiebel, Petersilie und Knoblauch fein hacken und unter die Avocadomasse mischen. Limette auspressen und hinzufügen. Mit Salz und Pfeffer abschmecken.
  • Guacamole auf dem Wrap verteilen, eng aufrollen und optional in Portionen schneiden oder in Alufolie wickeln.

Notes

Für extra Geschmack Cashewmus in die Guacamole einrühren.
Calories: 250kcal
Cost: $8
Course: Lunch, Snack
Cuisine: German
Keyword: Avocado, Wrap

Discover the Joy of Cooking with Beef Veggie Bowls

Welcome to a culinary adventure that’s both satisfying and simple! Today, we’re diving into a delightful recipe for **Quick and Flavor-Packed Beef Veggie Bowls with Zesty Comeback Sauce**. If you’re looking for a meal that’s quick to prepare, packed with nutrients, and bursting with flavor, you’ve landed in the right spot. This dish is perfect for busy weeknights or whenever you crave a wholesome meal. Let’s transform how you think about cooking with this delicious bowl of goodness!

Why You’ll Love This Recipe

This recipe isn’t just another meal; it’s a celebration of flavors and textures! Here’s why I think you’ll adore it:

  • Quick Preparation: Ready in just 30 minutes, making it ideal for busy evenings when time is tight.
  • Flavorful Meal: The combination of roasted veggies and the **zesty comeback sauce** ensures every bite is a flavor explosion.
  • Versatile Ingredients: Swap out veggies or protein based on what you have on hand—this dish is as flexible as your schedule!
  • Nutritious & Satisfying: Packed with lean protein and a rainbow of vegetables, this meal keeps you feeling full and nourished.
  • Easy Cleanup: One bowl means minimal fuss—just cook, assemble, and enjoy!

Ingredients Breakdown

Before we start cooking, let’s gather our ingredients. Here’s everything you need to make these flavorful beef veggie bowls:

  • 1 lb lean ground beef or ground turkey: Choose your favorite for a healthier option.
  • 20-24 oz fresh broccoli: Cut into florets for even cooking.
  • 1 lb fresh Brussels sprouts: Halved for optimal roasting.
  • 1 bell pepper: Any color will do—red, yellow, or green add a nice crunch!
  • 3 tbsp olive oil: For roasting the veggies and adding healthy fats.
  • For the Comeback Sauce:
  • 1/2 cup mayo: The creamy base of our zesty sauce.
  • 1 tbsp ketchup: Adds a touch of sweetness.
  • 1 tsp lemon juice: Brightens up the flavors.
  • 1/2 tsp Tabasco: For a spicy kick—adjust to your taste!
  • 1/2 tsp paprika: Adds warmth and depth.
  • 1/2 tsp garlic powder: For that aromatic touch.
  • 1/2 tsp ground mustard: Enhances the overall flavor.
  • 1/2 tsp salt: Essential for seasoning.

Feel free to explore substitutions! For instance, you can use **cauliflower rice** instead of traditional rice for a low-carb version, or opt for **chicken** for a different protein.

How to Make Beef Veggie Bowls

Juicy Beef & Veggie Bowl featuring fresh broccoli, Brussels sprouts, and bell pepper.

Now that we have our ingredients ready, let’s get cooking! Follow these simple steps to create your beef veggie bowls:

Step 1: Preheat Your Oven

Set your oven to 425°F (220°C). This high temperature is key for roasting those veggies to perfection!

Step 2: Prepare the Vegetables

Cut the broccoli and Brussels sprouts and place them on a baking sheet. Drizzle with olive oil and season with salt, pepper, and garlic powder. Roast for 20-25 minutes until golden and tender.

Step 3: Cook the Beef

In a skillet over medium-high heat, cook the ground beef until browned, seasoning with salt, pepper, and a pinch of chili powder for added depth.

Step 4: Make the Comeback Sauce

In a small bowl, mix all the comeback sauce ingredients until smooth. This sauce is where the magic happens!

Step 5: Assemble Your Bowl

Layer the roasted veggies and cooked beef in bowls. Drizzle the zesty comeback sauce generously on top. Enjoy every flavorful bite!

Pro Tips for Maximum Flavor

Want to elevate your beef veggie bowls even further? Check out these expert insights:

  • Choose Quality Meat: Opt for grass-fed beef or organic ground turkey for enhanced flavor and nutrition.
  • Customize Your Veggies: Use seasonal vegetables for the freshest taste—zucchini, asparagus, or snap peas work wonderfully!
  • Make It Spicy: Add sriracha or red pepper flakes for an extra heat boost in the comeback sauce.
  • Meal Prep Magic: Prepare the beef and veggies ahead of time for a quick assembly during the week.
  • Herb It Up: Sprinkle fresh herbs like cilantro or parsley before serving for an aromatic finish.
  • Don’t Skimp on Seasoning: A well-seasoned dish is key to a flavorful meal; taste as you go!
  • Perfectly Roasted Veggies: Make sure not to overcrowd the baking sheet; this helps achieve that nice caramelization.
  • Try Different Sauces: Explore various sauces like teriyaki or hoisin for a different flavor profile.

Common Mistakes and Troubleshooting

Even the best of us run into hiccups in the kitchen! Here are some common mistakes and how to avoid them:

  • Overcooking Your Veggies: Keep an eye on the roasting time to ensure they are tender, not mushy.
  • Undercooking the Beef: Make sure your beef is fully cooked to a safe internal temperature of 160°F (71°C).
  • Skipping the Seasoning: Don’t forget to season at every layer—meat, veggies, and sauce!
  • Using Cold Ingredients: Allow your meat to come to room temperature before cooking for even browning.

Variations to Try

Want to switch things up? Here are some fun variations to try:

  • Asian-Inspired Bowl: Swap the comeback sauce for teriyaki sauce and add snap peas and carrots.
  • Mediterranean Twist: Use ground lamb with roasted eggplant and a garlic yogurt sauce.
  • Spicy Tex-Mex Bowl: Add black beans, corn, and a spicy salsa in place of the comeback sauce.
  • Veggie-Only Bowl: Omit the beef entirely and load up on your favorite seasonal veggies for a hearty vegetarian option.

Storage and Make-Ahead Instructions

This dish is perfect for meal prep! Here’s how to store it:

  • Refrigeration: Store leftovers in an airtight container for up to 3 days.
  • Freezer-Friendly: Freeze cooked beef and veggies separately for up to 3 months.
  • Reheating: Reheat in the microwave or on the stovetop until heated through; add a splash of water to keep it moist.

Frequently Asked Questions

Got questions? I’ve got answers! Here are some FAQs about our beef veggie bowls:

  • Can I use frozen vegetables? Yes! Just adjust the cooking time as frozen veggies may cook faster.
  • What can I substitute for beef? Ground turkey, chicken, or even lentils for a vegetarian option work great!
  • How do I make the sauce healthier? Consider Greek yogurt instead of mayo for a lighter, protein-packed alternative.
  • Can I add grains? Absolutely! Quinoa or brown rice can be added for extra fiber and nutrients.
  • Is this recipe gluten-free? Yes, as long as you use gluten-free soy sauce in the comeback sauce.
  • How spicy is the comeback sauce? It’s mild but customizable; add more Tabasco or chili flakes for heat!
  • Can I prepare this ahead of time? Yes! Cook the beef and veggies in advance, and assemble when ready to eat.
  • What’s the best way to serve these bowls? Serve with a sprinkle of sesame seeds or chopped green onions for an extra touch!

Nutritional Tips and Dietary Adaptations

This recipe can easily fit a variety of diets:

  • High-Protein: The beef provides excellent protein; swap in turkey for a leaner option.
  • Low-Carb: Use cauliflower rice instead of traditional rice for a low-carb alternative.
  • Vegetarian: Substitute the beef with chickpeas or tofu to create a satisfying plant-based meal.
  • Dairy-Free: Use dairy-free mayo in the comeback sauce for a lactose-free option.

Equipment Recommendations

Here’s a quick list of must-have equipment to make your cooking experience smooth:

  • Sharp Chef’s Knife: For precise vegetable cutting.
  • Baking Sheet: Essential for roasting veggies evenly.
  • Non-Stick Skillet: Makes cooking the beef easier and cleanup a breeze.
  • Mixing Bowl: For whipping up the comeback sauce in no time!

Serving Suggestions

Serve your beef veggie bowls with a side of:

  • Fresh Salad: A light side salad complements the warmth of the bowls beautifully.
  • Crusty Bread: Perfect for dipping into any leftover comeback sauce!
  • Fruit Salad: A refreshing fruit salad can balance the savory flavors of the dish.

And there you have it! A complete guide to making your own **Quick and Flavor-Packed Beef Veggie Bowls with Zesty Comeback Sauce**. I hope this recipe inspires you to get creative in the kitchen and enjoy every bite along the way. Remember, cooking is about confidence and fun, so don’t stress about perfection. Happy cooking!

Beef Veggie Bowls with Comeback Sauce

Prep Time 10 minutes
Cook Time 25 minutes
Total Time 35 minutes
Servings 4 servings
Calories 650
A flavorful and healthy bowl combining roasted vegetables, seasoned ground beef, and a creamy comeback sauce for a satisfying meal.

Ingredients

Meat

  • 1 lb lean ground beef or ground turkey
  • 20-24 oz fresh broccoli
  • 1 lb fresh Brussels sprouts
  • 1 bell pepper bell pepper
  • 3 tbsp olive oil

Comeback Sauce

  • 0.5 cup mayo
  • 1 tbsp ketchup
  • 1 tsp lemon juice
  • 0.5 tsp Tabasco
  • 0.5 tsp paprika
  • 0.5 tsp garlic powder
  • 0.5 tsp ground mustard
  • 0.5 tsp salt

Instructions 

  • Preheat oven to 425°F (220°C). Prepare vegetables, cut broccoli and Brussels sprouts, place on a baking sheet, drizzle with olive oil, season with salt, pepper, and garlic powder, then roast for 20-25 minutes.
  • In a skillet, cook ground beef over medium-high heat until browned; season with salt, pepper, and chili powder.
  • Mix all Comeback Sauce ingredients in a bowl until smooth.
  • Assemble bowls by layering roasted vegetables and cooked beef, then drizzle with Comeback Sauce.

Notes

Feel free to customize with your favorite vegetables or protein options.
Calories: 650kcal
Cost: $15
Course: Main Course
Cuisine: American
Keyword: Beef, Sauce, Vegetables

The Ultimate Guide to Southwest Chicken Wraps

Welcome to your new favorite recipe: Southwest Chicken Wraps with Roasted Corn, Guacamole, and Crunchy Slaw. This dish is not only packed with flavor but also brings together a variety of textures and colors that can brighten up any weeknight dinner. Whether you’re cooking for the family or prepping lunches for the week, these wraps are the perfect solution. In this guide, we’ll break down everything you need to know about making these wraps—from ingredients to assembly, and even some delicious variations!

Why You’ll Love This Recipe

These Southwest Chicken Wraps are beloved for many reasons. Here are just a few:

  • Flavor Explosion: Each bite delivers a satisfying combination of spices from the Southwest spice blend and the creaminess of guacamole.
  • Healthy and Filling: With protein-packed chicken and fresh veggies, these wraps keep you satisfied without feeling heavy.
  • Quick Prep Time: You can whip these up in just about 30 minutes, making them ideal for busy weeknights.
  • Meal Prep Friendly: Perfect for making ahead of time; store components separately for easy assembly throughout the week.
  • Customizable: With several variations and substitutions, you can make these wraps fit any dietary preference or ingredient availability.

Ingredients That Elevate Your Wraps

Here’s what you’ll need to create these delicious Southwest Chicken Wraps:

  • Southwest Spice Blend: 1 1/2 teaspoons salt, 1/4 teaspoon ground black pepper, 2 teaspoons chili powder, 1 teaspoon garlic powder, 1 teaspoon dried oregano, 1 teaspoon paprika, 1 teaspoon ground cumin.
  • Chicken: 1 pound chicken tenders, 1 tablespoon olive oil or avocado oil.
  • Roasted Corn: 1 1/2 cups corn kernels, 1 teaspoon olive oil, pinch of salt, 1/4 teaspoon smoked paprika (optional).
  • Crunchy Slaw: 2 cups shredded red cabbage, 2 cups shredded green cabbage, 1/4 cup sliced red onion, 1/4 cup chopped cilantro, 2 tablespoons Southwest dressing, juice of 1 lime, 1 teaspoon reserved spice blend.
  • Guacamole: 2 ripe avocados, 1 tablespoon lime juice, 1/4 teaspoon salt, 1 tablespoon chopped cilantro.
  • Southwest Dressing: 1/4 cup mayonnaise or Greek yogurt, 2 tablespoons olive oil, 1 tablespoon lime juice, 1 teaspoon chili powder, 1/2 teaspoon cumin, 1/2 teaspoon garlic powder, salt to taste.
  • Wrap Assembly: 4 large flour tortillas, 4 tablespoons Southwest dressing, 1 cup shredded cheddar-style cheese, 1/2 cup crushed tortilla chips.

Step-by-Step Instructions for Perfect Wraps

Side view of a juicy Southwest chicken wrap, packed with vibrant ingredients like guacamole and crunchy slaw.

Now that you have your ingredients ready, let’s dive into the preparation steps:

  1. Mix the Spice Blend: Combine the spice mix ingredients in a small bowl and set aside 1 teaspoon for the slaw.
  2. Roast the Corn: Preheat your oven to 425°F. Toss corn with olive oil, salt, and smoked paprika (if using). Roast for 15-20 minutes until slightly charred.
  3. Cook the Chicken: Heat olive oil in a skillet over medium heat. Season chicken with the remaining spice blend and cook until the internal temperature reaches 165°F. Remove and let rest.
  4. Prepare the Dressing: In a bowl, whisk together all Southwest dressing ingredients until smooth.
  5. Toss the Slaw: In a large bowl, combine slaw ingredients until everything is well coated.
  6. Make the Guacamole: Mash together the guacamole ingredients until creamy.
  7. Assemble the Wraps: Lay out tortillas and spread a tablespoon of Southwest dressing on each. Layer with chicken, roasted corn, slaw, guacamole, cheese, and crushed tortilla chips. Roll tightly and slice in half.

Pro Tips for Perfect Southwest Chicken Wraps

Here are some expert insights to help you achieve the best results:

  • Warm Your Tortillas: Heating tortillas for a few seconds in the microwave or on a skillet makes them more pliable and less likely to tear when rolling.
  • Don’t Overstuff: Less is more when it comes to filling. This makes wrapping easier and helps prevent spills.
  • Let Ingredients Cool: Allow the chicken and corn to cool slightly before assembling to prevent soggy wraps.
  • Use Fresh Ingredients: Fresh veggies and ripe avocados enhance the flavors and textures of your wraps.
  • Store Components Separately: For meal prep, keep chicken, corn, and slaw in separate containers to maintain freshness.
  • Experiment with Spices: Adjust the spice levels to your preference. Add more chili powder for heat or less for milder flavors.
  • Try Different Proteins: Substitute chicken with shredded pork, beef, or even beans for a vegetarian option.
  • Mix Up the Wraps: Use whole wheat or spinach tortillas for a healthier twist.

Common Mistakes and Troubleshooting

Even the best cooks can face challenges. Here are some common mistakes and how to avoid them:

  • Wraps Falling Apart: Make sure not to overstuff and roll tightly.
  • Flavor Lacking: Ensure your spice blend is fresh and adjust seasoning as needed.
  • Soggy Wraps: Store wet ingredients separately and assemble right before serving.
  • Overcooked Chicken: Use a meat thermometer to check for doneness at 165°F.

Delicious Variations to Try

Customize your Southwest Chicken Wraps with these fun variations:

  • BBQ Chicken Wraps: Replace Southwest spices with your favorite BBQ sauce and smoked chicken.
  • Veggie-Only Wraps: Skip the chicken and add roasted bell peppers, zucchini, and extra avocado for a satisfying vegetarian option.
  • Greek-Style Wraps: Use tzatziki sauce, feta cheese, and olives instead of the Southwest dressing and spices.
  • Breakfast Wraps: Add scrambled eggs, black beans, and salsa for a hearty breakfast twist.

Storage and Make-Ahead Instructions

Planning ahead? Here’s how to store and prep your wraps:

  • Make-Ahead: Prepare all components in advance and store them in airtight containers in the refrigerator for up to 4 days.
  • Freezing: You can freeze the cooked chicken and corn. Just make sure to thaw them before assembling the wraps.
  • Storage: Assemble wraps no more than a few hours before serving to maintain freshness. Wrap tightly in foil or plastic wrap to keep them intact.

Frequently Asked Questions

Here are some common questions about these Southwest Chicken Wraps:

  • Can I use frozen corn? Yes, frozen corn works great! Just ensure it’s cooked thoroughly.
  • What can I substitute for the chicken? Try using shredded turkey, canned beans, or tempeh for a vegetarian option.
  • How do I make the wraps gluten-free? Use gluten-free tortillas and check the labels on your sauces and dressings.
  • Can these wraps be served cold? Absolutely! They taste great cold, making them perfect for lunchboxes.
  • How can I add more heat? Incorporate jalapeños or add hot sauce to your guacamole or dressing.
  • What’s the best way to reheat leftovers? Microwave for 30 seconds to 1 minute or heat on a skillet until warmed through.
  • Can I make these wraps vegan? Yes! Use tofu or tempeh instead of chicken and a vegan dressing.
  • How long do leftovers last? Store in the refrigerator for up to 3 days, but be mindful of moisture from the veggies.

Nutritional Tips and Dietary Adaptations

These wraps can be adapted to fit various dietary needs:

  • Low-Carb: Use lettuce leaves instead of tortillas for a keto-friendly option.
  • High-Protein: Add extra chicken or substitute with protein-rich beans.
  • Vegan: Swap chicken for chickpeas and use vegan mayo for the dressing.
  • Low-Fat: Opt for Greek yogurt instead of mayonnaise in the dressing.

Equipment Recommendations

A few kitchen tools can streamline your wrap-making process:

  • Skillet: For cooking the chicken to perfection.
  • Oven: Essential for roasting the corn.
  • Mixing Bowls: For prepping your slaw, dressing, and guacamole.
  • Meat Thermometer: Ensures your chicken is cooked safely.
  • Tortilla Warmer: Keeps your tortillas warm and pliable.

Serving Suggestions

Ready to serve? Here are some ideas to elevate your meal:

  • Pair with Sides: Serve alongside tortilla chips and salsa or a fresh salad for a complete meal.
  • Garnish: Top with extra cilantro, lime wedges, or a drizzle of extra Southwest dressing for added flair.
  • Drinks: Complement with a refreshing beverage like iced tea or a light beer.

Conclusion

With their vibrant flavors and satisfying textures, these Southwest Chicken Wraps are sure to become a staple in your kitchen. Remember, cooking is all about enjoying the process and experimenting with flavors! Whether you’re making these wraps for a quick dinner or meal prepping for the week, I hope this guide inspires you to get creative in the kitchen. Happy cooking!

Southwest Chicken Wraps with Roasted Corn, Guacamole Crunchy Slaw

Prep Time 15 minutes
Cook Time 25 minutes
Total Time 40 minutes
Servings 4 servings
Calories 650
Enjoy flavorful Southwest-inspired chicken wraps featuring roasted corn, crunchy slaw, and creamy guacamole for a satisfying meal.

Ingredients

Southwest Spice Blend

  • 1 1/2 teaspoons salt
  • 1/4 teaspoon ground black pepper
  • 2 teaspoons chili powder
  • 1 teaspoon garlic powder
  • 1 teaspoon dried oregano
  • 1 teaspoon paprika
  • 1 teaspoon ground cumin
  • 1 pound chicken tenders
  • 1 tablespoon olive oil or avocado oil

Roasted Corn

  • 1 1/2 cups corn kernels
  • 1 teaspoon olive oil
  • Pinch salt
  • 1/4 teaspoon smoked paprika (optional)

Crunchy Slaw

  • 2 cups shredded red cabbage
  • 2 cups shredded green cabbage
  • 1/4 cup sliced red onion
  • 1/4 cup chopped cilantro
  • 2 tablespoons Southwest dressing
  • Juice of 1 lime lime juice
  • 1 teaspoon reserved spice blend

Guacamole

  • 2 ripe avocados
  • 1 tablespoon lime juice
  • 1/4 teaspoon salt
  • 1 tablespoon chopped cilantro

Southwest Dressing

  • 1/4 cup mayonnaise or Greek yogurt
  • 2 tablespoons olive oil
  • 1 tablespoon lime juice
  • 1/4 teaspoon chili powder
  • 1/2 teaspoon cumin
  • 1/2 teaspoon garlic powder

Wrap Assembly

  • 4 large flour tortillas
  • 4 tablespoons Southwest dressing
  • 1 cup shredded cheddar-style cheese
  • 1/2 cup crushed tortilla chips

Instructions 

  • Mix spice blend and reserve 1 teaspoon.
  • Roast corn at 425°F (220°C) for 15-20 minutes.
  • Season chicken with spices and cook until internal temperature reaches 165°F (74°C).
  • Whisk dressing ingredients until smooth.
  • Toss slaw ingredients with dressing until coated.
  • Assemble wraps with chicken, corn, slaw, guacamole, cheese, and chips. Roll tightly and serve.

Notes

For extra flavor, add a squeeze of lime or hot sauce before serving.
Calories: 650kcal
Cost: $15
Course: Main Course
Cuisine: Southwest
Keyword: Chicken, Corn, Slaw, Wraps