Author

Steven

Browsing

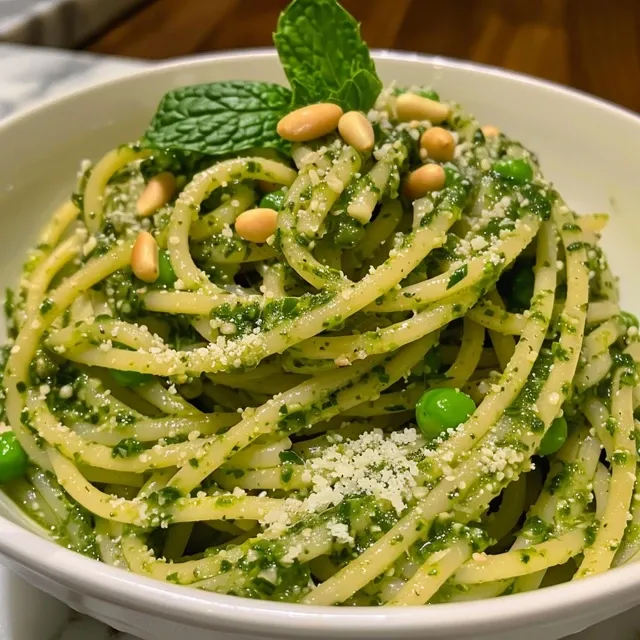
Unleash the Flavor of Spring with This Pesto Pasta Recipe

Spring brings a vibrant burst of flavors, and what better way to celebrate than with a delightful dish of Fresh Spring Pesto Pasta with peas and mint? In this article, I’ll guide you through crafting a pasta that not only dazzles with color but also tantalizes your taste buds. This recipe is perfect for busy weeknights or when you want to impress guests without the fuss. Let’s dive in and discover why this dish is a must-try!

Why You’ll Love This Recipe

There are countless reasons to fall in love with this Spring Pesto Pasta. Here are just a few:

  • Quick & Easy: Ready in under 30 minutes, making it ideal for hectic weeknights.
  • Fresh Ingredients: Utilizes seasonal ingredients like peas and mint for a refreshing taste.
  • Versatile: You can easily adapt this recipe to suit your dietary preferences or what you have on hand.
  • Nutritious: Packed with fresh herbs and vegetables, it’s a healthy meal option.
  • Impressive Presentation: The vibrant colors make it a stunning addition to any table setting.

Ingredients Breakdown

Here’s what you’ll need to make this delicious pasta:

  • 2 cups fresh basil leaves: The backbone of your pesto, providing aromatic flavor.
  • 1/2 cup fresh mint leaves: Adds a refreshing twist that complements the basil.
  • 1 cup fresh or frozen peas: Sweet and vibrant; if using frozen, make sure to thaw them first.
  • 1/4 cup toasted pine nuts: For a nutty flavor and creamy texture in the pesto.
  • 1/2 cup freshly grated Parmesan cheese: Essential for that rich, savory taste.
  • 2 cloves garlic, minced: Enhances the overall flavor profile.
  • 1/2 cup extra virgin olive oil: Brings everything together and adds richness.
  • Salt and freshly ground black pepper: To taste, enhancing all the flavors.
  • 12 ounces pasta of choice: Linguine or spaghetti works best, but feel free to use your favorite.
  • Optional garnish: Extra grated Parmesan, fresh mint leaves, and toasted pine nuts for serving.

Preparation Steps

Detailed image of spring pesto pasta dish adorned with peas, mint, and pine nuts, served in a bowl.

Now that we have everything ready, let’s get cooking:

  1. Bring a large pot of salted water to a boil (about 1 tablespoon of salt per 4 quarts of water). Add the pasta and cook according to package instructions until al dente, usually 8-10 minutes. Be sure to reserve 1 cup of pasta cooking water before draining.
  2. In the last 2-3 minutes of cooking time, add the peas to the boiling water. Drain the pasta and peas together, reserving some cooking liquid.
  3. In a food processor, combine the basil, mint, toasted pine nuts, Parmesan cheese, minced garlic, and the cooked peas. Pulse a few times to start breaking down the ingredients.
  4. While the processor is running, slowly pour in the olive oil until the mixture becomes a smooth, vibrant green sauce. If the pesto is too thick, add a tablespoon or two of reserved pasta water to loosen it. Season with salt and pepper to taste.
  5. Return the drained pasta and peas to the pot or a large mixing bowl. Add the pesto and toss gently to coat every strand. Use a splash of reserved pasta water if needed to create a silky sauce.
  6. Plate the pasta and garnish with extra grated Parmesan, a few fresh mint leaves, and toasted pine nuts. Serve immediately and enjoy!

Pro Tips for Perfecting Your Pesto Pasta

Here are some expert insights to elevate your dish:

  • Toast Your Nuts: Lightly toasting pine nuts enhances their flavor and adds depth to your pesto.
  • Don’t Overblend: For a rustic texture, pulse the ingredients rather than blending until completely smooth.
  • Season Gradually: Taste as you go and adjust salt and pepper to your preference.
  • Use Pasta Water Wisely: The starchy water helps create a creamy sauce that clings to the pasta.
  • Experiment with Herbs: Feel free to mix in other herbs like parsley or cilantro for a different flavor profile.
  • Make It Vegan: Substitute nutritional yeast for Parmesan and use your favorite plant-based pasta.
  • Adjust the Consistency: If the pesto is too thick, add more olive oil or pasta water until you reach your desired consistency.
  • Make Ahead: Prepare the pesto in advance and store it in the fridge for up to a week.

Common Mistakes and Troubleshooting

Even the best cooks make mistakes! Here’s how to troubleshoot common issues:

  • Pesto Too Bitter: This can happen if too much garlic is used. Balance it with a bit more olive oil and cheese.
  • Overcooked Pasta: Always follow the package instructions and check for doneness a minute or two before the timer goes off.
  • Flavor Lacking: If your dish tastes flat, it might need more salt or lemon juice for brightness.
  • Pesto Turns Brown: To prevent oxidation, toss the pesto with the pasta immediately after making it or store it with a thin layer of olive oil on top.

Variations to Try

Want to switch things up? Here are some delicious variations:

  • Nut-Free Pesto: Replace pine nuts with sunflower seeds or skip nuts entirely for an allergy-friendly version.
  • Whole Wheat Pasta: For a healthier option, use whole wheat or gluten-free pasta.
  • Add Protein: Toss in grilled chicken, shrimp, or chickpeas for added protein and heartiness.
  • Vegetable Boost: Mix in roasted veggies like zucchini, bell peppers, or asparagus for extra nutrition.

Storage and Make-Ahead Instructions

This dish is not only quick to prepare but also convenient for meal prep:

  • Refrigeration: Store any leftovers in an airtight container in the fridge for up to 3 days.
  • Freezing: You can freeze the pesto separately for up to 2 months. Just thaw and toss with freshly cooked pasta when ready to enjoy.
  • Make-Ahead: Prepare the pesto in advance and store it in the fridge, keeping it fresh with a thin layer of olive oil on top.

Frequently Asked Questions

Here are some common questions to help you along the way:

  • Can I use frozen peas? Yes, just make sure they are thawed before adding them to the pesto.
  • What pasta works best for this recipe? Linguine or spaghetti are recommended, but feel free to use your favorite type.
  • Can I make the pesto ahead of time? Absolutely! It can be stored in the fridge for up to a week.
  • Is this dish gluten-free? You can easily make this dish gluten-free by using gluten-free pasta.
  • How do I store leftovers? Keep leftovers in an airtight container in the fridge for up to 3 days.
  • What if my pesto is too thick? Add a bit of reserved pasta water or olive oil to loosen it up.
  • Can I substitute the Parmesan? Yes, you can use nutritional yeast for a vegan option.
  • How can I add more flavor? Incorporate lemon juice or zest for a bright flavor kick.

Nutritional Tips and Dietary Adaptations

To make this dish even healthier:

  • Increase Veggies: Add more greens or roasted vegetables for added fiber and vitamins.
  • Use Whole Foods: Opt for whole grain pasta for extra nutrients and fiber.
  • Watch Portion Sizes: For a lighter meal, consider serving with a side salad or steamed vegetables.

Equipment Recommendations

To prepare this dish, here’s what I recommend:

  • Large Pot: For boiling pasta and peas.
  • Food Processor: Essential for making the pesto.
  • Measuring Cups and Spoons: For accurate ingredient measurements.
  • Colander: To drain the pasta and peas efficiently.

Serving Suggestions

Once you’ve plated your pasta, consider these serving ideas:

  • Accompany with Salad: A light arugula salad drizzled with balsamic vinaigrette pairs perfectly.
  • Wine Pairing: A crisp white wine, like Sauvignon Blanc, complements the freshness of the dish.
  • Garnish Creatively: Add edible flowers or lemon zest for a stunning presentation.

Conclusion: Your Culinary Adventure Awaits!

Cooking should be enjoyable, and this Fresh Spring Pesto Pasta embodies that philosophy. With its vibrant colors, delightful flavors, and simple preparation, it’s a dish that invites creativity and confidence in the kitchen. So gather your ingredients, invite a friend, and let’s make something delicious together!

Discover the Magic of Apple Cinnamon Streusel Muffins

Welcome to your new favorite baking adventure! These Apple Cinnamon Streusel Muffins are not just another breakfast item; they are a delightful experience that combines the warm, comforting flavors of apples and cinnamon with a crunchy streusel topping. Whether you’re starting your day or indulging in a sweet afternoon snack, these muffins promise to bring joy with every bite. Let’s dive into this simple yet rewarding recipe that even beginner bakers can master!

Why You’ll Love This Recipe

There are countless reasons to fall in love with these cinnamon streusel muffins, but here are just a few:

  • Easy to Make: With simple ingredients and straightforward steps, you’ll find this recipe a breeze, even during a busy morning.
  • Delicious Flavor: The combination of apples and cinnamon creates a flavor profile reminiscent of warm apple pie, making these muffins irresistible.
  • Crowd-Pleaser: Perfect for family gatherings or brunch with friends, these muffins tend to disappear quickly!
  • Versatile Snack: Great for breakfast, dessert, or an afternoon treat—these muffins are suitable for any time of day.
  • Freezer-Friendly: Make a batch ahead of time and freeze them for a quick snack or breakfast option later.

Essential Ingredients for Apple Cinnamon Streusel Muffins

Gather these ingredients to start your baking journey:

  • 1 ½ cups all-purpose flour: The base of our muffins, providing structure.
  • ½ cup granulated sugar: Adds sweetness to the batter.
  • 1 ½ teaspoons baking powder: Gives the muffins their rise.
  • ½ teaspoon ground cinnamon: Infuses warm flavor into the batter.
  • ¼ teaspoon salt: Enhances all the flavors.
  • 1 large egg: Binds the ingredients together.
  • ½ cup milk: Keeps the muffins moist and tender.
  • ¼ cup unsalted butter, melted: Adds richness and flavor.
  • 1 teaspoon vanilla extract: A touch of sweetness that complements the other flavors.
  • 1 cup chopped apples: Fresh apples are key; use about one medium apple for this quantity.

Streusel Topping Ingredients

Don’t forget the delicious streusel topping! You’ll need:

  • ½ cup all-purpose flour: For the streusel base.
  • ¼ cup packed light brown sugar: Adds sweetness and a hint of caramel flavor.
  • ¼ teaspoon ground cinnamon: To enhance the cinnamon flavor.
  • ¼ cup unsalted butter, cold and cut into small pieces: Creates that delightful crumbly texture.

Step-by-Step Instructions

Juicy apple cinnamon muffins with a sprinkled streusel topping, captured in natural light.

Let’s get baking! Follow these steps to create your Apple Cinnamon Streusel Muffins:

  1. Preheat your oven to 375°F (190°C). Line a 12-cup muffin pan with paper liners.
  2. Mix dry ingredients: In a large bowl, whisk together the flour, granulated sugar, baking powder, cinnamon, and salt.
  3. Combine wet ingredients: In a separate medium bowl, whisk the egg, milk, melted butter, and vanilla extract until well combined.
  4. Combine wet and dry: Pour the wet ingredients into the dry ingredients. Stir just until moistened; a few lumps are perfectly fine—do not overmix!
  5. Add the apples: Gently fold in the chopped apples to distribute them evenly throughout the batter.
  6. Prepare the streusel topping: In a small bowl, combine the flour, brown sugar, and cinnamon. Cut in the cold butter using a pastry blender or your fingertips until the mixture resembles coarse crumbs.
  7. Fill the muffin cups: Divide the muffin batter evenly among the 12 muffin cups.
  8. Add streusel topping: Sprinkle a generous amount of the streusel topping over each muffin.
  9. Bake for 18-22 minutes, or until a wooden skewer inserted into the center of a muffin comes out clean.
  10. Cool: Let the muffins cool in the pan for a few minutes before transferring them to a wire rack to cool completely.

Pro Tips for Muffin Success

To ensure your muffins turn out perfectly every time, consider these expert insights:

  • Use fresh apples: Choose firm varieties like Honeycrisp, Granny Smith, or Fuji for the best texture and flavor.
  • Don’t overmix: To keep your muffins fluffy, mix just until the ingredients are combined.
  • Chill your butter: For the streusel, make sure your butter is cold to create that desired crumbly texture.
  • Check for doneness: If the tops are golden brown and a toothpick comes out clean, your muffins are ready!
  • Experiment with spices: Feel free to add nutmeg or ginger for an extra layer of warmth.
  • Try different add-ins: Consider adding nuts, raisins, or even chocolate chips for a unique twist.
  • Don’t skip the cooling: Allowing the muffins to cool in the pan helps them maintain their shape.
  • Use a muffin scoop: For evenly sized muffins, a muffin scoop ensures consistent portioning.

Common Mistakes and Troubleshooting

Even the best bakers can face challenges. Here are some common mistakes and how to avoid them:

  • Dense muffins: This often results from overmixing. Remember, a few lumps are okay—mix just until combined!
  • Sticky muffins: Make sure to use enough flour and properly measure your ingredients. Too much liquid can lead to stickiness.
  • Streusel that doesn’t stick: Ensure your butter is cold and cut into the flour mixture thoroughly to create a good crumbly texture.
  • Dry muffins: Overbaking can dry them out. Keep an eye on them as they bake and do the toothpick test.

Delicious Variations to Try

Feeling adventurous? Here are some fun variations to make these muffins your own:

  • Nutty Addition: Stir in ½ cup of chopped walnuts or pecans for a delightful crunch.
  • Dried Fruit: Add ½ cup of raisins or dried cranberries for a chewy, sweet contrast.
  • Chocolate Twist: Mix in ½ cup of mini chocolate chips for a decadent touch.
  • Gluten-Free Option: Substitute all-purpose flour with a 1:1 gluten-free blend for a gluten-free version.

Storing and Make-Ahead Instructions

Want to enjoy your muffins later? Here’s how to store and prepare them ahead of time:

  • Room Temperature: Store in an airtight container at room temperature for up to 2 days.
  • Refrigeration: Keep in the fridge for up to a week; just remember to warm them slightly before serving!
  • Freezing: Place muffins in a freezer-safe bag or container for up to 3 months. Thaw at room temperature or microwave for a quick warm-up.
  • Make-Ahead Batter: You can prepare the batter in advance and store it in the fridge for up to 24 hours before baking. Just give it a gentle stir before filling your muffin tin.

Frequently Asked Questions

Got questions? Here are some common inquiries about Apple Cinnamon Streusel Muffins:

  • Can I make these muffins ahead of time? Absolutely! Prepare and store them as mentioned above for easy access.
  • What are the best apples for these muffins? Firm apples like Honeycrisp, Granny Smith, or Fuji work best for texture and flavor.
  • Can I add nuts or other toppings? Yes! Feel free to customize with your favorite nuts or even a glaze on top.
  • How do I store leftovers? Keep them in an airtight container at room temperature or refrigerate to extend freshness.
  • Can I make a glaze for the muffins? Yes, a simple powdered sugar glaze can add a sweet finish!
  • What can I substitute for eggs? Use a flax egg (1 tablespoon ground flaxseed mixed with 2.5 tablespoons water) or applesauce for a vegan alternative.
  • Why are my muffins sinking? This could be due to overmixing or not enough leavening agent. Ensure your baking powder is fresh!
  • Can I double the recipe? Absolutely! Just make sure to adjust your baking time and use a larger pan if needed.

Nutritional Tips and Dietary Adaptations

For those mindful of dietary needs, here are some tips:

  • Healthier Sweeteners: Substitute granulated sugar with coconut sugar or a sugar alternative if desired.
  • Dairy-Free Option: Use almond milk or oat milk in place of regular milk.
  • Lower-Carb Version: Try using almond flour or coconut flour for a low-carb alternative.
  • Fiber Boost: Add flaxseed meal or chia seeds into the batter for an extra fiber kick.

Equipment Recommendations

Before you start baking, here’s a quick list of helpful tools:

  • Muffin Pan: A sturdy non-stick muffin pan ensures easy release.
  • Mixing Bowls: Use large mixing bowls for easy combining of ingredients.
  • Whisk: A good whisk helps blend wet and dry ingredients effectively.
  • Measuring Cups and Spoons: Accurate measurement is key to baking success!
  • Pastry Blender: Ideal for making the streusel topping.

Serving Suggestions

These muffins are delightful on their own, but here are some serving ideas:

  • With Butter: Spread a little butter on warm muffins for an extra indulgent treat.
  • Accompanied by Coffee: Pair with your favorite coffee or tea for a perfect breakfast combo.
  • With a Drizzle: Add a drizzle of caramel or maple syrup for a sweet touch.
  • Fruit Side: Serve with fresh fruit or yogurt for a well-rounded meal.

Final Thoughts

With these Apple Cinnamon Streusel Muffins, you’re not just baking; you’re creating warm memories filled with delicious flavors. Remember, cooking is all about enjoying the process and sharing it with others. So, take a deep breath, embrace the joy of baking, and let these muffins fill your kitchen with love. Happy baking, my friend!

Unleash 12 Divine Apple Cinnamon Streusel Muffins From Your Oven Today

Prep Time 15 minutes
Cook Time 20 minutes
Total Time 35 minutes
Servings 12 muffins
Calories 250
Enjoy freshly baked apple cinnamon muffins with a crunchy streusel topping, perfect for breakfast or a snack.

Ingredients

Dry ingredients

  • 1 ½ cups all-purpose flour
  • ½ cup granulated sugar
  • 1 ½ teaspoons baking powder
  • ½ teaspoon ground cinnamon
  • ¼ teaspoon salt

Wet ingredients

  • 1 large egg
  • ½ cup milk
  • ¼ cup unsalted butter, melted
  • 1 teaspoon vanilla extract

Apple filling

  • 1 cup chopped apples (about 1 medium apple)
  • ½ cup all-purpose flour
  • ¼ cup packed light brown sugar
  • ¼ teaspoon ground cinnamon
  • ¼ cup unsalted butter, cold and cut into small pieces

Instructions 

  • Preheat oven to 375°F (190°C). Line muffin pan with liners.
  • Mix dry ingredients in a bowl. Whisk wet ingredients separately.
  • Combine wet and dry; fold in apples. Prepare streusel topping.
  • Divide batter into muffin cups, sprinkle with streusel, and bake 18-22 mins.
  • Cool muffins briefly before transferring to a wire rack.

Notes

For extra flavor, add a pinch of nutmeg to the streusel topping.
Calories: 250kcal
Cost: $15
Course: Breakfast
Cuisine: American
Keyword: apple, Cinnamon, muffins

Introducing Delightful Strawberry Muffins

Are you ready to bring the warmth and joy of baking into your kitchen? These bakery-style strawberry muffins are a delightful treat, bursting with fresh berries and topped with a crunchy streusel. Perfect for breakfast, an afternoon snack, or a sweet addition to any gathering, this recipe will not only satisfy your cravings but also boost your confidence in the kitchen. In just a few simple steps, you’ll create muffins that are moist, fluffy, and absolutely delicious. Let’s dive in!

Why You’ll Love This Recipe

  • Quick and Easy: With a prep time of only about 15 minutes, you’ll have warm muffins ready to enjoy in no time!
  • Deliciously Moist: The combination of fresh strawberries and a simple batter ensures that every muffin is moist and tender.
  • Customizable: This recipe offers a variety of options, including an optional streusel topping and several delicious variations to suit your taste.
  • Perfect for Sharing: Bake a batch and watch them disappear! These muffins are great for brunches or as a sweet gift for friends and family.
  • Healthier Choice: Homemade means you control the ingredients, so you can make adjustments to suit your dietary needs.

Ingredients for Your Strawberry Muffins

Before we start baking, let’s gather our ingredients. Here’s what you’ll need:

  • 1 3/4 cups all-purpose flour: This forms the base of your muffins.
  • 3/4 cup granulated sugar: For sweetness that perfectly complements the strawberries.
  • 1 tablespoon baking powder: The leavening agent that gives your muffins a fluffy rise.
  • 1/2 teaspoon salt: Enhances flavor and balances the sweetness.
  • 1/2 cup (1 stick) unsalted butter, melted: Adds richness and moisture.
  • 2 large eggs: These bind the ingredients and provide structure.
  • 1/2 cup milk: Keeps the muffins tender and moist.
  • 1 teaspoon vanilla extract: For that aromatic touch.
  • 2 cups fresh strawberries, hulled and chopped: The star of the show!
  • Optional Streusel Topping:
    • 1/2 cup all-purpose flour
    • 1/4 cup packed brown sugar
    • 1/4 cup cold unsalted butter (cubed)
    • 1/2 teaspoon ground cinnamon

Ingredient Substitutions

Appetizing strawberry muffins arranged neatly, highlighting the delicious ingredients and optional streusel.

Don’t have everything on hand? No problem! Here are some substitutions you can make:

  • Flour: Use whole wheat flour for a heartier muffin or gluten-free flour for a gluten-free option.
  • Sugar: Substitute brown sugar for a deeper flavor or use a sugar alternative like coconut sugar.
  • Butter: Coconut oil or vegetable oil can replace melted butter for a dairy-free option.
  • Milk: Almond milk or oat milk works well for a dairy-free version.
  • Strawberries: Feel free to mix in other berries like blueberries or raspberries for a fruity twist!

How to Make Fluffy Strawberry Muffins: Step-by-Step Instructions

Now, let’s get to the fun part! Here’s how to bake your strawberry muffins:

  1. Preheat your oven: Set it to 400°F (200°C). Line a 12-cup muffin tin with paper liners or grease it well.
  2. Mix the dry ingredients: In a large bowl, whisk together the flour, sugar, baking powder, and salt.
  3. Combine the wet ingredients: In a separate medium bowl, whisk together the melted butter, eggs, milk, and vanilla extract until well combined.
  4. Combine wet and dry: Pour the wet ingredients into the dry ingredients. Gently mix with a spatula until just combined. Don’t overmix; a few lumps are fine!
  5. Add strawberries: Gently fold in the chopped fresh strawberries to distribute them throughout the batter.
  6. Prepare the streusel (optional): In a small bowl, mix the streusel ingredients until crumbly. Cut in the cold butter until it resembles coarse crumbs.
  7. Fill the muffin cups: Spoon the batter evenly into the prepared muffin cups, filling each about two-thirds full.
  8. Add streusel (optional): If using, sprinkle a small amount over the top of each muffin.
  9. Bake: Bake for 18 to 22 minutes, or until a toothpick inserted into the center comes out clean. For a bakery-style dome, start at 425°F for the first 5 minutes, then reduce to 375°F for the remaining baking time.
  10. Cool: Let the muffins cool in the pan for 5 minutes before transferring to a wire rack to cool completely.

Tips for Success: Achieving Perfect Muffins Every Time

  • Don’t overmix: A few lumps in the batter are okay. Overmixing can lead to dense muffins.
  • Use fresh strawberries: For the best flavor, make sure your strawberries are ripe and in season.
  • Chill the batter: If you have time, let the batter sit in the fridge for about 20 minutes before baking for an even fluffier texture.
  • Check doneness: Start checking your muffins a couple of minutes before the suggested baking time.
  • Cool completely: Allow muffins to cool fully on a wire rack to maintain their texture.

Common Mistakes and Troubleshooting

Even the best bakers make mistakes! Here are some common pitfalls and how to avoid them:

  • Muffins are dense: This usually happens from overmixing the batter. Remember, gentle folding is key!
  • Strawberries sink to the bottom: Tossing the chopped strawberries with a little flour before folding them into the batter can help prevent this.
  • Uneven baking: Make sure your oven is properly preheated and consider rotating the muffin tin halfway through baking.

Delicious Variations to Try

Feeling adventurous? Here are some tasty variations to mix things up:

  • Chocolate Chip Strawberry Muffins: Add 1/2 cup of chocolate chips for a sweet twist.
  • Banana Strawberry Muffins: Replace 1 cup of strawberries with 1 cup of mashed ripe bananas for a fruity mash-up.
  • Nutty Strawberry Muffins: Stir in 1/2 cup of chopped nuts like walnuts or pecans for added crunch.
  • Vegan Strawberry Muffins: Use flax eggs instead of regular eggs and almond milk instead of dairy milk.

Storage and Make-Ahead Instructions

Want to enjoy your muffins later? Here’s how to store and prepare them in advance:

  • Room Temperature: Store cooled muffins in an airtight container for up to 3 days.
  • Refrigerator: For longer storage, keep muffins in the fridge for up to a week.
  • Freezing: Freeze muffins in a freezer-safe bag or container for up to 3 months. Thaw at room temperature when ready to enjoy.
  • Make-Ahead: You can prepare the batter the night before and store it in the fridge, then bake fresh muffins in the morning!

Frequently Asked Questions

Here are some common questions about making strawberry muffins:

  • Can I use frozen strawberries? Yes, but make sure to thaw and drain them first, as excess moisture can affect the batter.
  • What if I don’t have baking powder? You can make a substitute with baking soda and cream of tartar.
  • How can I make these muffins healthier? Consider reducing the sugar or using whole grain flour.
  • Can I add other fruits? Absolutely! Blueberries, raspberries, or even chopped apples work well.
  • What if my muffins don’t rise? Check the freshness of your baking powder and ensure you’re not overmixing.
  • How do I know when the muffins are done? A toothpick inserted in the center should come out clean or with a few crumbs attached.
  • Can I double the recipe? Yes, just ensure your mixing bowl is large enough for the increased volume.
  • What’s the best way to enjoy these muffins? Warm them up slightly and enjoy with a pat of butter or a drizzle of honey!

Nutritional Tips and Dietary Adaptations

If you’re looking to make these muffins fit your dietary needs, consider the following:

  • Gluten-Free: Use a gluten-free flour blend to make these muffins suitable for those with gluten sensitivities.
  • Low Sugar: Replace granulated sugar with a sugar substitute suitable for baking.
  • High Fiber: Add flaxseed or chia seeds to boost the fiber content.

Essential Equipment for Baking

Before you start, make sure you have the following kitchen tools:

  • Muffin Tin: A standard 12-cup muffin tin is essential for this recipe.
  • Mixing Bowls: Use a large bowl for dry ingredients and a medium bowl for wet ingredients.
  • Whisk and Spatula: These tools are crucial for mixing and folding ingredients properly.
  • Measuring Cups and Spoons: Accurate measurements lead to baking success!
  • Cooling Rack: Allows muffins to cool properly and maintain their texture.

Serving Suggestions

Now that your strawberry muffins are ready, here are some delightful ways to serve them:

  • With Butter: A simple spread of butter complements the sweetness of the muffins.
  • With Jam: Top with a layer of strawberry jam or lemon curd for extra flavor.
  • As a Snack: Enjoy them alongside a cup of coffee or tea for a perfect afternoon treat.

Final Thoughts

There you have it! A comprehensive guide to baking delightful strawberry muffins that will impress your family and friends. Remember, cooking is about having fun and experimenting, so don’t hesitate to make this recipe your own. With these clear steps and tips, you’ll be whipping up bakery-style muffins in no time. Happy baking!

Bakery-Style Fresh Strawberry Muffins with Optional Streusel Topping

Prep Time 15 minutes
Cook Time 20 minutes
Total Time 35 minutes
Servings 12 muffins
Calories 250
Enjoy these moist, bakery-style strawberry muffins with a optional crunchy streusel topping, perfect for breakfast or a snack.

Ingredients

Muffin Batter

  • 1 3/4 cups all-purpose flour
  • 3/4 cup granulated sugar
  • 1 tablespoon baking powder
  • 1/2 teaspoon salt
  • 1/2 cup unsalted butter, melted
  • 2 large eggs
  • 1/2 cup milk
  • 1 teaspoon vanilla extract
  • 2 cups fresh strawberries, hulled and chopped

Streusel Topping

  • 1/2 cup all-purpose flour
  • 1/4 cup packed brown sugar
  • 1/4 cup cold unsalted butter (cubed)
  • 1/2 teaspoon ground cinnamon

Instructions 

  • Preheat oven to 400°F (200°C). Line a muffin tin.
  • Mix dry ingredients; in a separate bowl, whisk wet ingredients.
  • Combine wet and dry; fold in strawberries.
  • If using, prepare streusel and sprinkle over batter.
  • Spoon batter into cups; bake 18-22 mins. Cool before serving.

Notes

For a bakery-style dome, start at 425°F for 5 mins, then reduce to 375°F.
Calories: 250kcal
Cost: $15
Course: Breakfast
Cuisine: American
Keyword: Strawberry

Unlock the Joy of Cooking with the Ultimate Chicken Avocado Wrap

Welcome to your next kitchen adventure! Today, we’re diving into the world of wraps with a delightful recipe that’s not just delicious but also incredibly versatile—the Chicken Avocado Wrap. This meal is perfect for lunch, dinner, or even a quick snack. Packed with tender chicken, creamy avocado, and crunchy veggies, this wrap is sure to become a staple in your home. Let’s get started!

Why You’ll Love This Recipe

There are countless reasons to fall in love with this chicken avocado wrap. Here are just a few:

  • Quick and Easy: This recipe can be whipped up in under 30 minutes, making it ideal for busy weeknights.
  • Nutritious Ingredients: Filled with protein, healthy fats, and fresh veggies, this wrap is a wholesome meal choice.
  • Versatile Options: You can customize this wrap to suit your taste preferences or dietary needs.
  • Portable Meal: Perfect for on-the-go lunches, you can easily pack it for work or school.
  • Family-Friendly: Even the pickiest eaters will love the flavors and textures of this wrap.

Ingredients Breakdown

Here’s what you’ll need to make your chicken avocado wrap:

Ingredient Quantity Calories (Approx.)
Cooked chicken breast 1 (150g) 250 kcal
Whole wheat tortilla 1 large 130 kcal
Ripe avocado ½ medium 120 kcal
Greek yogurt or mayo 1 tablespoon 30 kcal
Lime juice 1 teaspoon 2 kcal
Fresh lettuce leaves 2–3 leaves 5 kcal
Tomato slices 2–3 slices 10 kcal
Red onion (optional) 2–3 thin rings 5 kcal
Salt and pepper To taste 0 kcal
Olive oil (optional) 1 teaspoon 40 kcal

Step-by-Step Cooking Instructions

Delicious wrap featuring chicken, avocado, and colorful veggies.

Now, let’s break down the preparation process into simple steps:

  • Prepare the Chicken: Season chicken with salt, pepper, and olive oil. Grill or pan-cook for 4–5 minutes on each side until golden and cooked through. Slice into thin strips.
  • Mash the Avocado: In a bowl, mash half an avocado with lime juice, salt, and pepper.
  • Assemble the Wrap: Spread Greek yogurt or mayo evenly on the tortilla. Add mashed avocado in the center, followed by lettuce, chicken, tomato, and onion.
  • Wrap It Up: Fold the sides inward and roll tightly. Slice in half diagonally for easy serving.
  • Serve Fresh: Enjoy immediately, or wrap in foil for a portable, on-the-go meal.

Expert Tips for Perfecting Your Wrap

To ensure your chicken avocado wrap turns out perfectly every time, keep these expert tips in mind:

  • Quality Ingredients: Use fresh, ripe avocados for the best flavor.
  • Customize Your Fillings: Feel free to add other vegetables like bell peppers or cucumbers for extra crunch.
  • Use Leftover Chicken: This recipe is perfect for using up leftover rotisserie or grilled chicken.
  • Make It Gluten-Free: Swap the whole wheat tortilla for a gluten-free option if needed.
  • Add Spice: If you like a kick, consider adding sliced jalapeños or hot sauce.
  • Store Properly: If you’re making these ahead of time, keep the avocado separate to prevent browning.
  • Perfect Wrap Technique: Practice your wrapping technique to prevent spills and keep all fillings intact.
  • Meal Prep Friendly: Assemble wraps in advance, but add fresh ingredients like avocado right before eating.

Common Mistakes and Troubleshooting

Even the best chefs make mistakes! Here are some common issues and how to avoid them:

  • Overcooked Chicken: Ensure your chicken is cooked to a safe temperature but avoid overcooking to keep it juicy.
  • Too Much Filling: Don’t overstuff your wrap—this can make it difficult to roll and eat.
  • Browning Avocado: To keep avocado fresh, add lime juice and wrap tightly if making ahead.

Delicious Variations

Feeling adventurous? Here are some tasty variations to try:

  • Ground Turkey Wrap: Substitute chicken with seasoned ground turkey for a different flavor profile.
  • Vegetarian Version: Replace chicken with grilled tofu or chickpeas for a plant-based option.
  • Spicy Chicken Wrap: Add sriracha or chipotle sauce for a spicy kick.
  • Breakfast Wrap: Use scrambled eggs, avocado, and salsa for a delicious breakfast twist.

Storage and Make-Ahead Instructions

This wrap is great for meal prep! Here’s how to store it:

  • In the Refrigerator: Wrap tightly in plastic wrap or foil; consume within 1-2 days for best freshness.
  • Make-Ahead: Prepare all ingredients separately, and assemble right before serving.
  • Freezing: While not ideal for avocado, you can freeze the cooked chicken and reassemble the wrap fresh later.

Comprehensive FAQ

Here are some common questions about this chicken avocado wrap:

  • Can I use frozen chicken?: Yes, just ensure it’s fully cooked before using.
  • How can I add more flavor?: Experiment with spices and herbs like cilantro or cumin.
  • Is this wrap gluten-free?: Use gluten-free tortillas to make it suitable for gluten-sensitive individuals.
  • Can I make this a salad?: Absolutely! Simply chop all ingredients and serve over mixed greens.
  • How do I prevent the wrap from getting soggy?: Keep wet ingredients like tomatoes separate until you’re ready to eat.
  • What if I don’t have Greek yogurt?: Mayonnaise or a light ranch dressing works well as a substitute.
  • Can I add cheese?: Blue cheese or shredded cheddar can add a delicious twist if desired.
  • How do I serve this wrap?: It’s perfect on its own, but pairs well with a side salad or sweet potato fries.

Nutritional Tips and Dietary Adaptations

For those watching their diet, here are some valuable tips:

  • Healthy Fats: Avocado is a great source of healthy fats, which are essential for a balanced diet.
  • Protein Power: Chicken is high in protein, which can help keep you full and satisfied.
  • Low-Calorie Options: Use low-calorie tortillas and skip the olive oil to reduce calories.

Recommended Equipment

To make this recipe easier, consider having the following tools on hand:

  • Cutting Board: For prepping your ingredients efficiently.
  • Sharp Knife: Ensure your knife is sharp for clean cuts of chicken and veggies.
  • Mixing Bowl: A medium-sized bowl for mashing your avocado.
  • Griddle or Skillet: For cooking the chicken to perfection.

Serving Suggestions

Looking to round out your meal? Here are some serving suggestions:

  • Pair with a Fresh Salad: A side salad with mixed greens, cherry tomatoes, and a vinaigrette complements the wrap perfectly.
  • Sweet Potato Fries: Crispy fries are a great side that adds a bit of indulgence to your meal.
  • Fruit Salad: A light fruit salad can add a refreshing touch to your meal.

There you have it! The ultimate Chicken Avocado Wrap recipe that’s quick, fresh, and full of flavor. With endless possibilities for customization, this dish is perfect for any occasion. Remember, cooking is all about experimenting and finding what works for you. So, roll up those sleeves, and let’s make mealtime exciting again!

Chicken Avocado Wrap: A Fresh, Flavorful, and Wholesome Meal

Prep Time 10 minutes
Cook Time 10 minutes
Total Time 20 minutes
Servings 2 servings
Calories 452
This vibrant chicken avocado wrap combines tender grilled chicken, creamy avocado, and fresh vegetables for a wholesome, portable meal.

Ingredients

Main Ingredients

  • 1 large Whole wheat tortilla
  • 150 g Cooked chicken breast
  • 0.5 medium Ripe avocado
  • 1 tablespoon Greek yogurt or mayo
  • 1 teaspoon Lime juice
  • 2-3 leaves Fresh lettuce leaves
  • 2-3 slices Tomato slices
  • 2-3 rings Red onion (optional)
  • to taste Salt and pepper
  • 1 teaspoon Olive oil (optional)

Instructions 

  • Season chicken with salt, pepper, and olive oil. Grill or pan-cook for 4–5 minutes per side until cooked through. Slice into strips.
  • Mash half an avocado with lime juice, salt, and pepper.
  • Spread yogurt or mayo on the tortilla. Add mashed avocado, lettuce, chicken, tomato, and onion. Roll tightly and slice diagonally.

Notes

For extra flavor, add a dash of hot sauce or herbs.
Calories: 452kcal
Cost: $15
Course: Main Course
Cuisine: International
Keyword: Avocado, Chicken, Wrap

Discover the Joy of Baking: Strawberry Banana Muffins

There’s something magical about the aroma of freshly baked muffins wafting through your home. Today, we’re diving into a delightful recipe for Strawberry Banana Muffins that are not only soft and fluffy but also bursting with flavor. These muffins are perfect for breakfast, an afternoon snack, or even a sweet treat after dinner. Let’s explore why this recipe will become your go-to, along with tips, variations, and more!

Why You’ll Love This Recipe

  • Quick and Easy: These muffins come together in less than an hour, making them a fantastic choice for busy mornings or last-minute gatherings.
  • Flavorful Combination: The sweet blend of strawberries and bananas creates a moist muffin that is irresistible and satisfying.
  • Healthy Ingredients: Packed with fresh fruits, these muffins provide a boost of vitamins and nutrients, making them a guilt-free indulgence.
  • Versatile: Customize your muffins with optional ingredients like nuts or chocolate chips, allowing you to make them your own.
  • Kid-Friendly: These muffins are a hit with children, making them perfect for lunchboxes or as a snack after school.

Ingredient Breakdown and Substitutions

Here’s what you’ll need for this mouthwatering recipe:

  • 6 tablespoons unsalted butter: For rich flavor; you can substitute with coconut oil for a dairy-free option.
  • 3/4 cup sugar: I recommend using granulated sugar, but you can use brown sugar for a deeper flavor.
  • 1 large egg: Ensure it’s at room temperature for the best mix.
  • 2 small ripe bananas: The riper, the better! If you don’t have bananas, unsweetened applesauce works as a substitute.
  • 3/4 tsp vanilla extract: For added depth; you can also use almond extract for a unique twist.
  • 1 cup all-purpose flour: Whole wheat flour can be used for a healthier version.
  • 1 1/2 tsp baking powder: Essential for that perfect rise.
  • 1/4 tsp baking soda: Helps achieve a lighter texture.
  • 1/4 tsp salt: Enhances the flavors.
  • 7 small strawberries: Fresh and diced; frozen strawberries can also work, just thaw them first.
  • 1/4 cup raisins (optional): Adds a chewy texture; you can swap them for chocolate chips or nuts if preferred.

Step-by-Step Instructions

Detailed side view of bakery-style strawberry banana muffins with a soft texture.

Let’s get baking! Follow these easy steps to create your delicious muffins:

Step 1: Prepare Your Equipment

Gather your ingredients and preheat your oven to 350°F (175°C). Line a muffin tin with paper liners or lightly grease it with cooking spray.

Step 2: Cream Butter and Sugar

In a mixing bowl, cream together the softened butter and sugar until light and fluffy. This process incorporates air into the butter, resulting in a fluffier muffin.

Step 3: Add Wet Ingredients

Beat in the egg, mashed bananas, and vanilla extract until well combined. Make sure there are no large lumps of banana left.

Step 4: Combine Dry Ingredients

In a separate bowl, whisk together the flour, baking powder, baking soda, and salt. Gradually add the dry ingredients to the wet mixture, stirring until just combined. Be careful not to overmix!

Step 5: Fold in Fruits

Gently fold in the diced strawberries and raisins (if using) until evenly distributed throughout the batter.

Step 6: Bake!

Divide the batter evenly among the muffin cups. Bake for 18-22 minutes or until a toothpick inserted into the center comes out clean. Let them cool in the pan for 5 minutes before transferring to a wire rack.

Pro Tips for Perfect Muffins

  • Check Your Bananas: Use bananas that are very ripe for maximum sweetness and moisture.
  • Don’t Overmix: Mixing too much can lead to dense muffins. Stir until just combined.
  • Cool Before Storing: Allow muffins to cool completely before storing to prevent them from becoming soggy.
  • Use Room Temperature Ingredients: This ensures a smoother batter and better incorporation of ingredients.
  • Experiment with Flavors: Try adding cinnamon or nutmeg for a warm spice note.
  • Check for Doneness: Ovens can vary; check your muffins a few minutes early.
  • Leave Space: Fill muffin cups only about 2/3 full to allow for rising.
  • Rotate the Pans: Halfway through baking, rotate the muffin pan to ensure even baking.

Common Mistakes and Troubleshooting

Even the best bakers face challenges! Here are some common mistakes and how to avoid them:

  • Muffins are too dense: This usually happens if you overmix the batter. Stir gently until just combined.
  • Burnt tops: If the tops brown too quickly, cover them with aluminum foil halfway through baking.
  • Underbaked muffins: Ensure you’re using the correct oven temperature and check them with a toothpick for doneness.

Variations to Try

Want to switch things up? Here are some fun variations for your muffins:

  • Chocolate Chip Strawberry Banana Muffins: Add 1/2 cup of chocolate chips for a decadent twist.
  • Nuts and Seeds: Fold in chopped walnuts or sunflower seeds for added crunch and nutrition.
  • Peanut Butter Swirl: Add a spoonful of peanut butter to the center of each muffin before baking for a nutty surprise.
  • Berry Medley: Replace strawberries with blueberries or raspberries for a mixed berry muffin.

Storage and Make-Ahead Instructions

These muffins are perfect for meal prep!

  • At Room Temperature: Store in an airtight container for up to 2 days.
  • In the Refrigerator: They can last up to a week in the fridge, but may lose some moisture.
  • Freezing: Freeze muffins in a zip-top bag for up to 3 months. Thaw at room temperature or microwave for a quick snack.

Frequently Asked Questions

  • Can I use frozen fruit? Yes, just make sure to thaw and drain any excess moisture!
  • How can I make these muffins healthier? Substitute half the all-purpose flour with whole wheat flour and reduce the sugar slightly.
  • Can I make mini muffins? Absolutely! Adjust baking time to 10-15 minutes.
  • What can I serve with these muffins? They pair beautifully with yogurt, fresh fruit, or a drizzle of honey.
  • How do I know when they’re done? A toothpick inserted in the center should come out clean or with a few crumbs.
  • Can I omit the sugar? Sugar is essential for flavor and texture, but you can reduce it or use a sugar substitute.
  • What if I don’t have enough bananas? You can replace mashed bananas with equal amounts of unsweetened applesauce.
  • Can I add spices? Definitely! A teaspoon of cinnamon or nutmeg can add wonderful flavor.

Nutritional Tips and Dietary Adaptations

These muffins can be adapted to fit various dietary needs:

  • Dairy-Free: Substitute butter with coconut oil or a dairy-free spread and use almond milk instead of regular milk.
  • Gluten-Free: Use a gluten-free flour blend to make this recipe gluten-free.
  • Lower Sugar: You can reduce the sugar to 1/2 cup or use a sugar alternative like stevia.

Essential Equipment for Baking

Here are some tools that can make your muffin-making experience easier:

  • Muffin Tin: A non-stick or silicone muffin pan works best for easy removal.
  • Mixing Bowls: Use a variety of sizes for mixing and measuring.
  • Whisk: Essential for combining dry ingredients and mixing the batter.
  • Measuring Cups and Spoons: Accurate measurements are key to baking success!
  • Cooling Rack: Helps muffins cool evenly and prevents sogginess.

Serving Suggestions

Enjoy your Strawberry Banana Muffins fresh out of the oven or try these serving ideas:

  • With Butter: Spread a little butter on a warm muffin for a rich flavor.
  • With Jam: Pair with strawberry or banana jam for an extra fruity kick.
  • With Yogurt: Serve alongside a dollop of Greek yogurt for a protein boost.

Conclusion

Now that you have the complete guide to making the ultimate Strawberry Banana Muffins, it’s time to roll up your sleeves and get baking! Remember, cooking is about having fun and experimenting. Enjoy the process, share with loved ones, and savor every delicious bite. Happy baking!

Bakery-Style Strawberry Banana Muffins - myjoyfulkitchen

Prep Time 10 minutes
Cook Time 20 minutes
Total Time 30 minutes
Servings 12 muffins
Calories 180
Delight in these moist and flavorful strawberry banana muffins, perfect for a quick breakfast or snack.

Ingredients

Dried ingredients

  • 6 tablespoons unsalted butter (I like Kerrygold for the rich flavor)
  • 3/4 cup sugar
  • 1 large egg (room temperature, about 70°F)
  • 2 small bananas (mashed until smooth)
  • 3/4 tsp vanilla extract
  • 1 cup King Arthur all-purpose flour
  • 1 1/2 tsp baking powder
  • 1/4 tsp baking soda
  • 1/4 tsp salt
  • 7 small strawberries (diced into 1/4-inch pieces)
  • 1/4 cup raisins (optional, adds a nice chewy texture)

Instructions 

  • Preheat oven to 375°F (190°C) and line a muffin tin with paper liners.
  • Cream together butter and sugar until light and fluffy.
  • Beat in the egg, mashed bananas, and vanilla extract.
  • In a separate bowl, whisk together flour, baking powder, baking soda, and salt. Gradually add to wet ingredients, then fold in strawberries and raisins.
  • Divide batter evenly into muffin cups and bake for 20 minutes or until golden brown.

Notes

For extra flavor, sprinkle a little sugar on top before baking.
Calories: 180kcal
Cost: $12
Course: Breakfast
Cuisine: American
Keyword: Banana, muffins, Strawberry

When it comes to quick and delicious meals, few dishes can compete with a flavorful spicy ground beef stir-fry bowl. This recipe not only packs a punch with its vibrant flavors but also boasts the versatility to cater to your preferences. In under 30 minutes, you can whip up a satisfying dinner that is perfect for busy weeknights and easy enough for anyone to tackle. Let’s dive into why this stir-fry bowl is a go-to choice for dinner and how it can become a staple in your home cooking.

Why You’ll Love This Recipe

This quick spicy ground beef stir-fry bowl offers a multitude of benefits that will have you coming back for more:

  • Speedy preparation: Ready in just 30 minutes, it’s the perfect solution for busy weeknights.
  • Flavor-packed: The combination of garlic, soy sauce, and a touch of sweetness elevates the dish.
  • Customizable: Swap out veggies and proteins based on what you have on hand or your dietary needs.
  • Healthy options: Use lean ground beef or substitute with ground turkey for a lighter take.
  • Meal prep friendly: Make ahead for quick lunches or dinners throughout the week.

Spicy Ground Beef Stir-Fry Bowl Ingredients

Here’s what you need to gather to create this delightful dish:

  • 1 pound Ground Beef: Substitute with ground turkey or chicken if preferred for a lighter option.
  • 1 tablespoon Soy Sauce: Use low-sodium soy sauce for a healthier alternative.
  • 1 tablespoon Brown Sugar: Honey or agave syrup can serve as alternatives for sweetness.
  • 1 teaspoon Chili Flakes: Adjust based on your spice preference to control the heat level.
  • 1 tablespoon Sesame Oil: Olive oil can work as a substitute if needed.
  • 4 cloves Garlic: Minced for enhanced flavor; fresh garlic is key!
  • 2 cups Broccoli: Alternative options include snow peas or bok choy for variety.
  • 1 medium Red Bell Pepper: Zucchini or carrots can be substituted for color and crunch.
  • 1 medium Zucchini: Asparagus or green beans work as great alternatives.
  • 1 cup Mushrooms: Any preferred variety can be used to add earthiness.
  • 4 cups Steamed White Rice: Substitute with brown rice or cauliflower rice for a healthier option.
  • 1 tablespoon Olive Oil: Any neutral cooking oil can be used for sautéing.

How to Make Spicy Ground Beef Stir-Fry Bowl

Creating this stir-fry bowl is a straightforward process. Follow these steps for a delicious dinner:

  1. **Prepare your ingredients**: Wash and chop all vegetables, mince the garlic, and have everything ready.
  2. **Heat the oil**: In a large skillet or wok, heat 1 tablespoon of olive oil over medium-high heat.
  3. **Cook the beef**: Add the ground beef to the skillet, breaking it apart with a spatula. Cook until browned and cooked through, about 5-7 minutes.
  4. **Incorporate garlic**: Stir in the minced garlic and cook for an additional 1 minute until fragrant.
  5. **Add veggies**: Toss in the broccoli, red bell pepper, zucchini, and mushrooms. Stir-fry for about 5 minutes until the veggies are tender-crisp.
  6. **Season the mixture**: Pour in the soy sauce, brown sugar, and chili flakes. Stir to combine, cooking for another 2-3 minutes until everything is heated through.
  7. **Serve warm**: Spoon the beef and veggie mixture over steamed rice and enjoy your flavorful bowl!

Expert Tips for a Perfect Stir-Fry

Juicy ground beef stir-fry with bright broccoli, red bell pepper, and zucchini on a bed of rice.

Here are some expert insights to elevate your stir-fry game:

  • Prep ahead: Chop your veggies in advance to make the cooking process swift and easy.
  • High heat: Cook on high heat to achieve that delicious stir-fried texture and flavor.
  • Don’t overcrowd the pan: If needed, cook in batches to ensure even cooking and browning of the beef.
  • Use fresh ingredients: Fresh garlic and crisp vegetables will enhance the flavor immensely.
  • Adjust spice levels: Feel free to add more chili flakes or even a splash of sriracha for extra heat.
  • Balance flavors: If it’s too salty, add a pinch more sugar; if too sweet, add a dash more soy sauce.
  • Garnish: Top with sliced green onions or sesame seeds for an appealing finish.
  • Experiment with sauces: Try teriyaki or hoisin for different flavor profiles.

Common Mistakes and Troubleshooting

Even the best of us can make mistakes in the kitchen. Here’s how to avoid common pitfalls:

  • Overcooking veggies: Aim for tender-crisp to maintain vibrant colors and nutrients.
  • Not enough sauce: If the stir-fry seems dry, add a bit more soy sauce or broth to moisten it up.
  • Uneven cooking: Stir frequently to ensure even cooking and avoid burning.
  • Too greasy: Use lean ground beef and measure your oil to keep the dish healthy.

Variations and Substitutions

This recipe is incredibly adaptable! Here are some variations you can try:

  • Vegetarian version: Substitute ground beef with tofu or tempeh for a plant-based meal.
  • Different proteins: Use shrimp or chicken for a change of pace while keeping it protein-rich.
  • Different grains: Serve over quinoa or bulgur for a nutritious twist.
  • Spice it up: Add fresh ginger or a splash of chili oil for a different flavor dimension.

Storage and Make-Ahead Instructions

This stir-fry bowl is perfect for meal prep! Here’s how to store and reheat:

  • Storing leftovers: Keep in an airtight container in the refrigerator for up to 3 days.
  • Freezing: Freeze in portions for up to 2 months. Thaw overnight in the fridge before reheating.
  • Reheating: Reheat on the stovetop over medium heat, adding a splash of water or broth to prevent drying out.

Comprehensive FAQ

If you have questions about this recipe, you’re not alone! Here are some frequently asked questions:

  • Can I use frozen veggies? Yes, frozen veggies can work, but they may release more water. Adjust cooking times accordingly.
  • What if I don’t have sesame oil? Use any neutral oil or a mix of olive oil and a dash of sesame oil for flavor.
  • Is this dish gluten-free? Use gluten-free soy sauce to make this dish suitable for gluten-free diets.
  • Can I add more vegetables? Absolutely! Feel free to throw in whatever veggies you have on hand.
  • How do I make it spicier? Add more chili flakes or toss in some sliced jalapeños during cooking.
  • Can I make this without rice? Yes, serve it over a salad or in lettuce wraps for a low-carb option.
  • What’s a good side dish? Steamed dumplings or a light cucumber salad pair wonderfully!
  • How many servings does this recipe make? This recipe serves about 4 people, making it perfect for families.

Nutrition Tips and Dietary Adaptations

This stir-fry bowl can fit various dietary needs:

  • Low-carb option: Swap rice for cauliflower rice or skip the grains altogether.
  • High-protein boost: Add edamame or chickpeas for additional protein and fiber.
  • Low-sugar alternative: Reduce or omit the brown sugar for a healthier dish.

Equipment Recommendations

To make this stir-fry bowl, you’ll need:

  • Wok or large skillet: Ideal for high-heat cooking and stir-frying.
  • Spatula: For breaking up the ground beef and stirring ingredients.
  • Chopping board and knife: Essential for preparing fresh ingredients.
  • Measuring spoons: To ensure accurate ingredient quantities.

Serving Suggestions

To make your meal even more delicious, consider these serving ideas:

  • Garnish with sesame seeds: Sprinkle on top for added flavor and texture.
  • Serve with hot sauce: Allow guests to customize their heat level.
  • Pair with a light salad: A fresh side salad can balance out the richness of the stir-fry.

This quick spicy ground beef stir-fry bowl is a perfect example of how simple ingredients can come together to create something truly delicious. With its vibrant flavors and easy prep, it’s sure to become a favorite in your household. So gather your ingredients and get cooking—you’ve got this!

Quick Spicy Ground Beef Stir-Fry Bowl with Garlic Veggies

Prep Time 10 minutes
Cook Time 15 minutes
Total Time 25 minutes
Servings 4 servings
Calories 650
A quick and flavorful stir-fry combining ground beef with vibrant vegetables and a spicy sauce, served over steamed rice.

Ingredients

Protein

  • 1 pound Ground Beef (Substitute with ground turkey or chicken if preferred.)
  • 1 tablespoon Soy Sauce (Use low-sodium for a healthier option.)
  • 1 tablespoon Brown Sugar (Honey or agave syrup can be used as alternatives.)
  • 1 teaspoon Chili Flakes (Adjust to spice preference.)
  • 1 tablespoon Sesame Oil (Olive oil can be used as a substitute.)
  • 4 cloves Garlic (Minced for best flavor.)
  • 2 cups Broccoli (Alternative options include snow peas or bok choy.)
  • 1 medium Red Bell Pepper (Zucchini or carrots can be substituted.)
  • 1 medium Zucchini (Asparagus or green beans work as alternatives.)
  • 1 cup Mushrooms (Any preferred variety can be used.)
  • 4 cups Steamed White Rice (Substitutes include brown rice or cauliflower rice.)
  • 1 tablespoon Olive Oil (Any neutral cooking oil can be used.)

Instructions 

  • Heat sesame oil in a large skillet over medium-high heat. Add ground beef and cook until browned, about 5-7 minutes.
  • Add minced garlic, chili flakes, soy sauce, and brown sugar. Stir well and cook for 2 minutes.
  • In a separate pan, sauté broccoli, bell pepper, zucchini, and mushrooms in olive oil until tender, about 5-7 minutes.
  • Serve the beef mixture over steamed rice and top with garlic veggies.

Notes

Adjust spice levels by modifying chili flakes to taste.
Calories: 650kcal
Cost: $15
Course: Main Course
Cuisine: Asian
Keyword: Ground Beef, Stir Fry

Your Guide to the Ultimate Easy Veggie Pizza

Are you ready to transform your weeknight dinners into something extraordinary? This Easy Veggie Pizza is your ticket to a delicious, colorful meal that the whole family will love. With fresh vegetables, gooey cheese, and a crispy crust, this recipe is not only quick to prepare but also packed with flavor. Plus, it’s customizable, ensuring everyone can enjoy their favorite toppings. Let’s dive into making a pizza that’s not just easy but also delightful!

Why You’ll Love This Recipe

This veggie pizza isn’t just another meal; it’s a celebration of fresh ingredients and creativity. Here are five reasons why this recipe will become a staple in your kitchen:

  • Quick and Simple: With just a handful of ingredients and minimal prep time, you can whip up this pizza in about 30 minutes.
  • Customizable: You can mix and match your favorite vegetables and toppings, making it perfect for picky eaters.
  • Healthy Options: Packed with veggies, this pizza is a great way to sneak in more nutrients for you and your family.
  • Kid-Friendly: Kids love pizza! Involve them in the preparation, and they’ll be more excited to eat their veggies.
  • Perfect for Meal Prep: Make extra and store it for quick lunches or snacks throughout the week.

Ingredients You’ll Need

Gather these ingredients to create your own Easy Veggie Pizza. Each item plays a crucial role in achieving that perfect flavor and texture.

  • 1 pre-made pizza crust: Use store-bought or homemade for convenience.
  • 0.5 cup pizza sauce: Choose your favorite brand or make your own for a personal touch.
  • 1 cup shredded mozzarella cheese: This classic cheese melts beautifully.
  • 0.5 bell pepper: Any color you like, thinly sliced for even cooking.
  • 1 small zucchini: Adds a lovely texture and flavor.
  • 0.5 cup cherry tomatoes: Halved to maximize sweetness.
  • 0.5 red onion: Thinly sliced for a slight bite.
  • 0.5 cup baby spinach: Adds a nutritious touch and a pop of color.
  • 1 tablespoon olive oil: For sautéing veggies and enhancing flavor.
  • 1 teaspoon Italian seasoning: A blend of herbs that brings everything together.
  • Salt and pepper to taste: Essential for seasoning.
  • Optional fresh basil leaves: For garnish and added flavor.

Step-by-Step Instructions

A vibrant and appetizing easy veggie pizza with spinach and red onion.

Follow these easy steps to create your delicious veggie pizza:

  1. Preheat your oven: Set it to 475°F (245°C) to prepare for baking.
  2. Prepare the pizza crust: If using a store-bought crust, roll it out onto a pizza stone or baking sheet. For homemade dough, shape it into a round crust on the prepared surface.
  3. Spread the sauce: Evenly distribute the pizza sauce over the crust, leaving a small border for the crust.
  4. Add the cheese: Generously sprinkle the shredded mozzarella cheese over the sauce.
  5. Toss the veggies: In a bowl, combine the sliced bell pepper, zucchini, cherry tomatoes, and red onion. Drizzle with olive oil, and sprinkle with Italian seasoning, salt, and pepper. Toss until well-coated.
  6. Layer the veggies: Evenly distribute the seasoned vegetables over the cheese, ensuring even coverage for optimal cooking.
  7. Add spinach: Scatter the baby spinach on top for added color and flavor.
  8. Bake your pizza: Place the pizza in the preheated oven and bake for about 12-15 minutes, or until the crust is golden brown and the cheese is melted and bubbly.
  9. Cool and serve: Once done, remove the pizza from the oven. Let it cool for a couple of minutes before slicing. Garnish with fresh basil leaves if desired.

Pro Tips for Perfecting Your Veggie Pizza

To ensure your pizza turns out perfectly every time, keep these expert tips in mind:

  • Use a pizza stone: If you have one, a pizza stone helps achieve a crispy crust.
  • Don’t overload the toppings: Too many toppings can make the pizza soggy. Stick to a balanced amount.
  • Pre-cook dense veggies: If you’re using hearty vegetables like mushrooms or eggplant, consider sautéing them briefly to reduce moisture.
  • Experiment with cheeses: Try mixing mozzarella with other cheeses like feta or goat cheese for different flavors.
  • Make it gluten-free: Use a gluten-free pizza crust to accommodate dietary restrictions.
  • Try different sauces: Switch out pizza sauce for pesto or alfredo for a unique twist.
  • Use fresh herbs: Adding fresh herbs like thyme or rosemary can elevate the flavor profile.
  • Let it rise: If making dough from scratch, allow it to rise for fluffier crust.

Common Mistakes to Avoid

Here are some pitfalls to watch out for to ensure your pizza is a success:

  • Skipping preheating: Always preheat your oven for the best crust.
  • Not drying veggies: Excess moisture from veggies can lead to a soggy pizza. Pat them dry if needed.
  • Using cold cheese: Bring cheese to room temperature for better melting.
  • Rushing the baking time: Keep an eye on the pizza, as baking times can vary based on your oven.

Delicious Variations

Feel free to mix things up with these delicious variations:

  • BBQ Veggie Pizza: Swap pizza sauce for BBQ sauce and add red onion, bell peppers, and corn.
  • Mediterranean Delight: Use feta cheese, black olives, and artichokes for a Mediterranean twist.
  • Spicy Pepperoni Veggie: Add pepperoni slices for those who want a bit of spice and richness.
  • Breakfast Veggie Pizza: Top with scrambled eggs, spinach, and cheese for a breakfast version.

Storage and Make-Ahead Instructions

If you want to prepare ahead of time, here’s how:

  • Make-ahead crust: Prepare the pizza crust and keep it in the fridge for up to 24 hours.
  • Store leftovers: Keep any leftover pizza in an airtight container in the fridge for up to 3 days. Reheat in the oven for best results.
  • Freezing: You can freeze cooked pizza for up to 2 months. Wrap it tightly in foil before freezing.

Frequently Asked Questions

Here are some common questions about making veggie pizza:

  • Can I use other cheeses? Yes! Feel free to experiment with different cheeses like cheddar or Gouda.
  • What’s the best way to cut pizza? Use a pizza cutter for clean slices.
  • Can I make this vegan? Absolutely! Use dairy-free cheese and omit any animal-based toppings.
  • What’s the best way to reheat pizza? The oven is best for reheating as it helps maintain crispiness.
  • Can I add meat to this pizza? Yes, feel free to add cooked meats like chicken or sausage.
  • How do I get a crispy crust? Ensure your oven is fully preheated and avoid overloading the toppings.
  • Can I use frozen vegetables? Yes, but be sure to thaw and drain them well before adding to avoid excess moisture.
  • How long does it take to bake? Bake for about 12-15 minutes, but keep an eye on it as ovens vary.

Nutrition Tips and Dietary Adaptations

This veggie pizza can easily fit into a balanced diet:

  • Increase fiber: Add more veggies to boost fiber content.
  • Low-calorie option: Use a cauliflower crust for a lower-cal version.
  • Watch your portions: Pair with a side salad for a complete meal.

Recommended Equipment

Here’s what you’ll need for this recipe:

  • Pizza stone or baking sheet: Essential for baking your crust evenly.
  • Pizza cutter: For easy slicing.
  • Mixing bowls: To toss your veggies.
  • Measuring cups: For accurate ingredient measurements.

Serving Suggestions

This pizza pairs beautifully with:

  • Fresh salad: A light salad balances the richness of the cheese.
  • Garlic bread: For those who love a little carb on carb action!
  • Wine: A nice red or white wine complements the flavors beautifully.

Now that you have all the information, you’re ready to create a veggie pizza that not only satisfies but also excites! Remember, cooking is an adventure, so have fun with it and enjoy the process. Happy cooking!

Easy Veggie Pizza

Prep Time 10 minutes
Cook Time 15 minutes
Total Time 25 minutes
Servings 4 pieces
Calories 350
A quick and colorful veggie pizza perfect for a healthy weeknight dinner or weekend treat.

Ingredients

Dough and Base

  • 1 piece pre-made pizza crust (store-bought or homemade)
  • 0.5 cup pizza sauce

Cheese and Vegetables

  • 1 cup shredded mozzarella cheese
  • 0.5 piece bell pepper (thinly sliced, any color)
  • 1 small zucchini (thinly sliced)
  • 0.5 cup cherry tomatoes (halved)
  • 0.5 red onion red onion (thinly sliced)
  • 0.5 cup baby spinach
  • 1 tablespoon olive oil
  • 1 teaspoon Italian seasoning
  • to taste salt and pepper
  • optional fresh basil leaves (for garnish)

Instructions 

  • Preheat oven to 475°F (245°C).
  • Prepare the crust on a baking sheet. Spread sauce over it, leaving a border.
  • Sprinkle cheese, then top with sliced vegetables. Drizzle with olive oil and season.
  • Bake for 12-15 minutes until golden and bubbly. Add spinach and basil, then serve.

Notes

Feel free to customize with your favorite vegetables or herbs.
Calories: 350kcal
Cost: $12
Course: Main Course
Cuisine: Italian
Keyword: Vegetables

Unleash Flavor and Ease with Orange Chicken Meal Prep Bowls

Welcome to your new favorite weeknight dinner solution: Effortless Orange Chicken Meal Prep Bowls. Perfect for busy evenings, these bowls combine vibrant flavors with nutritious ingredients, making them a delightful option for anyone looking to spice up their meal preparation. Packed with crispy chicken, fresh vegetables, and a zesty orange sauce, this recipe is not only easy to follow but also customizable to fit your taste preferences. Let’s dive into why you’ll love this recipe and how to make it a staple in your kitchen!

Why You’ll Love This Recipe

  • Quick and Easy Preparation: These orange chicken meal prep bowls can be whipped up in under 30 minutes, allowing you to enjoy delicious meals without spending hours in the kitchen.
  • Healthy Ingredients: Packed with protein and fresh veggies, this recipe is a wholesome choice that will keep you energized throughout the day.
  • Customizable Options: Whether you prefer chicken thighs for a richer flavor or want to swap in tofu for a vegan alternative, this recipe adapts to your dietary needs.
  • Perfect for Meal Prep: These bowls store well in the fridge, making them ideal for meal prepping. You can prepare a week’s worth of lunches or dinners in one go!
  • Flavor Explosion: The combination of sweet orange juice, savory soy sauce, and fresh vegetables creates a symphony of flavors that will leave your taste buds dancing.

Ingredients Breakdown

Let’s gather our ingredients to make these amazing Orange Chicken Meal Prep Bowls. Here’s what you’ll need:

  • 1 pound Boneless Skinless Chicken Breasts (Swap for chicken thighs for richer flavor.)
  • 1/4 cup Tapioca Starch (Use potato starch if needed for a crispy coating.)
  • 1 teaspoon Garlic Powder (Fresh minced garlic works as a great alternative.)
  • 1 teaspoon Ginger (Infuses warmth and spice.)
  • Salt & Pepper (Adjust to your preference.)
  • 2 tablespoons Avocado Oil (Use olive oil as a flavorful swap.)
  • 1/2 cup Freshly Squeezed Orange Juice (Lemon juice can be used for a different twist.)
  • 1 teaspoon Orange Zest (Feel free to skip if not available.)
  • 1/4 cup Honey (Maple syrup makes a vegan substitute.)
  • 2 tablespoons Tomato Paste (Ketchup can work in a pinch.)
  • 2 tablespoons Tamari (or Soy Sauce) (Coconut aminos work for a soy-free option.)
  • 1 teaspoon Sesame Oil (Olive oil can be replaced if necessary.)
  • 2 cups Broccoli (Seasonal swaps like snap peas or carrots are excellent.)
  • 1 cup Bell Peppers (Use any variety you prefer.)
  • 1 medium Onion (Regular onion is a fine substitute for green onions.)
  • 2 cups Cooked Jasmine Rice (Choose cauliflower rice for a low-carb alternative.)
  • 2 tablespoons Green Onion (Regular onion can work if you don’t have green onions.)

Pro Tips for Perfect Orange Chicken Bowls

Delicious orange chicken meal prep bowl with rice and vegetables, captured in a close-up side view.
  • Marinate the Chicken: For enhanced flavor, marinate the chicken in the sauce for at least 30 minutes before cooking.
  • Adjust Spice Levels: If you like it spicy, add a pinch of red pepper flakes to the sauce!
  • Use Fresh Ingredients: Fresh ginger and garlic will elevate the dish, providing a more vibrant flavor.
  • Prep Ahead: Cook extra chicken and veggies to have on hand for quick meals throughout the week.
  • Storage: Store the chicken and rice separately to keep the rice from getting soggy.
  • Make It Vegan: Substitute chicken with tofu or tempeh and use maple syrup for a vegan-friendly option.
  • Batch Cooking: Make a double batch for more convenient meals later in the week.
  • Experiment with Veggies: Feel free to throw in any seasonal vegetables you have on hand!

Common Mistakes and Troubleshooting

  • Overcooking the Chicken: To avoid dry chicken, cook until just done, and let rest before slicing.
  • Too Much Sauce: Start with less sauce; you can always add more as needed when assembling the bowls.
  • Not Using Enough Starch: Ensure the chicken is well-coated in starch for that crispy texture.
  • Skipping the Marinade: Don’t skip marinating the chicken; it adds vital flavor!
  • Using Low-Quality Ingredients: High-quality soy sauce and fresh orange juice make a significant difference in taste.

Delicious Variations to Try

  • Orange Chicken with Cashews: Add roasted cashews for a crunchy texture.
  • Sweet and Sour Orange Chicken: Incorporate pineapple chunks for a sweet twist.
  • Orange Chicken Stir-Fry: Skip the rice and serve the chicken and veggies over zucchini noodles.
  • Spicy Orange Chicken: Mix in sriracha or chili paste to the sauce for an extra kick.

Storage and Make-Ahead Instructions

These Orange Chicken Meal Prep Bowls are perfect for storing and reheating. Here’s how to keep them fresh:

  • Refrigeration: Store in airtight containers for up to 4 days.
  • Freezing: You can freeze the cooked chicken and sauce separately for up to 3 months.
  • Reheating: Reheat in the microwave or on the stovetop until warmed through. Add a splash of water if the rice is dry.

Comprehensive FAQ

  • Can I use chicken thighs instead of breasts? Yes! Chicken thighs add more flavor and moisture.
  • What can I substitute for orange juice? Lemon juice or a mix of apple and lemon juice can work.
  • Is this recipe gluten-free? Yes, just ensure you use gluten-free soy sauce or tamari.
  • Can I use frozen vegetables? Absolutely! Just add them towards the end of cooking.
  • How long does it take to make? About 30 minutes from start to finish!
  • Is it okay to make this recipe vegan? Yes! Substitute chicken with tofu and honey with maple syrup.
  • How do I make this lower in carbs? Replace rice with cauliflower rice or skip the grains altogether.
  • Can I make this in advance? Yes, these bowls are perfect for meal prepping!

Nutrition Tips and Dietary Adaptations

  • High Protein: This recipe is a great source of protein, making it suitable for muscle recovery.
  • Fiber-Rich: Adding more veggies can increase fiber, promoting digestive health.
  • Low-Calorie Option: Use less honey or a sugar substitute to reduce calories.
  • Heart-Healthy Fats: Avocado oil provides healthy fats that are good for your heart.

Equipment Recommendations

  • Non-Stick Skillet: Perfect for achieving that crispy chicken coating.
  • Measuring Cups and Spoons: Essential for accurate ingredient measurements.
  • Sharp Knife: A sharp knife makes cutting the chicken easier and safer.
  • Cutting Board: Use a dedicated cutting board to keep your prep area organized.

Serving Suggestions

These orange chicken meal prep bowls are delicious on their own, but here are some ideas to elevate your meal:

  • Top with Fresh Herbs: Cilantro or basil can add a fresh touch.
  • Serve with a Side Salad: A refreshing salad pairs beautifully with the rich flavors of the chicken.
  • Add a Slice of Lime: A squeeze of lime juice adds a zesty kick!
  • Include a Side of Noodles: For a more filling meal, serve with rice noodles or soba.

Ready to make your weeknights extraordinary with these Orange Chicken Meal Prep Bowls? Cooking doesn’t have to be stressful; with clear steps and good ingredients, you’ll feel confident in the kitchen. Enjoy the process and savor every delicious bite!

Orange Chicken Meal Prep Bowls for Quick Healthy Dinners

Prep Time 10 minutes
Cook Time 15 minutes
Total Time 25 minutes
Servings 4 servings
Calories 520
Enjoy a flavorful and healthy orange chicken bowl that's quick to prepare and perfect for meal prepping.

Ingredients

Protein

  • 1 pound Boneless Skinless Chicken Breasts (Swap for chicken thighs for richer flavor.)
  • 1/4 cup Tapioca Starch (Use potato starch if needed.)
  • 1 teaspoon Garlic Powder (Fresh minced garlic works as a great alternative.)
  • 1 teaspoon Ginger (Infuses warmth and spice.)
  • to taste Salt & Pepper (Adjust to your preference.)
  • 2 tablespoons Avocado Oil (Use olive oil as a flavorful swap.)
  • 1/2 cup Freshly Squeezed Orange Juice (Lemon juice can be used for a different twist.)
  • 1 teaspoon Orange Zest (Feel free to skip if not available.)
  • 1/4 cup Honey (Maple syrup makes a vegan substitute.)
  • 2 tablespoons Tomato Paste (Ketchup can work in a pinch.)
  • 2 tablespoons Tamari (or Soy Sauce) (Coconut aminos work for a soy-free option.)
  • 1 teaspoon Sesame Oil (Olive oil can be replaced if necessary.)

Vegetables

  • 2 cups Broccoli (Seasonal swaps like snap peas or carrots are excellent.)
  • 1 cup Bell Peppers (Use any variety you prefer.)
  • 1 medium Onion (Regular onion is a fine substitute for green onions.)

Carbohydrate

  • 2 cups Cooked Jasmine Rice (Choose cauliflower rice for a low-carb alternative.)
  • 2 tablespoons Green Onion (Regular onion can work if you don’t have green onions.)

Instructions 

  • Cut chicken into bite-sized pieces and toss with tapioca starch, garlic powder, ginger, salt, and pepper.
  • Heat oil in a pan over medium heat and cook chicken until golden and cooked through, about 5-7 minutes.
  • In a bowl, whisk together orange juice, orange zest, honey, tomato paste, tamari, and sesame oil.
  • Add vegetables to the pan and stir-fry until tender, then pour in the sauce and cook for another 2-3 minutes.
  • Serve the chicken and vegetables over cooked jasmine rice, garnished with chopped green onion.

Notes

For a lower sodium option, reduce soy sauce and use low-sodium broth.
Calories: 520kcal
Cost: $15
Course: Main Course
Cuisine: American
Keyword: Chicken, Healthy, Meal Prep

Are you ready to transform your weeknight dinners into something extraordinary? This Korean-Style Beef Rice Bowl is the perfect blend of tender flank steak, vibrant vegetables, and a savory sauce that will make your taste buds dance! Whether you’re cooking for yourself or a family, this dish is not only delicious but also easy to prepare, making it an ideal choice for busy evenings. In less than 30 minutes, you can have a delightful meal that’s packed with flavor and nutrition. Let’s dive into the details and get cooking!

Why You’ll Love This Recipe

Here are just a few reasons why this Korean-Style Beef Rice Bowl deserves a spot in your dinner rotation:

  • Quick and Easy: Perfect for busy weeknights, this dish comes together in just 30 minutes.
  • Flavor Explosion: The marinade infuses the beef with a delightful mix of sweet, salty, and spicy flavors.
  • Customizable: Feel free to swap in your favorite vegetables or adjust the heat level with more or less gochujang.
  • Balanced Nutrition: Packed with protein from the beef and vitamins from the veggies, it’s a well-rounded meal.
  • Meal Prep Friendly: Make extra and easily store leftovers for a quick lunch or dinner later!

Ingredient Breakdown and Substitutions

Let’s take a closer look at the ingredients that make up this delicious dish, along with some handy substitutions:

  • Flank Steak: This cut is ideal for quick cooking, but you can substitute with sirloin, ribeye, or even ground beef.
  • Soy Sauce: Use low-sodium soy sauce for a healthier option or tamari for a gluten-free alternative.
  • Brown Sugar: You can use honey or coconut sugar if you prefer a different sweetener.
  • Sesame Oil: This adds a nutty flavor; however, you can use olive oil in a pinch.
  • Gochujang: If you don’t have this Korean chili paste, sriracha or a mix of chili powder and a bit of sugar can work as substitutes.

How to Make Your Korean-Style Beef Rice Bowl

Ready to get cooking? Follow these simple steps for a delicious Korean-Style Beef Rice Bowl:

  1. Marinate the Beef: In a bowl, mix together soy sauce, brown sugar, sesame oil, minced garlic, grated ginger, rice vinegar, and gochujang. Add the sliced flank steak to the marinade and let it sit for at least 15 minutes.
  2. Prepare the Rice: Cook your rice according to package instructions. Jasmine or white rice works beautifully.
  3. Stir-Fry the Beef: Heat vegetable oil in a skillet over medium-high heat. Add the marinated beef and stir-fry for about 5-7 minutes until cooked through.
  4. Add the Vegetables: Toss in the sliced carrots and bell peppers, cooking for an additional 3-4 minutes until they’re tender. Stir everything to combine.
  5. Serve: In bowls, layer your cooked rice, topped with the beef and vegetable stir-fry. Finish with green onions, fried eggs, and a sprinkle of sesame seeds.

Pro Tips for Perfecting Your Korean-Style Beef Rice Bowl

A mouthwatering Korean-style beef rice bowl, emphasizing juicy flank steak over jasmine rice with a colorful topping.

Here are some expert insights to ensure your dish turns out perfectly every time:

  • Cut Against the Grain: When slicing flank steak, always cut against the grain for maximum tenderness.
  • Don’t Overcrowd the Pan: If making a larger batch, cook the beef in batches to avoid steaming and ensure a nice sear.
  • Adjust the Heat: Taste the marinade and adjust the gochujang based on your spice preference.
  • Add Fresh Herbs: Garnish with fresh cilantro or mint for an extra burst of flavor.
  • Perfect Fried Eggs: For a crispy edge and runny yolk, fry your eggs in a bit of oil over medium heat and cover for a minute.
  • Experiment with Sauces: Try adding a drizzle of sriracha or extra soy sauce for added flavor.
  • Prep Ahead: Marinate the beef the night before for even deeper flavor.
  • Serve with Kimchi: A side of kimchi adds an authentic Korean touch and a nice crunch.

Common Mistakes and Troubleshooting

Here are some common pitfalls to avoid and solutions to keep your Korean-Style Beef Rice Bowl on point:

  • Overcooking the Beef: Aim for medium-rare to medium; it cooks quickly, so keep an eye on it.
  • Too Much Sauce: If the dish is too salty, add a bit of sugar or more vegetables to balance it out.
  • Dry Rice: If your rice is too dry, try adding a splash of broth or water while reheating.
  • Veggies Overcooked: Stir-fry vegetables until just tender to keep them vibrant and crunchy.

Variations to Try

Feel free to get creative with your Korean-Style Beef Rice Bowl! Here are some variations to inspire you:

  • Vegetarian Version: Substitute flank steak with tofu or tempeh marinated in the same sauce for a plant-based option.
  • Spicy Kick: Add sliced jalapeños or a sprinkle of chili flakes for an extra heat boost.
  • Asian Slaw Topping: Top with a fresh slaw made from cabbage, carrots, and a sesame dressing for a crunchy contrast.
  • Rice Alternatives: Swap out traditional rice for cauliflower rice or quinoa for a low-carb version.

Storage and Make-Ahead Instructions

Want to enjoy your Korean-Style Beef Rice Bowl later? Here’s how to store and prep ahead:

  • Storing Leftovers: Keep any leftover beef and vegetables in an airtight container in the refrigerator for up to 3 days.
  • Freezing: For longer storage, freeze the beef and veggies separately from the rice. They can last up to 3 months.
  • Reheating: Reheat in a skillet over medium heat until warmed through, adding a splash of water to prevent drying out.
  • Meal Prep: Marinate the beef and cut vegetables the night before, so everything is ready to cook when you are.

Frequently Asked Questions (FAQs)

Got questions? We’ve got answers! Here are some common inquiries about the Korean-Style Beef Rice Bowl:

  • Can I use other cuts of beef? Yes, sirloin or ribeye work well! Just adjust cooking times as necessary.
  • Can I make this dish gluten-free? Absolutely! Use gluten-free soy sauce or tamari.
  • What vegetables can I use? Feel free to incorporate broccoli, snap peas, or mushrooms for variety!
  • Can I use ground beef? Yes, just adjust the cooking time, and ensure it’s fully browned.
  • Is gochujang necessary? While it adds authentic flavor, you can replace it with sriracha or omit it if you prefer less heat.
  • How can I make it less sweet? Reduce the amount of brown sugar in the marinade to balance the flavors.
  • Can I add more protein? Yes! Consider topping with fried eggs or adding nuts like cashews for extra protein.
  • What should I serve with it? Serve with a side of kimchi, pickled vegetables, or a simple salad for a complete meal.

Nutrition Tips and Dietary Adaptations

This Korean-Style Beef Rice Bowl is not only delicious but can also fit various dietary needs:

  • High Protein: With flank steak as the star, this dish is packed with protein, great for muscle repair.
  • Low Carb: Opt for cauliflower rice instead of traditional rice for a low-carb alternative.
  • Vegan Option: Replace beef with marinated tofu or seitan to create a satisfying vegan meal.
  • Fiber Boost: Add more vegetables to increase fiber content, which promotes digestive health.

Equipment Recommendations

To make your cooking experience seamless, here’s a list of recommended equipment:

  • Skillet or Wok: A large skillet or wok is essential for stir-frying the beef and vegetables evenly.
  • Cutting Board: Invest in a sturdy cutting board for easy slicing of your flank steak and veggies.
  • Chef’s Knife: A sharp chef’s knife will make quick work of slicing and dicing.
  • Measuring Cups and Spoons: Accurate measurements are key for perfecting your marinade.
  • Rice Cooker: If you cook rice often, a rice cooker can simplify the process and yield perfect rice every time.

Serving Suggestions

Now that your Korean-Style Beef Rice Bowl is ready, here are some serving suggestions to elevate your meal:

  • Garnish with Fresh Herbs: Sprinkle chopped cilantro or green onions on top for added freshness.
  • Serve with Kimchi: A side of kimchi adds a tangy crunch that complements the beef beautifully.
  • Pair with a Simple Salad: A light cucumber or Asian slaw salad can balance the richness of the beef.
  • Offer Extra Sauces: Provide soy sauce or extra gochujang on the side for those who like to customize their flavor.

In conclusion, this Korean-Style Beef Rice Bowl is not just a meal; it’s a celebration of flavors and textures that anyone can master in their kitchen. Cooking doesn’t have to be stressful or complicated. With the right ingredients and a little guidance, you can create delicious dishes that bring joy to your table. So gather your ingredients, roll up your sleeves, and enjoy the process. Happy cooking!

Korean-Style Beef Rice Bowl

Prep Time 15 minutes
Cook Time 15 minutes
Total Time 30 minutes
Servings 4 servings
Calories 650
A flavorful and easy Korean-inspired beef rice bowl with marinated flank steak and vibrant vegetables.

Ingredients

Marinade

  • 1/4 cup soy sauce (for marinade)
  • 2 tablespoons brown sugar (balances flavors)
  • 1 tablespoon sesame oil (infuses flavor)
  • 2 cloves garlic (minced)
  • 1 tablespoon ginger (grated)
  • 1 tablespoon rice vinegar
  • 1 tablespoon gochujang (Korean chili paste)

Main ingredients

  • 1 pound flank steak (sliced)
  • 2 cups cooked rice (jasmine or white)
  • 2 tablespoons vegetable oil (for stir-frying)
  • 1 cup carrots (thinly sliced)
  • 1 cup bell peppers (sliced)
  • 1/4 cup green onions (sliced)
  • 2 eggs fried eggs
  • 2 tablespoons sesame seeds (for garnish)

Instructions 

  • Marinate the sliced flank steak with soy sauce, brown sugar, sesame oil, garlic, ginger, rice vinegar, and gochujang for 15 minutes.
  • Heat vegetable oil in a skillet over medium-high heat and stir-fry the marinated beef until cooked through, about 5-7 minutes.
  • In the same skillet, stir-fry carrots and bell peppers until tender, about 3-4 minutes.
  • Fry the eggs separately to desired doneness.
  • Assemble the bowls by placing rice at the base, topped with cooked beef, vegetables, fried eggs, green onions, and sesame seeds.

Notes

For extra flavor, marinate the beef longer or add a drizzle of sesame oil before serving.
Calories: 650kcal
Cost: $15
Course: Main Course
Cuisine: Korean
Keyword: Beef, rice

Welcome to your new favorite weeknight dinner! This High Protein Ground Beef and Quinoa Bowl is not only delicious but also packed with nutrition, making it the perfect meal to keep your energy levels up throughout the week. Combining lean ground beef, quinoa, and vibrant veggies, this dish is designed to be both satisfying and easy to prepare. In just a few simple steps, you’ll create a meal that’s bursting with flavor and goodness!

Why You’ll Love This Recipe

  • High in Protein: This bowl features lean ground beef and protein-rich quinoa, ensuring you stay full and energized.
  • Customizable: Tailor your bowl with toppings like avocado, cheese, or Greek yogurt to suit your taste preferences.
  • Meal Prep Friendly: Perfect for prepping ahead! Make a big batch and portion it out for easy lunches throughout the week.
  • Quick Cooking: With minimal cooking time, you can get this hearty meal on the table in under 30 minutes.
  • Flavor Packed: The combination of spices, fresh ingredients, and your choice of toppings makes each bite a burst of flavor.

Ingredient Breakdown

Let’s take a closer look at the ingredients you’ll need to whip up this nutritious bowl:

  • 2 teaspoons olive oil: For sautéing and adding flavor.
  • 1 medium onion, chopped: Provides a base flavor that’s sweet and savory when sautéed.
  • 2 garlic cloves, finely chopped: Adds aromatic depth to the dish.
  • 1 pound lean ground beef: A hearty protein source that keeps you full.
  • 1 tablespoon chili seasoning: For that kick of flavor.
  • 4 teaspoons ground cumin: Adds warmth and earthiness.
  • 1 teaspoon garlic seasoning: Enhances the garlic flavor!
  • 1 teaspoon paprika: Brings a subtle smokiness.
  • 1 teaspoon salt: Essential for flavor enhancement.
  • 1 cup corn kernels: Adds sweetness and texture.
  • 1 can (540 ml) black beans, drained and rinsed: Provides fiber and additional protein.
  • 2 cups broth, no salt added: To cook the quinoa and add flavor.
  • 1 cup quinoa, uncooked: The base of your bowl, loaded with protein and fiber.
  • 2 cups cherry tomatoes, cut in half: Freshness and a burst of flavor.
  • Toppings: Grated cheese, chopped green onions, juice of lime, fresh cilantro, extra tomatoes, avocado or guacamole, Greek yogurt or sour cream, salsa.

Expert Tips for Success

To ensure your quinoa bowl turns out perfectly every time, here are some expert tips:

  • Rinse the Quinoa: Before cooking, rinse quinoa under cold water to remove its natural bitter coating.
  • Cook the Beef Thoroughly: Make sure your ground beef is fully cooked, with no pink remaining, for food safety.
  • Customize Your Spices: Feel free to adjust the spices based on your preference. Add more chili seasoning for extra heat!
  • Use Fresh Ingredients: Fresh vegetables can significantly enhance the flavor and nutritional value of your bowl.
  • Experiment with Toppings: Try different combinations of toppings to keep your meals exciting!
  • Flavor Boost: Adding a squeeze of lime juice right before serving brightens the entire dish.
  • Let it Rest: Allow the dish to rest for a few minutes after cooking to help the flavors meld together.
  • Storage Tips: Store leftovers in airtight containers for up to 4 days in the fridge, reheating thoroughly before serving.

Common Mistakes and Troubleshooting

Flavorful ground beef and quinoa dish garnished with cheese and cilantro.

Even the best cooks make mistakes! Here are some common pitfalls and how to avoid them:

  • Overcooking Quinoa: Keep an eye on the quinoa. It should be fluffy and not mushy.
  • Seasoning Errors: Taste as you go to ensure the seasoning is just right.
  • Not Adding Enough Liquid: If your quinoa is dry, you may need to adjust the broth amount during cooking.
  • Skipping the Toppings: Don’t skip toppings! They add essential flavor and texture.

Variations to Try

Feeling adventurous? Here are some variations to keep your meals exciting:

  • Vegetarian Option: Substitute ground beef with crumbled tempeh or lentils for a plant-based bowl.
  • Spicy Twist: Add jalapeños or a drizzle of hot sauce for some heat.
  • Asian-Inspired: Swap the spices for soy sauce, ginger, and sesame oil for an Asian flavor profile.
  • Mexican Style: Top with taco seasoning, fresh avocado, and salsa for a Mexican-inspired bowl.

Storage and Make-Ahead Instructions

This quinoa bowl is perfect for meal prep! Here’s how to store it:

  • Refrigerate: Store leftovers in airtight containers for up to 4 days.
  • Freeze: For longer storage, freeze individual portions in freezer-safe containers for up to 3 months.
  • Reheat: Reheat in the microwave or on the stovetop, adding a splash of broth or water to keep it moist.

Frequently Asked Questions

Here are some common questions about this quinoa bowl:

  • Can I use different grains? Yes! You can substitute quinoa with brown rice or farro.
  • How do I make it gluten-free? Ensure all ingredients, especially broth, are labeled gluten-free.
  • What can I use instead of black beans? You can use pinto beans, chickpeas, or kidney beans as alternatives.
  • Is this dish suitable for meal prep? Absolutely! It holds up well in the fridge and reheats nicely.
  • Can I add more vegetables? Definitely! Feel free to add your favorite veggies like bell peppers or spinach.
  • How spicy is this recipe? It’s mildly spicy, but you can increase the chili seasoning to suit your taste.
  • What should I serve with this bowl? It pairs well with a side salad or some crusty bread.
  • Can I make it ahead of time? Yes! You can prepare everything a day in advance and just heat it up when ready to serve.

Nutrition Tips and Dietary Adaptations

This meal is not just satisfying but also healthy! Here are some nutrition tips:

  • Protein Power: With lean beef and quinoa, you’re getting a balanced amount of protein for muscle repair.
  • Fiber Boost: The addition of beans and corn increases fiber, aiding digestion.
  • Customizable for Diets: Easily adapt this recipe for keto, paleo, or vegetarian diets by swapping ingredients.

Equipment Recommendations

Having the right tools can make cooking easier! Here’s what you’ll need:

  • Large skillet: Ideal for browning the beef and sautéing vegetables.
  • Medium saucepan: Perfect for cooking the quinoa.
  • Cutting board and knife: Essential for prepping your vegetables.
  • Measuring cups and spoons: To ensure precise ingredient amounts.

Serving Suggestions

Make your quinoa bowl even more delightful with these serving tips:

  • Garnish with Fresh Herbs: Chopped cilantro or parsley adds a fresh touch.
  • Offer a Variety of Toppings: Set up a toppings bar for everyone to customize their bowls.
  • Pair with a Refreshing Drink: Enjoy with iced tea or sparkling water with lime.

Cooking should be a joyful experience, and this High Protein Ground Beef and Quinoa Bowl is designed to bring excitement back into your kitchen. With its rich flavors and versatility, you’ll find it’s a go-to recipe for busy weeknights. So go ahead, gather your ingredients, and let’s cook up something amazing!

High Protein Ground Beef and Quinoa Bowl

Prep Time 10 minutes
Cook Time 20 minutes
Total Time 30 minutes
Servings 4 servings
Calories 650
A nutritious and flavorful bowl packed with lean ground beef, quinoa, and fresh vegetables, perfect for a satisfying meal.

Ingredients

Vegetables

  • 2 teaspoons olive oil
  • 1 medium onion, chopped
  • 2 cloves garlic, finely chopped

Meat and grains

  • 1 pound lean ground beef
  • 1 tablespoon chili seasoning
  • 4 teaspoons ground cumin
  • 1 teaspoon garlic seasoning
  • 1 teaspoon paprika
  • 1 teaspoon salt
  • 1 cup corn kernels
  • 1 can (540 ml) black beans, drained and rinsed, no salt added
  • 2 cups broth, no salt added
  • 1 cup quinoa, uncooked
  • 2 cups cherry tomatoes, cut in half

Toppings and extras

  • to taste Grated cheese
  • to taste Chopped green onions
  • to taste Juice of lime
  • to taste Fresh cilantro
  • to taste Extra tomatoes
  • to taste Avocado or guacamole
  • to taste Greek yogurt or sour cream
  • to taste Salsa

Instructions 

  • Heat olive oil in a large pan and sauté chopped onion and garlic until translucent.
  • Add ground beef and cook until browned, then stir in chili seasoning, cumin, garlic seasoning, paprika, and salt.
  • Pour in broth and add quinoa, simmer until liquid is absorbed and quinoa is cooked.
  • Stir in corn, black beans, and cherry tomatoes, cook for a few minutes to combine flavors.
  • Serve topped with cheese, green onions, lime juice, cilantro, and optional extras like avocado, yogurt, and salsa.

Notes

Feel free to customize toppings for added flavor and nutrition.
Calories: 650kcal
Cost: $15
Course: Main Course
Cuisine: American
Keyword: High-Protein