Author

Steven

Browsing

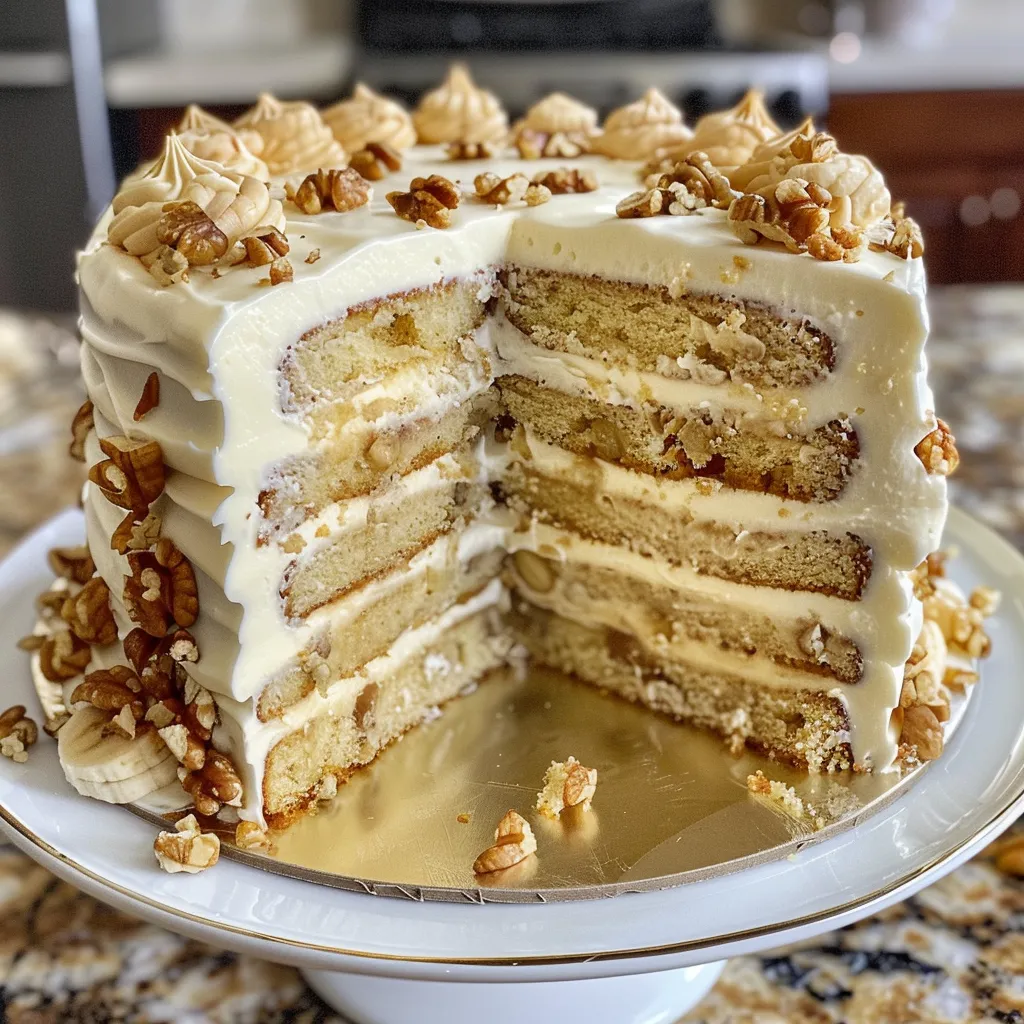
Indulge in Comfort with the Ultimate Banana Walnut Cream Cake

Welcome to your new favorite baking adventure! If you’re looking for a dessert that combines the natural sweetness of ripe bananas with the crunchy texture of walnuts, you’ve come to the right place. This Banana Walnut Cream Cake is not just a cake; it’s an experience—perfect for celebrations or just a cozy night in. With a luscious cream cheese frosting and a drizzle of white chocolate, this cake is bound to impress your family and friends. Let’s dive into this delightful recipe and discover why it deserves a spot in your recipe book!

Why You’ll Love This Recipe

This cake is not only delicious but also incredibly easy to make. Here are a few reasons you’ll fall in love with it:

  • Moist and Flavorful: The combination of ripe bananas and buttermilk ensures each slice is moist and bursting with flavor.
  • Crunchy Texture: Chopped walnuts add a satisfying crunch that complements the creamy frosting beautifully.
  • Easy to Customize: You can easily make this cake your own by adding chocolate chips or other nuts.
  • Perfect for Any Occasion: Whether it’s a birthday, holiday, or just a weekend treat, this cake fits right in.
  • Make-Ahead Friendly: Prepare the cake layers in advance and frost just before serving for the best taste.

Ingredients Breakdown

Before you start baking, let’s go through the ingredients and their roles in this delightful cake. Here’s what you’ll need:

  • 3 cups all-purpose flour: The base of our cake; you can substitute with gluten-free flour if needed.
  • 2 teaspoons baking soda: This helps the cake rise and become fluffy.
  • 1 teaspoon salt: Balances the sweetness.
  • 1½ cups granulated sugar: Sweetens the cake perfectly.
  • 1 cup unsalted butter, softened: Adds richness to the batter.
  • 3 large eggs, at room temperature: Helps with the cake’s structure.
  • 2 teaspoons pure vanilla extract: Enhances the flavor of the cake.
  • 4 very ripe bananas, mashed: The star ingredient that adds moisture and natural sweetness.
  • 1 cup buttermilk: Contributes to the cake’s tenderness.
  • 1½ cups chopped walnuts: Adds texture and nutty flavor.

For the creamy frosting:

  • 16 oz cream cheese, softened: Provides the creamy base for the frosting.
  • ½ cup unsalted butter, softened: Adds richness to the frosting.
  • 4 cups powdered sugar, sifted: Sweetens and thickens the frosting.
  • 2 teaspoons vanilla extract: Flavors the frosting.
  • 8 oz white chocolate, melted: Adds a luxurious touch to the frosting.
  • ¼ cup heavy cream: Helps achieve the perfect creamy consistency.
  • Additional chopped walnuts for decoration: To make your cake visually appealing.

Step-by-Step Instructions

Juicy Banana Walnut Cream Cake displayed on a rustic wooden table.

Ready to bake? Here’s how to make this delicious Banana Walnut Cream Cake in simple steps:

  • Step 1: Preheat your oven to 350°F (175°C). Grease and line two 9-inch round cake pans with parchment paper.
  • Step 2: In a medium bowl, whisk together the flour, baking soda, and salt.
  • Step 3: In a large bowl, beat the butter and sugar with an electric mixer for 2 minutes until light and fluffy.
  • Step 4: Add eggs one at a time, beating well after each addition. Mix in the vanilla extract.
  • Step 5: Fold in the mashed bananas.
  • Step 6: Gradually add the flour mixture alternating with buttermilk, beginning and ending with the flour.
  • Step 7: Fold in 1 cup of the chopped walnuts, saving the remaining half cup for the frosting and decoration.
  • Step 8: Divide the batter evenly between the prepared pans and smooth the tops. Bake for 25-30 minutes.
  • Step 9: Allow the cakes to cool in the pans for 10 minutes, then transfer to a wire rack to cool completely.

Making the Creamy Frosting

While your cake layers cool, let’s whip up the frosting:

  • Step 10: Beat the cream cheese and butter until smooth and creamy.
  • Step 11: Gradually add the sifted powdered sugar, vanilla extract, and melted white chocolate.
  • Step 12: In a separate bowl, whip the heavy cream until stiff peaks form, then gently fold it into the cream cheese mixture.

Assembling Your Cake

Now that everything is ready, let’s put it all together:

  • Step 13: Place one cake layer on a serving plate. Spread a generous layer of frosting on top.
  • Step 14: Add the second cake layer and cover the entire cake with the remaining frosting.
  • Step 15: Press the remaining chopped walnuts around the sides of the cake or sprinkle on top for decoration.

Pro Tips for the Best Banana Walnut Cream Cake

To ensure your cake turns out perfectly, here are some expert tips:

  • Use very ripe bananas: The riper the bananas, the sweeter and more flavorful the cake will be.
  • Don’t overmix the batter: Mix just until combined to keep the cake light and airy.
  • Check for doneness: Insert a toothpick into the center; it should come out clean when the cake is done.
  • Cool completely before frosting: This prevents the frosting from melting and sliding off.
  • Store in the fridge: If you have leftovers, keep the cake in the fridge to preserve its freshness.

Common Mistakes and Troubleshooting

Here are some common pitfalls and how to avoid them:

  • Dense cake: This can happen if you overmix the batter or use too much flour. Always measure accurately!
  • Too sweet: If the cake is overly sweet for your taste, try reducing the sugar by 1/4 cup.
  • Frosting too runny: If your frosting is too thin, add more powdered sugar until you reach the desired consistency.

Variations to Try

Feeling adventurous? Here are some fun variations to make this cake even more exciting:

  • Chocolate Chip Delight: Fold in 1 cup of chocolate chips into the batter for a decadent twist.
  • Coconut Cream: Add 1 cup of shredded coconut to the batter for a tropical flavor.
  • Spiced Banana Cake: Incorporate 1 teaspoon of cinnamon or nutmeg for a warm flavor profile.
  • Maple Walnut Frosting: Replace powdered sugar with maple syrup in the frosting for a unique flavor.

Storage and Make-Ahead Instructions

Here’s how to keep your cake fresh:

  • Make-Ahead: You can bake the cake layers a day in advance. Wrap them tightly in plastic wrap and store them in the fridge.
  • Storage: Store leftover cake in an airtight container in the fridge for up to 5 days.
  • Freezing: You can freeze the cake layers for up to 3 months. Just make sure they are well-wrapped.

Comprehensive FAQ

Got questions? We’ve got answers!

  • Can I use frozen bananas for this cake? Yes! Just thaw them and mash before adding to the batter.
  • Can I make this cake ahead of time? Absolutely! It stays fresh for days, so feel free to prepare it ahead.
  • What can I substitute for buttermilk? Mix 1 cup of milk with 1 tablespoon of vinegar or lemon juice and let it sit for 5 minutes.
  • How can I make this cake gluten-free? Substitute all-purpose flour with a gluten-free blend that measures 1:1.
  • Can I add more nuts to the cake? Yes! You can increase the walnut amount or use a mix of nuts.
  • What if my frosting is too thick? Add a splash of milk or cream to thin it out.
  • Can I make this cake vegan? Substitute eggs with flax eggs and use plant-based butter and cream cheese.
  • What is the best way to serve this cake? It’s delicious on its own, but pairs well with a scoop of vanilla ice cream!

Nutritional Tips and Dietary Adaptations

Make this cake suit your dietary needs:

  • For a lower sugar option: Use a sugar substitute like erythritol.
  • For added fiber: Consider adding a bit of whole wheat flour to the mix.
  • Dairy-free version: Use almond or coconut milk instead of buttermilk, and vegan cream cheese for frosting.

Equipment Recommendations

Here’s what you’ll need to make this cake:

  • Electric mixer: Essential for achieving that light and fluffy batter.
  • Two 9-inch round cake pans: Perfect for baking your cake layers evenly.
  • Parchment paper: Ensures easy removal of the cakes from the pans.
  • Mixing bowls: Use both medium and large bowls for different ingredients.

Serving Suggestions

Here are some delightful ways to serve your cake:

  • With fresh banana slices: Add banana slices on top for an extra touch of freshness.
  • A scoop of ice cream: Vanilla or caramel ice cream complements the flavors beautifully.
  • Drizzle with caramel sauce: A sweet drizzle enhances the flavor profile.
  • Pair with coffee or tea: This cake makes a great afternoon treat with your favorite beverage.

Now that you have it all, it’s time to roll up your sleeves and start baking! Enjoy every moment, and remember, cooking is all about having fun and experimenting. Happy baking!

Banana Walnut Cream Cake

Prep Time 30 minutes
Cook Time 30 minutes
Total Time 1 hour
Servings 12 slices
Calories 520
A moist and flavorful cake layered with creamy white chocolate frosting and crunchy walnuts, perfect for special occasions.

Ingredients

Cake Batter

  • 3 cups all-purpose flour
  • 2 teaspoons baking soda
  • 1 teaspoon salt
  • 1.5 cups granulated sugar
  • 1 cup unsalted butter, softened
  • 3 large eggs, at room temperature
  • 2 teaspoons pure vanilla extract
  • 4 ripe bananas mashed
  • 1 cup buttermilk
  • 1.5 cups chopped walnuts

Frosting

  • 16 oz cream cheese, softened
  • 0.5 cup unsalted butter, softened
  • 4 cups powdered sugar, sifted
  • 2 teaspoons vanilla extract
  • 8 oz white chocolate, melted and cooled
  • 0.25 cup heavy cream

Decoration

  • additional chopped walnuts for decoration

Instructions 

  • Preheat oven to 350°F (175°C). Prepare two 9-inch pans.
  • Mix dry ingredients; beat butter and sugar, add eggs, vanilla, and bananas. Alternate adding dry mix and buttermilk.
  • Fold in 1 cup walnuts, divide batter into pans, and bake for 25-30 minutes. Cool completely.
  • Prepare frosting by beating cream cheese, butter, powdered sugar, vanilla, and white chocolate. Fold in whipped cream.
  • Assemble cake: layer frosting between cakes, cover with remaining frosting, and decorate with chopped walnuts.

Notes

For best results, use very ripe bananas for extra flavor and moisture.
Calories: 520kcal
Cost: $15
Course: Dessert
Cuisine: American
Keyword: Banana

Discover Your New Favorite Snack with Quick and Cheesy Egg Toasts

Are you ready to elevate your snack game? If you love the delightful combination of egg and cheese, you’re in for a treat! This recipe for Quick and Cheesy Egg Toasts is not only simple but bursting with flavor that will make your taste buds sing. Whether you’re looking for a quick breakfast, a satisfying snack, or a light meal, these cheese toasts are the perfect solution. In just a few minutes, you can create a delicious dish that will impress family and friends alike. Let’s dive into why you’ll love this recipe!

Why You’ll Love This Recipe

  • Quick Preparation: With only a few minutes of prep and cooking time, you can whip up these toasts in under 15 minutes, making them perfect for busy days.
  • Versatile Ingredients: Customize your egg and cheese toasts with various bread, cheese types, and add-ins to suit your flavor preferences.
  • Kid-Friendly: This recipe is a hit with kids, allowing for creative toppings and variations that will make mealtime enjoyable.
  • Minimal Cleanup: With just one mixing bowl and a baking sheet, cleanup is a breeze, allowing you to savor your meal without the hassle.
  • Perfect for Any Meal: Enjoy these toasts for breakfast, as a snack, or as an easy lunch – they’re always a hit!

Ingredients You’ll Need

Gather these simple ingredients for your Egg and Cheese Toasts:

  • 2 slices hearty sandwich bread (choose a bread without large holes for optimal results)
  • 1 large egg (fresh eggs work best for flavor and texture)
  • 1/2 cup (2 ounces) grated cheese (options include cheddar, pepper jack, or gruyere)
  • 1 teaspoon finely chopped fresh herbs (try thyme or rosemary for added flavor)
  • Salt and black pepper to taste
  • Pinch of cayenne (optional, for a bit of heat)

How to Make Egg and Cheese Toasts: Oven Method

Delicious egg and cheese toast with a golden yolk and melted cheese.

Follow these simple steps to create your cheesy egg toasts:

  • Preheat the Oven: Begin by preheating your oven to 400°F (or use the bake setting on your toaster oven).
  • Toast the Bread: Lightly toast each slice of bread or broil both sides for 1-2 minutes until just golden.
  • Prepare the Egg Mixture: In a small bowl, beat the egg until fully combined.
  • Add Cheese and Seasonings: Stir in the grated cheese, chopped herbs, salt, and pepper.
  • Spread the Mixture: Evenly spread the egg and cheese mixture over the toasted bread, ensuring it reaches the edges. Sprinkle cayenne if you want a spicy kick.
  • Bake: Place on a baking sheet and bake for 10-12 minutes until the toasts are puffed and golden.

Air Fryer Egg and Cheese Toasts

If you’re looking to save time or reduce energy consumption, the air fryer method is perfect!

  • Preheat the Air Fryer: Set your air fryer to 340°F.
  • Toast the Bread: Similar to the oven method, lightly toast the bread first.
  • Prepare the Egg Mixture: Follow the same steps as above.
  • Air Fry: Place the prepared toasts in the air fryer basket and cook for 8-10 minutes until they are golden and the cheese is melted.

Delicious Variations to Try

Feel free to get creative with your egg and cheese toasts! Here are some tasty variations:

  • Faux-Monsieur: Add a layer of thinly sliced ham and a drizzle of Dijon mustard for a savory twist.
  • Tomato Toast: Top with sliced tomatoes and basil for a fresh, Italian-inspired dish.
  • Honey Apple Walnut Toast: Spread a thin layer of honey, add sliced apples, and sprinkle with walnuts for a sweet crunch.
  • Spicy Avocado Toast: Mash an avocado with lime juice and chili flakes as a base before adding the egg mixture for a creamy kick.

Pro Tips for Perfect Egg Toasts

  • Use Sturdy Bread: Opt for hearty sandwich bread to avoid sogginess.
  • Grate Your Own Cheese: For better melting and flavor, grate cheese fresh from the block.
  • Experiment with Herbs: Fresh herbs can elevate the flavor profile; don’t hesitate to try different combinations.
  • Monitor Cooking Time: Keep an eye on the toasts to ensure they don’t overcook or burn.
  • Use a Baking Sheet: Line your baking sheet with parchment paper for easy cleanup.
  • Customize Spices: Feel free to add spices like garlic powder or smoked paprika for an additional flavor punch.
  • Add Vegetables: Feel free to throw in some sautéed spinach or bell peppers for extra nutrients.
  • Check for Doneness: The egg mixture should be set and the cheese melty and bubbly.

Common Mistakes and Troubleshooting

Even the best cooks can encounter hiccups! Here are some common mistakes and how to fix them:

  • Too Soggy? : If your bread is soggy, try toasting it longer before adding the egg mixture.
  • Egg Not Cooking?: Ensure your oven or air fryer is fully preheated to cook the egg mixture properly.
  • Cheese Not Melting?: Grate cheese finely for better melting and distribution.
  • Too Spicy?: Omit the cayenne if you’re sensitive to heat or try milder cheese options.

Storage and Make-Ahead Instructions

Want to prepare ahead of time? Here’s how:

  • Make-Ahead: Prepare the egg mixture and store it covered in the fridge for up to 24 hours. Assemble and bake when ready to serve.
  • Storage: Cooked toasts can be stored in an airtight container in the fridge for up to 3 days. Reheat in the oven or air fryer for best results.

Nutrition Tips and Dietary Adaptations

Want to make your egg toasts healthier or cater to dietary needs? Here are some tips:

  • Low-Carb Version: Use a low-carb bread or even zucchini slices for a gluten-free option.
  • Dairy-Free Option: Swap regular cheese with a plant-based cheese or nutritional yeast for a cheesy flavor without dairy.
  • High-Protein Boost: Add cooked bacon or sausage for an extra protein hit.
  • Vegan Adaptation: Replace the egg with a chickpea flour mixture for a vegan-friendly version.

Equipment Recommendations

Here’s what you need to make your egg and cheese toasts:

  • Oven or Toaster Oven: For baking your toasts to perfection.
  • Air Fryer: Ideal for quick cooking and a crispy finish.
  • Baking Sheet: A must for even cooking and easy cleanup.
  • Mixing Bowl: For combining the ingredients smoothly.
  • Spatula: To help spread your egg mixture evenly.

Serving Suggestions

Pair your delicious egg and cheese toasts with:

  • Fresh Fruit: A side of mixed berries or sliced apples adds a refreshing touch.
  • Salad: A light green salad can complement the richness of the toasts.
  • Smoothies: Blend a quick smoothie for a nutritious drink.
  • Yogurt: Serve with a bowl of yogurt for added protein and creaminess.

Frequently Asked Questions About Egg and Cheese Toasts

  • Can I use different types of cheese? Absolutely! Feel free to experiment with your favorite cheese.
  • Can I make this recipe gluten-free? Yes, just substitute your bread with a gluten-free option.
  • How do I know when the toasts are done? Look for a puffed, golden appearance and a set egg mixture.
  • Can I use a different cooking method? Yes, you can also use a skillet to cook them on the stovetop.
  • What if I don’t have fresh herbs? Dried herbs can be used, but adjust the quantity as they are more concentrated.
  • How can I make these ahead of time? Prepare the mixture in advance and assemble just before baking.
  • Are these toasts freezable? While best fresh, you can freeze them. Reheat in the oven when ready to enjoy.
  • How can I make these spicier? Add jalapeños or a dash of hot sauce to the egg mixture for an extra kick.

In conclusion, these Quick and Cheesy Egg Toasts are not just a recipe; they are a canvas for creativity and flavor. With simple ingredients and easy steps, you can create a dish that feels special yet is incredibly approachable. Remember, cooking should be fun and stress-free! So, gather your ingredients and let your culinary adventure begin!

Egg and Cheese Toasts:Crispy, Cheesy, and Amazingly Quick

Prep Time 5 minutes
Cook Time 12 minutes
Total Time 17 minutes
Servings 2 servings
Calories 250
A quick and delicious breakfast featuring crispy toast topped with cheesy, herb-infused eggs.

Ingredients

Bread

  • 2 slices hearty sandwich bread (no large holes)
  • 1 large egg egg
  • 0.5 cup grated cheese (cheddar, pepper jack, or gruyere)
  • 1 teaspoon finely chopped fresh herbs (thyme or rosemary)
  • to taste Salt and black pepper
  • a pinch cayenne (optional) Pinch of cayenne (optional)

Instructions 

  • Toast bread lightly until golden.
  • Preheat oven to 400°F (200°C).
  • Beat egg until fully combined, then stir in cheese, herbs, salt, and pepper.
  • Spread egg mixture onto toasted bread, sprinkle cayenne if desired.
  • Bake for 10–12 minutes until puffed and golden.

Notes

For extra flavor, add a dash of hot sauce or herbs.
Calories: 250kcal
Cost: $5
Course: Breakfast
Keyword: Cheese, Eggs, Toast

Elevate Your Weeknight Meals with High-Protein Cottage Cheese Wraps

Are you tired of the same old weeknight dinners? Looking for a fun, healthy, and delicious meal that won’t take hours to prepare? Look no further! These high-protein cottage cheese wraps are here to save the day! Packed with flavor, nutrition, and versatility, they are the perfect solution for busy weeknights. In this article, I’ll guide you through every step of making these effortless wraps that are not only simple but also a fantastic way to boost your protein intake. Let’s get cooking!

Why You’ll Love This Recipe

  • Quick and Easy: This recipe takes less than 30 minutes from start to finish, making it perfect for those hectic weeknights.
  • High Protein Content: With cottage cheese and chicken, each wrap is loaded with protein, helping you feel full and satisfied.
  • Customizable: You can easily swap out ingredients to fit your taste or dietary preferences.
  • Meal Prep Friendly: Make the wraps ahead of time for a quick grab-and-go lunch or dinner option.
  • Deliciously Flavorful: The combination of spices and fresh ingredients makes each bite a burst of flavor.

Ingredients Breakdown

Let’s take a closer look at the ingredients you’ll need for these wraps, along with some potential substitutions:

  • Cottage Cheese: 1 cup (full-fat or low-fat) – Substitute with Greek yogurt for a creamier texture.
  • Eggs: 2 large – For a vegan option, you can use flax eggs (1 tablespoon ground flaxseed + 2.5 tablespoons water per egg).
  • Oat Flour: 1/2 cup – You can use whole wheat flour or almond flour as an alternative.
  • Garlic Powder: 1 teaspoon – Fresh minced garlic works as a great substitute.
  • Baking Powder: 1/2 teaspoon – This helps the flatbread rise; ensure it’s fresh for best results.
  • Salt: 1/2 teaspoon – Adjust to taste.
  • Olive Oil: 1 tablespoon – Avocado oil is a great alternative.
  • Chicken Breasts: 2 medium (about 1 lb) – Feel free to use turkey or tofu for a different protein source.
  • Spices: Paprika, cumin, chili powder, black pepper – Adjust based on your spice preference!
  • Greek Yogurt: 1/2 cup – Can be swapped with sour cream for a different flavor profile.
  • Lemon Juice: 1 tablespoon – Fresh lemon juice will enhance the sauce’s flavor.
  • Fresh Vegetables: Shredded romaine lettuce, cherry tomatoes, red onion, parsley/cilantro – Any greens or veggies you have on hand will work!

Step-by-Step Instructions

Delicious-looking flatbread chicken wraps filled with cottage cheese and vibrant veggies.

Ready to make your wraps? Follow these simple steps to create delicious high-protein cottage cheese wraps:

  1. Preheat your oven to 400°F (200°C) and line a baking sheet with parchment paper.
  2. In a blender, combine the cottage cheese, eggs, oat flour, garlic powder, baking powder, salt, and olive oil until smooth.
  3. Spread the mixture onto the baking sheet, shaping it into a rectangle about 1/4-inch thick.
  4. Bake for 18–22 minutes until golden and set. For an extra crispy finish, broil for 1–2 minutes. Let it rest for 5–7 minutes.
  5. While the flatbread cools, pat the chicken dry and rub it with paprika, cumin, chili powder, black pepper, and salt.
  6. Cook the chicken in a skillet over medium-high heat for about 5–6 minutes per side or until it reaches an internal temperature of 165°F (74°C). Allow it to rest for 5 minutes before slicing.
  7. Mix the Greek yogurt and lemon juice in a bowl to create a creamy sauce.
  8. Slice the flatbread into rectangles, layer with the yogurt sauce, chicken, lettuce, tomatoes, onions, and herbs.
  9. Fold tightly into wraps. For an added crunch, sear in a dry skillet for 1–2 minutes per side.

Pro Tips for Success

Want to make sure your wraps turn out perfectly? Keep these expert tips in mind:

  • Use room temperature eggs: This helps the batter mix evenly, resulting in a smoother texture.
  • Don’t overmix: Blend just until combined to avoid tough flatbread.
  • Watch the baking time: Ovens can vary, so keep an eye on your flatbread to avoid burning.
  • Resting the chicken: Allowing the chicken to rest after cooking keeps it juicy and flavorful.
  • Experiment with spices: Feel free to add your favorite herbs and spices to customize the flavor.
  • Try different sauces: Switch up the yogurt sauce with a spicy salsa or guacamole for a twist.
  • Keep leftovers refrigerated: Store any unused wraps in an airtight container for up to 3 days.
  • Freezing option: Freeze the flatbread separately for easy meal prep later!

Common Mistakes and Troubleshooting

Even the best cooks make mistakes! Here are a few common pitfalls and how to avoid them:

  • Flatbread is too thick: Ensure it’s spread evenly to achieve the right texture.
  • Wraps falling apart: Make sure to let the flatbread cool before slicing; this helps it hold its shape.
  • Chicken overcooked: Use a meat thermometer to check for doneness instead of guessing.
  • Flavor too bland: Don’t hesitate to adjust seasoning to your taste preferences!

Variations to Try

Get creative with these variations of the cottage cheese wraps:

  • Vegetarian Delight: Replace chicken with sautéed mushrooms and spinach for a veggie-packed option.
  • Spicy Southwest: Add jalapeños to the filling and top with chipotle sauce for a spicy kick.
  • Breakfast Wraps: Use scrambled eggs and avocado instead of chicken for a breakfast twist.
  • Greek Style: Stuff with feta cheese, olives, and tzatziki for a Mediterranean flair.

Storage and Make-Ahead Instructions

Planning ahead? Here’s how to store your wraps:

  • Refrigeration: Store wrapped components in an airtight container in the fridge for up to 3 days.
  • Freezing: Freeze the flatbread separately for up to 2 months. Thaw in the fridge before using.
  • Prep Ahead: Prepare filling and sauces in advance for quicker assembly on busy nights.

FAQs

Here are some frequently asked questions about these cottage cheese wraps:

  • Can I use low-fat cottage cheese? Yes, low-fat cottage cheese works well and keeps the wraps lighter.
  • How do I make these wraps gluten-free? Substitute oat flour with gluten-free flour or almond flour.
  • Can I prepare these wraps the night before? Absolutely! Assemble them ahead of time and store in the fridge until ready to eat.
  • How do I reheat leftovers? Microwave for a few seconds or warm in a skillet until heated through.
  • Are cottage cheese wraps suitable for meal prep? Yes! They are perfect for meal prep as they store well and are easy to pack.
  • What can I serve alongside these wraps? Consider pairing with a fresh salad, roasted vegetables, or a light soup.
  • Can I add more protein? Yes! You can add sliced turkey, ham, or even beans for extra protein.
  • What if my flatbread is too soft? Make sure to let it bake long enough and allow it to cool properly before slicing.

Nutritional Tips and Dietary Adaptations

These wraps can easily fit into various dietary plans:

  • Low Carb: Substitute oat flour with almond flour or coconut flour for a lower carbohydrate count.
  • High Fiber: Add flaxseed or chia seeds to the flatbread for added fiber.
  • Dairy-Free: Use plant-based yogurt and tofu in place of cottage cheese and chicken.

Equipment Recommendations

Before you start cooking, make sure you have the right tools at hand:

  • Blender or Food Processor: Essential for mixing the flatbread batter smoothly.
  • Baking Sheet: A quality baking sheet lined with parchment paper for easy cleanup.
  • Skillet: A non-stick skillet will help cook the chicken perfectly.
  • Meat Thermometer: Useful for ensuring chicken is cooked to a safe temperature.

Serving Suggestions

Once your wraps are ready, here are some delicious ways to serve them:

  • With Dipping Sauce: Serve with a side of hummus or your favorite dipping sauce for extra flavor.
  • Fresh Salad: Pair with a simple green salad for a balanced meal.
  • Chips and Salsa: Enjoy with a side of tortilla chips and fresh salsa for a crunchy contrast.

Conclusion

There you have it! These high-protein cottage cheese wraps are not just easy to make, but they are also a delicious way to enjoy a nutritious meal without the hassle. Whether you’re looking to impress your family, meal prep for the week, or simply enjoy a healthy dinner, these wraps are the perfect choice. Remember, cooking should be enjoyable—don’t stress about perfection. Just follow these simple steps, and you’ll be well on your way to creating a delightful dish that everyone will love. Happy cooking!

High-Protein Crispy Cottage Cheese Flatbread Chicken Wraps

Prep Time 15 minutes
Cook Time 20 minutes
Total Time 35 minutes
Servings 4 servings
Calories 550
Enjoy these protein-packed, crispy flatbread wraps filled with flavorful chicken and fresh vegetables for a healthy and satisfying meal.

Ingredients

Dough

  • 1 cup cottage cheese (full-fat or low-fat)
  • 2 large eggs
  • 1/2 cup oat flour
  • 1 teaspoon garlic powder
  • 1/2 teaspoon baking powder
  • 1/2 teaspoon salt
  • 1 tablespoon olive oil

Chicken

  • 2 medium boneless skinless chicken breasts (about 1 lb)
  • 1 teaspoon paprika
  • 1/2 teaspoon cumin
  • 1/2 teaspoon chili powder
  • 1/2 teaspoon black pepper
  • 1 tablespoon olive oil

Sauce

  • 1/2 cup Greek yogurt
  • 1 tablespoon fresh lemon juice

Vegetables & Herbs

  • 1 cup shredded romaine lettuce
  • 1/2 cup cherry tomatoes, halved
  • 1/4 cup thinly sliced red onion
  • 2 tablespoons chopped fresh parsley or cilantro

Instructions 

  • Preheat oven to 200°C and line a baking sheet with parchment.
  • Blend cottage cheese, eggs, oat flour, garlic powder, baking powder, salt, and olive oil until smooth. Spread into a 6 mm thick rectangle and bake for 18–22 minutes until golden. Rest 5 minutes.
  • Pat chicken dry, rub with spices, cook in a skillet over medium-high heat for 5–6 minutes per side until cooked through. Rest and slice.
  • Mix Greek yogurt and lemon juice to make the sauce. Slice flatbread, layer with sauce, chicken, lettuce, tomatoes, onion, and herbs. Wrap tightly and sear in a skillet if desired.

Notes

For extra crispiness, broil the flatbread for 1–2 minutes after baking or sear the wraps in a skillet.
Calories: 550kcal
Cost: $15
Course: Main Course
Cuisine: International
Keyword: Chicken, flatbread, High-Protein

Welcome to Your New Favorite Comfort Food

If you’re on the hunt for a warm and nutritious dish that’s easy to make and bursting with flavor, look no further than this Wholesome Lentil and Vegetable Soup. This delightful recipe combines hearty lentils with fresh vegetables, creating a satisfying bowl of goodness that’s perfect for any day of the week. Not only is this soup delicious, but it’s also packed with nutrients, making it a great option for busy weeknights when you want something both comforting and healthy. Let’s dive into why you’ll love this recipe!

Why You’ll Love This Recipe

  • Quick & Easy: With just 30-40 minutes of simmering, you can have a flavorful soup ready to enjoy.
  • Nutritious Ingredients: Packed with protein-rich lentils and a variety of vegetables, this soup supports a healthy lifestyle.
  • Customizable: Feel free to add your favorite vegetables or spices. This recipe is versatile and can easily adapt to your pantry staples.
  • Freezer-Friendly: Make a large batch and freeze portions for quick meals on busy days.
  • Delicious Leftovers: The flavors deepen overnight, making it even tastier the next day!

Ingredients for Lentil and Vegetable Soup

Gathering the right ingredients is key to making this soup a success. Here’s what you’ll need:

  • 1 cup green or brown lentils
  • 2 medium carrots, diced
  • 2 stalks celery, diced
  • 1 medium yellow onion, chopped
  • 3 cloves garlic, minced
  • 4 cups low-sodium vegetable broth
  • 1 can (14.5 oz) diced tomatoes (with juice)
  • 2 cups fresh spinach or kale
  • 1 tsp cumin
  • 1 tsp dried thyme
  • 2 bay leaves
  • Salt and pepper to taste
  • 1 tbsp olive oil

These ingredients create a robust flavor profile, but don’t hesitate to substitute or add extras based on what you have available:

  • Vegetables: You can toss in zucchini, bell peppers, or even sweet potatoes for a unique twist.
  • Herbs: Fresh herbs like parsley or cilantro can brighten up the soup.
  • Spices: Experiment with chili powder or smoked paprika for added depth.

How to Make Lentil and Vegetable Soup

Close-up image of a rich lentil and vegetable soup, highlighting its ingredients.

Ready to get cooking? Follow these simple steps for a delicious soup:

  1. In a large pot, heat olive oil over medium heat. Sauté onions, garlic, carrots, and celery until softened (about 5 minutes).
  2. Add lentils to the pot; stir in sautéed vegetables.
  3. Pour in vegetable broth and diced tomatoes; bring to a gentle boil.
  4. Stir in cumin, thyme, bay leaves, salt, and pepper.
  5. Reduce heat to low; simmer uncovered for 30-40 minutes until lentils are tender.
  6. Stir in spinach or kale just before serving; enjoy hot with crusty bread.

Pro Tips for Perfecting Your Soup

  • Rinse lentils: Always rinse lentils before cooking to remove any debris.
  • Adjust consistency: If you prefer a thicker soup, mash some of the lentils against the side of the pot.
  • Flavor boost: Add a splash of lemon juice just before serving for a bright finish.
  • Cool before freezing: Ensure the soup is completely cooled before transferring to freezer-safe containers.
  • Reheat gently: When reheating from frozen, do so slowly on low heat to maintain texture.
  • Texture matters: For a creamier texture, blend a portion of the soup before adding the greens.
  • Serve creatively: Top with croutons or a dollop of yogurt for added texture and flavor.
  • Mind the salt: Be cautious with salt, especially if using store-bought broth, as it can be quite salty.

Common Mistakes and Troubleshooting

Let’s tackle some common issues you might encounter while making lentil soup:

  • Overcooked lentils: If lentils are mushy, they’ve cooked too long. Aim for a tender but firm texture.
  • Lack of flavor: If your soup tastes bland, boost it with more herbs and spices or a splash of vinegar.
  • Too thick: Add more broth or water while cooking to reach your desired consistency.

Variations to Try

Feeling adventurous? Here are some variations to make this soup your own:

  • Spicy Lentil Soup: Add diced jalapeños or red pepper flakes for a kick.
  • Creamy Lentil Soup: Blend a portion of the soup with an immersion blender for a creamy texture.
  • Curried Lentil Soup: Incorporate curry powder and coconut milk for a warm, exotic twist.
  • Italian Lentil Soup: Add diced zucchini, basil, and a sprinkle of Parmesan cheese before serving.

Storing and Make-Ahead Instructions

This soup is perfect for meal prep! Here’s how to store and reheat:

  • Refrigerate: Store in an airtight container for up to 5 days.
  • Freeze: Portion into freezer-safe containers for up to 3 months.
  • Reheat: Warm on the stove over low heat, stirring occasionally, until heated through.

Frequently Asked Questions

  • Can I use dried lentils instead of canned? Yes, dried lentils are ideal for this recipe; just ensure they’re rinsed and sorted.
  • What kind of lentils are best? Green or brown lentils work well as they hold their shape during cooking.
  • Is it necessary to soak lentils before cooking? No, unlike beans, lentils don’t require soaking.
  • Can I use chicken broth instead of vegetable broth? Absolutely, for a non-vegetarian version, chicken broth adds great flavor.
  • How do I add protein to this soup? Consider adding shredded chicken or cooked sausage for a heartier meal.
  • What should I serve with lentil soup? Crusty bread, a fresh salad, or a side of rice complements this soup beautifully.
  • Can I make this soup in a slow cooker? Yes, combine all ingredients and cook on low for 6-8 hours or high for 3-4 hours.
  • How do I know when the lentils are done? Lentils are done when they are tender but not mushy, usually within 30-40 minutes.

Nutrition Tips and Dietary Adaptations

This soup is naturally vegan and gluten-free, making it a great option for various dietary needs. To enhance its nutritional profile:

  • Boost fiber: Add more vegetables like spinach or kale.
  • Increase protein: Incorporate quinoa or beans for added protein content.
  • Lower sodium: Use low-sodium broth and adjust salt to taste.

Equipment Recommendations

Here are some kitchen tools that can make your soup-making experience smoother:

  • Large pot: A heavy-bottomed pot is essential for even heat distribution.
  • Wooden spoon: Perfect for stirring without scratching your pot.
  • Measuring cups and spoons: Accurate measurements ensure a balanced flavor.
  • Immersion blender: Great for blending the soup directly in the pot, if desired.

Serving Suggestions

Enjoy your lentil and vegetable soup with:

  • Crusty bread: A warm baguette or sourdough is perfect for dipping.
  • Cheese: A sprinkle of feta or Parmesan adds a salty kick.
  • Fresh herbs: Garnish with parsley or cilantro for a fresh flavor boost.

Now that you have all the tips and tricks for making the perfect Lentil and Vegetable Soup, it’s time to put on your apron and get cooking! Remember, cooking should be fun and stress-free. This soup is all about enjoying the process and sharing delicious meals with those you love. Happy cooking!

Lentil and Vegetable Soup

Prep Time 10 minutes
Cook Time 40 minutes
Total Time 50 minutes
Servings 4 servings
Calories 250
A hearty and nutritious soup combining lentils and fresh vegetables, perfect for a comforting meal.

Ingredients

Dried Lentils

  • 1 cup green or brown lentils

Vegetables

  • 2 medium carrots, diced
  • 2 stalks celery, diced
  • 1 medium yellow onion, chopped
  • 3 cloves garlic, minced

Broth and Canned Goods

  • 4 cups low-sodium vegetable broth
  • 1 can diced tomatoes (14.5 oz) (with juice)

Greens

  • 2 cups fresh spinach or kale

Spices and Oils

  • 1 tsp cumin
  • 1 tsp dried thyme
  • to taste Salt and pepper
  • 1 tbsp olive oil

Instructions 

  • Heat olive oil in a large pot; sauté onions, garlic, carrots, and celery until softened.
  • Add lentils; stir with vegetables.
  • Pour in broth and tomatoes; bring to a boil.
  • Add spices, bay leaves, salt, and pepper; simmer for 30-40 minutes.
  • Stir in greens before serving; enjoy hot.

Notes

For extra flavor, add a squeeze of lemon or a dash of hot sauce.
Calories: 250kcal
Cost: $15
Course: Soup
Cuisine: Vegetarian
Keyword: Lentils

Discover the Joy of Cooking: Your Go-To Lemon Herb Chicken Skillet

Welcome to a delightful culinary experience where cooking is made easy and enjoyable! This Lemon Herb Chicken Skillet is your new favorite dish, perfect for busy weeknights or special occasions. Combining tender chicken thighs with the vibrant flavors of lemon and fresh herbs, this recipe not only delivers on taste but also on simplicity. Let’s dive into why this dish is a must-try and how you can master it in your own kitchen!

Why You’ll Love This Recipe

  • Quick and Easy: This dish comes together in under 30 minutes, making it ideal for those hectic evenings.
  • Flavorful Freshness: The combination of lemon zest and fresh herbs creates a bright and refreshing flavor profile.
  • One-Pan Wonder: Enjoy the convenience of cooking everything in one skillet, minimizing cleanup time.
  • Versatile & Adaptable: Easily swap out ingredients based on what you have on hand or your dietary preferences.
  • Meal Prep Friendly: This chicken skillet is perfect for leftovers, making it a great option for meal prepping.

Ingredients Breakdown

Let’s take a closer look at what you need to create this delicious Lemon Herb Chicken. Each ingredient plays a vital role in bringing out the flavors and ensuring a juicy, satisfying meal.

  • 4 pieces Chicken thighs: Use bone-in, skin-on for extra juicy results. If you prefer, chicken breasts can also be used but may require careful cooking to avoid dryness.
  • 1 tablespoon Lemon zest: This adds a bright, aromatic flavor that elevates the dish.
  • 2 tablespoons Lemon juice: Freshly squeezed juice is recommended for the best taste.
  • 4 cloves Garlic: Minced garlic adds warmth and depth to the overall flavor.
  • 4 sprigs Fresh thyme: This herb complements the lemon beautifully and adds an earthy undertone.
  • 2 sprigs Fresh rosemary: Another aromatic herb that lends its robust flavor to the dish.
  • 2 tablespoons Olive oil: Essential for cooking the chicken and adding richness.
  • 1 teaspoon Salt: Enhances all the flavors.
  • 1 teaspoon Black pepper: Adds a subtle heat.
  • 2 tablespoons Fresh parsley: Chopped parsley for garnish and a hint of freshness at the end.
  • 2 pieces Lemon wedges: For serving, these add a lovely touch to the presentation.

Step-by-Step Instructions

Delicious lemon herb chicken thighs resting in a skillet, with sprigs of rosemary and thyme.

Now that you have all your ingredients ready, let’s walk through the steps to make your Lemon Herb Chicken Skillet.

  1. In a large skillet, heat the olive oil over medium-high heat.
  2. Season the chicken thighs with salt and pepper. Once the oil is hot, add the chicken to the skillet, skin side down.
  3. Cook for about 5-7 minutes until the skin is golden brown and crispy. Flip the chicken over.
  4. Add the minced garlic, thyme, rosemary, lemon zest, and lemon juice to the skillet.
  5. Cover and cook for an additional 10-15 minutes, or until the chicken reaches an internal temperature of 165°F (75°C).
  6. Once cooked, remove from heat, garnish with chopped parsley, and serve with lemon wedges.

Pro Tips for Perfect Lemon Herb Chicken

  • Use a Meat Thermometer: To ensure the chicken is perfectly cooked, use a meat thermometer to check the internal temperature.
  • Let it Rest: Allow the chicken to rest for a few minutes before serving. This helps the juices redistribute, making the meat juicier.
  • Fresh Herbs Only: Whenever possible, use fresh herbs for maximum flavor rather than dried herbs.
  • Don’t Overcrowd the Pan: If making a larger batch, cook the chicken in batches to avoid steaming.
  • Variations: Experiment with different herbs like basil or oregano for a unique twist!
  • Adjust the Acidity: If you prefer a more tangy flavor, feel free to increase the lemon juice.
  • Vegetable Additions: Consider adding seasonal vegetables such as bell peppers or zucchini in the last few minutes of cooking.
  • Pairing Options: Serve with rice, quinoa, or a fresh salad for a complete meal.

Common Mistakes to Avoid

Even the best cooks can make mistakes! Here are some common pitfalls to steer clear of:

  • Overcooking the Chicken: Keep an eye on the cooking time to avoid dry chicken. Use a thermometer for accuracy.
  • Using Pre-Packaged Lemon Juice: For best results, always use fresh lemon juice to capture the vibrant flavor.
  • Not Allowing the Chicken to Brown: Give the chicken enough time to develop a golden crust for added flavor.

Variations to Try

Here are some fun variations to mix things up:

  • Herb Chicken Skillet: Substitute lemon with lime for a zesty flavor.
  • Vegetarian Option: Replace chicken with firm tofu or seitan for a plant-based version.
  • Spicy Kick: Add red pepper flakes or sliced jalapeños for a spicy twist.
  • Mushroom Medley: Include a mix of mushrooms for added texture and flavor.

Storage and Make-Ahead Instructions

This recipe is perfect for meal prep! Here’s how to store and reheat:

  • Storage: Store leftover chicken in an airtight container in the refrigerator for up to 3 days.
  • Freezing: You can freeze the chicken for up to 3 months. Thaw in the refrigerator before reheating.
  • Reheating: Gently reheat in a skillet over low heat, adding a splash of chicken broth to keep it moist.

Frequently Asked Questions

  • Can I use frozen chicken thighs? Yes, but ensure they are fully thawed before cooking for even results.
  • What can I serve with this dish? It pairs wonderfully with rice, couscous, or a fresh salad.
  • How do I know when the chicken is done? Check with a meat thermometer; it should read 165°F (75°C).
  • Can I make this ahead of time? Yes, this dish is great for meal prep and can be made in advance.
  • What herbs can I substitute? Feel free to experiment with herbs like dill or cilantro for different flavor profiles.
  • Is this recipe gluten-free? Yes, all ingredients are naturally gluten-free!
  • Can I add vegetables to the skillet? Absolutely! Add vegetables like bell peppers or broccoli in the last few minutes of cooking.
  • How do I keep the chicken juicy? Avoid overcooking and allow the chicken to rest before serving.

Nutritional Tips and Dietary Adaptations

This Lemon Herb Chicken Skillet is not only delicious but also nutritious. It’s rich in protein and can be adapted for various dietary needs:

  • Low-Carb: Pair with non-starchy vegetables like zucchini or cauliflower.
  • Paleo-Friendly: This recipe is naturally paleo as long as you stick to whole ingredients.
  • Kid-Friendly: Adjust the seasoning to suit younger palates.

Essential Equipment for Your Skillet

To make the most out of this recipe, here are a few essential kitchen tools you might need:

  • Skillet: A heavy-bottomed skillet or cast iron pan works best for even cooking.
  • Meat Thermometer: For ensuring perfectly cooked chicken every time.
  • Spatula: A sturdy spatula helps in flipping the chicken without breaking it apart.
  • Chopping Board and Knife: For prepping your ingredients efficiently.

Serving Suggestions and Final Thoughts

Serve your Lemon Herb Chicken Skillet with lemon wedges on the side for an extra zing, along with a fresh salad or your favorite grains. Cooking should be a joyful experience, and this recipe is designed to inspire confidence in your kitchen. Remember, great food doesn’t require perfection—just a willingness to experiment and enjoy the process. Happy cooking!

Easy Juicy Lemon Herb Chicken Skillet You’ll Crave Tonight

Prep Time 10 minutes
Cook Time 20 minutes
Total Time 30 minutes
Servings 4 servings
Calories 350
This flavorful chicken skillet combines fresh lemon and herbs for a juicy, satisfying meal that's quick to prepare.

Ingredients

Protein

  • 4 pieces Chicken thighs (Use bone-in, skin-on for extra juicy results)

Flavorings

  • 1 tablespoon Lemon zest
  • 2 tablespoons Lemon juice
  • 4 cloves Garlic cloves (Minced)
  • 4 sprigs Fresh thyme
  • 2 sprigs Fresh rosemary

Cooking Oil

  • 2 tablespoons Olive oil (For cooking)
  • 1 teaspoon Salt
  • 1 teaspoon Black pepper

Garnish & Serving

  • 2 pieces Lemon wedges (For serving)
  • 2 tablespoons Fresh parsley (Chopped)

Instructions 

  • Season chicken thighs with salt, pepper, lemon zest, and minced garlic.
  • Heat olive oil in a skillet over medium heat and cook chicken until golden and cooked through, about 8-10 minutes per side.
  • Add lemon juice, fresh thyme, and rosemary to the skillet; simmer for 2-3 minutes.
  • Garnish with chopped parsley and lemon wedges before serving.

Notes

Use bone-in, skin-on chicken thighs for extra juiciness and flavor.
Calories: 350kcal
Cost: $15
Course: Main Course
Cuisine: American
Keyword: Chicken, herbs, lemon

Start Your Day Right with a Delicious Breakfast Crumble

Are you looking for a way to kickstart your day with a burst of flavor and nutrition? Look no further than this energizing berry breakfast crumble. Packed with protein and bursting with fruity goodness, this simple yet satisfying recipe is the perfect addition to your morning routine.

In just a few quick steps, you can whip up a delightful protein-packed breakfast that fuels your body and tantalizes your taste buds. Whether you’re a busy professional or a stay-at-home parent, this recipe is designed to fit seamlessly into your life, proving that healthy eating doesn’t have to be complicated.

Why You’ll Love This Recipe

This protein berry breakfast crumble isn’t just tasty; it comes with a host of benefits that make it a go-to choice for breakfast lovers everywhere. Here are just a few reasons to fall in love with this dish:

  • High in Protein: Each serving offers a solid protein boost thanks to the addition of protein powder and egg whites, perfect for keeping you full and satisfied throughout the morning.
  • Rich in Antioxidants: The frozen berries are packed with antioxidants which are great for your overall health and wellness.
  • Customizable: You can easily tweak the ingredients to cater to your taste preferences or dietary needs.
  • Quick Preparation: With a prep time of just 10 minutes, you can have a delicious breakfast ready in no time.
  • Meal Prep Friendly: This recipe can be made ahead and stored, making it a convenient option for busy mornings.

Ingredients Breakdown

Let’s dive into the ingredients that make this berry breakfast crumble so special. Below is a comprehensive list of what you’ll need, along with some helpful substitutions:

  • 1 cup frozen blueberries or mixed berries: Opt for a mix without strawberries for a balanced sweetness and tartness.
  • 2 tsp chia seeds: These tiny seeds add fiber and a delightful crunch, plus they naturally thicken the fruit layer.
  • 1-2 tsp maple syrup or sweetener of choice: Adjust according to your taste preference—feel free to use honey or agave if you prefer!
  • 1/3 cup old-fashioned oats: These provide a wholesome base and add texture to the crumble.
  • 3 Tbsp vanilla protein powder: This is the star ingredient that elevates this dish into a protein-packed breakfast.
  • 1 Tbsp natural peanut butter: Ensure it’s runny for easy mixing. This adds healthy fats and a delicious nutty flavor.
  • 1 egg white (about 2 Tbsp egg whites): This helps bind the crumble together while adding extra protein.
  • 1 tsp maple syrup: Additional sweetness to enhance the flavor.
  • 1/8 tsp cinnamon: A touch of spice that complements the berries beautifully.
  • Pinch of salt: This enhances all the flavors.

Pro Tips for Perfecting Your Crumble

Tasty-looking protein berry breakfast crumble garnished with chia seeds.

To ensure your breakfast crumble turns out just right, here are some expert insights:

  • Use fresh ingredients: The fresher your ingredients, the better the flavor. If using fresh berries, reduce the baking time.
  • Don’t overmix: When combining the crumble topping, mix just until everything is combined to maintain a nice texture.
  • Adjust baking time: Keep an eye on your crumble as it bakes; cooking times can vary based on ramekin size.
  • Let it cool: Allow the crumble to rest for a few minutes before serving to let the flavors meld.
  • Try different toppings: Experiment with other nut butters or add nuts for extra crunch.
  • Use a variety of fruits: Feel free to mix in different types of fruit like raspberries or blackberries for a unique twist.
  • Make it vegan: Substitute the egg white with flaxseed meal mixed with water as a binding agent.
  • Store leftovers properly: If you have leftovers, store them in the fridge in an airtight container for a quick breakfast option later.

Avoiding Common Mistakes

Even the best recipes can go awry if you’re not careful. Here are some common pitfalls to avoid:

  • Overbaking: Keep track of time; overbaked crumbles can become dry and lose their appeal.
  • Skipping the cooling step: Allowing the crumble to rest enhances the flavors and makes for a better texture.
  • Not adjusting sweetness: Everyone’s taste is different; sample your mixture before baking to ensure it’s sweet enough for your liking.

Exciting Variations to Try

Want to mix things up? Here are some variations to consider:

  • Chocolate Chip Peanut Butter Crumble: Add a handful of dark chocolate chips to the crumble for a decadent twist.
  • Apple Cinnamon Crumble: Replace the berries with diced apples and increase the cinnamon for a classic flavor.
  • Nut-Free Option: Omit the peanut butter and use sunflower seed butter instead for a nut-free alternative.
  • Berry Banana Crumble: Incorporate sliced bananas along with the berries for added sweetness and creaminess.

Make Ahead and Storage

This breakfast crumble is perfect for meal prep! Here’s how to store it:

  • Refrigerate: Store leftover crumble in an airtight container in the fridge for up to 3 days.
  • Freeze: To freeze, wrap individual portions tightly in plastic wrap and place them in freezer bags. They can last up to 3 months.
  • Reheat: For the best texture, reheat in an oven or toaster oven until warmed through rather than microwaving.

FAQs About the Protein Berry Breakfast Crumble

Got questions? Here are some common queries about this delightful recipe:

  • Can I use fresh berries? Yes, fresh berries can be used, but make sure to adjust the baking time.
  • Is this recipe gluten-free? If using certified gluten-free oats, this recipe can easily be made gluten-free.
  • Can I substitute the protein powder? Absolutely! You can use any protein powder you prefer, or even omit it for a lower-protein option.
  • How can I make this vegan? Substitute the egg white with flaxseed meal mixed with water and use a plant-based protein powder.
  • What should I serve with this crumble? Enjoy it on its own or pair with Greek yogurt for a creamy contrast.
  • Can I add nuts to the crumble? Definitely! Adding nuts like almonds or walnuts gives extra crunch and nutrition.
  • How do I know when it’s done baking? The topping should be lightly golden and the berries should be soft.
  • Can I reheat leftovers? Yes, simply pop it in the oven or microwave until warmed through.

Nutrition Tips and Dietary Adaptations

This protein berry breakfast crumble is not only delicious but also nutritious. Here are some tips to enhance its health benefits:

  • Boost Fiber: Add flaxseeds or sliced almonds to the topping for extra fiber.
  • Reduce Sugar: Use less maple syrup or opt for a zero-calorie sweetener if you’re watching your sugar intake.
  • Increase Healthy Fats: Swap peanut butter for almond or cashew butter for a variation in flavor and healthy fats.

Equipment Recommendations

To make your cooking experience smoother, here are a few recommended kitchen tools:

  • Ramekins: Perfect for individual servings and make for an impressive presentation.
  • Mixing Bowls: A good set of mixing bowls will make combining your ingredients a breeze.
  • Measuring Cups and Spoons: Accurate measurements are key to achieving the best results.
  • Oven Mitts: Protect your hands when taking hot dishes out of the oven.

Serving Suggestions

Wondering how to serve this delicious crumble? Here are some ideas:

  • Top with Yogurt: A dollop of Greek yogurt adds creaminess and enhances the protein content.
  • Drizzle with Honey: A light drizzle of honey or maple syrup can elevate the sweetness.
  • Garnish with Fresh Berries: Fresh berries on top not only look gorgeous but also add a fresh burst of flavor.

In conclusion, this energizing berry breakfast crumble is more than just a meal; it’s a delightful way to start your day. With its blend of flavors, nutrients, and easy preparation, you’ll find yourself reaching for this recipe time and again. So, roll up your sleeves and enjoy the journey of creating a breakfast that not only tastes good but makes you feel good too!

Protein Berry Breakfast Crumble Recipe

Prep Time 5 minutes
Cook Time 20 minutes
Total Time 25 minutes
Servings 1 serving
Calories 250
A quick and nutritious breakfast featuring berries topped with a protein-packed crumble, perfect for a healthy start to your day.

Ingredients

Fruit and Seeds

  • 1 cup frozen blueberries or mixed berries (Use a blend without strawberries if using mixed berries)
  • 2 tsp chia seeds
  • 1-2 tsp maple syrup or sweetener of choice (Adjust to taste)
  • 1/3 cup old fashioned oats
  • 3 Tbsp vanilla protein powder
  • 1 Tbsp natural peanut butter (Make sure it's runny)
  • 1 egg white about 2 Tbsp egg whites
  • 1 tsp maple syrup
  • 1/8 tsp cinnamon
  • pinch salt

Instructions 

  • Preheat oven to 350°F (175°C).
  • Mix berries, chia seeds, and maple syrup in a ramekin; set aside.
  • Combine oats, protein powder, peanut butter, egg white, maple syrup, cinnamon, and salt until crumbly.
  • Spread crumble over fruit, pressing down slightly.
  • Bake for 15-25 minutes until golden and berries soften.
  • Rest for 5 minutes before serving warm.

Notes

Using fresh berries or a different protein powder may slightly alter nutrition.
Calories: 250kcal
Cost: $10
Course: Breakfast
Keyword: Berries, Healthy, Protein

Effortlessly Flavorful Baked Chicken: Your 30-Minute Guide

Welcome, fellow cooking enthusiasts! If you’re looking for a way to turn your weeknight dinners into something special without adding stress, you’re in the right place. This recipe for juicy baked chicken breasts is not only quick but also packed with flavor. In just 30 minutes, you can create a dish that’s perfect for busy nights, impressing guests, or simply enjoying a home-cooked meal. Let’s dive into the goodness of this oven-baked chicken experience!

Why You’ll Love This Recipe

This isn’t just any chicken recipe; it’s a celebration of flavors and simplicity. Here are five compelling reasons to fall in love with this dish:

  • Quick and Efficient: Ready in just 30 minutes, this recipe is perfect for busy weeknights when you need a delicious meal fast.
  • Affordable Ingredients: Made with everyday ingredients that you likely already have in your pantry, this dish won’t break the bank.
  • Flavorful and Juicy: The combination of spices and the cooking method guarantees a moist chicken breast that’s bursting with flavor.
  • Versatile: Perfect on its own or as part of a larger meal, this chicken pairs well with a variety of sides.
  • Simple Steps: Easy-to-follow instructions make this recipe approachable for cooks of all skill levels.

Ingredients You’ll Need

Gather these ingredients to create your new favorite baked chicken dish:

  • 4 medium-sized chicken breasts: About 2 pounds total, or 7-8 ounces each (you can also use 2-3 large breasts cut in half horizontally for even cooking).
  • 1 teaspoon garlic powder: For a savory kick that complements the chicken beautifully.
  • 1 teaspoon onion powder: Adds a hint of sweetness and depth to the flavor profile.
  • 1 teaspoon paprika: Gives the chicken a lovely color and a subtle smokiness.
  • 1 teaspoon dried parsley: Brightens up the dish with a touch of freshness.
  • 1/2 teaspoon dried mustard: Enhances the overall flavor without overpowering.
  • 1/2 teaspoon chili powder (optional): For those who enjoy a bit of heat.
  • 1 1/2 teaspoons kosher salt: To taste, ensuring the chicken is perfectly seasoned.
  • 1/4 teaspoon black pepper: For an extra layer of flavor.
  • 2 tablespoons olive oil or avocado oil: Keeps the chicken moist while baking.

Step-by-Step Instructions to Make Juicy Baked Chicken

A side view of seasoned chicken breast ready to be served, garnished with parsley.

Follow these simple steps to create delicious baked chicken breasts:

  1. Preheat the Oven: Set your oven to 425 degrees Fahrenheit and lightly grease a large baking dish or rimmed baking sheet.
  2. Pound the Chicken Breasts: Using a meat pounder or rolling pin, pound the thickest part of each chicken breast until they are roughly the same thickness throughout. This step helps the chicken cook evenly, preventing it from drying out.
  3. Season the Chicken: In a bowl, add the chicken breasts and toss them with garlic powder, onion powder, paprika, dried parsley, dried mustard, chili powder, salt, pepper, and olive oil until they are evenly coated.
  4. Arrange and Bake: Place the seasoned chicken in the greased baking dish, spaced evenly apart. Transfer to the oven and bake for 18-20 minutes, or until the internal temperature reaches 165 degrees Fahrenheit.
  5. Rest and Serve: Allow the chicken to rest for several minutes before slicing. This helps retain the juices. Brush with pan juices, slice, serve, and enjoy!

Pro Tips for Perfect Baked Chicken

To elevate your baked chicken to restaurant-quality, consider these expert tips:

  • Brine the Chicken: For extra juiciness, brine the chicken in saltwater for 30 minutes before cooking.
  • Use a Meat Thermometer: Ensure your chicken is perfectly cooked by checking the internal temperature, which should read 165 degrees Fahrenheit.
  • Let It Rest: Allowing the chicken to rest after baking helps to redistribute the juices for a more tender bite.
  • Experiment with Spices: Feel free to swap out spices for your favorites or try a marinade for a different flavor profile.
  • Consider Thinner Pieces: Cutting chicken breasts in half creates thinner pieces that cook faster and stay juicy.
  • Use Fresh Herbs: Garnish with fresh herbs like parsley or thyme for added flavor and a pop of color.
  • Pair with a Sauce: Drizzle with a homemade or store-bought sauce for an extra layer of flavor.
  • Keep an Eye on Time: Ovens vary; start checking for doneness at the 15-minute mark to avoid overcooking.

Common Mistakes and Troubleshooting

Even the best cooks make mistakes! Here’s how to avoid common pitfalls:

  • Overcooking: Monitor the chicken closely; overcooked chicken can be dry and tough.
  • Underseasoning: Don’t be shy with the seasoning—chicken needs flavor to shine!
  • Skipping the Rest: Cutting into chicken too soon can release all the juices, leading to a drier result.

Variations to Try

Make this recipe your own with these delightful variations:

  • Herb-Crusted Chicken: Add fresh herbs like rosemary or thyme to the seasoning mix for a fragrant twist.
  • Spicy Chicken: Increase the chili powder or add cayenne pepper for a fiery kick.
  • Citrus Chicken: Marinate the chicken in orange or lemon juice for a zesty flavor boost.
  • Cheesy Chicken: Top with shredded cheese during the last few minutes of baking for a gooey finish.

Storage and Make-Ahead Instructions

Planning ahead? Here’s how to store and prepare your chicken:

  • Refrigerate: Store leftover chicken in an airtight container for up to 4 days in the fridge.
  • Freeze: You can freeze cooked chicken for up to 3 months. Thaw overnight in the fridge before reheating.
  • Make-Ahead Option: Season the chicken the night before and refrigerate. Bake it fresh when you’re ready to eat!

Frequently Asked Questions

Got questions? We’ve got answers!

  • Can I use frozen chicken breasts? Yes, but they may need a little extra cooking time. Ensure they’re fully thawed for best results.
  • How do I know when the chicken is done? Use a meat thermometer to check for an internal temperature of 165 degrees Fahrenheit.
  • Can I double the recipe for a crowd? Absolutely! Just ensure your baking dish is large enough and adjust cooking time if necessary.
  • What can I serve with baked chicken? This chicken pairs beautifully with salads, roasted vegetables, or rice for a complete meal.
  • Can I use other types of meat? This recipe works well with pork chops or turkey breasts; adjust cooking times accordingly.
  • How do I keep the chicken from drying out? Ensure it’s not overcooked and let it rest post-baking to retain moisture.
  • What if I don’t have all the spices? Feel free to substitute with whatever you have on hand; just keep the seasoning balanced.
  • Can I marinate the chicken overnight? Yes! Marinating can enhance the flavor and tenderness of the chicken.

Nutritional Information and Dietary Adaptations

This recipe is not only delicious but also adaptable:

  • Healthy Option: Low in carbs and high in protein, making it suitable for various dietary preferences.
  • Paleo-Friendly: Free from dairy and grains, perfect for those following a paleo lifestyle.
  • Whole30 Compliant: Simple ingredients that fit within the Whole30 guidelines.

Essential Equipment for Baked Chicken

Here’s what you need to make this recipe a success:

  • Baking Dish: A large, rimmed baking sheet or dish ensures the chicken has space to cook evenly.
  • Meat Thermometer: An essential tool for checking doneness and ensuring juicy results.
  • Meat Pounder or Rolling Pin: For ensuring even cooking of chicken breasts.
  • Mixing Bowls: For tossing the chicken with spices and oil.

Serving Suggestions

Here are some delightful ideas for serving your baked chicken:

  • Fresh Salad: Pair with a crisp green salad for a refreshing contrast.
  • Roasted Vegetables: Serve alongside seasonal veggies for a colorful, nutritious meal.
  • Rice or Quinoa: A side of grains offers a hearty complement to the chicken.
  • Mashed Potatoes: A comfort classic that pairs beautifully with baked chicken.

In conclusion, this 30-minute baked chicken recipe is a game-changer for your weeknight dinners. With simple ingredients, easy-to-follow steps, and plenty of flavor, you’ll find yourself making this dish time and time again. So roll up your sleeves, get your oven preheated, and let’s make some magic happen in the kitchen! Happy cooking!

Juicy 30-Minute Baked Chicken Breast

Prep Time 10 minutes
Cook Time 20 minutes
Total Time 30 minutes
Servings 4 pieces
Calories 250
This quick and flavorful baked chicken breast recipe is perfect for a healthy weeknight dinner, delivering juicy results in just 30 minutes.

Ingredients

Protein

  • 4 pieces chicken breasts (about 2 pounds total, halved or thin)
  • 1 teaspoon garlic powder
  • 1 teaspoon onion powder
  • 1 teaspoon paprika
  • 1 teaspoon dried parsley
  • 0.5 teaspoon dried mustard
  • 0.5 teaspoon chili powder (optional)
  • 1.5 teaspoons kosher salt (or to taste)
  • 0.25 teaspoon black pepper
  • 2 tablespoons olive oil or avocado oil

Instructions 

  • Preheat oven to 425°F (220°C) and lightly grease a baking dish.
  • Pound the thickest part of each chicken breast to even thickness or cut in half horizontally.
  • Toss chicken with spices and oil until coated, then arrange in baking dish.
  • Bake for 18-20 minutes until internal temperature reaches 165°F (74°C).
  • Rest for a few minutes, then slice and serve.

Notes

Ensure chicken is cooked through for safety and juiciness.
Calories: 250kcal
Cost: $15
Course: Main Course
Cuisine: American
Keyword: baked, Chicken, Quick

Discover the Joy of Cooking with a Moroccan Beef and Couscous Salad

Welcome to a culinary adventure that will transform your weeknight dinners! This delightful Moroccan beef and couscous salad is not just a recipe; it’s a celebration of flavors that come together effortlessly. Perfect for busy evenings, this dish combines lean beef, wholesome couscous, and vibrant vegetables, making it a wholesome choice for anyone looking to spice up their dinner routine. With its rich flavors and easy preparation, you’ll find that cooking can be both fun and fulfilling.

Why You’ll Love This Recipe

Let’s dive into the reasons why this Moroccan beef and couscous salad is sure to become a favorite in your kitchen:

  • Quick Preparation: Ready in under 30 minutes, making it perfect for busy weeknights.
  • Nutritious Ingredients: Packed with protein from lean beef and fiber from wholemeal couscous and veggies.
  • Flavor Explosion: Infused with Moroccan spices, this dish tantalizes your taste buds with every bite.
  • Customizable: Easily adapt the ingredients to suit your dietary needs and preferences.
  • Make Ahead: Perfect for meal prepping, you can enjoy leftovers for lunch or dinner!

Ingredient Breakdown

Here’s what you’ll need to create this delicious Moroccan beef and couscous salad, along with some tips for substitutions:

  • 400g lean beef stir-fry strips: Opt for chicken or tofu for a lighter option.
  • 2 teaspoons Moroccan seasoning: A blend of spices like cumin and coriander gives depth; feel free to use a store-bought mix or make your own.
  • 1 cup wholemeal couscous: For a gluten-free version, swap with quinoa or rice.
  • 1 cup reduced-salt beef stock, heated: Vegetable stock works well too!
  • Zest and juice of ½ lemon: Fresh lime juice can be a great alternative.
  • ½ medium red onion, diced: Shallots or green onions can also add a nice flavor.
  • 6 cups rocket (arugula): Spinach or mixed greens can be used for a different texture.
  • 1 medium carrot, grated: Try using zucchini or bell peppers for a colorful twist.
  • 1 cup store-bought roasted red capsicum, drained, thinly sliced: Fresh roasted peppers or sun-dried tomatoes can add a unique flavor.
  • ½ cup tzatziki or yoghurt and cucumber dip: For a dairy-free option, use almond or coconut yogurt.

Cooking Instructions

A detailed close-up of Moroccan beef salad with couscous, herbs, and lemon zest.

Let’s get started on making this delightful salad:

  1. Coat beef strips in Moroccan seasoning. Heat a barbecue hotplate or non-stick frying pan to medium-high heat and spray with olive oil. Cook the beef in batches for 2-5 minutes or until browned.
  2. Meanwhile, prepare the couscous according to packet directions, using hot stock in place of water. Fluff the grains with a fork, then add lemon zest, juice, and diced red onion. Toss gently to combine.
  3. Divide rocket, grated carrot, and roasted capsicum among 4 serving bowls. Top with couscous, beef, and a dollop of tzatziki or dip.

Pro Tips for Perfecting Your Salad

Enhance your cooking experience with these expert tips:

  • Let the beef rest: Allowing the beef strips to sit for a few minutes after cooking helps retain their juices.
  • Perfect couscous texture: Don’t forget to fluff the couscous after it cooks to prevent it from becoming sticky.
  • Season to taste: Always taste your salad before serving to adjust seasoning if necessary.
  • Add crunch: For added texture, consider adding toasted nuts or seeds like almonds or pumpkin seeds.
  • Herb it up: Fresh herbs like parsley or mint can enhance freshness and flavor.
  • Don’t skip the lemon: The acidity from lemon juice balances the dish and brightens the flavors.
  • Serve it warm or cold: This salad is versatile and can be enjoyed warm right after cooking or chilled as a refreshing meal prep option.
  • Experiment with spices: Feel free to adjust the Moroccan seasoning to match your preferred spice level.
  • Store dressing separately: If making in advance, keep dressing separate until you’re ready to serve to maintain freshness.

Common Mistakes and Troubleshooting

Let’s ensure your Moroccan beef and couscous salad turns out perfectly every time!

  • Overcooking the beef: Keep an eye on the beef; it should be browned but juicy, not tough.
  • Not fluffing the couscous: Skipping this step can lead to a clumpy texture, which isn’t ideal.
  • Ignoring seasoning: Always taste and adjust the seasoning of the salad as needed.
  • Forgetting about the dressing: A good dressing can elevate your salad, so don’t skip it!

Variations of the Moroccan Beef and Couscous Salad

Mix things up with these creative variations:

  • Vegan Delight: Substitute beef with chickpeas or lentils and use a vegan yogurt for the dressing.
  • Spicy Kick: Add diced jalapeños or a splash of hot sauce to the beef for an extra kick!
  • Fruit Fusion: Incorporate diced apples or pomegranate seeds for a sweet contrast to the savory elements.
  • Grilled Veggie Version: Throw in some grilled zucchini or eggplant for a smoky flavor.

Storage and Make-Ahead Instructions

This salad is perfect for meal prep! Here’s how to store it:

  • Refrigeration: Keep your salad in an airtight container for up to 3 days.
  • Make-Ahead: Prepare the components separately and assemble just before serving to keep everything fresh.

Comprehensive FAQ

Got questions? We’ve got answers!

  • Can I use other meats? Yes! Chicken or lamb works great too.
  • Is this dish gluten-free? You can make it gluten-free by using quinoa instead of couscous.
  • Can I freeze leftovers? While it’s best fresh, you can freeze the beef and couscous separately for up to a month.
  • What can I serve with this salad? It pairs well with a side of mint tea or a light soup.
  • How do I add more protein? Consider adding beans or nuts for an extra protein boost.
  • Can I skip the tzatziki? Yes, but it adds a creamy texture that compliments the salad beautifully.
  • How can I make this dish spicier? Add more Moroccan seasoning or fresh chili peppers to the beef.
  • What’s the best way to reheat the beef? Reheat it gently in a pan to avoid overcooking.

Nutrition Tips and Dietary Adaptations

For a balanced meal, consider these nutrition tips:

  • Protein-Packed: This recipe provides a great source of protein; pair it with a side of fruit for a well-rounded meal.
  • Vegetable Boost: Add more vegetables to increase fiber and nutrients.
  • Low-Sodium Options: Use low-sodium stock and seasonings to keep the sodium levels in check.

Essential Equipment Recommendations

Having the right tools can make cooking easier:

  • Non-stick frying pan: Ideal for cooking the beef without sticking.
  • Fork: For fluffing the couscous.
  • Measuring cups and spoons: Essential for precise ingredient measurements.
  • Cutting board and knife: For chopping vegetables easily.

Serving Suggestions

This Moroccan beef and couscous salad is versatile enough for various occasions:

  • Weeknight Dinner: Serve it as a quick and satisfying meal.
  • Picnics or Potlucks: Pack it for an outdoor gathering; it travels well!
  • Meal Prep: Great for lunchboxes or make-ahead dinners.

In conclusion, cooking should be an enjoyable experience filled with creativity and flavor. This Moroccan beef and couscous salad not only provides a delicious dish but also the confidence to explore new flavors and ingredients in your kitchen. So roll up your sleeves, gather your ingredients, and let’s whip up a meal that’s sure to impress!

Warm Moroccan beef and couscous salad

Prep Time 10 minutes
Cook Time 15 minutes
Total Time 25 minutes
Servings 4 servings
Calories 520
A vibrant and flavorful salad combining spiced beef, wholesome couscous, and fresh vegetables for a quick and satisfying meal.

Ingredients

Meat

  • 400 g lean beef stir-fry strips
  • 2 teaspoons Moroccan seasoning

Grains

  • 1 cup wholemeal couscous
  • 1 cup reduced-salt beef stock, heated

Fruits & Vegetables

  • ½ medium red onion, diced
  • 1 medium medium carrot, grated
  • 6 cups rocket (arugula)
  • 1 cup store-bought roasted red capsicum, drained, thinly sliced
  • ½ medium red onion, diced

Dairy & Condiments

  • ½ cup tzatziki or yoghurt and cucumber dip

Instructions 

  • Coat beef with Moroccan seasoning and cook in a hot pan for 2-5 minutes until browned.
  • Prepare couscous with hot beef stock, then fluff and add lemon zest, juice, and diced onion.
  • Divide rocket, grated carrot, and capsicum among bowls, top with couscous, beef, and a dollop of dip.

Notes

For extra flavor, add fresh herbs or a squeeze of lemon before serving.
Calories: 520kcal
Cost: $15
Course: Main
Cuisine: Moroccan
Keyword: Beef, couscous, Salad

Transform Your Dinner Routine with This Creamy Lemon Parmesan Chicken Skillet

If you’re looking to elevate your weeknight dinners, look no further! This Creamy Lemon Parmesan Chicken Skillet combines juicy chicken breasts with a rich, flavorful sauce that will impress your family and friends. In just about 30 minutes, you can serve a dish that not only pleases the palate but also fills your home with a delightful aroma. Here’s everything you need to know to make this delicious recipe a staple in your kitchen.

Why You’ll Love This Recipe

This recipe has been crafted with flavor and ease in mind, ensuring that you can enjoy a restaurant-quality meal without the fuss. Here are five specific reasons why this creamy lemon parmesan chicken will become a household favorite:

  • Quick and Easy: With a total cooking time of just 30 minutes, this recipe is perfect for busy weeknights.
  • Rich and Flavorful Sauce: The creamy lemon parmesan sauce complements the tender chicken beautifully, making every bite a delight.
  • One-Pan Wonder: Minimal cleanup is required since everything is prepared in one skillet, allowing you to savor your meal without the hassle.
  • Customizable Ingredients: You can easily adjust the recipe to suit your taste or dietary needs with simple substitutions.
  • Impressive Presentation: The dish not only tastes amazing but also looks stunning, making it perfect for entertaining guests.

Ingredient Breakdown

Let’s take a closer look at the ingredients you’ll need for this mouthwatering dish, along with some tips for substitutions.

  • 4 chicken breasts: You can use boneless, skinless breasts or thighs for a juicier option.
  • 2 tbsp olive oil: Extra virgin olive oil enhances the flavor, but any cooking oil will suffice.
  • 2 tbsp butter: For a richer flavor, consider using unsalted butter.
  • 4 cloves garlic, minced: Fresh garlic adds depth; however, garlic powder can be used in a pinch.
  • 1 cup heavy cream: For a lighter version, substitute with half-and-half or a plant-based cream.
  • 1 cup chicken broth: Homemade broth is ideal, but store-bought works just as well.
  • 1 cup grated parmesan cheese: Freshly grated parmesan melts better than pre-grated versions.
  • 2 tbsp lemon juice: Fresh lemon juice is essential for the best flavor.
  • 1 tsp lemon zest: Zest enhances the lemon flavor; you can add more for extra zing.
  • 1 tsp Italian seasoning: Use your favorite herb blend for added flavor.
  • Salt and black pepper to taste: Always season your dish to bring out the flavors.
  • Fresh parsley for garnish: A sprinkle of parsley adds a pop of color and freshness.

How to Make Creamy Lemon Parmesan Chicken Skillet

Side angle of a skillet filled with creamy lemon parmesan chicken and garlic.

Ready to dive into the cooking process? Follow these easy steps for a delicious meal:

  1. Season the Chicken: Generously season both sides of the chicken breasts with salt, black pepper, and Italian seasoning.
  2. Heat the Skillet: In a large skillet, heat the olive oil over medium heat. Sear the chicken for 5 to 6 minutes on each side until golden brown. Remove the chicken from the pan and set aside.
  3. Sauté Garlic: Lower the heat and add butter to the skillet. Sauté the minced garlic for about 30 seconds, or until fragrant.
  4. Add Broth and Cream: Pour in the chicken broth and use a spatula to scrape the bottom of the pan to lift those tasty browned bits. Then add the heavy cream and let it simmer gently.
  5. Incorporate Lemon and Parmesan: Stir in the lemon juice, lemon zest, and grated parmesan cheese until the sauce is smooth and thick.
  6. Return Chicken to Skillet: Place the chicken back into the skillet, spooning the sauce over the chicken. Simmer for an additional 5 minutes, allowing the chicken to absorb the flavors.
  7. Garnish and Serve: Taste the sauce and adjust seasoning if needed. Garnish with fresh parsley before serving warm.

Pro Tips for Perfecting Your Dish

Here are some expert insights to ensure your creamy lemon parmesan chicken is a hit:

  • Perfect Texture: Ensure not to boil the sauce; simmer gently to avoid a grainy texture.
  • Fresh Ingredients: Always opt for freshly grated parmesan cheese for the best results.
  • Chicken Thickness: Pound the chicken to an even thickness to ensure it cooks evenly.
  • Adjust Lemon Flavor: If you love lemon, feel free to add more lemon juice or zest for an extra tang.
  • Rest the Chicken: Let the chicken rest for a few minutes after cooking to retain its juices.
  • Make it Creamy: For an even creamier sauce, you can add a splash of cream at the end.
  • Flavor Boost: Add fresh herbs such as thyme or basil for a fresh flavor kick.
  • Serve with Style: Pair this dish with pasta, rice, or a fresh salad for a complete meal.

Common Mistakes and Troubleshooting

Even the best cooks make mistakes! Here are some common pitfalls to avoid:

  • Overcooking the Chicken: Keep an eye on your chicken to prevent it from drying out; it should be cooked until just done.
  • Thick Sauce: If your sauce is too thick, simply add a little more chicken broth or cream to loosen it up.
  • Lack of Flavor: Always taste your sauce before serving and adjust with additional salt, pepper, or lemon juice.
  • Burning Garlic: Garlic can burn quickly, so ensure you sauté it on low heat and for only a short time.

Delicious Variations to Try

This recipe is versatile, allowing for a range of variations. Here are some ideas:

  • Mushroom Add-In: Sauté sliced mushrooms alongside garlic for added depth of flavor.
  • Spinach Delight: Add fresh spinach to the sauce for a boost of nutrition and color.
  • Sun-Dried Tomatoes: Incorporate chopped sun-dried tomatoes for a tangy twist.
  • Herb Swaps: Experiment with fresh herbs like dill or tarragon instead of Italian seasoning for a different flavor profile.

Storage and Make-Ahead Instructions

This creamy lemon parmesan chicken can be made ahead and stored:

  • In the Fridge: Store leftovers in an airtight container for up to 3 days.
  • To Freeze: Freeze the sauce separately from the chicken for up to 2 months. Thaw before reheating.
  • Reheating: Gently reheat on the stove with a splash of chicken broth to bring back the creamy texture.

Nutrition Tips and Dietary Adaptations

Making this dish fit your dietary needs is simple:

  • Low-Carb Option: Serve with zucchini noodles or cauliflower rice for a low-carb meal.
  • Dairy-Free Version: Substitute heavy cream with coconut cream and parmesan with a dairy-free cheese alternative.
  • Gluten-Free: Ensure your chicken broth is gluten-free and enjoy this dish worry-free.

Equipment Recommendations

To make the cooking process smooth, here’s what I recommend:

  • Skillet: A large non-stick or cast-iron skillet is ideal for even cooking.
  • Meat Thermometer: This ensures your chicken reaches an internal temperature of 165°F (75°C).
  • Spatula: A sturdy spatula is helpful for flipping and serving.

Serving Suggestions

To complement your creamy lemon parmesan chicken, consider these serving ideas:

  • Pasta: Serve over fettuccine or linguine for a hearty meal.
  • Rice: Fluffy jasmine or basmati rice absorbs the sauce beautifully.
  • Salad: A fresh green salad balances the richness of the dish.
  • Bread: A warm baguette or garlic bread is perfect for soaking up the sauce.

Frequently Asked Questions (FAQs)

Here are some common questions about this recipe:

  • Can I use frozen chicken? Yes, but thaw it completely before cooking for even results.
  • What can I substitute for heavy cream? Half-and-half or coconut cream can be great alternatives.
  • How do I store leftovers? Keep them in an airtight container in the fridge for up to 3 days.
  • Can I make this dish in advance? Yes, prepare the sauce and chicken separately and combine before serving.
  • Is this recipe gluten-free? Yes, as long as the chicken broth is gluten-free.
  • What side dishes pair well? Rice, pasta, or a fresh salad make excellent sides.
  • How can I make it spicier? Add a pinch of red pepper flakes to the sauce for a kick.
  • Can I use other cheeses? Yes, try mozzarella or asiago for a different flavor.

With this Creamy Lemon Parmesan Chicken Skillet, dinner will never feel boring again! Remember, cooking is about experimenting and enjoying the process. So grab your ingredients and get ready for a delicious meal that’s sure to impress!

Creamy Lemon Parmesan Chicken Skillet

Prep Time 10 minutes
Cook Time 20 minutes
Total Time 30 minutes
Servings 4 servings
Calories 550
A flavorful and creamy chicken dish with zesty lemon and Parmesan, perfect for a quick and satisfying meal.

Ingredients

Chicken

  • 4 pieces chicken breasts
  • 2 tbsp olive oil
  • 2 tbsp butter
  • 4 cloves garlic, minced
  • 1 cup heavy cream
  • 1 cup chicken broth
  • 1 cup grated parmesan cheese
  • 2 tbsp lemon juice
  • 1 tsp lemon zest
  • 1 tsp Italian seasoning
  • Salt to taste Salt
  • Black pepper to taste Black pepper
  • Fresh parsley for garnish Fresh parsley

Instructions 

  • Season chicken with salt, pepper, and Italian seasoning.
  • Heat oil and sear chicken 5-6 mins per side; remove from pan.
  • Add butter and sauté garlic 30 seconds.
  • Pour in broth, add cream, and simmer. Stir in lemon juice, zest, and Parmesan.
  • Return chicken, cook 5 mins, spoon sauce over. Garnish with parsley.

Notes

Adjust seasoning to taste and serve immediately.
Calories: 550kcal
Cost: $15
Course: Main Course
Cuisine: American
Keyword: Chicken

Discover the Joy of Baking: Wholesome Chocolate Chip Protein Muffins

If you’re looking for a delightful and healthy treat that the whole family will love, look no further than these Wholesome Chocolate Chip Protein Muffins. Packed with essential nutrients and made with simple ingredients like Greek yogurt and coconut oil, they offer a perfect balance of flavor and health benefits. Whether it’s for a quick breakfast or a tasty snack, these muffins are designed to make your cooking experience enjoyable and stress-free.

In this comprehensive guide, we’ll explore everything you need to know about making these muffins, including tips, variations, and storage instructions. Let’s dive into the delicious world of protein muffins and unleash your inner baker!

Why You’ll Love This Recipe

Here are just a few reasons why these muffins will become your new favorite:

  • Kid-friendly: With their sweet chocolate chip flavor and moist texture, these muffins are sure to be a hit with kids and adults alike.
  • Extra protein: The addition of Greek yogurt and collagen provides a healthy dose of protein, making them a satisfying option for breakfast or snacks.
  • Quick and easy: Ready in under an hour, these muffins are perfect for busy mornings or last-minute gatherings.
  • Customizable: This recipe allows for various substitutions and additions, so you can tailor them to your family’s tastes.
  • Healthy ingredients: Made with wholesome ingredients like coconut oil and pure maple syrup, these muffins are a guilt-free indulgence.

Ingredients Breakdown and Substitutions

Let’s take a closer look at the ingredients you’ll need and some potential substitutions to make this recipe your own:

  • 2 eggs (room temperature, about 70°F): Eggs help bind the ingredients together; you can substitute with flax eggs for a vegan option.
  • 1/2 cup coconut oil (melted and cooled to room temperature): This oil adds moisture; you can substitute with unsalted butter or applesauce for a lower-fat option.
  • 1 cup Greek yogurt (I prefer Fage 2% for extra creaminess): Greek yogurt adds protein and moisture; dairy-free yogurt works well for a non-dairy option.
  • 1/3 cup maple syrup: This natural sweetener provides flavor; honey or agave syrup can be used instead.
  • 1 tsp vanilla: Vanilla enhances flavor; almond extract is a great alternative.
  • 1.75 cups flour (I always use King Arthur all-purpose flour): All-purpose flour is standard; try whole wheat flour or gluten-free flour for different dietary needs.
  • 2 scoops collagen: Collagen boosts protein; omit if you prefer a non-collagen option or use protein powder.
  • 1 1/4 tsp baking powder: This helps the muffins rise; ensure it’s fresh for best results.
  • 1/2 tsp baking soda: Works with the yogurt for leavening; can be omitted if using self-rising flour.
  • 1/2 tsp salt: Balances the sweetness; use less if on a low-sodium diet.
  • 1/2 tsp ground cinnamon: Adds warmth and flavor; nutmeg is a lovely substitute.
  • 1 cup chocolate chips (I use Enjoy Life mini chips for better distribution): Chocolate chips add a sweet touch; try dried fruits or nuts for a different twist.

Pro Tips for Perfect Muffins

Juicy chocolate chip protein muffin captured from the side, revealing its inviting texture and evenly distributed chocolate chips.

To ensure your muffins turn out perfectly every time, consider these expert insights:

  • Room temperature ingredients: Allow eggs and yogurt to reach room temperature for better mixing.
  • Mix gently: Combine wet and dry ingredients until just mixed to avoid tough muffins.
  • Don’t overfill: Fill muffin cups about 2/3 full to allow for rising.
  • Check for doneness: Insert a toothpick into the center; it should come out clean when done.
  • Let cool: Allow muffins to cool in the pan for a few minutes before transferring to a wire rack.
  • Flavor enhancements: Add nuts or spices like nutmeg for an extra flavor boost.
  • Use mini muffins: For smaller bites, adjust baking time and use a mini muffin pan.
  • Experiment with fillings: Consider adding fruit puree or yogurt into the batter for added moisture and flavor.

Avoid Common Baking Mistakes

Baking can be tricky, but here are some common mistakes to watch for:

  • Overmixing: Mixing too much can lead to dense muffins; mix until just combined.
  • Incorrect oven temperature: Always preheat your oven; use an oven thermometer for accuracy.
  • Skipping the cooling step: Letting them cool helps develop flavor and texture.

Delicious Variations to Try

Feel free to get creative with these variations:

  • Banana Chocolate Chip: Substitute 1 cup of mashed bananas for some of the yogurt for a fruity twist.
  • Berry Blast: Incorporate 1 cup of fresh or frozen berries instead of chocolate chips.
  • Nutty Delight: Add 1/2 cup of walnuts or pecans for a crunchy texture.
  • Spiced Pumpkin: Substitute 1 cup of pumpkin puree and add extra spices for a seasonal treat.

Storage and Make-Ahead Instructions

For optimal freshness, follow these storage tips:

  • Room temperature: Store in an airtight container for up to 3 days.
  • Refrigeration: Keep in the fridge for up to a week if you want them to last longer.
  • Freezing: Muffins can be frozen for up to 3 months. Just thaw before eating.
  • Make-ahead: Prepare the batter the night before and bake in the morning for a quick breakfast.

Frequently Asked Questions

Got questions? We’ve got answers! Here are some common inquiries about these muffins:

  • Can I use a different sweetener? Yes, feel free to substitute with honey or agave syrup.
  • Are these muffins gluten-free? You can use gluten-free flour for a gluten-free option.
  • What can I use instead of Greek yogurt? Any non-dairy yogurt works well as a substitute.
  • Can I add protein powder? Yes, just remember to adjust liquid ingredients if necessary.
  • How do I know when they are done? A toothpick inserted should come out clean when they are fully baked.
  • Can I omit chocolate chips? Absolutely! Try dried fruit or nuts instead.
  • What if I don’t have collagen? You can simply leave it out or use protein powder.
  • How do I make these muffins vegan? Substitute eggs with flax eggs and yogurt with non-dairy yogurt.

Nutritional Tips and Dietary Adaptations

These muffins can easily fit into various dietary preferences:

  • High protein: Keep the Greek yogurt and collagen for an extra protein boost.
  • Dairy-free: Use non-dairy yogurt and ensure your chocolate chips are dairy-free.
  • Lower sugar: Reduce the amount of maple syrup or substitute with a low-calorie sweetener.

Essential Equipment Recommendations

To make this recipe, you’ll need the following:

  • Muffin pan: A standard or mini muffin pan works perfectly.
  • Mixing bowls: Use one for dry ingredients and one for wet.
  • Whisk: A whisk is essential for mixing ingredients smoothly.
  • Measuring cups and spoons: Accurate measurements ensure your muffins come out just right.

Serving Suggestions

These muffins can be enjoyed in many ways:

  • Serve warm: Enjoy fresh from the oven with a pat of butter or a drizzle of honey.
  • Pair with fruit: Serve alongside fresh fruit for a balanced breakfast.
  • With yogurt: Pair with your favorite yogurt for added protein and creaminess.

In conclusion, making Wholesome Chocolate Chip Protein Muffins is a fun and rewarding experience that can bring joy to your kitchen. Remember, cooking doesn’t have to be perfect; it just needs to be enjoyable. With this comprehensive guide, you’re well-equipped to create muffins that are not only healthy but also full of flavor. So gather your ingredients, roll up your sleeves, and let the baking commence!

Chocolate Chip Protein Muffins for Kids

Prep Time 10 minutes
Cook Time 20 minutes
Total Time 30 minutes
Servings 12 muffins
Calories 180
These kid-friendly muffins are packed with protein, chocolate chips, and wholesome ingredients for a delicious snack or breakfast.

Ingredients

Dairy & Eggs

  • 2 pcs eggs (room temperature, about 70°F)
  • 1/2 cup coconut oil (melted and cooled to room temperature)
  • 1 cup greek yogurt (preferably Fage 2% for extra creaminess)
  • 1/3 cup maple syrup
  • 1 tsp vanilla

Dry Ingredients

  • 1.75 cups flour (King Arthur all-purpose flour)
  • 2 scoops collagen
  • 1 1/4 tsp baking powder
  • 1/2 tsp baking soda
  • 1/2 tsp salt
  • 1/2 tsp ground cinnamon

Add-ins

  • 1 cup chocolate chips (Enjoy Life mini chips for better distribution)

Instructions 

  • Preheat oven to 350°F (175°C) and line a muffin tin with paper liners.
  • Mix eggs, coconut oil, Greek yogurt, maple syrup, and vanilla until well combined.
  • In a separate bowl, whisk together flour, collagen, baking powder, baking soda, salt, and cinnamon.
  • Gradually add dry ingredients to wet ingredients, mixing until just combined. Fold in chocolate chips.
  • Divide batter evenly among muffin cups and bake for 20 minutes or until a toothpick inserted comes out clean.

Notes

Store muffins in an airtight container for up to 3 days or freeze for longer storage.
Calories: 180kcal
Cost: $15
Course: Breakfast, Snack
Cuisine: American
Keyword: chocolate, Kids, Protein