Author

Steven

Browsing

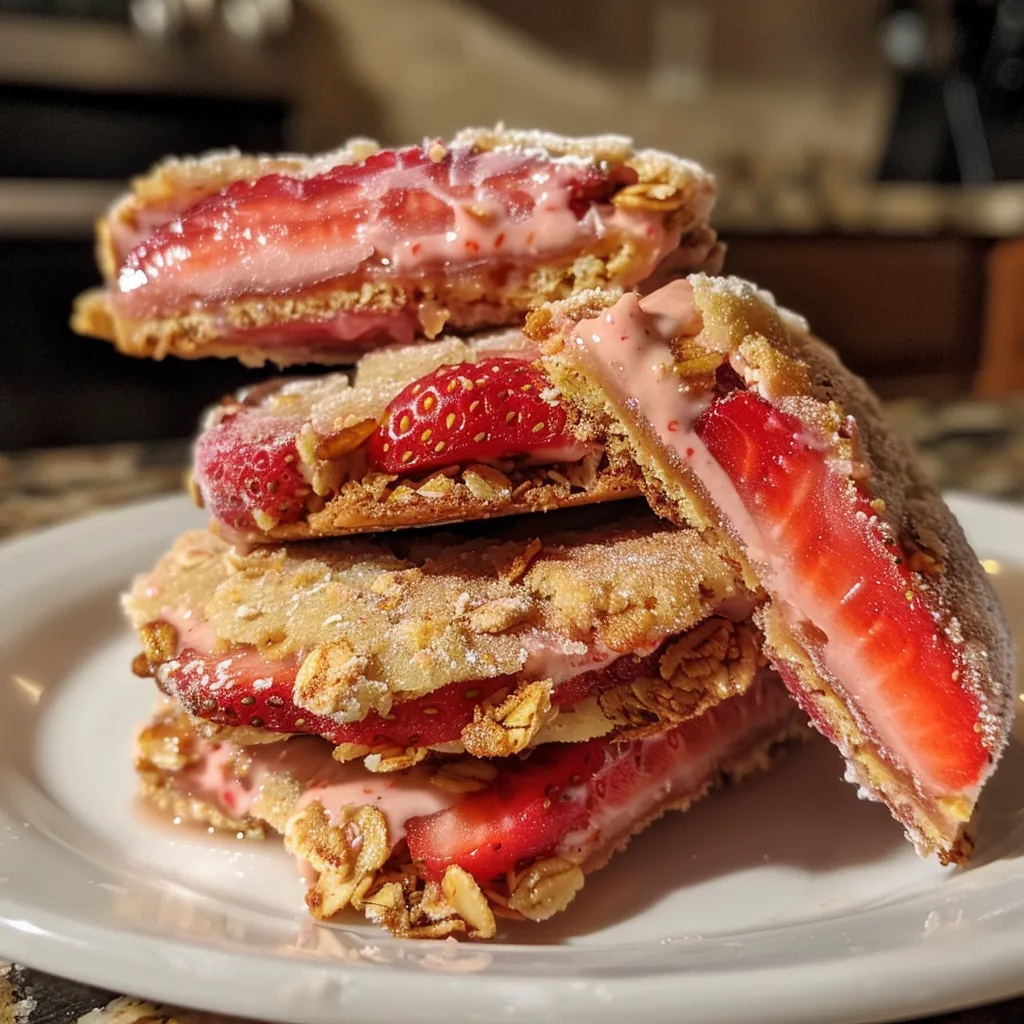
Discover the Joy of No-Bake Frozen Strawberry Yogurt Cookies

Welcome to your new favorite healthy snack! These no-bake frozen strawberry yogurt cookies are the perfect blend of creamy yogurt and fresh strawberries, making them a guilt-free delight that’s easy to whip up. Whether you’re looking for a quick treat after dinner or a refreshing snack on a hot day, this recipe has you covered. Let’s dive into the deliciousness!

Why You’ll Love This Recipe

This recipe is not just about taste; it’s about bringing joy and ease into your cooking routine. Here are five reasons why you’ll fall in love with these no-bake frozen strawberry yogurt cookies:

  • Quick and Easy: With minimal prep time, you can have these cookies ready in just minutes, plus a little freeze time.
  • Healthy Ingredients: Made with Greek yogurt and fresh strawberries, these cookies are not only tasty but also packed with nutritional benefits.
  • No-Bake Convenience: Perfect for those hot summer days when you don’t want to turn on the oven.
  • Customizable: Easily tweak the recipe with your favorite fruits or toppings to make it your own.
  • Kid-Friendly: A fun and healthy treat that kids will love and can help make, encouraging them to enjoy cooking!

Ingredients Breakdown

To make these delicious cookies, you’ll need just a few simple ingredients. Here’s what you’ll need:

  • 1 cup plain or vanilla Greek yogurt: This provides a creamy base and is packed with protein.
  • 1/2 cup chopped fresh strawberries: Fresh strawberries give the cookies a burst of flavor and natural sweetness.
  • 1–2 teaspoons honey or maple syrup (optional): This adds a touch of sweetness, but feel free to skip it if your strawberries are sweet enough.
  • 1/2 teaspoon vanilla extract: Enhances the overall flavor of the cookies.
  • 1/4 cup granola: Adds a delightful crunch on top and can be substituted with nuts or seeds if you prefer.

Step-by-Step Instructions

Side view of yogurt cookies with strawberries, captured on a wooden surface.

Making these cookies is as easy as 1-2-3! Follow these simple steps:

  1. In a bowl, stir together the Greek yogurt, chopped strawberries, vanilla extract, and sweetener (if using).
  2. Spoon the mixture into silicone cookie molds or muffin liners.
  3. Sprinkle granola on top and gently press it in.
  4. Freeze for 2–3 hours, or until solid.
  5. Once frozen, pop them out of the molds and store in a freezer-safe container. Enjoy them straight from the freezer!

Pro Tips for the Best Cookies

To ensure your frozen strawberry yogurt cookies turn out perfectly every time, consider these expert tips:

  • Use ripe strawberries: This will enhance the flavor and sweetness of your cookies.
  • Experiment with yogurt: Try flavored Greek yogurt for an extra layer of taste.
  • Don’t overmix: Gently fold the strawberries into the yogurt to maintain their texture.
  • Try different molds: Use fun shapes to make these cookies more appealing to kids.
  • Allow ample freezing time: Make sure they are completely frozen before serving for the best texture.
  • Store properly: Keep them in an airtight container to prevent freezer burn.
  • Double the batch: These cookies can be stored for up to 2 months in the freezer, so make extra to have on hand!
  • Check for doneness: If they feel soft, give them a little more time in the freezer.

Common Mistakes and Troubleshooting

Even the best of us make mistakes! Here are some common pitfalls to avoid:

  • Using overly soft yogurt: This can lead to a watery mixture. Choose a thicker Greek yogurt for best results.
  • Not pressing granola in enough: If it’s not pressed down, it may fall off after freezing. Make sure to gently press it into the mixture.
  • Skipping the freeze time: These cookies need sufficient time to set. Don’t rush this step!
  • Not adjusting sweetness: Always taste your mixture before freezing. If it’s not sweet enough, add a bit more honey or syrup.

Creative Variations to Try

Feeling adventurous? Here are some great variations to switch things up:

  • Banana Chocolate Chip: Substitute strawberries for mashed bananas and add mini chocolate chips for a sweet twist.
  • Berry Blast: Mix different berries like blueberries and raspberries for a colorful cookie.
  • Nutty Delight: Add chopped nuts or seeds into the yogurt mixture for added texture and nutrition.
  • Coconut Bliss: Mix in shredded coconut for a tropical touch.

Storage and Make-Ahead Instructions

These cookies are perfect for meal prep:

  • Storage: Keep your cookies in an airtight container in the freezer. They can last up to two months.
  • Make-ahead tip: Prepare a batch on the weekend for easy snacks throughout the week!

Frequently Asked Questions

Got questions? We’ve got answers! Here are some FAQs about these delicious cookies:

  • Can I use frozen strawberries? Yes, but make sure to thaw and drain any excess moisture before using them in the recipe.
  • How do I avoid a watery mixture? Stick to thicker Greek yogurt and ensure the strawberries are well-drained if using frozen ones.
  • Can I make these cookies vegan? Absolutely! Substitute Greek yogurt with a plant-based yogurt and use maple syrup as a sweetener.
  • What if I don’t have molds? You can use muffin liners or even ice cube trays to shape your cookies.
  • How do I know when they’re ready? They should feel firm to the touch, and not soft or mushy.
  • Can I add protein powder? Yes, adding a scoop of protein powder can enhance the nutritional value.
  • Are these cookies suitable for kids? Definitely! They make for a fun and healthy snack for children.
  • How do I serve them? Enjoy them straight from the freezer or let them sit out for a few minutes to soften slightly before indulging!

Nutritional Tips and Dietary Adaptations

These cookies are a healthy choice, but here’s how you can adapt them further:

  • Low-Sugar Option: Use a sugar substitute like stevia or erythritol if you’re watching your sugar intake.
  • High-Protein Version: Opt for high-protein Greek yogurt or add protein powder to enhance the protein content.
  • Dairy-Free Option: Use coconut yogurt or almond milk yogurt for a dairy-free version.

Equipment Recommendations

To make these cookies, you’ll need:

  • Mixing Bowl: For combining your ingredients.
  • Spoon or Spatula: To stir and scoop the mixture.
  • Silicone Molds: Perfect for shaping your cookies without sticking.
  • Freezer-Safe Container: For storing your finished cookies.

Serving Suggestions

Serve these cookies as a delightful snack or dessert! Here are some fun ideas:

  • As a Breakfast Treat: Pair with a smoothie for a refreshing start to your day.
  • Post-Workout Snack: These cookies are a great source of protein and carbohydrates to refuel your body.
  • Party Platter: Serve alongside other healthy snacks at gatherings for a guilt-free dessert option.
  • Kid’s Lunch Box: A fun and nutritious treat to tuck into your child’s lunch!

In Conclusion

These no-bake frozen strawberry yogurt cookies are not just a recipe—they’re a way to make healthy eating enjoyable and stress-free! With simple ingredients and easy steps, you can create a delightful snack that everyone will love. So grab your ingredients, get creative, and enjoy the process—happy cooking!

Frozen Strawberry Yogurt Cookies : Healthy No-Bake Snack Meets Dessert

Prep Time 10 minutes
Total Time 10 minutes
Servings 8 cookies
Calories 80
These healthy, no-bake frozen yogurt cookies combine fresh strawberries and creamy Greek yogurt for a delicious and guilt-free treat.

Ingredients

Dairy

  • 1 cup plain or vanilla Greek yogurt
  • 1/2 cup chopped fresh strawberries
  • 1–2 teaspoons honey or maple syrup (optional, to taste)
  • 1/2 teaspoon vanilla extract
  • 1/4 cup granola

Instructions 

  • Mix yogurt, strawberries, vanilla, and sweetener (if using).
  • Spoon mixture into silicone molds or muffin liners.
  • Sprinkle granola on top and press gently.
  • Freeze for 2–3 hours until solid.
  • Remove from molds and store in a freezer-safe container. Enjoy straight from the freezer.

Notes

Use ripe strawberries for the best flavor.
Calories: 80kcal
Cost: $10
Course: Dessert, Snack
Cuisine: Healthy
Keyword: Strawberry, Yogurt

Welcome to the World of Fluffy Baked Cottage Cheese Eggs

If you’re looking for a delicious and nutritious breakfast that’s quick to prepare, you’ve come to the right place! This recipe for Baked Cottage Cheese Eggs is not only simple but also packed with protein, making it a perfect choice for a low-carb meal. Let’s dive into how you can create this fluffy delight that’s sure to impress your family or fuel your busy day.

Why You’ll Love This Recipe

This dish is a true game changer for breakfast lovers. Here are some benefits that make it a must-try:

  • High Protein Content: Each serving packs a whopping 28g of protein, making it an excellent choice for muscle maintenance and satiety.
  • Quick & Easy Prep: With just a few simple ingredients and minimal prep time, you can whip this up in under 10 minutes!
  • Customizable: Whether you’re a veggie lover or prefer a plain dish, this recipe allows you to tailor it to your taste.
  • Low Carb: Perfect for those following a low-carb or keto diet, this dish is filling without the extra carbs.
  • Meal Prep Friendly: Make a big batch to enjoy throughout the week, making your mornings more manageable.

Ingredient Breakdown

Let’s take a closer look at the ingredients that make these Baked Cottage Cheese Eggs a flavor powerhouse. Here’s what you’ll need:

  • 4 large eggs: The base of your dish; they provide structure and a protein boost.
  • ½ cup cottage cheese: This creamy ingredient adds richness and moisture.
  • ¼ cup shredded cheddar cheese: For a melty, cheesy flavor that elevates the dish.
  • 2 tbsp chopped spinach (optional): A great way to sneak in some greens!
  • 1 tbsp butter or olive oil: For greasing the baking dish and adding flavor.
  • ¼ tsp salt: Enhances all the flavors.
  • ¼ tsp black pepper: Adds a touch of spice.
  • ¼ tsp garlic powder (optional): For a savory kick.

Ingredient Substitutions

Don’t have all the ingredients on hand? Here are some easy substitutions:

  • Egg Whites: For a lighter version, you can use egg whites instead of whole eggs.
  • Greek Yogurt: Swap cottage cheese for Greek yogurt for a tangy flavor and extra protein.
  • Any Cheese: Feel free to use your favorite cheese instead of cheddar—goat cheese or feta work wonderfully!
  • Any Vegetables: Use whatever veggies you have on hand, like bell peppers, onions, or mushrooms.

Step-by-Step Instructions

Juicy baked cottage cheese eggs with a rich, golden crust, garnished with spinach and herbs.

Ready to get cooking? Follow these simple steps:

  1. Preheat the Oven: Preheat your oven to 350°F (175°C) to ensure it’s ready for baking.
  2. Prepare Your Baking Dish: Grease a baking dish with butter or olive oil to prevent sticking.
  3. Mix Ingredients: In a bowl, whisk together the eggs, cottage cheese, shredded cheese, salt, pepper, and optional garlic powder until well combined.
  4. Add Vegetables: If using, fold in the chopped spinach or any other vegetables you prefer.
  5. Pour into the Dish: Transfer the mixture into the prepared baking dish.
  6. Bake: Bake in the preheated oven for 25-30 minutes, or until the eggs are set and the top is golden brown.
  7. Cool & Serve: Allow to cool slightly before slicing and serving. Enjoy your fluffy baked goodness!

Pro Tips for Perfect Baked Cottage Cheese Eggs

Here are some expert insights to help you achieve the best results:

  • Use Fresh Ingredients: Fresh eggs and cottage cheese will yield the best flavor and texture.
  • Experiment with Herbs: Don’t hesitate to add fresh herbs like basil or chives for an aromatic touch.
  • Check for Doneness: The dish is done when the center is set and a toothpick comes out clean.
  • Mix it Up: Use an immersion blender for a smoother texture if you prefer a fluffier consistency.
  • Let it Rest: Allow the dish to sit for a few minutes after baking for easier slicing.
  • Try Different Cheeses: Mix in different cheeses for a unique flavor profile.
  • Serve with Salsa: A dollop of salsa or hot sauce adds a fantastic kick!
  • Storage Tips: Store leftovers in an airtight container in the refrigerator for up to 3 days.

Common Mistakes & Troubleshooting

Here are some pitfalls to avoid:

  • Overmixing: Avoid overmixing the egg mixture to keep it fluffy.
  • Not Preheating: Skipping this step can lead to uneven cooking.
  • Underbaking: Make sure the eggs are fully set before removing from the oven.

Variations to Try

Feel free to mix things up with these variations:

  • Southwestern Style: Add diced jalapeños and corn for a spicy twist.
  • Mediterranean Delight: Incorporate sun-dried tomatoes, olives, and feta cheese.
  • Italian Herb: Mix in Italian seasoning and serve with marinara sauce on the side.
  • Breakfast Burrito: Serve in a tortilla with avocado and salsa for a hearty breakfast.

Storage and Make-Ahead Instructions

This dish is perfect for meal prep! Here’s how to store and reheat:

  • Make Ahead: Assemble the ingredients the night before and bake in the morning.
  • Refrigeration: Store leftovers in an airtight container for up to 3 days.
  • Freezing: This dish can also be frozen! Cut into portions and freeze in freezer-safe bags for up to 2 months.
  • Reheating: Reheat in the microwave or oven until warmed through.

Frequently Asked Questions

Here are some common questions about Baked Cottage Cheese Eggs:

  • Can I use egg substitutes? Yes, egg substitutes or egg whites can be used for a lighter dish.
  • What can I use instead of cottage cheese? Greek yogurt or ricotta can be good alternatives.
  • How do I know when it’s done? The dish should be set in the center and golden on top.
  • Can I add meat? Absolutely! Cooked bacon or sausage can be mixed in for extra flavor.
  • Is this dish gluten-free? Yes, all the ingredients are gluten-free!
  • How long can I store it? Store leftovers in the fridge for up to 3 days or freeze for up to 2 months.
  • Can I make it vegan? You can use tofu or chickpea flour as an egg substitute for a vegan version.
  • What’s the best way to serve it? This dish is great on its own, or you can serve it with toast or a side salad.

Nutritional Information

Here’s a quick look at the nutritional benefits:

  • Calories: Approximately 250 per serving
  • Protein: 28g
  • Carbohydrates: 6g
  • Fat: 15g

Equipment Recommendations

For best results, here’s what you’ll need:

  • Mixing Bowls: For combining the ingredients.
  • Whisk: To whisk the eggs and mix ingredients smoothly.
  • Baking Dish: A 9×9 inch baking dish works well.
  • Measuring Cups and Spoons: For precise ingredient measurements.

Serving Suggestions

Serve your Baked Cottage Cheese Eggs with:

  • Fresh Herbs: Sprinkle with fresh parsley or chives for added flavor.
  • Avocado Slices: Creamy avocado complements the dish beautifully.
  • Salsa or Hot Sauce: For a spicy kick, top with your favorite salsa or hot sauce.
  • Toast or Muffins: Pair with whole-grain toast or a muffin for a complete meal.

Conclusion

Now that you have the ultimate guide to making Baked Cottage Cheese Eggs, it’s time to get cooking! With its incredible flavor, protein-packed goodness, and versatility, this recipe is sure to become a staple in your kitchen. Remember, cooking is about enjoying the process, so relax and have fun experimenting with different ingredients. Happy cooking!

Baked Cottage Cheese Eggs Recipe

Prep Time 5 minutes
Cook Time 15 minutes
Total Time 20 minutes
Servings 2 servings
Calories 220
A quick and nutritious baked egg dish combining cottage cheese and optional spinach for a protein-packed breakfast or snack.

Ingredients

Eggs

  • 4 large eggs

Cottage Cheese

  • 0.5 cup cottage cheese

Shredded Cheddar Cheese

  • 0.25 cup shredded cheddar cheese

Chopped Spinach (optional)

  • 2 tbsp chopped spinach (optional)

Butter or Olive Oil

  • 1 tbsp butter or olive oil

Salt

  • 0.25 tsp salt

Black Pepper

  • 0.25 tsp black pepper

Garlic Powder (optional)

  • 0.25 tsp garlic powder (optional)

Instructions 

  • Preheat oven to 375°F (190°C).
  • In a bowl, whisk eggs, cottage cheese, salt, black pepper, and garlic powder.
  • Stir in shredded cheddar cheese and chopped spinach (if using).
  • Melt butter or heat olive oil in a baking dish, then pour the egg mixture into it.
  • Bake for 15 minutes until set and golden on top. Serve warm.

Notes

You can add more vegetables or cheese for extra flavor.
Calories: 220kcal
Cost: $5
Course: Breakfast
Cuisine: American
Keyword: Cottage Cheese, Eggs

Unlock the Flavor: Your Ultimate Guide to Easy Stuffed Bell Peppers

Welcome to the world of cooking where creativity meets comfort! If you’re looking for a dish that’s not only easy to prepare but also bursting with flavor, you’ve come to the right place. Today, we’ll dive deep into the art of making easy stuffed bell peppers. This recipe combines juicy ground beef, fluffy rice, and melty cheese, all nestled inside vibrant bell peppers. It’s a delightful dish that the whole family will love, making it perfect for weeknight dinners or weekend gatherings.

Get ready to impress your loved ones with a meal that’s as beautiful as it is delicious. Whether you’re a seasoned chef or just starting, this recipe will guide you through every step, ensuring you feel confident and excited to cook!

Why You’ll Love This Recipe

  • Quick and Easy: With minimal prep and cooking time, these stuffed bell peppers are perfect for busy evenings.
  • Customizable: This recipe is a blank canvas! Feel free to swap out ingredients based on your preferences or dietary needs.
  • Colorful Presentation: The vibrant colors of the bell peppers make for a visually stunning dish that will brighten up your dinner table.
  • Comfort Food: A hearty filling of ground beef and rice wrapped in tender peppers creates a cozy, satisfying meal.
  • Great for Meal Prep: Stuffed peppers can be made ahead of time, making them an excellent option for meal prepping or freezing.

Gathering Your Ingredients: What You’ll Need

To create these delightful stuffed bell peppers, you’ll need the following ingredients:

  • 4 Bell peppers: Choose a mix of colors for a beautiful presentation. Red, yellow, green, or orange all work!
  • 1 pound Ground beef: This is the classic choice, but feel free to substitute with ground turkey or chicken for a leaner option.
  • 1 cup Cooked rice: White or brown rice works well. Quinoa is also a great alternative if you’re looking for a gluten-free option.
  • 1 medium Onion: Chopped finely to add sweetness and depth of flavor.
  • 1 (15-ounce) can Tomato sauce: This adds moisture and richness to the filling.
  • 1 teaspoon Italian seasoning: A blend of herbs that complements the dish beautifully.
  • 1/2 teaspoon Garlic powder: For that aromatic punch.
  • 1 cup Shredded cheddar cheese: The ultimate melty topping that brings it all together.

Step-by-Step Instructions: How to Make Easy Stuffed Bell Peppers

Now that you have your ingredients prepped, let’s get cooking!

  1. Preheat your oven: Set your oven to 375°F (190°C) to ensure it’s hot and ready for your stuffed peppers.
  2. Brown the ground beef: In a large skillet over medium-high heat, add the ground beef and cook until browned. Drain any excess grease.
  3. Add the onions: Toss the chopped onions into the skillet and sauté until softened, about 5 minutes.
  4. Mix in the filling: Stir in the cooked rice, half of the tomato sauce, Italian seasoning, and garlic powder. Mix until well combined.
  5. Stuff the peppers: Take each bell pepper and fill them generously with the beef and rice mixture.
  6. Prepare for baking: Place the stuffed peppers in a baking dish and pour the remaining tomato sauce over the top of each pepper.
  7. Bake: Cover the dish with foil and bake for 30 minutes. Remove the foil, sprinkle with shredded cheddar cheese, and bake for an additional 10-15 minutes, or until the cheese is melted and bubbly.

Pro Tips for Perfect Stuffed Peppers

  • Choose ripe peppers: Look for firm, shiny peppers with no blemishes for the best flavor.
  • Don’t overstuff: Leave a little room at the top of the peppers to allow for expansion while cooking.
  • Pre-cook the rice: Make sure your rice is cooked beforehand to avoid undercooked rice in the final dish.
  • Experiment with spices: Feel free to add your favorite spices or herbs to the filling for a personal touch.
  • Use leftovers creatively: If you have leftover filling, use it as a topping for baked potatoes or mix it into a salad.
  • Keep the heat in check: If you enjoy a little spice, consider adding diced jalapeños or crushed red pepper to the filling.
  • Garnish with fresh herbs: Top with fresh parsley or cilantro after baking for a burst of freshness.

Common Mistakes and Troubleshooting

Even the best cooks can run into issues. Here are some common mistakes to avoid:

  • Underseasoning: Make sure to taste your filling before stuffing the peppers. Adjust seasoning as necessary.
  • Overcooking the peppers: If your peppers are too soft, they may fall apart. Bake them just until tender.
  • Not using enough moisture: If your filling is dry, add a splash of broth or more tomato sauce to keep it moist.

Variations to Try

Feel free to get creative! Here are some delicious variations to this basic recipe:

  • Vegetarian Stuffed Peppers: Replace ground beef with lentils or black beans, and add more veggies like zucchini or corn.
  • Southwestern Style: Incorporate corn, black beans, and taco seasoning for a zesty twist.
  • Cheesy Spinach and Feta: Use spinach, feta cheese, and rice for a Mediterranean flair.
  • Italian Sausage Version: Substitute ground beef with Italian sausage and add diced tomatoes for a richer flavor.

Storage and Make-Ahead Instructions

These stuffed peppers are perfect for meal prep! Here’s how to store and reheat them:

  • Refrigerate: Store leftover stuffed peppers in an airtight container in the fridge for up to 3 days.
  • Freeze: Assemble the peppers but do not bake them. Wrap them individually in plastic wrap and freeze for up to 3 months.
  • Reheat: Bake frozen peppers at 350°F (175°C) for about 45-50 minutes, until heated through.

Frequently Asked Questions (FAQs)

  • Can I use different types of meat? Yes! Ground turkey, chicken, or even plant-based alternatives work well.
  • What if I don’t have tomato sauce? Substitute with diced tomatoes or make a simple sauce with crushed tomatoes and herbs.
  • Can I make these ahead of time? Absolutely! You can prepare them up to 24 hours in advance and store them in the fridge before baking.
  • How can I ensure the peppers are tender? Bake them covered initially to steam and soften, then uncover for a nice finish.
  • What sides go well with stuffed peppers? Pair them with a simple green salad, garlic bread, or a side of roasted vegetables.
  • Can I use quinoa instead of rice? Yes, quinoa is a fantastic substitute for a nutritious twist!
  • How can I make these gluten-free? Ensure all ingredients are gluten-free, including the tomato sauce, and use rice or quinoa.
  • What’s the best way to serve leftover stuffed peppers? Slice them in half and serve over a bed of salad or pasta for a different meal.

Nutritional Tips and Dietary Adaptations

For a healthier take on this dish, consider the following adaptations:

  • Lean Proteins: Opt for lean ground turkey or chicken instead of beef to reduce fat content.
  • Whole Grains: Use brown rice or quinoa for added fiber and nutrients.
  • More Veggies: Incorporate extra vegetables into the filling for added vitamins and minerals.
  • Cheese Alternatives: Use low-fat cheese or nutritional yeast for a dairy-free option.

Essential Equipment for Success

To make your cooking experience smooth, here are some recommended tools:

  • Sharp knife: For cleanly chopping vegetables.
  • Large skillet: Ideal for browning meat and sautéing onions.
  • Baking dish: A sturdy baking dish is essential for holding your stuffed peppers.
  • Measuring cups and spoons: Ensure accuracy in your ingredient amounts.

Serving Suggestions: What to Pair with Stuffed Peppers

These stuffed bell peppers are versatile and can be served with a variety of sides:

  • Garlic bread: A crunchy side that’s perfect for soaking up any leftover sauce.
  • Simple salad: A fresh side salad with vinaigrette balances the richness of the stuffed peppers.
  • Roasted vegetables: A medley of seasonal veggies roasted to perfection complements the dish well.

Conclusion: Your New Favorite Dinner Awaits!

Now that you have all the tips and tricks to create these easy stuffed bell peppers, it’s time to roll up your sleeves and get cooking! Remember, cooking is about enjoying the process and getting a little creative in the kitchen. Don’t hesitate to put your spin on this recipe. With its comforting flavors and beautiful presentation, this dish is sure to become a family favorite. Happy cooking!

Easy Stuffed Bell Peppers Recipe

Prep Time 10 minutes
Cook Time 40 minutes
Total Time 50 minutes
Servings 4 servings
Calories 450
A delicious and hearty dish perfect for a quick dinner. Colorful bell peppers are filled with savory ground beef and rice, topped with melted cheese.

Ingredients

Bell Peppers

  • 1 pound Ground beef
  • 1 cup Cooked rice
  • 1 medium Onion (chopped)
  • 1 15 ounce can Tomato sauce
  • 1 teaspoon Italian seasoning
  • 1/2 teaspoon Garlic powder
  • 1 cup Shredded cheddar cheese

Instructions 

  • Preheat oven to 375°F (190°C). Brown ground beef in a skillet, then drain.
  • Add chopped onion to beef and cook until softened. Mix in cooked rice, half of tomato sauce, Italian seasoning, and garlic powder.
  • Stuff each bell pepper with the beef mixture. Place in a baking dish and pour remaining tomato sauce over.
  • Cover with foil and bake for 30 minutes. Remove foil, sprinkle cheese, and bake 10-15 minutes until cheese melts.

Notes

For a healthier option, use lean ground turkey or chicken.
Calories: 450kcal
Cost: $15
Course: Main Course
Cuisine: American
Keyword: Stuffed Peppers

Start Your Day Right with Wholesome Strawberry Oat Bars

There’s nothing quite like the taste of fresh strawberries baked into a warm, crumbly oat bar to kickstart your morning! These strawberry oat bars are not only delicious but also incredibly easy to make, making them the ideal breakfast treat for busy people. With vibrant flavors and nourishing ingredients, they provide a bright morning boost that will keep you energized throughout the day. Let’s dive into how you can make these delightful bars!

Why You’ll Love This Recipe

Before we get into the nitty-gritty of the recipe, here’s why these strawberry oatmeal bars will become a staple in your kitchen:

  • Quick and Easy: With just a few simple steps, you can whip up a batch in under an hour.
  • Versatile Ingredients: Use fresh strawberries or even frozen ones; this recipe adapts well to whatever you have on hand.
  • Healthier Option: Packed with oats and fruit, these bars are a nutritious choice that can keep you feeling full longer.
  • Perfect for Meal Prep: Make these bars ahead of time, and enjoy them throughout the week as a convenient breakfast or snack.
  • Customizable: Feel free to experiment with different fruits or add-ins to make the recipe your own!

Ingredients Breakdown

Let’s gather everything you need for these strawberry oat bars. Here’s a detailed breakdown of the ingredients, along with some handy substitutions:

  • 1 cup rolled oats: For a heartier texture, use old-fashioned oats; quick oats work too if that’s what you have.
  • 3/4 cup all-purpose flour: You can substitute with whole wheat flour for a nuttier flavor or use gluten-free flour blends to make these bars gluten-free.
  • 1/2 cup light brown sugar: If you prefer less sweetness, you can reduce this amount or use coconut sugar as an alternative.
  • 1/2 teaspoon ground ginger: This adds a lovely warmth to the bars; feel free to leave it out if you’re not a fan.
  • Pinch of salt: Essential for enhancing flavor.
  • 8 tablespoons unsalted butter, melted: For a dairy-free version, you can substitute with coconut oil.
  • 2 cups strawberries, small-diced: Fresh strawberries are best, but frozen will work if thawed and drained well.
  • 1 teaspoon cornstarch: This helps thicken the strawberry filling; you can also use arrowroot powder.
  • 2 tablespoons lemon juice: Freshly squeezed is best to brighten the flavors.
  • 1 tablespoon granulated sugar: Just a touch to sweeten the strawberry filling.

Step-by-Step Instructions

Now, let’s get to the fun part! Here’s how to make your delicious strawberry oat bars:

  1. Prepare the crust: In a medium bowl, combine rolled oats, flour, brown sugar, ginger, and salt. Add melted butter and mix until coarse crumbs form.
  2. Preheat the oven: Set your oven to 350°F (175°C). Grease and flour an 8×8 inch baking pan to ensure easy removal later.
  3. Form the base: Press two-thirds of the oat mixture firmly into the bottom of the prepared baking pan.
  4. Make the strawberry filling: In a separate bowl, combine diced strawberries, cornstarch, lemon juice, and granulated sugar. Toss to coat the strawberries evenly.
  5. Assemble: Spread the strawberry mixture evenly over the oat base. Sprinkle the remaining oat crumble mixture over the strawberries to create a nice topping.
  6. Bake: Place your pan in the oven and bake for 30-35 minutes, or until the topping is golden brown and the filling is bubbling.
  7. Cool and serve: Let the bars cool completely in the pan before lifting out and cutting into squares.

Pro Tips for Perfect Strawberry Oat Bars

Want to take your strawberry oatmeal bars to the next level? Here are some expert insights:

  • Don’t skip the cooling: Allow the bars to cool completely to ensure they hold their shape when cut.
  • Use ripe strawberries: The riper the strawberries, the sweeter and more flavorful your filling will be.
  • Store it right: Keep your oat bars in an airtight container to maintain freshness.
  • Experiment with flavors: Add spices like cinnamon or nutmeg for a warm twist!
  • Try a glaze: Drizzle a simple glaze made from powdered sugar and lemon juice over the cooled bars for added sweetness.
  • Double the batch: Make a larger batch and freeze some bars for quick breakfasts on busy mornings.
  • Mix in nuts: Adding chopped nuts like walnuts or pecans can enhance texture and flavor.
  • Use parchment paper: Lining your baking pan with parchment paper can make removal and cleanup a breeze.

Common Mistakes and Troubleshooting

Even experienced bakers can run into hiccups. Here are some common mistakes and how to avoid them:

  • Bars falling apart: Make sure to press the base firmly into the pan before adding the filling.
  • Too dry or crumbly: If your mixture seems dry, a little extra melted butter or a splash of milk can help bind it together.
  • Burnt edges: If your bars are browning too quickly, cover them with foil during the last few minutes of baking.
  • Undercooked filling: Ensure your filling is bubbling before removing the bars from the oven.

Delicious Variations

Feeling adventurous? Here are some fun variations to switch things up:

  • Berry medley: Swap strawberries for mixed berries like blueberries, raspberries, or blackberries for a fruity twist.
  • Nutty addition: Incorporate chopped nuts like almonds or pecans for an extra crunch!
  • Chocolate chips: Add a handful of dark chocolate chips to the oat mixture for a sweet surprise.
  • Coconut flakes: Mix in unsweetened shredded coconut for a tropical flair.

Storage and Make-Ahead Instructions

These strawberry oat bars store beautifully and can be made ahead of time:

  • Room temperature: Keep the bars in an airtight container for up to 3 days at room temperature.
  • Refrigerator: For longer freshness, store them in the fridge for up to a week.
  • Freezing: Wrap individual bars in plastic wrap and place them in a freezer bag for up to 3 months. Thaw overnight in the fridge when ready to enjoy.

Comprehensive FAQ

Got questions? Here are answers to some frequently asked questions about these delicious strawberry oatmeal bars:

  • Can I make these bars gluten-free? Yes! Substitute the all-purpose flour with a gluten-free blend.
  • What if I don’t have fresh strawberries? You can use frozen strawberries—just make sure to thaw and drain them first.
  • Can I add more sugar? Absolutely! Adjust the sugar to your taste preferences, but be aware it may alter the texture.
  • How do I know when they are done baking? The edges should be golden brown and the filling should be bubbling.
  • Can I use other fruits? Yes! Feel free to experiment with fruits like peaches, apples, or blueberries.
  • Do I need to grease the pan? Yes, greasing and flouring the pan prevents the bars from sticking.
  • Can I make these vegan? Substitute the butter with coconut oil and use a flax egg instead of a regular egg if needed.
  • How do I serve these bars? They’re delicious as is, or you can serve them with yogurt or whipped cream for an extra treat!

Nutrition Tips and Dietary Adaptations

These strawberry oat bars can be adapted to fit various dietary needs:

  • Low sugar: Reduce the sugar content or use a sugar substitute for a healthier version.
  • Vegan: Substitute butter with coconut oil and use plant-based milk if needed.
  • Protein boost: Add protein powder to the oat mixture for an extra nutritional kick.

Recommended Equipment

Before you start baking, here’s a quick list of essential tools you’ll need:

  • Mixing bowls: For combining your ingredients.
  • Baking pan: An 8×8 inch pan is perfect for this recipe.
  • Measuring cups and spoons: Accurate measurements are key to successful baking.
  • Spatula: To help you spread the filling and mix ingredients.

Serving Suggestions

Enjoy these strawberry oat bars in various ways:

  • With yogurt: Serve with a dollop of Greek yogurt for added creaminess and protein.
  • Drizzled with honey: A drizzle of honey adds sweetness and pairs beautifully with the strawberries.
  • As a dessert: Warm them up and serve with vanilla ice cream for a delightful treat!

Conclusion

These wholesome strawberry oat bars are more than just a breakfast option; they’re a versatile treat that can brighten any meal. With their delightful taste and easy preparation, you’ll wonder how you ever lived without them. So gather your ingredients, and let’s make some magic happen in the kitchen!

Strawberry Oat Bars - Delicious Breakfast Treat

Prep Time 15 minutes
Cook Time 35 minutes
Total Time 50 minutes
Servings 9 bars
Calories 250
Enjoy these easy-to-make strawberry oat bars, perfect for a wholesome breakfast or snack.

Ingredients

Dough and topping

  • 1 cup rolled oats
  • 3/4 cup all-purpose flour
  • 1/2 cup light brown sugar
  • 1/2 teaspoon ground ginger
  • Pinch salt
  • 8 tablespoons unsalted butter, melted
  • 2 cups strawberries, small-diced
  • 1 teaspoon cornstarch
  • 2 tablespoons lemon juice
  • 1 tablespoon granulated sugar

Instructions 

  • Mix oats, flour, sugar, ginger, and salt. Add melted butter and combine.
  • Preheat oven to 350°F (175°C). Press two-thirds of the oat mixture into a pan.
  • Combine strawberries, cornstarch, lemon juice, and sugar. Toss to coat.
  • Spread strawberry mixture over base. Sprinkle remaining oat mixture on top.
  • Bake for 30-35 minutes until golden and bubbling. Cool before cutting.

Notes

Store in an airtight container for up to 3 days.
Calories: 250kcal
Cost: $12
Course: Breakfast
Keyword: Strawberry

Welcome to Your New Favorite Recipe: A Cozy Bowl of Spiced Lentil Soup

Hey there, fellow food lovers! If you’re looking for a comforting, nourishing meal that warms you from the inside out, you’ve landed in the right place. Today, we’re diving into a delightful recipe for Spiced Lentil Soup that not only promises to be a feast for your taste buds but also offers a wealth of health benefits. This soup is perfect for busy weeknights, requiring just one pot and a handful of ingredients. Let’s get started on this culinary adventure!

Why You’ll Love This Recipe

This isn’t just any soup; it’s a bowl filled with warmth, flavor, and nutrition! Here are a few reasons why this lentil soup will become a staple in your kitchen:

  • Quick and Easy: Ready in under 40 minutes, this recipe is perfect for those hectic evenings.
  • One-Pot Wonder: Minimal cleanup is required since everything is cooked in a single pot!
  • Nutritious Ingredients: Packed with lentils, veggies, and spices, this soup is loaded with protein and fiber.
  • Customizable: Feel free to add in your favorite vegetables or proteins to make it your own!
  • Freezer-Friendly: Make a big batch and store it for those days when you need a quick meal.

The Ingredients: What You’ll Need

Gathering your ingredients is the first step to kitchen success. Here’s what you’ll need for our Spiced Lentil Soup:

  • 1 tablespoon olive oil: Our cooking fat, adding a subtle fruitiness to the base.
  • 1 onion, diced: The aromatic foundation that brings sweetness and depth.
  • 2 cloves garlic, minced: A must-have for that lovely, savory flavor.
  • 1 tablespoon fresh ginger, grated: Adds a zesty kick and warming spice.
  • 2 carrots, chopped: For a touch of sweetness and vibrant color.
  • 1 cup dried lentils (red or brown), rinsed: The star of the show, providing protein and fiber.
  • 1 teaspoon ground turmeric: Known for its anti-inflammatory properties and beautiful color.
  • 1/2 teaspoon cumin: Adds a warm, earthy flavor.
  • 1/2 teaspoon paprika: For a hint of smokiness.
  • Salt and pepper to taste: Essential for enhancing all the flavors.
  • 4 cups vegetable broth: The base of our soup, bringing everything together.
  • Juice of 1/2 lemon: Brightens the flavors beautifully.
  • Optional: chopped cilantro or parsley for garnish: A fresh finish to your bowl!

Let’s Get Cooking: Step-by-Step Instructions

Now that we have everything ready, let’s dive into the cooking process. Follow these simple steps to create your delicious Spiced Lentil Soup:

  1. Heat the olive oil in a large, heavy-bottomed pot or Dutch oven over medium heat. Once it shimmers, add the diced onion. Sauté for 3-4 minutes, stirring occasionally, until it becomes translucent and sweet.
  2. Add the minced garlic, grated ginger, and chopped carrots to the pot. Stir and cook for just 1 minute. Sprinkle in the turmeric, cumin, and paprika. Stir constantly for another 30 seconds to 1 minute to release those wonderful aromas.
  3. Add the rinsed lentils and the vegetable broth to the pot. Stir, scraping up any bits stuck to the bottom. Turn the heat up to high and bring the soup to a boil. Once bubbling, reduce the heat to low, cover the pot with a lid slightly ajar, and let it simmer gently for 25-30 minutes.
  4. Turn off the heat. Use an immersion blender to thicken the soup while leaving plenty of texture, or mash some lentils against the side of the pot with a wooden spoon for a chunkier consistency. Season with salt and pepper, then squeeze in the lemon juice.
  5. Ladle the soup into warm bowls. Top with fresh cilantro or parsley and serve. Enjoy!

Pro Tips for Perfecting Your Soup

Here are some expert insights to elevate your cooking game:

  • Choose the right lentils: Red lentils cook faster and become softer, while brown lentils hold their shape better.
  • Don’t skip the spices: Fresh spices enhance flavor significantly. Ensure they are fresh for the best taste.
  • Adjust the thickness: Depending on your preference, add more broth for a thinner soup or blend more lentils for a creamier texture.
  • Experiment with toppings: Try adding croutons, a dollop of yogurt, or a swirl of olive oil for extra richness.
  • Make it a meal: Pair this soup with crusty bread or a simple salad for a complete dining experience.
  • Storage tip: Store leftovers in an airtight container in the fridge for up to 5 days or freeze for up to 3 months.
  • Reheat gently: When reheating, add a splash of water or broth to loosen the soup.
  • Think ahead: Prepare a double batch on weekends for quick, healthy meals throughout the week.

Common Mistakes and Troubleshooting

Cooking is all about learning, and mistakes are part of the process. Here are a few common pitfalls and how to avoid them:

  • Overcooking lentils: Keep an eye on the simmering time. Overcooked lentils can turn mushy.
  • Too much seasoning: Start with less salt and pepper; you can always adjust later.
  • Skipping the aromatics: Don’t underestimate the importance of onions, garlic, and ginger—these build the soup’s flavor foundation.
  • Not tasting as you go: Always taste before serving! Adjust seasonings to your liking.

Delicious Variations to Try

Feel free to switch things up! Here are some tasty variations you can try:

  • Add some greens: Stir in a handful of spinach or kale during the last few minutes of cooking for added nutrition.
  • Protein boost: Add shredded chicken, tofu, or chickpeas for extra protein.
  • Spice it up: Add a pinch of cayenne pepper or crushed red pepper flakes for a spicy kick.
  • Herb infusion: Experiment with fresh herbs like thyme or rosemary for a unique flavor profile.

Storage and Make-Ahead Instructions

This soup is perfect for meal prep! Here’s how to store and reheat:

  • Refrigeration: Allow the soup to cool completely before transferring it to an airtight container. It can be stored in the fridge for up to 5 days.
  • Freezing: Portion out the soup into freezer-safe containers. It can be frozen for up to 3 months. Defrost in the fridge before reheating.
  • Reheating: Warm on the stovetop over low heat, adding broth or water to reach your desired consistency.

Frequently Asked Questions

Let’s tackle some common questions about this recipe:

  • Can I use canned lentils? Yes! If using canned, reduce the cooking time and add them towards the end.
  • Is this soup vegan? Absolutely! All ingredients are plant-based.
  • Can I use chicken broth instead of vegetable broth? Yes, if you don’t need it to be vegetarian.
  • How can I make this soup spicier? Add more spices, or include fresh jalapeños or chili powder to taste.
  • What can I serve with this soup? Pair it with crusty bread, a fresh salad, or a hearty sandwich.
  • Can I make this soup in a slow cooker? Yes! Sauté the aromatics first, then add all ingredients and cook on low for 6-8 hours.
  • What other vegetables can I add? Feel free to include zucchini, bell peppers, or sweet potatoes.
  • Is this soup gluten-free? Yes, all ingredients are gluten-free!

Nutrition Tips and Dietary Adaptations

This Spiced Lentil Soup is not only delicious but also packed with nutrients. Here are some tips:

  • High in Protein: Lentils are a great source of plant-based protein, making this soup a filling option.
  • Rich in Fiber: This soup is loaded with fiber, promoting digestive health.
  • Anti-Inflammatory Benefits: Ingredients like turmeric and ginger are known for their anti-inflammatory properties.
  • Low-Calorie Option: This soup is low in calories, making it a great choice for weight management.
  • Dietary Adjustments: Easily adaptable for various diets—vegan, vegetarian, gluten-free.

Equipment Recommendations

Here’s what you’ll need to whip up this delicious soup:

  • Heavy-Bottomed Pot or Dutch Oven: Essential for even heat distribution.
  • Immersion Blender: Perfect for achieving your desired soup texture.
  • Cutting Board and Sharp Knife: For efficient chopping of your ingredients.

Serving Suggestions

When it comes to serving your Spiced Lentil Soup, here are a few ideas:

  • Accompany with Bread: Serve with a slice of crusty bread or pita for a complete meal.
  • Garnish Creatively: Top with avocado slices, a dollop of yogurt, or a sprinkle of feta cheese for added flavor.
  • Pair with a Salad: A fresh green salad or coleslaw can complement the soup beautifully.

Wrapping It Up

There you have it—a cozy, nourishing Spiced Lentil Soup that’s not just easy to make but also incredibly satisfying. I hope this recipe inspires you to get cooking in your kitchen! Remember, it’s all about enjoying the process and making it your own. Feel free to experiment with flavors and ingredients. Happy cooking, and may your soup always simmer with love!

Spiced Lentil Soup

Prep Time 10 minutes
Cook Time 30 minutes
Total Time 40 minutes
Servings 4 servings
Calories 250
A hearty and flavorful lentil soup seasoned with warming spices, perfect for a comforting meal.

Ingredients

olive oil

  • 1 tablespoon olive oil

onion

  • 1 diced onion

garlic

  • 2 cloves garlic (minced)

fresh ginger

  • 1 tablespoon fresh ginger (grated)

carrots

  • 2 chopped carrots

dried lentils

  • 1 cup dried lentils (rinsed)

ground turmeric

  • 1 teaspoon ground turmeric

cumin

  • 1/2 teaspoon cumin

paprika

  • 1/2 teaspoon paprika

salt and pepper

  • to taste salt and pepper

vegetable broth

  • 4 cups vegetable broth

lemon juice

  • juice of 1/2 lemon lemon juice

cilantro or parsley

  • optional chopped cilantro or parsley (for garnish)

Instructions 

  • Heat oil, sauté onion until translucent.
  • Add garlic, ginger, carrots; cook 1 min. Stir in spices.
  • Add lentils and broth; bring to boil, then simmer 25-30 min.
  • Blend part of the soup for thickness, season with salt, pepper, and lemon juice.
  • Ladle into bowls, garnish with herbs, and serve.

Notes

For a creamier texture, blend more lentils or add coconut milk.
Calories: 250kcal
Cost: $12
Course: Soup
Cuisine: International
Keyword: Lentils

Discover the Joy of Homemade Energy Bars

Welcome to your new favorite snack that’s as nourishing as it is delicious! These Easy Cashew & Date Energy Bars are packed with wholesome ingredients, making them perfect for busy days when you need a quick boost of energy. Whether you’re looking for a pre-workout snack, a midday pick-me-up, or a sweet treat that won’t derail your healthy eating, you’ve found the right recipe. Let’s dive into the world of homemade energy bars that not only satisfy your sweet tooth but also fuel your body!

Why You’ll Love This Recipe

Here are just a few reasons why these energy bars will become a staple in your kitchen:

  • Simple Ingredients: Made with just a handful of whole foods, these bars are easy to whip up and customize.
  • Nutritious Boost: With cashews, dates, and chia seeds, you’re getting healthy fats, natural sweetness, and fiber in every bite.
  • Energy On-the-Go: Perfectly portable, these bars are great for travel, work, or outdoor adventures.
  • Customizable: Feel free to swap in your favorite nuts, seeds, or dried fruits to make them your own.
  • Vegan & Gluten-Free: Suitable for a variety of dietary preferences, making them accessible for everyone.

Ingredients You’ll Need

Gather these simple ingredients to get started on your energy bars:

  • 12 pieces Medjool Dates (pitted): These dates provide natural sweetness and sticky texture, perfect for binding the bars.
  • 1 cup Raw Cashews (lightly toasted): Toasted cashews add a delightful crunch and nutty flavor.
  • 1 cup Rolled Oats: Oats contribute fiber and texture, making the bars filling.
  • 2 tablespoons Chia Seeds: A nutritious boost with omega-3s and fiber, chia seeds help bind the mixture.
  • 1/4 cup Maple Syrup: This natural sweetener enhances the flavor and adds moisture.
  • 1 teaspoon Vanilla Extract: A splash of vanilla elevates the overall taste.
  • 1 pinch Sea Salt: A touch of salt balances the sweetness and enhances flavor.
  • 1/2 cup Dark Chocolate Chips: Optional, but who can resist chocolate? They add a rich, indulgent touch.
  • 1/2 cup Shredded Coconut: For added texture and a hint of tropical flavor.
  • 1/4 cup Pumpkin Seeds: These seeds provide a crunch and additional nutrients.

How to Make Your Energy Bars

Tasty energy bars displayed, highlighting chunks of chocolate and dates.

Now that you have your ingredients, let’s break down the steps to create these delicious bars:

  1. Prepare the Ingredients: Start by pitting your Medjool dates if they’re not already pitted. Lightly toast your cashews in a dry skillet over medium heat until fragrant, about 5 minutes. Allow them to cool slightly.
  2. Blend It Up: In a food processor, combine the dates, toasted cashews, rolled oats, chia seeds, maple syrup, vanilla extract, and sea salt. Pulse until the mixture is well-combined but still has some texture.
  3. Add Extras: Fold in the dark chocolate chips, shredded coconut, and pumpkin seeds. Mix until evenly distributed.
  4. Press and Set: Line an 8×8 inch baking dish with parchment paper. Transfer the mixture to the dish and press it down firmly with your hands or a spatula. Make sure it’s evenly spread out.
  5. Chill: Place the dish in the refrigerator for at least an hour to firm up.
  6. Slice and Enjoy: Once set, lift the bars out of the dish using the parchment paper, slice them into squares or rectangles, and enjoy!

Pro Tips for Perfect Energy Bars

Here are some expert insights to help you create the best energy bars:

  • Use Fresh Dates: Medjool dates should be soft and fresh for the best flavor and binding quality.
  • Customize Texture: Adjust the consistency by pulsing more or less in the food processor to achieve your desired texture.
  • Don’t Overprocess: You want some chunks for texture, so avoid over-blending the mixture.
  • Experiment with Flavors: Try adding spices like cinnamon or nutmeg for an extra flavor kick.
  • Check for Sweetness: Adjust the amount of maple syrup according to your taste preference.
  • Try Different Nuts: Swap cashews for almonds or walnuts for a different flavor profile.
  • Keep It Cool: Store bars in the refrigerator to maintain freshness and prevent them from becoming too soft.
  • Make Ahead: Prepare a batch in advance for busy weeks to always have a healthy snack on hand.

Common Mistakes and Troubleshooting

If things don’t go as planned, here are some common pitfalls and how to avoid them:

  • Bars Crumbling: If your bars are too crumbly, try adding a little more maple syrup or a few more dates to enhance the binding.
  • Too Sticky: If the mixture is too sticky, blend in more oats or shredded coconut to absorb excess moisture.
  • Flavor Imbalance: Taste the mixture before pressing it into the pan. Adjust sweetness or salt as needed.
  • Uneven Texture: Ensure that you pulse the mixture just enough to combine ingredients without making it too smooth.

Delicious Variations to Try

Feel free to mix things up with these fun variations:

  • Chocolate Peanut Butter Bars: Add 1/4 cup of natural peanut butter for a rich, nutty flavor.
  • Spiced Pumpkin Bars: Incorporate 1/4 cup of pumpkin puree and a teaspoon of pumpkin spice for a seasonal twist.
  • Berry Burst Bars: Mix in 1/2 cup of dried cranberries or blueberries for a fruity kick.
  • Nut-Free Option: Substitute sunflower seeds for cashews to create a nut-free version that’s just as delicious.

Storage and Make-Ahead Instructions

Keep your energy bars fresh and ready to enjoy with these storage tips:

  • Refrigeration: Store bars in an airtight container in the refrigerator for up to 2 weeks.
  • Freezing: For longer storage, wrap individual bars in plastic wrap and place them in a freezer-safe bag. They can last up to 3 months in the freezer.
  • Thawing: To enjoy frozen bars, simply let them sit at room temperature for about 15 minutes before eating.

Frequently Asked Questions

Got some questions? Here are answers to common inquiries about this recipe:

  • Can I use other nuts? Yes! Feel free to substitute with your favorite nuts.
  • Are these bars suitable for vegan diets? Absolutely! All the ingredients are plant-based.
  • Can I make these bars without oats? Yes, you can use quinoa flakes or ground flaxseed instead.
  • What’s the best way to cut the bars? Use a sharp knife and cut them while they’re still chilled for cleaner edges.
  • Can I add protein powder? Yes, you can mix in a scoop of your favorite protein powder for an added boost.
  • How do I know when the bars are set? They should feel firm to the touch and hold their shape when pressed.
  • What’s the nutritional information? Each bar contains approximately 150 calories, depending on the specific ingredients used.
  • Can I skip the chocolate chips? Yes, feel free to omit them if you prefer a lower-sugar option.

Nutritional Tips and Dietary Adaptations

Whether you’re watching your nutrition or need to cater to specific dietary needs, here are some tips:

  • High Protein: Add your choice of protein powder to boost the protein content.
  • Lower Sugar: Use less maple syrup or replace it with a sugar-free sweetener.
  • Fiber Boost: Incorporate flaxseeds or hemp seeds for extra fiber and nutrients.

Essential Equipment You’ll Need

To create these energy bars, make sure you have the following equipment:

  • Food Processor: Essential for blending the ingredients until they reach the right consistency.
  • Baking Dish: An 8×8 inch dish works perfectly for setting the bars.
  • Parchment Paper: Use it to line your baking dish for easy removal of the bars.
  • Measuring Cups and Spoons: Accurate measurements will ensure your bars turn out great every time.

Serving Suggestions

These energy bars are versatile and can be enjoyed in various ways:

  • Breakfast on the Go: Pair a bar with a banana for a quick breakfast.
  • Post-Workout Snack: Enjoy with a side of Greek yogurt for extra protein.
  • Lunchbox Treat: Include in lunchboxes for a healthy afternoon snack.
  • Cheese Board Addition: Slice into smaller pieces and serve with cheese for a savory-sweet snack.

Conclusion: Embrace Your Kitchen Adventure!

Cooking should be fun and rewarding, and these Easy Cashew & Date Energy Bars make it easy to enjoy nutritious snacks without the fuss. With simple ingredients, customizable options, and delightful flavors, you’re sure to impress your family and friends. So roll up your sleeves, grab your food processor, and let’s get cooking! You’ve got this!

Easy Cashew & Date Energy Bars That Fuel Your Day Naturally

Prep Time 15 minutes
Total Time 15 minutes
Servings 12 pieces
Calories 180
These homemade energy bars combine the natural sweetness of dates with crunchy cashews and chocolate for a nutritious snack that keeps you energized throughout the day.

Ingredients

Dried Fruits

  • 12 pieces Medjool Dates (pitted)

Nuts & Seeds

  • 1 cup Raw Cashews (lightly toasted)
  • 2 tablespoons Chia Seeds

Grains & Add-ins

  • 1 cup Rolled Oats
  • 1/2 cup Dark Chocolate Chips
  • 1/2 cup Shredded Coconut
  • 1/4 cup Pumpkin Seeds

Sweeteners & Flavorings

  • 2 tablespoons Maple Syrup
  • 1 teaspoon Vanilla Extract
  • 1 pinch Sea Salt

Instructions 

  • Pit the dates and blend them until sticky paste forms.
  • In a large bowl, combine chopped dates, toasted cashews, oats, chia seeds, coconut, pumpkin seeds, chocolate chips, vanilla extract, maple syrup, and sea salt.
  • Press the mixture firmly into a lined baking dish to form an even layer.
  • Refrigerate for at least 30 minutes to set.
  • Cut into 12 bars and enjoy!

Notes

Store these energy bars in an airtight container for up to a week.
Calories: 180kcal
Cost: $12
Course: Snack
Cuisine: Healthy
Keyword: Energy Bars

Transform Your Dinner with a Flavor-Packed Chicken Shawarma Bowl

Welcome, friends! If you’re searching for a meal that’s not only delicious but also quick to prepare, you’ve landed in the right spot. This Chicken Shawarma Bowl offers a delightful fusion of tender marinated chicken, crisp fresh vegetables, and a creamy tahini sauce, all served over a bed of fluffy basmati rice. Whether you’re winding down after a hectic day or looking to impress at your next gathering, this recipe is your go-to solution!

Why You’ll Love This Recipe

Here are a few reasons why this Chicken Shawarma Bowl should be on your dinner table:

  • Quick and Easy: Ready in under 30 minutes, perfect for busy weeknights.
  • Customizable: Swap ingredients to suit your taste or dietary needs.
  • Healthy: Packed with lean protein and fresh veggies, it’s a nutritious meal option.
  • Flavor Explosion: The combination of spices creates a depth of flavor that’s simply irresistible.
  • Meal Prep Friendly: Make it ahead for easy lunches or dinners throughout the week.

Ingredients You’ll Need

Let’s gather everything you need for this delicious bowl! Here’s what you’ll need:

  • 500 grams Boneless chicken breast: The star of our dish, providing lean protein.
  • 3 tablespoons Olive oil: For marinating and cooking the chicken.
  • 3 tablespoons Greek yogurt: Adds creaminess and helps tenderize the chicken.
  • 2 tablespoons Lemon juice: Freshens up the flavors and balances richness.
  • 4 cloves Garlic, minced: Infuses the marinade with aromatic goodness.
  • 1 teaspoon Ground cumin: An essential spice for that authentic shawarma flavor.
  • 1 teaspoon Paprika: Adds warmth and color.
  • 1 teaspoon Ground coriander: Complements the other spices beautifully.
  • ½ teaspoon Turmeric powder: For a hint of earthiness and vibrant color.
  • Salt and Black pepper, to taste: Always essential!
  • 2 cups Cooked basmati rice: The perfect base for your bowl.
  • 1 cup Cucumber, sliced: Adds crunch and freshness.
  • 1 cup Tomato, chopped: Brightens up the dish.
  • ½ cup Red onion, thinly sliced: For a hint of sharpness.
  • 1 cup Lettuce, shredded: Adds volume and freshness.
  • 3 tablespoons Tahini sauce: Drizzled on top for a creamy finish.

Ingredient Substitutions

If you don’t have some ingredients on hand, don’t worry! Here are some easy substitutions:

  • Chicken: Use turkey breast or firm tofu for a vegetarian option.
  • Greek yogurt: Substitute with dairy-free yogurt or sour cream.
  • Olive oil: Can be replaced with avocado oil or vegetable oil.
  • Basmati rice: Quinoa or couscous can be used for a different twist.

Step-by-Step Cooking Instructions

Let’s dive into the cooking process! Follow these simple steps for a perfect Chicken Shawarma Bowl:

  1. Place chicken breast pieces in a large bowl and pat them dry with a paper towel.
  2. Add olive oil, Greek yogurt, lemon juice, minced garlic, cumin, paprika, coriander, turmeric, salt, and black pepper.
  3. Mix thoroughly until chicken is evenly coated with the marinade.
  4. Cover the bowl and let the chicken marinate for at least thirty minutes for deeper flavor.
  5. Heat a heavy pan or grill skillet over medium heat.
  6. Add marinated chicken pieces in a single layer without overcrowding.
  7. Cook chicken for five to six minutes on one side until golden.
  8. Flip pieces and cook another five minutes until fully cooked and juicy.
  9. Remove chicken from heat and let it rest for three minutes.
  10. Slice chicken into bite-sized strips.

Assembly of Your Chicken Shawarma Bowl

Now it’s time to assemble your delicious bowl:

  1. Warm cooked basmati rice and fluff gently using a fork.
  2. Arrange rice at the base of serving bowls.
  3. Add sliced chicken over the rice evenly.
  4. Layer cucumber, tomato, onion, and lettuce neatly around the chicken.
  5. Drizzle tahini sauce over the bowl just before serving.

Pro Tips for Perfect Shawarma Bowls

Here are some expert insights to elevate your Chicken Shawarma Bowl:

  • Marinate Longer: For the best flavor, marinate the chicken overnight.
  • Use High Heat: Cooking on high heat sears the chicken and locks in moisture.
  • Don’t Skip the Rest: Let the chicken rest after cooking for juiciness.
  • Fresh Herbs: Garnish with parsley or cilantro for added freshness.
  • Extra Sauce: Serve with extra tahini or a yogurt sauce for dipping.
  • Grilled Veggies: Consider grilling your veggies for extra flavor.
  • Spice It Up: Add chili flakes or sriracha for a spicy kick!
  • Layering: Layer ingredients to create a beautiful presentation.

Common Mistakes and Troubleshooting

Here are some common pitfalls and how to avoid them:

  • Overcooking Chicken: Use a meat thermometer; chicken should reach 165°F (75°C).
  • Skipping the Marinade: Don’t rush this step; it’s essential for flavor.
  • Too Much Tahini: Start with a little and add more to taste to avoid overpowering.
  • Not Fluffing Rice: Fluff rice after cooking for the best texture.

Variations of Chicken Shawarma Bowl

Feel free to mix it up! Here are some variations to try:

  • Spicy Shawarma Bowl: Add harissa or chili paste to the marinade for heat.
  • Vegetable Shawarma Bowl: Omit chicken and use marinated roasted vegetables instead.
  • Quinoa Bowl: Replace rice with quinoa for a protein-packed option.
  • Middle Eastern Tzatziki Bowl: Top with tzatziki sauce instead of tahini for a twist.

Storage and Make-Ahead Instructions

Planning ahead? Here’s how to store and prep your Shawarma Bowl:

  • Refrigeration: Store leftover chicken and veggies in airtight containers for up to 3 days.
  • Freezing: Cooked chicken can be frozen for up to 2 months. Thaw before reheating.
  • Make-Ahead: Marinate chicken a day in advance for extra flavor.

Frequently Asked Questions

Here are some common questions about making Chicken Shawarma Bowls:

  • Can I use chicken thighs instead of breasts? Absolutely! Thighs are juicier and add great flavor.
  • Is this recipe gluten-free? Yes, as long as you use gluten-free tahini and check all sauces.
  • Can I make this vegetarian? Yes! Substitute chicken with chickpeas or grilled halloumi.
  • How can I make it spicier? Add more spices or serve with hot sauce on the side.
  • What can I serve with it? Pita bread, a side salad, or hummus are great options.
  • How do I know when the chicken is done? Use a meat thermometer; it should register 165°F (75°C).
  • Can I use store-bought tahini? Yes, but homemade is always fresher and tastier.
  • Is this meal prep friendly? Definitely! It stores well and reheats beautifully.

Nutritional Tips and Dietary Adaptations

To make this dish fit your dietary needs:

  • Low-Carb: Serve over a salad instead of rice.
  • Paleo: Omit the yogurt and serve with more veggies.
  • Low-Fat: Use less olive oil and choose lean chicken.

Equipment Recommendations

Here’s what you’ll need to make this recipe:

  • Heavy Skillet or Grill Pan: Essential for cooking the chicken evenly.
  • Mixing Bowl: For marinating the chicken.
  • Meat Thermometer: To ensure chicken is perfectly cooked.
  • Cutting Board: For slicing your cooked chicken.

Serving Suggestions

To elevate your Shawarma Bowl experience, consider:

  • Fresh Herbs: Garnish with chopped parsley or mint for added flavor.
  • Extra Sauce: Serve with additional tahini or a spicy sauce on the side.
  • Side Dishes: Pair with a fresh salad or crispy pita chips.

Wrap Up Your Culinary Adventure!

There you have it, friends! A delicious and satisfying Chicken Shawarma Bowl that’s not only easy to make but also packed with flavor and nutrients. Remember, cooking is all about experimenting and enjoying the process, so feel free to make this recipe your own. Happy cooking, and enjoy every bite of your flavorful creation!

Chicken Shawarma Bowl

Prep Time 15 minutes
Cook Time 15 minutes
Total Time 30 minutes
Servings 4 servings
Calories 550
A flavorful and healthy Chicken Shawarma Bowl packed with marinated chicken, fresh vegetables, and rice, perfect for a quick and satisfying meal.

Ingredients

Protein

  • 500 grams Boneless chicken breast

Marinade

  • 3 tablespoons Olive oil
  • 3 tablespoons Greek yogurt
  • 2 tablespoons Lemon juice
  • 4 cloves Garlic minced
  • 1 teaspoon Ground cumin
  • 1 teaspoon Paprika
  • 1 teaspoon Ground coriander
  • 0.5 teaspoon Turmeric powder
  • Salt to taste Salt
  • 0.5 teaspoon Black pepper

Base

  • 2 cups Cooked basmati rice

Vegetables

  • 1 cup Cucumber sliced
  • 1 cup Tomato chopped
  • 0.5 cup Red onion thin sliced
  • 1 cup Lettuce shredded

Sauce

  • 3 tablespoons Tahini sauce

Instructions 

  • Marinate chicken with olive oil, yogurt, lemon juice, garlic, and spices for 30 minutes.
  • Cook marinated chicken in a skillet until golden and cooked through, then slice into strips.
  • Warm rice and assemble bowls with rice, chicken, vegetables, and drizzle with tahini sauce.

Notes

For extra flavor, marinate the chicken longer or add fresh herbs.
Calories: 550kcal
Cost: $15
Course: Main Course
Cuisine: Middle Eastern
Keyword: bowl, Chicken, Shawarma

Indulge in a Cozy Classic: Baked Pears with Honey and Walnuts

Welcome to the delightful world of baked pears! This simple yet luxurious dessert, featuring sweet, juicy pears drizzled with honey and topped with crunchy walnuts, is the perfect way to treat yourself or impress your guests. Whether you’re looking for a quick weeknight dessert or a show-stopping finale for a dinner party, this recipe is here to inspire you. Let’s dive into the reasons why you’ll love this dish and how to make it your own!

Why You’ll Love This Recipe

  • Quick and Easy: This dessert comes together in just 30 minutes, making it perfect for busy weeknights or last-minute gatherings.
  • Healthier Indulgence: Packed with fiber from pears and healthy fats from walnuts, this dessert satisfies your sweet tooth without the guilt.
  • Customizable: The recipe allows for various substitutions and additions, so you can tailor it to your taste and dietary needs.
  • Impressive Presentation: Baked pears look stunning on any table, offering a warm, inviting appeal that’s sure to wow your guests.
  • Versatile Serving Options: Serve it warm as a dessert or chilled as a refreshing summer treat, making it suitable for any occasion.

Ingredients for Baked Pears with Honey and Walnuts

Here’s what you’ll need to create this mouthwatering dessert:

  • 4 ripe pears (such as Bosc or Anjou): Offers a sweet, juicy base.
  • 1/4 cup honey: Adds a natural sweetness that complements the pears beautifully.
  • 1/2 cup chopped walnuts: Provides a delightful crunch and nutty flavor.
  • 1 tsp cinnamon: Brings warmth and depth, enhancing the overall flavor.
  • 2 tbsp unsalted butter, melted: Adds richness and helps to caramelize the pears.
  • 1 tbsp lemon juice: Brightens the flavors and prevents the pears from browning.

Step-by-Step Directions for Making Baked Pears

Delicious baked pears featuring honey and walnuts on a white plate.

Ready to get started? Let’s walk through the process of making these delectable baked pears:

  1. Preheat your oven to 350°F (175°C).
  2. Slice the pears in half lengthwise and scoop out the core with a spoon.
  3. In a small bowl, mix together the melted butter, honey, cinnamon, and lemon juice until well combined.
  4. Place the pear halves cut-side up in a baking dish and drizzle the honey mixture over each half.
  5. Sprinkle the chopped walnuts evenly over the pears.
  6. Bake in the preheated oven for 25-30 minutes, or until the pears are tender and slightly caramelized.
  7. Remove from the oven and let cool slightly before serving.

Pro Tips for Perfect Baked Pears

  • Choose the Right Pears: Use ripe pears for optimal sweetness and texture. Avoid overripe pears as they may become mushy.
  • Experiment with Spices: Feel free to add nutmeg or ginger for an extra layer of flavor.
  • Adjust Sweetness: Depending on your taste preference, you can reduce the amount of honey or substitute with maple syrup.
  • Try Different Nuts: Almonds or pecans can be used instead of walnuts for a different flavor profile.
  • Make Ahead: Prepare the pears and honey mixture in advance, then bake just before serving.

Common Mistakes and Troubleshooting

Here are some tips to avoid common pitfalls when making baked pears:

  • Overcooking: Keep an eye on the pears as they bake; you want them tender but not falling apart.
  • Not Enough Flavor: If the pears taste bland, consider adding more spices or topping them with a dollop of yogurt or whipped cream before serving.
  • Uneven Baking: Ensure that the pears are placed cut-side up and evenly spaced in the baking dish for consistent cooking.

Variations on Baked Pears

If you’re looking to mix things up, try one of these delicious variations:

  • Pears with Blue Cheese: Add crumbled blue cheese on top of the walnuts before baking for a savory twist.
  • Chocolate Drizzle: After baking, drizzle melted dark chocolate over the pears for an indulgent dessert.
  • Fruit Medley: Mix in other fruits like apples or figs alongside the pears for a colorful fruit medley.
  • Spiced Rum: Add a splash of spiced rum to the honey mixture for a deeper flavor.

Storage and Make-Ahead Instructions

These baked pears can be made ahead of time and stored:

  • Refrigeration: Store in an airtight container in the fridge for up to 3 days.
  • Reheating: Reheat in the oven at 350°F for about 10-15 minutes, or until warmed through.
  • Make Ahead: Assemble the pears and honey mixture up to 24 hours in advance and refrigerate, then bake just before serving.

Nutritional Information and Dietary Adaptations

Here’s a quick overview of the health benefits of this dessert:

  • High in Fiber: Pears are an excellent source of dietary fiber, aiding in digestion.
  • Healthy Fats: Walnuts provide essential omega-3 fatty acids beneficial for heart health.
  • Low in Saturated Fat: By using unsalted butter and natural sweeteners, this dessert is lighter than traditional options.

Equipment Recommendations

To make the most of this recipe, consider the following kitchen tools:

  • Sharp Knife: For easily slicing the pears.
  • Baking Dish: A glass or ceramic dish works best for even baking.
  • Mixing Bowl: To combine the honey mixture.

Serving Suggestions

Pair your baked pears with these delicious accompaniments:

  • Vanilla Ice Cream: The classic pairing that adds a creamy contrast to the warm pears.
  • Greek Yogurt: A healthier option that provides a tangy flavor.
  • Cheese Board: Serve alongside a selection of cheeses for a sophisticated touch.

Common FAQs about Baked Pears

Here are some frequently asked questions to help you on your baking journey:

  • Can I use other types of fruit? Yes! Apples, peaches, or plums can be substituted for pears.
  • What if I don’t have walnuts? You can use any nuts you have on hand or omit them entirely.
  • Is this recipe gluten-free? Yes, all the ingredients are naturally gluten-free.
  • Can I prepare this in advance? Absolutely! Prepare the pears and honey mixture ahead of time and bake just before serving.
  • How do I know when the pears are done? They should be tender when pierced with a fork but not mushy.
  • Can I freeze baked pears? It’s best to eat them fresh, but you can freeze the baked pears for up to 2 months. Thaw and reheat before serving.
  • What should I serve with baked pears? They pair well with ice cream, yogurt, or as part of a cheese platter.
  • Do I need to peel the pears? No, leaving the skin on adds flavor and texture.

Conclusion

There you have it—an easy yet decadent recipe for baked pears with honey and walnuts. This dish not only brings comfort and warmth to your table but also allows for creativity and customization. Whether you’re enjoying it alone or sharing it with friends and family, these baked pears are sure to delight. So grab your ingredients, turn on your oven, and let the sweet aroma fill your kitchen. Happy baking!

Baked Pears with Honey and Walnuts

Prep Time 10 minutes
Cook Time 20 minutes
Total Time 30 minutes
Servings 4 pieces
Calories 250
Enjoy this warm, sweet dessert featuring tender baked pears topped with honey, crunchy walnuts, and a hint of cinnamon.

Ingredients

Fruits

  • 4 pieces ripe pears (Bosc or Anjou) (Offering a sweet, juicy base.)
  • 0.25 cup honey (Adding a natural sweetness.)
  • 0.5 cup chopped walnuts (Providing a delightful crunch.)
  • 1 tsp cinnamon (Bringing warmth and depth.)
  • 2 tbsp unsalted butter, melted (For richness.)
  • 1 tbsp lemon juice (To brighten the flavors.)

Instructions 

  • Preheat oven to 375°F (190°C).
  • Core the pears and place them in a baking dish.
  • Mix honey, melted butter, lemon juice, and cinnamon; drizzle over pears.
  • Sprinkle chopped walnuts on top of the pears.
  • Bake for 20 minutes until pears are tender.

Notes

Serve warm, optionally with a dollop of yogurt or ice cream.
Calories: 250kcal
Cost: $12
Course: Dessert
Cuisine: Fusion
Keyword: pear

Unlock the Flavor: Your Guide to Zucchini Noodles with Pesto and Grilled Chicken

Welcome to your new favorite dish: **Zucchini Noodles with Pesto and Grilled Chicken**! This quick and vibrant recipe marries the freshness of zucchini with the rich flavors of homemade pesto, all topped with juicy grilled chicken. Perfect for a weeknight dinner, this meal is not only delicious but also healthy and easy to prepare. Let’s dive into this culinary adventure together!

Why You’ll Love This Recipe

This dish is more than just a meal; it’s a celebration of flavors and textures that will brighten your weeknight dinners. Here are some reasons why you’ll love it:

  • Quick and Easy: Ready in under 30 minutes, perfect for busy days.
  • Fresh Ingredients: Utilizes bright, seasonal ingredients that elevate your dish.
  • Healthy Option: Low in carbs and high in nutrients, making it a guilt-free indulgence.
  • Versatile: Easily customizable with various proteins or vegetables according to your preference.
  • Meal Prep Friendly: Ideal for make-ahead meals, just store components separately!

Ingredients Breakdown

Let’s gather our ingredients for this delightful dish. Here’s what you’ll need:

  • 4 medium zucchini: A fresh base for your noodles, spiralized for texture.
  • 2 tbsp olive oil: For sautéing the zucchini and grilling the chicken.
  • 2 medium chicken breasts: The protein star of the dish, grilled to perfection.
  • 1 tbsp garlic powder: Adds a depth of flavor to the chicken.
  • 1 tsp paprika: Provides a smoky kick.
  • 1 tsp Italian seasoning: A blend of herbs that enhances the dish.
  • 0.5 tsp salt and 0.5 tsp black pepper: Essential for seasoning.
  • 2 cups fresh basil leaves: The main ingredient for our pesto.
  • 0.5 cup Parmesan cheese: Nutty flavor that complements the pesto.
  • 0.25 cup pine nuts: Essential for a creamy, nutty pesto.
  • 2 cloves garlic: Freshly minced for robust flavor in the pesto.
  • 0.5 cup extra virgin olive oil: For blending into the pesto.
  • 0.25 cup cherry tomatoes: Fresh garnish to add color and sweetness.
  • 2 tbsp Parmesan cheese (for garnish): Because you can never have too much cheese!

If you’re missing any of these ingredients, don’t worry! Here are some substitutions:

  • Zucchini: Try using yellow squash or carrot noodles for a different flavor.
  • Chicken: Swap for grilled shrimp or tofu for a vegetarian option.
  • Pine nuts: Walnuts or sunflower seeds can be great substitutes in the pesto.
  • Parmesan: Nutritional yeast works well for a dairy-free alternative.

Step-By-Step Instructions

Now that we have our ingredients, let’s get cooking! Follow these simple steps for a delicious outcome:

  1. Prepare the Zucchini Noodles: Use a spiralizer to turn the zucchini into noodles. Pat them dry with a paper towel to remove excess moisture.
  2. Grill the Chicken:
    1. Preheat a grill pan or outdoor grill to 180°C (350°F).
    2. Rub the chicken breasts with olive oil and season with garlic powder, paprika, Italian seasoning, salt, and pepper.
    3. Grill the chicken for 6-7 minutes per side, or until fully cooked (internal temperature of 74°C or 165°F). Let it rest for 5 minutes before slicing.
  3. Make the Pesto:
    1. In a food processor, blend basil, Parmesan, pine nuts, and garlic until combined.
    2. Gradually add olive oil while blending until smooth. Season with salt and pepper to taste.
  4. Sauté the Zucchini Noodles: Heat olive oil in a large skillet over medium heat. Add the zucchini noodles and sauté for 2-3 minutes until just tender but not mushy.
  5. Combine and Serve: Toss the sautéed zucchini noodles with the pesto. Plate the noodles, top with sliced grilled chicken, and garnish with cherry tomatoes and Parmesan.

Pro Tips for Perfect Zucchini Noodles

Before we wrap this up, here are some expert insights to ensure your dish turns out perfectly:

  • Don’t Overcook: Keep zucchini noodles al dente to maintain their texture and prevent sogginess.
  • Use Fresh Ingredients: Fresh basil and quality olive oil will elevate your pesto.
  • Batch Cook Chicken: Grill extra chicken to save for salads or wraps throughout the week.
  • Experiment with Pesto: Add different nuts or herbs to create your signature pesto.
  • Adjust Seasoning: Taste your pesto before serving and adjust salt and pepper as needed.
  • Try Other Veggies: Add bell peppers or spinach for added nutrition and color.
  • Storage: Store zucchini noodles and pesto separately to maintain freshness.
  • Meal Prep: Prepare components ahead of time for quick assembly on busy nights.

Common Mistakes and Troubleshooting

Even the best cooks face challenges! Here are some common missteps and how to avoid them:

  • Soggy Noodles: Always pat your zoodles dry and avoid overcooking them.
  • Pesto Too Thick: If your pesto is too thick, add a splash of water or more olive oil to loosen it.
  • Chicken Drying Out: Let the chicken rest after grilling to lock in moisture.
  • Flavorless Pesto: Don’t skip on seasoning; taste and adjust as you go!

Variations to Try

Feel free to get creative with these variations:

  • Vegan Delight: Replace chicken with grilled portobello mushrooms and use nutritional yeast instead of cheese in the pesto.
  • Seafood Twist: Use shrimp or scallops instead of chicken for a delicious seafood version.
  • Spicy Kick: Add red pepper flakes to the pesto for an extra layer of heat.
  • Cheesy Zoodles: Mix in cream cheese or ricotta for a creamy texture.

Storage and Make-Ahead Instructions

This dish is perfect for meal prep! Here’s how to store it:

  • Refrigeration: Store zucchini noodles and pesto in airtight containers in the fridge for up to 3 days.
  • Freezing: The pesto can be frozen for up to 3 months; use ice cube trays for easy portions.
  • Reheating: Gently heat zucchini noodles in a skillet over low heat to avoid mushiness.

Frequently Asked Questions (FAQ)

Here are some commonly asked questions about this recipe:

  • Can I use a different type of noodle? Absolutely! Feel free to substitute with whole wheat or gluten-free pasta.
  • Is this dish gluten-free? Yes, it’s naturally gluten-free as long as you use gluten-free pesto.
  • Can I make this dish ahead of time? Yes, prepare the components in advance and combine when ready to serve.
  • What can I serve with this dish? Pair with a light salad or garlic bread for a complete meal.
  • Can I use store-bought pesto? Yes, but homemade pesto is much fresher and tastier!
  • How do I make this dairy-free? Substitute cheese with nutritional yeast and make sure your pesto is dairy-free.
  • What if I don’t have a spiralizer? You can use a vegetable peeler to create ribbon-like noodles.
  • How do I keep leftovers fresh? Always store components separately to maintain texture and flavor.

Nutritional Tips and Dietary Adaptations

This recipe is not only delicious but also nutritious! Here are some dietary adaptations:

  • Low-Carb: Zucchini noodles provide a great alternative to traditional pasta.
  • High Protein: Adding chicken boosts the protein content, making it a filling meal.
  • Vegetarian-Friendly: Swap chicken for chickpeas or lentils for a hearty vegetarian option.

Equipment Recommendations

Here’s a quick list of essential tools for making this dish:

  • Spiralizer: A must-have for creating perfect zucchini noodles.
  • Grill Pan or Outdoor Grill: For that delicious grilled flavor on the chicken.
  • Food Processor: Essential for blending your pesto to a smooth consistency.
  • Large Skillet: Needed for sautéing the zucchini noodles.

Serving Suggestions

Now that your dish is ready, it’s time to serve! Here are some ideas:

  • Garnish: Top with extra Parmesan, fresh basil, or a squeeze of lemon for brightness.
  • Pair with Wine: A crisp white wine such as Sauvignon Blanc pairs beautifully.
  • Add a Salad: A simple green salad can complement the flavors wonderfully.

Conclusion

Your journey to a flavorful and satisfying meal is just beginning! This **Zucchini Noodles with Pesto and Grilled Chicken** recipe is not only easy to prepare but also full of vibrant flavors that will impress your family and friends. Embrace the art of cooking with confidence, and don’t hesitate to experiment with variations that suit your taste. Remember, cooking is about enjoying the process as much as the result. Happy cooking!

Zucchini Noodles with Pesto & Grilled Chicken Recipe

Prep Time 15 minutes
Cook Time 20 minutes
Total Time 35 minutes
Servings 4 servings
Calories 450
A healthy and flavorful dish combining spiralized zucchini, fresh basil pesto, and grilled chicken for a satisfying meal.

Ingredients

Vegetables

  • 4 medium zucchini (medium-sized zucchinis)
  • 2 tbsp olive oil

Protein

  • 2 medium chicken breasts (skinless, boneless)
  • 1 tbsp olive oil
  • 1 tsp garlic powder
  • 1 tsp paprika
  • 1 tsp Italian seasoning
  • 0.5 tsp salt
  • 0.5 tsp black pepper

Pesto

  • 2 cups fresh basil leaves
  • 0.5 cup Parmesan cheese
  • 0.25 cup pine nuts
  • 2 cloves garlic
  • 0.5 cup extra virgin olive oil
  • 0.5 tsp salt
  • 0.25 tsp black pepper
  • 0.25 cup cherry tomatoes

Instructions 

  • Spiralize zucchini and pat dry.
  • Preheat grill, season chicken, and grill for 6-7 minutes per side. Rest and slice.
  • Blend basil, Parmesan, pine nuts, and garlic; add olive oil gradually. Season with salt and pepper.
  • Sauté zucchini noodles in olive oil for 2-3 minutes.
  • Toss noodles with pesto, top with sliced chicken, cherry tomatoes, and Parmesan.

Notes

Use fresh basil for best flavor and avoid overcooking zucchini noodles.
Calories: 450kcal
Cost: $15
Course: Main Course
Cuisine: Italian
Keyword: Chicken, Pesto, Zucchini

Discover the Joy of One Pan Honey Lemon Chicken

If you’re searching for a quick, delicious, and satisfying meal that your family will love, look no further than this One Pan Honey Lemon Chicken. This recipe is designed for busy weeknights, combining tender chicken breasts with vibrant mixed vegetables, all enveloped in a sweet and tangy glaze. In just one pan, you can create a dish that not only bursts with flavor but also brings excitement back to your dinner table. So roll up your sleeves, and let’s dive into this flavorful adventure!

Why You’ll Love This Recipe

This honey lemon chicken dish isn’t just easy to make; it’s packed with benefits that will keep you coming back for more. Here are five reasons why this recipe stands out:

  • Quick Preparation: With just 30 minutes from start to finish, this meal is perfect for those hectic evenings when time is of the essence.
  • One-Pan Convenience: Say goodbye to multiple pots and pans. Everything cooks together, making cleanup a breeze.
  • Flavor Explosion: The combination of honey, lemon, and soy sauce creates a delightful balance of sweet and savory flavors that will leave your taste buds dancing.
  • Customizable Ingredients: Swap in your favorite vegetables or adjust the sweetness to fit your family’s preferences.
  • Health Benefits: Packed with lean protein and colorful vegetables, this dish is as nutritious as it is delicious, providing vitamins and minerals to support your family’s health.

Ingredient Breakdown

Let’s take a closer look at the ingredients that make this One Pan Honey Lemon Chicken shine. Here’s what you’ll need:

  • 4 pieces boneless, skinless chicken breasts: Choose fresh, high-quality chicken for the best flavor.
  • Salt and pepper to taste: These simple seasonings enhance the natural flavors of the chicken.
  • 1/3 cup honey: For a richer flavor, consider using raw honey.
  • 1/4 cup fresh lemon juice: Freshly squeezed lemon juice adds brightness and acidity.
  • 1/4 cup soy sauce: Opt for low-sodium soy sauce if you prefer a lighter dish.
  • 3 cloves garlic (minced): Fresh garlic infuses the dish with aromatic flavor.
  • 1 teaspoon ground ginger: Fresh grated ginger is a great substitute for a more vibrant taste.
  • 1 tablespoon olive oil: Use this for cooking the chicken to a perfect golden brown.
  • 4 cups mixed vegetables: Bell peppers, broccoli, and snap peas work beautifully, but feel free to swap in quick-cooking vegetables like zucchini or asparagus.
  • 4 slices lemon: These not only add flavor but also make for a beautiful presentation.
  • 1/4 cup fresh parsley: Chopped parsley adds a pop of color and freshness to the dish.

How to Make One Pan Honey Lemon Chicken

Colorful mixed vegetables surrounding savory honey lemon chicken in a pan.

Now that you have your ingredients ready, let’s walk through the simple steps to create this delightful meal.

  1. Prep the Chicken: Season the chicken breasts with salt and pepper on both sides.
  2. Cook the Chicken: In a large pan, heat the olive oil over medium-high heat. Add the chicken breasts and sear for about 5-7 minutes on each side until golden brown and cooked through.
  3. Make the Marinade: While the chicken cooks, mix together honey, lemon juice, soy sauce, minced garlic, and ginger in a bowl.
  4. Add the Marinade: Once the chicken is cooked, pour the marinade over the chicken in the pan. Let it simmer for 2-3 minutes to thicken slightly.
  5. Add the Vegetables: Toss in your mixed vegetables, stirring to coat them in the marinade. Cook for another 5-7 minutes until the vegetables are tender yet crisp.
  6. Garnish: Top with lemon slices and fresh parsley before serving.

Pro Tips for Perfect Results

To elevate your cooking experience and ensure your dish is a success, consider these pro tips:

  • Use a Meat Thermometer: Ensure your chicken reaches an internal temperature of 165°F (75°C) for optimal safety and tenderness.
  • Perfect Searing: Don’t overcrowd the pan; cook the chicken in batches if necessary to achieve a nice sear.
  • Fresh Ingredients: Using fresh garlic and ginger will enhance the aroma and flavor of the dish significantly.
  • Vegetable Variety: Feel free to experiment with seasonal veggies for variety; just remember to choose those that cook quickly.
  • Let It Rest: Allow the chicken to rest for a few minutes after cooking for maximum juiciness.
  • Adjust Sweetness: If you prefer a less sweet dish, reduce the amount of honey or substitute with maple syrup.
  • Meal Prep: Prepare the chicken and marinade a day ahead for a quick weeknight meal.
  • Freezer Friendly: This dish can be frozen after cooking, making it great for batch cooking.

Common Mistakes and Troubleshooting

Even the best cooks make mistakes! Here are some common pitfalls and how to avoid them:

  • Overcooking the Chicken: Keep an eye on the cooking time, as overcooked chicken can become dry and tough.
  • Ignoring the Marinade: Allow the chicken to marinate for at least 15-30 minutes before cooking for deeper flavor.
  • Skipping the Sear: Searing the chicken is crucial for flavor development; don’t skip this step!
  • Not Using Enough Vegetables: Load your pan with veggies for a nutritious boost and colorful presentation.

Variations to Try

Make this recipe your own with these fun variations:

  • Honey Lemon Chicken Thighs: Swap chicken breasts for thighs for a richer flavor and juicier texture.
  • Spicy Honey Lemon Chicken: Add red pepper flakes or sriracha to the marinade for a kick of heat.
  • One Pan Honey Lemon Shrimp: Replace the chicken with shrimp for a quick seafood option that cooks in minutes.
  • Vegetarian Option: Use tofu or chickpeas instead of chicken, adjusting cooking times as needed.

Storage and Make-Ahead Instructions

Planning ahead? Here’s how to store and prepare this dish:

  • Refrigerate: Store leftovers in an airtight container in the fridge for up to 3 days.
  • Freeze: Place cooled chicken and vegetables in a sealed freezer bag for up to 3 months. Thaw overnight in the fridge before reheating.
  • Reheat: Gently reheat in the oven at 350°F (175°C) or microwave in short bursts, adding a splash of water to maintain moisture.

Frequently Asked Questions (FAQs)

Here are some answers to common questions about this recipe:

  • Can I use frozen chicken? Yes, but make sure to thaw it completely before cooking for even results.
  • What can I substitute for soy sauce? You can use tamari for a gluten-free option or coconut aminos for a different flavor profile.
  • Can I add more vegetables? Absolutely! Feel free to toss in your favorites or whatever you have on hand.
  • How can I make this dish spicier? Add some chili paste or sliced jalapeños to the marinade for an extra kick.
  • Is this recipe kid-friendly? Yes! The sweet and tangy flavors are usually a hit with kids.
  • How do I know when the chicken is done? Use a meat thermometer—chicken should reach an internal temperature of 165°F (75°C).
  • Can I make this dish ahead of time? Yes, you can prepare the marinade and chicken a day in advance, just cook it fresh on the day you plan to serve it.
  • What should I serve with One Pan Honey Lemon Chicken? It pairs wonderfully with rice, quinoa, or a fresh salad for a complete meal.

Nutritional Tips and Dietary Adaptations

This recipe is not only delicious but can also be adapted to fit various dietary needs:

  • Low-Carb: Serve with cauliflower rice instead of traditional rice for a low-carb option.
  • Gluten-Free: Use tamari or coconut aminos in place of soy sauce to keep it gluten-free.
  • Low-Sodium: Opt for low-sodium soy sauce and skip added salt to reduce sodium levels.
  • Vegetarian/Vegan: Replace chicken with tofu or chickpeas, and ensure the honey is substituted with agave nectar or maple syrup.

Equipment Recommendations

For this recipe, having the right tools makes all the difference:

  • Large Skillet: A non-stick or cast-iron skillet works best for even cooking.
  • Meat Thermometer: Essential for checking the doneness of your chicken safely.
  • Mixing Bowl: For preparing the marinade, a medium-sized mixing bowl is perfect.
  • Spatula: A sturdy spatula will help you flip the chicken without breaking it apart.

Serving Suggestions

Complete your meal with these tasty side options:

  • Fluffy Rice: Serve over white, brown, or jasmine rice to soak up the delicious sauce.
  • Fresh Salad: A simple green salad with a light vinaigrette pairs nicely.
  • Quinoa: For a protein-packed side, serve with quinoa for a nutritious boost.
  • Garlic Bread: For a comforting option, warm garlic bread is always a crowd-pleaser.

Conclusion

With its vibrant flavors and simple preparation, this One Pan Honey Lemon Chicken is sure to become a staple in your home. Whether you’re cooking for family or entertaining friends, this dish brings both joy and satisfaction to the table. So gather your ingredients, unleash your inner chef, and enjoy the deliciousness that awaits!

One Pan Honey Lemon Chicken – Easy Weeknight Delight

Prep Time 10 minutes
Cook Time 20 minutes
Total Time 30 minutes
Servings 4 servings
Calories 350
This flavorful one-pan dish combines tender chicken with a tangy honey lemon sauce and colorful vegetables, perfect for a quick and satisfying weeknight dinner.

Ingredients

Protein

  • 4 pieces boneless, skinless chicken breasts

Seasonings

  • to taste salt
  • to taste pepper

Sauces & Sweeteners

  • 1/3 cup honey (consider using raw honey for richer flavor)
  • 1/4 cup fresh lemon juice
  • 1/4 cup soy sauce (opt for low-sodium if desired)

Aromatics

  • 3 cloves garlic (minced)
  • 1 teaspoon ground ginger (fresh grated ginger is a great substitute)

Cooking Oil

  • 1 tablespoon olive oil

Vegetables

  • 4 cups mixed vegetables (bell peppers, broccoli, snap peas) (feel free to swap in quick-cooking vegetables)
  • 4 slices lemon (provides visual appeal)
  • 1/4 cup fresh parsley (adds a fresh herbaceous touch)

Instructions 

  • Season chicken breasts with salt and pepper.
  • Heat olive oil in a large pan over medium heat and cook chicken until golden and cooked through, about 6-8 minutes per side.
  • Add garlic and ground ginger; cook for 1 minute until fragrant.
  • Pour in honey, lemon juice, and soy sauce; stir to combine and simmer for 2-3 minutes.
  • Add mixed vegetables and cook until tender, about 5 minutes. Garnish with lemon slices and parsley before serving.

Notes

For extra flavor, marinate the chicken in the honey lemon mixture for 30 minutes before cooking.
Calories: 350kcal
Cost: $15
Course: Dinner
Cuisine: American
Keyword: Chicken