Author

Steven

Browsing

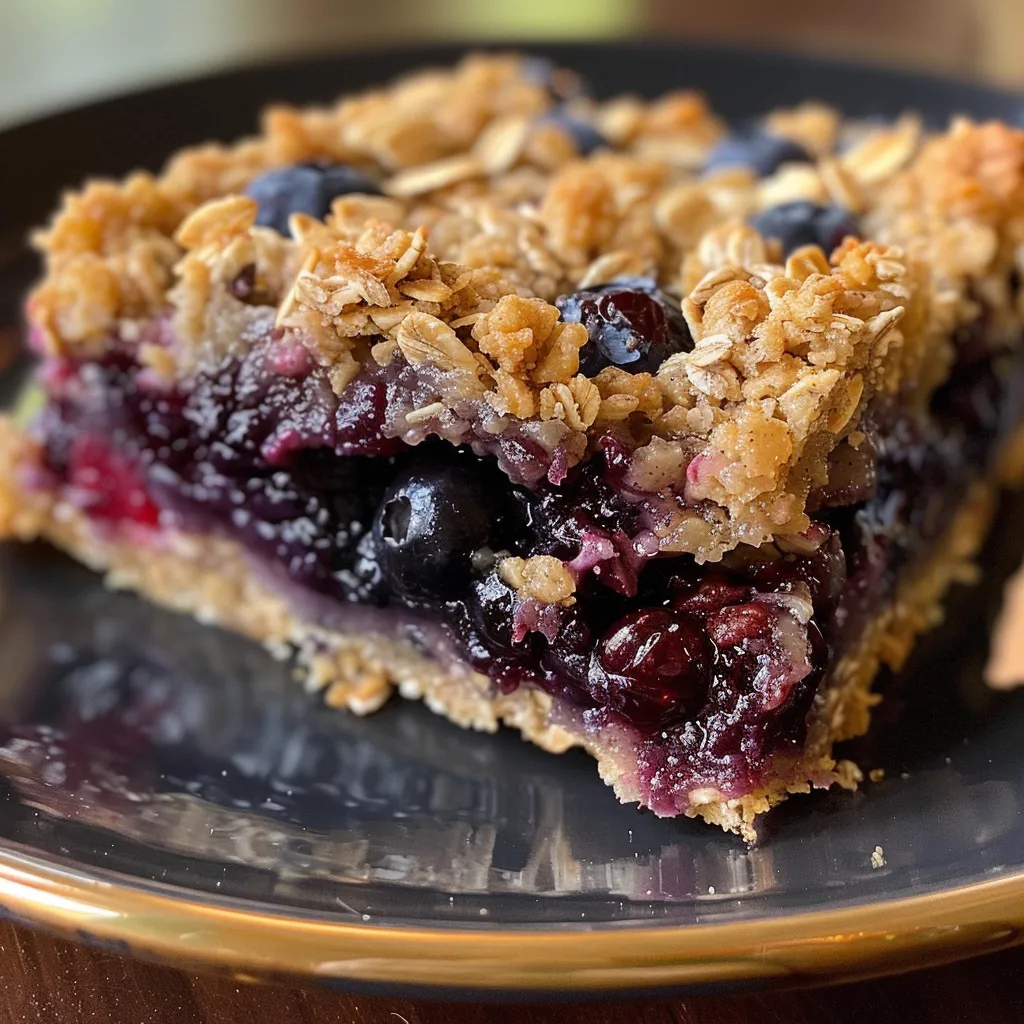
Why You’ll Love These Delightfully Chewy Blueberry Oat Bars

If you’re looking for a snack that’s not only delicious but also wholesome and easy to make, you’ve landed in the right place! These blueberry oat bars are about to become your new favorite companion for breakfast, an energizing snack, or a delightful dessert. Made with simple, wholesome ingredients, they are packed with flavor and nutrition. Let’s dive into why these bars are a must-try!

  • Quick and Easy: With minimal prep time and straightforward steps, you can whip these up in no time, perfect for busy schedules.
  • Healthy Ingredients: Utilizing rolled oats, fresh blueberries, and natural sweeteners means you can enjoy these bars guilt-free.
  • Customizable: Whether you want to add nuts, seeds, or even swap out the fruit, this recipe can easily adapt to your taste.
  • Make Ahead: These bars are great for meal prep—make a batch on the weekend, and you’ll have snacks ready throughout the week.
  • Freezer Friendly: Store them in the freezer for up to three months, so you always have a healthy option on hand.

Essential Ingredients for Blueberry Oat Bars

Let’s break down what you’ll need to create these delicious bars:

  • 2 cups Rolled oats: Use old-fashioned oats for that perfect chewy texture. They form the base of our bars.
  • 1 cup All-purpose flour: This helps bind the oats together, giving the bars structure.
  • 1/2 cup Brown sugar: Adds natural sweetness and moisture—feel free to adjust based on your sweetness preference.
  • 1 teaspoon Baking powder: Lightens the oat base, ensuring your bars don’t become dense.
  • 1 teaspoon Ground cinnamon: Complements the blueberries beautifully and adds warmth.
  • 1/2 teaspoon Salt: Balances the sweetness, bringing out the flavors.
  • 2 cups Fresh or frozen blueberries: The star ingredient! They provide juiciness and flavor.
  • 1/4 cup Honey or maple syrup: Natural sweeteners that enhance the flavor profile.
  • 2 tablespoons Cornstarch: Thickens the blueberry filling, ensuring it holds together.
  • 1 tablespoon Lemon zest: Adds brightness and a refreshing note.
  • 1/4 cup Butter: Cold and cubed for topping; you can substitute with coconut oil for a dairy-free option.
  • 1/4 cup Brown sugar: For a caramelized finish on top.
  • 1/2 cup Chopped nuts (optional): Walnuts or pecans can add a delightful crunch.

How to Make Blueberry Oat Bars

Ready to make your own delicious blueberry oat bars? Follow these simple steps:

  1. Preheat your oven to 350°F (175°C) and line a baking dish (about 9×9 inches) with parchment paper for easy removal.
  2. In a large mixing bowl, combine the oats, flour, brown sugar, baking powder, cinnamon, and salt.
  3. Add in the blueberries, cornstarch, honey (or maple syrup), and lemon zest. Mix until just combined.
  4. Press half of the oat mixture into the prepared baking dish to form the base.
  5. Spread the remaining oat mixture evenly over the top, sprinkling with additional brown sugar and nuts if using.
  6. Bake for 25-30 minutes or until the top is golden brown and set.
  7. Let cool completely in the pan before lifting out and slicing into bars.

Pro Tips for Perfect Blueberry Oat Bars

Freshly baked blueberry oat bars with a golden brown crust, garnished with nuts.

Here are some expert insights for making these bars truly exceptional:

  • Use room temperature ingredients: This helps the butter or coconut oil blend more easily with the other ingredients.
  • Don’t overmix: Once you add the butter or wet ingredients, mix just until combined to keep your bars tender.
  • Press the mixture firmly: When creating the base, make sure to press it down well to prevent crumbling.
  • Cool completely: Allowing the bars to cool fully helps them set properly, making them easier to cut.
  • Adjust sweetness to taste: Feel free to reduce the sugar if you prefer less sweet or swap for stevia or other alternatives.
  • Experiment with flavors: Try adding vanilla extract or almond extract for a twist!
  • Store properly: Keep bars in an airtight container or wrap them in plastic wrap to maintain freshness.
  • Check for doneness: The edges should be golden and the center should be set but slightly soft when you pull them out of the oven.

Common Mistakes and Troubleshooting

Even the best of us make mistakes in the kitchen! Here are some common pitfalls and how to avoid them:

  • Bars are too dry: This can happen if you overbake them. Keep an eye on the time and perform a toothpick test.
  • Filling leaks out: Ensure you’re using the right amount of cornstarch to thicken the filling.
  • Not enough flavor: Consider adding spices like nutmeg or ginger for extra depth.
  • Bars crumble when cut: This can be due to not pressing the oat mixture firmly enough or not letting them cool completely.

Delicious Variations to Try

Want to mix it up? Here are some fun variations to keep things interesting:

  • Peanut Butter Swirl: Add dollops of peanut butter in the mixture before baking for a creamy twist.
  • Mixed Berry Delight: Use a combination of blueberries, raspberries, and chopped strawberries for a berry explosion.
  • Chocolate Chip Oat Bars: Stir in mini chocolate chips for a sweeter treat that kids will love.
  • Apple Cinnamon: Substitute blueberries for diced apples and increase the cinnamon for a fall-inspired snack.

Storage and Make-Ahead Instructions

These bars are perfect for meal prep! Here’s how to store them:

  • Room Temperature: Store in an airtight container at room temperature for up to 3 days.
  • Refrigerator: For longer freshness, keep them in the fridge for up to 1 week.
  • Freezer: Wrap individual bars in plastic wrap and store in a freezer-safe bag for up to 3 months.

Frequently Asked Questions

Got questions? We’ve got answers! Here are some common queries about blueberry oat bars:

  • Can I use frozen blueberries? Yes! Just make sure to thaw and drain them before adding to the mixture.
  • Can I make them gluten-free? Absolutely! Substitute all-purpose flour with a gluten-free blend.
  • What can I use instead of butter? Coconut oil or applesauce works well as a substitute.
  • How do I know when they’re done baking? Look for golden edges and a firm center that springs back when pressed.
  • Can these bars be eaten cold? Yes! They’re delicious straight from the fridge.
  • Are they kid-friendly? Definitely! Kids love the sweetness and fruity taste.
  • Can I add protein powder? Yes, just reduce the amount of flour slightly to accommodate.
  • How do I cut the bars cleanly? Use a sharp knife and wipe it clean between cuts for neat edges.

Nutritional Tips and Dietary Adaptations

These bars not only taste great but can also fit various dietary needs:

  • Vegan Option: Replace honey with maple syrup and butter with coconut oil.
  • Low-Sugar Version: Reduce the brown sugar and use ripe bananas for natural sweetness.
  • Protein Boost: Add a scoop of your favorite protein powder to the oat mixture.
  • Nut-Free: Omit nuts or substitute with seeds like sunflower or pumpkin for crunch.

Recommended Equipment for Making Blueberry Oat Bars

Having the right tools makes all the difference in baking:

  • Mixing Bowls: A good set of mixing bowls in various sizes is essential for combining ingredients.
  • 9×9 Baking Dish: This size is perfect for baking and cutting into bar shapes.
  • Parchment Paper: Lining your dish helps with easy removal and clean-up.
  • Measuring Cups and Spoons: Precision is key to achieving the best results.

Serving Suggestions

These blueberry oat bars are versatile and pair well with various accompaniments:

  • Yogurt: Serve with a dollop of Greek yogurt for added creaminess and protein.
  • Fresh Fruit: Pair with sliced bananas or additional berries for a refreshing side.
  • Nut Butter: Spread almond or peanut butter on top for a satisfying protein boost.
  • Milk or Dairy Alternative: Enjoy with a glass of milk or plant-based milk for a complete snack.

Conclusion

There you have it! These delightfully chewy blueberry oat bars are the perfect blend of health, flavor, and ease. With a few simple ingredients, you can create a delicious treat that everyone will love. So, gather your ingredients, roll up your sleeves, and let’s make some magic in the kitchen! Happy baking!

Best Blueberry Oat Bars Ever: Easy, Chewy, and Homemade Bliss

Prep Time 15 minutes
Cook Time 25 minutes
Total Time 40 minutes
Servings 9 bars
Calories 250
Enjoy these delicious homemade blueberry oat bars that are chewy, sweet, and perfect for any occasion.

Ingredients

Oats

  • 2 cups Rolled oats (use old-fashioned oats for a chewy texture)
  • 1 cup All-purpose flour (helps bind the oats)
  • 1/2 cup Brown sugar (adds natural sweetness and moisture)
  • 1 teaspoon Baking powder (lightens the oat base)
  • 1 teaspoon Ground cinnamon (complements the blueberry)
  • 1/2 teaspoon Salt (balances the sweetness)
  • 2 cups Fresh or frozen blueberries (star ingredient)
  • 1/4 cup Honey or maple syrup (natural sweeteners)
  • 2 tablespoons Cornstarch (thickens the filling)
  • 1 tablespoon Lemon zest (adds brightness)
  • 1/4 cup Butter (cold and cubed for topping)
  • 1/4 cup Brown sugar (for a caramelized finish)
  • 1/2 cup Chopped nuts (optional (walnuts or pecans))

Instructions 

  • Preheat oven to 350°F (175°C). Mix oats, flour, brown sugar, baking powder, cinnamon, and salt.
  • Combine blueberries, honey, cornstarch, and lemon zest; spread over the oat mixture.
  • Cut cold butter into small pieces and sprinkle over the filling and oat mixture. Add nuts if desired.
  • Bake for 25 minutes until golden brown. Let cool before slicing.

Notes

Store in an airtight container for up to 3 days for best freshness.
Calories: 250kcal
Cost: $15
Course: Dessert
Cuisine: American
Keyword: Blueberry

Welcome to your new favorite recipe for a warming Coconut Curry Soup, perfect for those busy weeknights when you crave a comforting dish without spending hours in the kitchen. This easy soup combines vibrant vegetables, fragrant spices, and creamy coconut milk to create a delightful meal that’s not only satisfying but also packed with flavor. Let’s dive into the details of this delicious coconut curry soup recipe!

Why You’ll Love This Recipe

  • Quick and Easy: This soup can be prepared in under 30 minutes, making it ideal for busy weeknights.
  • Flavor Explosion: The combination of coconut milk, curry powder, and fresh vegetables creates a rich and satisfying flavor profile.
  • Customizable: You can easily modify the ingredients to suit your taste or dietary preferences, adding proteins or swapping out veggies.
  • Healthy and Nutritious: Packed with vitamins from fresh vegetables, this soup is a wholesome meal that feels indulgent.
  • Make Ahead Friendly: This soup stores well in the refrigerator or freezer, making it perfect for meal prep.

Ingredients Breakdown

To create this Coconut Curry Soup, you’ll need the following ingredients:

  • 2 Tbsp coconut oil: Provides a rich base flavor and healthy fats.
  • ½ medium yellow onion (finely chopped): Adds sweetness and depth to the soup.
  • 6 sweet baby peppers (cored and chopped): Brings a burst of color and sweetness.
  • 2 large carrots (peeled and chopped): Contributes natural sweetness and a satisfying crunch.
  • 3 cloves garlic (minced): Infuses the soup with aromatic flavors.
  • 1 Tbsp fresh ginger (peeled and grated): Adds warmth and a hint of spice.
  • ½ medium head cauliflower (chopped into florets): This veggie adds creaminess and fiber.
  • 2 Tbsp yellow curry powder: The star ingredient that gives this soup its signature flavor.
  • 1 tsp sea salt (to taste): Enhances all the flavors of the ingredients.
  • ½ tsp red pepper flakes (optional): For those who like a touch of heat!
  • 1 (14-ounce) can full-fat coconut milk: Provides creaminess and a rich, velvety texture.
  • 3 cups vegetable broth: The liquid base; feel free to use chicken broth for a non-vegetarian version.
  • 2 Tbsp lime juice: Brightens the soup and adds a refreshing zing.
  • 2 tsp pure maple syrup: Balances the flavors with a hint of sweetness.
  • 1 bunch green onion (chopped for serving): Adds a fresh, crisp garnish.

Recipe Instructions

Let’s get cooking! Follow these simple steps to make your Coconut Curry Soup:

  1. Heat the coconut oil in a large stock pot (I use my Dutch Oven) over medium-high heat. Add the yellow onion and sauté, stirring occasionally, until translucent, about 8 minutes.
  2. Add the garlic, ginger, cauliflower, curry powder, sea salt, and red pepper flakes. Cook, stirring occasionally, until very fragrant, about 5 minutes.
  3. Add the peppers and carrots, cover, and continue cooking, stirring occasionally, until the vegetables have softened but are still slightly al dente, about 5 to 8 minutes.
  4. Pour in the coconut milk, vegetable broth, lime juice, and pure maple syrup. Cover and heat to a gentle boil, then immediately reduce the heat to a simmer.
  5. Continue cooking, covered, until the vegetables have reached your desired doneness, about 5 to 10 minutes.
  6. Taste the soup for flavor, adjusting with more sea salt, lime juice, or red pepper flakes as needed. Serve hot, garnished with fresh green onion.

Pro Tips for the Best Coconut Curry Soup

Coconut Curry Soup close-up, highlighting its rich color and texture.
  • Fresh Ingredients: Use fresh vegetables for the best flavor and nutritional value.
  • Customize with Protein: Add cooked chicken, shrimp, or chickpeas for a heartier meal.
  • Adjust Spice Level: Start with less curry paste and add more to taste for a milder soup.
  • Use Full-Fat Coconut Milk: For the richest flavor and creaminess, opt for full-fat coconut milk.
  • Experiment with Herbs: Fresh cilantro or basil can elevate the soup with added freshness.
  • Check Consistency: If the soup is too thick, add more vegetable broth to loosen it up.
  • Storage Tips: Store leftovers in an airtight container in the fridge for up to 4 days.
  • Freezer Friendly: This soup freezes well; just let it cool completely before transferring to freezer-safe containers.

Common Mistakes and Troubleshooting

Even the best cooks can make mistakes! Here are some tips to avoid common pitfalls:

  • Burnt Garlic: Be careful not to burn the garlic by stirring it frequently and adjusting the heat as necessary.
  • Too Thick or Thin: If the soup is too thick, add more broth or water. If it’s too thin, simmer it longer to reduce.
  • Flavor Mismatch: If the soup lacks flavor, consider adding more salt, lime, or spices, tasting as you go.

Delicious Variations

Want to mix things up? Try these variations:

  • Thai Coconut Curry Soup: Substitute red curry paste for yellow curry powder for a different flavor profile.
  • Vegetable Variations: Incorporate leafy greens like spinach or kale for extra nutrients.
  • Protein Boost: Add cooked lentils or beans for a plant-based protein punch.
  • Noodle Option: Serve over rice noodles or add them directly into the soup for a heartier dish.

Storage and Make-Ahead Instructions

This Coconut Curry Soup is perfect for meal prep! Here’s how to store it:

  • Refrigerate: Keep in an airtight container for up to 4 days.
  • Freeze: Portion into freezer-safe containers for up to 3 months.
  • Reheat: Gently reheat on the stove over low heat, adding a splash of broth if needed to loosen the soup.

Frequently Asked Questions

  • Can I make this soup vegan? Absolutely! Just use vegetable broth and omit any animal products.
  • How spicy is this soup? The spice level can be adjusted by varying the amount of curry powder and red pepper flakes.
  • What can I substitute for coconut milk? You can use almond milk or oat milk, though the flavor will differ.
  • Can I add meat to this recipe? Yes, cooked chicken or shrimp can be added for a protein boost.
  • How long does this soup last in the fridge? It lasts up to 4 days when stored in an airtight container.
  • Can I use frozen vegetables? Yes, frozen vegetables can be used; just adjust cooking time accordingly.
  • Is this soup gluten-free? Yes, all ingredients are naturally gluten-free; just ensure your broth is gluten-free.
  • Can I make this soup in a slow cooker? Yes, sauté the aromatics first, then add everything to the slow cooker and cook on low for 4-6 hours.

Nutrition Tips and Dietary Adaptations

This Coconut Curry Soup is not only delicious but also nutritious! Here are some tips for dietary adaptations:

  • Low-Carb Option: Skip the carrots and use zucchini or other low-carb vegetables.
  • Protein-Packed: Add tofu or tempeh for a plant-based protein source.
  • Nut-Free Variant: Use sunflower oil instead of coconut oil to avoid nuts.

Equipment Recommendations

To make this Coconut Curry Soup, you’ll need:

  • Heavy-bottomed pot: A Dutch oven or a large stockpot works best for even heat distribution.
  • Sharp knife and cutting board: For efficient chopping of your fresh vegetables.
  • Measuring cups and spoons: To ensure precise ingredient measurements.

Serving Suggestions

For a complete meal, try serving your Coconut Curry Soup with:

  • Crusty Bread: A slice of sourdough or rustic bread to soak up the delicious broth.
  • Salad: A fresh cucumber or avocado salad adds a refreshing contrast.
  • Rice: Serve it over steamed rice or quinoa for a heartier option.

Now that you have all the tools and tips to make a delicious Coconut Curry Soup, it’s time to gather your ingredients and get cooking! Remember, cooking is all about exploration and enjoyment. So, don’t hesitate to adjust the recipe to make it your own. Happy cooking!

Coconut Curry Soup

Prep Time 10 minutes
Cook Time 20 minutes
Total Time 30 minutes
Servings 4 servings
Calories 250
A flavorful and comforting vegan soup packed with vegetables and aromatic spices, perfect for a quick and nourishing meal.

Ingredients

Oil

  • 2 Tbsp coconut oil (or avocado oil)

Vegetables

  • ½ medium yellow onion (finely chopped)
  • 6 pieces sweet baby peppers (cored and chopped*)
  • 2 large carrots (peeled and chopped)
  • 3 cloves garlic (minced)
  • 1 Tbsp fresh ginger (peeled and grated)
  • ½ head cauliflower (chopped into florets)
  • 2 Tbsp yellow curry powder
  • 1 tsp sea salt (to taste)
  • ½ tsp red pepper flakes (optional)
  • 14 oz full-fat coconut milk
  • 3 cups vegetable broth
  • 2 Tbsp lime juice
  • 2 tsp pure maple syrup (see note***)
  • 1 bunch green onion (chopped for serving)

Instructions 

  • Heat coconut oil in a large pot over medium-high heat. Sauté onion until translucent (~8 min). Add garlic, ginger, cauliflower, curry powder, salt, and red pepper flakes; cook until fragrant (~5 min).
  • Add peppers and carrots, cover, and cook until vegetables are slightly tender (~5-8 min). Pour in coconut milk, broth, lime juice, and maple syrup; bring to a boil, then simmer until vegetables are cooked (~5-10 min).
  • Adjust seasoning with salt, lime juice, or red pepper flakes. Serve hot garnished with chopped green onion.

Notes

Feel free to add more red pepper flakes for extra heat or adjust salt to taste.
Calories: 250kcal
Cost: $15
Course: Soup
Cuisine: Thai
Keyword: Coconut, Vegetarian

Why Chicken Fajitas Bowls are Your New Go-To Dinner

Are you ready to elevate your weeknight dinners with a dish that’s as vibrant as it is satisfying? This Chicken Fajitas Bowl combines juicy chicken, colorful bell peppers, and your choice of toppings, all over a bed of rice. In just under 30 minutes, you can whip up a meal that feels like a fiesta on your dinner table! Let’s dive into why this recipe is a must-try.

Why You’ll Love This Recipe

  • Quick and Easy: This dish comes together in about 30 minutes, making it perfect for busy weeknights.
  • Customizable: Mix and match toppings and ingredients to suit your taste, ensuring everyone at the table is happy.
  • Meal Prep Friendly: Prepare components ahead of time for easy assembly during the week.
  • Healthy and Delicious: Packed with lean protein, fiber, and colorful veggies, these bowls are nutrient-dense and satisfying.
  • Family Favorite: With its vibrant flavors and fun presentation, it’s sure to please even the pickiest eaters!

Ingredients Breakdown

Here’s what you’ll need to make your Chicken Fajitas Bowl:

  • Chicken & Fajitas:
    • 1½ lbs boneless, skinless chicken breasts, sliced
    • 2 tablespoons olive oil
    • 2 tablespoons lime juice
    • 1 teaspoon chili powder
    • 1 teaspoon cumin
    • 1 teaspoon paprika
    • ½ teaspoon garlic powder
    • ½ teaspoon onion powder
    • Salt and black pepper, to taste
  • Vegetables:
    • 1 red bell pepper, sliced
    • 1 green bell pepper, sliced
    • 1 yellow bell pepper, sliced
    • 1 large onion, sliced
  • Bowls:
    • 3 cups cooked rice (choose from white, brown, or cilantro-lime)
    • 1 cup black beans, drained and rinsed
    • 1 cup corn (grilled or canned)
  • Optional toppings:
    • Avocado
    • Salsa
    • Sour cream
    • Cilantro
    • Shredded cheese

Step-by-Step Instructions

Close-up shot of a Chicken Fajitas Bowl, highlighting juicy chicken and various colorful toppings.

Now that you have your ingredients ready, let’s make this delicious Chicken Fajitas Bowl!

  • Marinate the Chicken: In a bowl, toss chicken with olive oil, lime juice, chili powder, cumin, paprika, garlic powder, onion powder, salt, and pepper. Allow it to marinate for 10-15 minutes for maximum flavor.
  • Cook the Chicken: Heat a large skillet over medium-high heat. Cook the marinated chicken for 6-8 minutes until browned and cooked through. Remove from the skillet and set aside.
  • Sauté the Veggies: In the same skillet, add sliced peppers and onions. Cook for 5-7 minutes until they are tender-crisp and slightly charred. This adds a lovely smoky flavor!
  • Combine: Return the cooked chicken to the skillet and toss with the sautéed vegetables. Heat everything together for an additional 2-3 minutes.
  • Assemble the Bowls: Divide the cooked rice into bowls and top with the fajita chicken and veggies. Add black beans, corn, and your choice of toppings. Serve immediately and enjoy!

Pro Tips for Perfect Fajitas Bowls

  • Marinate Longer: For even more flavor, let the chicken marinate overnight if you have the time.
  • Use a Cast Iron Skillet: This helps achieve that perfect sear on both the chicken and the veggies.
  • Don’t Overcrowd: Cook in batches if necessary to ensure your chicken and vegetables get that nice browning.
  • Fresh Ingredients: Using fresh, high-quality ingredients will elevate the taste of your dish significantly.
  • Experiment with Spice: Adjust the chili powder and cumin to match your heat preference.
  • Try Different Rice: Switch it up with quinoa or cauliflower rice for a low-carb version.
  • Garnish Creatively: Fresh herbs like cilantro or parsley add a burst of freshness that can’t be beaten.
  • Make it a Salad: Skip the rice and serve over mixed greens for a lighter meal.

Common Mistakes and Troubleshooting

Here are some common pitfalls and how to avoid them:

  • Overcooking Chicken: Ensure your chicken is cooked until it reaches an internal temperature of 165°F to keep it moist and tender.
  • Underseasoning: Don’t be shy with your spices! Taste as you go and adjust seasoning accordingly.
  • Too Much Water in Rice: Make sure to measure your water accurately when cooking rice to avoid mushiness.
  • Skipping the Marinade: Don’t skip the marinating step—it’s essential for flavor!

Variations to Try

Feel free to mix it up with these fun variations:

  • Steak Fajitas: Substitute chicken with flank steak for a different protein option.
  • Vegetarian Bowl: Swap the chicken for sautéed mushrooms, zucchini, or tofu for a vegetarian delight.
  • Spicy Kick: Add jalapeños or a dash of hot sauce for those who like it spicy!
  • Breakfast Fajitas: Use scrambled eggs instead of chicken for a delightful brunch option.

Storage and Make-Ahead Instructions

Planning to make this dish ahead of time? Here’s how:

  • Store Separately: Keep the chicken, veggies, rice, and toppings in separate airtight containers to maintain freshness.
  • Refrigerate: Everything should be stored in the refrigerator and consumed within 3-4 days.
  • Reheat Properly: Reheat chicken and veggies in a skillet over medium heat to retain texture.
  • Freezer-Friendly: You can freeze the cooked chicken and veggies for up to 2 months. Thaw overnight in the fridge before reheating.

Frequently Asked Questions

  • Can I use frozen chicken? Yes, just ensure it’s fully thawed before marinating and cooking.
  • How do I keep my chicken juicy? Marinate your chicken and don’t overcook it! Use a meat thermometer for best results.
  • What can I substitute for lime juice? You can use lemon juice or apple cider vinegar in a pinch.
  • Can I make this gluten-free? Yes, just ensure your toppings and rice are gluten-free.
  • What’s the best way to reheat leftovers? Reheat in a skillet on medium heat for even warming.
  • Is this recipe kid-friendly? Absolutely! Let kids choose their own toppings for a fun family meal.
  • How can I make it spicier? Add cayenne pepper or fresh jalapeños to the chicken marinade.
  • Can I skip the rice? Yes! You can serve it in a lettuce wrap or over a salad for a low-carb option.

Nutritional Tips and Dietary Adaptations

This Chicken Fajitas Bowl is not just delicious, but it can be made to fit various dietary needs:

  • Low-Carb: Use cauliflower rice instead of regular rice for a low-carb option.
  • High-Protein: Add extra chicken or beans to boost protein content.
  • Vegan: Replace chicken with tofu or tempeh and use plant-based toppings.
  • Low-Fat: Use skinless chicken breast and limit cheese and creamy toppings.

Essential Equipment

To make this recipe, you’ll need:

  • A large skillet or cast iron pan for cooking.
  • A cutting board and knife for chopping your ingredients.
  • A mixing bowl for marinating the chicken.
  • A measuring cup and spoons for precise ingredient measurements.

Serving Suggestions

Want to elevate your Chicken Fajitas Bowls even further? Consider these serving ideas:

  • Fresh Sides: Serve with a side of corn on the cob or a simple green salad.
  • Drinks: Pair with a refreshing margarita or iced tea for a complete meal.
  • Fun Extras: Consider adding tortilla chips on the side for some crunch!

Conclusion

Your journey to a stress-free, flavorful dinner starts here with these Chicken Fajitas Bowls. They’re not just a meal; they’re an experience—vibrant, customizable, and oh-so-delicious. So grab your ingredients, gather your loved ones, and let’s make dinner a fun occasion! Happy cooking!

Chicken Fajitas Bowl

Prep Time 10 minutes
Cook Time 15 minutes
Total Time 25 minutes
Servings 4 servings
Calories 550
A flavorful and customizable bowl featuring marinated chicken, sautéed peppers and onions, served over rice with tasty toppings.

Ingredients

Chicken & Fajitas

  • 1.5 lbs boneless, skinless chicken breasts, sliced
  • 2 tablespoons olive oil
  • 2 tablespoons lime juice
  • 1 teaspoon chili powder
  • 1 teaspoon cumin
  • 1 teaspoon paprika
  • 0.5 teaspoon garlic powder
  • 0.5 teaspoon onion powder
  • to taste Salt and black pepper
  • 1 red bell pepper sliced
  • 1 green bell pepper sliced
  • 1 yellow bell pepper sliced
  • 1 large onion (sliced)

Bowls

  • 3 cups cooked rice (white, brown, or cilantro-lime)
  • 1 cup black beans, drained and rinsed
  • 1 cup corn (grilled or canned)

Optional toppings

  • as desired avocado, salsa, sour cream, cilantro, shredded cheese

Instructions 

  • Toss chicken with olive oil, lime juice, chili powder, cumin, paprika, garlic powder, onion powder, salt, and pepper.
  • Cook chicken in a skillet over medium-high heat for 6–8 minutes until browned and cooked through. Remove and set aside.
  • Sauté peppers and onions in the same skillet for 5–7 minutes until tender and slightly charred. Return chicken to the skillet and toss to combine.
  • Divide rice into bowls, top with chicken, black beans, corn, and optional toppings.

Notes

For extra flavor, add fresh cilantro or a squeeze of lime before serving.
Calories: 550kcal
Cost: $15
Course: Main Course
Cuisine: Mexican
Keyword: bowl, Chicken, Fajitas

Welcome to the world of delicious, nutritious, and satisfying chocolate protein shakes! If you’re looking for a quick boost to power up your day, then this shake is a fantastic choice. In just a few minutes, you can whip up a creamy and satisfying chocolate protein shake that’s perfect for breakfast, a post-workout boost, or even a healthy dessert. Let’s dive into the details of how to make this shake your own, packed with flavor and nutrients!

Why You’ll Love This Recipe

  • Quick and Easy: This shake takes only minutes to prepare, making it perfect for busy mornings or post-workout recovery. With a few simple ingredients, you can enjoy a delicious treat without the hassle.
  • Customizable: You can easily tweak the recipe to suit your taste preferences or dietary needs. Whether you prefer dairy or non-dairy options, there’s a way to make this shake work for you.
  • Protein Power: Packed with protein from both the protein powder and yogurt (or banana), this shake supports muscle recovery and keeps you feeling full longer.
  • Deliciously Indulgent: With the rich flavor of chocolate, you can satisfy your sweet tooth while still staying healthy. It’s the best of both worlds!
  • Nutrient-Rich: Loaded with vitamins and minerals, this shake can contribute to your daily nutritional intake, especially if you add fruits or greens.

Chocolate Protein Shake Ingredients

Understanding each ingredient in your shake is crucial for achieving the best flavor and texture. Here’s a breakdown of what you’ll need, along with possible substitutions:

  • 1 cup milk (of choice) (240g): Any milk works—dairy, almond, soy, or oat milk. For a creamier texture, consider using whole milk or a nut milk blend.
  • 1 scoop chocolate protein powder (30g): Choose a high-quality protein powder that you enjoy. If you’re vegan, opt for a plant-based protein powder.
  • 6 oz vanilla yogurt (or 1 banana) (170g): Yogurt adds creaminess and protein. If you prefer, you can substitute with a banana for a dairy-free option.
  • Sweetener (of choice): This can be honey, maple syrup, or a sugar substitute like stevia or monk fruit. Adjust based on your sweetness preference.
  • 2 tbsp peanut butter (or almond butter) (optional) (30g): This adds healthy fats and a nutty flavor. You can also try cashew butter or omit it entirely.

How to Make a Chocolate Protein Shake

Let’s get to the fun part—making your shake! Follow these simple steps:

  • Start with cold ingredients: This helps achieve that refreshing, smooth texture.
  • Add all ingredients to a blender. Blend on high until thick and smooth.
  • Taste and adjust: If you want it sweeter, add your sweetener of choice and blend again.
  • Pour into a glass and enjoy immediately. If you have leftovers, store them in a lidded container in the refrigerator for up to three days.

Pro Tips for the Perfect Shake

Delicious chocolate protein shake shown in a clear glass, with a side of peanut butter ready to mix in.

To elevate your chocolate protein shake game, keep these expert tips in mind:

  • Use frozen fruits: Adding frozen bananas or berries can enhance the creaminess and chill of your shake.
  • Layer in greens: Spinach or kale can be added without affecting the flavor much, giving you an extra nutrient boost.
  • Mix in spices: A pinch of cinnamon or vanilla extract can add a unique flavor twist.
  • Chill your glass: For an extra-refreshing experience, chill your glass in the freezer before serving.
  • Check your blender: Ensure your blender is powerful enough to blend all ingredients smoothly, especially if you include frozen items.
  • Don’t over-blend: Blend just until smooth to avoid heating the shake and altering the taste.
  • Try different protein powders: Experiment with various flavors to find your favorite combination.
  • Prep in advance: For busy days, measure out your ingredients the night before and blend in the morning.

Common Mistakes and Troubleshooting

If your shake doesn’t turn out as expected, here are some common mistakes to avoid:

  • Using warm ingredients: Always start with cold ingredients to achieve the desired thick and creamy texture.
  • Over-sweetening: Start with a small amount of sweetener and adjust as needed to avoid overpowering the chocolate flavor.
  • Not blending enough: Make sure to blend thoroughly to avoid lumps, especially with protein powder.
  • Skipping the yogurt: Yogurt adds creaminess and helps create a satisfying texture, so don’t skip it unless you have a substitute.

Variations to Try

Feel free to mix things up with these delicious variations!

  • Chocolate Banana Shake: Use a ripe banana and increase the amount of peanut butter for a richer flavor.
  • Mint Chocolate Protein Shake: Add a few drops of peppermint extract for a refreshing twist.
  • Chocolate Berry Smoothie: Toss in a handful of frozen berries for added antioxidants and flavor.
  • Mocha Protein Shake: Mix in a shot of espresso or instant coffee for a caffeine boost and a coffee flavor.

Storage and Make-Ahead Instructions

If you want to prepare your shake ahead of time, here’s how to do it:

  • Make-ahead: You can prep all ingredients and store them in the blender jar in the fridge overnight. Blend in the morning for a quick breakfast.
  • Storage: Leftover shake can be kept in the fridge for up to three days. Stir or shake well before drinking, as it may separate.

Frequently Asked Questions

Here are some common questions about chocolate protein shakes:

  • Are protein shakes good for weight loss? Yes, they can be part of a weight loss plan when used as meal replacements or snacks, providing essential nutrients while keeping calories in check.
  • Can I use water instead of milk? Absolutely! Using water will reduce calories but may slightly alter the creaminess of the shake.
  • Is it better to drink a protein shake before or after a workout? Both have benefits; before helps fuel your workout, while after aids in recovery.
  • Can I make this shake vegan? Yes, use plant-based protein powder and substitute yogurt with a non-dairy option.
  • How can I make my shake thicker? Add more frozen ingredients or reduce the amount of liquid.
  • What’s the best protein powder to use? Choose one based on your dietary needs and taste preference; look for high-quality options with minimal additives.
  • Can I add greens to my shake? Yes, adding spinach or kale is a great way to boost nutrition without significantly changing the flavor.
  • How often can I have protein shakes? They can be enjoyed daily as part of a balanced diet, but remember to vary your sources of protein.

Nutrition Tips and Dietary Adaptations

Here are some key nutrition tips to consider when making your chocolate protein shake:

  • Balance your macronutrients: Ensure that you have a good balance of protein, carbohydrates, and healthy fats for optimal energy.
  • Watch your portions: While shakes can be nutritious, be mindful of portion sizes, especially if you’re adding high-calorie ingredients like nut butter.
  • Consider dietary restrictions: Adapt the shake to fit vegan, gluten-free, or nut-free diets as needed.

Equipment Recommendations

To make your chocolate protein shake, here are some essential tools:

  • High-speed blender: A good blender is crucial for achieving that smooth and creamy consistency.
  • Measuring cups and spoons: Accurate measurements help ensure the perfect balance of flavors.
  • Glass or shaker bottle: For serving and on-the-go convenience, use a glass or shaker bottle to enjoy your shake anywhere.

Serving Suggestions

Here are a few ideas on how to serve your chocolate protein shake:

  • Garnish: Top with sliced bananas, a drizzle of nut butter, or a sprinkle of chia seeds for added texture and nutrition.
  • Pair with snacks: Enjoy your shake with a handful of nuts or a piece of fruit for a balanced snack.
  • Use as a base: Try using the shake as a base for smoothie bowls, topping it with granola and fresh fruits.

Now that you have all the tips and tricks, you’re ready to make the ultimate chocolate protein shake. Remember, cooking and blending are all about having fun and experimenting! So, roll up your sleeves, and let’s get shaking!

Chocolate Protein Shake

Prep Time 5 minutes
Total Time 5 minutes
Servings 1 shake
Calories 350
A quick and delicious protein shake perfect for a post-workout boost or a healthy snack.

Ingredients

Liquid

  • 1 cup milk (of choice) ((240g))
  • 1 scoop chocolate protein powder ((30g))
  • 6 oz vanilla yogurt (or 1 banana) ((170g))
  • to taste sweetener sweetener (of choice)
  • 2 tbsp peanut butter (or almond butter) ((optional) (30g))

Instructions 

  • Combine all ingredients in a blender.
  • Blend until thick and smooth.
  • Pour into a glass and serve.

Notes

Use cold ingredients for the best taste.
Calories: 350kcal
Cost: $5
Course: Beverage
Cuisine: American
Keyword: chocolate, Protein

Hey there, my fellow food enthusiasts! Are you ready to transform your lunchtime routine into something magical? This Green Goddess Chicken Wrap is more than just a meal; it’s a vibrant explosion of flavors and nutrients that will keep you energized throughout the day. Packed with juicy grilled chicken, creamy avocado, and zesty pesto, this recipe is perfect for anyone looking to spice up their lunch game. Let’s dive into this delicious adventure!

Why You’ll Love This Recipe

Here are five compelling reasons to whip up your own Green Goddess Chicken Wrap:

  • Quick and Easy: Ready in just 20 minutes, making it ideal for busy weekdays.
  • Nutritious and Satisfying: Loaded with protein, healthy fats, and fiber to keep you full and focused.
  • Customizable: Easily adapt ingredients to suit your taste or dietary needs.
  • Flavor-Packed: The combination of grilled chicken, pesto, and fresh veggies creates a mouthwatering taste experience.
  • Meal Prep Friendly: Perfect for making ahead of time, so you can grab-and-go during hectic days.

Gather Your Flavor Crew (Plus Handy Swaps!)

Let’s gather the ingredients needed to create this beautiful wrap. Don’t worry if you don’t have everything on hand; I’ll offer some great substitutions!

Ingredients

  • 1 whole wheat wrap or tortilla: For a gluten-free option, use a corn or spinach tortilla.
  • 1 grilled chicken breast, sliced: Leftover rotisserie chicken works wonders too!
  • ¼ avocado, sliced: Substitute with hummus for creaminess if you’re out of avocado.
  • 2 tbsp prepared pesto: Feel free to use homemade or any store-bought brand you love.
  • ¼ cup cooked quinoa: Swap with brown rice or couscous to keep it interesting.
  • ½ cup chopped kale: Spinach or arugula can easily replace kale.
  • ¼ cup shredded Jack cheese: Use feta or goat cheese for a different flavor profile.

Roll Like a Pro: Let’s Build That Wrap!

These steps will guide you through creating your Green Goddess Chicken Wrap.

Instructions

  1. Warm your wrap slightly in a skillet or microwave for easy folding.
  2. Spread the pesto down the center of the wrap for a flavorful base.
  3. Layer on slices of grilled chicken, avocado, quinoa, chopped kale, and shredded cheese.
  4. Roll the wrap tightly, tucking in the ends as you go, and press gently to seal.
  5. Toast in a skillet or panini press until the cheese melts and the wrap is golden brown.
  6. Slice in half and serve with extra pesto or your favorite green sauce.

Pro Tips for a Perfect Wrap

Juicy chicken wrap with layers of avocado, pesto, and quinoa, viewed from the side.

Here are some expert insights to elevate your wrap-making game:

  • Warm It Up: Warming the wrap makes it more pliable, reducing the chance of tearing.
  • Layer Wisely: Arrange ingredients in a way that balances flavors and textures.
  • Don’t Overfill: Less is more! Avoid stuffing too much to ensure a clean roll.
  • Seal It Right: Pressing down gently as you roll helps to keep everything inside.
  • Skillet Toast: Toasting not only melts the cheese but adds a delightful crunch.
  • Make Ahead: Wraps can be made a day in advance; just store them in an airtight container.
  • Keep It Green: For an extra nutrient boost, add fresh herbs like basil or cilantro.
  • Experiment: Try different sauces or spreads to give your wrap a unique twist.

Avoiding Common Mistakes

Even the best of us make mistakes in the kitchen! Here are some common pitfalls to watch out for:

  • Too Much Liquid: Avoid watery ingredients that can make your wrap soggy.
  • Skipping the Warm-Up: Not warming the tortilla can lead to cracks when rolling.
  • Chopping Ingredients Too Big: Cut veggies and proteins into bite-sized pieces for easier eating.
  • Neglecting Flavor: Season your ingredients well to ensure a burst of flavor in every bite.

Variations to Try

Feel free to mix it up! Here are some tasty variations of the Green Goddess Chicken Wrap:

  • Spicy Southwest: Add jalapeños and chipotle sauce for a kick.
  • Asian Twist: Swap chicken for teriyaki tofu and add shredded carrots.
  • Breakfast Wrap: Use scrambled eggs, spinach, and feta for a hearty breakfast option.
  • Mediterranean Delight: Incorporate olives, sun-dried tomatoes, and feta cheese.

Storage and Make-Ahead Instructions

If you want to prepare your wraps in advance, here’s how to store them:

  • Refrigeration: Wrap tightly in plastic wrap and store in the fridge for up to 2 days.
  • Freezing: Wrap individually in foil and freeze for up to a month. Thaw in the fridge overnight before eating.
  • Assemble Before Serving: Keep ingredients separate until you’re ready to enjoy for the freshest taste.

Frequently Asked Questions

Let’s tackle some common questions about this delightful wrap:

  • Can I use a different protein? Absolutely! Turkey, tofu, or even beans work great.
  • Is this wrap suitable for meal prep? Yes! It’s perfect for making ahead and storing for busy days.
  • Can I make this wrap vegan? Certainly! Use a plant-based protein and skip the cheese.
  • What’s the best way to eat this wrap? Enjoy it cold, or warm it up for a toasty treat!
  • How can I make it gluten-free? Use a gluten-free tortilla or lettuce leaves as a wrap.
  • What if I don’t like pesto? You can substitute with hummus or tahini for a different flavor.
  • Can I add more veggies? Yes! Feel free to include bell peppers, cucumbers, or sprouts.
  • How should I serve it? Pair it with a light salad or some fresh fruit for a balanced meal.

Nutrition Tips and Dietary Adaptations

Here are some tips to make this wrap even more nutritious:

  • Increase Fiber: Include more veggies or use a whole grain wrap to boost fiber content.
  • Healthy Fats: Avocado adds healthy fats; consider using it generously.
  • Protein Power: Add beans or legumes for extra protein if desired.

Essential Equipment Recommendations

To make this wrap, you’ll need:

  • Skillet or Panini Press: For toasting the wrap to perfection.
  • Sharp Knife: For slicing ingredients and your finished wrap.
  • Cutting Board: A sturdy surface for assembling your wrap.

Serving Suggestions

For a complete meal, consider serving your Green Goddess Chicken Wrap with:

  • A side salad: A light green salad complements the flavors beautifully.
  • Chips or Veggies: Crunchy snacks like tortilla chips or fresh veggie sticks are great sides.
  • Fresh Fruit: A piece of fruit adds a refreshing sweetness to your meal.

Final Thoughts: Wrapped With Love, Rolled With Soul

Now that you have all the tools to create your own Green Goddess Chicken Wrap, it’s time to roll up your sleeves and get cooking! Remember, cooking should be fun and stress-free. Don’t hesitate to experiment with flavors and ingredients until you find the perfect combination for your palate. Enjoy the process and savor every delicious bite!

Green Goddess Chicken Wrap

Prep Time 10 minutes
Cook Time 10 minutes
Total Time 20 minutes
Servings 1 wrap
Calories 450
A fresh and flavorful wrap combining grilled chicken, avocado, quinoa, and kale for a healthy lunch or dinner.

Ingredients

Wraps

  • 1 piece whole wheat wrap or tortilla
  • 1 piece grilled chicken breast, sliced
  • 0.25 piece avocado, sliced
  • 2 tbsp prepared pesto
  • 0.25 cup cooked quinoa
  • 0.5 cup chopped kale
  • 0.25 cup shredded Jack cheese

Instructions 

  • Warm the wrap slightly.
  • Spread pesto down the center.
  • Layer chicken, avocado, quinoa, kale, and cheese.
  • Roll tightly and press to seal.
  • Toast until cheese melts and wrap is golden.
  • Slice and serve with extra pesto or green sauce.

Notes

For extra flavor, add a squeeze of lemon or a dash of hot sauce.
Calories: 450kcal
Cost: $12
Course: Main Course
Cuisine: Healthy
Keyword: Chicken, Healthy, Wrap

Welcome to a culinary adventure that will transform your weeknight dinners into something extraordinary! Korean BBQ Chicken Bowls are not just a meal; they are an experience packed with vibrant flavors, nourishing ingredients, and the joy of cooking. In this comprehensive guide, I’m going to walk you through the process of creating these delightful bowls, ensuring that even the busiest of cooks can whip them up effortlessly. Let’s dive into the world of savory Korean BBQ and discover why this dish deserves a spot in your weekly rotation!

Why You’ll Love This Recipe

This Korean BBQ Chicken Bowl recipe is not only simple but also incredibly rewarding. Here are five reasons to fall in love with it:

  • Quick and Easy: With a prep and cook time of around 30 minutes, you can have a delicious dinner on the table in no time, perfect for busy weeknights.
  • Customizable: Tailor your bowls with various toppings and side options to suit your family’s preferences, making it a versatile choice for everyone.
  • Flavor-Packed: The marinade brings together the sweetness of brown sugar, the umami of soy sauce, and the kick of gochujang, creating a mouthwatering explosion of flavors.
  • Healthy and Nutritious: Packed with protein from chicken thighs and colorful veggies, this dish not only tastes great but also provides balanced nutrition.
  • Meal Prep Friendly: These bowls are perfect for meal prepping. Make a big batch on the weekend and enjoy them throughout the week!

Ingredients for Korean BBQ Chicken Bowls

Here’s what you’ll need to create these savory bowls:

  • 1 pound Chicken Thighs: Cut into 1-inch pieces for even cooking.
  • 1/4 cup Low-Sodium Soy Sauce: Or tamari if you need a gluten-free option.
  • 2 tablespoons Gochujang: Adjust this based on your spice preference for the perfect kick.
  • 2 tablespoons Brown Sugar: Honey is a great alternative for a different flavor profile.
  • 1 tablespoon Sesame Oil: Adds a rich, nutty flavor to the marinade.
  • 2 cloves Garlic: Minced for a fragrant base.
  • 1 tablespoon Fresh Ginger: Grated or powdered for an aromatic touch.
  • 2 tablespoons Rice Vinegar: Or apple cider vinegar for acidity.
  • 2 cups Cooked Rice: Jasmine or brown rice works well as a base.
  • 1 cup Cucumber: Sliced for a refreshing crunch.
  • 1 cup Carrots: Sliced thinly or shredded for bright color and sweetness.
  • 1 cup Edamame: Fresh or frozen for added protein.
  • 1/2 cup Kimchi: For authentic flavor and health benefits.
  • 1 tablespoon Sesame Seeds: For texture and garnish.
  • 2 tablespoons Green Onions: Thinly sliced to finish your bowls.

Step-By-Step Instructions for Korean BBQ Chicken Bowls

Ready to make your Korean BBQ Chicken Bowls? Follow these simple steps:

  1. In a large bowl, combine the soy sauce, gochujang, brown sugar, sesame oil, garlic, ginger, and rice vinegar. Mix well to create the marinade.
  2. Add the chicken thighs to the marinade, ensuring they are well coated. Let them marinate for at least 15 minutes (or up to 2 hours for deeper flavor).
  3. While the chicken marinates, cook your rice according to package instructions, and prepare your veggies by slicing the cucumber and carrots.
  4. Heat a skillet over medium-high heat. Add the marinated chicken (discard any leftover marinade) and cook for about 6-8 minutes, or until fully cooked and slightly caramelized.
  5. To assemble, divide the cooked rice among serving bowls, top with the cooked chicken, and scatter the cucumber, carrots, edamame, and kimchi on top.
  6. Garnish with sesame seeds and green onions. Serve immediately and enjoy!

Korean BBQ Chicken Bowls – Customizable Options

A mouth-watering Korean BBQ chicken bowl, highlighting chicken pieces, rice, and toppings like kimchi and green onions.

Your Korean BBQ Chicken Bowl can be tailored to suit your taste! Here are some ideas:

  • Protein Swaps: Try using tofu for a vegetarian option or shrimp for a seafood twist.
  • Grain Alternatives: Swap out rice for quinoa, cauliflower rice, or even noodles for a different texture.
  • Veggie Variations: Experiment with other veggies like bell peppers, zucchini, or snap peas for variety.
  • Spice Level: Adjust the amount of gochujang or add a sprinkle of chili flakes to raise the heat.

Make Ahead Options

Making your Korean BBQ Chicken Bowls in advance can save time during busy days. Here’s how:

  • Marinate the Chicken: You can marinate the chicken a day ahead and store it in the refrigerator.
  • Prep the Veggies: Chop your fresh ingredients ahead of time and store them in airtight containers.
  • Cooked Rice: Prepare a big batch of rice and keep it in the fridge for up to 4 days.

Expert Tips for Korean BBQ Chicken Bowls

Here are some pro tips to ensure your bowls turn out perfectly:

  • Marinade Time: The longer you marinate, the more flavor the chicken absorbs, so aim for at least 1 hour if possible.
  • Don’t Overcrowd the Pan: Cook the chicken in batches if necessary to achieve a nice sear.
  • Use Fresh Ingredients: Fresh veggies not only taste better but also add vibrant color to your bowls.
  • Adjust to Your Taste: Feel free to tweak the ingredients in the marinade to suit your preferences.
  • Garnishes Matter: Garnishing with sesame seeds and green onions elevates the dish visually and flavor-wise.

How to Store and Freeze Korean BBQ Chicken Bowls

Proper storage is key to keeping your Korean BBQ Chicken Bowls fresh:

  • Refrigeration: Store leftovers in an airtight container in the fridge for up to 4 days.
  • Freezing: To freeze, cool the chicken and veggies, then store them in freezer-safe containers for up to 3 months.
  • Reheating: Reheat in the microwave or on the stove until heated through. Add a splash of water to keep things moist.

What to Serve with Korean BBQ Chicken Bowls?

Enhance your meal with these tasty accompaniments:

  • Steamed Broccoli: A healthy side that pairs well with the flavors of the bowl.
  • Kimchi: Provides a tangy contrast that complements the dish beautifully.
  • Pickled Vegetables: Add a crunchy, sour note that enhances the overall flavor profile.
  • Sesame Noodles: For a delightful side dish that echoes the flavors of the bowl.

Korean BBQ Chicken Bowls Recipe FAQs

Got questions? Here are some common queries answered:

  • Can I use chicken breast instead of thighs? Yes, but be cautious not to overcook it as it tends to dry out.
  • Is gochujang necessary? While it adds authentic flavor, you can adjust the spice level or omit it if preferred.
  • Can I make this gluten-free? Absolutely! Just use tamari instead of soy sauce.
  • How do I store leftovers? Keep them in an airtight container in the fridge for up to 4 days.
  • Can I freeze the bowls? Yes, freeze the chicken and veggies separately for easy reheating.
  • What can I substitute for rice? Quinoa, cauliflower rice, or even noodles are great alternatives.
  • How spicy is this dish? You can control the spice level by adjusting the amount of gochujang.
  • What’s the best way to serve it? Serve it warm with all the toppings for a beautiful presentation.

Nutrition Tips and Dietary Adaptations

For a balanced meal, consider these nutrition tips:

  • Add More Veggies: Increase the vegetable portion for more fiber and vitamins.
  • Lean Proteins: Use chicken breast or tofu for a lighter option.
  • Whole Grains: Opt for brown rice or quinoa for added nutrients.

Equipment Recommendations

To streamline your cooking process, consider having these tools on hand:

  • Skillet or Wok: Ideal for cooking the chicken evenly.
  • Rice Cooker: Simplifies the rice cooking process.
  • Measuring Cups and Spoons: Essential for accurate ingredient measurements.

Serving Suggestions

When serving your Korean BBQ Chicken Bowls, consider the following tips:

  • Layering: Start with rice, then add the chicken and veggies for a visually appealing bowl.
  • Garnish Generously: Don’t skimp on the sesame seeds and green onions; they add wonderful flavor and texture.
  • Offer Extra Sauce: Serve some extra marinade or a soy sauce mix on the side for those who love additional flavor.

In conclusion, Korean BBQ Chicken Bowls are a fantastic way to bring vibrant flavors to your dinner table without the stress of complicated cooking. With this detailed guide, you’re equipped to create delicious meals that your family will love and that you can feel proud of. Enjoy experimenting, and remember—cooking should be fun! Happy cooking!

Savory Korean BBQ Chicken Bowls for Perfect Weeknight Dinners

Prep Time 10 minutes
Cook Time 15 minutes
Total Time 25 minutes
Servings 4 servings
Calories 550
Enjoy a quick and flavorful Korean-inspired chicken bowl that's perfect for weeknights, packed with bold flavors and fresh vegetables.

Ingredients

Protein

  • 1 pound Chicken Thighs (cut into 1-inch pieces)

Sauces & Condiments

  • 1/4 cup Low-Sodium Soy Sauce (or tamari for gluten-free)
  • 2 tablespoons Gochujang (adjust to preferred spice level)
  • 2 tablespoons Brown Sugar (honey is a great alternative)
  • 1 tablespoon Sesame Oil (other oils can be used, but will have different flavor)
  • 2 cloves Garlic (minced)
  • 1 tablespoon Fresh Ginger (grated or powdered can be used)
  • 2 tablespoons Rice Vinegar (or apple cider vinegar)

Grains & Staples

  • 2 cups Cooked Rice (jasmine or brown rice)

Vegetables & Sides

  • 1 cup Cucumber (sliced)
  • 1 cup Carrots (sliced thinly or shredded)
  • 1 cup Edamame (fresh or frozen)
  • 1/2 cup Kimchi (for authentic flavor)
  • 1 tablespoon Sesame Seeds (for texture)
  • 2 tablespoons Green Onions (thinly sliced)

Instructions 

  • Mix soy sauce, gochujang, brown sugar, sesame oil, garlic, ginger, and rice vinegar to make the marinade.
  • Marinate chicken with the sauce for at least 10 minutes.
  • Cook chicken in a skillet until fully cooked, about 8-10 minutes.
  • Assemble bowls with rice, cooked chicken, cucumber, carrots, edamame, kimchi, sesame seeds, and green onions.
  • Serve immediately and enjoy!

Notes

For extra flavor, sprinkle additional sesame seeds or green onions before serving.
Calories: 550kcal
Cost: $15
Course: Main Course
Cuisine: Korean
Keyword: Chicken

Are you ready to elevate your weeknight dinners with a dish that’s both delicious and nutritious? These Chicken Quinoa Lettuce Wraps are here to save your evenings! Packed with flavor and vibrant ingredients, this recipe is perfect for those busy nights when you want something healthy without the fuss. Imagine tender ground chicken, fluffy quinoa, and crunchy lettuce leaves drizzled with a creamy peanut sauce—sounds delightful, right? Let’s dive into the details of this easy, satisfying, and gluten-free meal!

Why You’ll Love This Recipe

There are countless reasons to fall in love with these Chicken Quinoa Lettuce Wraps. Here are just a few:

  • Quick to Prepare: In less than 30 minutes, you can have a wholesome meal ready to enjoy.
  • Nutritious Ingredients: Loaded with protein from chicken and quinoa, plus vitamins from fresh vegetables, this dish is a powerhouse of nutrients.
  • Gluten-Free Option: Using gluten-free soy sauce and hoisin sauce makes it perfect for those with dietary restrictions.
  • Kid-Friendly: The fun of wrapping your own lettuce leaves makes this meal a hit with kids!
  • Customizable: Easily modify ingredients to suit your taste or dietary needs—swap in different proteins or veggies!

Essential Ingredients for Chicken Quinoa Lettuce Wraps

Let’s take a closer look at what you’ll need to create these delicious wraps. Here’s a breakdown of the main ingredients:

  • Quinoa: 1 cup
  • Ground Chicken: 1 lb (feel free to substitute with ground turkey or tofu for a vegetarian option)
  • Bell Peppers: 1 cup, diced (choose your favorite colors for a vibrant touch)
  • Shredded Carrots: 1/2 cup
  • Green Onions: 1/4 cup, chopped
  • Garlic: 2 cloves, minced
  • Ginger: 1 tbsp, grated
  • Hoisin Sauce: 2 tbsp
  • Rice Vinegar: 1 tbsp
  • Peanut Butter: 1/4 cup (for the sauce)
  • Soy Sauce: 2 tbsp + 1 tbsp for the sauce
  • Lettuce Leaves: 1 head of romaine or butter lettuce, separated
  • Sesame Seeds and Cilantro: for garnish

Preparation Steps for Perfect Chicken Quinoa Lettuce Wraps

Now that we have our ingredients, let’s walk through the preparation step-by-step. Don’t worry; it’s easier than you think!

  1. Rinse and Cook the Quinoa: Begin by rinsing 1 cup of quinoa in a fine mesh strainer under cold water for 1 minute. This removes its natural bitterness. In a medium saucepan, bring 2 cups of water to a boil. Add the rinsed quinoa, reduce the heat to low, cover, and simmer for about 15 minutes until the water is absorbed and the quinoa is fluffy. Fluff it with a fork and set aside.
  2. Prep the Vegetables and Aromatics: Dice the bell peppers, shred the carrots, mince the garlic, and grate the ginger. Chop the green onions and pick the cilantro leaves. Don’t forget to separate the lettuce leaves, rinse them, and chill them in the fridge for that extra crunch!
  3. Brown the Chicken: Heat 1 tbsp of olive oil in a large skillet over medium heat. Add the ground chicken, breaking it apart with a spoon. Cook for about 5 minutes until no longer pink. Stir in the minced garlic and grated ginger, cooking for another minute until fragrant.
  4. Season and Add Vegetables: Pour in 2 tbsp of soy sauce and stir for about 1 minute. Add the diced bell peppers, shredded carrots, and chopped green onions. Cook for an additional 3 minutes until the vegetables soften slightly but still retain some crunch.
  5. Combine with Quinoa and Sauces: Stir the cooked quinoa into the chicken mixture along with 2 tbsp hoisin sauce and 1 tbsp rice vinegar. Season with salt and pepper to taste and cook for 2 more minutes to meld the flavors. Adjust with more vinegar if you like a tangy kick.
  6. Make the Peanut Sauce: In a small bowl, whisk together 1/4 cup peanut butter, 2 tbsp soy sauce, 1 tbsp lime juice, 1 tsp honey, and 1 tsp sesame oil. If it’s too thick, add 2-3 tbsp of water until smooth. You can microwave it for 20 seconds to help with mixing if needed.
  7. Assemble and Serve: Spoon 2-3 tbsp of the filling into each lettuce leaf. Drizzle with the peanut sauce and sprinkle with sesame seeds and cilantro. Serve immediately with extra sauce on the side for dipping!

Pro Tips for Success

A side view of vibrant Chicken Quinoa Lettuce Wraps on a plate.

Enhance your cooking experience with these expert tips:

  • Perfect Texture: Ensure your quinoa is fully cooked by fluffing it well. This prevents it from becoming mushy in the wraps.
  • Flavor Boost: For extra depth, add a splash of sesame oil while sautéing the chicken.
  • Chill Your Lettuce: Keeping the lettuce leaves in the fridge before serving adds a satisfying crunch to your wraps.
  • Make-Ahead Filling: Prepare the chicken and quinoa filling ahead of time and store in the refrigerator. Just assemble the wraps when you’re ready to eat!
  • Spicy Kick: If you love heat, add some chopped chilies or red pepper flakes to the chicken mixture for a spicy twist.
  • Substitutions: Feel free to use ground turkey, beef, or even chickpeas for a vegetarian alternative!
  • Experiment with Sauces: Try different sauces like sriracha or teriyaki to keep things exciting!
  • Storage Tips: Store leftover filling in an airtight container in the fridge for up to 3 days.

Common Mistakes and Troubleshooting

Cooking can sometimes come with hiccups, but don’t worry! Here are some common mistakes and how to avoid them:

  • Overcooked Quinoa: Always keep an eye on your quinoa while it cooks. If it’s mushy, it can affect the texture of your wraps.
  • Too Much Sauce: Be careful not to overload the wraps with peanut sauce, as it can make them soggy. Less is more!
  • Weak Flavors: If the filling tastes bland, don’t hesitate to adjust the seasoning with more soy sauce or spices.

Variations to Try

Make this recipe your own! Here are some fun variations to consider:

  • Vegetarian Version: Substitute ground chicken with crumbled tofu or tempeh for a plant-based alternative.
  • Mediterranean Twist: Use ground lamb or beef and add spices like cumin and coriander for a Mediterranean flavor.
  • Asian-Inspired: Incorporate water chestnuts and bamboo shoots into the filling for added crunch and flavor.
  • Mexican Flair: Add black beans and corn to the filling, and serve with avocado and salsa!

Storage and Make-Ahead Instructions

Planning ahead? Here’s how to store and prepare your Chicken Quinoa Lettuce Wraps:

  • Make-Ahead Filling: Prepare the chicken and quinoa filling a day in advance and store it in the fridge. Just reheat before serving.
  • Storing Leftovers: Place any leftover filling in an airtight container in the refrigerator for up to 3 days. The lettuce leaves can be stored separately to maintain their crispness.

Frequently Asked Questions

Let’s address some common questions about this recipe:

  • Can I freeze Chicken Quinoa Lettuce Wraps? Yes, the filling can be frozen for up to 3 months. Thaw and reheat before serving.
  • What other vegetables can I add? Feel free to add any of your favorites! Mushrooms, zucchini, or even diced water chestnuts work great.
  • Can I use a different sauce? Absolutely! Teriyaki sauce, sweet chili sauce, or even a yogurt-based sauce can be delicious alternatives.
  • How do I make these wraps vegan? Substitute chicken with crumbled tofu and use a vegan hoisin sauce.
  • What’s the best way to assemble the wraps? Place the filling towards the base of the lettuce leaf and roll it up tightly from the bottom to the top.
  • Can I serve these wraps cold? Yes, these wraps can be enjoyed cold as a refreshing salad option!
  • How spicy is the peanut sauce? The spice level can easily be adjusted by adding or omitting chili sauce or using spicy peanut butter.
  • What can I serve with these wraps? Serve with fresh fruit, a light salad, or a side of steamed vegetables for a complete meal!

Nutrition Tips and Dietary Adaptations

Want to make your wraps even healthier? Here are some tips:

  • Increase Fiber: Add more vegetables like spinach or shredded cabbage to increase fiber content.
  • Swap Sauces: Use low-sodium soy sauce to reduce sodium intake without sacrificing flavor.
  • Portion Control: Consider the number of wraps you’re consuming to maintain balanced portion sizes.

Equipment Recommendations

To prepare your Chicken Quinoa Lettuce Wraps, you’ll need a few essential tools:

  • Medium Saucepan: For cooking quinoa.
  • Large Skillet: For browning the chicken and sautéing vegetables.
  • Fine Mesh Strainer: To rinse quinoa effectively.
  • Mixing Bowls: For preparing the peanut sauce and other ingredients.

Serving Suggestions

Finally, here are some serving ideas to pair with your wraps:

  • Dipping Sauces: Offer extra peanut sauce, sweet chili sauce, or a spicy soy sauce on the side.
  • Garnishes: Fresh cilantro, crushed peanuts, or lime wedges can enhance the presentation and flavor.
  • Side Salads: A simple cucumber and carrot salad pairs nicely with the wraps for a refreshing crunch.

Now that you have all the tips, tricks, and insights, you’re ready to whip up these delightful Chicken Quinoa Lettuce Wraps. Enjoy the cooking process, and remember: there’s no need for perfection—just have fun and savor every bite!

Chicken Quinoa Lettuce Wraps

Prep Time 20 minutes
Cook Time 30 minutes
Total Time 50 minutes
Servings 4 servings
Calories 450
Delicious and healthy chicken and vegetable wraps served in crisp lettuce leaves, topped with a creamy peanut sauce.

Ingredients

Grains

  • 1 cup quinoa
  • 2 cups water

Protein

  • 1 lb ground chicken
  • 1 tbsp olive oil

Aromatics & Vegetables

  • 2 cloves minced garlic
  • 1 tbsp grated ginger
  • 1 cup diced bell peppers
  • 1/2 cup shredded carrots
  • 1/4 cup chopped green onions

Sauces & Seasonings

  • 2 tbsp soy sauce
  • 2 tbsp hoisin sauce
  • 1 tbsp rice vinegar
  • Salt and pepper to taste

Lettuce & Garnishes

  • 1 head large romaine or butter lettuce (separated into leaves)
  • Sesame seeds for garnish
  • Cilantro for garnish

Peanut Sauce

  • 1/4 cup creamy peanut butter
  • 2 tbsp soy sauce (for sauce)
  • 1 tbsp lime juice
  • 1 tsp honey
  • 1 tsp sesame oil
  • 2-3 tbsp water (to thin sauce)

Instructions 

  • Cook quinoa: rinse, boil water, add quinoa, simmer 15 mins, then fluff.
  • Prepare vegetables: dice peppers, shred carrots, mince garlic, grate ginger, chop green onions, rinse lettuce leaves.
  • Cook chicken: sauté with oil, add garlic and ginger, cook until no pink, then stir in soy sauce and vegetables, cook briefly.
  • Combine: mix cooked quinoa, hoisin sauce, rice vinegar, season with salt and pepper.
  • Make peanut sauce: whisk peanut butter, soy sauce, lime juice, honey, sesame oil, and water until smooth.
  • Assemble: spoon filling into lettuce leaves, drizzle with peanut sauce, garnish with sesame seeds and cilantro, serve immediately.

Notes

For extra flavor, add chopped peanuts or a squeeze of lime.
Calories: 450kcal
Cost: $15
Course: Main Course
Cuisine: Asian-inspired
Keyword: Chicken, lettuce, quinoa

Welcome to Your New Favorite Weeknight Dinner

If you’re looking for a dish that combines rich flavors with quick preparation, look no further than Creamy Garlic Parmesan Chicken Skillet. This delightful recipe offers tender chicken breasts enveloped in a luscious garlic parmesan sauce, all ready in just 30 minutes. Perfect for those busy weekdays or when you want to impress without the stress, this meal is sure to become a staple in your kitchen.

Why You’ll Love This Recipe

This isn’t just another chicken recipe; it’s a flavor-packed experience that anyone can achieve. Here are some reasons to love it:

  • Quick & Easy: With a prep time of just 10 minutes and cooking time of 20 minutes, this dish is perfect for busy weeknights.
  • Flavor Explosion: The combination of garlic, parmesan, and cream creates a sauce that’s irresistibly savory and satisfying.
  • Versatile Meal: Serve it over pasta, rice, or alongside vegetables for a complete dinner that caters to any palate.
  • Meal Prep Friendly: Leftovers taste even better the next day, making it ideal for lunch or dinner prep.
  • Kid-Approved: The creamy sauce and tender chicken are usually a hit with even the pickiest eaters.

Essential Ingredients for Creamy Garlic Parmesan Chicken

Before diving into the cooking process, let’s take a closer look at the ingredients you’ll need:

  • 1.5 lbs boneless, skinless chicken breasts: Cut in half horizontally for even cooking.
  • 1 tablespoon olive oil: For searing and flavor.
  • 1 tablespoon butter: Adds richness to the sauce.
  • 4 cloves garlic, minced: The star ingredient that brings aromatic depth.
  • 1 cup heavy cream: For a luxuriously creamy sauce.
  • 1/2 cup chicken broth: Helps to deglaze the pan and adds flavor.
  • 1/2 cup grated Parmesan cheese: Essential for that cheesy goodness.
  • 1/4 cup grated Parmesan cheese, for topping: An extra layer of flavor.
  • 1 teaspoon dried Italian seasoning: Enhances the overall taste profile.
  • 1/2 teaspoon salt: To taste.
  • 1/4 teaspoon black pepper: Adds a hint of spice.
  • 2 tablespoons fresh parsley, chopped: For garnish and a pop of color.

Step-by-Step Guide: How to Make Creamy Garlic Parmesan Chicken

Delicious garlic Parmesan chicken dish, rich and creamy, served in a cast iron skillet.

Now that you have your ingredients ready, let’s break down the steps to create this mouthwatering dish:

  1. Season the chicken pieces lightly with salt and pepper.
  2. In a large skillet, heat olive oil and butter over medium-high heat.
  3. Sear the chicken for 4-5 minutes per side until golden brown and cooked through. Remove chicken from the skillet and set aside.
  4. Reduce heat to medium. Add minced garlic to the skillet and cook for 1 minute until fragrant, making sure not to let it burn.
  5. Pour in chicken broth and scrape up any browned bits from the bottom of the pan. Let it simmer for 2 minutes.
  6. Stir in heavy cream and Italian seasoning, bringing the mixture to a gentle simmer.
  7. Reduce heat to low. Stir in 1/2 cup of grated Parmesan cheese until the sauce is smooth and thickened.
  8. Return the cooked chicken to the skillet, spooning the sauce over the chicken.
  9. Sprinkle the remaining 1/4 cup of Parmesan cheese over the top. Cover the skillet and cook for 2 minutes to heat through.
  10. Garnish with fresh parsley before serving.

Pro Tips for the Perfect Creamy Garlic Parmesan Chicken

To ensure your dish turns out perfectly every time, here are some expert tips:

  • Don’t rush the searing: Achieving a nice golden brown crust on the chicken enhances flavor.
  • Use fresh garlic: Fresh garlic provides a more robust flavor compared to pre-minced options.
  • Adjust the cream: If you prefer a lighter sauce, you can substitute part of the heavy cream with low-fat milk.
  • Experiment with cheeses: Mixing in some mozzarella or goat cheese can add a unique twist.
  • Herb variations: Fresh herbs like thyme or basil can be added for an extra layer of flavor.
  • Don’t skip the deglazing: Scraping the pan helps incorporate all those delicious browned bits into the sauce.
  • Let it rest: Allowing the chicken to rest after cooking keeps it juicy.
  • Serve immediately: This dish is best enjoyed fresh, but it can be reheated gently if needed.

Common Mistakes to Avoid

Even the most seasoned cooks can slip up sometimes. Here’s how to avoid common pitfalls:

  • Overcooking the chicken: Use a meat thermometer to ensure a safe internal temperature of 165°F.
  • Burning the garlic: Garlic can quickly go from fragrant to bitter, so keep an eye on the heat.
  • Not enough seasoning: Don’t be shy with the salt and pepper; they enhance all flavors in the dish.
  • Skipping the simmer: Allowing the sauce to simmer helps meld the flavors together.

Recipe Variations

This recipe is versatile and can be adjusted to suit your taste. Here are some variations to consider:

  • Spicy Garlic Parmesan Chicken: Add red pepper flakes for a kick of heat.
  • Lemon Garlic Parmesan Chicken: Stir in some fresh lemon juice and zest for a citrusy twist.
  • Mushroom Garlic Parmesan Chicken: Sauté sliced mushrooms with the garlic for added texture and flavor.
  • Vegetarian Option: Substitute chicken with firm tofu or cauliflower for a meatless version.

Storage and Make-Ahead Instructions

This dish is perfect for meal prep! Here’s how to store and reheat:

  • Refrigeration: Store leftovers in an airtight container in the fridge for up to 3 days.
  • Freezing: You can freeze the sauce separately for up to 2 months; however, cooked chicken is best enjoyed fresh.
  • Reheating: Gently reheat on the stove over low heat, adding a splash of chicken broth to loosen the sauce.

Frequently Asked Questions

Here are answers to some common questions about this recipe:

  • Can I use chicken thighs instead of breasts? Yes, chicken thighs can be used for a juicier option.
  • Can I make this recipe dairy-free? Yes, substitute heavy cream with coconut cream and use dairy-free cheese.
  • What should I serve with this dish? It pairs well with pasta, rice, or a fresh salad.
  • How do I know when the chicken is done? Use a meat thermometer; the internal temperature should reach 165°F.
  • What if the sauce is too thick? Simply add more chicken broth or cream to reach your desired consistency.
  • Can I double the recipe? Absolutely! Just ensure your skillet is large enough to accommodate all the chicken.
  • Is this recipe gluten-free? Yes, all the ingredients listed are gluten-free.
  • How can I enhance the flavor? Adding a splash of white wine when deglazing the pan can elevate the dish.

Nutritional Tips and Dietary Adaptations

This dish is not only delicious but can also be adapted to fit various dietary needs:

  • Low-Carb Option: Serve with steamed vegetables instead of pasta or rice.
  • Heart-Healthy Adaptation: Substitute olive oil with avocado oil and reduce the amount of cream used.
  • Protein Boost: Add chickpeas to the sauce for additional protein and fiber.

Recommended Equipment

To make this recipe, you’ll need:

  • Large Skillet: A good-quality skillet allows for even cooking and browning.
  • Meat Thermometer: Ensures your chicken is cooked perfectly every time.
  • Wooden Spoon: Ideal for stirring without scratching your skillet.

Serving Suggestions

For a well-rounded meal, consider serving your Creamy Garlic Parmesan Chicken with:

  • Pasta: Toss with fettuccine or spaghetti for a comforting dish.
  • Rice: Fluffy white or brown rice absorbs the creamy sauce beautifully.
  • Salad: A crisp Caesar or garden salad provides a refreshing contrast.

Final Thoughts

Cooking should be a joyful experience, and this Creamy Garlic Parmesan Chicken Skillet makes it easy to achieve culinary success without stress. With its creamy sauce, tender chicken, and quick preparation, you’re not just making dinner—you’re creating a moment to savor. So grab your ingredients, follow these steps, and enjoy a delicious meal that’s sure to become a favorite in your home. Happy cooking!

Easy Creamy Garlic Parmesan Chicken Skillet

Prep Time 10 minutes
Cook Time 20 minutes
Total Time 30 minutes
Servings 4 servings
Calories 550
A quick and flavorful chicken skillet with a creamy garlic Parmesan sauce, perfect for a satisfying dinner.

Ingredients

Protein

  • 1.5 lbs boneless, skinless chicken breasts, cut in half horizontally
  • 1 tablespoon olive oil
  • 1 tablespoon butter
  • 4 cloves garlic, minced
  • 1 cup heavy cream
  • 1/2 cup chicken broth
  • 1/2 cup grated Parmesan cheese
  • 1/4 cup grated Parmesan cheese, for topping
  • 1 teaspoon dried Italian seasoning
  • 1/2 teaspoon salt
  • 1/4 teaspoon black pepper
  • 2 tablespoons fresh parsley, chopped

Instructions 

  • Season chicken with salt and pepper.
  • Heat oil and butter in skillet; sear chicken 4-5 mins per side until cooked. Remove and set aside.
  • Cook garlic in skillet 1 min, then add chicken broth and simmer 2 mins.
  • Stir in heavy cream and Italian seasoning; simmer gently. Add Parmesan cheese until thickened.
  • Return chicken to skillet, spoon sauce over, sprinkle with Parmesan, cover, and cook 2 mins. Garnish with parsley.

Notes

Use fresh parsley for best flavor and serve immediately.
Calories: 550kcal
Cost: $15
Course: Main Course
Cuisine: American
Keyword: Chicken

Discover the Art of Cooking a Spicy Tuna Poke Bowl

Welcome to a culinary adventure that will elevate your weeknight dinners! Today, we’re diving into the world of poke bowls, specifically a delicious Spicy Tuna Poke Bowl. Poke bowls are not only a feast for the eyes but also a delightful mix of flavors and textures that come together in a bowl. This recipe is perfect for busy weeknights when you want something quick, healthy, and utterly satisfying. Let’s walk through everything you need to know about making this vibrant dish, from the ingredients to serving suggestions!

Why You’ll Love This Recipe

  • Quick & Easy: This spicy tuna poke bowl can be ready in just 30 minutes, making it an excellent choice for those hectic evenings.
  • Fresh Ingredients: You’ll be using sushi-grade tuna and fresh vegetables, ensuring that every bite is packed with flavor and nutrients.
  • Customizable: Feel free to swap ingredients based on your preferences or what’s in your fridge, making it versatile for any palate.
  • Healthy & Balanced: This dish is loaded with lean protein from the tuna, healthy fats from avocado, and fiber from veggies, making it a wholesome meal option.
  • Impressive Presentation: Serve it in a bowl, and you have a visually stunning dish that will impress your family and friends.

Ingredients You’ll Need

Here’s a complete list of the ingredients for your Spicy Tuna Poke Bowl, along with some helpful notes:

  • 1 cup sushi rice: Provides a sticky and satisfying texture, essential for holding the bowl together.
  • 1.25 cups water: Essential for cooking the sushi rice to perfection.
  • 1 tablespoon rice vinegar: Adds a tangy flavor to the rice, balancing the sweetness.
  • 1 tablespoon sugar: Balances the acidity of the vinegar for a more rounded flavor.
  • 0.5 teaspoon salt: Enhances the overall taste of the dish.
  • 8 ounces sushi-grade tuna, diced: The star of the show, providing fresh and rich flavors.
  • 1 tablespoon soy sauce: Adds umami and depth to the tuna.
  • 1 teaspoon sesame oil: Offers a nutty aroma and flavor that complements the dish.
  • 1 teaspoon sriracha: Gives the dish its signature spiciness; adjust to your taste.
  • 0.5 avocado, sliced: Creamy texture that enhances the overall flavor.
  • 0.5 cucumber, thinly sliced: Adds a refreshing crunch.
  • 0.25 cup edamame, shelled: Provides protein and a pop of color.
  • 0.25 cup shredded carrots: Adds sweetness and a crunchy contrast.
  • 1 tablespoon green onions, chopped: Offers a mild onion flavor and serves as a garnish.
  • 1 tablespoon sesame seeds: For a nutty finish and added texture.

Step-by-Step Preparation

A detailed close-up of a Spicy Tuna Poke Bowl featuring colorful toppings and a glossy finish.

Let’s break down the process of making your Spicy Tuna Poke Bowl into simple steps. Don’t worry; I’ll guide you through it!

Step 1: Prepare the Sushi Rice

Start by rinsing the sushi rice under cold water until the water runs clear. This step is crucial as it removes excess starch, ensuring your rice is fluffy and not overly sticky.

In a medium saucepan, combine the rinsed rice with 1.25 cups of water. Bring it to a boil, then reduce the heat to low, cover, and let it simmer for about 18-20 minutes. Once done, remove from heat and let it sit, covered, for 10 additional minutes to allow the rice to steam.

Step 2: Marinate the Tuna

While the rice is cooking, it’s time to marinate the tuna. In a separate bowl, combine the diced sushi-grade tuna with soy sauce, sesame oil, and sriracha. Toss gently to coat the tuna evenly. Allow it to marinate in the refrigerator for 15-30 minutes to enhance the flavors.

Step 3: Prepare the Vegetables

Slice half an avocado and half a cucumber thinly. Measure out your shelled edamame and shredded carrots. Finally, chop the green onions for garnish. These fresh ingredients will add a delightful crunch and vibrant color to your bowl.

Step 4: Assemble the Bowl

Now for the fun part—assembly! Divide the prepared sushi rice among serving bowls. Top each bowl with the marinated tuna mixture, avocado slices, cucumber, edamame, shredded carrots, and green onions. For a finishing touch, sprinkle sesame seeds over the top.

Pro Tips for Making Your Poke Bowl Perfect

  • Choose Quality Tuna: Always opt for sushi-grade tuna to ensure safety and flavor. Look for bright, vivid color and a fresh smell.
  • Don’t Skip Rinsing the Rice: Rinsing ensures the rice is fluffy and prevents it from becoming gummy.
  • Let It Chill: Allow the tuna to marinate in the fridge for maximum flavor. The longer it sits, the tastier it gets!
  • Experiment with Toppings: Try adding seaweed salad, radishes, or pickled ginger for extra flavor.
  • Control the Spice: Adjust the amount of sriracha based on your spice tolerance. Start with less if you’re unsure!
  • Fresh Ingredients Matter: Use the freshest vegetables possible for the best texture and taste.
  • Use a Rice Cooker: If you have one, a rice cooker takes the guesswork out of cooking rice perfectly.
  • Warm Rice is Best: Serve the rice warm for the best texture contrast with the cold toppings.

Common Mistakes and Troubleshooting

  • Overcooked Rice: If your rice is mushy, it may have been overcooked or had too much water. Follow the water-to-rice ratio closely.
  • Insufficient Marination: If the tuna lacks flavor, ensure it marinates long enough in the sauce.
  • Too Much Spice: Start with half the sriracha, and taste before adding more to avoid overwhelming heat.
  • Rice Clumping: Stir the rice gently after cooking to separate grains and avoid clumping.

Variations to Try

Don’t hesitate to mix things up! Here are some delicious variations of your Spicy Tuna Poke Bowl:

  • Salmon Poke Bowl: Substitute tuna with sushi-grade salmon for a different flavor profile.
  • Vegetable Poke Bowl: Make it vegetarian by using marinated tofu and adding more veggies like bell peppers and radishes.
  • Spicy Crab Poke Bowl: Use imitation crab with spicy mayo instead of tuna for a different seafood experience.
  • Korean BBQ Poke Bowl: Incorporate bulgogi beef for a Korean twist, complementing the traditional poke flavors.

Storage and Make-Ahead Instructions

This recipe is best enjoyed fresh, but you can prepare some components in advance:

  • Rice: Cook and store sushi rice in an airtight container in the fridge for up to 3 days.
  • Tuna Marinade: You can marinate the tuna a day ahead, but it’s best consumed within 24 hours for freshness.
  • Vegetables: Pre-cut your vegetables and store them in the fridge to save time when assembling the bowl.

Comprehensive FAQ

  • What is a poke bowl? A poke bowl is a Hawaiian dish featuring diced raw fish served over rice and topped with various ingredients.
  • Can I use frozen tuna? Yes, as long as it’s labeled as sushi-grade, it can be safely consumed raw.
  • What kind of rice is used? Sushi rice is the best choice for its stickiness, essential for holding the bowl together.
  • Can I make this recipe ahead of time? Yes, you can prepare the rice and marinate the tuna a day in advance, but it’s best when fresh.
  • Is this dish gluten-free? Yes, as long as you use gluten-free soy sauce.
  • Can I add other toppings? Absolutely! Avocado, seaweed, and pickled vegetables can enhance the flavor.
  • What’s the best way to serve it? Serve immediately after assembling for the freshest flavors and textures.
  • How can I adjust the spice level? Start with less sriracha and gradually add more to suit your taste.

Nutrition Tips and Dietary Adaptations

To make this dish even healthier:

  • Opt for Brown Rice: Swap sushi rice for brown rice for added fiber and nutrients.
  • Go Low Sodium: Use low-sodium soy sauce to reduce sodium content.
  • Add More Veggies: Increase the portion of vegetables for more vitamins and minerals.

Equipment Recommendations

For the best results, here are a few handy tools:

  • Rice Cooker: Perfect for cooking sushi rice with precision.
  • Sharp Knife: Essential for neatly slicing your fish and vegetables.
  • Mixing Bowls: Useful for marinating and mixing ingredients.

Serving Suggestions

Pair your Spicy Tuna Poke Bowl with these side dishes for a complete meal:

  • Miso Soup: A warm bowl of miso soup complements the freshness of the poke.
  • Seaweed Salad: Adds a refreshing, salty crunch that pairs well with the poke flavors.
  • Edamame: Steamed edamame makes for a healthy, protein-rich side.

Conclusion

Creating a Spicy Tuna Poke Bowl at home is not just about the meal; it’s about the experience of bringing fresh, vibrant flavors together in a beautiful way. With this guide, you have everything you need to whip up a dish that’s not only satisfying but also a feast for the senses. So gather your ingredients, roll up your sleeves, and enjoy the process of making this delightful poke bowl. Happy cooking!

Spicy Tuna Poke Bowl

Prep Time 15 minutes
Cook Time 20 minutes
Total Time 35 minutes
Servings 2 servings
Calories 450
A vibrant and flavorful dish combining fresh tuna, seasoned rice, and crisp vegetables for a satisfying meal.

Ingredients

Rice and Water

  • 1 cup sushi rice (Provides a sticky and satisfying texture.)
  • 1.25 cups water (Essential for cooking the sushi rice.)

Seasonings

  • 1 tablespoon rice vinegar (Adds a tangy flavor to the rice.)
  • 1 tablespoon sugar (Balances the acidity of the vinegar.)
  • 0.5 teaspoon salt (Enhances the overall taste of the dish.)

Tuna and Marinade

  • 8 ounces sushi-grade tuna, diced (The star of the show, providing fresh and rich flavors.)
  • 1 tablespoon soy sauce (Adds umami and depth to the tuna.)
  • 1 teaspoon sesame oil (Offers a nutty aroma and flavor.)
  • 1 teaspoon sriracha (Gives the dish its signature spiciness; adjust to your taste.)

Vegetables and Garnishes

  • 0.5 avocado sliced (Creamy texture that complements the tuna.)
  • 0.5 cucumber thinly sliced (Adds crunch and freshness.)
  • 0.25 cup edamame, shelled (Provides protein and a pop of color.)
  • 0.25 cup shredded carrots (Adds sweetness and crunch.)
  • 1 tablespoon green onions, chopped (Offers a mild onion flavor and garnish.)
  • 1 tablespoon sesame seeds (For a nutty finish and added texture.)

Instructions 

  • Rinse rice, cook with water, then let sit covered for 10 minutes.
  • Marinate diced tuna with soy sauce, sesame oil, and sriracha for 15-30 minutes.
  • Slice avocado and cucumber; prepare edamame, carrots, and green onions.
  • Assemble bowls with rice, top with tuna, vegetables, and garnish with sesame seeds.

Notes

Use fresh, high-quality tuna for best flavor.
Calories: 450kcal
Cost: $15
Course: Main Course
Cuisine: Hawaiian
Keyword: Poke, Sushi Rice, Tuna

Why Chicken and Sweet Potato Bowls Are Your New Go-To Meal

If you’re looking for a meal that combines comfort, nutrition, and incredible flavor, then look no further than Chicken and Sweet Potato Bowls. These bowls are not only visually appealing but also packed with wholesome ingredients that can satisfy your hunger and energize your day. Whether it’s a weeknight dinner or a leisurely Sunday brunch, these bowls come together with minimal effort, making them perfect for any occasion. Ready to transform your meal routine? Let’s dive into why you’ll love this recipe!

Why You’ll Love This Recipe

  • Nutritional Powerhouse: Sweet potatoes are rich in vitamins A and C, fiber, and antioxidants, providing a healthy base for your meal.
  • Easy Meal Prep: With simple ingredients that store well, these bowls are perfect for prepping in advance for busy weeks.
  • Customizable Options: This recipe is incredibly versatile—switch up the proteins or veggies to suit your taste or dietary needs.
  • Flavor Explosion: The combination of spices, creamy sauce, and roasted components creates a delicious harmony of flavors in every bite.
  • Quick to Prepare: With just a handful of ingredients and straightforward steps, you can have dinner on the table in about 30 minutes.

Essential Ingredients for Your Chicken and Sweet Potato Bowls

Let’s break down the ingredients you’ll need for this recipe. Each item plays a vital role in creating the perfect balance of taste and nutrition.

  • 4 cups Sweet Potatoes: Naturally sweet and creamy, they provide the perfect base for your bowls. You can substitute with butternut squash for a different flavor.
  • 2 tablespoons Olive Oil: Use extra virgin for better flavor and to help achieve a crispy finish on your roasted sweet potatoes.
  • 1 teaspoon Paprika: Adds depth to the dish; consider using smoked paprika for an even richer flavor.
  • 1 teaspoon Garlic Powder: For a warm, aromatic base. Fresh minced garlic can elevate the flavor even more.
  • 1 pound Chicken Breast: Cut into cubes; this lean protein will keep you satisfied.
  • 1 teaspoon Salt: Adjust to taste, enhancing all the flavors.
  • 1 teaspoon Pepper: Freshly cracked is always best for a more robust flavor.
  • 2 cups Rice: Brown rice is preferred for its nutty flavor and added fiber.
  • 1 cup Greek Yogurt: This creamy element provides a tangy contrast and can be substituted with sour cream.
  • 2 tablespoons Lime Juice: Brightens the dish; lemon juice works as a good alternative.
  • 1 tablespoon Sriracha: Adjust based on your spice preference to add a kick!
  • 1 teaspoon Cumin: Adds warmth and earthiness to the chicken.
  • 1 bunch Fresh Herbs (Cilantro or Parsley): Fresh herbs brighten up the dish; omit if you’re not a cilantro fan.
  • 2 cups Green Vegetables: Sautéed or steamed, like broccoli or spinach, add color and nutrition.

Step-by-Step Instructions for Perfect Chicken and Sweet Potato Bowls

Juicy Hearty Chicken and Sweet Potato Bowl featuring vibrant colors and textures.

Follow these simple steps to create your delicious bowls!

  1. Preheat Your Oven: Preheat your oven to 425°F (220°C).
  2. Prepare the Sweet Potatoes: Peel and cube the sweet potatoes. Toss them in a bowl with olive oil, paprika, garlic powder, salt, and pepper. Spread on a baking sheet in a single layer.
  3. Roast the Sweet Potatoes: Roast for about 25-30 minutes, flipping halfway through, until they are tender and slightly caramelized.
  4. Cook the Chicken: While the sweet potatoes are roasting, season the chicken with cumin, salt, and pepper. In a skillet over medium heat, add a drizzle of olive oil and cook the chicken until golden brown and cooked through (about 7-10 minutes).
  5. Prepare the Rice: Cook the rice according to package instructions.
  6. Mix the Sauce: In a small bowl, combine Greek yogurt, lime juice, and Sriracha. Adjust to taste.
  7. Assemble Your Bowls: Start with a base of rice, then layer the roasted sweet potatoes, cooked chicken, and green vegetables.
  8. Finish with Sauce and Herbs: Drizzle the creamy sauce over the top and garnish with fresh herbs.

Expert Tips for Success

  • Don’t Overcrowd the Pan: Ensure the sweet potatoes have space to roast evenly for that perfect crispy texture.
  • Experiment with Spices: Feel free to add your favorite spices to customize the flavor profile further.
  • Use Leftover Chicken: Rotisserie chicken or leftover grilled chicken can save you time and enhance flavor.
  • Make it a Salad: Swap rice for a bed of mixed greens for a lighter option.
  • Adjust the Creaminess: For a thinner sauce, add a splash of water or more lime juice to the yogurt.
  • Batch Cook: Prepare extra sweet potatoes and chicken for quick lunches throughout the week.
  • Fresh vs. Dried Herbs: Fresh herbs add brightness, while dried can work in a pinch; just remember to adjust the amounts.
  • Check for Doneness: Use a meat thermometer for the chicken; it should reach 165°F (75°C).

Common Mistakes and Troubleshooting

Even with simple recipes, mistakes can happen. Here are some common issues and how to solve them:

  • Soggy Sweet Potatoes: Ensure they are well-coated but not swimming in oil and that they have enough space on the baking sheet.
  • Undercooked Chicken: Always check the internal temperature with a thermometer.
  • Too Spicy: If the sauce is too spicy, balance it with additional yogurt or a touch of honey.
  • Rice Not Cooked Properly: Ensure to follow the package instructions and let it rest after cooking for fluffy grains.

Delicious Variations to Try

Feeling adventurous? Here are some fun variations to keep things exciting:

  • BBQ Chicken Bowls: Substitute the seasoning for BBQ sauce and add corn and black beans.
  • Vegetarian Option: Replace chicken with chickpeas or tofu for a plant-based meal.
  • Spicy Southwest Bowls: Incorporate jalapeños, corn, and a spicy chipotle sauce.
  • Asian-Inspired Bowls: Use teriyaki chicken, sesame seeds, and steamed bok choy instead of rice.

Storage and Make-Ahead Instructions

These bowls are perfect for meal prep! Here’s how to store them:

  • In the Fridge: Store individual components in airtight containers for up to 4 days. Assemble just before serving.
  • In the Freezer: The chicken and sweet potatoes can be frozen for up to 2 months. Thaw before reheating.
  • Make-Ahead Tips: Chop vegetables and cook rice in advance to save time.

Frequently Asked Questions (FAQ)

Got questions? We’ve got answers!

  • Can I use other vegetables? Yes! Feel free to add your favorites like bell peppers, zucchini, or asparagus.
  • Is this meal gluten-free? Yes, just ensure your rice is certified gluten-free.
  • Can I make this dairy-free? Absolutely! Substitute Greek yogurt with a dairy-free alternative like cashew yogurt.
  • How do I reheat leftovers? Microwave or reheat in a skillet over low heat until warmed through.
  • Can I skip the rice? Yes, you can use quinoa or serve it over leafy greens instead.
  • What’s the best way to cook sweet potatoes? Roasting brings out their natural sweetness and enhances flavor. You can also steam or boil them if preferred.
  • How long do leftovers last? Stored properly in the fridge, leftovers can last up to 4 days.
  • Can I make this recipe vegan? Yes! Swap chicken for chickpeas or lentils and omit yogurt or use a vegan alternative.

Nutrition Tips and Dietary Adaptations

For a balanced meal, ensure you’re pairing your chicken and sweet potato bowls with a variety of colors. Consider the following:

  • Increase Fiber: Add more vegetables or choose whole grains like quinoa.
  • Reduce Sodium: Limit added salt and opt for low-sodium broth in the rice.
  • Add Healthy Fats: Incorporate avocados or a sprinkle of nuts for a nutritious boost.

Essential Equipment You’ll Need

Before you start cooking, gather these tools:

  • Sharp Knife: For easy chopping of vegetables and chicken.
  • Cutting Board: A sturdy surface for all your prep work.
  • Baking Sheet: For roasting the sweet potatoes; consider using parchment paper for easy cleanup.
  • Skillet: A non-stick skillet works best for cooking the chicken.
  • Measuring Cups and Spoons: For precise ingredient measurements.

Serving Suggestions

To elevate your chicken and sweet potato bowls, consider these serving ideas:

  • Top with Seeds: Add pumpkin or sunflower seeds for a crunchy texture.
  • Fresh Lime Wedges: Serve with lime wedges on the side for an extra zesty kick.
  • Crunchy Toppings: Consider adding crispy shallots or fried onions for an added crunch.

Now that you have everything you need, it’s time to get cooking! Enjoy the process, and remember that great food is all about experimenting and having fun. Happy cooking!

Hearty Chicken and Sweet Potato Bowls for Cozy Nights

Prep Time 15 minutes
Cook Time 30 minutes
Total Time 45 minutes
Servings 4 servings
Calories 650
Enjoy a warm, nutritious bowl combining roasted sweet potatoes, tender chicken, and fresh greens, perfect for cozy evenings.

Ingredients

Vegetables

  • 4 cups Sweet Potatoes
  • 2 tablespoons Olive Oil (Use extra virgin for better flavor)
  • 1 teaspoon Paprika (Smoked paprika for a smokier flavor)
  • 1 teaspoon Garlic Powder (Fresh minced garlic for more flavor)
  • 1 pound Chicken Breast (Cut into cubes)
  • 1 teaspoon Salt (Adjust to taste)
  • 1 teaspoon Pepper (Adjust to taste)
  • 2 cups Rice (Brown rice preferred)
  • 1 cup Greek Yogurt (Sour cream can be used as an alternative)
  • 2 tablespoons Lime Juice (Can substitute with lemon juice)
  • 1 tablespoon Sriracha (Adjust based on spice preference)
  • 1 teaspoon Cumin

Fresh Herbs

  • 1 bunch Fresh Herbs (Cilantro or Parsley) (Omit if cilantro is not preferred)
  • 2 cups Green Vegetables (Sautéed or steamed like broccoli or spinach)

Instructions 

  • Roast sweet potatoes with olive oil, paprika, garlic powder, salt, and pepper at 400°F (200°C) for 25-30 minutes.
  • Cook rice according to package instructions.
  • Cook chicken cubes in a skillet until browned and cooked through.
  • Mix Greek yogurt with lime juice, Sriracha, and chopped herbs.
  • Assemble bowls with rice, roasted sweet potatoes, chicken, green vegetables, and drizzle with spicy yogurt sauce.

Notes

Feel free to customize the vegetables and herbs to your preference for added flavor and nutrition.
Calories: 650kcal
Cost: $15
Course: Main Course
Cuisine: American
Keyword: Chicken, sweet potatoes