Author

Steven

Browsing

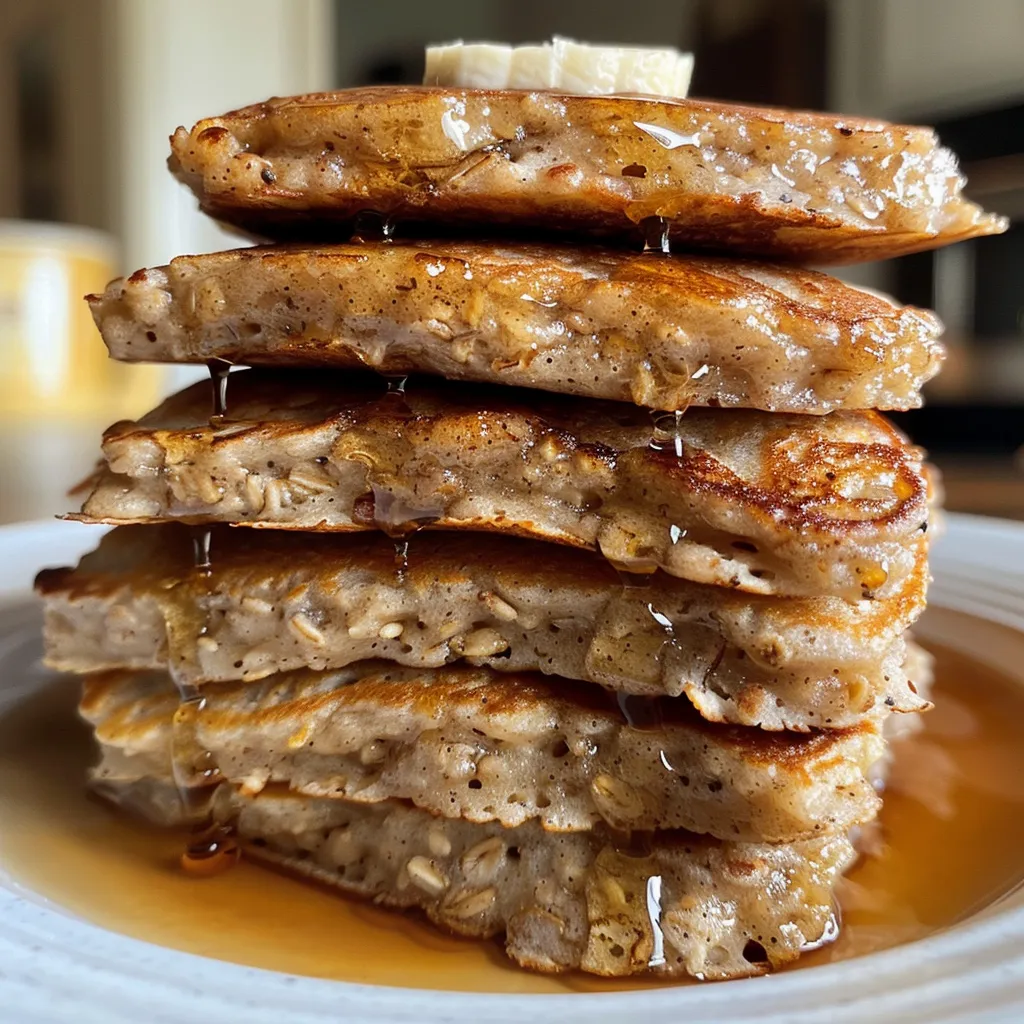
Start Your Day Right with Fluffy Banana Oatmeal Pancakes

Are you ready to elevate your breakfast game? These Fluffy Banana Oatmeal Pancakes are not just delicious but also packed with nutrients, making them the perfect way to kickstart your day. With just a few simple ingredients, you can whip up a stack of pancakes that are fluffy, flavorful, and guilt-free. Let’s dive into why this recipe stands out and how you can make it a staple in your kitchen!

Why You’ll Love These Pancakes

  • Nutritious Ingredients: Made with wholesome oats and ripe bananas, these pancakes are a great source of fiber and essential vitamins.
  • Quick and Easy: With just a few minutes of prep and cooking time, you can enjoy these pancakes any day of the week!
  • Customizable: Add your favorite toppings or mix-ins to make them uniquely yours.
  • Gluten-Free Option: Substitute rolled oats with certified gluten-free oats to make these pancakes suitable for those with gluten sensitivities.
  • Meal Prep Friendly: These pancakes can be made in advance and frozen for quick breakfasts during busy mornings.

Ingredients Breakdown

To prepare these delightful pancakes, you will need:

  • 2 ripe bananas: The riper, the better! Overripe bananas add natural sweetness and moisture to the batter.
  • 1 1/2 cups rolled oats: Provides structure and fiber; you can blend them into oat flour for a smoother texture.
  • 3/4 cup almond milk: Use any milk you prefer, including dairy or non-dairy alternatives.
  • 1 tablespoon ground flaxseed: Acts as a binder and adds healthy omega-3 fatty acids.
  • 1 teaspoon vanilla extract: Enhances the flavor of the pancakes.
  • 1 teaspoon baking powder: Ensures your pancakes are fluffy and rise well.
  • 1/2 teaspoon cinnamon: Adds warmth and flavor; feel free to adjust based on your taste.
  • Pinch of salt: Balances the sweetness of the bananas.
  • Coconut oil or vegan butter: For cooking, giving the pancakes a nice golden color.

How to Make Fluffy Banana Oatmeal Pancakes

Side view of golden-brown banana oatmeal pancakes drizzled with syrup.

Making these pancakes is a breeze! Here’s a step-by-step guide:

  1. Toss the bananas, oats, almond milk, flaxseed, vanilla, baking powder, cinnamon, and salt into a blender.
  2. Blend until smooth and thick; the mixture should resemble pancake batter.
  3. Let the batter sit for a few minutes to allow the oats to absorb some liquid, making the pancakes even fluffier.
  4. Heat a little coconut oil in a non-stick pan over medium-low heat.
  5. Pour in about 1/4 cup of batter per pancake.
  6. Cook for 2-3 minutes until bubbles form, then flip and cook for another 1-2 minutes until golden brown.
  7. Stack them high and go wild with toppings!

Pro Tips for Perfect Pancakes

  • Don’t Overmix: Blend until just combined; overmixing can lead to tough pancakes.
  • Let Batter Rest: This is key for fluffy pancakes, allowing the oats to soak up moisture.
  • Adjust Cooking Temperature: If your pancakes are browning too quickly, lower the heat to cook through without burning.
  • Use a Non-stick Pan: This prevents sticking and makes flipping easier.
  • Keep Warm: Place cooked pancakes in a warm oven (200°F) while you finish the batch.
  • Experiment with Add-Ins: Mix in blueberries, chocolate chips, or nuts for extra flavor and texture.
  • Top Creatively: Consider yogurt, fruits, nut butter, or a drizzle of maple syrup for serving.

Common Mistakes and Troubleshooting

Here are common pitfalls and how to avoid them:

  • Pancakes Are Too Thick: If your batter is too thick, add a little more almond milk to achieve the desired consistency.
  • Pancakes Are Too Thin: If the batter is too runny, add a bit more oats or let it sit longer to thicken.
  • Pancakes Burn Quickly: Adjust your cooking temperature; medium-low heat is usually best for even cooking.
  • Pancakes Don’t Rise: Ensure your baking powder is fresh and don’t skip this ingredient!

Delicious Variations

Want to switch things up? Try these variations:

  • Chocolate Chip Banana Oatmeal Pancakes: Stir in some mini chocolate chips for a sweet treat.
  • Blueberry Banana Pancakes: Add fresh or frozen blueberries to the batter for a fruity twist.
  • Peanut Butter Banana Oatmeal Pancakes: Mix in a scoop of peanut butter for a protein boost.
  • Spiced Pumpkin Pancakes: Substitute some oats with pumpkin puree and add pumpkin spice for a fall-themed pancake.

Storage and Make-Ahead Instructions

These pancakes are perfect for meal prep! Here’s how to store them:

  • Refrigerate: Store cooked pancakes in an airtight container for up to 3 days.
  • Freeze: Place pancakes in a single layer on a baking sheet to freeze, then transfer to a zip-top bag. They will keep for up to 2 months.
  • Reheat: To reheat, simply pop them in the toaster or microwave until warmed through.

Comprehensive FAQ

  • Can I make these pancakes without a blender? Yes! You can mash bananas and mix the ingredients by hand, though the texture may differ.
  • Are these pancakes suitable for a high-protein diet? Absolutely! You can add a scoop of protein powder to the batter for an extra protein boost.
  • Can I use quick oats instead of rolled oats? While rolled oats provide better texture, quick oats can work in a pinch.
  • How can I make these pancakes vegan? This recipe is already vegan when using almond milk and flaxseed instead of eggs.
  • What toppings do you recommend? Top with sliced bananas, a drizzle of maple syrup, nut butter, fresh berries, or coconut yogurt.
  • How long do these pancakes take to cook? Each pancake takes about 2-3 minutes per side on medium-low heat.
  • Can I double the recipe? Yes! Feel free to double or triple the recipe for a larger batch.
  • Can I add other fruits? Yes! Consider adding chopped apples, peaches, or even a scoop of shredded zucchini.

Nutritional Tips and Dietary Adaptations

These pancakes are not only tasty but also nutritious. Here’s how to adapt them:

  • Plant-Based Protein: For an added protein boost, consider mixing in a scoop of plant-based protein powder.
  • Storage Tips: Store leftovers in a sealed container; they can be easily reheated for a quick breakfast.
  • Low-Sugar Option: The natural sweetness from the bananas means you can skip added sugars.

Equipment Recommendations

To make these pancakes, you’ll need:

  • High-Speed Blender: Essential for creating a smooth batter.
  • Non-Stick Skillet: Ensures even cooking and easy flipping.
  • Measuring Cups and Spoons: Precision is key for the best results.

Serving Suggestions

Serve these pancakes with an array of toppings to please everyone:

  • Maple Syrup: A classic choice that complements the pancakes’ sweetness.
  • Fresh Fruits: Sliced bananas, strawberries, or blueberries add freshness.
  • Nuts and Seeds: Top with chopped nuts or seeds for added crunch and nutrition.
  • Yogurt: A dollop of yogurt adds creaminess and a tangy flavor.

Conclusion

These Fluffy Banana Oatmeal Pancakes are not only a delightful breakfast option but also a fantastic way to start your day on a healthy note. With their fluffy texture, delicious flavor, and nutritional benefits, they’re sure to become a family favorite. So grab your ingredients, and let’s get cooking! Enjoy the process and the delicious results you’ll achieve.

Banana Oatmeal Pancakes

Prep Time 10 minutes
Cook Time 10 minutes
Total Time 20 minutes
Servings 4 pancakes
Calories 250
Delicious and healthy banana oatmeal pancakes perfect for a quick breakfast or brunch. Easy to make with simple ingredients and customizable toppings.

Ingredients

Main

  • 2 pieces ripe bananas
  • 1 1/2 cups rolled oats
  • 3/4 cup almond milk
  • 1 tablespoon ground flaxseed
  • 1 teaspoon vanilla extract
  • 1 teaspoon baking powder
  • 1/2 teaspoon cinnamon
  • Pinch salt

For cooking

  • Coconut oil or vegan butter (for cooking)

Instructions 

  • Toss bananas, oats, almond milk, flaxseed, vanilla, baking powder, cinnamon, and salt into a blender and blend until smooth.
  • Let the batter sit for a few minutes to absorb the liquid and thicken.
  • Heat coconut oil in a non-stick pan over medium-low heat.
  • Pour about 1/4 cup of batter per pancake and cook for 2-3 minutes until bubbles form, then flip and cook for another 1-2 minutes until golden.
  • Serve with toppings like sliced bananas, maple syrup, nut butter, or berries.

Notes

Use ripe bananas for natural sweetness and fluffier pancakes.
Calories: 250kcal
Cost: $10
Course: Breakfast
Keyword: Banana, oatmeal, Vegan

Unlock the Magic of Baking with Apple Cinnamon Muffins

Welcome to the delightful world of baking! If you’re looking for a recipe that combines warm spices, juicy apples, and a touch of sweetness, then these Apple Cinnamon Muffins are the perfect choice. Not only are they easy to make, but they also fill your kitchen with the inviting aroma of cinnamon and baked apples. In just a few simple steps, you’ll be able to whip up a batch of fluffy muffins that are perfect for breakfast, a snack, or even dessert!

Why You’ll Love This Recipe

  • Quick & Easy: Ready in under an hour, you can enjoy fresh muffins without spending all day in the kitchen.
  • Deliciously Moist: Thanks to the combination of sour cream and applesauce, these muffins are incredibly moist and tender.
  • Versatile: Perfect for breakfast or as a snack, you can even freeze them for later enjoyment.
  • Healthy Ingredients: Made with wholesome ingredients, these muffins are a tasty way to enjoy fruit.
  • Customizable: Add your favorite mix-ins like nuts or chocolate chips to make them your own!

Ingredient Breakdown

Let’s dive into the ingredients you’ll need for these delicious muffins. Here’s a detailed list along with some handy substitutions.

  • All-purpose flour: 2 cups (240g). You can substitute whole wheat flour for a healthier option.
  • Baking powder: 2 teaspoons for leavening. Ensure it’s fresh for the best rise.
  • Baking soda: 1/2 teaspoon. This helps balance the acidity of the applesauce.
  • Cinnamon: 2 teaspoons. Use fresh ground cinnamon for the best flavor.
  • Salt: 1/2 teaspoon enhances the overall taste.
  • Unsalted butter: 1/2 cup, softened. You can use coconut oil or applesauce for a dairy-free option.
  • Brown sugar: 1/2 cup, packed, adds moisture and flavor. Consider using maple sugar for a unique twist.
  • Granulated sugar: 1/4 cup for sweetness.
  • Large eggs: 2 for binding. Flax eggs can be used for a vegan alternative.
  • Sour cream: 1/2 cup gives a tender crumb. Greek yogurt can be used as a substitute.
  • Applesauce: 1/3 cup, unsweetened, adds moisture and flavor.
  • Vanilla extract: 1 teaspoon enhances the flavor profile.
  • Peeled apples: 2 cups, diced. Use tart apples like Granny Smith for a balanced flavor.
  • Cinnamon sugar topping: 1/2 cup brown sugar, 3/4 cup all-purpose flour, 1 teaspoon cinnamon, and 1/4 cup unsalted butter, softened. This adds a delightful crunch.

Step-by-Step Instructions

A delectable side view of apple cinnamon muffins, highlighting their fluffy texture and warm cinnamon dusting.

Ready to bake? Let’s get started! Follow these simple steps to create your apple cinnamon muffins.

  1. Preheat the oven: Set your oven to 425°F (220°C). Line a muffin pan with paper liners or grease it with butter.
  2. Mix dry ingredients: In a large bowl, whisk together the flour, baking powder, baking soda, cinnamon, and salt.
  3. Cream butter and sugars: In another bowl, beat the softened butter, brown sugar, and granulated sugar until light and fluffy. This should take about 2-3 minutes.
  4. Add wet ingredients: Beat in the eggs one at a time, followed by the sour cream, applesauce, and vanilla until well blended.
  5. Combine mixtures: Gradually add the wet mixture to the dry ingredients, mixing until just combined. Be careful not to overmix!
  6. Fold in apples: Gently fold in the diced apples to ensure even distribution.
  7. Make the topping: In a separate bowl, mix the brown sugar, flour, and cinnamon for the topping. Cut in the softened butter until it resembles coarse crumbs.
  8. Fill muffin cups: Divide the batter evenly among the muffin cups, filling them about 3/4 full. Sprinkle the cinnamon sugar topping over each muffin.
  9. Bake: Bake for 5 minutes, then reduce the heat to 350°F (175°C) and bake for an additional 15-18 minutes. A toothpick inserted in the center should come out mostly clean.
  10. Cool: Let the muffins cool in the pan for 5 minutes, then transfer them to a wire rack to cool completely.

Pro Tips for Perfect Muffins

  • Don’t overmix: Overmixing can lead to dense muffins. Mix just until combined.
  • Use fresh ingredients: Fresh baking powder and spices make a significant difference in flavor.
  • Let the batter rest: Allowing the batter to rest for 10-15 minutes can improve texture.
  • Check doneness: Oven temperatures can vary, so keep an eye on your muffins as they bake.
  • Experiment with spices: Feel free to add nutmeg or ginger for a different flavor profile.
  • Cool completely: Letting them cool completely on a wire rack prevents sogginess.
  • Use a muffin scoop: For uniform muffins, use a scoop to portion out the batter.
  • Store properly: Store in an airtight container to maintain freshness.

Common Mistakes & Troubleshooting

Even the best bakers encounter challenges. Here are some common mistakes and how to fix them:

  • Muffins are too dense: This could be due to overmixing the batter. Mix just until wet and dry ingredients are combined.
  • Dry muffins: If your muffins turn out dry, you may have overbaked them. Always check for doneness a few minutes early.
  • Uneven baking: If some muffins bake faster than others, ensure your oven temperature is accurate and rotate the pan halfway through baking.
  • Flavor is lacking: Ensure you use fresh spices and consider adding a pinch of salt for balance.

Delicious Variations

Feel free to mix things up! Here are some fun variations to try:

  • Nutty Addition: Add 1/2 cup of chopped walnuts or pecans for a crunchy texture.
  • Chocolate Chip Delight: Fold in 1/2 cup of chocolate chips for a sweet twist.
  • Berry Blend: Substitute half of the apples with fresh blueberries or cranberries for a fruity variation.
  • Spiced Up: Incorporate 1/4 teaspoon of nutmeg or ginger for an extra layer of flavor.

Storage & Make-Ahead Instructions

Want to enjoy these muffins later? Here’s how to store them:

  • Room Temperature: Store in an airtight container for up to 3 days.
  • Refrigeration: They can last up to a week in the fridge, though they may dry out slightly.
  • Freezing: Freeze muffins in a single layer, then transfer to a freezer-safe bag. They’ll last for up to 3 months.
  • Make-Ahead Tip: Prepare the batter the night before and refrigerate it. Bake fresh muffins in the morning!

Comprehensive FAQ

  • Can I use whole wheat flour? Yes, whole wheat flour works well, but it may make the muffins denser.
  • How can I make these muffins gluten-free? Substitute with a gluten-free flour blend. Look for one that includes xanthan gum.
  • What apples are best for baking? Tart apples like Granny Smith or Honeycrisp are excellent choices for baking.
  • Can I make mini muffins? Absolutely! Just reduce the baking time to about 10-12 minutes.
  • How do I know when muffins are done? A toothpick inserted in the center should come out mostly clean with a few crumbs.
  • What if I don’t have sour cream? Greek yogurt or buttermilk can be used as a substitute.
  • Can I add nuts or chocolate chips? Yes! Feel free to add your favorite mix-ins.
  • How can I enhance the flavor? Consider adding a splash of apple cider or orange juice for a flavor boost.

Nutritional Tips & Dietary Adaptations

These muffins can fit into a variety of dietary needs:

  • Lower Sugar: Reduce the sugar by 1/4 cup for a healthier option.
  • Dairy-Free: Use coconut oil and dairy-free yogurt to accommodate lactose intolerance.
  • Vegan: Replace eggs with flax eggs and the butter with coconut oil.
  • Nut-Free: Ensure no nuts are added and use sunflower seeds instead if desired.

Recommended Equipment

To make these muffins, you’ll need:

  • Muffin Pan: A standard 12-cup muffin pan works perfectly.
  • Mixing Bowls: A set of mixing bowls in various sizes makes the process easier.
  • Whisk: A whisk is essential for properly mixing your dry ingredients.
  • Measuring Cups & Spoons: Accurate measurements are key to successful baking.
  • Cooling Rack: A cooling rack helps muffins cool evenly and prevents sogginess.

Serving Suggestions

These muffins are delightful on their own, but here are some ideas to elevate your serving:

  • With Butter: Slather on some butter or cream cheese for extra richness.
  • Serve Warm: Enjoy them warm right out of the oven for the best flavor.
  • Accompanied by Coffee: Pair with your favorite coffee or tea for a delightful breakfast.
  • With a Side of Fruit: Serve alongside fresh fruit for a balanced meal.

Conclusion

There you have it! A comprehensive guide to making mouthwatering Apple Cinnamon Muffins that are sure to impress family and friends. Whether you’re baking for a special occasion or just want a comforting treat, this recipe is a fantastic choice. Remember, cooking is all about enjoying the process and having fun in the kitchen. Happy baking, and I can’t wait to hear how your muffins turn out!

Apple Cinnamon Muffins

Prep Time 15 minutes
Cook Time 20 minutes
Total Time 35 minutes
Servings 12 muffins
Calories 250
Delight in these moist and flavorful apple cinnamon muffins, perfect for breakfast or a snack.

Ingredients

Dry Ingredients

  • 2 cups all-purpose flour
  • 2 teaspoons baking powder
  • 1.5 teaspoons baking soda
  • 2 teaspoons cinnamon
  • 0.5 teaspoons salt

Wet Ingredients

  • 0.5 cup unsalted butter
  • 0.5 cup brown sugar, packed
  • 0.25 cup granulated sugar
  • 2 large eggs
  • 0.5 cup sour cream
  • 0.33 cup unsweetened applesauce
  • 1 teaspoon vanilla extract

Additional Ingredients

  • 2 cups peeled apples, diced
  • 0.5 cup brown sugar
  • 0.75 cup all-purpose flour
  • 1 teaspoon cinnamon
  • 0.25 cup unsalted butter, softened

Instructions 

  • Preheat oven to 425°F (220°C). Line muffin pan with liners or grease.
  • Mix dry ingredients in a bowl. Beat sugar and butter, then add eggs, sour cream, applesauce, and vanilla.
  • Combine wet and dry ingredients, fold in diced apples.
  • Mix topping ingredients, cut in butter to form crumbs. Divide batter into cups, sprinkle topping.
  • Bake for 5 minutes at 425°F, then reduce to 350°F and bake 15-18 minutes. Cool and enjoy.

Notes

For best results, do not overmix the batter to keep muffins light and fluffy.
Calories: 250kcal
Cost: $12
Course: Breakfast
Cuisine: American
Keyword: apple, Cinnamon, muffins

Welcome to Your New Favorite Summer Recipe!

There’s something magical about the combination of peaches and muffins. When you bite into a peach cobbler muffin, the juicy sweetness of ripe peaches mingles with a fluffy, tender texture that evokes summer memories with every mouthful. Today, I’m excited to share with you my recipe for Peach Cobbler Muffins—a delightful treat that’s perfect for breakfast or as a sweet snack. This recipe is not only easy to make but also packed with flavor, showcasing the best of what summer has to offer.

Why You’ll Love This Recipe

  • Deliciously Sweet: These muffins are bursting with juicy peaches that bring a refreshing sweetness to every bite.
  • Easy to Make: With simple ingredients and straightforward steps, even beginner bakers can whip these up with confidence!
  • Perfect for Meal Prep: Bake a batch on the weekend and enjoy them throughout the week for a quick breakfast or snack.
  • Customizable: Feel free to mix in your favorite nuts or spices to make this recipe your own!
  • Family-Friendly: These muffins are sure to be a hit with both kids and adults alike, making them a great addition to family gatherings.

Ingredients You’ll Need

To create these delectable Peach Cobbler Muffins, gather the following ingredients:

  • 2 cups All-Purpose Flour: Provides the structure for fluffy muffins. You can use a gluten-free blend if needed.
  • 3/4 cup Granulated Sugar: Sweetens the muffins without overpowering the natural peach flavor.
  • 1 tbsp Baking Powder: Make sure it’s fresh to ensure the muffins rise beautifully.
  • 1/2 tsp Baking Soda: Helps add lift and contributes to a tender crumb.
  • 1/2 tsp Salt: A touch of salt enhances the sweetness and balances the flavors.
  • 1 cup Milk: You can use dairy or dairy-free alternatives like almond or oat milk.
  • 1/2 cup Unsalted Butter: Melted butter adds richness; feel free to substitute with oil if desired.
  • 2 large Eggs: These contribute to the muffins’ structure; for a vegan option, you can substitute with flax eggs.
  • 1 tsp Vanilla Extract: A splash of pure extract elevates the flavor profile of the muffins.
  • 1 cup Fresh or Canned Peaches: Ensure they are diced and well-drained if using canned.
  • 1/2 tsp Ground Cinnamon: Adds warm spice that pairs beautifully with the peaches.
  • 1/4 cup Brown Sugar: A sprinkle on top for a delightful crunch and caramel flavor.

How to Make Peach Cobbler Muffins

Side shot of fluffy Peach Cobbler Muffins, showcasing a light texture and bits of peach.

Let’s dive into the step-by-step process to create these mouthwatering muffins!

Step 1: Prep Your Muffin Tin and Preheat

Start by preheating your oven to 375°F (190°C). Grease your muffin tin or line it with paper liners to prevent sticking.

Step 2: Sift Dry Ingredients

In a large mixing bowl, sift together the flour, baking powder, baking soda, salt, and ground cinnamon. This helps to aerate the flour and ensures even distribution of the leavening agents.

Step 3: Mix Wet Ingredients

In a separate bowl, whisk together the milk, melted butter, eggs, and vanilla extract until well combined.

Step 4: Combine Wet and Dry Ingredients

Gently fold the wet ingredients into the dry ingredients. Be careful not to overmix; a few lumps are perfectly fine!

Step 5: Prepare the Peaches

If using fresh peaches, wash, peel, and dice them into small chunks. If using canned peaches, make sure they are well-drained and diced.

Step 6: Fold in Peaches

Gently fold the diced peaches into the batter. This helps to distribute the juicy sweetness throughout the muffins.

Step 7: Fill Muffin Cups and Add Extra Peaches

Using a spoon or an ice cream scoop, fill each muffin cup about two-thirds full. Then, add a few extra peach pieces on top of each muffin for an appealing presentation.

Step 8: Make the Streusel Topping

In a small bowl, combine the brown sugar and a sprinkle of cinnamon. Use your fingers to mix it until crumbly, then sprinkle it generously over the muffin batter.

Step 9: Top and Bake

Place the muffin tin in the preheated oven and bake for 18-20 minutes, or until the muffins are golden and a toothpick inserted in the center comes out clean.

Step 10: Cool and Enjoy

Once baked, remove the muffins from the oven and let them cool in the tin for 5 minutes before transferring them to a wire rack to cool completely. Enjoy these warm, or store them for later!

Pro Tips for Perfect Peach Cobbler Muffins

  • Choose Ripe Peaches: For the best flavor, use ripe, juicy peaches that are in season.
  • Don’t Overmix: Mixing too much can lead to dense muffins. Just combine until moistened.
  • Try Different Fruits: Feel free to experiment with other fruits like blueberries or raspberries for a twist!
  • Use Room Temperature Ingredients: This helps create a better texture in your muffins.
  • Adjust Sweetness: If your peaches are particularly sweet, you can reduce the sugar slightly.
  • Experiment with Spices: Add nutmeg or cardamom for a unique flavor profile.
  • Check Doneness Early: Ovens can vary, so check your muffins a few minutes before the suggested baking time.
  • Allow to Cool: Letting them cool completely helps enhance the flavors.

Common Mistakes and Troubleshooting

  • Muffins are Dense: This can happen if you overmix or use too much flour. Make sure to spoon the flour into your measuring cup rather than scooping directly from the bag.
  • Peaches Sink to the Bottom: Toss diced peaches in a little flour before adding them to the batter. This helps keep them suspended.
  • Muffins are Dry: Ensure you’re measuring your ingredients accurately, especially the flour.
  • Uneven Baking: Rotate the muffin tin halfway through the baking time for even cooking.

Variations to Try

  • Blueberry Peach Cobbler Muffins: Add 1 cup of fresh blueberries along with the peaches for a delightful mix.
  • Vegan Peach Muffins: Substitute eggs with flax eggs and use plant-based milk and oil.
  • Peach Almond Muffins: Mix in 1/2 cup of chopped almonds for added crunch and flavor.
  • Spiced Peach Muffins: Add 1/4 teaspoon of nutmeg or ginger for a warm spice kick.

Storage and Make-Ahead Instructions

These muffins can be stored in an airtight container at room temperature for up to 3 days. For longer storage, place them in the refrigerator for up to a week or freeze them for up to 3 months. To reheat, simply pop them in the microwave for a few seconds or in a preheated oven at 350°F (175°C) for 10-15 minutes.

Comprehensive FAQ

  • Can I use frozen peaches? Yes, just thaw and drain them before adding to the batter.
  • What can I use instead of eggs? For each egg, you can use 1/4 cup of unsweetened applesauce or 1 tablespoon of flaxseed meal mixed with 2.5 tablespoons of water.
  • How do I know when my muffins are done? Insert a toothpick in the center; if it comes out clean, they’re ready!
  • Can I make these muffins gluten-free? Absolutely! Use a gluten-free flour blend to replace all-purpose flour.
  • How do I add a glaze? Mix powdered sugar with a little milk or peach juice for a sweet glaze to drizzle on top.
  • What’s the best way to reheat muffins? The microwave is quick, but the oven keeps them crispy on the outside. Heat at 350°F until warmed through.
  • Can I double the recipe? Yes, simply double all the ingredients and use two muffin tins!
  • What are some serving suggestions for these muffins? Serve warm with a dollop of whipped cream or yogurt for a delicious breakfast treat!

Nutrition Tips and Dietary Adaptations

These muffins can fit into various dietary preferences. For a lower-sugar version, reduce the granulated sugar or use a sugar substitute. To increase fiber, consider adding a tablespoon of chia seeds or using whole wheat flour. Always check the labels on your dairy-free alternatives for added sugars and preservatives.

Essential Equipment Recommendations

To make your baking experience smooth, here’s a quick list of must-have equipment:

  • Muffin Tin: A standard 12-cup muffin tin is essential.
  • Mixing Bowls: A set of various sizes for mixing dry and wet ingredients.
  • Whisk: For blending wet ingredients and ensuring a lump-free batter.
  • Spatula: A rubber spatula is great for folding in the peaches without breaking them.
  • Cooling Rack: Allows muffins to cool evenly and prevents sogginess.

Serving Suggestions

These Peach Cobbler Muffins are delightful on their own, but here are some serving ideas:

  • With Fresh Cream: A dollop of whipped cream or a scoop of vanilla ice cream can elevate these muffins to dessert status.
  • With Coffee or Tea: Pair them with your favorite morning beverage for a delightful start to your day.
  • As a Snack: Enjoy them as a midday treat, perhaps with a smear of almond butter for added protein.
  • At Brunch: Serve alongside a fresh fruit salad and yogurt for a beautiful brunch spread.

Final Thoughts

These Peach Cobbler Muffins are more than just a recipe; they are a celebration of summer flavors and a reminder that cooking can be fun and stress-free. With simple steps, you can create something truly special that will impress your family and friends. So roll up your sleeves, grab those peaches, and let’s get baking! Remember, cooking is about exploration and enjoyment—there’s no need for perfection. Happy baking!

Peach Cobbler Muffins Fluffy Bites of Summer Bliss

Prep Time 10 minutes
Cook Time 20 minutes
Total Time 30 minutes
Servings 12 muffins
Calories 210
Enjoy these light and fluffy peach cobbler muffins that capture the essence of summer in every bite.

Ingredients

Dry Ingredients

  • 2 cups All-Purpose Flour or gluten-free blend
  • 0.75 cup Granulated Sugar or coconut sugar
  • 1 tbsp Baking Powder (ensure it's fresh)
  • 0.5 tsp Baking Soda
  • 0.5 tsp Salt (consider sea salt)

Wet Ingredients

  • 1 cup Milk dairy or dairy-free
  • 0.5 cup Unsalted Butter melted (can substitute with oil)
  • 2 large Eggs (can substitute with flax eggs)
  • 1 tsp Vanilla Extract (use pure extract)

Fruits & Spices

  • 1 cup Fresh or Canned Peaches diced (well-drained if canned)
  • 0.5 tsp Ground Cinnamon
  • 0.25 cup Brown Sugar or turbinado sugar (for a crunch)
  • 2 tbsp Brown Sugar or coconut sugar

Instructions 

  • Preheat oven to 375°F (190°C). Line a muffin tin with paper liners.
  • Mix dry ingredients: flour, sugar, baking powder, baking soda, salt, and cinnamon.
  • In a separate bowl, combine wet ingredients: milk, melted butter, eggs, and vanilla.
  • Fold wet ingredients into dry, then gently mix in peaches and cinnamon.
  • Divide batter among muffin cups and sprinkle with brown sugar mixture.
  • Bake for 20 minutes or until golden brown. Cool slightly before serving.

Notes

For extra flavor, add a touch of nutmeg or ginger.
Calories: 210kcal
Cost: $12
Course: Breakfast, Dessert
Cuisine: American
Keyword: muffins, Peach, Summer

Welcome to a world of easy, delicious cooking! If you’re looking for a meal that combines convenience with incredible flavor, you’ve landed in the right spot. These quick and flavorful Chicken and Rice Wraps are perfect for busy weeknights, offering a satisfying dish that you can whip up in no time. With tender chicken, fluffy wild rice, and melty cheese all wrapped in a warm tortilla, this recipe will soon become a go-to favorite in your household.

In this article, we’ll explore why you’ll love these wraps, provide a detailed ingredient breakdown, share pro tips, and guide you through common mistakes to avoid. Plus, we’ve got some tasty variations and storage tips to help you make the most of your cooking experience. Ready to dive in? Let’s go!

Why You’ll Love This Recipe

These Chicken and Rice Wraps are not just delicious; they’re also incredibly versatile and easy to prepare. Here are five reasons why you’ll fall in love with this recipe:

  • Quick Preparation: With just a few simple steps, you can have a wholesome meal ready in under 30 minutes, making it perfect for those hectic weeknights.
  • Customizable Ingredients: The beauty of these wraps is that you can easily swap out ingredients based on your preferences or what’s in your pantry.
  • Kid-Friendly: These wraps are loaded with familiar flavors, making them a hit with kids and adults alike!
  • Meal Prep Friendly: You can prepare the chicken and rice in advance, saving time on busy days and allowing for easy reheating.
  • Health-Conscious: Packed with lean protein, whole grains, and fresh ingredients, these wraps are a nutritious option for any meal.

Ingredient Breakdown

Here’s what you’ll need to create these delicious wraps:

  • 1.5 pounds chicken tenders: Lean protein that cooks quickly and stays juicy.
  • 3 tablespoons olive oil: Used in parts for marinating and cooking, it adds flavor and moisture.
  • 3 cups wild rice: Already cooked, this adds a nutty flavor and chewy texture. You can substitute with brown rice or quinoa if desired.
  • 1 cup corn kernels: Fresh or frozen, they add sweetness and vibrant color.
  • 1.5 cups shredded cheddar cheese: Melty goodness that brings everything together. Feel free to experiment with different cheeses!
  • 5 large flour tortillas: The perfect vessel for holding all your delicious fillings.
  • 1 tablespoon olive oil: For sautĂ©ing the chicken and adding flavor.
  • Juice from half a lemon: Brightens the dish with acidity.
  • 2 cloves garlic, minced: Adds aromatic depth.
  • 1 tablespoon ground cumin: A warm spice that enhances the chicken’s flavor.
  • 1 teaspoon salt and 1/2 teaspoon ground black pepper: Essential seasonings for taste.
  • Juice from one and a half limes: For a zesty kick!
  • 1 teaspoon sugar: Balances the acidity of the lime and lemon.
  • A small handful of fresh cilantro, chopped: Adds freshness and flavor.

Step-by-Step Instructions

Now that you have your ingredients ready, let’s get cooking!

Step 1: Marinate the Chicken

In a bowl, combine 2 tablespoons of olive oil, the juice from half a lemon, minced garlic, cumin, salt, and pepper. Add the chicken tenders and let them marinate for at least 15 minutes while you prep the other ingredients.

Step 2: Cook and Shred the Chicken

Heat 1 tablespoon of olive oil in a large skillet over medium heat. Cook the marinated chicken for about 6-7 minutes on each side until fully cooked. Remove from heat and let it cool slightly before shredding.

Step 3: Prepare the Rice Mixture

In a large bowl, mix the cooked wild rice, corn kernels, shredded chicken, lime juice, sugar, and chopped cilantro until well combined.

Step 4: Assemble the Wraps

Lay a tortilla flat and spoon a generous amount of the chicken and rice mixture onto the center. Sprinkle shredded cheddar cheese over the top. Roll the tortilla tightly, tucking in the sides as you go, to create a wrap. Repeat with the remaining tortillas.

Pro Tips for Perfect Wraps

Side view of a vibrant chicken wrap with colorful ingredients peeking out.

To ensure your wraps turn out perfectly every time, keep these tips in mind:

  • Don’t Overfill: Keep the filling quantity moderate to prevent the wraps from breaking when rolled.
  • Warm the Tortillas: Slightly warming the tortillas makes them more pliable and easier to wrap.
  • Use Leftovers Wisely: If you have leftover chicken or rice from previous meals, use them to save time!
  • Balance Flavors: Taste your filling before wrapping to ensure the flavors are just right.
  • Experiment with Spices: Feel free to add different spices or herbs to the marinade for a unique twist.
  • Make Ahead: Prepare the filling a day in advance to save time on busy nights.
  • Grill for Extra Flavor: For a smoky flavor, grill the wraps for a couple of minutes after assembling.
  • Serve with Dipping Sauces: Consider offering ranch, salsa, or a spicy aioli on the side for added flavor.

Common Mistakes to Avoid

Here are some troubleshooting tips to help you avoid common pitfalls:

  • Chicken Not Shredding Well: Ensure the chicken is cooked through and let it rest before shredding to maintain moisture.
  • Wraps Falling Apart: If the wraps are too full, they may collapse. Adjust the filling amount as needed.
  • Rice Too Dry: If your rice has dried out, add a splash of broth or water to rehydrate it.
  • Overcooking the Tortillas: Heat them gently, as overheating can make them brittle.

Delicious Variations

Want to mix things up? Here are a few tasty variations to try:

  • Spicy Chicken and Rice Wraps: Add diced jalapeños or a splash of hot sauce to the filling for a kick.
  • Veggie-Packed Wraps: Incorporate diced bell peppers, shredded carrots, or spinach for extra nutrition.
  • Asian-Inspired Wraps: Substitute soy sauce for lime juice, add shredded cabbage, and include sesame oil in the marinade.
  • BBQ Chicken Wraps: Use BBQ sauce instead of the marinade for a smoky-sweet flavor twist.

Storage and Make-Ahead Instructions

These Chicken and Rice Wraps are perfect for meal prep! Here’s how to store them:

  • Refrigerate: Keep the assembled wraps in an airtight container in the fridge for up to 3 days.
  • Freeze: Wrap individual portions in plastic wrap and place them in a freezer bag for up to 3 months. Thaw overnight in the fridge before reheating.
  • Reheat: To reheat, place wrapped tortillas in a microwave or oven until warm. Grilling them for a couple of minutes adds a nice crispness.

Frequently Asked Questions

Here are some common questions about Chicken and Rice Wraps:

  • Can I use a different type of meat? Absolutely! This recipe works well with turkey, pork, or even tofu for a vegetarian option.
  • What can I use instead of wild rice? Brown rice or quinoa are great alternatives that will still provide a nice texture.
  • Can I make these wraps gluten-free? Yes, use gluten-free tortillas and ensure your other ingredients are gluten-free as well.
  • How do I prevent the tortillas from tearing? Warm them before use to make them more pliable.
  • What sauces pair well with these wraps? Try ranch, salsa, or even a homemade yogurt sauce for dipping.
  • Can I add more vegetables? Definitely! Feel free to add your favorite veggies to the filling.
  • How long does it take to cook the chicken? It typically takes about 12-15 minutes, depending on the thickness of the tenders.
  • Can I prepare the filling in advance? Yes! You can prepare the chicken and rice mixture a day ahead of time for convenience.

Nutrition Tips and Dietary Adaptations

This recipe can be adapted to fit various dietary needs:

  • Low-Carb Option: Use lettuce leaves instead of tortillas for a lighter wrap.
  • Dairy-Free: Skip the cheese or substitute with a dairy-free alternative.
  • High-Protein: Add beans or chickpeas for an additional protein boost.

Equipment Recommendations

To make the cooking process easier, here are some handy tools:

  • Non-Stick Skillet: Perfect for cooking chicken without sticking.
  • Mixing Bowls: Essential for marinating and mixing ingredients.
  • Kitchen Tongs: Useful for flipping the chicken and assembling the wraps.
  • Sharp Knife: For shredding chicken and chopping vegetables.

Serving Suggestions

These Chicken and Rice Wraps can be served with a variety of sides:

  • Fresh Salad: A crisp side salad adds freshness to your meal.
  • Chips and Salsa: For a fun crunch, serve with tortilla chips and your favorite salsa.
  • Fruit Salad: A light fruit salad balances the savory flavors of the wraps.

In conclusion, these Chicken and Rice Wraps are not just quick and easy to make; they’re also a canvas for your culinary creativity. With simple ingredients and straightforward steps, anyone can whip up a delightful meal that the whole family will enjoy. So gather your ingredients, roll up your sleeves, and let’s get cooking! You’ve got this!

Unlock the Creamy Delight of Vanilla Chia Pudding

Are you ready to transform your dessert game with a treat that’s not only delicious but also packed with nutrients? Welcome to the world of vanilla chia pudding! This delightful dish is easy to prepare and perfect for any time of day, whether you’re looking for a quick breakfast, a satisfying snack, or a light dessert. In just a few minutes, you can whip up a creamy, dreamy pudding that will impress your family and friends. Let’s dive into why this recipe is a must-try!

Why You’ll Love This Recipe

This easy vanilla chia pudding recipe boasts a variety of benefits that make it a standout choice:

  • Quick Preparation: With just a few simple steps, you can have your pudding ready in minutes.
  • Rich in Nutrients: Chia seeds are a powerhouse of omega-3 fatty acids, fiber, and protein, making this pudding a healthy option.
  • Customizable: Tailor the recipe to your taste by experimenting with different toppings and flavorings.
  • Great for Meal Prep: Prepare a batch in advance, and enjoy it throughout the week, stored conveniently in the refrigerator.
  • Kid-Friendly: This pudding is not only nutritious but also fun for kids to eat, especially when topped with their favorite fruits!

Perfect Chia Pudding Ingredients

Let’s gather the ingredients to create this creamy delight:

  • 1/3 cup Chia seeds: The star ingredient that thickens the pudding into creamy perfection, providing a subtle crunch.
  • 1 cup Milk of choice: Use almond, coconut, oat, or dairy milk to tailor creaminess and flavor.
  • 2 tablespoons Maple syrup: Adds gentle sweetness; adjust to taste or swap with honey or agave for a different flavor profile.
  • 1 teaspoon Pure vanilla extract: Delivers a warm, inviting flavor that complements the chia beautifully.
  • 1/2 cup Fresh berries: Juicy, antioxidant-rich toppings that add a pop of color and flavor.
  • 2 tablespoons Toasted nuts: Add crunch and healthy fats, enhancing the pudding’s texture.
  • 1 teaspoon Cinnamon or nutmeg: For cozy warmth, adding depth to the flavor.
  • 2 tablespoons Coconut flakes: Bring a tropical flair and additional texture to your pudding.

How to Make Vanilla Chia Pudding

Side view of a bowl of vanilla chia pudding garnished with coconut flakes and cinnamon.

Follow these simple steps to create your delicious vanilla chia pudding:

  1. In a mixing bowl, combine the chia seeds, milk, maple syrup, and vanilla extract.
  2. Whisk the mixture well to ensure that the chia seeds are evenly distributed.
  3. Let it sit for about 5 minutes, then whisk again to break up any clumps of chia seeds.
  4. Cover the bowl with plastic wrap or a lid and refrigerate for at least 2 hours, or overnight for best results.
  5. Before serving, stir the pudding to achieve a creamy texture. Top with fresh berries, toasted nuts, coconut flakes, and a sprinkle of cinnamon or nutmeg as desired.

Pro Tips for Perfect Chia Pudding

Here are some expert insights to ensure your pudding turns out perfectly every time:

  • Stir Regularly: Make sure to stir your pudding a couple of times during the first 15 minutes of chilling to avoid clumping.
  • Experiment with Sweetness: Taste your mixture before chilling and adjust the sweetness according to your preference.
  • Choose Quality Ingredients: Use high-quality chia seeds and pure vanilla extract for the best flavor and texture.
  • Store Properly: Keep your pudding in an airtight container in the refrigerator to maintain freshness for up to 5 days.
  • Try Different Milks: Don’t hesitate to try various plant-based or dairy milks for different flavors and textures.
  • Incorporate Superfoods: Add a scoop of protein powder or a tablespoon of nut butter for an extra nutrition boost.
  • Layer It Up: For a visually appealing dessert, layer the pudding with fruits and nuts in a glass.
  • Use a Mason Jar: This makes for easy storage and a fun way to serve your pudding.

Common Mistakes and Troubleshooting

Even the best cooks can face challenges. Here’s how to troubleshoot common issues:

  • Pudding Too Thick: If your pudding is too thick after chilling, simply stir in a little extra milk until you reach your desired consistency.
  • Pudding Too Runny: If it doesn’t thicken, it may need more chia seeds. Start with an additional tablespoon and let it sit longer.
  • Chia Seeds Clumping: Ensure you stir the mixture well before chilling and periodically during the first 15 minutes.
  • Flavor Lacking: If the pudding tastes bland, boost the flavor with more vanilla or a pinch of salt to enhance sweetness.

Delicious Variations to Try

Get creative with these variations to spice up your vanilla chia pudding:

  • Chocolate Chia Pudding: Add 2 tablespoons of cocoa powder to the mixture for a rich, chocolatey twist.
  • Matcha Chia Pudding: Incorporate 1-2 teaspoons of matcha powder for a vibrant green pudding loaded with antioxidants.
  • Tropical Chia Pudding: Substitute coconut milk for regular milk and top with mango and pineapple for a fruity tropical treat.
  • Peanut Butter Chia Pudding: Mix in 2 tablespoons of peanut butter for a nutty flavor that pairs beautifully with banana slices.

Storage and Meal Prep Instructions

Your vanilla chia pudding is perfect for meal prep. Here’s how to store it:

  • Transfer your pudding into individual serving containers or mason jars for easy grab-and-go breakfasts or snacks.
  • Your pudding can be stored in the refrigerator for up to 5 days. Just give it a good stir before serving.
  • If you’re making a larger batch, consider freezing portions for up to 3 months—just thaw in the fridge overnight before enjoying.

Frequently Asked Questions

Here are some common questions about making vanilla chia pudding:

  • Can I use different sweeteners? Yes! Feel free to use honey, agave, or even stevia as alternatives to maple syrup.
  • Is chia pudding gluten-free? Absolutely! Chia seeds are naturally gluten-free, making this pudding safe for those with gluten sensitivities.
  • Can I make this vegan? Yes! Use plant-based milk and sweeteners to keep it vegan-friendly.
  • How long does chia pudding last? When stored properly in the refrigerator, it lasts about 5 days.
  • Can I add protein powder? Yes, adding protein powder can enhance the nutritional value, making it a great post-workout snack.
  • What can I top my chia pudding with? Fresh fruits, nuts, seeds, granola, or a drizzle of honey all make great toppings!
  • Is chia pudding healthy? Yes! It’s rich in fiber, omega-3 fatty acids, and protein, making it a nutritious choice.
  • Can I use flavored milk? Definitely! Flavored almond milk or coconut milk can add an extra layer of taste to your pudding.

Nutritional Tips and Dietary Adaptations

To make this recipe fit your dietary needs:

  • Low Sugar: Reduce or omit the sweetener for a less sugary option.
  • High Protein: Add Greek yogurt or a scoop of protein powder to the pudding mixture.
  • Nut-Free: Use sunflower seeds instead of nuts for a nut-free version.

Essential Equipment for Making Chia Pudding

Here’s what you’ll need to make your chia pudding:

  • Mixing Bowl: For combining all your ingredients.
  • Whisk or Spoon: To mix the chia pudding thoroughly.
  • Airtight Containers: For storing your pudding in the refrigerator.
  • Measuring Cups and Spoons: For accurate ingredient measurements.

Serving Suggestions

Elevate your vanilla chia pudding by serving it with:

  • Fresh Fruit: Top with strawberries, blueberries, or bananas for added flavor and nutrition.
  • Granola: A crunchy topping that adds texture and makes it a satisfying breakfast.
  • Nut Butters: Drizzle almond or peanut butter for a creamy, nutty finish.
  • Coconut Whipped Cream: For a decadent touch, add a dollop of coconut whipped cream on top.

Conclusion

Making vanilla chia pudding is a simple yet rewarding experience that yields delicious results. With its creamy texture and endless customization options, it’s sure to become a staple in your kitchen. Whether you enjoy it as a breakfast, snack, or dessert, this pudding is packed with nutrients and flavor. So gather your ingredients and treat yourself to this delightful dish today—you deserve it!

Easy Vanilla Chia Pudding Recipe That s Creamy Done in Minutes

Prep Time 5 minutes
Total Time 5 minutes
Servings 2 servings
Calories 250
Enjoy a quick, creamy vanilla chia pudding packed with nutritious ingredients and fresh berries, perfect for a healthy breakfast or snack.

Ingredients

Main

  • 0.75 cup Chia seeds (The star ingredient that thickens the pudding into creamy perfection.)
  • 1 cup Milk of choice (Use almond, coconut, oat, or dairy milk.)
  • 2 tablespoons Maple syrup (Adds gentle sweetness, adjust to taste.)
  • 1 teaspoon Pure vanilla extract (Delivers warm, inviting flavor.)
  • 0.5 cup Fresh berries (Juicy, antioxidant-rich.)
  • 2 tablespoons Toasted nuts (Add crunch and healthy fats.)
  • 1 teaspoon Cinnamon or nutmeg (For cozy warmth.)
  • 2 tablespoons Coconut flakes (Bring tropical flair.)

Instructions 

  • Mix chia seeds, milk, maple syrup, vanilla, and cinnamon in a bowl.
  • Let sit for 5 minutes, then stir to prevent clumping.
  • Divide pudding into serving jars and refrigerate for at least 2 hours or overnight.
  • Top with fresh berries, toasted nuts, and coconut flakes before serving.

Notes

For extra flavor, add a dash of cinnamon on top.
Calories: 250kcal
Cost: $10
Course: Breakfast, Snack
Cuisine: American
Keyword: Chia Seeds, Healthy

Welcome to a culinary adventure that celebrates the vibrant flavors of fresh vegetables! This Grilled Veggie Platter is not just a dish; it’s a canvas for creativity, perfect for any occasion. Whether you’re hosting a summer barbecue or simply looking to enhance your weeknight dinners, this recipe will help you impress your family and friends with minimal effort. Let’s dive into the delightful world of grilled vegetables and the herb sauce that brings it all together!

Why You’ll Love This Recipe

This grilled veggie platter is not only visually stunning but also packed with flavor and nutrition. Here are just a few reasons why this recipe will become a staple in your kitchen:

  • Versatile Dish: Serve it as a starter, side, or main course. This platter can fit any meal situation!
  • Health Benefits: Packed with vitamins and minerals, grilled vegetables are a fantastic addition to a healthy diet.
  • Easy Preparation: With minimal ingredients and straightforward steps, you can whip this up in no time.
  • Perfect for Meal Prep: Prepare ahead of time and enjoy them throughout the week.
  • Crowd-Pleaser: Impress your guests with a colorful and delicious presentation that caters to various dietary preferences.

Ingredients Breakdown

Here’s what you’ll need for this vibrant grilled veggie platter:

  • 1 red bell pepper: sliced into strips
  • 1 yellow bell pepper: sliced into strips
  • 1 medium zucchini: sliced into rounds
  • 1 medium eggplant: sliced into rounds
  • 1 red onion: cut into wedges
  • 1 cup cherry tomatoes: whole
  • 2 tbsp olive oil: for grilling
  • Salt and black pepper: to taste

For the herb sauce:

  • 1 cup fresh parsley
  • ½ cup fresh basil
  • 2 cloves garlic
  • 2 tbsp lemon juice
  • ÂĽ cup olive oil: for blending
  • Salt and pepper: to taste
  • Optional: 1 tbsp capers or 1 tsp Dijon mustard for an extra punch

Step-by-Step Instructions

Ready to fire up that grill? Follow these simple steps:

  1. Preheat the Grill: Heat your grill or grill pan over medium-high heat.
  2. Toss the Veggies: In a large bowl, toss the sliced vegetables with olive oil, salt, and pepper until well coated.
  3. Grill the Vegetables: Grill the vegetables in batches for about 3-5 minutes per side, until they are charred and tender. Remove and set aside on a serving platter.
  4. Make the Herb Sauce: In a food processor, blend together parsley, basil, garlic, lemon juice, and olive oil until smooth. Season with salt, pepper, and any optional ingredients to taste.
  5. Serve It Up: Drizzle the herb sauce generously over the grilled vegetables or serve it on the side as a dipping sauce. Enjoy warm or at room temperature!

Pro Tips for Perfect Grilled Veggies

Close-up view of a grilled veggie platter garnished with fresh herbs and accompanied by a creamy herb sauce.

To elevate your grilling game, consider these expert insights:

  • Cut Evenly: Ensure all vegetables are cut to similar sizes for uniform cooking.
  • Marinate Ahead: Allow vegetables to marinate in olive oil and spices for at least 30 minutes for deeper flavor.
  • Use Fresh Ingredients: Fresh herbs and vegetables will yield the best flavor and texture.
  • Control the Heat: If you’re grilling over charcoal, let the coals cool slightly to avoid burning the veggies.
  • Experiment with Seasonings: Feel free to add your favorite herbs or spices to the oil for a unique twist!
  • Grill in Batches: Don’t overcrowd the grill; cook in small batches to achieve perfect char and tenderness.
  • Keep an Eye on Cooking Time: Different vegetables have different cooking times; check frequently to avoid overcooking.
  • Experiment with Skewers: For a fun presentation, consider threading veggies onto skewers for grilling.

Common Mistakes and Troubleshooting

Even the most seasoned cooks can make mistakes! Here are some common pitfalls and how to avoid them:

  • Overcooking: Keep a close watch on cooking times; veggies should be charred but not mushy.
  • Not Preheating: Always preheat the grill to ensure proper cooking and prevent sticking.
  • Skipping the Oil: Don’t skip the olive oil! It adds flavor and helps prevent sticking.
  • Ignoring Seasoning: A little salt and pepper can elevate your veggies immensely; don’t underestimate it!

Variations to Try

Looking to mix things up? Here are a few delicious variations of the grilled veggie platter:

  • Mediterranean Medley: Add artichokes, olives, and feta cheese for a Mediterranean twist.
  • Spicy Grilled Veggies: Toss vegetables with chili flakes or a spicy sauce before grilling.
  • Herb-Infused Oil: Infuse olive oil with rosemary or thyme for added flavor.
  • Grilled Fruit Addition: Include sliced peaches or pineapples for a sweet contrast.

Storage and Make-Ahead Instructions

Want to prepare ahead? Here’s how to store and enjoy leftovers:

  • Refrigeration: Store leftover grilled vegetables in an airtight container in the fridge for up to 4 days.
  • Reheating: Reheat on the grill or in a skillet to maintain texture.
  • Make-Ahead: Grill and prepare the herb sauce a day in advance; just mix before serving!

Comprehensive FAQ

Here are some common questions about grilled veggie platters:

  • Can I use frozen vegetables? Frozen vegetables can work, but fresh ones yield the best flavor and texture.
  • What other vegetables can I use? Feel free to experiment with asparagus, mushrooms, or even corn on the cob!
  • How do I make the herb sauce vegan? The recipe is already vegan; just omit the optional ingredients if desired.
  • Can I prepare this recipe without a grill? Yes! You can roast the vegetables in the oven at 425°F for 20-25 minutes.
  • How can I make this dish gluten-free? The recipe is naturally gluten-free; just ensure any optional ingredients are gluten-free.
  • Can I double the recipe? Absolutely! Just make sure you have enough grill space for all the veggies.
  • What’s the best way to serve this platter? A large serving platter with the herb sauce drizzled on top looks stunning!
  • Can I add protein? Yes! Grilled chicken, shrimp, or tofu can be great additions for a more filling dish.

Nutrition Tips and Dietary Adaptations

This grilled veggie platter not only looks great but is also a healthy choice. Here’s how to make it even better:

  • Low-Calorie Option: Use less oil for a lighter dish.
  • Vegan-Friendly: This recipe is naturally vegan, making it perfect for plant-based diets.
  • Low-Carb: Enjoy the dish as a low-carb option by focusing on non-starchy vegetables.
  • High-Protein Addition: Add grilled chicken or chickpeas to increase the protein content.

Equipment Recommendations

To successfully create this grilled veggie platter, consider these essential tools:

  • Grill or Grill Pan: For perfectly charred vegetables.
  • Food Processor: For a smooth and creamy herb sauce.
  • Sharp Knife: To easily slice your veggies.
  • Cutting Board: A solid surface for all your ingredient preparation.

Serving Suggestions

Elevate your presentation with these serving ideas:

  • Garnish with Fresh Herbs: Sprinkle additional parsley or basil for a pop of color.
  • Pair with Dips: Serve alongside hummus or tzatziki for a delightful contrast.
  • Offer Whole Grain Bread: Provide a side of crusty bread for a more filling meal.
  • Complement with Cheese: Include a cheese platter with goat cheese or feta for an extra layer of flavor.

In conclusion, creating a stunning and delicious grilled veggie platter with herb sauce is not only easy but also an incredibly rewarding experience. With these clear steps, tips, and variations, you’ll feel empowered to make this dish your own. So gather your ingredients, fire up the grill, and enjoy the colorful, healthy, and flavor-packed goodness that this recipe brings to your table. Happy cooking!

Grilled Veggie Platter with Herb Sauce

Prep Time 10 minutes
Cook Time 15 minutes
Total Time 25 minutes
Servings 4 servings
Calories 250
A vibrant and healthy grilled vegetable platter served with a fresh herb sauce, perfect for summer gatherings.

Ingredients

Vegetables

  • 1 piece red bell pepper (sliced into strips)
  • 1 piece yellow bell pepper (sliced into strips)
  • 1 medium zucchini (sliced into rounds)
  • 1 medium eggplant (sliced into rounds)
  • 1 red onion (cut into wedges)
  • 1 cup cherry tomatoes
  • 2 tbsp olive oil
  • to taste Salt and black pepper

Herb Sauce

  • 1 cup fresh parsley
  • ½ cup fresh basil
  • 2 cloves garlic
  • 2 tbsp lemon juice
  • ÂĽ cup olive oil
  • to taste Salt and pepper (for seasoning)
  • 1 tbsp capers or Dijon mustard (optional for extra punch)

Instructions 

  • Preheat grill to medium-high heat.
  • Toss vegetables in olive oil, salt, and pepper. Grill in batches for 3-5 minutes per side until charred and tender.
  • Blend parsley, basil, garlic, lemon juice, and olive oil until smooth. Season with salt, pepper, and optional ingredients.
  • Drizzle herb sauce over grilled vegetables or serve on the side.
  • Serve warm or at room temperature.

Notes

For extra flavor, add capers or Dijon mustard to the herb sauce.
Calories: 250kcal
Cost: $15
Course: Main Course
Cuisine: International
Keyword: Vegetables

Unlock the Secrets to Perfectly Grilled Shrimp

Welcome to the world of grilling! If you’re looking to elevate your culinary skills with a dish that’s both quick and bursting with flavor, then you’ve come to the right place. This guide will walk you through the steps of making the best grilled shrimp, ensuring that you feel confident and excited to impress your family and friends at your next gathering.

Why You’ll Love This Recipe

  • Quick Preparation: This recipe can be ready in under 30 minutes, making it perfect for busy weeknights or spontaneous dinner parties.
  • Flavor Explosion: The combination of garlic, lemon juice, and Old Bay seasoning creates an irresistible marinade that enhances the natural sweetness of the shrimp.
  • Versatile Dish: Whether served as an appetizer, main course, or in tacos, grilled shrimp fits seamlessly into any meal.
  • Healthy Option: Packed with protein and low in calories, shrimp is a nutritious addition to your diet.
  • Simple Ingredients: With easy-to-find ingredients, you won’t need to make a special trip to the store.

Grilled Shrimp Ingredients

Let’s gather our ingredients! Here’s what you’ll need to make this delicious grilled shrimp dish:

  • 1 pound large shrimp: Make sure they are peeled and deveined for easy cooking.
  • 3 tablespoons olive oil: This adds richness and helps the shrimp cook evenly.
  • 2-3 cloves garlic, minced: Fresh garlic infuses the shrimp with a robust flavor.
  • 2 tablespoons fresh lemon juice: About half a lemon’s worth; it brightens up the dish wonderfully.
  • 2 teaspoons Old Bay seasoning: A classic seasoning mix that complements seafood beautifully.
  • 1/2-1 teaspoon red pepper flakes: Optional, but it adds a nice kick!
  • 1/2 teaspoon smoked or sweet paprika: This gives the shrimp a lovely color and flavor.
  • 1/2 teaspoon salt: Essential for enhancing all the flavors.
  • 1/4 teaspoon black pepper: Freshly ground is best for a stronger flavor.
  • Chopped fresh parsley: For garnish, adding a pop of color.
  • Lemon wedges: For serving, to squeeze over the shrimp.

How to Grill Shrimp

Juicy grilled shrimp on a plate, showing a side view and vibrant colors from seasoning.

Now that we have our ingredients, let’s dive into the cooking process! Follow these simple steps to achieve perfectly grilled shrimp:

  • Clean and rinse the shrimp under cold water and pat them dry with paper towels. If desired, remove the tails for easier eating.
  • In a large bowl, mix the olive oil, garlic, lemon juice, Old Bay seasoning, red pepper flakes (if using), paprika, salt, and pepper.
  • Add the shrimp to the marinade and toss gently to ensure they are evenly coated. Let the shrimp rest in the marinade for 10 to 15 minutes (no more than 30 minutes).
  • Heat the grill or grill pan to medium-high heat and lightly oil the grill grates or skillet to prevent sticking.
  • Place the shrimp directly on the grill, spacing them out for even cooking. Grill for 2 to 3 minutes per side until they turn pink and opaque.
  • Rest the cooked shrimp for a minute or two then arrange them on a serving platter. Garnish with fresh herbs and an additional squeeze of lemon, if desired. Enjoy!

Pro Tips for the Best Grilled Shrimp

  • Choose the right shrimp: Opt for large or jumbo shrimp for a satisfying bite and better grilling results.
  • Don’t over-marinate: Marinating for too long can make shrimp mushy; stick to the recommended time.
  • Use skewers: If grilling smaller shrimp, consider using skewers to make flipping easier and prevent shrimp from falling through the grill.
  • Check for doneness: Shrimp is cooked when it turns pink and opaque; avoid overcooking to keep it tender.
  • Experiment with flavors: Feel free to customize the marinade with your favorite spices and herbs for a unique twist!
  • Use a meat thermometer: For precise cooking, shrimp should reach an internal temperature of 120°F.
  • Let it rest: Allowing shrimp to rest for a minute after grilling enhances the flavor and juiciness.
  • Pair wisely: Serve grilled shrimp with refreshing sides like a salad, rice, or grilled vegetables for a complete meal.

Common Mistakes and Troubleshooting

Even the best cooks can make mistakes. Here are some common pitfalls and how to avoid them:

  • Overcooking: Shrimp cooks quickly; keep an eye on it and remove it from the grill as soon as it’s done.
  • Not seasoning enough: Don’t skimp on the seasoning; shrimp benefits from bold flavors.
  • Skipping the resting step: Allowing shrimp to rest helps juices redistribute, enhancing flavor.

Variations on Grilled Shrimp

Once you’ve mastered the basic grilled shrimp recipe, try these delicious variations to keep things exciting:

  • Garlic Butter Grilled Shrimp: Swap olive oil for melted butter and add more minced garlic for a rich flavor.
  • Spicy Cajun Shrimp: Use Cajun seasoning instead of Old Bay for a fiery twist.
  • Honey-Lime Shrimp: Add honey and lime juice to the marinade for a sweet and tangy flavor.
  • Herb-Infused Grilled Shrimp: Incorporate fresh herbs like dill or cilantro into the marinade for an aromatic touch.

Storage and Make-Ahead Instructions

If you want to prep ahead of time, here’s what to do:

  • Make-ahead marinade: Prepare the marinade in advance and store it in the refrigerator for up to 3 days.
  • Storing cooked shrimp: Keep leftover grilled shrimp in an airtight container in the fridge for up to 3 days.
  • Reheating: Gently reheat cooked shrimp in a pan over low heat, adding a splash of broth or water to keep them moist.

Frequently Asked Questions

Here are some common questions I receive about grilling shrimp:

  • Can I use frozen shrimp? Yes, frozen shrimp works well; just be sure to thaw them completely before marinating.
  • What’s the best way to tell if shrimp is done? Shrimp should be pink and opaque in color when cooked through.
  • Can I grill shrimp without a grill? Yes! You can use a grill pan or even bake them in the oven at high heat.
  • How do I prevent shrimp from sticking to the grill? Make sure to preheat the grill and oil the grates before placing the shrimp on.
  • What sides go well with grilled shrimp? Fresh salads, grilled vegetables, or rice complement grilled shrimp perfectly.
  • How can I make shrimp more flavorful? Don’t hesitate to experiment with different marinades and spices!
  • Is grilled shrimp healthy? Yes! Shrimp is low in calories and high in protein, making it a healthy meal option.
  • Can I marinate shrimp overnight? It’s best not to exceed 30 minutes for marinating shrimp to avoid a mushy texture.

Nutritional Tips and Dietary Adaptations

Grilled shrimp is generally a healthy choice, but here are some tips for making it even better:

  • Low-carb option: Serve grilled shrimp over a bed of greens instead of rice for a low-carb meal.
  • Gluten-free: All ingredients in this recipe are gluten-free, making it suitable for those with gluten sensitivities.
  • Heart-healthy fats: Olive oil is a great source of heart-healthy fats; feel free to adjust the amount according to your dietary needs.

Essential Equipment for Grilling Shrimp

To make your grilling experience smooth and enjoyable, here are some essential tools:

  • Grill or grill pan: A good quality grill is essential; if using a grill pan, ensure it’s non-stick.
  • Tongs: For flipping the shrimp with ease without piercing them.
  • Meat thermometer: To check for doneness without guesswork.
  • Mixing bowl: For marinating your shrimp; a glass or stainless steel bowl works best.

Serving Suggestions

Now that your grilled shrimp is ready, here are some delightful ways to serve it:

  • As a taco filling: Serve in corn tortillas with fresh toppings like avocado and salsa.
  • Over pasta: Toss with your favorite pasta and a light garlic sauce for a hearty meal.
  • In salads: Add to a mixed green salad with a tangy vinaigrette for a refreshing dish.
  • With dips: Pair with cocktails like spicy cocktail sauce or garlic aioli for a fun appetizer.

Conclusion

Grilling shrimp doesn’t have to be intimidating. With this guide, you’ll be well on your way to mastering the art of perfectly grilled shrimp. Remember, cooking is about enjoying the process and sharing delightful meals with loved ones. So fire up that grill, and let’s make some amazing memories together around the dinner table!

Grilled Shrimp

Prep Time 10 minutes
Cook Time 6 minutes
Total Time 16 minutes
Servings 4 servings
Calories 200
Enjoy tender, flavorful grilled shrimp with a zesty marinade, perfect for a quick and delicious meal or appetizer.

Ingredients

Shrimp

  • 1 pound large shrimp, peeled and deveined
  • 3 tablespoons olive oil
  • 2-3 cloves garlic, minced
  • 2 tablespoons fresh lemon juice (about half a lemon)
  • 2 teaspoons Old Bay seasoning
  • 1-2 teaspoons red pepper flakes (optional)
  • 1/2 teaspoon smoked or sweet paprika
  • 1/2 teaspoon salt
  • 1/4 teaspoon black pepper

Garnish

  • chopped fresh parsley (for garnish)
  • lemon wedges (for serving)

Instructions 

  • Rinse and dry the shrimp; remove tails if desired.
  • Mix olive oil, garlic, lemon juice, Old Bay, red pepper flakes, paprika, salt, and pepper in a bowl.
  • Toss shrimp in marinade; let sit for 10-15 minutes.
  • Preheat grill; thread shrimp and cook 2-3 minutes per side until pink and opaque.
  • Rest briefly, then serve garnished with parsley and lemon wedges.

Notes

Ensure not to over-marinate to keep the shrimp tender.
Calories: 200kcal
Cost: $15
Course: Main Course
Cuisine: American
Keyword: Seafood

Welcome to a delightful journey where every sip of your morning smoothie can uplift your day! This creamy avocado smoothie is not just any drink; it’s a nutritious, invigorating start to your morning routine that promises to tantalize your taste buds. Packed with healthy fats, fiber, and vitamins, this smoothie is a fantastic way to fuel your body. In this article, we’ll explore the incredible benefits of this recipe, provide a detailed breakdown of ingredients, offer expert tips, and answer your most pressing questions about making the perfect avocado smoothie.

Why You’ll Love This Recipe

This avocado smoothie isn’t just delicious; it comes with a multitude of benefits that make it a perfect addition to your morning routine. Here are five reasons why you’ll adore this recipe:

  • Quick and Easy: With just a few ingredients and minimal prep time, you can whip up this smoothie in under 10 minutes, making it perfect for busy mornings.
  • Nutritious Boost: Avocados are rich in healthy fats, fiber, and potassium, providing a creamy texture while keeping your energy levels stable throughout the day.
  • Versatile Flavor: The smoothie can be customized with various fruits, sweeteners, or add-ins, allowing you to tailor it to your taste preferences.
  • Ice Cream-Like Texture: By adding frozen coconut milk ice cubes, you can achieve a luxurious, creamy consistency that feels indulgent yet healthy.
  • Great for Meal Prep: This smoothie can be made ahead of time, making it a convenient option for those who enjoy meal prepping.

Ingredient Breakdown

Let’s dive into the ingredients that make this smoothie not only delicious but also healthy:

  • Avocado: The star ingredient! A ripe avocado will provide a creamy base and healthy fats. You can substitute with half a banana for a different flavor profile.
  • Milk: Use your choice of milk—almond, coconut, or regular dairy milk. Each option offers a unique flavor and nutritional profile.
  • Sweetener: You can use 2 tablespoons of pure maple syrup, honey, or stevia, depending on how sweet you want your smoothie.
  • Vanilla Extract: A scant teaspoon of pure vanilla extract enhances the flavor, making the smoothie taste even more delicious.
  • Salt: Just a pinch of salt balances the flavors, bringing out the sweetness of the other ingredients.
  • Protein Powder (optional): For an extra protein boost, add a scoop of your favorite protein powder. This is especially beneficial for post-workout recovery.

Pro Tips for the Perfect Avocado Smoothie

To help you create the best avocado smoothie, here are some expert insights:

  • Use Ripe Avocados: Ensure your avocado is ripe for optimal creaminess. It should yield slightly when gently pressed.
  • Freeze Coconut Milk: For a thicker texture, freeze coconut milk in ice cube trays ahead of time.
  • Blend High: Start blending on low, then gradually increase speed to achieve a smooth consistency without lumps.
  • Adjust Sweetness: Always taste your smoothie before serving and adjust the sweetness to your liking by adding more sweetener.
  • Experiment with Add-ins: Try adding spinach, kale, or even cocoa powder for different flavors and added nutrients.
  • Chill Your Ingredients: Ensure your milk and any fruits used are chilled for a refreshing smoothie experience.
  • Use a High-Powered Blender: A good blender will ensure a perfectly smooth texture, so invest in one if you can.
  • Serve Immediately: Enjoy your smoothie right away for the best flavor and texture. If you have leftovers, store them in the refrigerator for up to three days.

Common Mistakes and Troubleshooting

Side view of a luscious avocado smoothie with a green hue, placed on a wooden surface.

Even the best cooks encounter hurdles. Here are common mistakes and how to avoid them:

  • Too Watery: If your smoothie turns out too watery, add more avocado, banana, or ice cubes to thicken it up.
  • Too Sweet: If you’ve accidentally made it too sweet, balance it out with a splash of lemon juice or a pinch of salt.
  • Lumpy Texture: This can happen if ingredients aren’t blended well. Make sure to blend long enough and in the right order (liquids first).
  • Flavor Imbalance: Always taste and adjust flavors as needed. If it’s bland, a dash of salt or a bit more vanilla can work wonders.

Variations: Get Creative!

Mix things up with these delicious variations:

  • Chocolate Avocado Smoothie: Add 2 tablespoons of cocoa powder for a rich chocolate flavor.
  • Tropical Avocado Smoothie: Incorporate pineapple or mango for a fruity twist.
  • Green Power Smoothie: Blend in a handful of spinach or kale for extra nutrients without altering the flavor significantly.
  • Nut Butter Boost: Add a tablespoon of almond or peanut butter for a nutty flavor and additional protein.

Storage and Make-Ahead Instructions

Want to save time in the mornings? Here’s how to prepare ahead:

  • Make Ahead: Blend your smoothie and store it in an airtight container in the fridge for up to three days.
  • Freezing: You can also freeze the prepared smoothie in portions. Thaw overnight in the fridge before enjoying.
  • Ingredient Prep: Pre-measure your ingredients and store them in bags in the freezer for a quick blend in the morning.

Comprehensive FAQ

Here are answers to some frequently asked questions about avocado smoothies:

  • Can I use frozen avocado? Yes, frozen avocado works well and provides a creamy texture.
  • Is this smoothie vegan? Yes, it is vegan if you use plant-based milk and sweeteners.
  • How many servings does this recipe make? This recipe yields approximately 2 cups, or 2 servings.
  • Can I add greens to the smoothie? Absolutely! Spinach or kale can be added for extra nutrients.
  • What’s the best milk to use? Almond milk, coconut milk, or oat milk are great choices that complement the avocado flavor.
  • How can I make it lower in calories? Use unsweetened almond milk and reduce or eliminate the sweetener.
  • Can I make this smoothie without a blender? A blender is recommended for the best texture, but you could use a food processor.
  • How long does the smoothie last in the fridge? It can last up to three days in the refrigerator if stored properly.

Nutrition Tips and Dietary Adaptations

To enhance the nutritional profile of your smoothie, consider these tips:

  • Fiber Boost: Add chia seeds or flaxseeds for added fiber and omega-3 fatty acids.
  • Protein Punch: Incorporate Greek yogurt or protein powder for a filling breakfast option.
  • Low-Carb Option: Use unsweetened almond milk and avoid added sweeteners for a lower-carb version.

Equipment Recommendations

To ensure a smooth and enjoyable blending experience, here are some recommended tools:

  • High-Powered Blender: Brands like Vitamix or Ninja make blending easy and efficient.
  • Measuring Cups and Spoons: Essential for precise ingredient measurements.
  • Ice Cube Tray: For freezing coconut milk and making ice cubes ahead of time.

Serving Suggestions

Serve your avocado smoothie in style! Here are some fun ideas:

  • Garnish with Fresh Fruit: Top with sliced strawberries, bananas, or a sprinkle of granola for added texture.
  • Pair with Breakfast: Enjoy alongside whole grain toast or oatmeal for a wholesome breakfast.
  • Use Fun Glassware: Serve in a beautiful glass or mason jar for a delightful presentation.

This creamy avocado smoothie is more than just a drink; it’s a nutritious powerhouse that can transform your mornings. With its rich flavor, easy preparation, and endless customization options, it’s bound to become a staple in your kitchen. So grab your blender, and let’s get started on making a smoothie that not only fuels your body but also excites your taste buds!

Avocado Smoothie Recipe

Prep Time 5 minutes
Total Time 5 minutes
Servings 2 cups
Calories 250
A creamy and nutritious avocado smoothie perfect for a quick breakfast or snack. Customize with your favorite sweetener and protein boost.

Ingredients

Sweetener

  • 2 tbsp pure maple syrup or stevia (to taste)
  • 1 1/2 cups cold milk of choice
  • 1/2 large avocado
  • scant 1 tsp pure vanilla extract
  • 1/8 tsp salt

Optional

  • 1 scoop protein powder (optional)

Instructions 

  • Peel the avocado and remove the pit.
  • Combine all ingredients in a blender and blend until smooth.
  • For a thicker shake, blend in coconut milk ice cubes.
  • Serve the smoothie cold and enjoy.

Notes

Use ripe avocados for the best flavor and creaminess.
Calories: 250kcal
Cost: $8
Course: Breakfast, Snack
Cuisine: Fusion
Keyword: Avocado

Welcome, fellow food enthusiasts! Today, we’re diving into the delightful world of grilled vegetable paninis—a dish that not only celebrates vibrant flavors but also encourages creativity in the kitchen. This grilled vegetable panini is a fantastic way to enjoy seasonal vegetables while indulging in the comforting embrace of melted cheese and crispy bread. Perfect for a quick weeknight dinner or a leisurely weekend lunch, this recipe will make you feel like a culinary pro in no time. Let’s get started!

Why You’ll Love This Recipe

  • Quick and Easy: You can whip up this grilled vegetable panini in about 30 minutes, making it perfect for busy days.
  • Flavor Explosion: The combination of grilled veggies, creamy cheese, and a hint of pesto creates a flavor profile that’s simply irresistible.
  • Customizable: Feel free to switch up the vegetables and spreads based on what you have on hand or what’s in season!
  • Healthier Option: Packed with fresh vegetables, this panini is a wholesome choice that doesn’t compromise on taste.
  • Perfect for Meal Prep: You can make these paninis ahead of time, making them a great option for lunches on the go.

Essential Ingredients

Let’s gather our ingredients! Each component plays a crucial role in ensuring your panini is bursting with flavor.

  • 1 small zucchini: Sliced into thin strips for easy grilling.
  • 1 small eggplant: Thinly sliced to add a rich, meaty texture.
  • 1 red bell pepper: Cut into strips for sweetness and color.
  • 1 yellow bell pepper: Adds a beautiful contrast and additional sweetness.
  • 1 small red onion: Sliced into rings to enhance the flavor profile.
  • 2 tablespoons olive oil: Essential for grilling and adding moisture.
  • Salt and black pepper: To taste, enhancing the natural flavors of the veggies.
  • ½ teaspoon dried oregano: Adds a lovely herby note.
  • ½ teaspoon chili flakes: Optional for a bit of heat.
  • 8 slices of bread: Ciabatta, sourdough, or multigrain are all great options.
  • 4 tablespoons butter: Softened, for spreading on the bread.
  • 4 slices of mozzarella or provolone cheese: The melty cheese that binds it all together.
  • 2 tablespoons pesto or mayonnaise: Optional spreads for added flavor.
  • Fresh basil or spinach leaves: For a fresh crunch.
  • Sun-dried tomatoes: Optional, for a tangy kick.
  • Grated parmesan: For an extra cheesy finish.

Step-by-Step Instructions

Now that we have everything ready, let’s make this delicious grilled vegetable panini!

  • 1. Grill the Vegetables: Preheat your grill or grill pan over medium heat. Toss the zucchini, eggplant, bell peppers, and onion in olive oil, salt, black pepper, and oregano. Grill for about 5-7 minutes or until tender and slightly charred. Remove from heat.
  • 2. Prepare the Bread: Spread softened butter on one side of each slice of bread. On the unbuttered side, spread a layer of pesto or mayonnaise if using.
  • 3. Assemble the Panini: Layer the grilled vegetables and cheese between two slices of bread, buttered side out.
  • 4. Grill the Panini: Place the assembled panini on a preheated panini press or grill pan. Cook for about 3-5 minutes on each side, or until the bread is golden brown and the cheese is melted.
  • 5. Cut and Serve: Remove the panini from the grill, let it cool for a minute, then cut in half and serve hot. Pair it with a side of soup or a fresh salad for a complete meal!

Pro Tips for Perfecting Your Panini

A side view of a juicy grilled vegetable panini, showcasing vibrant vegetables and crispy bread.
  • Grill Marks: For those beautiful grill marks, press down slightly on the panini with a spatula while grilling.
  • Cheese Choice: Use a combination of cheeses for a more complex flavor—try feta or goat cheese alongside mozzarella.
  • Extra Crunch: Add a thin layer of grated parmesan directly on the bread before grilling for an extra crispy crust.
  • Vegetable Prep: Slice your vegetables uniformly to ensure even cooking.
  • Grease the Grill: Lightly oil the grill or pan to prevent sticking and promote even browning.
  • Experiment with Flavor: Don’t be afraid to add spices like smoked paprika or garlic powder to your vegetable mix for added zest.
  • Don’t Overload: Avoid overstuffing your panini, as it can make grilling difficult and messy.
  • Rest Before Cutting: Let your panini sit for a minute after grilling to help the cheese set slightly, making it easier to cut.

Common Mistakes and Troubleshooting

Even the best of us can have an off day in the kitchen. Here are some common pitfalls and how to avoid them:

  • Burnt Bread: If your bread is burning before the cheese melts, try lowering the heat or using a thicker slice of bread.
  • Undercooked Vegetables: Make sure to grill your vegetables until they are tender. If they are still crunchy, they won’t meld well in the panini.
  • Sticking to the Grill: Always oil your grill or pan to prevent sticking. You can also use non-stick spray as a backup.
  • Too Much Filling: If your panini is bursting at the seams, try using fewer vegetables or cheese to make grilling easier.

Variations to Try

Ready to switch things up? Here are some fun variations to inspire your next grilled vegetable panini:

  • Mediterranean Delight: Add olives, feta cheese, and a splash of balsamic glaze for a Mediterranean twist.
  • Spicy Southwest: Incorporate grilled corn, black beans, and pepper jack cheese with a dollop of salsa.
  • Caprese Style: Layer fresh mozzarella, tomatoes, and basil, drizzled with balsamic reduction.
  • Vegan Option: Replace cheese with avocado and add hummus for creaminess, using any vegetables of choice.

Storage and Make-Ahead Instructions

If you want to enjoy your grilled vegetable panini later, here’s how to store and reheat:

  • Storing: Wrap leftover paninis in foil and store them in an airtight container in the fridge for up to 3 days.
  • Reheating: To reheat, place your panini back on the grill or in a toaster oven until heated through and crispy again.
  • Make-Ahead: You can grill the vegetables in advance and assemble the panini just before serving for a quick meal.

Frequently Asked Questions

Here are some common questions about making grilled vegetable paninis:

  • What vegetables work best for grilled vegetable panini? Zucchini, bell peppers, eggplant, and onions are fantastic choices.
  • Can I use gluten-free bread? Absolutely! Just ensure your chosen bread is labeled gluten-free.
  • How do I make my panini extra crispy? Use a bit more butter on the outside of the bread and grill at a higher temperature for a shorter time.
  • Can I add protein to my panini? Yes! Grilled chicken, turkey, or even tofu can be excellent additions.
  • What spreads can I use? Besides pesto and mayonnaise, try hummus, tapenade, or even mustard for different flavor profiles.
  • How do I know when the panini is done? When the bread is golden brown and the cheese is melted, it’s ready to enjoy!
  • Can I freeze my paninis? Yes, wrap them tightly in foil and freeze. To reheat, allow them to thaw and then grill.
  • How can I add more flavor to my grilled veggies? Marinate them in olive oil, herbs, and spices for about 30 minutes before grilling.

Nutrition Tips and Dietary Adaptations

This grilled vegetable panini is naturally packed with nutrients, but here are a few tips to make it even healthier:

  • Whole Grain Bread: Opt for whole grain or sprouted bread for added fiber and nutrients.
  • Less Cheese: Use less cheese or choose low-fat options to reduce calories while still enjoying that cheesy goodness.
  • More Veggies: Load up on vegetables to increase the nutritional value without adding too many calories.
  • Herbs and Spices: Use fresh herbs and spices to enhance flavor without relying on extra salt or fat.

Equipment Recommendations

To create the perfect grilled vegetable panini, here’s what you’ll need:

  • Grill or Grill Pan: A good-quality grill or grill pan is essential for achieving those lovely grill marks.
  • Panini Press: If you make paninis often, consider investing in a panini press for convenience.
  • Spatula: A sturdy spatula helps flip and press the panini without falling apart.
  • Cutting Board: A good cutting board is crucial for prepping your veggies and assembling the panini.

Serving Suggestions

Once your grilled vegetable panini is ready, consider pairing it with:

  • Tomato Soup: The classic pairing that complements the flavors beautifully.
  • Side Salad: A fresh green salad with a light vinaigrette adds a refreshing crunch.
  • Chips or Fries: For a fun twist, serve with homemade sweet potato fries or crispy chips.
  • Dips: Try serving it with a side of marinara or aioli for dipping.

Cooking can be a joy, and with this grilled vegetable panini recipe, you’ll be able to create a dish that’s not just delicious but also fulfilling. So gather your ingredients, invite a friend over, and enjoy the art of cooking together. Remember, it’s all about the experience and the joy of sharing great food. Happy cooking!

Delicious Grilled Vegetable Panini Veg Sandwich Recipe

Prep Time 10 minutes
Cook Time 15 minutes
Total Time 25 minutes
Servings 4 servings
Calories 450
A flavorful and hearty grilled vegetable panini perfect for a quick lunch or dinner, packed with fresh veggies and melted cheese.

Ingredients

Vegetables

  • 1 small zucchini (sliced into thin strips)
  • 1 small eggplant (sliced thin)
  • 1 red bell pepper red bell pepper (cut into strips)
  • 1 yellow bell pepper yellow bell pepper (cut into strips)
  • 1 small red onion (sliced into rings)
  • 2 tablespoons olive oil
  • to taste Salt and black pepper
  • 0.5 teaspoon dried oregano
  • 0.5 teaspoon chili flakes (optional)
  • 8 slices ciabatta sourdough or multigrain bread
  • 4 tablespoons butter (softened, for spreading)
  • 4 slices mozzarella or provolone cheese
  • 2 tablespoons pesto or mayonnaise (optional spread)
  • as needed Fresh basil or spinach leaves
  • as needed Sun-dried tomatoes
  • for extra cheesy flavor Grated parmesan

Instructions 

  • Grill seasoned zucchini, eggplant, peppers, and onions until tender.
  • Spread butter on bread, add pesto or mayo inside.
  • Layer grilled vegetables and cheese between slices.
  • Grill in a panini press or pan until golden and cheese melts.
  • Cut and serve hot with dips or soup.

Notes

Use fresh vegetables for best flavor and texture.
Calories: 450kcal
Cost: $15
Course: Dinner, Lunch
Cuisine: Italian
Keyword: Sandwich, Vegetables

Get Ready for Sizzling Chicken Fajitas!

If you’re looking for a quick, vibrant, and delicious meal that the whole family will love, chicken fajitas are your answer! These chicken fajitas are not only easy to prepare but also packed with flavor that will have everyone coming back for seconds. In this guide, I’ll walk you through every step, ensuring that you feel confident and excited to cook.

Why You’ll Love This Recipe

Chicken fajitas are a crowd-pleaser for many reasons:

  • Quick and Easy: Ready in under 30 minutes, perfect for busy weeknights.
  • Customizable: Adjust spices and toppings to suit your taste preferences.
  • Healthy Ingredients: Fresh veggies and lean chicken make for a nutritious meal.
  • Interactive Cooking: Everyone can assemble their own fajitas, making mealtime fun!
  • Great for Meal Prep: Make a big batch for meals throughout the week!

Ingredients Breakdown

To make these flavorful chicken fajitas, here’s what you’ll need:

  • 1½ lbs boneless, skinless chicken breasts or thighs: Sliced into strips. Thighs add more moisture, while breasts are leaner.
  • 2 tablespoons olive oil: Use this for marinating the chicken and sautĂ©ing the veggies.
  • Juice of 1 lime: Adds a zesty kick to the marinade.
  • 2 cloves garlic, minced: For a depth of flavor.
  • Spices: 1½ teaspoons chili powder, 1 teaspoon ground cumin, 1 teaspoon smoked paprika, ½ teaspoon onion powder, ½ teaspoon salt, and ÂĽ teaspoon black pepper.
  • Peppers: 1 red, 1 green, and optionally, 1 yellow bell pepper, sliced for sweetness and crunch.
  • 1 red onion: Sliced for added flavor and texture.
  • Warm flour tortillas: The perfect vessel for your fajitas!
  • Toppings: Sour cream or Greek yogurt, shredded cheese, fresh cilantro, and lime wedges.

Pro Tips for Perfect Fajitas

Side view of sizzling chicken fajitas garnished with fresh cilantro and lime.

Follow these expert insights to elevate your fajita game:

  • Marinate Longer: For maximum flavor, marinate your chicken for up to 2 hours.
  • High Heat Cooking: Ensure your skillet is hot enough to get a nice sear on your chicken.
  • Don’t Overcrowd: Cook the chicken in batches if your skillet is small to achieve a good crust.
  • Rest the Chicken: Let the chicken rest for a few minutes after cooking to keep it juicy.
  • Fresh Ingredients: Use fresh, crisp vegetables for the best texture.
  • Warm Tortillas: Soft tortillas are best; warm them in a skillet or microwave just before serving.
  • Adjust Spice Levels: Feel free to add more chili powder or jalapeños for a spicier kick!
  • Use a Cast-Iron Skillet: For the best heat retention and searing.

Common Mistakes and Troubleshooting

Here’s how to avoid common pitfalls:

  • Dry Chicken: Avoid overcooking; aim for an internal temperature of 165°F.
  • Soggy Veggies: Don’t add the veggies too early; they should be just tender and slightly charred.
  • Bland Flavor: Ensure adequate seasoning—taste and adjust your marinade before adding the chicken.

Recipe Variations

Feel free to experiment with these variations:

  • Vegetarian Fajitas: Replace chicken with grilled portobello mushrooms or tofu.
  • Spicy Fajitas: Add jalapeños or use a spicy marinade.
  • BBQ Fajitas: Mix in BBQ sauce for a tangy twist!
  • Sheet Pan Fajitas: Roast everything together on a sheet pan for a hands-off approach.

Storage and Make-Ahead Instructions

Want to make your meal prep easier? Here’s how:

  • Refrigerate: Store leftovers in an airtight container for up to 3 days.
  • Freeze: Freeze cooked chicken and veggies for up to 2 months. Thaw in the fridge before reheating.
  • Make-Ahead: Marinate chicken the night before for deeper flavor.

Frequently Asked Questions

Here are some common queries about chicken fajitas:

  • Can I use frozen chicken? Yes, but make sure to thaw it thoroughly before marinating.
  • What’s the best way to cut chicken for fajitas? Cut against the grain for tender strips.
  • Can I grill the fajitas instead? Absolutely! Grilling adds a wonderful smoky flavor.
  • What toppings do you recommend? Try avocado, salsa, or pickled onions for a flavor boost.
  • How do I know when the chicken is done? Use a meat thermometer; it should read 165°F.
  • Can I use other vegetables? Yes! Zucchini and mushrooms work well too.
  • What’s the best way to reheat leftovers? In a skillet over medium heat to maintain texture.
  • Are chicken fajitas healthy? Yes, they’re packed with lean protein and veggies!

Nutritional Tips and Dietary Adaptations

Make these fajitas fit your dietary needs:

  • Low-Carb: Serve the chicken and veggies in lettuce wraps instead of tortillas.
  • Dairy-Free: Skip the cheese and sour cream, or use dairy-free alternatives.
  • Gluten-Free: Use corn tortillas or serve over rice.

Essential Equipment Recommendations

Here’s what you’ll need to get started:

  • Cast Iron Skillet: For perfect searing and heat distribution.
  • Cutting Board: A sturdy board for chopping veggies and chicken.
  • Sharp Knife: Essential for slicing chicken and vegetables easily.

Serving Suggestions

To make your meal even more enjoyable:

  • Presentation: Serve fajitas on a large platter with all toppings on the side.
  • Pairing: Serve with a side of Mexican rice or a fresh salad.
  • Drinks: Pair with a refreshing margarita or iced tea!

Conclusion

Now you’re ready to whip up some delicious and sizzling chicken fajitas that will wow your friends and family! Cooking doesn’t have to be intimidating; with this guide, you can create a meal that’s bursting with flavor and joy. So, gather your ingredients, put on your apron, and let’s get cooking! Happy fajita making!

Chicken Fajitas

Prep Time 15 minutes
Cook Time 15 minutes
Total Time 30 minutes
Servings 4 servings
Calories 450
Enjoy flavorful chicken fajitas with colorful peppers and onions, wrapped in warm tortillas and topped with fresh garnishes.

Ingredients

Meat

  • 1.5 lbs boneless, skinless chicken breasts or thighs, sliced into strips
  • 2 tablespoons olive oil
  • 1 lime juice of 1 lime
  • 2 cloves garlic, minced
  • 1.5 teaspoons chili powder
  • 1 teaspoon ground cumin
  • 1 teaspoon smoked paprika
  • 0.5 teaspoon onion powder
  • 0.5 teaspoon salt
  • 0.25 teaspoon black pepper
  • 1 red bell pepper sliced
  • 1 green bell pepper sliced
  • 1 yellow bell pepper sliced (optional) (optional)
  • 1 red onion sliced
  • 1 tablespoon olive oil
  • Pinch salt

Warm flour tortillas

Sour cream or Greek yogurt

Shredded cheese

Fresh cilantro, chopped

Lime wedges

Instructions 

  • Combine olive oil, lime juice, garlic, and spices; add chicken and toss to coat. Marinate for 30 minutes.
  • Heat 1 tablespoon olive oil in a skillet; cook peppers and onions with a pinch of salt until softened and charred, about 5-6 minutes. Remove and set aside.
  • Cook marinated chicken in the same skillet over medium-high heat until fully cooked and seared, about 6-8 minutes.
  • Return vegetables to skillet with chicken; cook together for 1-2 minutes to meld flavors.
  • Warm tortillas; fill with chicken and vegetables, then top with sour cream, cheese, cilantro, and lime wedges.

Notes

For extra flavor, marinate the chicken longer or add your favorite toppings.
Calories: 450kcal
Cost: $15
Course: Main Course
Cuisine: Mexican
Keyword: Chicken