Author

Steven

Browsing

Start Your Day Right with These Wholesome Oatmeal Waffles

Welcome to your new favorite breakfast! These Easy Oatmeal Waffles are not only delicious but also incredibly simple to make. Packed with wholesome ingredients, they provide the perfect fuel to kickstart your day. Whether you’re rushing out the door or enjoying a leisurely morning at home, this recipe is designed to fit into your busy lifestyle.

In just a few steps, you’ll be able to whip up a batch of waffles that are crispy on the outside and soft on the inside. Let’s dive into the delightful world of oatmeal waffles, where healthy meets delicious!

Why You’ll Love This Recipe

  • Quick and Easy: This recipe comes together in no time—perfect for busy mornings or last-minute brunches.
  • Nutritious Ingredients: Made with oats and wholesome ingredients, these waffles are a great source of fiber and protein.
  • Versatile Base: Customize the flavors with your favorite add-ins like fruits, nuts, or chocolate chips.
  • Freezer-Friendly: Make a big batch and freeze them for quick breakfasts throughout the week.
  • Kid-Friendly: Even the pickiest eaters will love these waffles, making breakfast a stress-free experience!

Ingredients You’ll Need to Make Oatmeal Waffles

Here’s what you’ll need to whip up these delicious oatmeal waffles:

  • 3 cups old fashioned oats
  • 3 teaspoons baking powder
  • 1/4 teaspoon salt
  • 1 to 2 tablespoons brown sugar or maple syrup
  • 4 large eggs
  • 1 and 1/2 cups milk (dairy or non-dairy)
  • 1/2 cup + 2 tablespoons liquid coconut oil (not hot)
  • 2 teaspoons vanilla extract

Ingredient Breakdown and Substitutions

Mouth-watering oatmeal waffles in a cozy, inviting setting.

Understanding your ingredients is key to mastering this recipe. Here’s a closer look:

  • Old Fashioned Oats: These provide the base for your waffles. You can substitute with quick oats, but the texture will vary.
  • Milk: Any milk works—dairy, almond, or oat milk are great options.
  • Coconut Oil: This adds a subtle flavor and moisture. You can substitute with melted butter or another oil if desired.
  • Sweeteners: Adjust the sweetness according to your preference. Try honey or agave syrup instead of brown sugar.
  • Eggs: For a vegan version, use flax eggs (1 tablespoon ground flaxseed mixed with 2.5 tablespoons water per egg).

How to Make Oatmeal Waffles

Now, let’s get cooking! Follow these simple steps:

  1. Add all ingredients into a blender. Blend until smooth (it usually takes about 3 minutes in my blender). Let the batter rest while you preheat the waffle iron; this helps it thicken slightly.
  2. Grease the waffle maker with non-stick cooking spray. Pour about 1/3 cup batter into each waffle plate and cook according to the manufacturer’s instructions until golden brown. Pro tip: Check the batter consistency before each batch. Oats absorb moisture, so the batter may thicken as it sits. Stir in a little water to maintain a pourable consistency.
  3. Remove waffles onto a plate and repeat with the remaining batter. Enjoy!

Pro Tips for Perfect Oatmeal Waffles

  • Resting the Batter: Allowing the batter to rest helps achieve a fluffier texture.
  • Greasing the Waffle Iron: Even if your waffle maker is non-stick, a little spray goes a long way in preventing sticking.
  • Don’t Overmix: Blend just until smooth; overmixing can lead to tougher waffles.
  • Check Your Waffle Iron: Adjust the heat settings according to your waffle maker for optimal results.
  • Add Flavor: Experiment with spices like cinnamon or nutmeg to elevate the flavor of your waffles.
  • Use Fresh Ingredients: Always use fresh baking powder for the best rise.
  • Monitor Cooking Time: Every waffle maker is different; keep an eye on the first batch to gauge timing.
  • Serve Immediately: Waffles are best served fresh, but you can keep them warm in a low oven while you cook the rest.

Common Mistakes and Troubleshooting

Even the best cooks encounter hiccups. Here are common issues and how to fix them:

  • Waffles Are Too Soggy: This may be due to excess moisture in the batter. Add a little more oats or reduce the milk next time.
  • Waffles Stick to the Iron: Be sure to grease the waffle maker well before pouring the batter.
  • Waffles Are Too Dense: If overmixed, the batter can become too dense. Blend just until smooth.
  • Uneven Cooking: Adjust the heat settings on your waffle maker as needed for even browning.

Variations to Try with Your Oatmeal Waffles

Feel free to get creative with your waffles! Here are some fun variations:

  • Chocolate Chip Oatmeal Waffles: Add 1/2 cup of mini chocolate chips to the batter for a sweet treat.
  • Banana Oatmeal Waffles: Mash 1 ripe banana into the batter for added sweetness and flavor.
  • Spiced Apple Oatmeal Waffles: Fold in diced apples and a teaspoon of cinnamon for a fall-inspired twist.
  • Berry Oatmeal Waffles: Mix in fresh or frozen berries for a burst of flavor.

Storage and Make-Ahead Instructions

Want to enjoy these waffles throughout the week? Here’s how to store and reheat them:

  • Refrigeration: Store cooled waffles in an airtight container in the refrigerator for up to 4 days.
  • Freezing: Place waffles in a single layer on a baking sheet, freeze until solid, then transfer to a freezer bag. They’ll last up to 3 months.
  • Reheating: Toast frozen waffles directly in the toaster or reheat in the oven at 350°F (175°C) for about 10 minutes.

Frequently Asked Questions

Here are some common queries to help you along the way:

  • Can I use quick oats instead of old fashioned oats? Yes, but the texture may be slightly different.
  • How do I make these waffles gluten-free? Use certified gluten-free oats and ensure your baking powder is gluten-free.
  • Can I use almond milk? Absolutely! Any milk works well in this recipe.
  • How many waffles does this recipe make? This recipe typically makes about 8-10 waffles, depending on your waffle maker.
  • Can I double the recipe? Yes, feel free to double the ingredients for a larger batch.
  • What can I serve with these waffles? They go great with maple syrup, fresh fruit, yogurt, or a dollop of nut butter.
  • How do I know when the waffles are done? Waffles are done when they’re golden brown and crisp. Check your waffle maker’s indicator light.
  • Can I make the batter ahead of time? It’s best to make the batter fresh, but you can prepare it the night before—just give it a good stir before using.

Nutrition Tips and Dietary Adaptations

These oatmeal waffles are not just tasty; they’re also healthy! Here are some nutritional insights:

  • High in Fiber: Oats are an excellent source of dietary fiber, which can help with digestion.
  • Protein Boost: Adding eggs provides a good amount of protein, perfect for keeping you full.
  • Low Sugar: With natural sweeteners like maple syrup or honey, you can control the sugar content.
  • Vegan Option: Use flax eggs and non-dairy milk to make this recipe vegan-friendly.

Equipment Recommendations

Here’s what you need to make these waffles:

  • High-Speed Blender: Essential for blending the oats smoothly.
  • Waffle Maker: A good quality non-stick waffle maker is key for perfect results.
  • Measuring Cups and Spoons: Accurate measurements ensure your waffles turn out just right.
  • Spatula: A silicone spatula is great for transferring waffles without damaging them.

Serving Suggestions

Once your waffles are ready, here are some delightful serving ideas:

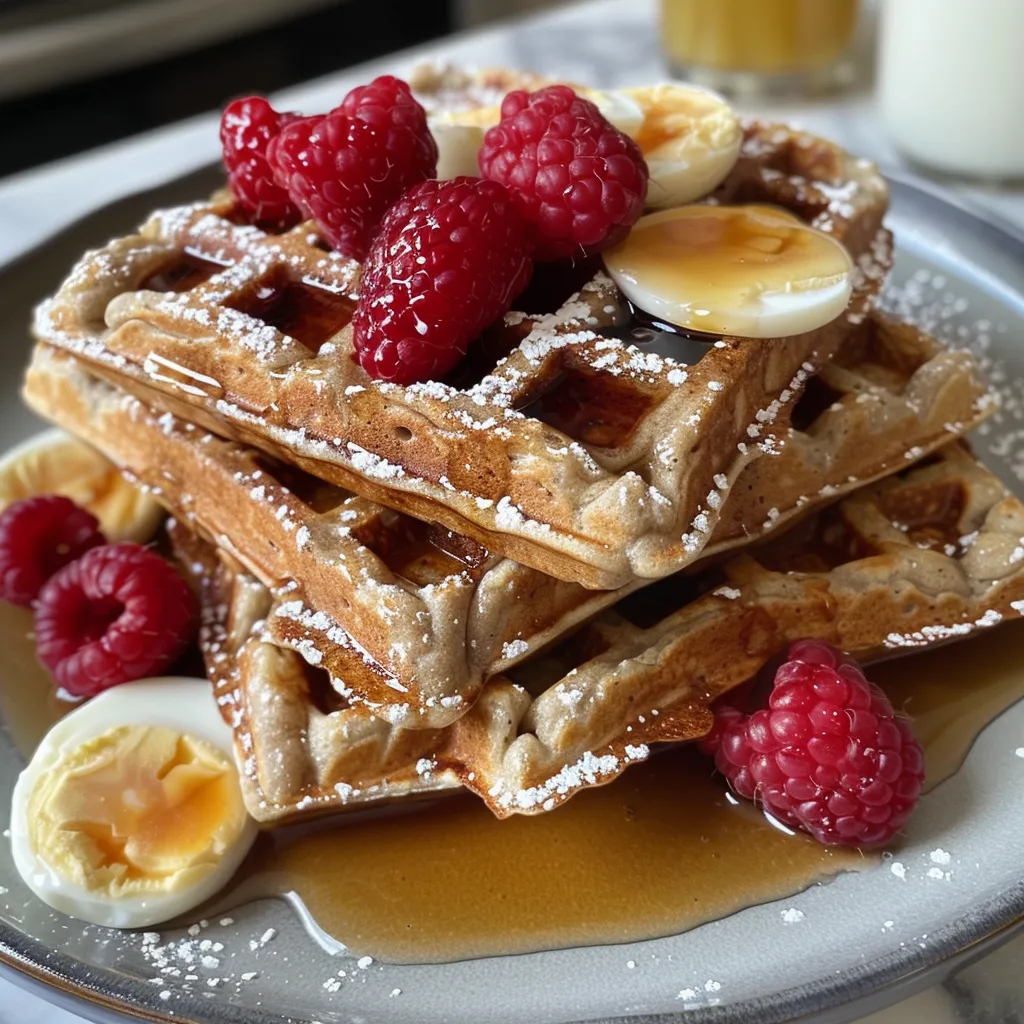
  • Top with Fresh Fruits: Berries, banana slices, or even sautéed apples add natural sweetness.
  • Drizzle with Maple Syrup: A classic choice that never disappoints.
  • Spread Nut Butter: Almond or peanut butter adds creaminess and extra protein.
  • Add a Dollop of Yogurt: Greek yogurt gives a tangy flavor and boosts the protein content.

Enjoy your wholesome waffle mornings and remember, cooking is all about having fun and experimenting. With this easy-to-follow recipe, you’ll create delicious oatmeal waffles that everyone in your home will love. Don’t hesitate to make this recipe your own—add your favorite flavors and toppings for a breakfast experience that’s uniquely yours!

Easy Oatmeal Waffles

Prep Time 10 minutes
Cook Time 15 minutes
Total Time 25 minutes
Servings 4 servings
Calories 250
Delicious and wholesome oatmeal waffles that are quick to prepare and perfect for a hearty breakfast.

Ingredients

Dry ingredients

  • 3 cups old fashioned oats
  • 3 teaspoons baking powder
  • 1/4 teaspoon salt
  • 1 to 2 tablespoons brown sugar or maple syrup
  • 4 large eggs
  • 1 1/2 cups milk
  • 1/2 cup + 2 tablespoons liquid coconut oil liquid coconut oil (not hot)
  • 2 teaspoons vanilla extract

Instructions 

  • Add all ingredients into a blender and blend until smooth. Let batter rest while preheating the waffle iron.
  • Grease the waffle maker and pour about 1/3 cup batter into each section. Cook until golden brown.
  • Check batter consistency before each batch; stir in water if it thickens.
  • Remove cooked waffles and repeat with remaining batter.

Notes

Stir in water to adjust batter consistency before each batch.
Calories: 250kcal
Cost: $15
Course: Breakfast
Keyword: Oats

Elevate Your Dinner with Garlic Parmesan Roasted Cauliflower

Welcome to a culinary adventure that transforms a humble head of cauliflower into a star side dish! This Garlic Parmesan Roasted Cauliflower recipe is not just a feast for the eyes but also a delight for the taste buds. With just a handful of ingredients, you can create a dish that’s flavorful, satisfying, and oh-so-simple to make. Whether you’re serving it alongside grilled meats, tossing it into a salad, or enjoying it as a snack, this recipe is sure to become a staple in your kitchen.

Why You’ll Love This Recipe

  • Quick and Easy: This recipe requires minimal prep time and is perfect for busy weeknights. With just a few steps, you can have a delicious side dish on the table.
  • Flavor-Packed: Infused with the rich taste of garlic and the nutty goodness of Parmesan, this dish elevates the natural flavor of cauliflower to new heights.
  • Healthy and Nutritious: Cauliflower is a low-carb vegetable packed with vitamins C, K, and B6, making this dish a guilt-free addition to your meals.
  • Customizable: You can easily modify this recipe to suit your taste preferences or dietary needs, making it versatile for any occasion.
  • Family-Friendly: Even the pickiest eaters will enjoy this dish. Its crispy texture and savory flavor make it a fun way to introduce more vegetables into your family’s diet.

Ingredients You’ll Need

To make this delicious Garlic Parmesan Roasted Cauliflower, gather the following ingredients:

  • 1 head cauliflower (about 2 lbs)
  • 4 cloves garlic (minced)
  • 1/4 cup extra virgin olive oil
  • 1/2 cup Parmesan cheese (freshly grated)
  • Salt (to taste)
  • Pepper (to taste)
  • Fresh parsley (optional, for garnish)

How to Make Garlic Parmesan Roasted Cauliflower

Deliciously browned cauliflower with a sprinkle of Parmesan, showcasing its texture.

Follow these simple steps to create your Garlic Parmesan Roasted Cauliflower:

  1. Preheat your oven: Set it to 400°F (200°C).
  2. Prepare the cauliflower: Remove the leaves and stem from the cauliflower and cut it into uniform bite-sized florets.
  3. Make the garlic mixture: In a bowl, combine olive oil, minced garlic, salt, and pepper.
  4. Toss the florets: Coat the cauliflower florets with the garlic mixture until evenly coated.
  5. Arrange and sprinkle: Place the florets on a baking sheet lined with parchment paper. Sprinkle with half of the Parmesan cheese.
  6. Roast: Bake in the oven for 25 minutes until golden brown and tender. Add the remaining Parmesan cheese and roast for an additional 5 minutes until bubbly.
  7. Garnish: Before serving, sprinkle with fresh parsley for a pop of color and flavor.

Pro Tips for Perfect Garlic Parmesan Cauliflower

  • Uniform Florets: Ensure your cauliflower florets are cut to the same size for even cooking.
  • Fresh Ingredients: Use fresh garlic and quality Parmesan cheese for the best flavor impact.
  • Oven Thermometer: Check your oven’s temperature with a thermometer; uneven heat can affect roasting results.
  • Extra Crispiness: For added crunch, you can broil the cauliflower for the last 2-3 minutes.
  • Coating Variations: Feel free to add breadcrumbs for extra texture. Mix them with the Parmesan cheese before sprinkling.
  • Mix in Herbs: Experiment with different herbs like thyme or rosemary for an aromatic twist.
  • Batch Cooking: Roast a larger batch to enjoy as leftovers throughout the week in salads or wraps.
  • Serving Temperature: Serve immediately after roasting for the best texture; reheating may cause sogginess.

Common Mistakes and Troubleshooting

  • Soggy Cauliflower: Overcrowding the baking sheet can trap steam, making the cauliflower soggy. Use multiple sheets if necessary.
  • Burnt Garlic: If you notice the garlic browning too quickly, cover the dish with foil for part of the cooking time.
  • Undercooked Cauliflower: If your florets are large, they may need extra time. Check for tenderness with a fork.

Variations to Try

  • Spicy Garlic Parmesan Cauliflower: Add red pepper flakes to the olive oil mixture for a spicy kick.
  • Lemon Garlic Cauliflower: Squeeze fresh lemon juice over the cauliflower before serving for a zesty flavor.
  • Cheesy Herb Cauliflower: Add a mix of herbs like oregano and thyme along with the cheese for an herby twist.
  • Balsamic Glazed Cauliflower: Drizzle balsamic reduction over roasted cauliflower for a sweet tangy finish.

Storage and Make-Ahead Instructions

This Garlic Parmesan Roasted Cauliflower can be stored in an airtight container in the refrigerator for up to 3 days. To reheat, place it in the oven at 350°F (175°C) until warmed through for the best texture. You can also prepare the garlic oil mixture and cut the cauliflower ahead of time, storing them separately until you’re ready to roast.

Frequently Asked Questions

  • Can I use frozen cauliflower? Yes, but be aware that the texture may differ. Adjust the cooking time accordingly.
  • What can I serve with roasted cauliflower? This dish pairs well with grilled chicken, steak, or as part of a vegetarian platter.
  • Is this recipe keto-friendly? Absolutely! Cauliflower is a great low-carb vegetable, making this dish suitable for keto diets.
  • Can I make this vegan? Yes, substitute nutritional yeast for Parmesan cheese and use a plant-based oil.
  • How do I ensure my cauliflower is crispy? Make sure not to overcrowd the baking sheet and allow enough space for air circulation.
  • What’s the best way to cut cauliflower? Start by removing the leaves and stem, then cut the head into quarters and slice into florets.
  • How long does it take to roast cauliflower? Typically, 25-30 minutes at 400°F will yield tender and golden cauliflower.
  • Can I use other cheeses? Yes! Try using cheddar, mozzarella, or a mix for different flavor profiles.

Nutritional Tips and Dietary Adaptations

This recipe is not only delicious but also nutritious. Cauliflower is a low-calorie vegetable rich in fiber and vitamins. You can adapt this dish for various dietary needs:

  • Gluten-Free: This recipe is naturally gluten-free; just ensure the breadcrumbs (if used) are gluten-free.
  • Dairy-Free: Substitute dairy-free cheese or nutritional yeast to keep it dairy-free.
  • Low-FODMAP: Limit the garlic to reduce FODMAP content if necessary.

Equipment Recommendations

  • Baking Sheet: A sturdy, rimmed baking sheet will help prevent spills and ensure even roasting.
  • Parchment Paper: Using parchment paper prevents sticking and makes cleanup a breeze.
  • Mixing Bowl: A large mixing bowl is essential for tossing the cauliflower with the garlic mixture.

Serving Suggestions

Serve your Garlic Parmesan Roasted Cauliflower warm, garnished with fresh parsley. It works wonderfully as a side dish for any protein, or you can toss it into a salad for added texture and flavor. For a complete meal, consider pairing it with a light quinoa salad or a refreshing cucumber yogurt dip.

Now that you have all the details, it’s time to get cooking! This Garlic Parmesan Roasted Cauliflower is not just a recipe; it’s an experience that will make your weeknight dinners exciting and flavorful. Happy cooking!

Garlic Parmesan Roasted Cauliflower

Prep Time 10 minutes
Cook Time 30 minutes
Total Time 40 minutes
Servings 4 servings
Calories 180
A deliciously roasted cauliflower dish infused with garlic and topped with Parmesan cheese, perfect as a side or snack.

Ingredients

Cauliflower

  • 1 head cauliflower (about 2 lbs)
  • 4 cloves garlic (minced)
  • 0.25 cup extra virgin olive oil
  • 0.5 cup Parmesan cheese (freshly grated)
  • to taste salt
  • to taste pepper
  • optional fresh parsley (for garnish)

Instructions 

  • Preheat oven to 400°F (200°C).
  • Cut cauliflower into bite-sized florets and toss with olive oil, garlic, salt, and pepper.
  • Arrange on a baking sheet, sprinkle with half of the Parmesan, and roast for 25 minutes.
  • Add remaining Parmesan and roast for 5 more minutes until bubbly.
  • Garnish with parsley before serving.

Notes

For extra flavor, sprinkle with red pepper flakes or lemon zest.
Calories: 180kcal
Cost: $15
Course: Side Dish
Cuisine: American
Keyword: Cauliflower

Unlock the Secret to Deliciously Moist Blueberry Cottage Cheese Muffins!

Welcome to the wonderful world of baking! Today, we’re diving into a recipe for Blueberry Cottage Cheese Muffins. These muffins are not just any ordinary baked goods; they are packed with flavor, moisture, and a delightful twist thanks to the cottage cheese. Perfect for breakfast, a snack, or even dessert, this recipe is designed to boost your confidence in the kitchen! So, let’s get started!

Why You’ll Love This Recipe

Here are five compelling reasons why these muffins will become a staple in your kitchen:

  • Health Boost: With the addition of cottage cheese, these muffins are rich in protein, making them a nutritious choice for breakfast.
  • Moist and Flavorful: The cottage cheese keeps the muffins incredibly moist while adding a subtle tang that complements the sweetness of the blueberries.
  • Easy to Make: This recipe is straightforward, perfect for both novice and experienced bakers alike.
  • Versatile: Enjoy them fresh or customize with your favorite add-ins like nuts, spices, or different fruits!
  • Make Ahead: These muffins can be prepared in advance and stored for a quick grab-and-go breakfast option.

Ingredient Breakdown

Understanding the ingredients is key to creating the best Blueberry Cottage Cheese Muffins. Here’s what you’ll need and some suggestions for substitutions:

  • Coconut Oil: 1/4 cup, melted and cooled to room temperature. Substitute with unsalted butter or vegetable oil if preferred.
  • Coconut Sugar: 1/2 cup for natural sweetness. Brown sugar or honey can also be used.
  • Vanilla Paste: 1 tsp for added flavor. Vanilla extract is a suitable replacement.
  • Milk: 1/4 cup, any type works (dairy or non-dairy).
  • Eggs: 2 large, at room temperature. Use flax eggs for a vegan option.
  • Cottage Cheese: 1 cup, preferably a thick brand like Good Culture.
  • Flour: 1.75 cups, all-purpose or whole wheat. Gluten-free flour blends work too!
  • Baking Soda: 1 tsp to help the muffins rise.
  • Salt: 1/2 tsp to enhance flavor.
  • Cinnamon: 1/2 tsp for warmth, optional but recommended.
  • Nutmeg: 1/4 tsp for depth of flavor, optional.
  • Blueberries: 1 cup, fresh or frozen (toss with a bit of flour to prevent sinking).

Step-by-Step Instructions for Blueberry Cottage Cheese Muffins

A delicious batch of cottage cheese muffins with blueberries, highlighting their inviting texture.

Follow these simple steps to whip up your muffins:

  1. Preheat your oven to 375°F (190°C) and line a muffin tin with paper liners or grease them lightly.
  2. In a large mixing bowl, combine the coconut oil, coconut sugar, and vanilla paste. Mix until well combined.
  3. Add the milk and eggs, whisking until smooth.
  4. Fold in the cottage cheese until evenly incorporated.
  5. In a separate bowl, mix the flour, baking soda, salt, cinnamon, and nutmeg.
  6. Gradually add the dry ingredients to the wet mixture, stirring until just combined. Be careful not to overmix!
  7. Gently fold in the blueberries, ensuring they are evenly distributed.
  8. Divide the batter evenly among the prepared muffin cups.
  9. Bake for 20-25 minutes, or until a toothpick inserted into the center comes out clean.
  10. Let the muffins cool in the pan for a few minutes before transferring to a wire rack to cool completely.

Common Mistakes and Troubleshooting

A few tips to ensure your muffins turn out perfectly:

  • Overmixing: This can lead to dense muffins. Mix until just combined.
  • Incorrect Oven Temperature: Always preheat your oven and check with an oven thermometer if unsure.
  • Too Many Berries: While blueberries are delicious, too many can make the muffins soggy. Stick to 1 cup.
  • Using Cold Ingredients: Make sure your eggs and milk are at room temperature for better mixing.

Variations to Try

Feel free to customize this recipe to suit your taste preferences!

  • Chocolate Chip: Add 1/2 cup of dark chocolate chips for a decadent twist.
  • Banana: Replace half of the cottage cheese with mashed banana for a fruity flavor.
  • Nutty: Stir in 1/2 cup of chopped walnuts or pecans for added crunch.
  • Spiced: Add a touch of ginger or cardamom for a unique flavor profile.

Storage and Make-Ahead Instructions

These muffins store beautifully! Here’s how:

  • Room Temperature: Keep in an airtight container for up to 3 days.
  • Refrigerator: Store in an airtight container for up to a week.
  • Freezing: Freeze muffins for up to 3 months. Thaw in the fridge overnight before enjoying.

Comprehensive FAQ

Here are some common questions about making Blueberry Cottage Cheese Muffins:

  • Can I use frozen blueberries? Yes! Just toss them in flour before adding them to the batter.
  • How do I know when the muffins are done? A toothpick inserted in the center should come out clean.
  • Can I make these muffins gluten-free? Absolutely! Use a 1:1 gluten-free flour blend.
  • What can I substitute for cottage cheese? Greek yogurt or ricotta can be used for a similar texture.
  • How can I make these muffins vegan? Substitute eggs with flax eggs and use non-dairy milk and yogurt.
  • Can I add other fruits? Yes! Chopped strawberries or raspberries can be great alternatives.
  • How do I make the muffins sweeter? Increase the coconut sugar or add a drizzle of honey on top after baking.
  • What’s the best way to serve these muffins? Warm, with a pat of butter or a dollop of cream cheese for an indulgent treat!

Nutritional Tips and Dietary Adaptations

For those keeping an eye on nutrition, here are some tips:

  • Protein Boost: Cottage cheese is a great source of protein, making these muffins a filling option for breakfast.
  • Low Sugar: Adjust the sweetness by using less coconut sugar or opting for a sugar substitute.
  • Fiber Rich: Opt for whole wheat flour to increase dietary fiber.
  • Vegan Option: Easily adapt this recipe for vegan diets with simple substitutions.

Equipment Recommendations

To make this recipe easier, here’s some recommended equipment:

  • Muffin Tin: A non-stick muffin tin or silicone molds will yield the best results.
  • Mixing Bowls: A set of mixing bowls in various sizes is essential for combining ingredients.
  • Whisk: A good whisk helps incorporate ingredients smoothly.
  • Rubber Spatula: Perfect for folding in blueberries without breaking them.

Serving Suggestions

These muffins are delicious on their own, but here are a few ways to enhance your serving experience:

  • With Butter: Spread a little butter on warm muffins for added richness.
  • With Yogurt: Serve alongside a dollop of Greek yogurt for a protein-packed breakfast.
  • With Jam: Pair with your favorite jam or preserves to complement the flavors.
  • With Tea or Coffee: Enjoy with a warm beverage for a cozy treat.

In conclusion, these Blueberry Cottage Cheese Muffins are not just a recipe; they are a way to enjoy delicious, nutritious baking without the fuss. Remember, cooking is about experimenting and having fun in the kitchen. So, roll up your sleeves, and let’s bake some muffins that will make your taste buds sing!

Best Blueberry Cottage Cheese Muffins - theamazingfood

Prep Time 10 minutes
Cook Time 20 minutes
Total Time 30 minutes
Servings 12 muffins
Calories 210
These moist and fluffy blueberry cottage cheese muffins are perfect for a nutritious breakfast or snack, combining creamy cottage cheese with fresh blueberries for a delightful treat.

Ingredients

Dairy & Oils

  • 0.25 cup coconut oil (melted and cooled to room temperature)
  • 0.5 cup coconut sugar
  • 1 tsp vanilla paste (prefer Nielsen-Massey for richer flavor)
  • 0.25 cup milk
  • 2 eggs eggs (room temperature, about 70°F)
  • 1 cup cottage cheese (Good Culture brand provides the best thick texture)
  • 1.75 cups flour
  • 1 tsp baking soda
  • 0.5 tsp salt
  • 0.5 tsp cinnamon
  • 0.25 tsp ground nutmeg
  • 1 cup blueberries (fresh or frozen)

Instructions 

  • Preheat oven to 375°F (190°C) and line a muffin tin with paper liners.
  • Mix dry ingredients: flour, baking soda, salt, cinnamon, and nutmeg in a bowl.
  • In a separate bowl, whisk together coconut oil, coconut sugar, vanilla, milk, eggs, and cottage cheese until smooth.
  • Combine wet and dry ingredients, then gently fold in blueberries.
  • Divide batter evenly among muffin cups and bake for 20 minutes or until golden brown.

Notes

For extra flavor, sprinkle a little cinnamon on top before baking.
Calories: 210kcal
Cost: $12
Course: Breakfast, Snack
Cuisine: American
Keyword: Blueberry, Cottage Cheese

Start Your Day Right with a Vanilla Berry Protein Smoothie Bowl

Welcome to your ultimate guide to crafting the perfect Vanilla Berry Protein Smoothie Bowl! This deliciously thick and creamy bowl is not just a treat for your taste buds; it’s also a powerhouse of nutrients that sets the stage for a vibrant day ahead. Enjoy the delightful flavor of fresh berries combined with a protein boost that can kickstart your morning or serve as a fulfilling post-workout recovery. In this comprehensive guide, we’ll break down everything you need to know to make this smoothie bowl a staple in your kitchen.

Why You’ll Love This Recipe

This Vanilla Berry Protein Smoothie Bowl is not just about taste; it comes loaded with benefits that will make you want to whip it up every morning. Here are just a few reasons:

  • Quick and easy: Prepared in under 10 minutes, this smoothie bowl is perfect for busy mornings.
  • Customizable: Use your favorite fruits and toppings to make it your own!
  • Nutrient-dense: Packed with protein, fiber, and antioxidants for a balanced breakfast.
  • Great for meal prep: Make a batch for quick breakfasts throughout the week.
  • Kid-friendly: This smoothie bowl is a fun way to get kids excited about healthy eating.

Ingredients Breakdown

Let’s dive into the ingredients you’ll need for this creamy delight, along with some handy substitutions to cater to your dietary needs.

  • Frozen mixed berries (1 to 1.5 cups): Blueberries, strawberries, and raspberries all work well. If you prefer fresh, just add ice to maintain the texture.
  • Frozen banana (1 small, in chunks): This adds creaminess and sweetness. You can substitute with a ripe fresh banana or omit for a lower sugar option.
  • Vanilla protein powder (1 scoop): This can be whey or plant-based. Choose a flavor that complements the berries.
  • Greek yogurt (1/3 to 1/2 cup): For creaminess and protein. Use dairy-free yogurt for a vegan option.
  • Milk of choice (1/4 to 1/2 cup): Almond, oat, or soy milk can all work; adjust based on your preferred creaminess.
  • Chia seeds (1 tablespoon): These add fiber and omega-3 fatty acids. If unavailable, you can use flaxseeds.
  • Nut butter (1 tablespoon): Almond, peanut, or cashew butter enhance flavor and healthy fats. You can skip it or use sunflower seed butter for a nut-free option.
  • Vanilla extract (1/2 teaspoon): Elevates the flavor—don’t skip this!
  • Optional sweetener (1–2 teaspoons): Maple syrup, honey, or a few drops of stevia can be added based on your sweetness preference.
  • Toppings: Sliced banana, fresh berries, granola, coconut flakes, cacao nibs, and hemp seeds for added nutrition and crunch.

Step-by-Step Instructions

A delicious breakfast bowl featuring a blend of vanilla and berries, adorned with coconut flakes and chia seeds.

Now that you have your ingredients ready, let’s walk through the preparation process.

  1. Prep your base: Add frozen berries and frozen banana to your blender first. This helps the blades grab the fruit and create a thick texture.
  2. Add protein and creaminess: Scoop in the protein powder and Greek yogurt. This combo makes it creamy and keeps you full.
  3. Flavor and healthy fats: Add chia seeds, nut butter, and vanilla extract to boost thickness, fiber, and flavor.
  4. Pour in a little liquid: Start with 1/4 cup milk. You want just enough to get things moving. You can always add more.
  5. Blend low and slow: Pulse or blend on low, using a tamper if you have one. Scrape down the sides as needed. Add milk 1 tablespoon at a time until it turns into a thick, soft-serve-like blend.
  6. Taste and adjust: If it’s not sweet enough, add a touch of honey or maple syrup. If it’s too tart, a bit more banana or yogurt helps.
  7. Serve immediately: Spoon into a chilled bowl to keep it thick. Add toppings for crunch and extra nutrients.

Pro Tips for the Perfect Smoothie Bowl

Here are some expert insights to elevate your smoothie bowl game:

  • Use frozen fruits: They create a thicker, creamier texture compared to fresh fruits.
  • Chill your bowl: A cold bowl helps maintain the temperature of your smoothie, making it even more refreshing.
  • Layer wisely: Start with heavier toppings like granola at the bottom and lighter ones like coconut flakes on top for a beautiful presentation.
  • Experiment with flavors: Mix in spices like cinnamon or nutmeg to enhance the flavor profile.
  • Adjust thickness: Keep the liquid minimal until you achieve your desired consistency—thicker is better!
  • Don’t rush blending: Blend slowly to ensure everything is mixed well without turning it into a liquid.
  • Make it colorful: Use a variety of fruits to create an appealing visual that invites you to dig in.
  • Try different protein sources: Swap out protein powder for Greek yogurt or cottage cheese for a fun twist.

Common Mistakes and Troubleshooting

Even the best chefs run into hiccups! Here’s how to avoid common pitfalls:

  • Too thin: If your smoothie bowl is too runny, add more frozen fruit or yogurt to thicken it up.
  • Not sweet enough: Adjust sweetness with natural sweeteners—start small and taste as you go.
  • Uneven blending: If you notice chunks, pause to scrape down the sides and blend again.
  • Too thick: Add a splash more milk to get it moving, but be cautious not to overdo it.

Variations to Try

Feel free to switch things up with these creative variations:

  • Chocolate Berry Bowl: Add a scoop of cocoa powder or chocolate protein powder for a chocolatey twist.
  • Tropical Smoothie Bowl: Replace berries with mango and pineapple for a refreshing tropical flavor.
  • Green Smoothie Bowl: Add a handful of spinach or kale for a nutrient boost without compromising taste.
  • Nut-Free Version: Omit nut butter and replace it with sunflower seed butter or coconut yogurt for a nut-free option.

Storage and Make-Ahead Instructions

This smoothie bowl is best enjoyed fresh, but you can prepare components ahead of time:

  • Pre-packaged ingredients: Portion out your dry ingredients and freeze fruits together for a quick blend in the morning.
  • Storage duration: If you have leftovers, store them in an airtight container in the refrigerator for up to 24 hours. Note that texture may change.

Frequently Asked Questions

Here are some common questions to help you get the most out of your smoothie bowl experience:

  • Can I use fresh berries instead of frozen? Yes, but you’ll need to add ice for the desired thickness.
  • Is this smoothie bowl vegan-friendly? Absolutely! Use plant-based yogurt and protein powder.
  • How can I make this bowl lower in calories? Reduce the amount of nut butter and use unsweetened yogurt and milk.
  • Can I prepare this smoothie bowl the night before? Yes, but it’s best to blend fresh the next day for optimal texture.
  • What can I use instead of protein powder? Greek yogurt or cottage cheese can provide a protein boost without the powder.
  • Are there any nut-free options? Yes, use sunflower seed butter or omit nut butter entirely.
  • Can I add vegetables to my smoothie bowl? Yes! Spinach and kale can boost nutrition without affecting the flavor.
  • What toppings work best? Fresh fruits, seeds, nuts, and granola all work wonderfully—mix and match!

Nutrition Tips and Dietary Adaptations

This smoothie bowl is inherently nutritious, but here are a few tips to cater to specific dietary needs:

  • For a high-protein option: Increase the protein powder or add extra Greek yogurt.
  • Dairy-free: Ensure all ingredients, including yogurt and milk, are plant-based.
  • Gluten-free: This recipe is naturally gluten-free, just check your toppings.
  • Low-carb: Use fewer fruits and consider adding avocado for creaminess without the carbs.

Essential Equipment Recommendations

Having the right tools makes cooking a breeze. Here’s what you’ll need:

  • High-speed blender: A powerful blender ensures a smooth, creamy texture.
  • Measuring cups and spoons: For accurate ingredient measurements.
  • Spatula: To scrape down the sides of the blender for even blending.
  • Chilled serving bowls: Keeps your smoothie bowl thick and refreshing.

Serving Suggestions

For a delightful breakfast or snack, serve your Vanilla Berry Protein Smoothie Bowl with:

  • Crunchy toppings: Granola, nuts, or seeds for texture.
  • Fresh herbs: A sprinkle of mint or basil can add an unexpected burst of flavor.
  • Complementary flavors: Pair it with a side of whole-grain toast or a fruit salad.

Conclusion: Enjoy Your Culinary Adventure

With this definitive guide to the Vanilla Berry Protein Smoothie Bowl, you’re equipped to start your day with a delicious and nutritious meal. Embrace the creativity of customizing your bowl and enjoy the process of making healthy eating a joyful experience. Remember, cooking is about confidence, creativity, and enjoying every bite. Happy blending!

Vanilla Berry Protein Smoothie Bowl (Simple, Thick & Meal-Worthy) - A Creamy, Satisfying Breakfast

Prep Time 10 minutes
Total Time 10 minutes
Servings 2 bowl
Calories 350
This creamy smoothie bowl combines berries, banana, and protein for a satisfying breakfast that’s quick to prepare and customizable with your favorite toppings.

Ingredients

Fruits

  • 1 cup Frozen mixed berries
  • 1 small Frozen banana (in chunks)

Protein & Dairy

  • 1 scoop Vanilla protein powder (whey or plant-based)
  • 1/3 cup Greek yogurt (plain or vanilla)

Liquid & Seeds

  • 1/4 cup Milk of choice (almond, oat, dairy, etc.)
  • 1 tablespoon Chia seeds
  • 1 tablespoon Nut butter (almond, peanut, or cashew)
  • 1/2 teaspoon Vanilla extract

Optional Sweetener

  • 1-2 teaspoons Sweetener (maple syrup, honey, or stevia)

Toppings

  • Sliced banana, fresh berries, granola, coconut flakes, cacao nibs, hemp seeds (for topping)

Instructions 

  • Add frozen berries and banana to your blender for a thick base.
  • Add protein powder and Greek yogurt for creaminess and fullness.
  • Mix in chia seeds, nut butter, vanilla extract, and a splash of milk. Blend until smooth and thick.
  • Taste and adjust sweetness with honey or syrup if needed. Serve immediately topped with your favorite toppings.

Notes

Use frozen fruit for a thicker, colder smoothie bowl. Adjust liquid for desired consistency.
Calories: 350kcal
Cost: $10
Course: Breakfast
Keyword: Berry, Protein, Smoothie

Discover the Joy of Crispy Roasted Chickpeas

Are you ready to elevate your snacking game? Crispy roasted chickpeas are the perfect solution for anyone looking for a healthy, delicious snack that’s easy to make and packed with flavor. In this guide, I’ll walk you through everything you need to know about making these tasty morsels, from the ingredients to the best ways to enjoy them. Whether you’re vegan, gluten-free, or just someone who loves a good crunch, this recipe will have you covered!

Why You’ll Love This Recipe

This isn’t just a recipe; it’s a game-changer in your kitchen! Here’s why:

  • Quick and easy: With just a few simple steps, you can whip up a batch of these roasted chickpeas in under an hour, making them a convenient snack option.
  • Flavor-packed: Tossed with your favorite spices, these chickpeas can be tailored to your taste, from spicy to sweet.
  • Healthy snacking: Chickpeas are a great source of plant-based protein and fiber, making this snack not only satisfying but also nutritious.
  • Versatile: Enjoy them on their own, toss them into salads, or sprinkle over soups for added texture and flavor.
  • Kid-friendly: Even picky eaters will love the crunch and flavor of these chickpeas, making them a perfect snack for the whole family.

Ingredients You’ll Need

Let’s gather what you need to make these crispy roasted chickpeas:

  • 2 cans chickpeas: Make sure they are well-drained and rinsed. You can also use dried chickpeas that you soak and cook, but canned is quicker!
  • 2 tablespoons olive oil: This helps achieve that perfect crisp. You could also substitute with avocado oil for a different flavor.
  • 1 teaspoon smoked paprika powder: Adds a delightful smokiness. Feel free to explore other spices like cumin or curry powder.
  • 1 teaspoon garlic powder: For an extra layer of flavor. Fresh garlic can also work, but be cautious as it can burn.
  • 1/2 teaspoon salt: Essential for enhancing the flavors. You could also use sea salt or Himalayan salt for a gourmet touch.

Pro Tips for Perfectly Crispy Chickpeas

A detailed look at perfectly roasted chickpeas, glistening with olive oil.

Ready to become a roasted chickpea pro? Here are my top tips:

  • Dry thoroughly: Make sure to dry the chickpeas very well after rinsing. This is crucial for achieving a crunchy texture.
  • Don’t skip the oil: A bit of oil is essential for the roasting process, helping the chickpeas crisp up nicely.
  • Use parchment paper: Line your baking sheet with parchment paper for easy cleanup and to prevent sticking.
  • Watch the baking time: Keep an eye on your chickpeas towards the end of baking. They can go from perfect to overdone quickly!
  • Let them cool: Allow the chickpeas to cool on the baking sheet for a few minutes after baking; this helps them crisp up even more.
  • Experiment with spices: Don’t hesitate to get creative! Try using chili powder, cinnamon, or even a sprinkle of sugar for sweet variations.
  • Store properly: Keep your roasted chickpeas in an airtight container to maintain their crispiness.
  • Serve warm: For the best texture, enjoy them fresh out of the oven.

Common Mistakes to Avoid

Here are a few pitfalls to watch out for when making roasted chickpeas:

  • Not drying them enough: If the chickpeas are still wet, they won’t crisp up as desired.
  • Overcrowding the baking sheet: Give them enough space to roast evenly; otherwise, they may steam instead of roast.
  • Using too much spice before baking: Spices can burn during the initial roasting, so it’s best to add them afterward.
  • Not checking for doneness: Every oven is different. Check your chickpeas a few minutes before the suggested time to ensure they don’t burn.

Variations to Try

Feeling adventurous? Here are some delicious variations on the classic roasted chickpea recipe:

  • Spicy Sriracha: Toss your chickpeas with Sriracha sauce and a squeeze of lime before roasting for a fiery kick.
  • Sweet Cinnamon: Mix chickpeas with cinnamon and a touch of honey or maple syrup for a sweet treat.
  • Italian Herb: Use Italian seasoning, garlic powder, and a sprinkle of Parmesan cheese for an Italian twist.
  • BBQ Flavor: Coat your chickpeas with barbecue seasoning for a smoky, sweet flavor.

Storage and Make-Ahead Instructions

Want to make these chickpeas in advance? Here’s how to store them:

  • Room temperature: Store your roasted chickpeas in an airtight container at room temperature. They are best enjoyed within a few days for maximum crispiness.
  • Make-ahead: You can roast them a day or two in advance. Just be sure to keep them stored properly and re-crisp them in the oven for a few minutes if they lose their crunch.

FAQ About Roasted Chickpeas

Got questions? I’ve got answers! Here are some common inquiries about roasted chickpeas:

  • Can I use dried chickpeas? Yes! Just soak and cook them first according to package instructions.
  • What’s the best way to season them? You can use any spices you love! Just remember to add them after the first round of baking.
  • Can I make them without oil? Yes, but they won’t be as crispy. You can try air frying for a similar effect.
  • How do I store leftovers? Keep them in an airtight container at room temperature for up to 3 days.
  • Can I freeze roasted chickpeas? While you can freeze them, they may lose their crunch once thawed. It’s best to enjoy them fresh.
  • How long do they take to cook? The total baking time is about 35-40 minutes, depending on your oven.
  • What can I pair them with? They’re fantastic on their own or tossed into salads, grain bowls, or even soups!
  • Are they healthy? Absolutely! They’re packed with protein and fiber, making them a great snack option.

Nutritional Tips and Dietary Adaptations

Roasted chickpeas are not only delicious but also nutritious. Here are some tips to enhance their health benefits:

  • Boost fiber: Chickpeas are already high in fiber, which is great for digestion. Combine them with whole grains for a fiber-rich meal.
  • Protein power: Pair them with a source of protein like quinoa or tofu for a balanced meal.
  • Low sodium: Control the salt by making your own spice blends to keep sodium levels in check.
  • Gluten-free: Chickpeas are naturally gluten-free, making this snack perfect for those with gluten intolerance.

Essential Equipment

Here’s what you’ll need for the best results:

  • Baking sheet: A sturdy baking sheet ensures even cooking.
  • Parchment paper: This makes cleanup a breeze and prevents sticking.
  • Mixing bowl: A medium bowl for tossing the chickpeas with oil and spices.
  • Clean dishtowel or paper towels: For drying the chickpeas thoroughly after rinsing.

Serving Suggestions

How to enjoy your roasted chickpeas? Here are some delicious ideas:

  • As a snack: Enjoy them straight from the oven for a crunchy treat.
  • In salads: Toss them into salads for added texture and protein.
  • On grain bowls: Add them to bowls with rice or quinoa for a satisfying meal.
  • With dips: Pair them with hummus or guacamole for a fun twist on dipping.

Conclusion

Now that you know how to make crispy roasted chickpeas, it’s time to get into the kitchen and start experimenting! This simple recipe is not only satisfying but also offers endless variations to keep your snacking exciting. Remember, cooking is about confidence and creativity—don’t hesitate to tweak the recipe to make it your own. Enjoy your culinary adventure, and happy cooking!

Roasted Chickpeas

Prep Time 10 minutes
Cook Time 35 minutes
Total Time 45 minutes
Servings 4 servings
Calories 200
A crunchy and flavorful snack made from roasted chickpeas seasoned to perfection.

Ingredients

Canned Goods

  • 2 cans chickpeas (drained and dried)
  • 2 tablespoons olive oil
  • 1 teaspoon smoked paprika powder
  • 1 teaspoon garlic powder
  • 1/2 teaspoon salt

Instructions 

  • Preheat oven to 350°F (175°C). Line a baking sheet with parchment paper.
  • Drain and thoroughly dry the chickpeas with a towel.
  • Toss chickpeas with olive oil. Spread on baking sheet and bake for 25 minutes.
  • Remove from oven, add spices, and toss to coat evenly.
  • Return to oven and bake for another 10 minutes until crunchy.

Notes

Store in an airtight container for a crispy snack.
Calories: 200kcal
Cost: $5
Course: Snack
Keyword: Chickpeas

Start Your Day Right with a High Protein Strawberry Banana Smoothie Bowl

Are you looking for a delicious and nutritious way to kickstart your morning? Look no further than this High Protein Strawberry Banana Smoothie Bowl. Packed with vibrant flavors and essential nutrients, this smoothie bowl is not just a meal; it’s an experience that can energize your day. With a perfect blend of strawberries, bananas, Greek yogurt, and even a sneaky addition of riced cauliflower, you’ll be surprised at how deliciously thick and creamy this bowl can be. Let’s dive into why this recipe is a must-try!

Why You’ll Love This Recipe

  • Quick and Easy: This smoothie bowl can be whipped up in just 10 minutes. Perfect for busy mornings!
  • Customizable: Swap ingredients easily based on your preferences or what you have on hand.
  • Nutritious: Packed with protein from Greek yogurt and fiber from fruits, this bowl will keep you full and satisfied.
  • Kid-Friendly: A fun, colorful dish that kids will love to help make and eat!
  • Deliciously Versatile: Enjoy it as breakfast, a snack, or even a light dessert.

Ingredient Breakdown

Let’s take a closer look at the ingredients you’ll need to make this delightful smoothie bowl:

  • ¼ cup milk: Any type works! Almond, soy, or coconut milk can add unique flavors.
  • ¾ cup Greek yogurt: This adds creaminess and protein. Feel free to use plain or vanilla for a little sweetness.
  • 1 frozen banana: A frozen banana creates a thick, creamy texture and adds natural sweetness.
  • 1 cup frozen strawberries: These provide a burst of flavor and vibrant color!
  • 1 cup frozen riced cauliflower: An unexpected addition that boosts nutrients without altering the flavor.
  • Optional sweetener: A splash of honey or maple syrup can be added for extra sweetness.
  • Toppings: Get creative! Fresh strawberries, banana slices, granola, or hemp hearts work beautifully.

How to Make Your Smoothie Bowl

Here’s a simple step-by-step guide to creating your smoothie bowl:

  1. To a blender, add the milk, Greek yogurt, frozen banana, frozen strawberries, and riced cauliflower. Blend on low to get things moving, then increase to high.
  2. Blend until smooth, using a tamper or spatula to scrape down the sides as needed. If the mixture is too thick, add more milk gradually—just be careful not to make it runny!
  3. Pour the smoothie into a bowl and top with your favorite toppings. Enjoy immediately for the best experience!

Pro Tips for the Perfect Smoothie Bowl

  • Use frozen ingredients: Frozen fruits and vegetables create a thick and creamy texture.
  • Don’t over-blend: Blend just until smooth to maintain thickness.
  • Adjust consistency: If it’s too thick, add a little more milk; if too thin, add more frozen fruit.
  • Experiment with flavors: Try adding spinach or kale for an extra nutrient boost!
  • Presentation matters: Layer your toppings artfully for a beautiful bowl that’s Instagram-ready.
  • Make it a meal: Add protein powder for an extra kick if you’re looking for a more filling option.
  • Stay seasonal: Use seasonal fruits for the best flavor and freshness.
  • Prep ahead: You can pre-measure your smoothie base ingredients and freeze them for a quick blend in the morning.

Common Mistakes and Troubleshooting

Even the best recipes can hit a snag! Here are some common pitfalls and how to avoid them:

  • Too thin: If your smoothie bowl is too runny, add more frozen fruit or a handful of oats.
  • Too thick: Add a splash of milk at a time until you reach your desired consistency.
  • Not blending well: If your blender struggles, stop and scrape down the sides to help it blend evenly.
  • Flavor imbalance: If it’s too sweet, add a squeeze of lemon juice to balance the flavors.

Variations to Try

Mix things up with these fun variations:

  • Berry Blast: Swap strawberries for mixed berries (blueberries, raspberries, blackberries).
  • Green Machine: Add a handful of spinach or kale for a nutrient boost without altering the taste much.
  • Chocolate Delight: Add a tablespoon of cocoa powder or a scoop of chocolate protein powder.
  • Nutty Banana: Top with almond butter and sliced bananas for extra protein and healthy fats.

Storage and Make-Ahead Instructions

Want to prep ahead? Here’s how:

  • Make-Ahead: You can prep the smoothie base ingredients, blend, and freeze in an airtight container. Just thaw and blend on busy mornings!
  • Storage: Store leftover smoothie in the fridge for up to 24 hours. Stir or blend again before enjoying.

Frequently Asked Questions

Got questions? Here are some FAQs about this recipe:

  • Can I use fresh fruit instead of frozen? Absolutely! Just add a handful of ice to achieve the desired thickness.
  • Can I make this smoothie bowl vegan? Yes! Replace Greek yogurt with coconut yogurt and use plant-based milk.
  • What’s a good substitute for Greek yogurt? You can use any thick yogurt like Skyr or a dairy-free alternative.
  • How can I add more protein? Incorporate protein powder, chia seeds, or nut butter into your blend.
  • Can I add greens? Definitely! Spinach or kale is a great way to get extra nutrients without changing the flavor.
  • What toppings can I use? Get creative! Fresh fruits, nuts, seeds, or granola are all great options.
  • Is this smoothie bowl kid-friendly? Yes! Kids will love the fun toppings and the ability to customize their own bowls.
  • How do I make this smoothie bowl more filling? Add oats or nut butter for extra fiber and healthy fats.

Nutritional Tips and Dietary Adaptations

Want to make this recipe even healthier? Here are some tips:

  • Watch added sugars: Use fruits for sweetness rather than sweeteners.
  • Increase fiber: Add flax seeds or chia seeds to boost fiber content.
  • Low-carb option: Use unsweetened almond milk and omit the banana for a lower-carb version.

Essential Equipment for Smoothie Bowls

Having the right kitchen tools can make your smoothie bowl making experience smoother:

  • High-speed blender: A powerful blender is essential for achieving that creamy, smooth consistency.
  • Measuring cups and spoons: Ensure accurate measurements for perfect results.
  • Bowl: A nice, deep bowl allows for generous servings and beautiful presentations.

Serving Suggestions

Pair your High Protein Strawberry Banana Smoothie Bowl with:

  • Whole grain toast: Top with avocado or nut butter for a balanced meal.
  • Fresh juice: A glass of fresh orange juice adds a refreshing touch.
  • Yogurt parfait: Layer with granola and yogurt for a full breakfast spread!

In conclusion, this High Protein Strawberry Banana Smoothie Bowl is not just a recipe; it’s a pathway to a healthier, happier morning routine. Whether you’re whipping it up for yourself or sharing with family, it’s a delightful dish that brings joy and nourishment. Don’t forget to get creative with toppings and variations to make it your own. Happy cooking!

High Protein Strawberry Banana Smoothie Bowl

Prep Time 10 minutes
Total Time 10 minutes
Servings 2 servings
Calories 250
A delicious and nutritious smoothie bowl packed with protein, perfect for a quick breakfast or snack.

Ingredients

Dairy

  • 0.25 cup milk
  • 0.75 cup Greek yogurt (plain or vanilla)
  • 1 frozen banana (peeled) banana (frozen and peeled)
  • 1 cup frozen strawberries
  • 1 cup frozen riced cauliflower
  • optional splash honey or maple syrup (to sweeten if desired)

Toppings of choice

  • to taste fresh strawberries, banana, granola, hemp hearts

Instructions 

  • Add milk, yogurt, banana, strawberries, and cauliflower to a blender. Blend on low then high until smooth.
  • If needed, add more milk 1 tablespoon at a time to help blending. Do not over-blend to keep thickness.
  • Pour into a bowl, add toppings, and enjoy immediately.

Notes

Feel free to customize toppings for added flavor and texture.
Calories: 250kcal
Cost: $10
Course: Breakfast
Cuisine: American
Keyword: Fruit, Protein, Smoothie

Discover the Joy of Roasted Parmesan Cauliflower Bites

Are you ready to elevate your snacking game? If you’re looking for an easy yet delicious option that brings flavor and satisfaction to your table, look no further! These Roasted Parmesan Cauliflower Bites are not only simple to make but also incredibly versatile, perfect for any occasion—from a quick weeknight dinner to a festive gathering. With just a handful of ingredients, you can whip up a dish that’s both healthy and indulgent. So let’s dive into how to make these scrumptious bites.

Why You’ll Love This Recipe

This delightful recipe is designed to captivate your taste buds and spark your culinary creativity. Here are five reasons why these parmesan cauliflower bites deserve a spot in your kitchen:

  • Flavor Explosion: The combination of roasted cauliflower and Parmesan cheese creates a savory, cheesy delight with every bite.
  • Easy to Prepare: With minimal prep time, this recipe is perfect for busy weeknights or last-minute gatherings.
  • Health-Conscious Choice: Cauliflower is a nutritious vegetable packed with vitamins, making this a guilt-free snack or side dish.
  • Versatile and Customizable: You can easily tweak the seasonings or add different toppings to suit your taste preferences.
  • Kid-Approved: Even picky eaters will love these tasty bites, making them a great option for family meals.

Ingredients You’ll Need

To make these irresistible roasted parmesan cauliflower bites, gather the following ingredients:

  • 1 medium head of cauliflower: Cut into bite-sized florets for even roasting.
  • 2 tablespoons extra virgin olive oil: This helps achieve that perfect golden-brown crispiness.
  • ½ cup freshly grated Parmesan cheese: Adds a rich, cheesy flavor that pairs beautifully with the cauliflower.
  • 1 teaspoon garlic powder: Infuses the bites with a savory aroma and taste.
  • 1 teaspoon paprika: Provides a hint of smokiness and color.
  • Salt to taste: Enhances all the flavors.

Feel free to experiment with substitutions! For example, you can use nutritional yeast for a dairy-free option or add a pinch of red pepper flakes for a spicy kick.

How to Make Roasted Parmesan Cauliflower Bites

Deliciously crispy cauliflower pieces garnished with parmesan and seasoning.

Follow these simple steps to create your roasted perfection:

  1. Preheat your oven: Set it to 425°F (220°C) to ensure your cauliflower gets crispy.
  2. Prepare your baking sheet: Line it with parchment paper or grease it lightly for easy cleanup.
  3. Toss the cauliflower: In a large bowl, coat the cauliflower florets with olive oil until they are evenly covered.
  4. Add seasonings: Sprinkle the garlic powder, paprika, and salt over the florets; mix thoroughly to ensure even seasoning.
  5. Coat with Parmesan: Add the freshly grated Parmesan cheese and toss until every floret is well-coated.
  6. Arrange on the baking sheet: Spread the cauliflower in a single layer to promote even roasting.
  7. Roast in the oven: Bake for 25-30 minutes or until the cauliflower is golden brown and crispy. Enjoy the heavenly aroma!

Pro Tips for Perfect Bites

To ensure your roasted parmesan cauliflower bites turn out perfectly every time, consider these expert tips:

  • Leave space between florets: This helps them roast evenly and become extra crispy.
  • Don’t skip the preheating: A hot oven is essential for achieving that perfect roasted texture.
  • Experiment with toppings: Try adding different herbs or spices like Italian seasoning or cumin for a unique twist.
  • Store leftovers properly: Keep any uneaten bites in an airtight container in the fridge for up to 3 days.
  • Reheat in the oven: For the best results, reheat leftover cauliflower bites in the oven rather than the microwave to maintain their crispiness.
  • Mix in other veggies: Feel free to add bell peppers or Brussels sprouts to the baking sheet for a colorful veggie medley.
  • Go for fresh cheese: Using freshly grated Parmesan will always yield better flavor than pre-grated cheese.
  • Check for doneness: The bites should be golden brown and tender when pierced with a fork.

Common Mistakes and Troubleshooting

Even the best of us make mistakes in the kitchen! Here are some common pitfalls to avoid when making roasted parmesan cauliflower bites:

  • Overcrowding the baking sheet: This leads to steaming rather than roasting, resulting in soggy bites.
  • Not using enough oil: Insufficient oil can cause the cauliflower to dry out instead of becoming crispy.
  • Skipping the salt: Don’t forget to season your cauliflower; it can make a huge difference in flavor.
  • Using old cauliflower: Fresh cauliflower is key! Look for firm florets without brown spots.

Delicious Variations

Want to switch things up? Here are a few tasty variations to try:

  • Buffalo Cauliflower Bites: Toss the cauliflower in buffalo sauce before roasting for a spicy kick.
  • Italian Herb Cauliflower: Mix in dried oregano and basil with the garlic powder for an Italian twist.
  • Cheesy Ranch Cauliflower: Add ranch seasoning to the mix for a zesty flavor.
  • Lemon Zest Cauliflower: Sprinkle some lemon zest before serving for a refreshing brightness.

Make Ahead and Storage

You can make these roasted parmesan cauliflower bites ahead of time!

  • Make Ahead: Prep the cauliflower and season it. Store in the fridge for up to 24 hours before roasting.
  • Storage: Keep leftovers in an airtight container for up to 3 days. Reheat in a 400°F oven for best results.

FAQs About Roasted Parmesan Cauliflower Bites

Got questions? Here are some frequently asked ones:

  • Can I use frozen cauliflower? Yes, but fresh cauliflower yields the best texture. If using frozen, thaw and pat dry before roasting.
  • What can I serve these bites with? They pair wonderfully with dips like ranch or buffalo sauce, or as a side to your favorite main dish.
  • Is this dish gluten-free? Absolutely! All the ingredients are naturally gluten-free.
  • Can I make this vegan? Substitute nutritional yeast for Parmesan and use a vegan butter alternative for added flavor.
  • How do I know when they’re done? The bites should be golden brown and crispy on the outside. A fork should easily pierce the cauliflower.
  • Can I add more cheese? Of course! Sprinkle more Parmesan cheese halfway through roasting for an extra cheesy finish.
  • What’s the best way to reheat leftovers? Reheat in the oven at 400°F until crispy again, about 10 minutes.
  • Can I add other spices? Absolutely! Feel free to customize with your favorite spices or herbs.

Nutritional Tips and Dietary Adaptations

This recipe is not only delicious but also offers some nutritional benefits:

  • Low in Carbs: Cauliflower is a fantastic low-carb alternative to traditional snacks.
  • Rich in Fiber: This vegetable is high in fiber, promoting digestive health.
  • Vitamins and Minerals: Cauliflower is packed with vitamins C, K, and B6, as well as folate.

For dietary adaptations, consider using almond flour instead of breadcrumbs for a gluten-free option!

Essential Equipment Recommendations

Here’s what you’ll need to successfully make these roasted parmesan cauliflower bites:

  • Baking Sheet: A sturdy baking sheet ensures even cooking.
  • Parchment Paper: This helps prevent sticking and makes cleanup a breeze.
  • Mixing Bowl: A large bowl for tossing the cauliflower and ingredients together.
  • Measuring Cups and Spoons: Precise measurements will help you get the best results.

Serving Suggestions

While these roasted parmesan cauliflower bites are delightful on their own, here are a few serving ideas:

  • As a Snack: Serve with your favorite dip, like ranch or hummus, for a satisfying snack.
  • As a Side Dish: Pair with grilled chicken or fish for a wholesome dinner.
  • On a Salad: Toss them into a fresh salad for added crunch and flavor.
  • At a Party: Serve on a platter with assorted dips for a crowd-pleasing appetizer.

With these Roasted Parmesan Cauliflower Bites, you’re not just making a dish; you’re creating an experience of joy and satisfaction. Whether you’re snacking solo or sharing with friends, these bites are sure to delight. Enjoy cooking and the delicious results!

Roasted Parmesan Cauliflower Bites

Prep Time 10 minutes
Cook Time 30 minutes
Total Time 40 minutes
Servings 4 servings
Calories 150
Enjoy these crispy, cheesy cauliflower bites that make a perfect snack or side dish.

Ingredients

Cauliflower

  • 1 medium head cauliflower
  • 2 tablespoons extra virgin olive oil
  • ½ cup freshly grated parmesan cheese
  • 1 teaspoon garlic powder
  • 1 teaspoon paprika
  • Salt to taste salt

Instructions 

  • Preheat oven to 425°F (220°C). Line a baking sheet.
  • Toss cauliflower in olive oil, then sprinkle with garlic powder, paprika, and salt.
  • Add parmesan cheese and toss to coat evenly.
  • Spread on baking sheet in a single layer.
  • Roast for 25-30 minutes until golden and crispy.

Notes

For extra crunch, broil for an additional 2 minutes.
Calories: 150kcal
Cost: $12
Course: Appetizer, Side Dish
Cuisine: American
Keyword: Bites, Cauliflower, Parmesan

Start Your Day Right with Apple Cinnamon Overnight Oats

Welcome to a deliciously simple recipe that brings the comforting flavors of apple cinnamon straight to your breakfast table! These overnight oats are not only easy to prepare but also packed with nutrients, making them a perfect choice for busy mornings. With just a few ingredients and minimal effort, you’ll have a wholesome breakfast that’s ready to go when you are. So grab a jar, and let’s dive into the delightful world of cinnamon overnight oats!

Why You’ll Love This Recipe

  • Quick and Easy Preparation: Spend just 10 minutes preparing your oats, and they’ll be ready to enjoy in the morning.
  • Healthy Breakfast Option: Packed with fiber and nutrients, these oats will keep you full and energized throughout your busy day.
  • Customizable: Tailor this recipe to your taste—swap out apples for other fruits, or use different sweeteners.
  • Perfect for Meal Prep: Prepare several jars at once to have a grab-and-go breakfast ready for the week.
  • Family-Friendly: Kids love the sweet and comforting flavors, making it a breakfast everyone can agree on!

Ingredients Breakdown

Here’s what you’ll need to create these delicious apple cinnamon overnight oats:

  • 1/2 cup rolled oats: Use old-fashioned oats for the best texture.
  • 1 cup milk: Any kind works—dairy, almond, coconut, or oat milk are all great choices.
  • 1/2 cup unsweetened applesauce: Adds moisture and sweetness without extra sugar.
  • 1 tablespoon chia seeds: These are packed with omega-3s and help thicken the oats.
  • 1 teaspoon maple syrup or honey (optional): Adjust sweetness to your liking.
  • 1/2 teaspoon ground cinnamon: The star spice that brings warmth and flavor.
  • 1/4 cup finely diced apple: Fresh apple adds crunch and flavor—feel free to peel or leave the skin on!
  • Pinch of salt: Enhances the sweetness and balances flavors.

Substitutions and Variations

A textured view of Apple Cinnamon Overnight Oats, highlighting the creamy mixture and diced apples.

If you want to mix things up a bit, here are some substitutions and variations to try:

  • Different Fruits: Swap apples for bananas, berries, or peaches for a fruity twist.
  • Nut Butters: Stir in a tablespoon of almond or peanut butter for added creaminess and protein.
  • Seeds and Nuts: Add chopped walnuts or sliced almonds for extra crunch and healthy fats.
  • Yogurt Addition: Mix in some Greek yogurt for additional creaminess and protein boost.

How to Make Apple Cinnamon Overnight Oats

Follow these simple steps to create your cinnamon overnight oats:

  • Combine Dry Ingredients: In a jar or bowl, mix rolled oats, chia seeds, ground cinnamon, and a pinch of salt.
  • Add Wet Ingredients: Pour in your milk and applesauce. If you’re adding maple syrup or honey, include it now.
  • Stir Thoroughly: Mix until everything is well combined. Ensure no clumps of oats or chia seeds stick to the bottom.
  • Fold in Diced Apple: Gently incorporate the apples into your mixture.
  • Cover and Chill: Seal your jar or bowl and place it in the refrigerator.
  • Soak Overnight: Allow the oats to soak for at least 6-8 hours, or preferably overnight.
  • Serve and Enjoy: In the morning, give the oats a quick stir and adjust the consistency with more milk if needed. Add your favorite toppings, like nuts or additional fruit!

Pro Tips for Perfect Overnight Oats

  • Use a Mason Jar: This keeps your oats fresh and ready to grab in the morning.
  • Layering Ingredients: Layer dry ingredients first, then wet, to avoid clumping.
  • Experiment with Flavors: Try adding vanilla extract or nutmeg for added depth.
  • Adjust Sweetness: Taste your mixture before chilling; you can always add more sweetener later.
  • Keep it Creamy: If your oats seem too thick in the morning, add a splash of milk and stir.
  • Mix and Match: Combine different fruits or toppings throughout the week to keep things interesting.
  • Stay Mindful of Portions: Stick to the recommended serving sizes to maintain a balanced diet.
  • Utilize Leftovers: If you have extra oats, use them in smoothies or baked goods!

Common Mistakes and Troubleshooting

Here are a few common slip-ups when making overnight oats and how to avoid them:

  • Too Thick: If your oats are too thick in the morning, simply stir in a little more milk until you reach your desired consistency.
  • Watery Oats: If your oats are too watery, next time reduce the amount of milk or increase the oats slightly.
  • Flavorless Oats: Make sure to season well with cinnamon and salt, and don’t forget to taste before refrigerating!
  • Using Quick Oats: Avoid quick oats for this recipe; they can become mushy and lose their texture.

Storage and Make-Ahead Instructions

These apple cinnamon overnight oats are great for meal prep! Here’s how to store them:

  • Refrigeration: Store your overnight oats in the refrigerator for up to 5 days.
  • Make-Ahead: Prepare multiple jars at once to save time during your busy mornings.
  • Freezer-Friendly: You can freeze the mixture for up to 3 months; just thaw overnight in the fridge before serving.

Frequently Asked Questions

Here are some common questions about apple cinnamon overnight oats:

  • How long do overnight oats last? They can be stored in the fridge for up to 5 days.
  • Can I eat overnight oats warm? Yes! If you prefer them warm, simply heat them up in the microwave for a minute or two.
  • What kind of oats should I use? Old-fashioned rolled oats are best; avoid instant oats as they can become mushy.
  • Can I make this vegan? Absolutely! Just use plant-based milk and a vegan sweetener.
  • How do I make my oats creamier? Try adding Greek yogurt or more chia seeds for a creamier texture.
  • Are overnight oats healthy? Yes! They’re high in fiber, protein, and whole grains, making them a nutritious breakfast option.
  • Can I add other toppings? Definitely! Try nuts, seeds, or any fresh fruit you enjoy.
  • What if I don’t have chia seeds? You can omit them, but they do help with texture and nutritional value.

Nutritional Tips and Dietary Adaptations

To optimize the health benefits of your apple cinnamon overnight oats, consider these tips:

  • Boost Fiber: Add a tablespoon of flaxseed or hemp seeds for extra fiber and nutrients.
  • Reduce Sugar: If you’re watching sugar intake, skip the sweeteners or use stevia.
  • Increase Protein: Add a scoop of protein powder or Greek yogurt for a more balanced breakfast.
  • Gluten-Free Option: Ensure you use certified gluten-free oats.

Equipment Recommendations

To make your cinnamon overnight oats successfully, you’ll need:

  • Jars or Bowls: Mason jars or airtight containers work best for storing overnight oats.
  • Spoons: A good mixing spoon for combining your ingredients thoroughly.
  • Measuring Cups and Spoons: For accurate measurements of your ingredients.
  • Refrigerator: To chill your oats overnight and enhance their flavor.

Serving Suggestions

Once your apple cinnamon overnight oats are ready, consider these serving ideas:

  • Top with Fresh Fruit: Add banana slices, berries, or additional diced apples for a fruity kick.
  • Nut Butter Drizzle: A spoonful of almond or peanut butter adds richness and flavor.
  • Sprinkle with Nuts: Chopped walnuts or pecans add crunch and healthy fats.
  • Yogurt Swirl: A dollop of yogurt on top makes for a creamy finish.

Enjoy these apple cinnamon overnight oats as a satisfying, nutritious breakfast that will keep you energized and ready to tackle your day. Remember, cooking is about enjoying the process, so feel free to experiment and make this recipe your own. Happy cooking!

Apple Cinnamon Overnight Oats

Prep Time 10 minutes
Total Time 10 minutes
Servings 2 servings
Calories 250
A quick and healthy breakfast that combines oats, apples, and cinnamon for a delicious start to your day.

Ingredients

Dry Ingredients

  • 1/2 cup rolled oats (old-fashioned oats)
  • 1 cup milk (dairy or non-dairy)
  • 1/2 cup unsweetened applesauce
  • 1 tablespoon chia seeds
  • 1 teaspoon maple syrup or honey (optional, for sweetness)
  • 1/2 teaspoon ground cinnamon
  • 1/4 cup finely diced apple (peeled or unpeeled)
  • Pinch salt

Instructions 

  • Mix oats, chia seeds, cinnamon, and salt in a jar or bowl.
  • Add milk, applesauce, and sweetener; stir well.
  • Fold in diced apple; cover and refrigerate overnight.
  • In the morning, stir and add more milk if needed. Serve and enjoy.

Notes

You can customize toppings like nuts or additional fruit for variety.
Calories: 250kcal
Cost: $10
Course: Breakfast
Cuisine: American
Keyword: Oats

Unlock the Secret to Irresistibly Crunchy Garlic Parmesan Cauliflower

Welcome to a culinary adventure where we transform humble cauliflower into a crispy garlic parmesan delight! This Crispy Garlic Parmesan Cauliflower is not just another side dish; it’s a flavor-packed experience that’s perfect for weeknight dinners or impressing guests at gatherings. With its golden crust and savory garlic undertones, you’ll find yourself craving this dish again and again. Let’s dive into why this recipe deserves a spot in your kitchen!

Why You’ll Love This Recipe

There are countless reasons to fall in love with this garlic parmesan cauliflower. Here are just a few:

  • Easy to Prepare: With just a handful of ingredients and simple steps, you can whip up this dish in no time.
  • Flavor Explosion: The combination of garlic and parmesan takes the natural flavor of the cauliflower to new heights.
  • Versatile Side Dish: Pair it with any main course, or enjoy it on its own as a snack or appetizer.
  • Healthy and Guilt-Free: Packed with nutrients, this dish is a great way to enjoy comfort food without the guilt.
  • Impressive Presentation: The golden, crispy florets make for a stunning addition to any dinner table.

Essential Ingredients for Crispy Garlic Parmesan Cauliflower

Before we get cooking, let’s break down the ingredients you’ll need:

  • Cauliflower: 1 medium head, cut into florets (about 8 cups). This is the star of our dish!
  • Extra-Virgin Olive Oil: 3 tablespoons. This adds flavor and helps achieve that crispiness.
  • Paprika: 1.5 teaspoons. A touch of smokiness that enhances the flavor.
  • Kosher Salt: 0.75 teaspoons. Essential for bringing out the flavors.
  • Cracked Black Pepper: 0.5 teaspoons. Adds a bit of heat and depth.
  • Garlic: 3 cloves, minced. Fresh garlic is a must for that aromatic flavor.
  • Grated Parmesan Cheese: 2 to 3 tablespoons. The secret to that golden, crispy coating.
  • Lemon Juice: 1/2 juice of lemon. Brightens the dish and adds freshness.
  • Fresh Parsley: 2 tablespoons, finely chopped. For garnish and a pop of color.

Step-by-Step Cooking Instructions

Delicious looking crispy cauliflower with a sprinkle of grated parmesan and chopped herbs.

Now that we have our ingredients ready, let’s get cooking with these simple steps:

  1. Preheat your oven to 450ºF and place a large rimmed baking sheet on the center rack.
  2. Prepare the Cauliflower: Cut the cauliflower into small florets and add them to a large bowl. Toss with olive oil, paprika, salt, and black pepper until evenly coated.
  3. Roast the Cauliflower: Empty the cauliflower onto the preheated baking sheet. Arrange the florets in a single layer, avoiding overcrowding. Roast for 20 to 25 minutes, tossing once midway through, until lightly charred and tender.
  4. Add Garlic and Cheese: Sprinkle Parmesan cheese and minced garlic over the cauliflower and place it back in the oven for an additional 5 minutes.
  5. Finish with Lemon and Parsley: Once roasted, spritz lemon juice over the top and garnish with fresh parsley. Toss gently and serve!

Pro Tips for Perfecting Your Cauliflower

Want to elevate your dish even further? Here are some expert insights:

  • Uniform Florets: Cut your cauliflower into similar-sized florets for even cooking.
  • Don’t Skimp on Oil: A good amount of olive oil helps achieve that coveted crispy texture.
  • Experiment with Cheese: For a twist, try using a mix of Parmesan and Pecorino Romano.
  • Spice It Up: Feel free to add a pinch of cayenne or chili powder for some heat.
  • Use Fresh Garlic: Freshly minced garlic gives the best flavor—avoid pre-minced varieties.
  • Check for Doneness: Every oven is different; keep an eye on your cauliflower to prevent burning.
  • Serve Immediately: This dish is best enjoyed fresh out of the oven for maximum crispiness.
  • Make Ahead: You can prep the cauliflower ahead of time, just add the cheese and garlic before roasting.

Common Mistakes and Troubleshooting

Even seasoned cooks can run into issues. Here’s how to troubleshoot:

  • Cauliflower Isn’t Crispy: Ensure you’re using enough oil and avoid overcrowding the baking sheet.
  • Burnt Cheese: If the cheese burns, try adding it halfway through the roasting process.
  • Undercooked Cauliflower: If it’s not tender, give it a few extra minutes in the oven.
  • Flavorless Dish: Make sure to season generously with salt and spices.

Variations to Explore

Get creative! Here are some variations you can try:

  • Buffalo Cauliflower: Toss in buffalo sauce before roasting for a spicy kick.
  • Herb-Infused: Add dried herbs like oregano or thyme for a fragrant twist.
  • Cheesy Garlic Bread Cauliflower: Mix in breadcrumbs for added crunch and extra cheese.
  • Asian-Inspired: Drizzle with soy sauce and sprinkle sesame seeds before serving.

Storage and Make-Ahead Instructions

Want to enjoy this dish later? Here’s how to store it:

  • Refrigerate: Store any leftovers in an airtight container in the fridge for up to 3 days.
  • Reheat: For best results, reheat in the oven at 350ºF to regain crispiness.
  • Make Ahead: You can prepare the cauliflower and seasonings a day in advance. Roast just before serving.

Frequently Asked Questions

Got questions? We’ve got answers!

  • Can I make this dish vegan? Yes! Simply omit the Parmesan or use a vegan cheese substitute.
  • What can I serve with garlic parmesan cauliflower? It pairs wonderfully with grilled meats, pasta, or as part of a vegetable platter.
  • Is cauliflower healthy? Absolutely! It’s low in calories and high in vitamins and fiber.
  • Can I use frozen cauliflower? Fresh cauliflower is best, but if you use frozen, reduce the roasting time.
  • How do I know when it’s cooked? The cauliflower should be tender and lightly charred.
  • What’s the best way to cut cauliflower? Use a sharp knife and cut the head into quarters before slicing off florets.
  • Can I add other vegetables? Yes, feel free to mix in other vegetables like broccoli or Brussels sprouts.
  • How do I make it spicier? Add red pepper flakes or a dash of hot sauce to the oil before tossing the cauliflower.

Nutrition Tips and Dietary Adaptations

This recipe is not only delicious but also versatile for various dietary needs:

  • Gluten-Free: Naturally gluten-free, making it perfect for those with gluten sensitivities.
  • Low-Carb: A great low-carb option for anyone following a keto or low-carb diet.
  • High-Protein Option: Add chickpeas or tofu for additional protein without sacrificing flavor.

Equipment Recommendations

To make your cooking experience smooth and enjoyable, here are some essential kitchen tools:

  • Rimmed Baking Sheet: A large, sturdy baking sheet is crucial for even roasting.
  • Mixing Bowl: For tossing the cauliflower and seasonings together.
  • Sharp Knife: A good knife will make cutting the cauliflower easier and safer.
  • Spatula: For flipping the cauliflower halfway through roasting.

Serving Suggestions

Here are some great ways to serve your crispy garlic parmesan cauliflower:

  • As a Side Dish: It pairs wonderfully with grilled chicken, steak, or fish.
  • Appetizer: Serve it with a dipping sauce like ranch or a spicy aioli.
  • Salad Topping: Add it on top of salads for added crunch and flavor.

In conclusion, this Crispy Garlic Parmesan Cauliflower recipe is a sure-fire way to impress anyone at your table with its delightful flavors and crispy texture. Remember, cooking is all about experimentation and finding joy in the process. So roll up your sleeves, have fun, and enjoy this delicious dish! Happy cooking!

Crispy Garlic Parmesan Cauliflower

Prep Time 10 minutes
Cook Time 25 minutes
Total Time 35 minutes
Servings 4 servings
Calories 180
A flavorful and crispy roasted cauliflower dish infused with garlic, Parmesan, and lemon, perfect as a side or snack.

Ingredients

Vegetables

  • 1 medium head cauliflower, cut into florets (about 8 cups)
  • 3 Tbsp. extra-virgin olive oil
  • 1.5 tsp. paprika
  • 0.75 tsp. kosher salt
  • 0.5 tsp. cracked black pepper
  • 3 cloves garlic, minced
  • 2 to 3 Tbsp. grated Parmesan cheese
  • 1/2 juice of lemon lemon juice
  • 2 Tbsp. finely chopped fresh parsley

Instructions 

  • Preheat oven to 450ºF (230ºC). Toss cauliflower florets with olive oil, paprika, salt, and pepper.
  • Arrange on a baking sheet and roast for 20-25 minutes until lightly charred and tender.
  • Sprinkle Parmesan and garlic over cauliflower and bake for 5 more minutes.
  • Spritz with lemon juice, garnish with parsley, toss, and serve.

Notes

For extra crispiness, broil for the last 2 minutes.
Calories: 180kcal
Cost: $12
Course: Side Dish
Cuisine: American
Keyword: Cauliflower

Your Ultimate Guide to a Refreshing 5-Minute Fruit Smoothie Bowl

Welcome to a delightful and energizing start to your day! If you’re looking for a quick and healthy breakfast option, look no further than this 5-Minute Fruit Smoothie Bowl. This recipe combines the creaminess of Greek yogurt with the vibrant flavors of fresh and frozen fruits, creating a nutritious breakfast that’s not only delicious but also visually appealing. In just five minutes, you can whip up this smoothie bowl and customize it with your favorite toppings, making it a versatile choice for any morning. Let’s dive in!

Why You’ll Love This Recipe

This recipe is not just a meal; it’s an experience! Here are five reasons why you’ll absolutely love making this smoothie bowl:

  • Quick to Prepare: In just 5 minutes, you can have a nutritious breakfast ready, perfect for busy mornings.
  • Customizable: You can easily swap out fruits and toppings to suit your taste preferences or dietary needs.
  • Nutrient-Rich: Packed with vitamins, minerals, and protein from Greek yogurt, this smoothie bowl is a healthy way to kickstart your day.
  • Kid-Friendly: The colorful presentation and fruity flavors make it a hit among kids, encouraging them to enjoy healthy foods.
  • Great for Meal Prep: You can prepare the base ahead of time and add toppings in the morning for a grab-and-go breakfast.

Ingredients Breakdown

Here’s what you’ll need to make this delicious smoothie bowl, along with some helpful substitutions:

  • 1 Banana: Use a ripe banana for sweetness. You can substitute with half an avocado for a creamier texture.
  • 1 Cup Frozen Strawberries: These add a refreshing flavor. Feel free to replace them with frozen raspberries or cherries.
  • 1/3 Cup Frozen Pineapple Chunks: Pineapple gives a tropical twist. Use mango chunks for an equally delightful flavor.
  • 1/2 Cup Vanilla Greek Yogurt: This provides creaminess and protein. Plant-based yogurt can be used for a vegan option.
  • Toppings: Get creative! Options include sliced strawberries, sliced bananas, fresh blueberries, granola, shredded coconut, slivered almonds, chopped walnuts, chia seeds, or sunflower seeds.

Simple Steps to Make Your Smoothie Bowl

A delicious smoothie bowl showcasing bananas, blueberries, and various toppings in a detailed close-up.

Follow these straightforward steps to create your smoothie bowl:

  • Prep: Chop the banana into 1-inch pieces and freeze for at least 1-2 hours (overnight is ideal).
  • Process: In a food processor, combine the frozen banana, strawberries, pineapple, and Greek yogurt. Blend for 2-4 minutes, making sure to scrape down the sides with a spatula for an even consistency.
  • Enjoy: Once the mixture is smooth and creamy, scoop it into bowls. Top with your favorite toppings and enjoy immediately!

Pro Tips for the Perfect Smoothie Bowl

To elevate your smoothie bowl game, consider these expert insights:

  • Texture Matters: For a thicker smoothie bowl, use less liquid (like yogurt or milk) and more frozen fruits.
  • Blend in Stages: Start with the harder ingredients and gradually add softer ones for a smoother blend.
  • Chill Your Bowl: For an extra refreshing experience, chill your serving bowls in the freezer before serving.
  • Add Protein: Boost the nutritional value by adding a scoop of protein powder or nut butter into the mix.
  • Sweetness Control: Taste your smoothie before adding sweeteners. You might find the fruits provide enough natural sweetness!
  • Layer Your Toppings: Create a visually appealing bowl by layering your toppings in sections—get creative!
  • Experiment with Greens: Add a handful of spinach or kale for added nutrients without altering the flavor significantly.
  • Freeze Leftovers: If you have extra smoothie mix, pour it into ice cube trays and freeze for future smoothies.

Common Mistakes & Troubleshooting

Even the best cooks make mistakes, but here’s how to avoid common pitfalls:

  • Too Runny: If your smoothie bowl is too thin, add more frozen fruit or reduce the liquid next time.
  • Not Blending Well: If your ingredients aren’t blending properly, stop and scrape down the sides of the bowl. Ensure your blender is powerful enough for frozen items.
  • Overly Sweet: If it turns out too sweet, balance it out with a splash of lemon juice or additional yogurt.
  • Not Enough Flavor: Add a pinch of salt or a splash of vanilla extract to enhance the overall taste.

Delicious Variations to Try

Switch things up and keep your breakfasts exciting with these variations:

  • Chocolate Peanut Butter: Blend in a tablespoon of cocoa powder and a scoop of peanut butter for a decadent treat.
  • Green Smoothie Bowl: Add a handful of spinach and some avocado for a nutritious green twist.
  • Tropical Paradise: Use mango instead of pineapple and add shredded coconut on top for a tropical vibe.
  • Berry Blast: Swap the strawberries for mixed berries (blueberries, blackberries, and raspberries) for a berry-packed bowl.

Storage & Make-Ahead Instructions

Want to prepare ahead of time? Here’s how:

  • Meal Prep: Prepare the smoothie base the night before and store it in an airtight container in the fridge. Add toppings fresh in the morning.
  • Freezing: You can freeze the smoothie base in portions. Just blend and pour into freezer-safe bags for up to 2 months.

Frequently Asked Questions

Here are some common questions about making smoothie bowls:

  • Can I use fresh fruit instead of frozen? Yes, but your smoothie may not be as thick. You can add ice to achieve the desired texture.
  • What if I don’t have a food processor? A high-speed blender works well too; just ensure to blend in small batches if needed.
  • How can I make it vegan? Substitute Greek yogurt with a dairy-free yogurt option and ensure your toppings are plant-based.
  • Can I add protein powder? Absolutely! A scoop of your favorite protein powder can boost the nutritional content.
  • Is this suitable for kids? Yes! The colorful presentation and fruity flavors make it a kid-friendly option.
  • How long can I store leftovers? Smoothie bowls are best enjoyed fresh, but you can store them in the fridge for up to 24 hours.
  • What toppings do you recommend? Get creative! Try granola, nuts, seeds, or fresh fruits based on your taste.
  • Can I meal prep smoothie bowls? Yes! Prepare the base in advance and add toppings when you’re ready to enjoy.

Nutritional Tips and Dietary Adaptations

This smoothie bowl is not only delicious but also packed with nutrients. Here are some tips for making it even healthier:

  • Boost Fiber: Add chia seeds or flaxseeds for an extra fiber boost.
  • Lower Sugar: Use unsweetened yogurt and watch the amount of sweet toppings you add.
  • Increase Protein: Incorporate Greek yogurt or protein powder to make it more filling and satisfying.

Equipment Recommendations

Here’s what you’ll need to make your smoothie bowl:

  • Food Processor or Blender: A high-quality appliance is key for a smooth consistency.
  • Measuring Cups and Spoons: Accurate measurements ensure the perfect balance of flavors.
  • Spatula: Use this to scrape down the sides of your food processor or blender.
  • Bowl and Spoon: For serving your delicious creation!

Serving Suggestions

To make your smoothie bowl a complete meal, consider pairing it with:

  • Whole Grain Toast: Top with avocado or nut butter for added healthy fats.
  • Hard-Boiled Eggs: A great source of protein to keep you full longer.
  • Oatmeal: Serve a small side of oatmeal for a heartier breakfast.

Conclusion

Now you have everything you need to create a delicious and nutritious 5-Minute Fruit Smoothie Bowl. With its vibrant flavors, health benefits, and endless customization possibilities, this recipe is sure to become a staple in your breakfast routine. Remember, cooking should be enjoyable, so feel free to experiment and make this recipe your own. Happy blending!

5-Minute Fruit Smoothie Bowl (with Greek Yogurt)

Prep Time 10 minutes
Total Time 10 minutes
Servings 2 bowls
Calories 250
A quick and delicious smoothie bowl packed with fresh fruits, Greek yogurt, and nutritious toppings, perfect for a healthy breakfast or snack.

Ingredients

Fruits

  • 1 piece banana (ripe, sliced)
  • 1 cup frozen strawberries
  • 1/3 cup frozen pineapple chunks

Dairy & Toppings

  • 1/2 cup vanilla Greek yogurt
  • sliced strawberries (for topping)
  • sliced bananas (for topping)
  • handful fresh blueberries (for topping)

Add-ins & Toppings

  • granola granola (for topping)
  • shredded coconut shredded coconut (for topping)
  • slivered almonds slivered almonds (for topping)
  • chopped walnuts chopped walnuts (for topping)
  • chia seeds chia seeds (for topping)
  • sunflower seeds sunflower seeds (for topping)

Instructions 

  • Chop banana into 1-inch pieces and freeze for 1-2 hours.
  • Add all ingredients to a food processor and blend for 2-4 minutes until smooth.
  • Scoop into bowls, add toppings, and serve immediately.

Notes

Use frozen fruits for a creamier texture and serve immediately for best taste.
Calories: 250kcal
Cost: $10
Course: Breakfast
Cuisine: American
Keyword: Fruit, Healthy, Smoothie