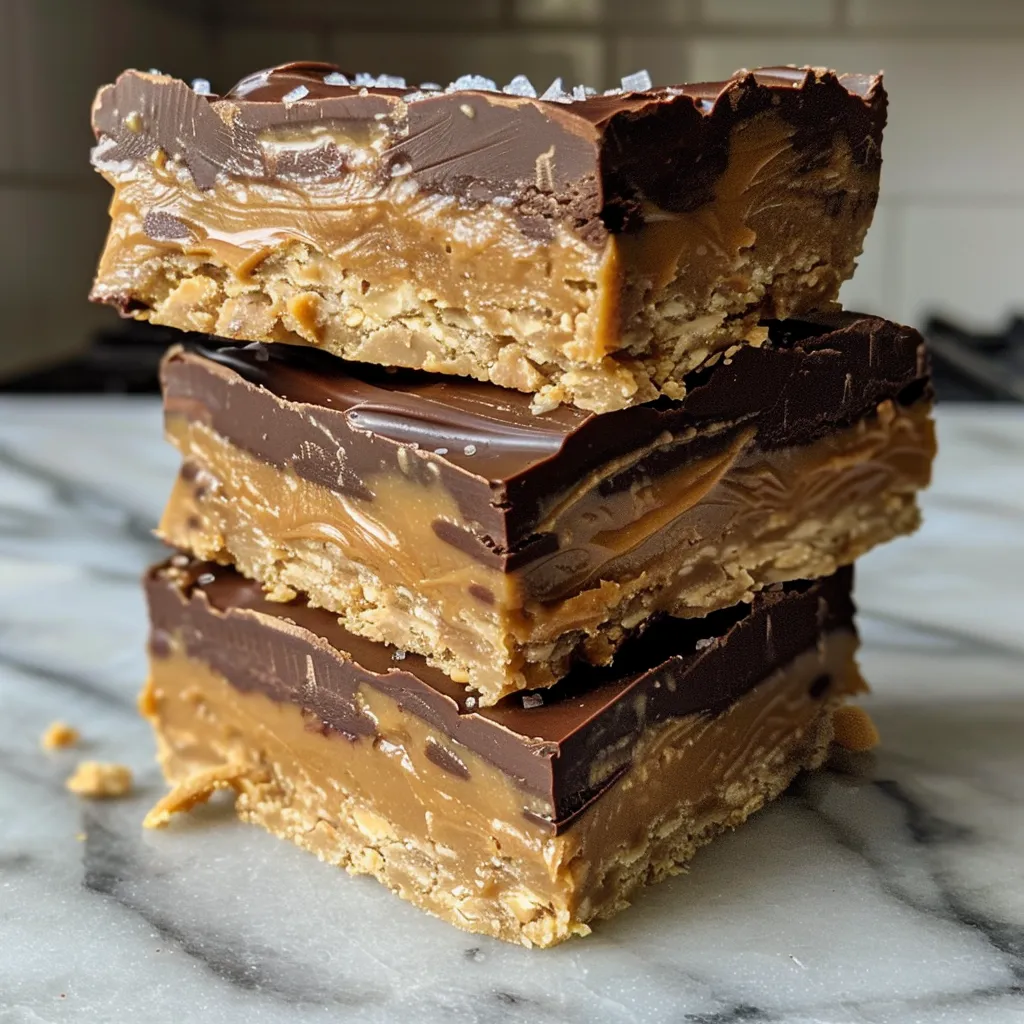
Unlock the Decadence: No-Bake Peanut Butter Cup Bars
If you’re searching for a dessert that marries ease with indulgence, you’ve landed in the right place! These no-bake peanut butter cup bars are a delightful fusion of creamy peanut butter and rich chocolate, delivering a satisfying treat without the hassle of baking. Whether you’re craving something sweet after dinner or need a quick snack for your afternoon slump, these bars are sure to hit the spot!
In this article, we’ll explore everything you need to know about crafting your very own decadent peanut butter cup bars, from ingredient breakdowns to troubleshooting tips, ensuring you can recreate this delicious recipe with confidence.
Why You’ll Love This Recipe
Here are just a few reasons why this recipe will become a staple in your kitchen:
- Quick and Easy: With minimal ingredients and no baking required, you can whip these up in no time!
- Flavor Explosion: The combination of creamy peanut butter and rich chocolate creates a perfect balance of flavors.
- Customizable: Feel free to tweak the recipe to suit your taste—add nuts, or swap out the chocolate!
- Healthy Indulgence: Made with wholesome ingredients like almond flour and natural peanut butter, these bars satisfy your sweet tooth without guilt.
- Perfect for Sharing: Cut them into bite-sized pieces and bring them to parties, or pack them for lunch as a sweet surprise!
All About the Ingredients
Let’s dive into the ingredients that make these no-bake peanut butter cup bars so irresistible:
- Creamy Salted Peanut Butter: Aim for drippy, natural peanut butter; it should ideally contain just peanuts and salt. This provides a rich base for our bars.
- Almond Flour: This gives the bars their chewy texture and adds a nutty flavor. You can substitute it with oat flour or all-purpose flour if desired.
- Maple Syrup: A natural sweetener that enhances the bars’ flavor, making them just sweet enough.
- Sea Salt: A pinch elevates the flavors. If using unsalted peanut butter, this is especially important.
- Semi-Sweet Chocolate Chips: These are melted for the top layer, adding a luscious finish to the bars.
- Coconut Oil: This helps the chocolate topping set perfectly and adds a hint of tropical flavor.
- Flaky Sea Salt: For an optional finishing touch that adds a delightful crunch and enhances the sweetness.
Step-by-Step Guide to Making No-Bake Peanut Butter Cup Bars
Ready to get started? Let’s break it down step by step:
Ingredients
Here’s everything you’ll need:
- 3/4 cup creamy salted peanut butter (natural, preferably just 2 ingredients: peanuts and salt)
- 1/2 cup almond flour
- 2 Tbsp maple syrup
- 1/4 tsp sea salt (optional, for extra saltiness)
- 1/2 cup semi-sweet chocolate chips or chunks
- 2 Tbsp creamy salted peanut butter (for the chocolate topping)
- 1/2 tsp coconut oil
- Flaky sea salt for topping
Instructions
Follow these simple steps to create your bars:
- Prepare the Pan: Line a standard-size loaf pan with parchment paper and set it aside.
- Make the Peanut Butter Base: In a medium microwavable mixing bowl, combine peanut butter, almond flour, maple syrup, and optional sea salt. Stir until well combined. Scrape the mixture into the loaf pan and smooth it out.
- Prepare the Chocolate Topping: In the microwavable bowl, add the chocolate chips. Microwave in 30-second intervals, stirring in between, until the chocolate is smooth. Alternatively, melt on the stovetop using a double boiler method.
- Add Peanut Butter and Coconut Oil: Once melted, stir in the additional peanut butter and coconut oil until a smooth mixture forms.
- Assemble: Pour the chocolate mixture over the peanut butter base. Sprinkle with flaky sea salt if desired. Place in the freezer for about 20 minutes or until the chocolate is set.
- Slice and Enjoy: Remove the bars by lifting the parchment paper out of the pan. Slice into 14 bars (they’re rich, so a little goes a long way!).
Storage Tips
Store any leftovers in an airtight container:
- In the refrigerator for up to 1-2 weeks.
- In the freezer for up to 1 month.
Pro Tips for Perfect Bars
To ensure your no-bake peanut butter cup bars turn out perfectly every time, keep these expert tips in mind:
- Use Room Temperature Ingredients: This helps everything combine smoothly without clumps.
- Don’t Overheat Chocolate: Stir frequently while melting to avoid burning, which can ruin the texture.
- Chill Thoroughly: Ensure the bars are fully set before slicing; this makes for cleaner cuts.
- Experiment with Flavors: Try adding a splash of vanilla extract or a pinch of cinnamon to the peanut butter mixture for a flavor twist.
- Make Ahead: These bars are perfect for meal prepping! They can be made in advance and stored for quick snacks.
- Use Quality Ingredients: The better the ingredients, the better the bars will taste—opt for high-quality chocolate and nut butter.
- Adjust Sweetness: If you prefer a sweeter bar, feel free to increase the amount of maple syrup.
- Check for Allergies: Always ensure that your ingredients are safe for those who will be enjoying them, especially if sharing.
Common Mistakes and Troubleshooting
Even the best recipes can have hiccups. Here’s how to troubleshoot:
- Too Crumbly: If your base is falling apart, try adding a bit more peanut butter or maple syrup to bind it.
- Chocolate Won’t Set: Make sure you’ve melted the chocolate properly; if it remains too warm, it may not solidify correctly.
- Bars are Too Sweet: Reduce the maple syrup next time or add a touch more sea salt to balance the flavors.
- Sticking to the Pan: Ensure you’ve lined your pan well with parchment paper to avoid any sticky situations.
Delicious Variations to Try
Feeling adventurous? Here are some tasty variations to put your spin on this recipe:
- Nutty Chocolate Delight: Mix in chopped walnuts or almonds for added crunch.
- Chocolate Drizzle: Drizzle extra melted chocolate over the top for a decorative touch.
- Peanut Butter Swirl: Add dollops of peanut butter on top of the chocolate layer before it sets, creating a beautiful swirl.
- Protein-Packed: Incorporate your favorite protein powder into the peanut butter base for a post-workout treat.
Frequently Asked Questions
Here are some common questions about making no-bake peanut butter cup bars:
- Can I use natural peanut butter? Absolutely! Just ensure it’s drippy and smooth for the best results.
- How long do these bars last? They can be stored in the fridge for 1-2 weeks and in the freezer for up to a month.
- Can I substitute almond flour? Yes, you can use oat flour or regular all-purpose flour as a substitute.
- What can I use instead of maple syrup? Honey or agave syrup can also work well in this recipe.
- Can I add other flavors? Definitely! Feel free to experiment with vanilla, chocolate extract, or spices like cinnamon.
- What’s the best way to cut these bars? Use a sharp knife and clean it between cuts for neat slices.
- Can I make them vegan? Yes, just use vegan chocolate chips and maple syrup.
- What do I do if the chocolate doesn’t set? Ensure it’s cooled properly; if it remains soft, try placing it in the freezer for a bit longer.
Nutritional Benefits and Dietary Adaptations
This recipe offers a delicious way to enjoy a sweet treat while providing some nutritional benefits:
- Peanut Butter: Packed with protein and healthy fats, it helps keep you feeling full and satisfied.
- Almond Flour: Lower in carbs and high in nutrients compared to traditional flour, making it a great choice for gluten-free diets.
- Maple Syrup: A natural sweetener that contains antioxidants, offering a healthier alternative to refined sugars.
Essential Equipment
To make these bars, you’ll need:
- Microwave or Double Boiler: For melting chocolate.
- Mixing Bowls: For combining ingredients.
- Parchment Paper: To line your pan for easy removal.
- Loaf Pan: Standard-size works best for this recipe.
- Sharp Knife: For slicing the bars cleanly.
Serving Suggestions
Enjoy your no-bake peanut butter cup bars in a variety of ways:
- Pair with a cup of coffee for a delightful afternoon treat.
- Serve alongside fresh fruit for a balanced snack.
- Top with whipped cream or yogurt for a decadent dessert.
- Crush and use as a topping for ice cream or yogurt parfaits.
Conclusion
These no-bake peanut butter cup bars are a celebration of flavor and convenience, perfect for any occasion. With simple ingredients and easy steps, you can impress your friends and family with this delightful treat. Remember, cooking is about enjoying the process and sharing love through food. So, roll up your sleeves and give this recipe a try—you’re going to be so glad you did! Thank you for sharing this culinary adventure with me, and I can’t wait for you to enjoy every bite of these delicious bars!
No-Bake Peanut Butter Cup Bars
Ingredients
Peanut Butter Base
- 0.5 cup creamy salted peanut butter (drippy, natural, preferably just 2 ingredients: peanuts and salt)
- 0.5 cup almond flour
- 2 Tbsp maple syrup
- 0.25 tsp sea salt (optional, include for extra saltiness or if using unsalted peanut butter)
- 0.5 cup semi-sweet chocolate chips (or chunks)
- 2 Tbsp creamy salted peanut butter
- 0.5 tsp coconut oil
Flaky sea salt
Instructions
- Line a loaf pan with parchment paper.
- Mix peanut butter, almond flour, maple syrup, and optional sea salt until well combined. Press into the prepared pan.
- Microwave chocolate chips in 30-second intervals, stirring until smooth. Add peanut butter and coconut oil, stir until combined.
- Pour chocolate over the peanut butter base and sprinkle with flaky sea salt. Freeze for 20 minutes until set.
- Lift the bars out of the pan using parchment and slice into 14 bars. Store in an airtight container in the refrigerator or freezer.