Unlock the Magic of No-Bake Oat Bars
Welcome to the world of No-Bake Oat Bars! If you’re looking for a quick, nutritious, and utterly delicious snack, you’ve come to the right place. These bars are perfect for busy mornings, afternoon pick-me-ups, or late-night cravings. With just three simple ingredients—rolled oats, natural peanut butter, and honey—you’ll whip up a delightful treat in minutes. Let’s dive into why you’ll love making these oat bars and how you can customize them to suit your taste!
Why You’ll Love This Recipe
- Quick and Easy: With minimal prep time, you’ll have these bars ready in no time, making them ideal for meal prep.
- Healthy Snacking: Packed with wholesome ingredients, these bars are a great source of energy without the sugar crash.
- Kid-Friendly: Even the pickiest eaters will enjoy these bars—feel free to involve the kids in the mixing process!
- Customizable: Add your favorite mix-ins and toppings to create a unique flavor profile that suits your taste.
- Great for Any Time: Whether you need a breakfast boost or a sweet dessert, these oat bars fit the bill perfectly.
Ingredients Breakdown
Here’s what you need to make your No-Bake Oat Bars:
- 3 cups rolled oats: The base of our bars, providing fiber and texture.
- 1 cup natural peanut butter: For creaminess and healthy fats. You can substitute with almond butter or sunflower seed butter for a nut-free version.
- 1/2 cup honey: Acts as a sweetener and binder. Agave syrup or maple syrup can be used as vegan alternatives.
- 1/4 tsp salt (optional): Enhances flavor; consider adding it for a richer taste.
How to Make No-Bake Oat Bars

Follow these simple steps to create your delicious oat bars:
Step 1: Mix the Base
In a large mixing bowl, combine the rolled oats and salt (if using). If you’re adding in the salt, mix it with the oats first before incorporating the wet ingredients.
Step 2: Add the Wet Ingredients
Pour in the natural peanut butter and honey. Make sure to mix thoroughly until the mixture is well combined and sticky.
Step 3: Prepare Your Baking Tray
Line an 8×8 or 9×9 inch baking tray with parchment paper. This helps in easily removing the bars later. Clip the edges with binder clips to keep it in place while you pour in the mixture.
Step 4: Press and Chill
Transfer the oat mixture into the lined tray, and flatten it out with a spatula. Make sure to press it down firmly to eliminate any air gaps. Refrigerate for 2-3 hours until set.
Step 5: Slice and Serve
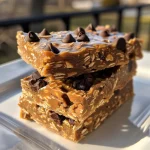
Once set, remove the hardened mixture from the tray and place it on a cutting board. Slice into squares or rectangles in your preferred size. I typically cut it into 12 bars. Enjoy!
Pro Tips for Perfect No-Bake Oat Bars
- Use the Right Consistency: Make sure your peanut butter is creamy and not too thick, as this affects the binding.
- Chill Time: Don’t rush the chilling process; this is key for firm bars.
- Mix and Match: Experiment with different nut butters and sweeteners to find your favorite combination.
- Slicing Technique: Use a sharp knife and slice while the bars are cold for clean cuts.
- Batch Prep: Make a double batch for a week’s worth of snacks—just store them in the fridge!
- Keep It Fresh: Store the bars in an airtight container to maintain freshness for up to a week.
- Experiment with Add-Ins: Consider adding in chocolate chips, dried fruit, or nuts for extra flavor and texture.
- Stay Organized: Keep your workspace clean to make the process quicker and more enjoyable.
Common Mistakes and Troubleshooting
- Too Crumbly: If your bars are falling apart, try adding a bit more peanut butter or honey to increase stickiness.
- Not Firming Up: Ensure you’re chilling the mixture for long enough; it needs time to set properly.
- Overmixing: Avoid overmixing the ingredients; you want a good mix without making it too mushy.
Delicious Variations to Try
- No-Bake Chocolate Chip Oat Bars: Fold in 1/2 cup of chocolate chips before pressing into the tray.
- Banana Oat Bars: Mash one ripe banana and mix it in for natural sweetness and flavor.
- Nutty Oat Bars: Add chopped nuts (like almonds or walnuts) for an extra crunch.
- Fruit and Nut Oat Bars: Mix in dried fruits like cranberries, apricots, or raisins for a fruity twist.
Storage and Make-Ahead Instructions
Store your No-Bake Oat Bars in an airtight container in the fridge for up to a week. For longer storage, you can freeze them. Just wrap each bar in plastic wrap and place them in a freezer bag. They’ll stay fresh for up to 3 months. Thaw in the fridge before enjoying!
FAQ About No-Bake Oat Bars
- Can I use quick oats instead of rolled oats? Yes, but rolled oats give a better texture.
- Are these bars gluten-free? Use certified gluten-free oats to ensure they are gluten-free.
- How do I get the bars to stick together? Make sure you are using enough peanut butter and honey to bind the ingredients together.
- Can I make them vegan? Absolutely! Just substitute honey with maple syrup.
- What’s the best way to slice them? Use a sharp knife and slice them while they are cold from the fridge.
- What can I use instead of peanut butter? Almond butter or sunflower seed butter work well!
- Can I add protein powder? Yes, just keep in mind it may change the consistency.
- How long will they last? They will stay fresh in the fridge for about a week.
Nutritional Tips and Dietary Adaptations
These No-Bake Oat Bars are a fantastic source of energy, but you can also make them even healthier! Consider using:
- Nut Butters: Opt for unsweetened nut butters to control sugar levels.
- Natural Sweeteners: Swap honey for stevia or erythritol for a lower-calorie option.
- Add Superfoods: Incorporate chia seeds or flaxseeds for added fiber and omega-3s.
Essential Equipment Recommendations
To make your No-Bake Oat Bars, you’ll need:
- Mixing Bowl: A large bowl for combining ingredients.
- Baking Tray: An 8×8 or 9×9 inch square baking tray works best.
- Parchment Paper: To line your tray for easy removal.
- Spatula: For spreading and pressing the mixture.
Serving Suggestions
Enjoy these oat bars as they are, or pair them with:
- Yogurt: Serve with a dollop of Greek yogurt for a satisfying breakfast.
- Fresh Fruit: Top with sliced bananas or berries for a refreshing twist.
- Nut Milk: Pair with almond or oat milk for a complete snack.
Conclusion
These No-Bake Oat Bars are more than just a recipe; they’re a canvas for your creativity in the kitchen! With their delicious taste, ease of preparation, and endless customization options, you’ll find yourself making these bars again and again. So grab your ingredients, get your family involved, and enjoy the satisfaction of creating a wholesome snack that everyone will love!
No-Bake Oat Bars 3 Ingredients
Ingredients
Dry ingredients
- 3 cups rolled oats
- 1 cup natural peanut butter
- 0.5 cup honey
- 0.25 tsp salt (optional) (optional)
Instructions
- Mix oats, salt (if using), and peanut butter in a large bowl.
- Add honey and stir until well combined.
- Line a baking tray with parchment paper and press the mixture firmly into it.
- Refrigerate for 2-3 hours until set.
- Remove from tray, cut into 12 bars, and enjoy.