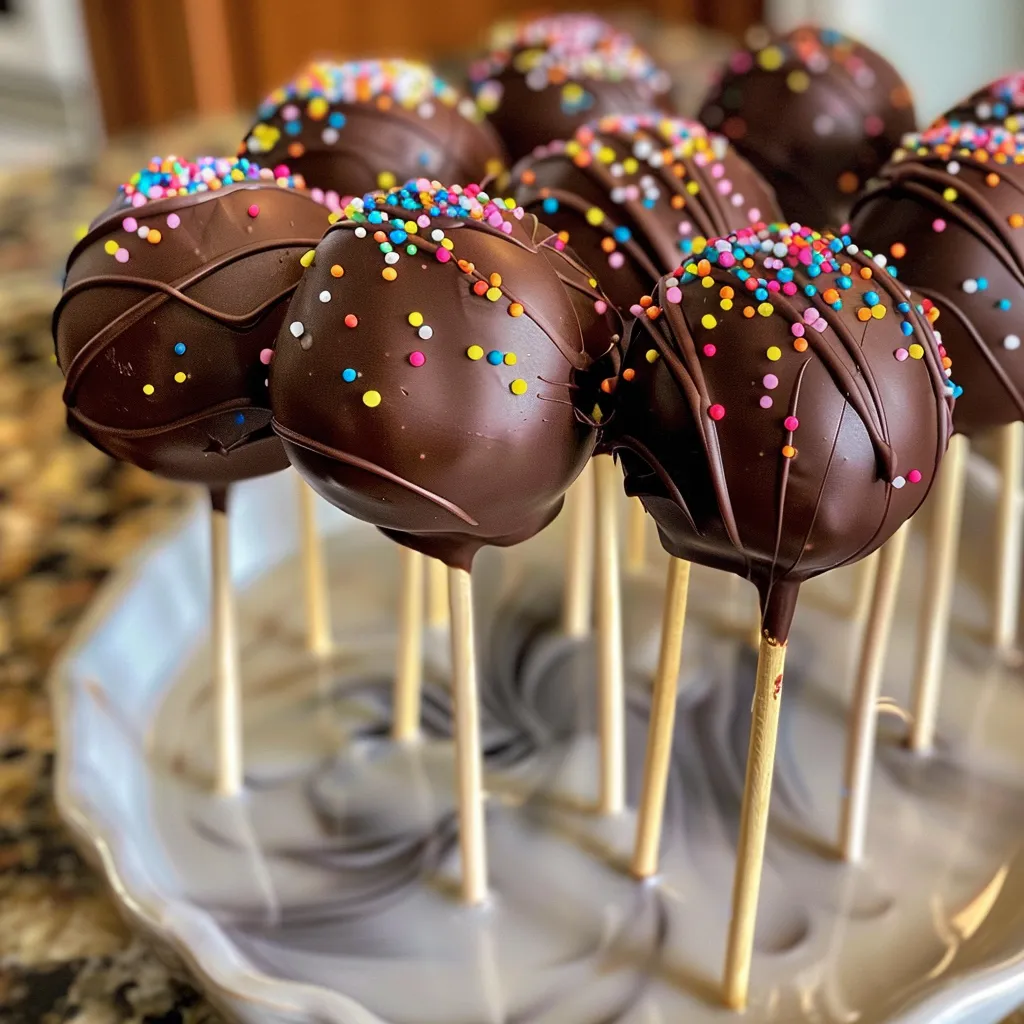
Get Ready to Indulge in Delightful Chocolate Cake Pops!
Welcome to the world of Chocolate Cake Pops, where delightful flavors meet fun shapes! These treats are not just a feast for the eyes—they’re also a delicious way to satisfy your sweet tooth. Whether you’re throwing a party, celebrating a special occasion, or simply treating yourself, this recipe is your ticket to creating stunning cake pops that everyone will adore.
In this comprehensive guide, you’ll discover not only how to make these delicious morsels but also tips, tricks, and variations to elevate your cake pop game. Let’s dive in!
Why You’ll Love This Recipe
- Easy to Make: This recipe simplifies the process of making cake pops, breaking it down into manageable steps that anyone can follow.
- Perfect for Any Occasion: Whether it’s a birthday party, a bake sale, or just a fun weekend project, these chocolate cake pops are versatile enough for any event.
- Customizable: From flavor variations to decoration, you can personalize these cake pops to suit your taste and preferences.
- Impressive Presentation: Cake pops are a delightful treat that impresses guests with their cute appearance and delicious flavor.
- Kid-Friendly Fun: Get the kids involved in rolling the cake balls and decorating—making this a fun family activity!
Ingredient Breakdown
Let’s take a closer look at what you’ll need to create these delicious treats.
- 1 box Chocolate Cake Mix: This is the base of your cake pops. Feel free to use your favorite brand.
- Additional ingredients: Follow the instructions on the box, but for a richer flavor, substitute water with milk.
- 12 oz Chocolate Melting Wafers: These are essential for coating your cake pops. You can use white chocolate or colored melts for a fun twist!
- Sprinkles for decoration: Choose your favorite sprinkles to add a pop of color and fun!
- 1/2 cup Salted Butter: Softened to room temperature, this adds richness to your cream cheese frosting.
- 8 oz Plain Cream Cheese: This gives your frosting a creamy texture and a slight tang.
- 2 tsp Vanilla Extract: For a boost of flavor in your frosting.
- 3 cups Powdered Sugar: Essential for sweetening your frosting.
Pro Tips for Perfect Cake Pops
Before you get started, here are some expert insights to ensure your cake pops turn out perfectly:
- Chill the Cake Balls: After shaping your cake balls, chilling them for 30-45 minutes helps them hold their shape during coating.
- Quality Chocolate: Use high-quality melting wafers for the best coating results. They melt smoothly and set well.
- Don’t Overheat the Chocolate: Melt your chocolate in short bursts (30 seconds) and stir in between to avoid scorching.
- Use a Styrofoam Block: To let your cake pops cool and set upright, insert them into a styrofoam block or a cake pop stand.
- Experiment with Flavors: Add different extracts or mix-ins like crushed cookies or nuts to your cake batter for unique flavor profiles.
- Keep It Clean: Use a toothpick or skewer to remove any drips of chocolate for a clean finish.
- Use Room Temperature Ingredients: For the frosting, make sure your butter and cream cheese are at room temperature for easier mixing.
- Decorate Before the Chocolate Sets: Add sprinkles immediately after dipping to ensure they stick!
Common Mistakes and Troubleshooting
Even the best of us can run into issues while making cake pops. Here are some common pitfalls and how to avoid them:
- Cake Pops Cracking: This can happen if the chocolate is too thick or if the cake balls were not chilled enough. Ensure a smooth melting process and proper chilling times.
- Sticks Not Staying in: Dip the end of the stick in melted chocolate before inserting it into the cake ball for better adhesion.
- Chocolate Coating Uneven: Ensure the cake pops are chilled before dipping, and make sure the chocolate is at the right consistency.
- Too Dry or Too Wet Cake Balls: Adjust the amount of frosting you add. Start with less and add more as needed to achieve the right texture.
Delicious Variations
Want to switch things up a bit? Here are some fun variations to try:
- Red Velvet Cake Pops: Substitute chocolate cake mix with red velvet for a festive twist.
- Cookies and Cream Cake Pops: Mix crushed Oreo cookies into the cake batter for a delicious crunch.
- Peanut Butter Chocolate Cake Pops: Mix in peanut butter into your frosting for a nutty flavor.
- Fruit-Infused Cake Pops: Add pureed fruit to the cake batter or frosting for a fruity twist.
Storage and Make-Ahead Instructions
Planning ahead? Here’s how to store your cake pops:
- Room Temperature: Store cake pops in an airtight container for up to 3 days.
- Refrigerator: For longer storage, keep them in the fridge for up to a week.
- Freezer: Cake pops can be frozen for about 2 months. Just wrap them tightly in plastic wrap and place them in an airtight container.
Frequently Asked Questions
Let’s address some common questions about making cake pops:
- Can I use any cake mix? Yes, feel free to use any flavor of cake mix you enjoy!
- What can I use instead of cream cheese? You can use buttercream frosting or a vegan cream cheese alternative if desired.
- How do I prevent my cake pops from falling off the stick? Ensure the cake balls are thoroughly chilled and dip the stick in melted chocolate before insertion.
- Can I decorate my cake pops? Absolutely! Use edible glitter, chocolate drizzle, or various sprinkles to make them visually appealing.
- What’s the best way to melt chocolate? Use a microwave in short bursts or a double boiler for gentle melting.
- How can I make my cake pops more flavorful? Incorporate different extracts or flavored syrups into your cake batter or frosting.
- Why are my cake pops too soft? You may have added too much frosting; adjust the amounts for a firmer texture.
- Can I freeze cake pops? Yes, they freeze well! Just ensure they are wrapped tightly to prevent freezer burn.
Nutritional Tips and Dietary Adaptations
If you’re looking to make your cake pops a bit healthier or fit specific dietary needs, here are some tips:
- Gluten-Free: Use a gluten-free cake mix to make this recipe suitable for gluten-sensitive individuals.
- Reduced Sugar: Substitute some of the powdered sugar in the frosting with a sugar alternative to reduce sweetness.
- Vegan Option: Use a vegan cake mix and substitute the cream cheese with a dairy-free alternative.
Equipment Recommendations
To make your cake pop-making experience even smoother, here are some essential tools:
- Electric Mixer: A hand or stand mixer makes mixing the frosting and cake batter a breeze.
- Microwave-Safe Bowl: For melting chocolate, ensure your bowl is safe for microwave use.
- Parchment Paper: A must-have for lining your baking sheet to prevent sticking.
- Styrofoam Block: Perfect for letting your cake pops stand upright while they set.
Serving Suggestions
Now that you’ve made your delightful cake pops, here are some fun ways to serve them:
- Party Favor: Package them in clear bags tied with ribbons for cute favors.
- Candy Buffet: Add them to a dessert table alongside other sweets for a colorful display.
- Sweet Treats for Kids: Serve them as a fun snack at playdates or birthday parties.
In conclusion, making Chocolate Cake Pops is not just a baking project; it’s a way to create joyful moments and delicious memories. With this guide in hand, you’re ready to impress your friends and family with your cake pop skills. So roll up those sleeves, get your ingredients ready, and let’s make cake pops that are sure to brighten anyone’s day!
Chocolate Cake Pops
Ingredients
Cake Mix and Ingredients
- 1 box Chocolate Cake Mix (plus ingredients per box instructions)
- 12 oz Chocolate Melting Wafers
- 0.5 cup Salted Butter (softened to room temperature)
- 8 oz Plain Cream Cheese (softened to room temperature)
- 2 tsp Vanilla Extract
- 3 cups Powdered Sugar
Decorations
- to taste Sprinkles (for decoration)
Instructions
- Prepare and bake the cake according to box instructions, then cool completely.
- Make the frosting by beating butter, cream cheese, vanilla, and powdered sugar until smooth.
- Crumble the cooled cake, mix with about 1.5 cups of frosting until firm enough to roll into balls, then chill for 30-45 minutes.
- Shape the chilled mixture into balls, insert sticks, and chill again.
- Melt the chocolate wafers, dip each cake pop into the chocolate, add sprinkles, and let set at room temperature or in the fridge.