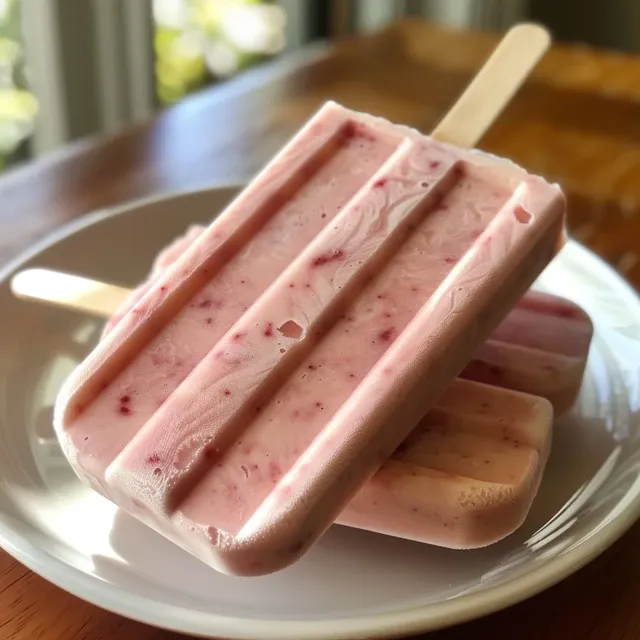
Beat the Heat with Refreshing Yogurt Popsicles
As the temperature rises and summer days stretch long, nothing beats the refreshing delight of homemade yogurt popsicles. These easy-to-make frozen treats are not only a fun way to cool off, but they also provide a healthy alternative to store-bought ice creams. With just a few ingredients, you can transform simple yogurt into a delightful dessert that everyone in the family will love. Let’s dive into why you’ll adore this recipe and how to make yogurt popsicles that are both tasty and nutritious!
Why You’ll Love This Recipe
- Simple Ingredients: With just a 6-pack of Stonyfield Organic Kids or YoBaby Yogurts and popsicle sticks, you can whip up these treats in no time.
- Kid-Friendly Fun: Making yogurt popsicles is a delightful activity for kids. They can help with the mixing, layering, and even choose their favorite flavors!
- Healthy Alternative: These popsicles are a great option for a refreshing snack, packed with probiotics and lower in sugar than traditional ice creams.
- Customizable Flavors: You can easily customize your yogurt popsicles with fruits, honey, or even a splash of vanilla—limitless flavor combinations await!
- Make Ahead and Store: These popsicles can be made in bulk, allowing you to have a stash of cool treats ready whenever the craving strikes.
Ingredients Breakdown
Here’s what you need to create your yogurt popsicles:
- Stonyfield Organic Kids or YoBaby Yogurts: 6-pack of your choice. These yogurts are creamy, flavorful, and a fantastic base for popsicles.
- Popsicle Sticks: Essential for holding your delicious creations together while they freeze. You can find these at any grocery store.
If you want to add more variety or adjust the sweetness, consider these substitutions:
- Fruit Add-ins: Fresh berries, bananas, or mango chunks can be blended into the yogurt for added flavor.
- Sweeteners: If you prefer sweeter popsicles, consider using honey or maple syrup. You can also use agave syrup for a vegan option.
- Yogurt Alternatives: For a dairy-free version, swap out regular yogurt for coconut yogurt or almond yogurt.
How to Make Yogurt Popsicles: A Step-by-Step Guide
Now that you have your ingredients, let’s break down the steps to make your yogurt popsicles.
- Prepare the Yogurt: Using a paring knife, make a small slit in the middle of the foil wrapper for each cup of yogurt to allow for easy access.
- Insert Popsicle Sticks: Gently push a popsicle stick into the center of each yogurt cup.
- Freeze Overnight: Place the yogurt cups in the freezer. Allow them to freeze overnight to ensure they are solid.
- Enjoy! Once frozen, peel back the foil lid, remove the popsicle from the cup, and enjoy your homemade yogurt popsicles. If you encounter any difficulty removing them, run the container under warm water to loosen.
Pro Tips for Perfect Popsicles
- Layering Flavors: For a fun twist, layer different flavors of yogurt in the molds. Start with one flavor, add a layer of fruit, and top with another yogurt flavor.
- Use High-Fat Yogurt: Higher-fat Greek yogurt (3.5% or more) will yield creamier popsicles compared to non-fat varieties.
- Experiment with Mix-ins: Consider adding a handful of shredded coconut or chocolate chips for extra texture and flavor.
- Adjusting Sweetness: Taste the yogurt before freezing. If you find it too tart, mix in a bit of honey or maple syrup to balance the flavors.
- Make-ahead Tips: Make a large batch of yogurt popsicles and store them in a freezer-safe bag to keep them fresh and ready for when the heat hits!
- Using Molds: If you want to get fancy, consider using silicone molds instead of yogurt cups for easy removal.
- Keep it Simple: Start with the basics before experimenting with more complicated recipes. This ensures you build confidence as you create delicious treats!
- Serve with Toppings: Serve your popsicles with a drizzle of honey or a sprinkle of granola for a delightful crunch.
Common Mistakes and Troubleshooting
Even the best cooks encounter challenges. Here are some common mistakes to avoid when making yogurt popsicles:
- Not Freezing Long Enough: Make sure to freeze your yogurt popsicles for at least 6-8 hours or overnight for best results.
- Using Low-Quality Yogurt: Always opt for high-quality yogurt like Stonyfield for the best flavor and texture.
- Skipping the Sweetener: If you find your popsicles too tart, don’t hesitate to mix in a natural sweetener.
Delicious Variations to Try
Why stick to one flavor when you can mix it up? Here are a few fun variations to try:
- Berry Blast: Use mixed berries (strawberries, blueberries, raspberries) blended into the yogurt for a vibrant and fruity treat.
- Peanut Butter Banana: Mix in creamy peanut butter and banana puree for a protein-packed popsicle.
- Chocolate Delight: Add cocoa powder or melted chocolate to the yogurt and swirl in some chocolate chips for a decadent twist.
- Coconut Lime: Incorporate coconut milk and a splash of fresh lime juice for a tropical vibe.
Storage and Make-Ahead Instructions
Your homemade yogurt popsicles can be stored in the freezer for up to 2 months. Here’s how to keep them fresh:
- Wrap Individually: Wrap each popsicle in plastic wrap or store them in an airtight container to prevent freezer burn.
- Label and Date: If you’re making multiple flavors, label them clearly, so you know exactly what you’re grabbing on a hot day.
- Thaw Before Eating: If the popsicles are too frozen, let them sit at room temperature for a few minutes before attempting to remove them from their molds.
Frequently Asked Questions (FAQ)
- How long do yogurt popsicles take to freeze? Typically, yogurt popsicles need to freeze for at least 6-8 hours or overnight for best results.
- Can I use non-dairy yogurt? Yes! Coconut yogurt or almond yogurt can be great substitutes for a dairy-free version.
- What fruits work best in yogurt popsicles? Berries, bananas, and mangoes are popular choices, but feel free to experiment with your favorites!
- How do I remove popsicles from the molds? If stuck, run the molds under warm water for a few seconds to loosen them.
- Can I add protein powder to the mixture? Absolutely! Adding protein powder is a great way to boost the nutritional value of your popsicles.
- What if my popsicles are too icy? This can happen if the yogurt isn’t creamy enough. Try using a higher-fat yogurt for a smoother texture.
- How can I make these popsicles more appealing for kids? Use colorful fruits and let them help in making their own combinations to keep things fun!
- Can I use flavored yogurts? Yes! Flavored yogurts can add an extra layer of taste, just be mindful of the sugar content.
Nutritional Tips and Dietary Adaptations
These yogurt popsicles are not only delicious but can also fit various dietary needs:
- Low-Sugar Option: Use plain yogurt and add your own natural sweeteners to control the sugar content.
- Gluten-Free: All ingredients used are gluten-free, making them safe for those with gluten sensitivities.
- Protein Boost: Mix in protein powder or Greek yogurt for an extra protein kick.
- Vegan-Friendly: Substitute with plant-based yogurts and sweeteners for a vegan-friendly treat.
Equipment Recommendations
Here’s what you’ll need to get started:
- Popsicle Molds: Silicone molds work best for easy removal.
- Blender: A good blender will help you thoroughly mix in fruits or other ingredients.
- Measuring Cups: Useful for precise ingredient measurements, especially if you’re trying new combinations.
- Plastic Wrap: Great for storing popsicles and preventing freezer burn.
Serving Suggestions
Once your yogurt popsicles are ready, here are some fun ways to serve them:
- With a Drizzle: Serve with a drizzle of honey, maple syrup, or chocolate sauce for added sweetness.
- As a Snack: Perfect as a healthy snack during the day; they can also serve as a refreshing dessert.
- Pair with Fresh Fruit: Serve alongside fresh fruit for a colorful, nutritious platter.
In conclusion, making yogurt popsicles is not only a great way to cool off during the hot days but also an opportunity to get creative in the kitchen. With this comprehensive guide, you now have the tools and knowledge to craft delicious, healthy treats that can become a staple in your summer routine. So gather your ingredients, grab some molds, and let the fun begin! Happy cooking!
Easy Yogurt Popsicles
Ingredients
Yogurt
- 6 cups Stonyfield Organic Kids or YoBaby Yogurts
- 6 popsicle sticks popsicle sticks
Instructions
- Use a paring knife to make a small slit in the foil wrapper of each yogurt cup.
- Insert a popsicle stick into each slit and place the cups in the freezer overnight.
- Once frozen, peel back the foil lid, remove the yogurt from the cup, and enjoy.