Discover the Joy of Mini Fruit Tarts
Welcome to your next sweet adventure in the kitchen! If you’re looking for a dessert that is not only visually stunning but also delicious and easy to make, you’ve come to the right place. These mini fruit tarts filled with luscious pastry cream are perfect for any occasion—from a casual family dinner to an elegant gathering of friends. In this guide, we’ll walk you through everything you need to know to create these delightful treats, ensuring success every step of the way. Get ready to impress!
Why You’ll Love This Recipe
Here are just a few reasons why this mini fruit tart recipe is a must-try:
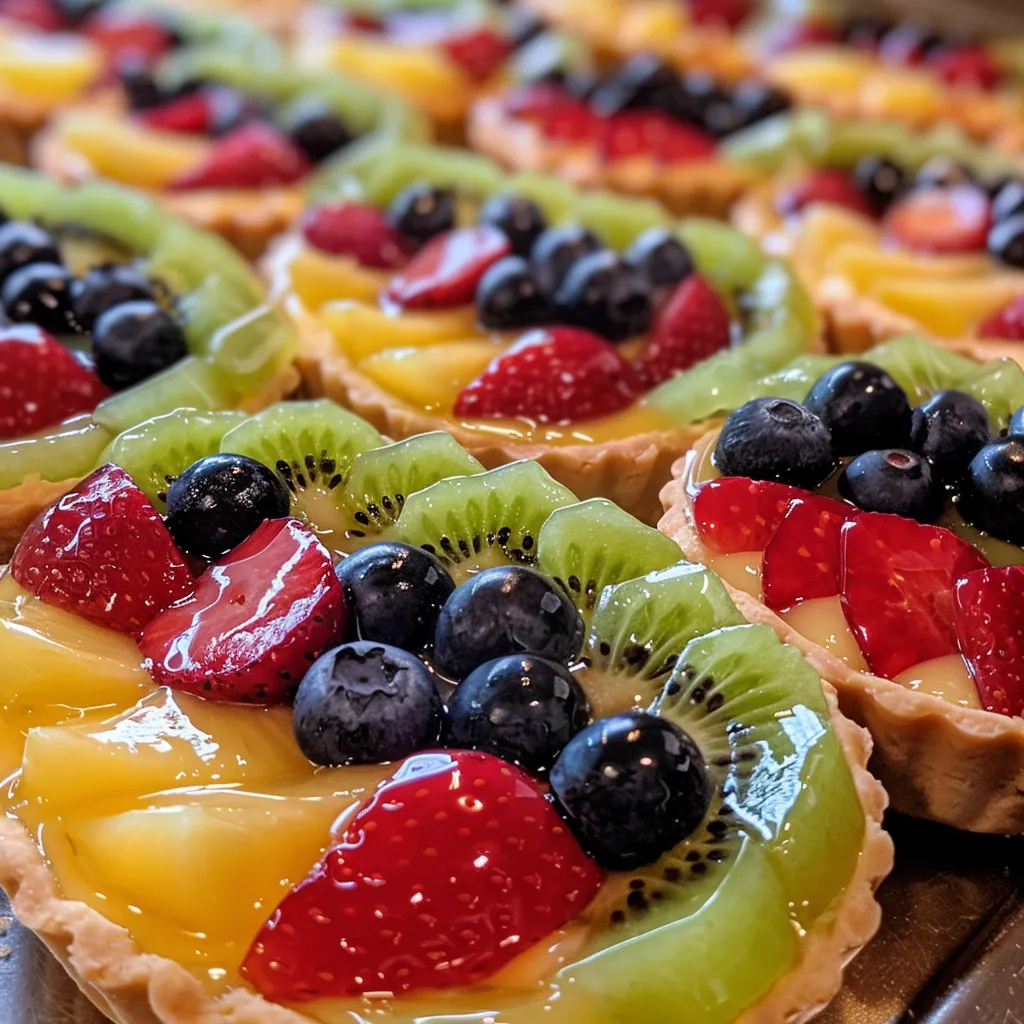
- Visually Stunning: The vibrant colors of the fresh fruits create an eye-catching presentation that is sure to wow your guests.
- Customizable: You can swap out fruits based on the season or your personal preferences, making it versatile for any event.
- Make-Ahead Friendly: Prepare the tart shells and pastry cream in advance, so you can assemble them just before serving.
- Deliciously Balanced: The sweet and creamy pastry cream paired with fresh fruits provides a delightful contrast of flavors.
- Fun to Make: Baking these mini tarts can be a fun activity to do with family or friends, turning dessert preparation into a memorable occasion.
Ingredients Breakdown
To create your mini fruit tarts, you’ll need the following ingredients:
- 1 ½ cups unsalted butter, cold: Essential for a flaky tart shell.
- 1 egg: Binds the dough together.
- ½ tsp vanilla extract: Adds a touch of warmth to the flavor.
- ½ cup powdered sugar: Sweetens the tart dough.
- ¼ tsp kosher salt: Enhances flavor.
- 2 cups all-purpose flour: The base of your tart shell.
- 1 ¾ cups milk: Used for the pastry cream.
- 5 egg yolks: Provides richness and creamy texture to the filling.
- ½ cup granulated sugar: Sweetens the filling.
- 3 tbsp cornstarch: Thickens the pastry cream.
- Fresh fruits: Strawberries, blueberries, or any seasonal fruits you love.
- 1 tbsp apricot jam: For a glossy finish.
- ½ tsp water: To thin out the jam.
Substitutions
- Butter: You can use coconut oil for a dairy-free version.
- Egg: Substitute with flaxseed meal mixed with water for a vegan option.
- Milk: Almond or oat milk works well as a non-dairy alternative.
- Granulated sugar: Consider using honey or maple syrup for a natural sweetener.
Step-by-Step Instructions
Now let’s dive into the fun part—making your mini fruit tarts!
- Make the Tart Dough: In a food processor, mix the flour, powdered sugar, and salt until combined. Add the cold cubed butter and blend until pea-sized pieces form. If you don’t have a food processor, use your hands to mix the cold butter into the flour.
- Add the Egg: Incorporate the egg and vanilla extract, mixing gently until a dough forms without overmixing.
- Chill the Dough: Wrap the dough in plastic wrap and refrigerate for at least one hour. This step is crucial for a flaky crust!
- Roll Out the Dough: On a floured surface, roll the dough into a rectangle. Use a cookie cutter or a round bowl to cut out small rounds.
- Prepare the Tart Shells: Place the dough rounds in mini tart pans, pressing down gently. Trim the edges and poke holes in the bottom with a fork. Freeze for 20 minutes.
- Bake the Shells: Preheat your oven to 350°F (180°C) and bake for 15-20 minutes until lightly golden. Allow them to cool.
- Make the Pastry Cream: In a saucepan, heat the milk over medium heat. Whisk together the egg yolks, sugar, cornstarch, and salt in a separate bowl. Slowly add the hot milk to the egg mixture, whisking constantly. Return this mixture to the saucepan and cook on low heat until it thickens, about 5-7 minutes. Stir in the vanilla extract and let it cool.
- Assemble the Tarts: Once the tart shells are cool, fill each with the pastry cream and top with fresh fruits arranged beautifully.
- Glaze the Tarts: For a shiny finish, mix the apricot jam with water and brush it over the fruits.
Pro Tips for Perfect Mini Fruit Tarts
To elevate your tart-making game, consider these expert tips:
- Keep Ingredients Cold: Use cold butter and keep your dough chilled for a flaky texture.
- Don’t Overmix: When making the dough, mixing too much can lead to tough tarts. Just mix until combined.
- Use Seasonal Fruits: For the freshest flavor and appearance, choose fruits that are in season.
- Chill the Pastry Cream: Let your pastry cream cool completely before filling the tarts to prevent sogginess.
- Experiment with Flavors: Add a dash of almond extract or citrus zest to the pastry cream for a unique twist.
- Make Ahead: Prepare the tart shells and pastry cream a day in advance for easy assembly.
- Watch Baking Time: Keep a close eye on the crust to avoid overbaking, which can lead to a dry texture.
- Clean Edges: After filling, use a damp paper towel to clean the edges of each tart for a professional look.
Common Mistakes and Troubleshooting
Even the best of us can encounter a few bumps along the way. Here’s how to troubleshoot common issues:
- Crust is Too Tough: You may have overmixed the dough. Mix just until combined.
- Pastry Cream is Lumpy: Ensure you whisk constantly while cooking and strain the mixture if needed.
- Shells Shrink During Baking: Make sure to chill the dough properly before baking to help maintain shape.
- Fruit Tarts Are Soggy: Allow the pastry cream to cool completely before filling the shells and serve promptly after assembly.
Delicious Variations to Try
Get creative with your mini fruit tarts! Here are some fun variations:
- Chocolate Ganache Tarts: Replace the pastry cream with rich chocolate ganache for a decadent twist.
- Citrus Cream Tarts: Use a lemon or lime-infused pastry cream for a refreshing citrus kick.
- Mixed Berry Tarts: Top the tarts with a mix of your favorite berries for a colorful presentation.
- Nutty Tarts: Add a layer of almond or hazelnut cream under the pastry cream for added depth of flavor.
Storage and Make-Ahead Instructions
These mini fruit tarts are best enjoyed fresh, but you can prepare components in advance:
- Tart Shells: Store baked tart shells in an airtight container at room temperature for up to 3 days.
- Pastry Cream: Keep in the fridge for up to 3 days. Cover with plastic wrap pressed directly onto the surface to avoid a skin forming.
- Assembling Tarts: Assemble the tarts just before serving for the best texture and flavor.
Frequently Asked Questions
Here are some common questions about making mini fruit tarts:
- Can I use store-bought tart shells? Yes, store-bought shells can save time but making your own adds a personal touch.
- What fruits can I use? You can use any fruit you like! Berries, kiwi, and peaches work beautifully.
- How do I prevent the tarts from getting soggy? Fill the tarts just before serving and ensure the pastry cream is fully cooled.
- Can I freeze the tarts? It’s best to freeze the shells separately from the filling and fruit for optimal results.
- How can I make the tarts gluten-free? Substitute all-purpose flour with a gluten-free blend.
- Is this recipe suitable for vegans? Yes, with plant-based substitutes for butter, milk, and eggs, you can create a vegan version.
- What can I do with leftover pastry cream? Use it in other desserts, like eclairs or as a layer in cakes.
- How do I store leftover tarts? Store leftover assembled tarts in the fridge for up to a day, but they are best enjoyed fresh.
Nutritional Tips and Dietary Adaptations
To make these delightful tarts fit various dietary needs, consider these adaptations:
- Lower Sugar: Reduce the sugar in the pastry cream for a healthier option.
- Dairy-Free: Use coconut milk and dairy-free butter alternatives.
- Nut-Free: Ensure no nuts are used in your fillings or crust if allergies are a concern.
Essential Equipment Recommendations
Having the right tools will make the process smoother. Here are some essentials:
- Food Processor: Ideal for quickly mixing the tart dough.
- Mini Tart Pans: Perfect for creating individual servings.
- Rolling Pin: Necessary for rolling out the dough evenly.
- Whisk: Essential for making the pastry cream smooth and creamy.
- Spatula: Useful for filling and smoothing out the pastry cream.
Serving Suggestions
These mini fruit tarts are a delightful stand-alone dessert, but you can also elevate your serving experience:
- Pair with Coffee or Tea: The sweetness of the tarts complements a warm beverage beautifully.
- Garnish with Mint: A sprig of fresh mint adds a touch of color and flavor.
- Serve with Whipped Cream: A dollop of whipped cream or a scoop of ice cream can enhance the experience.
In conclusion, making mini fruit tarts is not just about baking; it’s about creating memories and enjoying the process. With this comprehensive guide, you’ll feel empowered to tackle this delightful dessert, impressing your friends and family along the way. Remember, cooking is all about having fun and experimenting, so don’t be afraid to make these tarts your own. Happy baking!
Mini Fruit Tarts With Pastry Cream
Ingredients
Dough
- 0.5 cup unsalted butter, cold
- 1 egg egg
- 0.5 tsp vanilla extract
- 0.25 cup powdered sugar
- 0.25 tsp kosher salt
- 2 cups flour
- 1.75 cups milk
- 2 tsp vanilla extract
- 5 egg yolks egg yolks
- 0.25 tsp kosher salt
- 0.5 cup granulated sugar
- 3 tbsp cornstarch
Filling & Topping
- strawberries strawberries (sliced)
- blueberries blueberries
- 1 tbsp apricot jam
- 0.5 tsp water
Instructions
- Mix flour, powdered sugar, and salt in a food processor or by hand.
- Add cold butter and blend until pea-sized pieces form. Mix in egg and vanilla until dough forms. Chill for 1 hour.
- Roll dough into a rectangle, cut out 1-inch larger rounds, and press into mini tart pans. Freeze for 20 minutes.
- Bake at 180°C (350°F) for 15-20 minutes until golden. Cool before filling.